How to Replace a Cracked iPhone 3G Screen
Since having a child last year, my wife and I often find ourselves confirming that gravity does, in fact, continue to function well. Our toddler trips, sits down abruptly, and drops things from all heights as one would expect from someone still figuring out how her body is working.
You can see where this is going.
One day recently, my daughter reached for something shiny and swiped the corner of my wife’s iPhone 3G, spinning it off the table and onto one of its corners against the floor. The top portion of the glass screen fractured, but the phone was still usable. To keep glass shards out of my wife’s ear when using the phone, I immediately applied an Artwizz ScratchStopper, a plastic film designed to protect the iPhone’s screen.
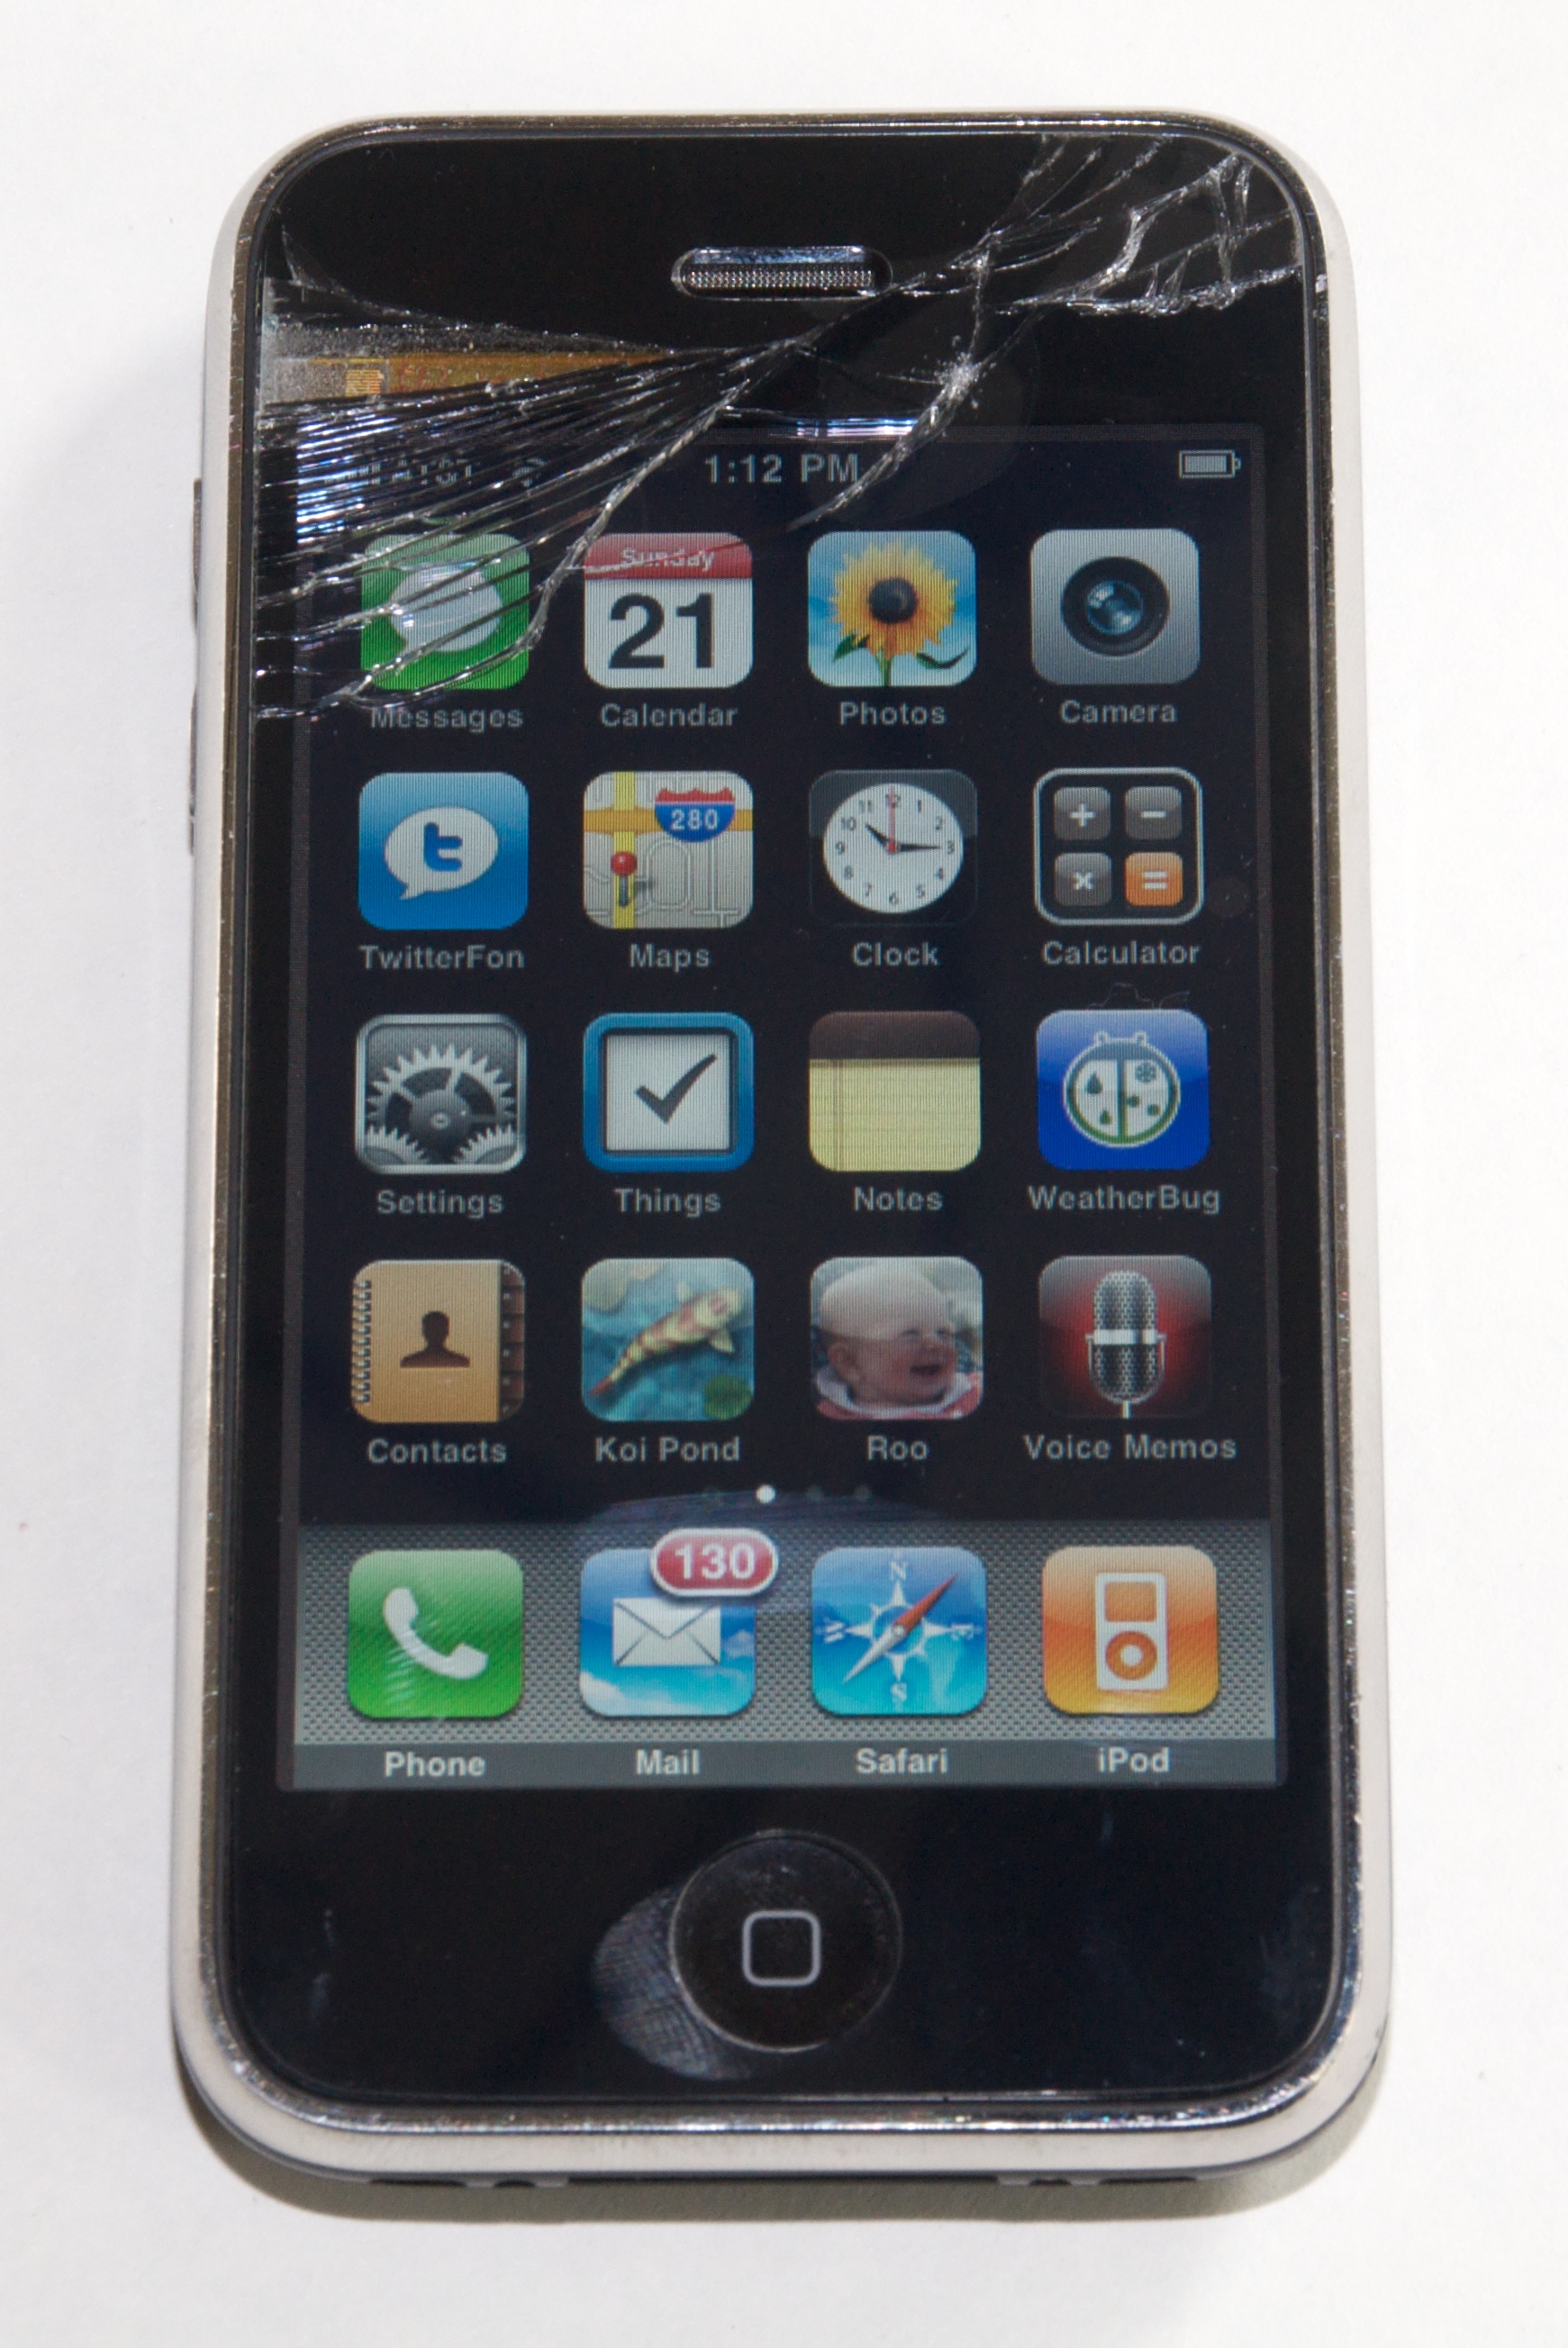
Next, I researched the options. Although the phone was still under its original warranty, according to Apple’s iPhone Service FAQ the “Limited Warranty for iPhone excludes coverage for damage resulting from accident, disassembly, unauthorized service and unauthorized modifications.” The other Apple option was to get Out-of-Warranty service, which costs $199 and results in a replacement (refurbished or new) iPhone. (According to Jim Dalrymple at The Loop, Apple is now offering screen-replacement services onsite at Apple retail stores, which also
costs $199, since it would be a non-warranty repair. That means the repair can be done without having to send it in or be given a replacement.) We could have also bought a new iPhone 3GS, but since this iPhone 3G wasn’t yet a year old, it didn’t qualify for AT&T’s least-expensive pricing.
Instead, I turned to the do-it-yourself-and-risk-destroying-the-whole-thing approach. A few minutes of searching Google led me to 3G Cracked Glass.com. Site owner Tim Dupree has put together links to companies other than Apple who can do the repair and where to get parts yourself, as well as a tutorial video on making the repair. Although the video lacks narration (which Dupree notes will be added later), I found it helpful to watch someone disassemble the iPhone. For about $80 and four hours of my time (working slowly and deliberately), I successfully fixed the screen myself.
(If you’re reading this article on the Web, click any image to view a larger version.)
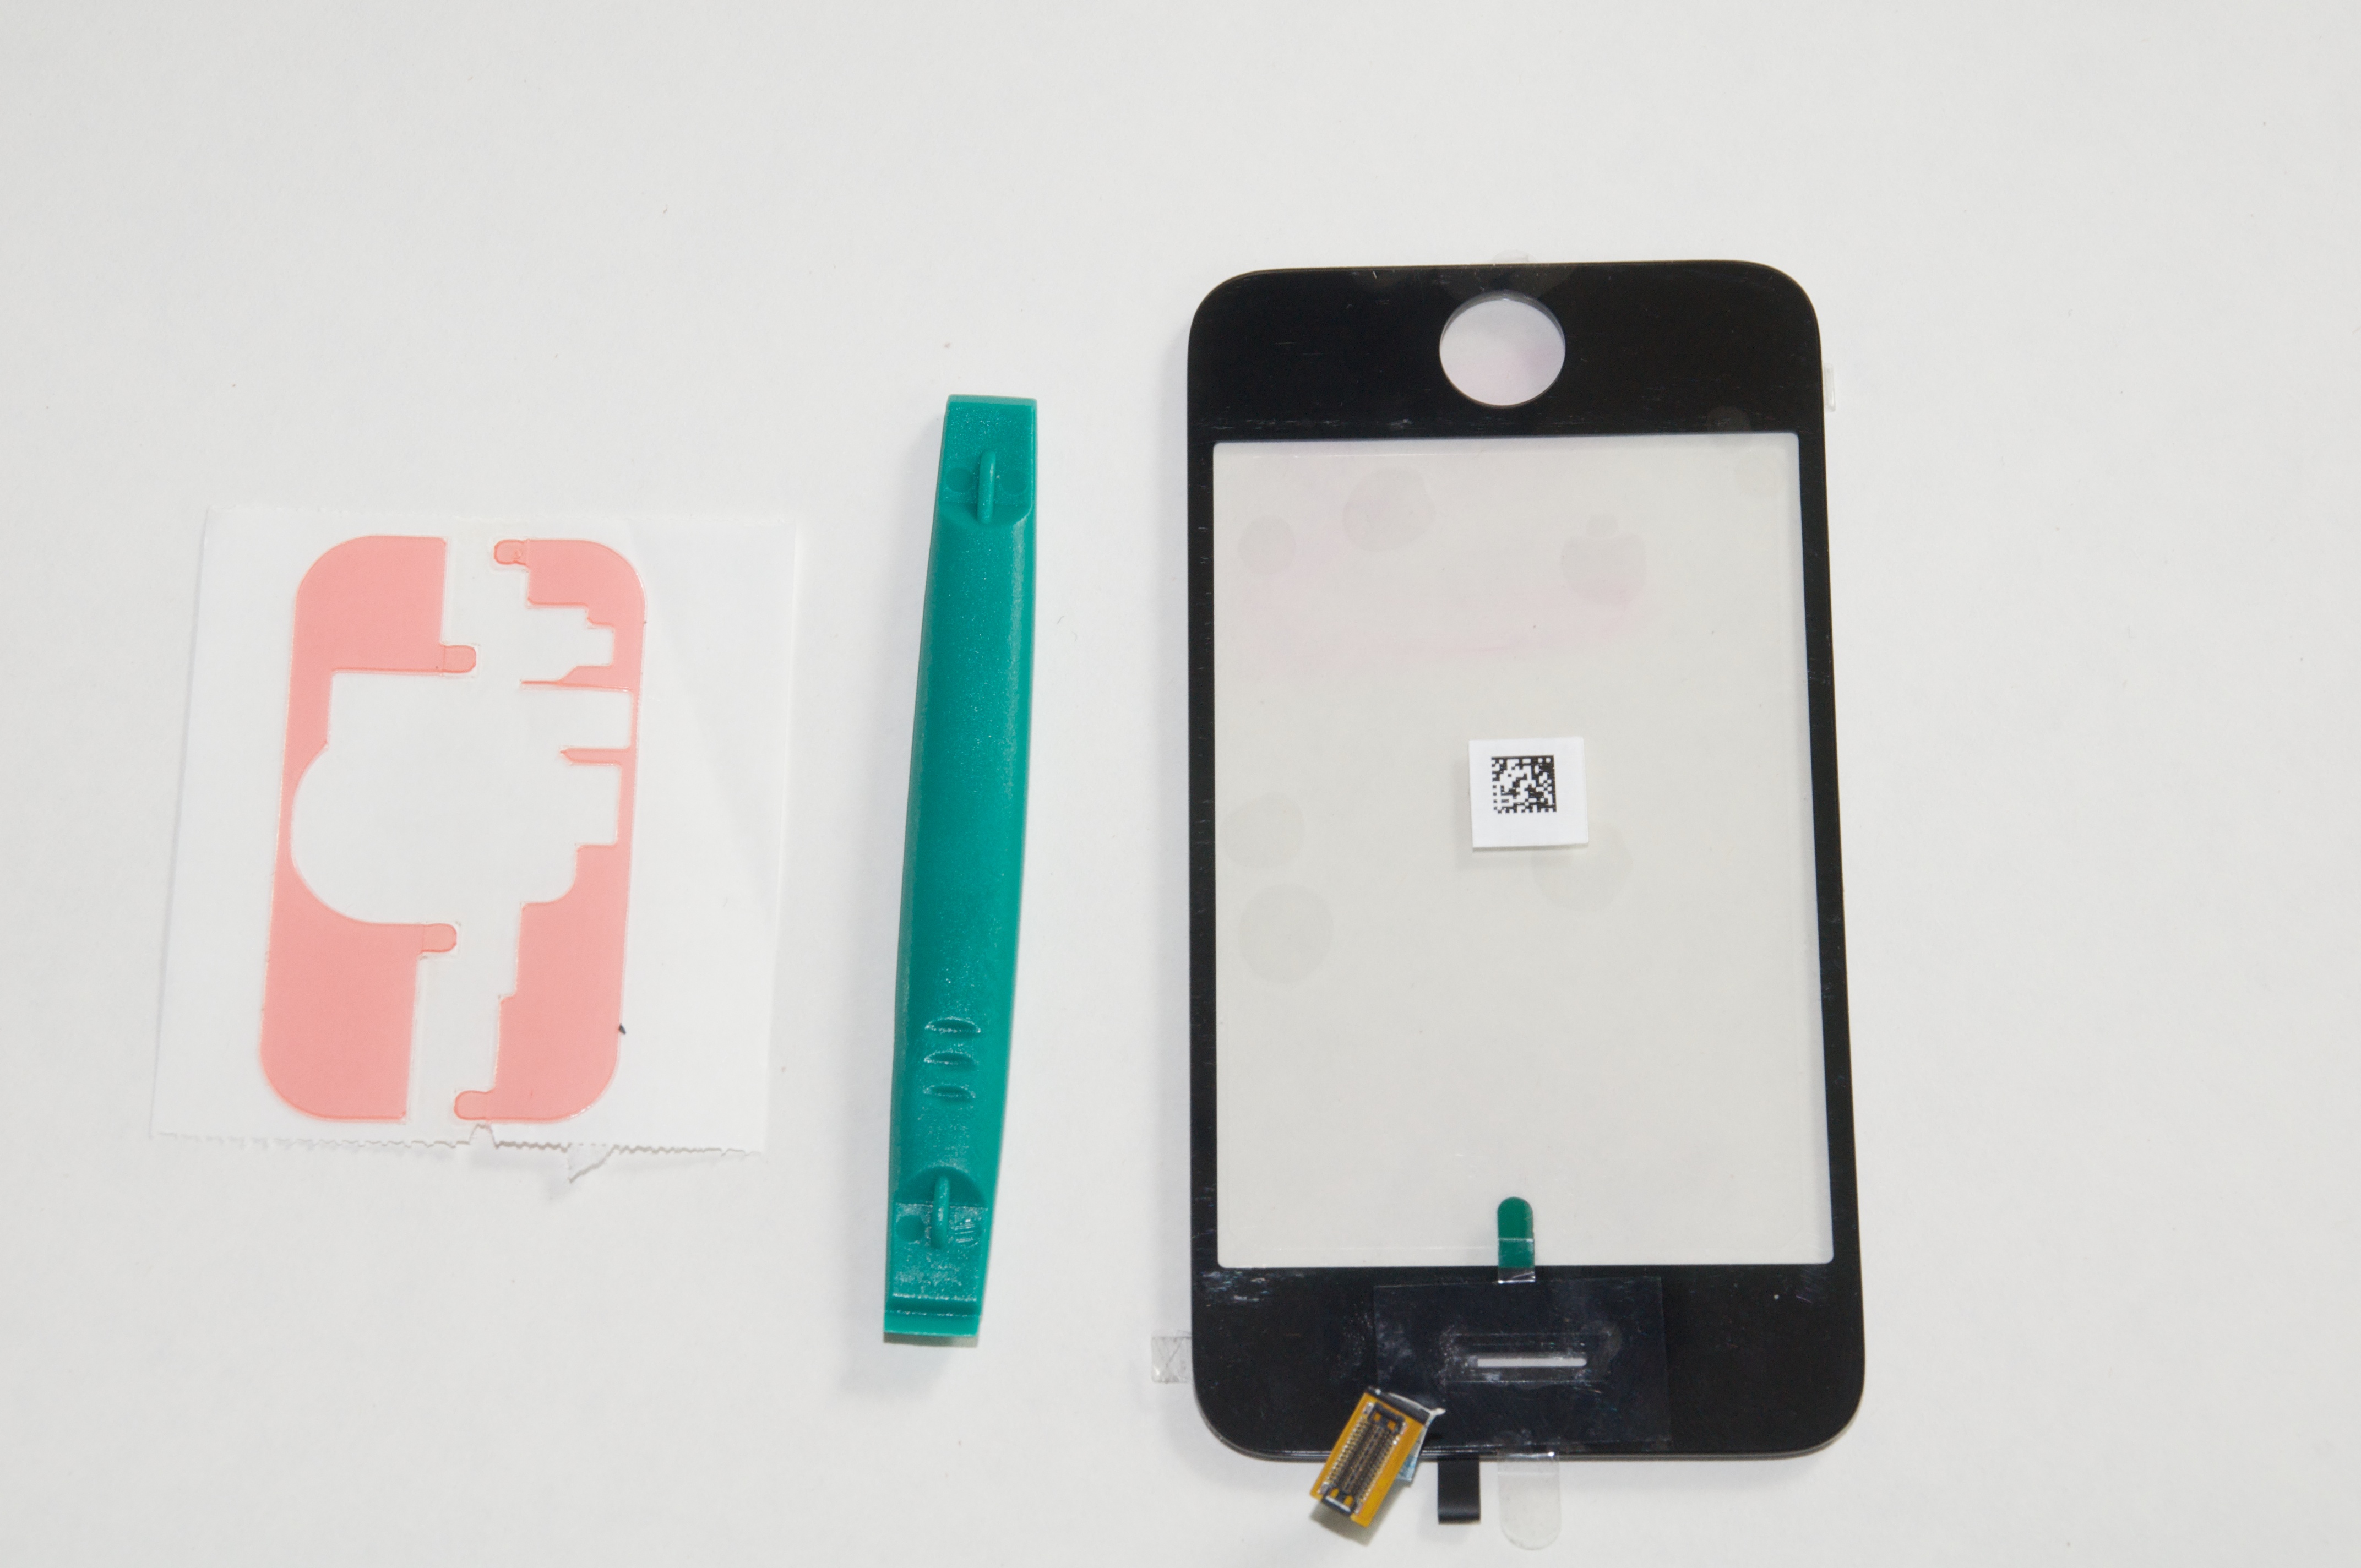
The Parts — I purchased the iPhone 3G Digitizer and Front Glass with Adhesive Kit from Mission Repair for $59. Taking this route is more advanced than ordering a $119 kit that includes the digitizer, glass, and frame. In hindsight, the latter would have made for a much easier repair, but I was trying to do it myself without spending a lot of money. I had resigned myself to the likelihood that if I messed up and damaged the iPhone, I’d be paying $199 to replace it, so I wanted to reduce the cost of learning my limitations to $59.
I also bought a case opener tool from AX Micro Solutions (Directfix.com) for $3.99. Yes, it’s just a molded piece of plastic, and I also ended up paying $3.99 for shipping, and it’s silly that I had to go to a second merchant to get the part. However, I don’t have a lot of tools, and the thought of using a bare X-Acto knife to pry open the iPhone didn’t sound like a great idea. Within a week or so, I had the tools in hand.
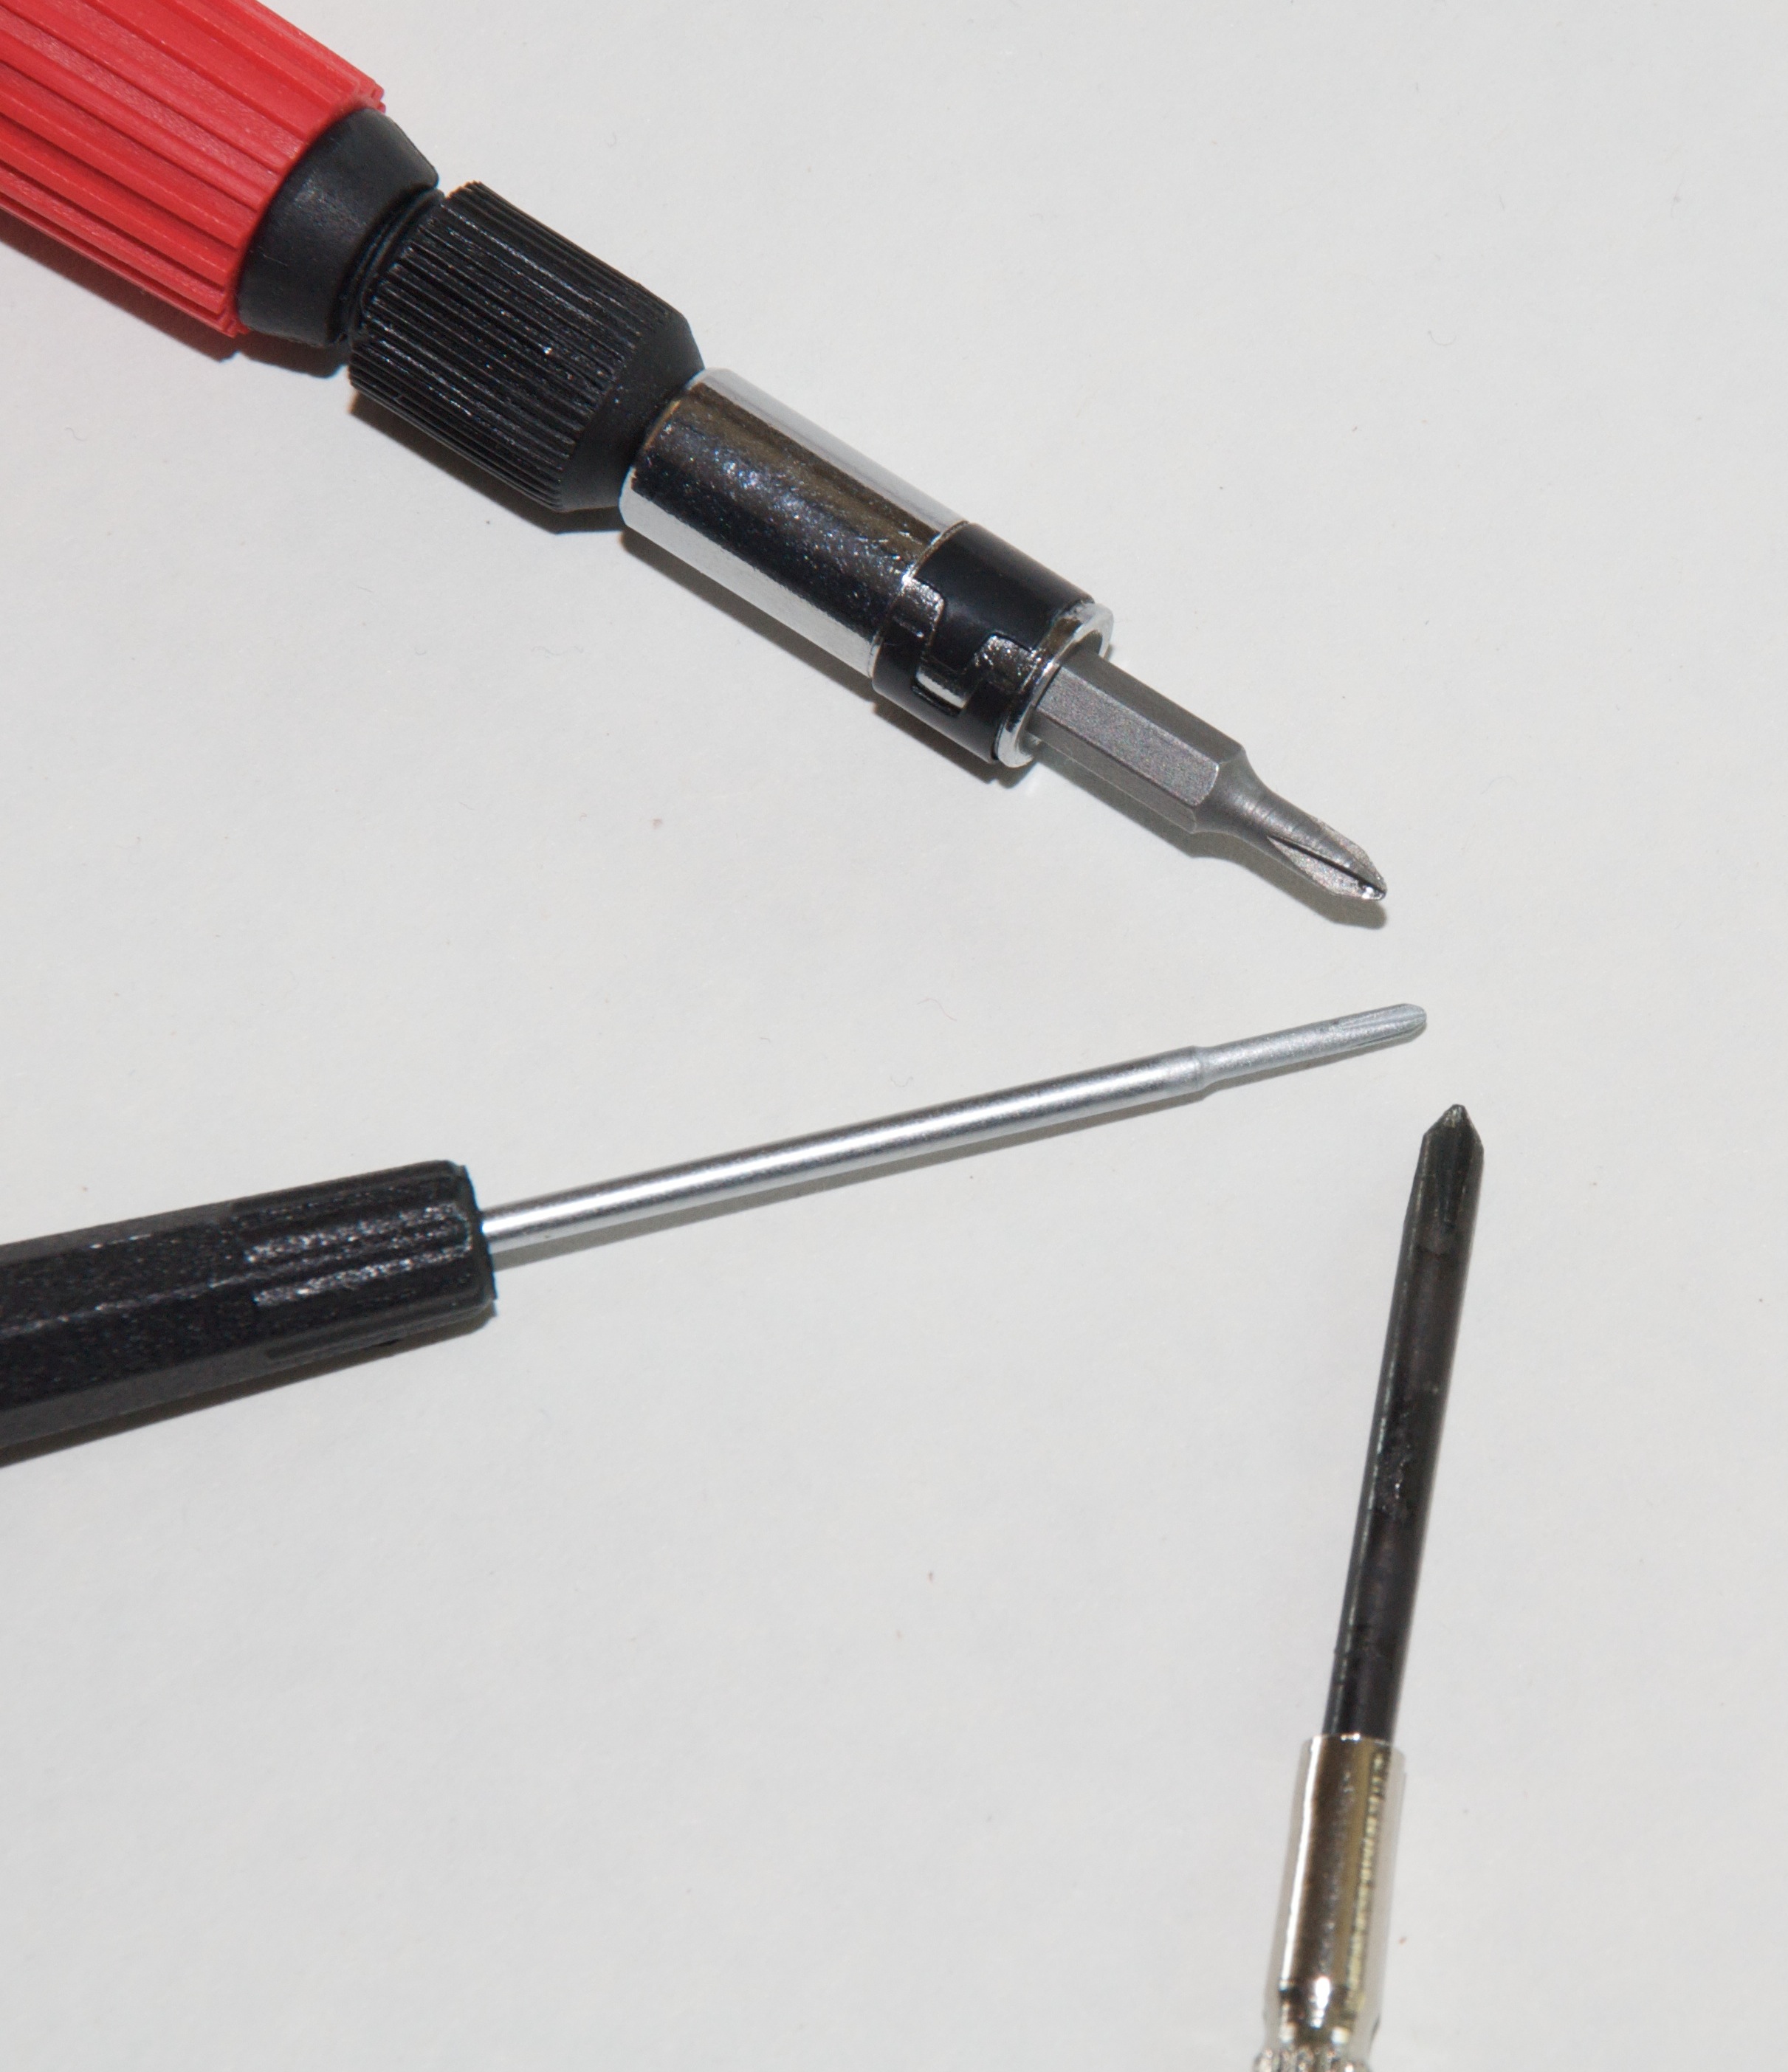
I also assembled the other tools I’d need: the SIM removal tool that came with the iPhone, or a small paperclip; a small Phillips screwdriver; a pair of tweezers; a cup to hold the incredibly tiny screws; and a small knife (more on that later). The screwdriver turned out to be a sticking point, because none of mine were small enough. You need a size #000 Phillips head (the middle one in the photo below). I ended up purchasing one at Amazon for about $6 with free Amazon Prime shipping, because not even my local Radio Shack carried one that small.
Performing the screen replacement isn’t particularly difficult, as long as you’re patient and comfortable working with small electronics. Also keep in mind that doing so voids your warranty and introduces the possibility that you could damage other components if you’re not careful.
That said, here are the steps to replace a damaged screen on an iPhone 3G. Although I suspect that the steps are similar for an iPhone 3GS, I haven’t opened mine, so I can’t be sure. I’ve included photos where appropriate, but I also highly recommend that you watch the video at 3G Cracked Glass as you go along. You can find several other videos on YouTube, too.
Open the Case — Turn off the iPhone’s power and pull out the SIM card from the top of the device. Next, remove the two screws on the bottom, located on each side of the dock connector.
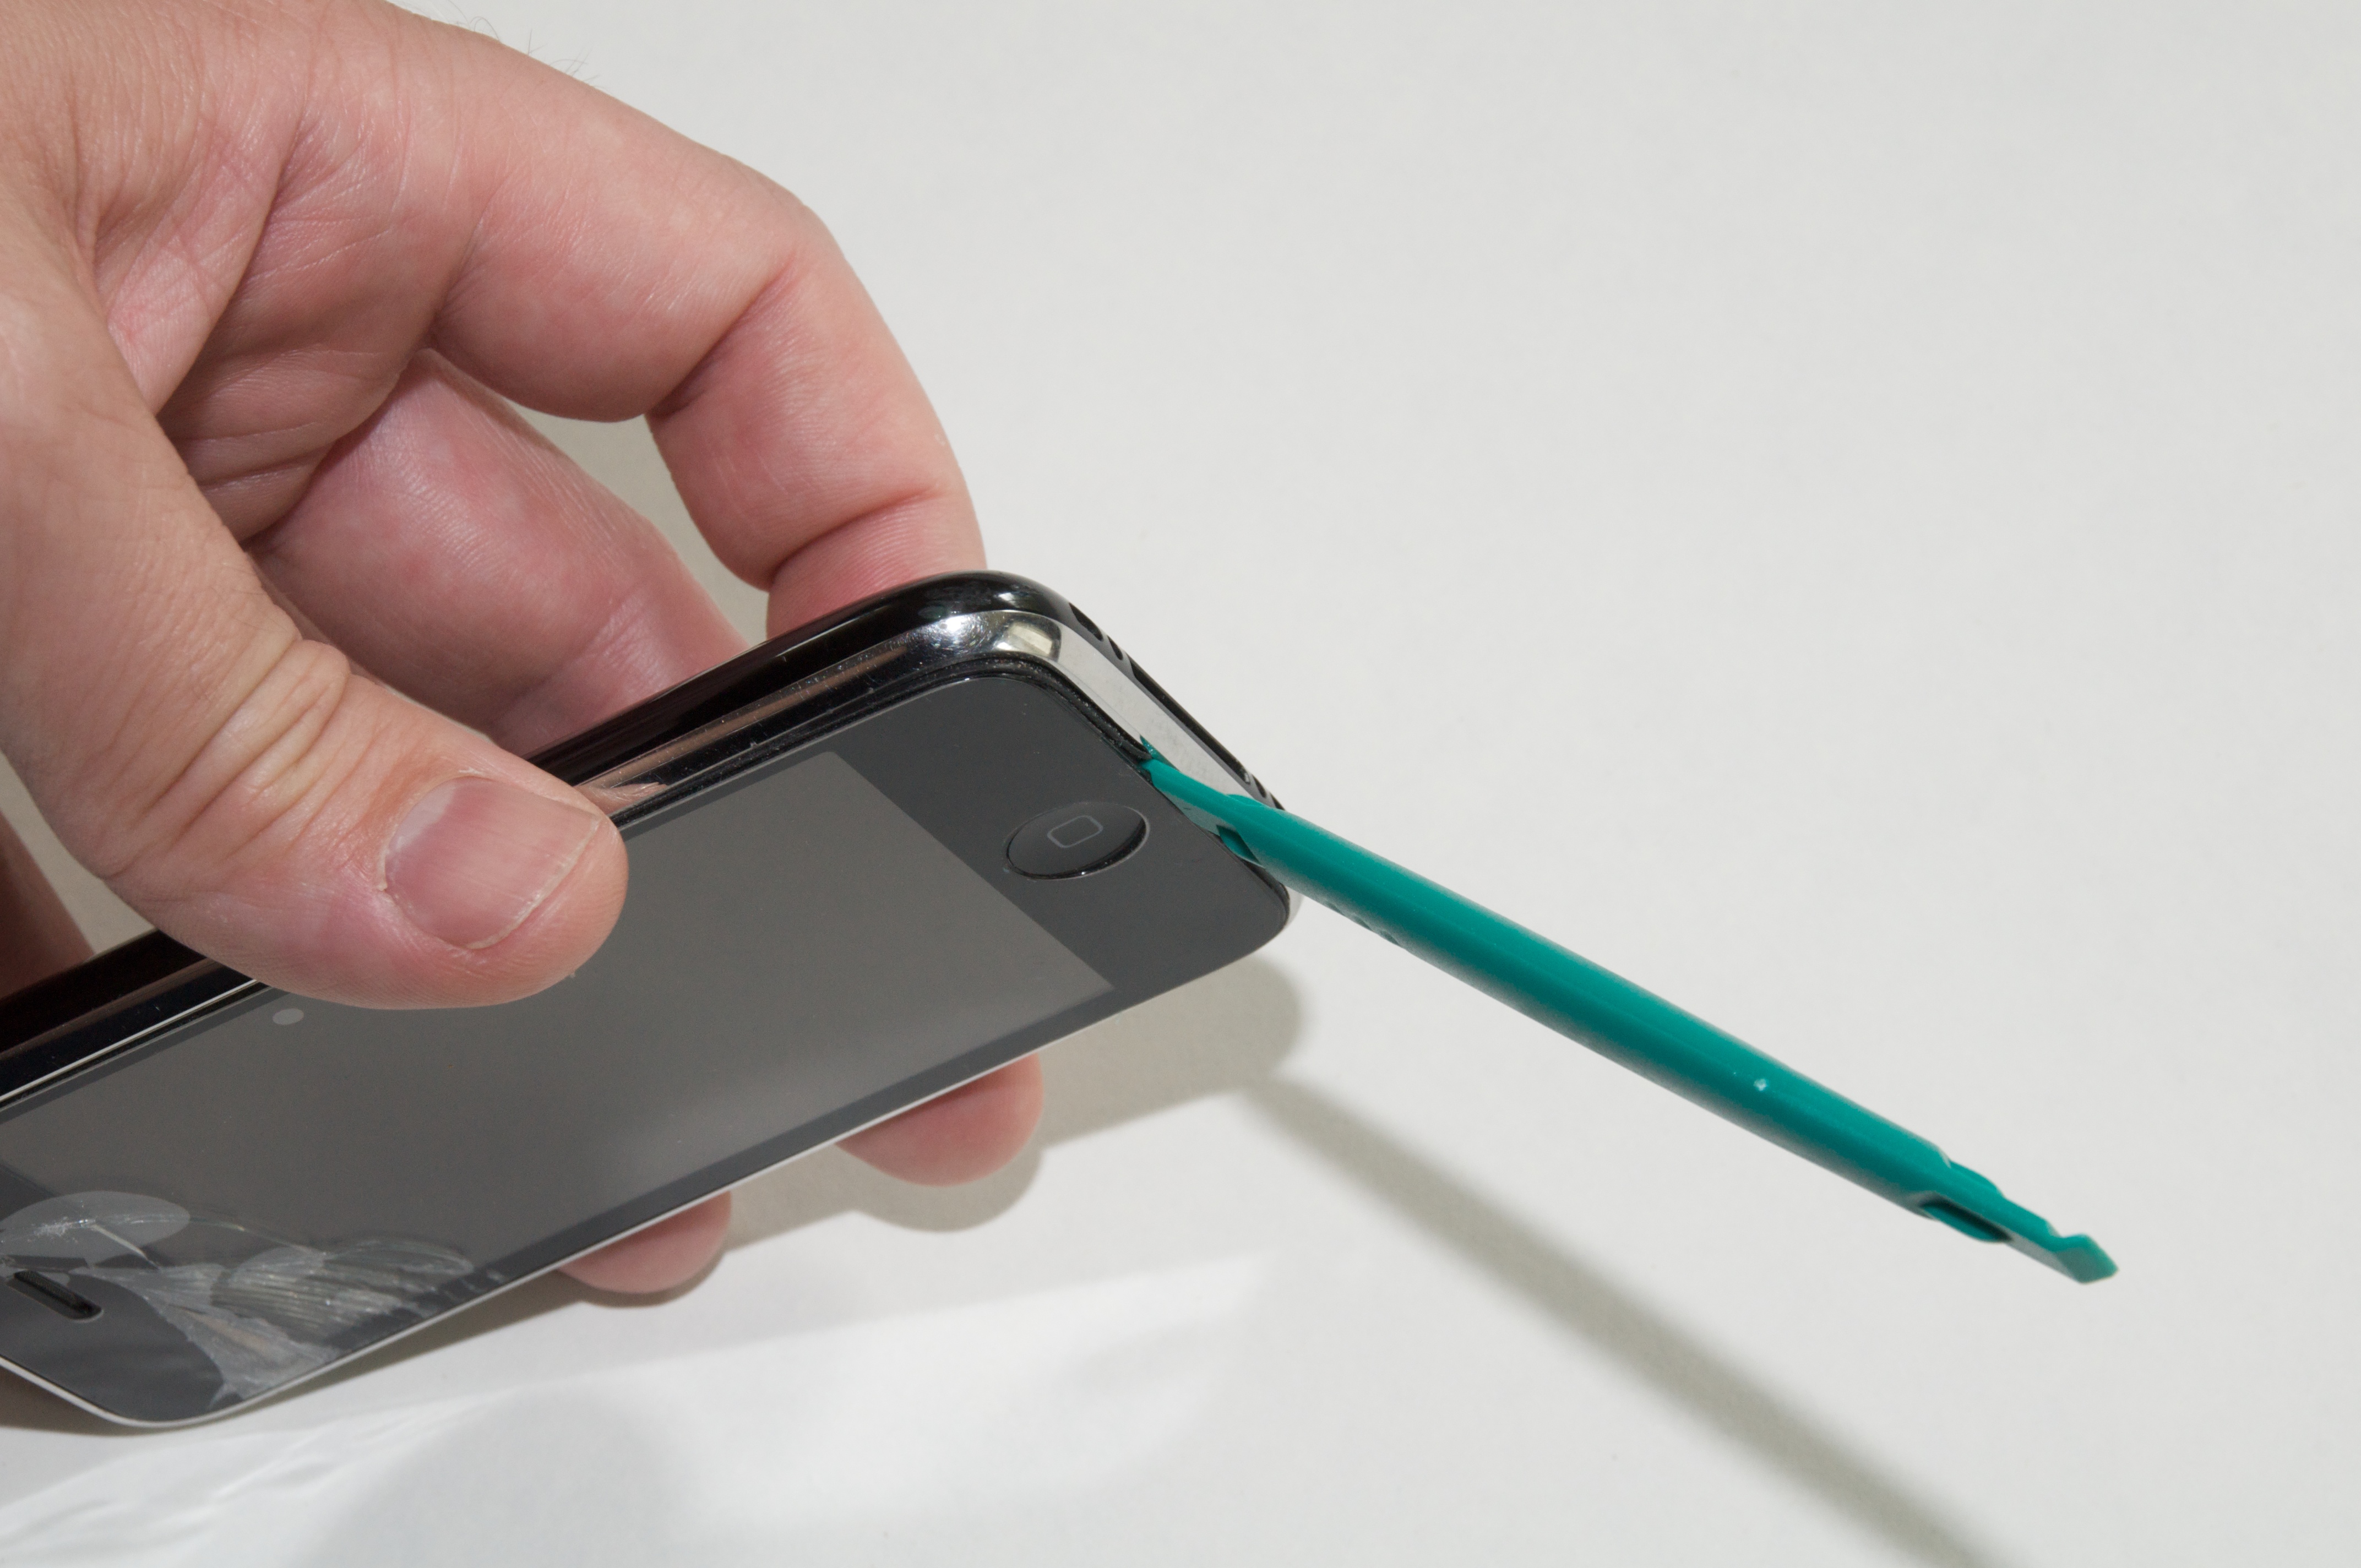
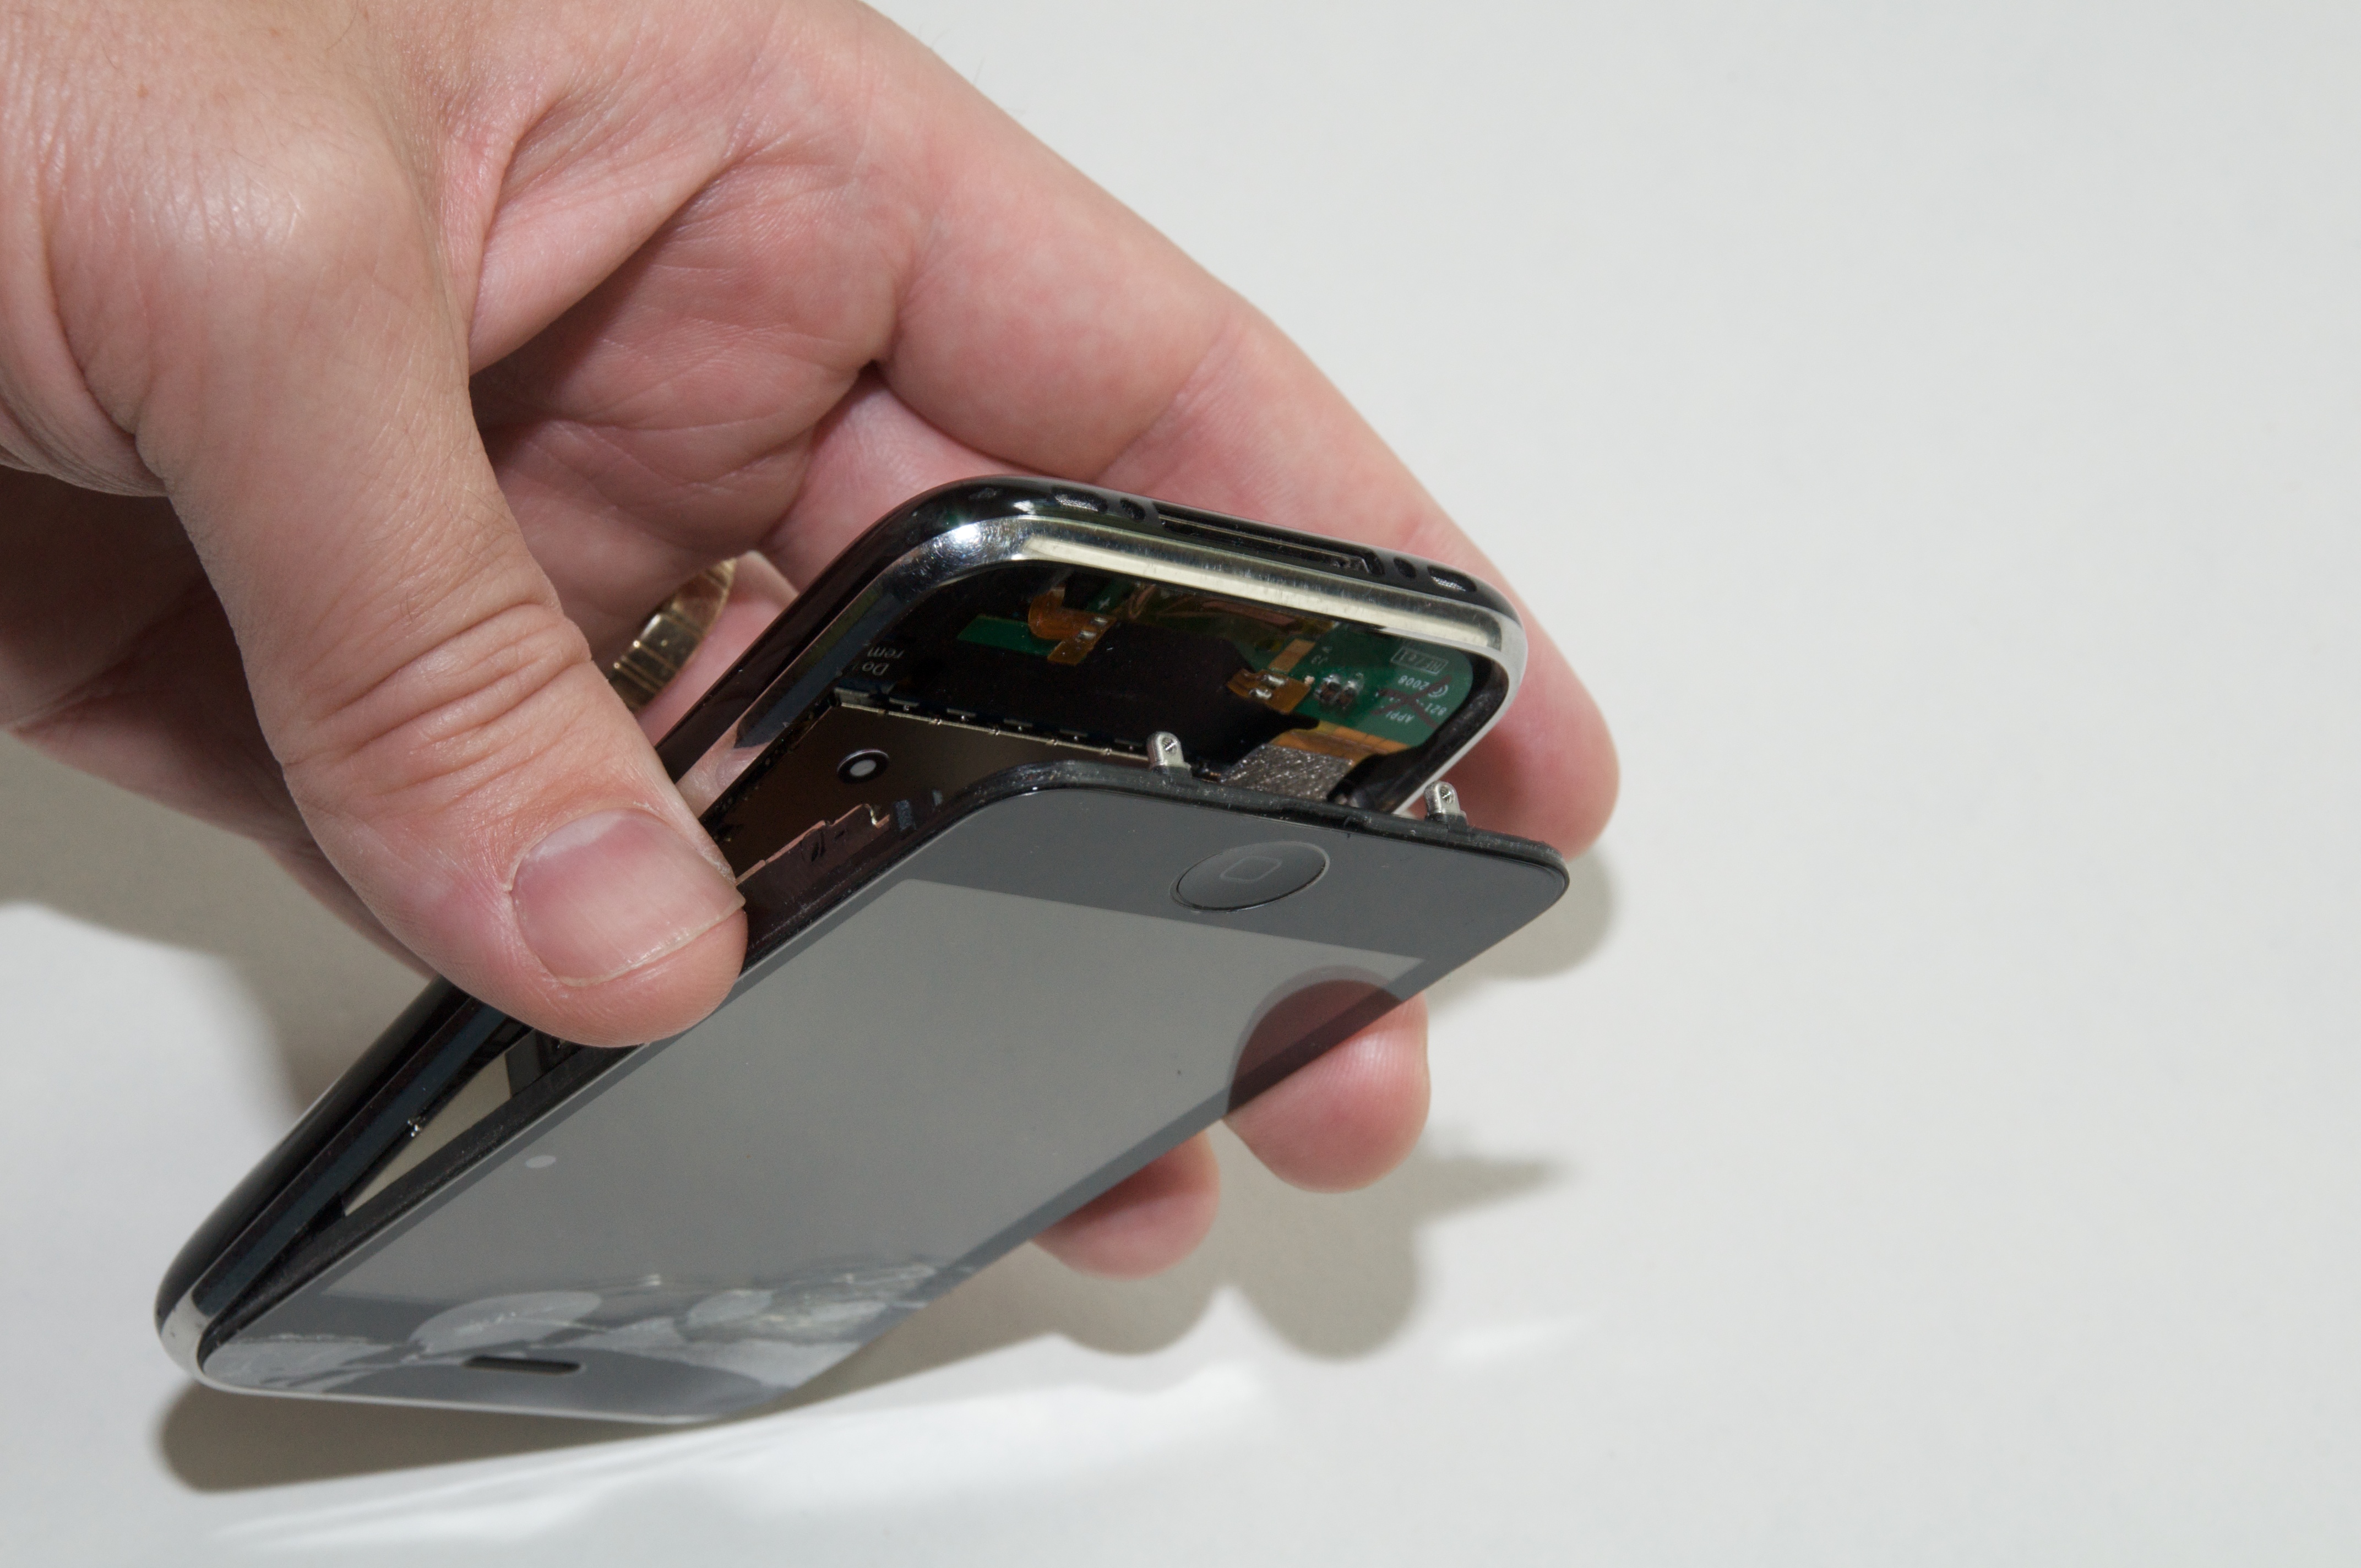
The iPhone is tightly built, so simply prying it open seems almost impossible. Furthermore, the case doesn’t come apart at the seam separating the metal frame and the plastic back. Instead, press the edge of the pry tool into the seam just below the Home button.
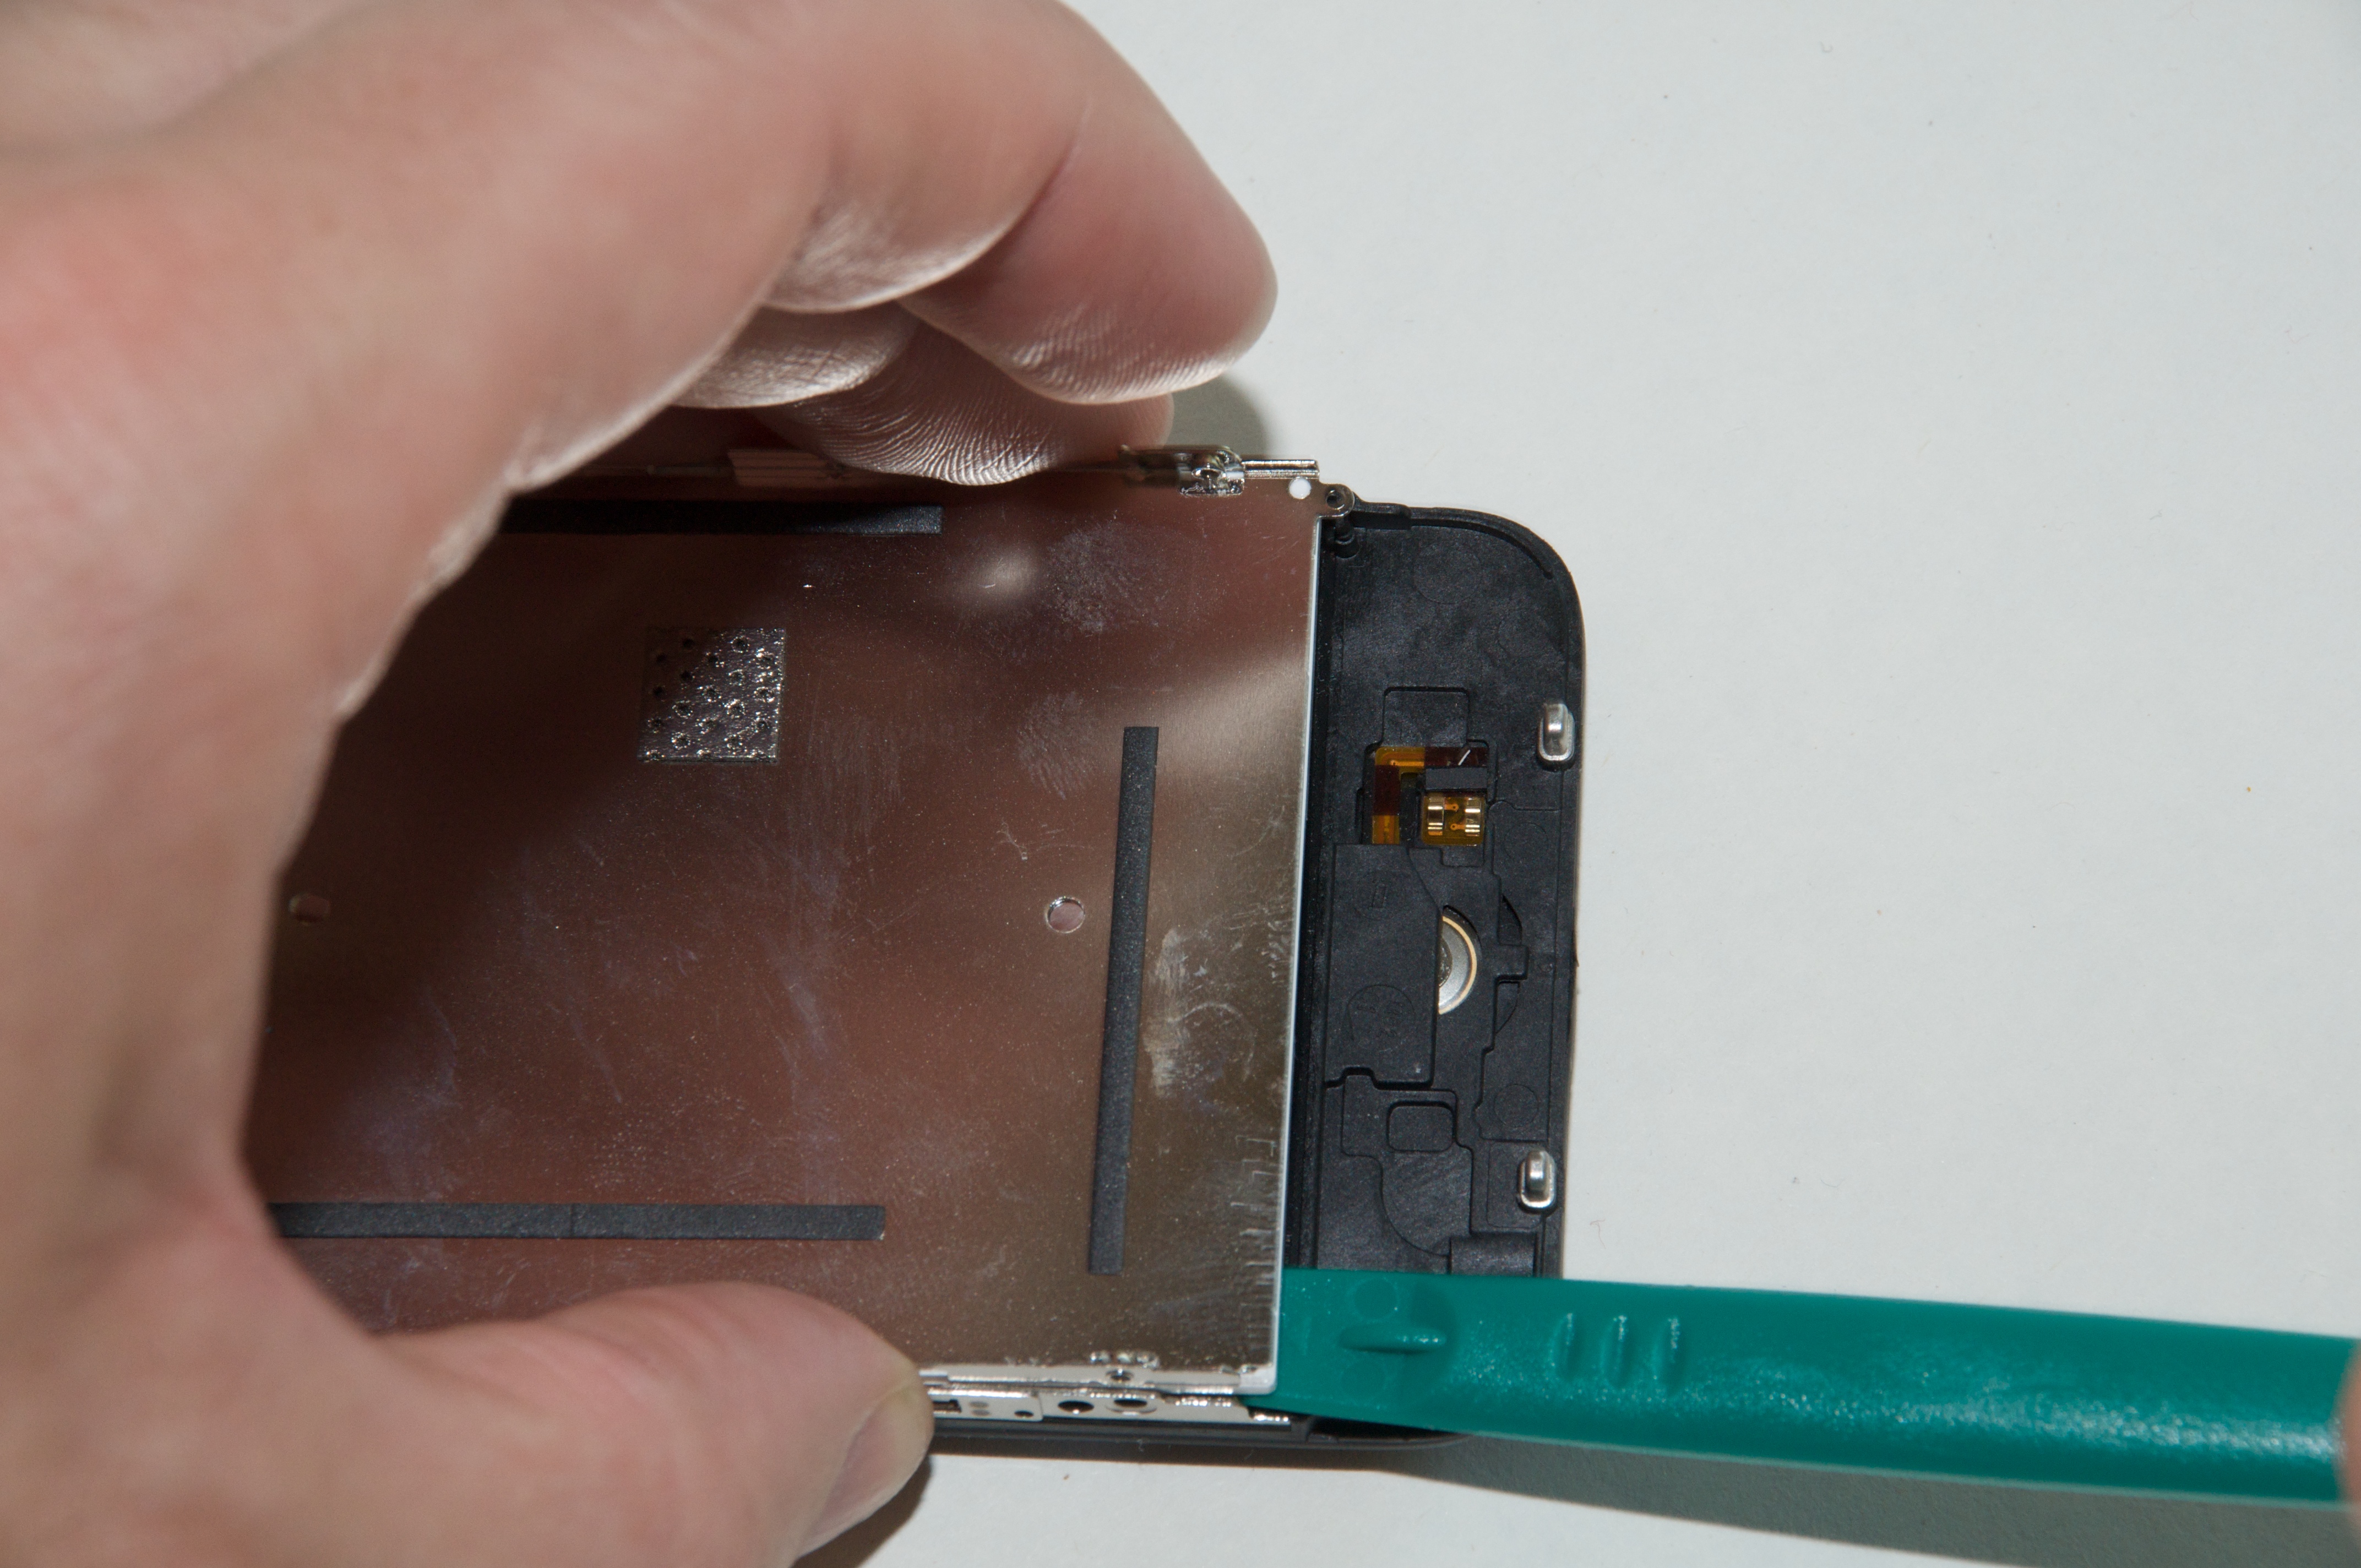
Gently pry the screen up, but don’t pull it off entirely yet, because three cables connect the screen to the lower section.
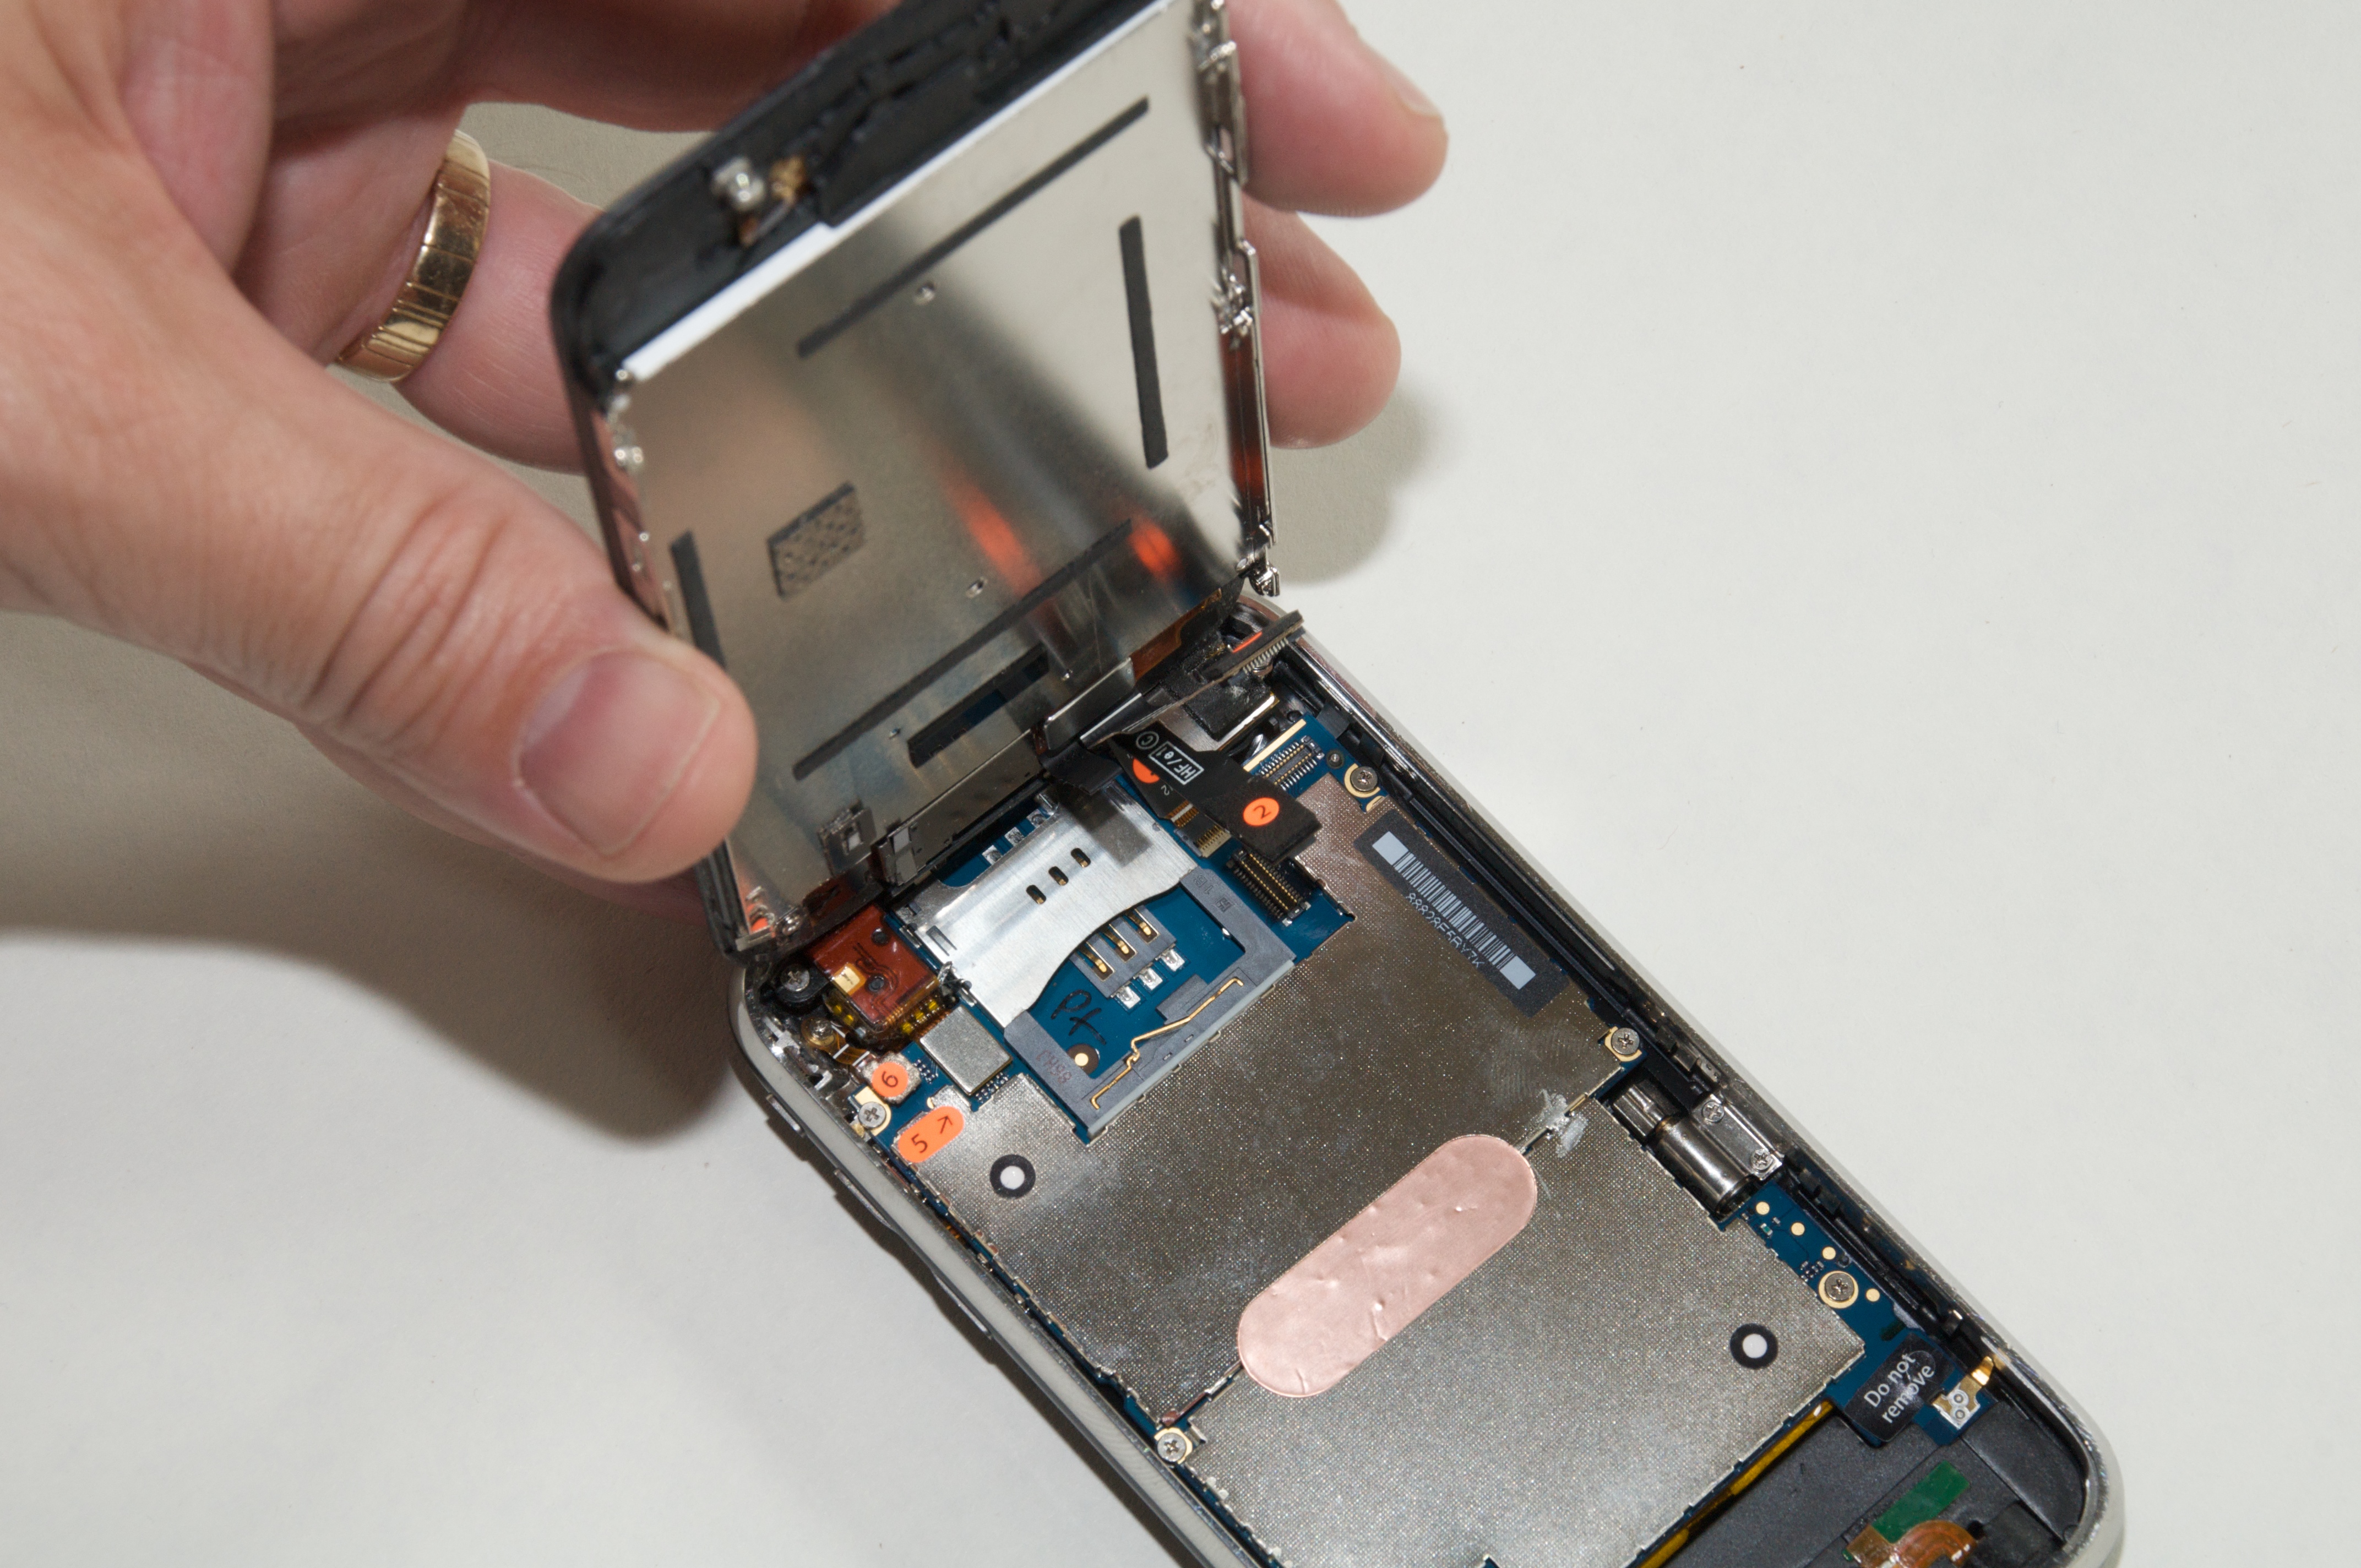
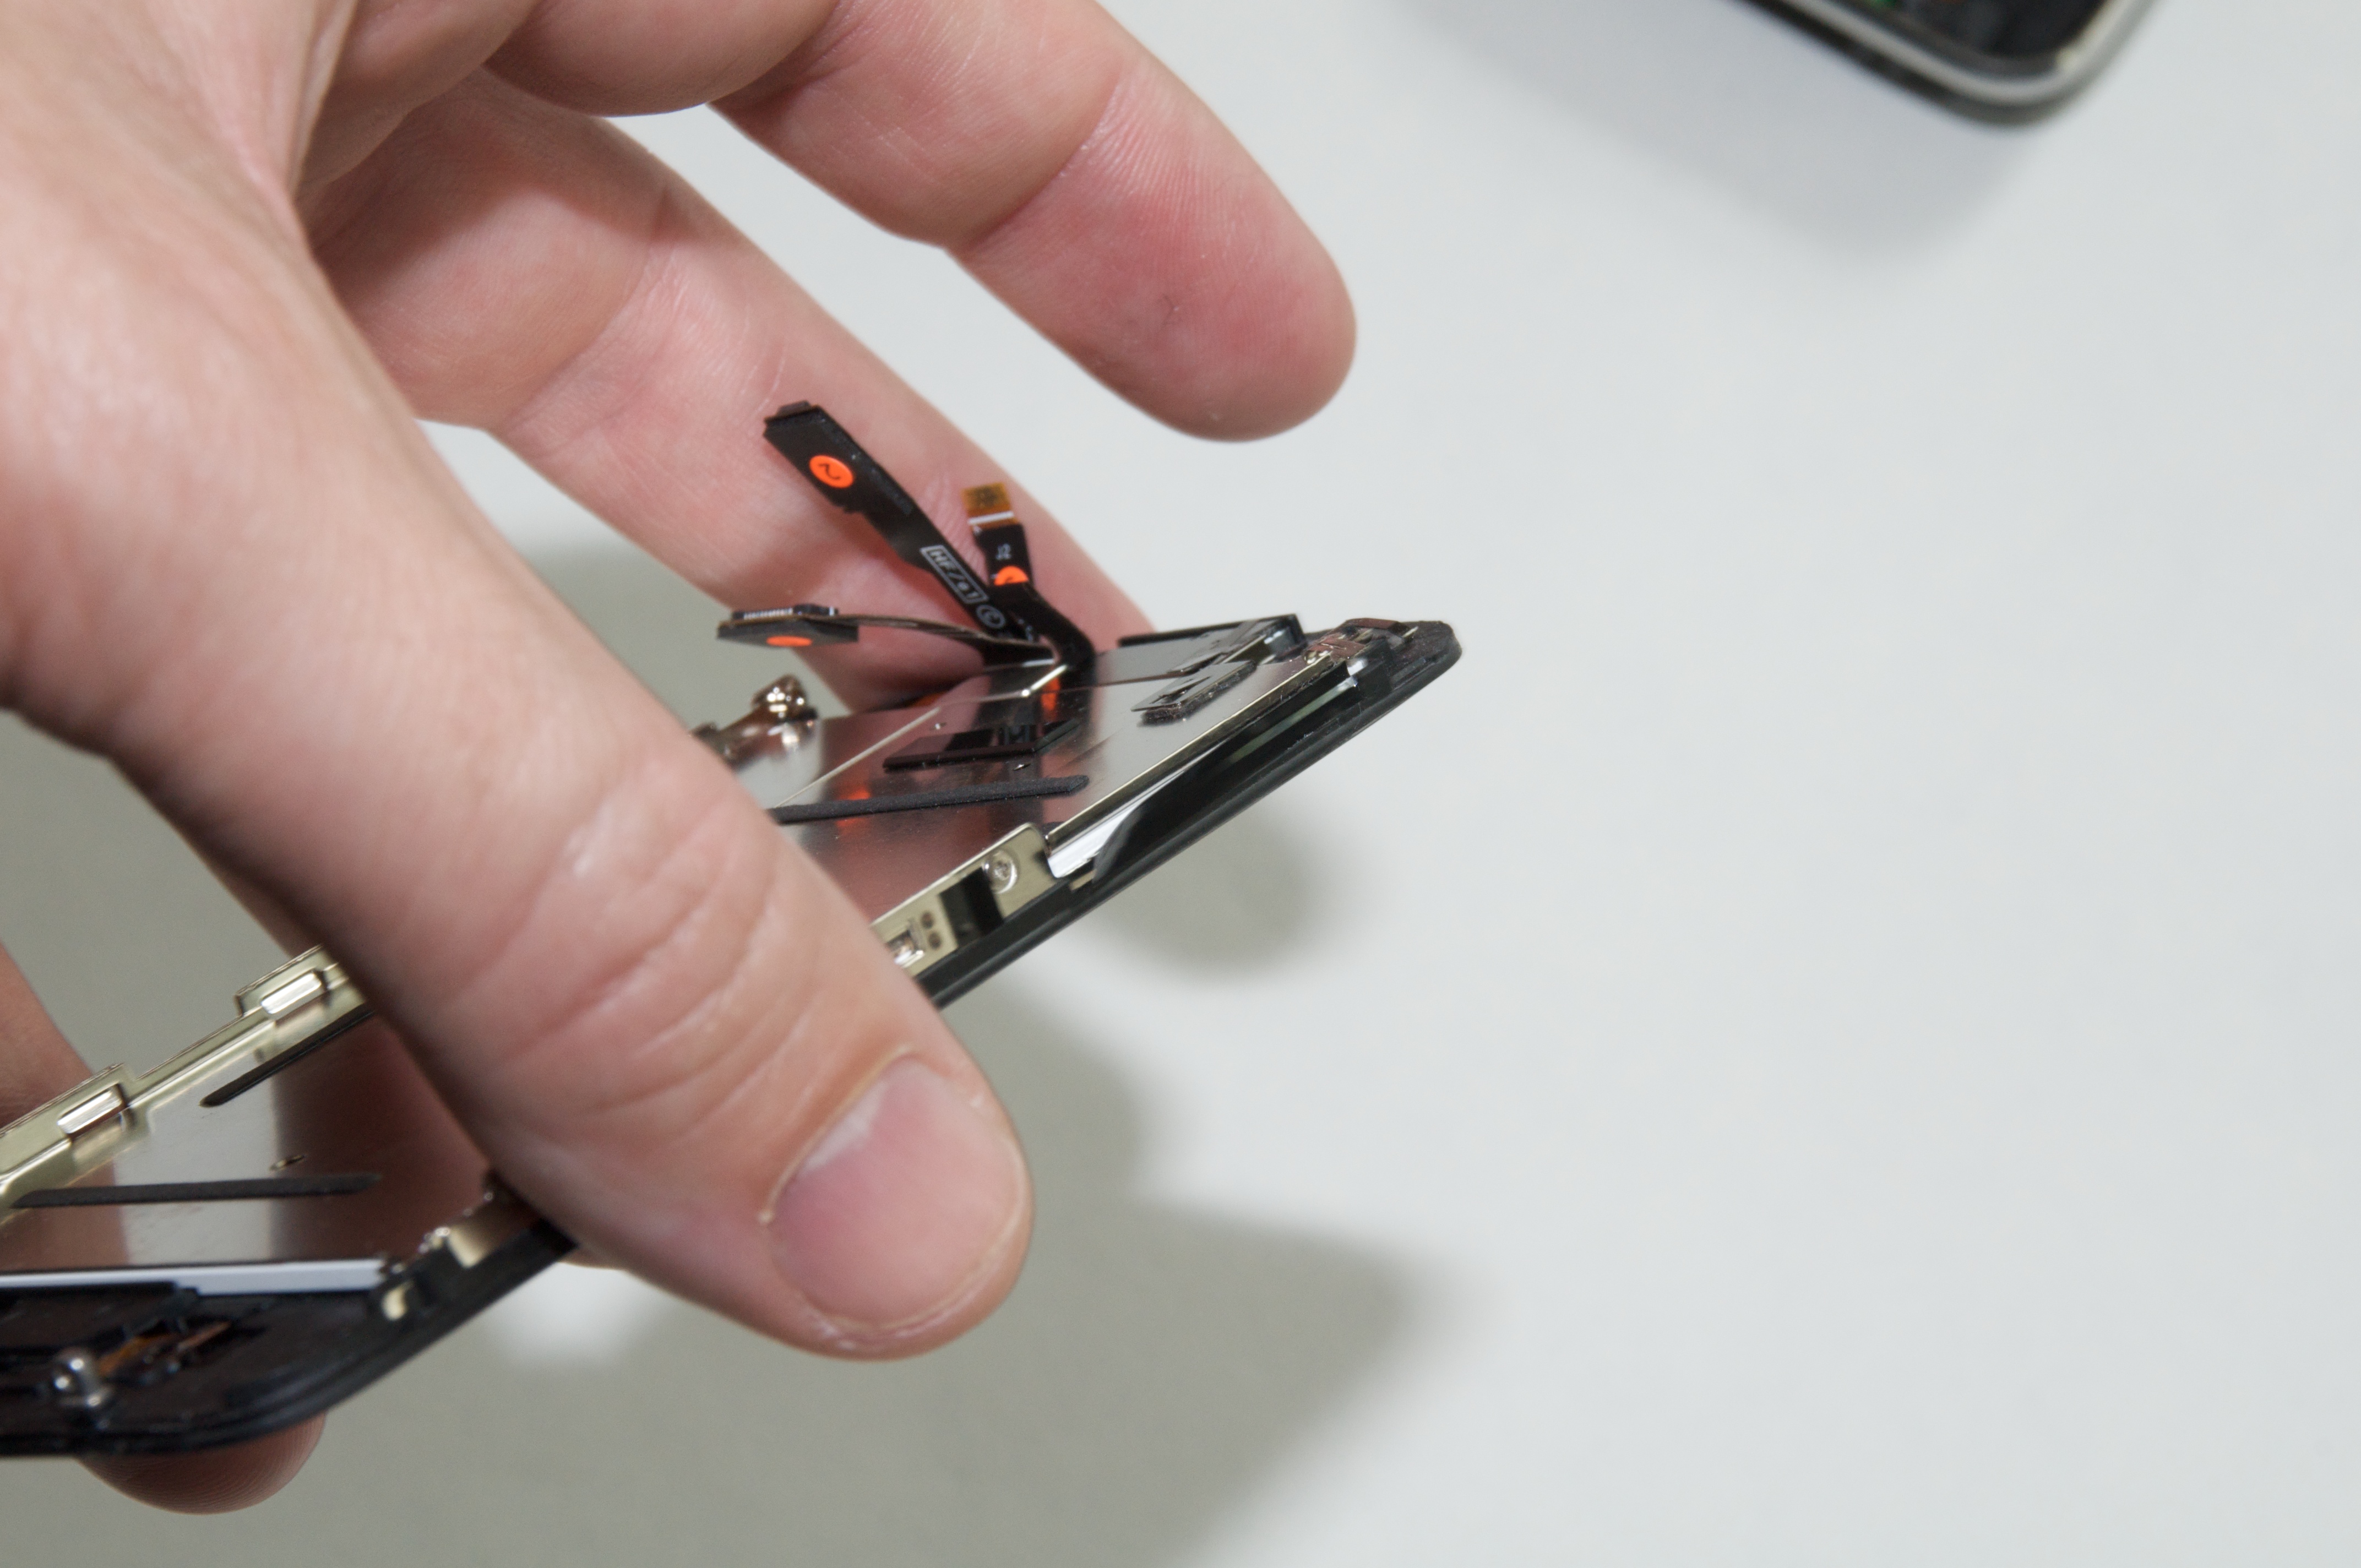
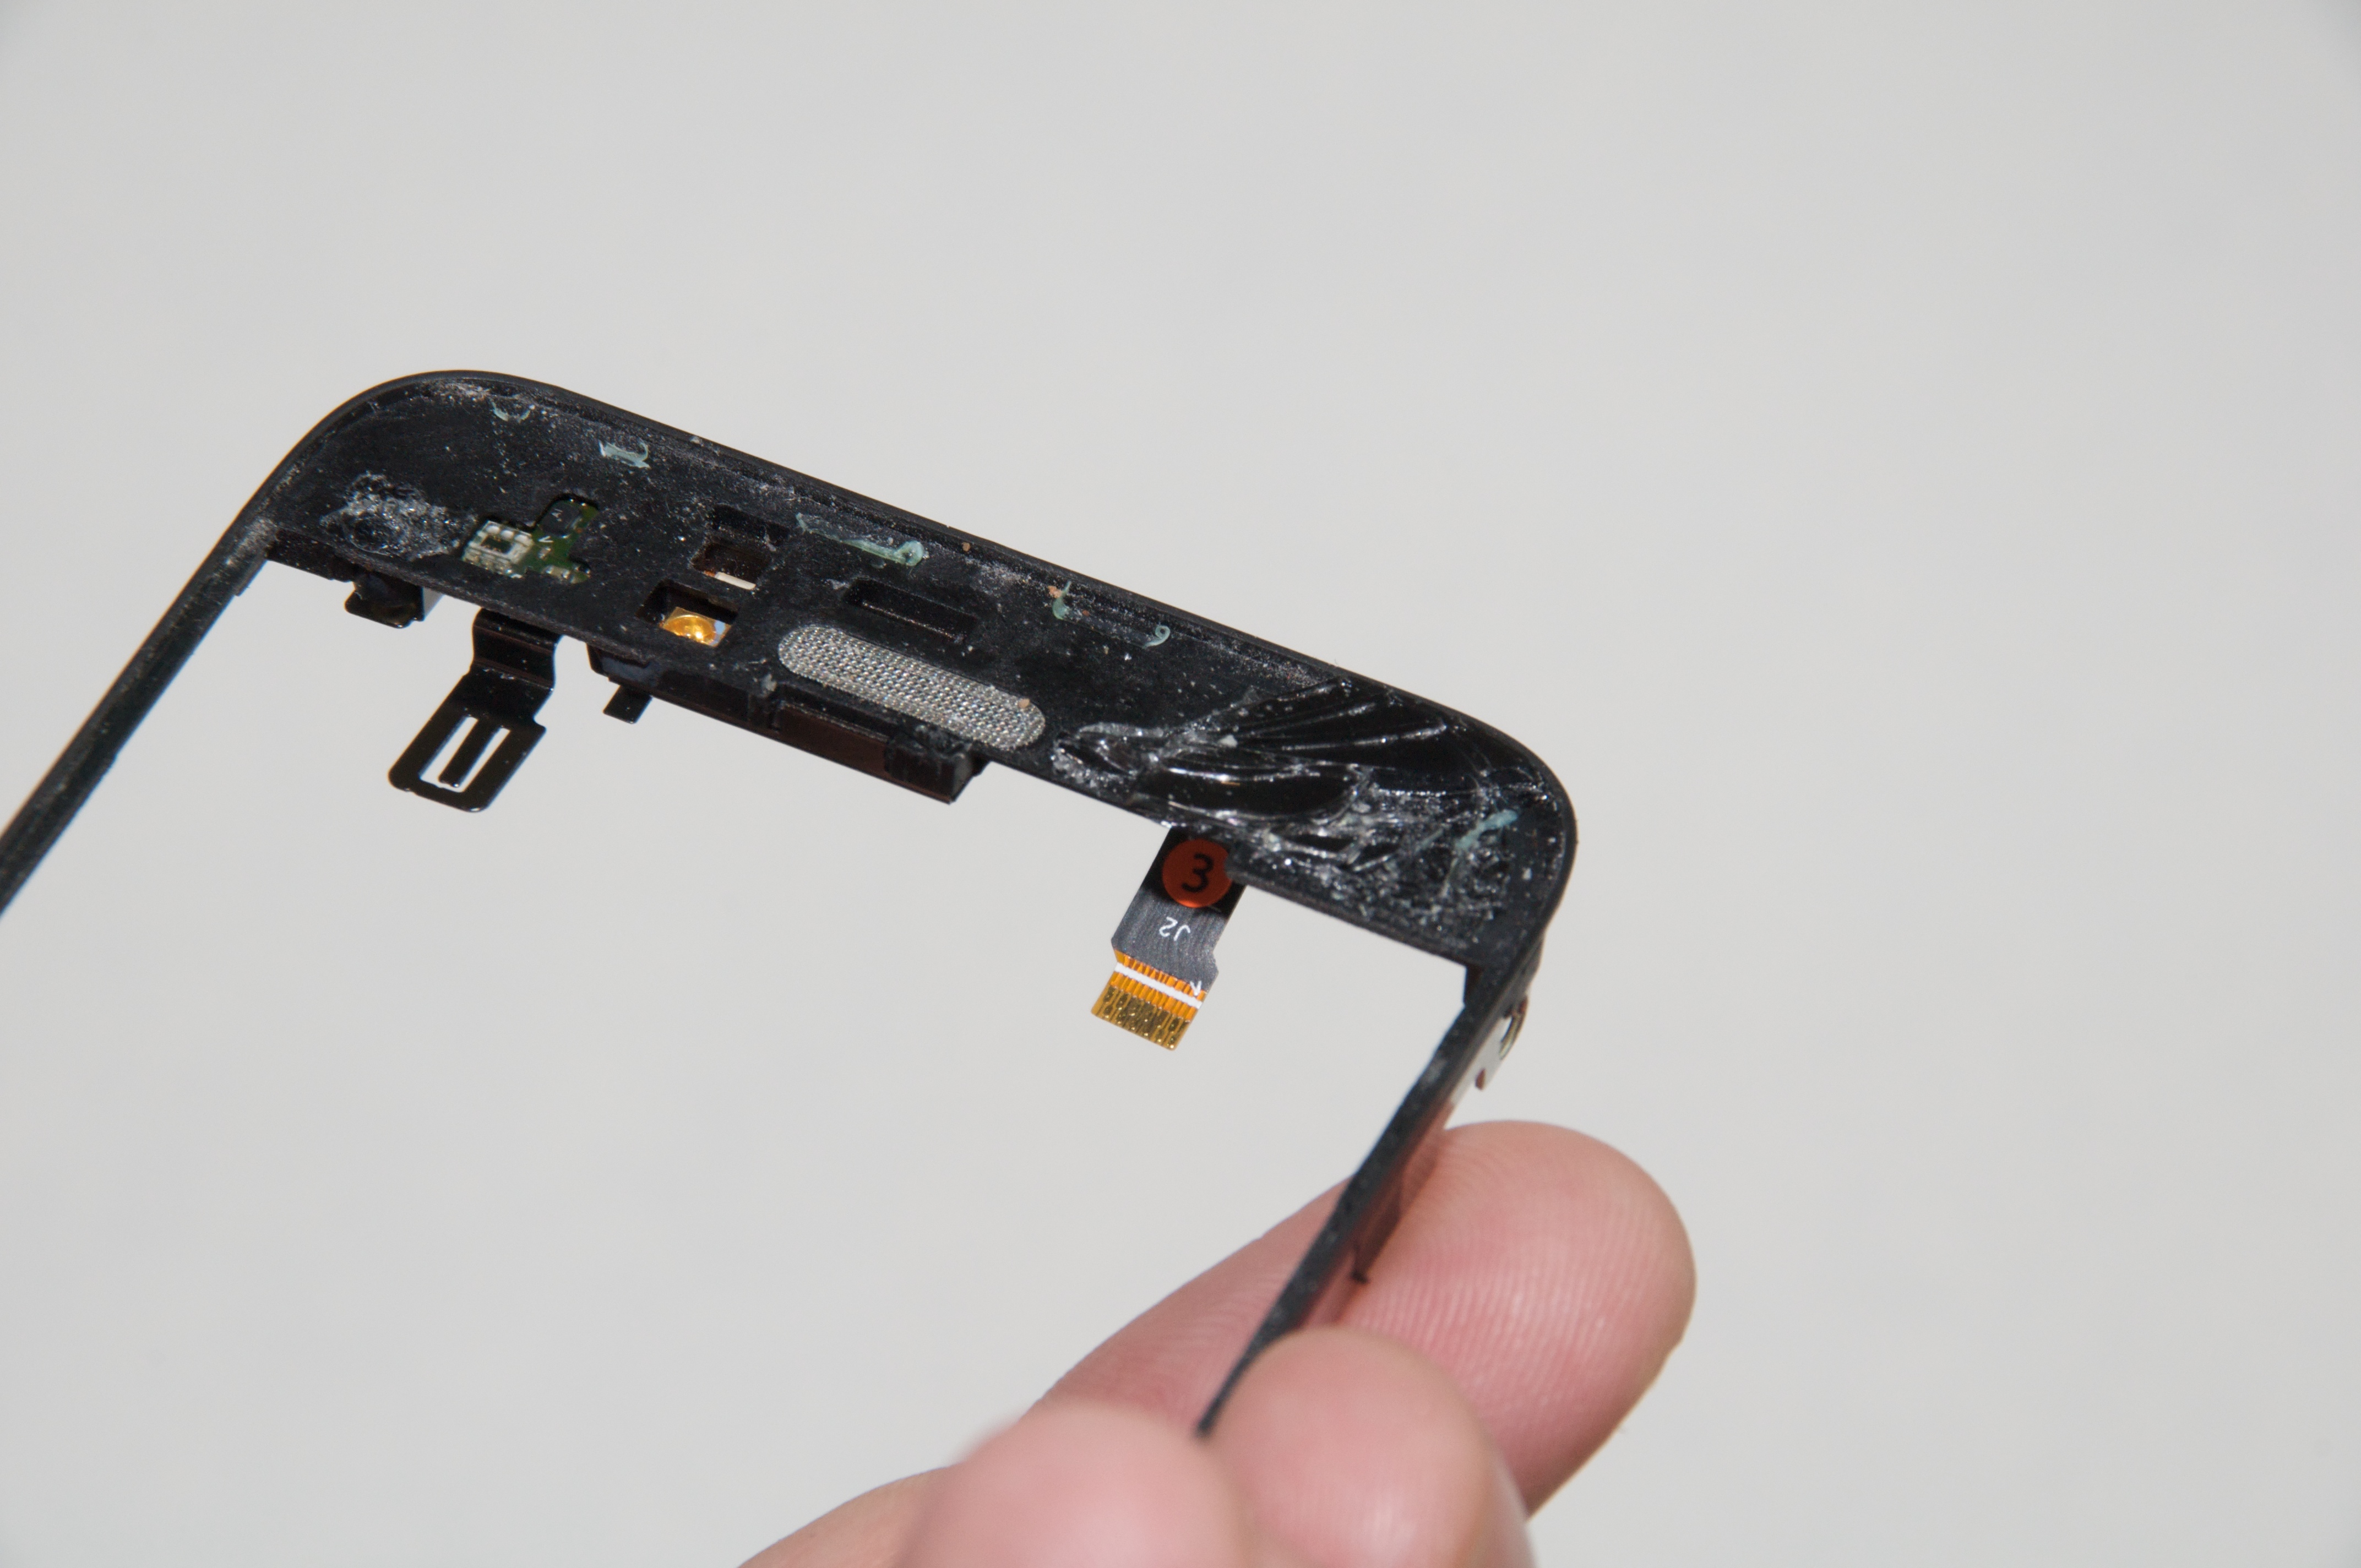
Using the pry tool or your fingers (if your fingers are small enough), remove connectors 1 and 2; for me, connector 1 lifted off by itself as I pulled the screen up, and connector 2 popped up when I placed the pry tool under its lip and gave it a little twist. Number 3 is actually a ribbon that’s anchored by a connector on the base. To disconnect it, use the pry tool to flip up the white latch and then pull the ribbon out. Set the base aside.
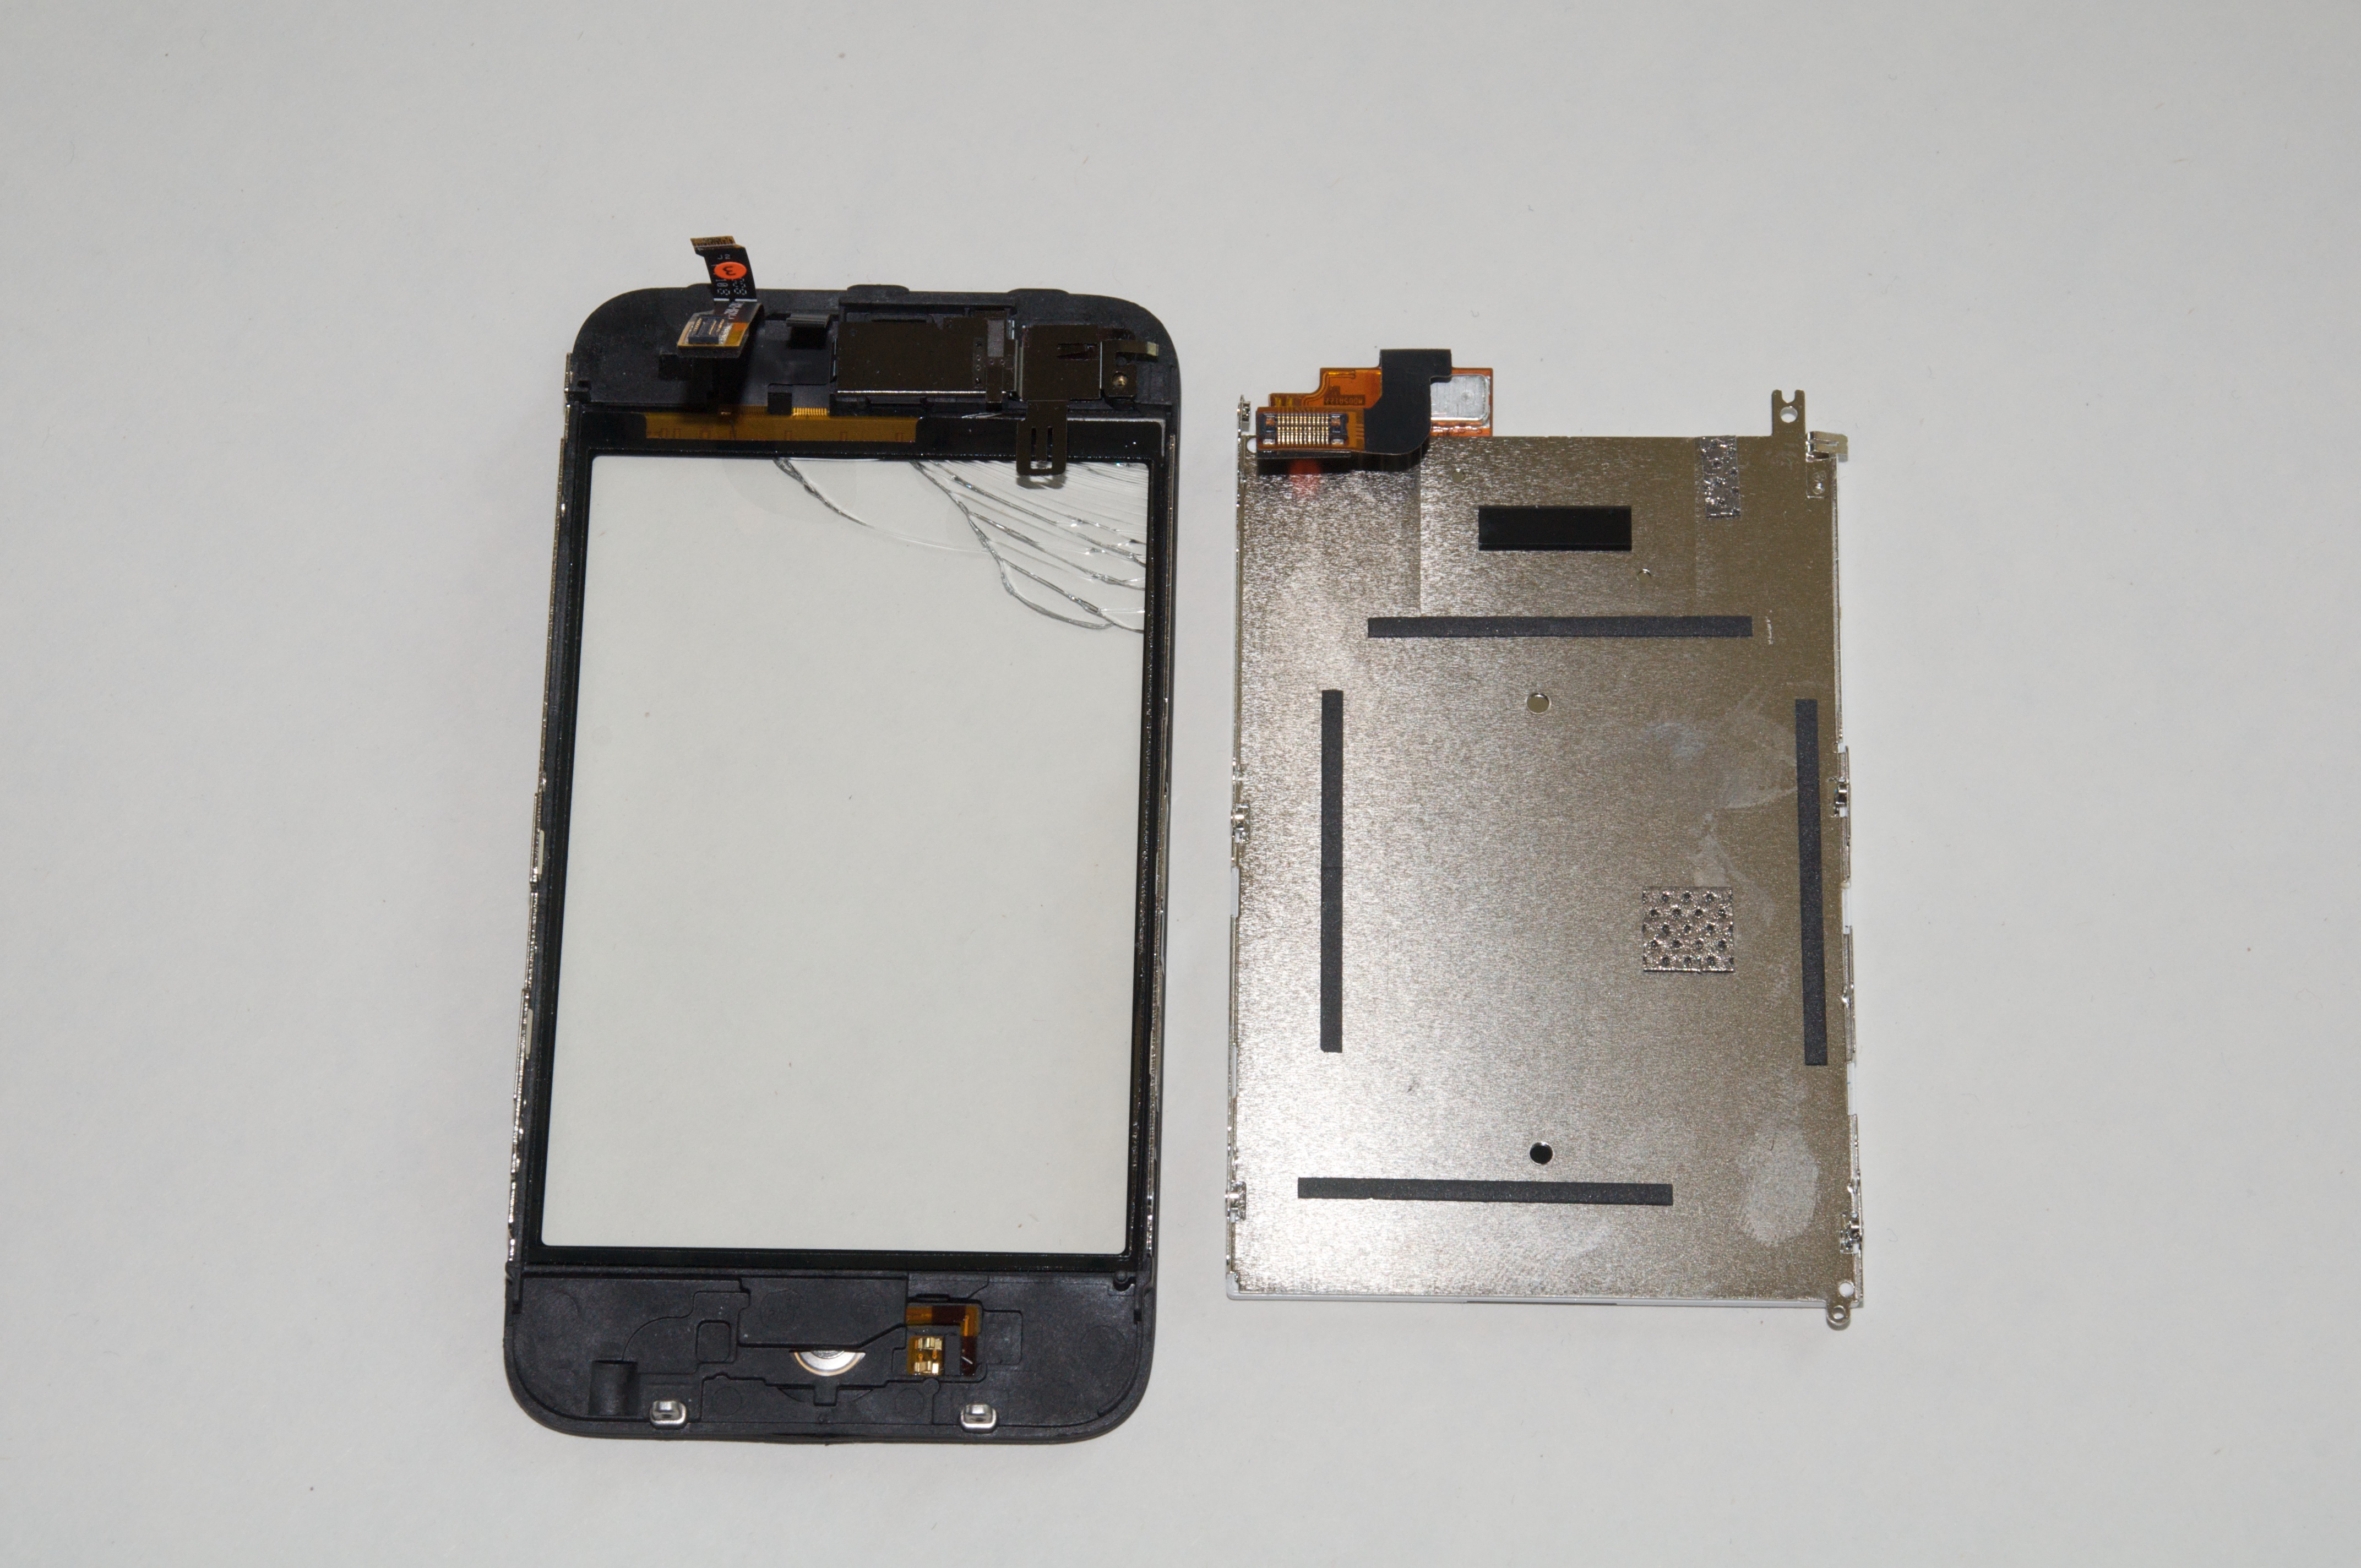
Remove the LCD Assembly — Next you need to separate the screen frame from the LCD assembly. Using tweezers, pull off the black strips of tape on the left and right edges of the frame.
That exposes five screws for you to remove. One other screw is located at the top of the LCD assembly near the connecting cables.
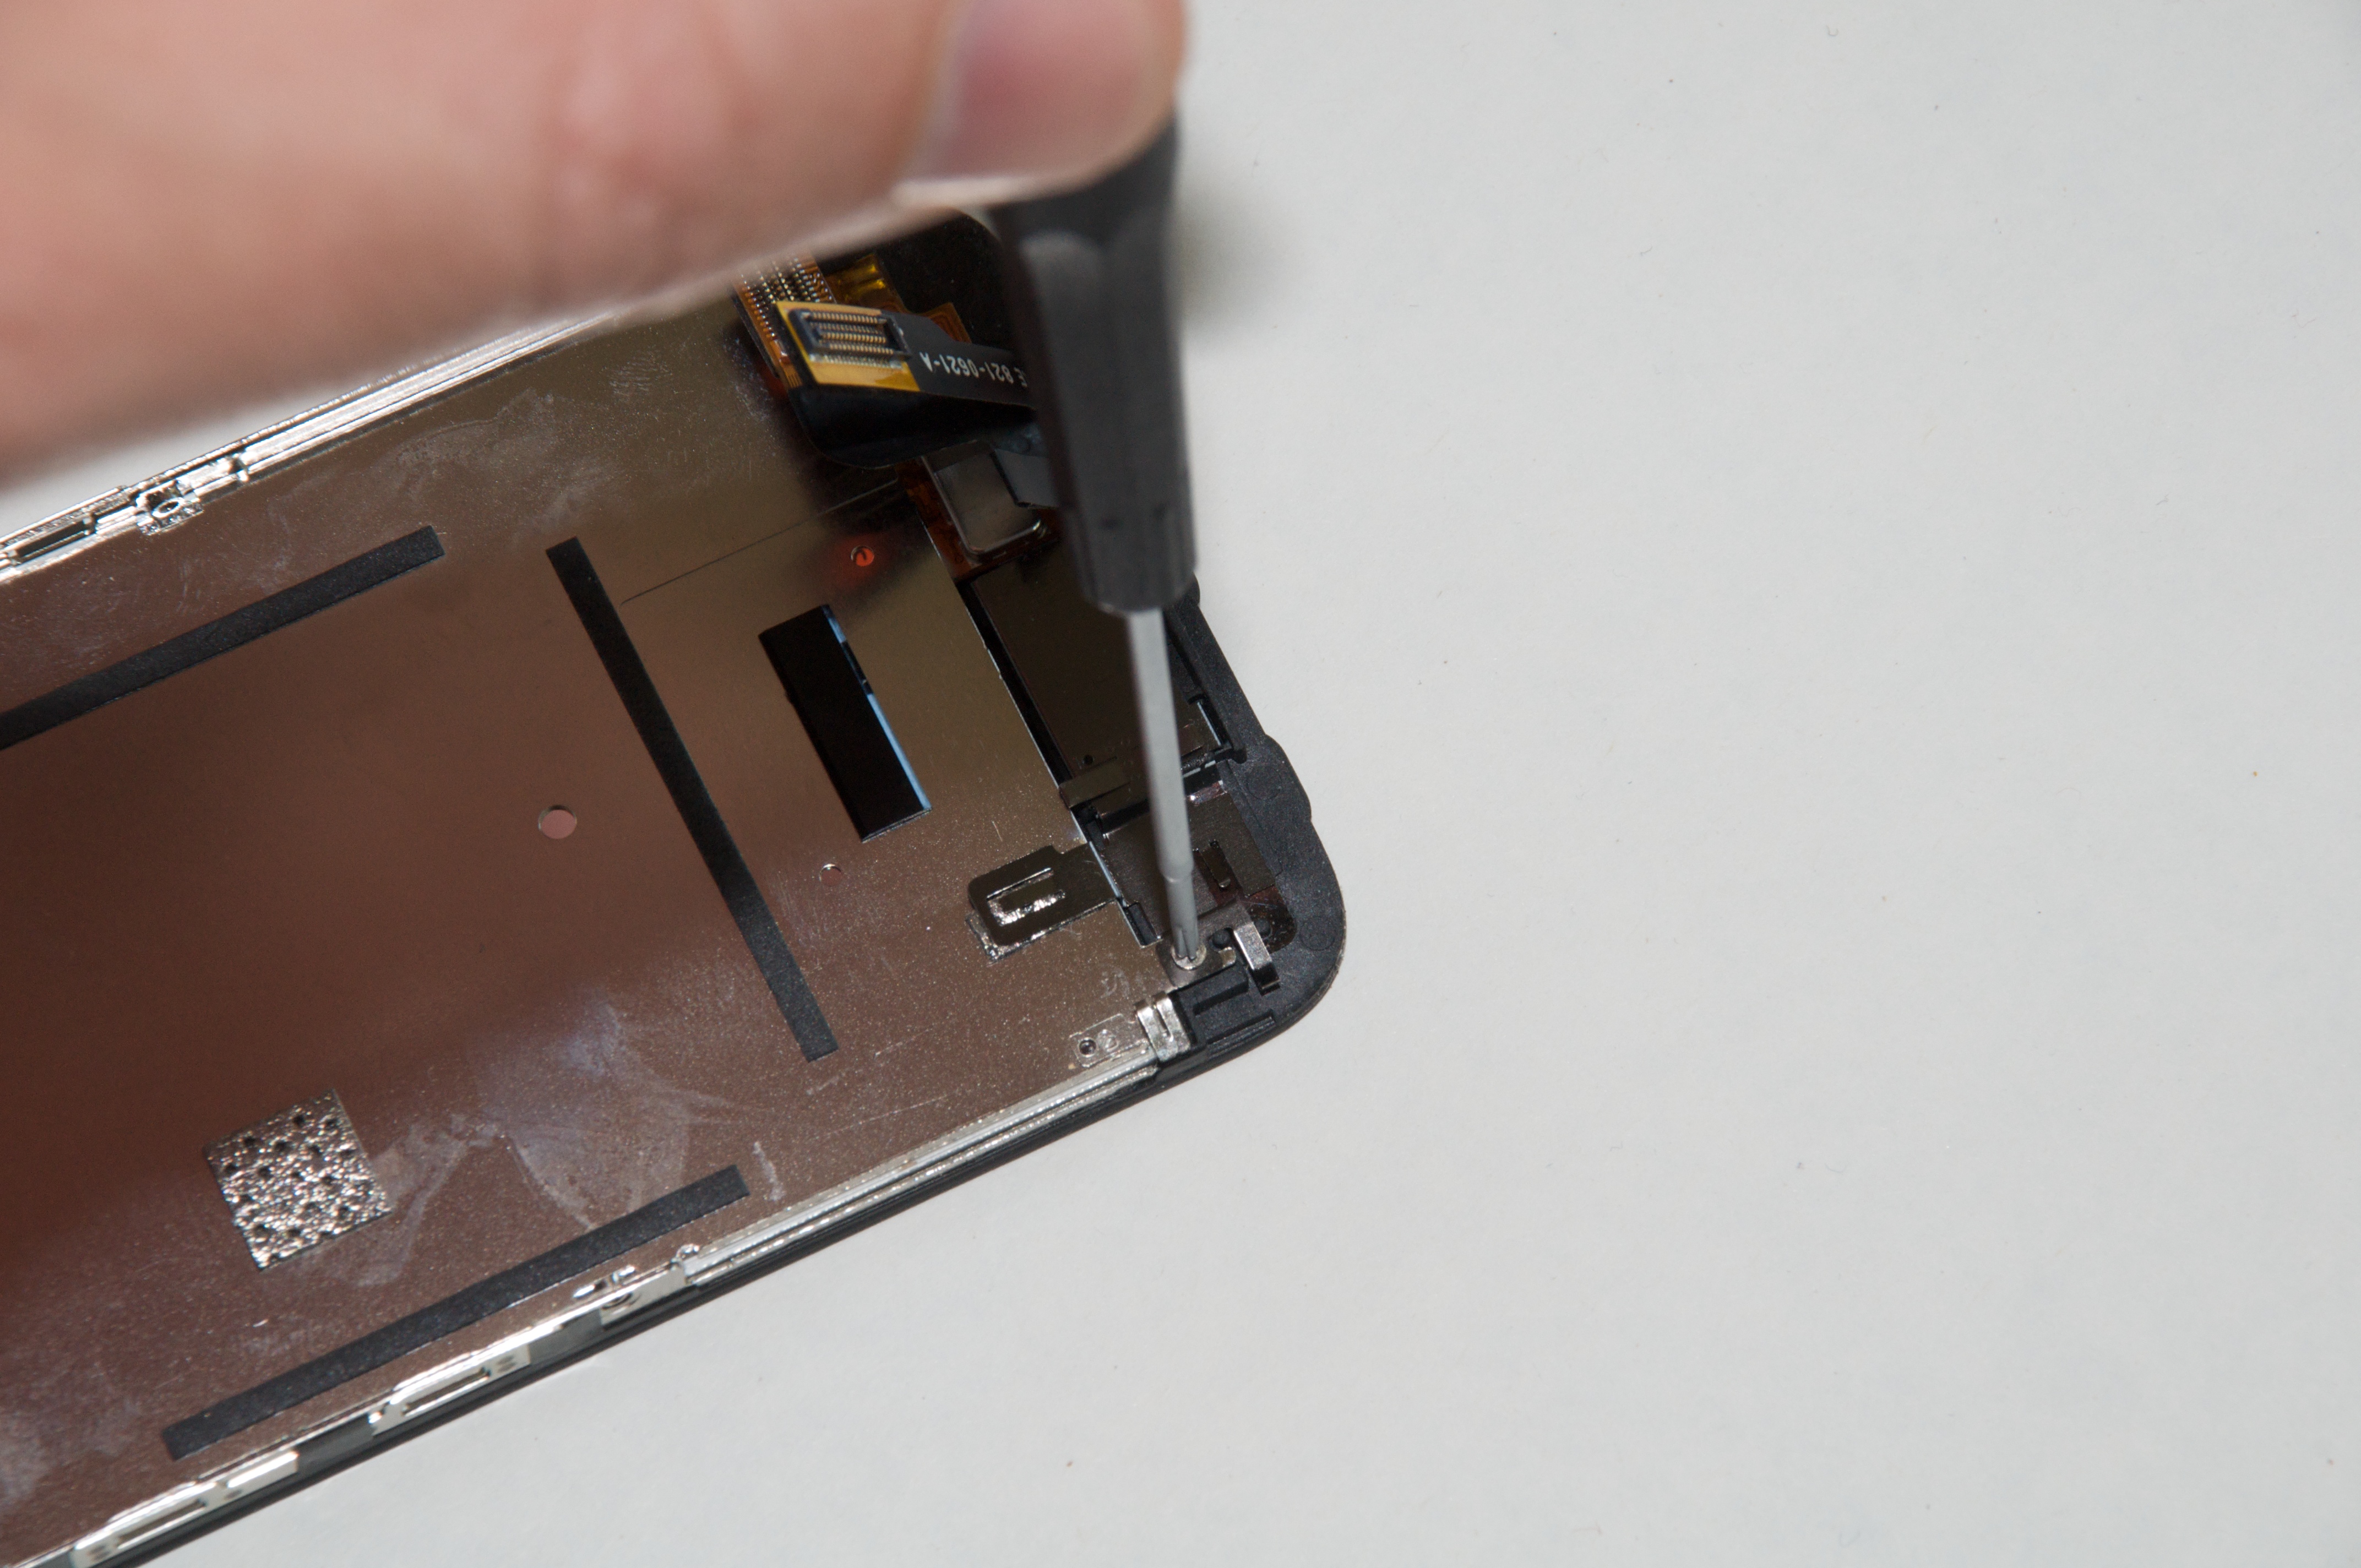
Use the pry tool to gently – so as not to damage it – remove the LCD assembly from the glass; it lifts slightly and then slides out. Set the LCD assembly aside.
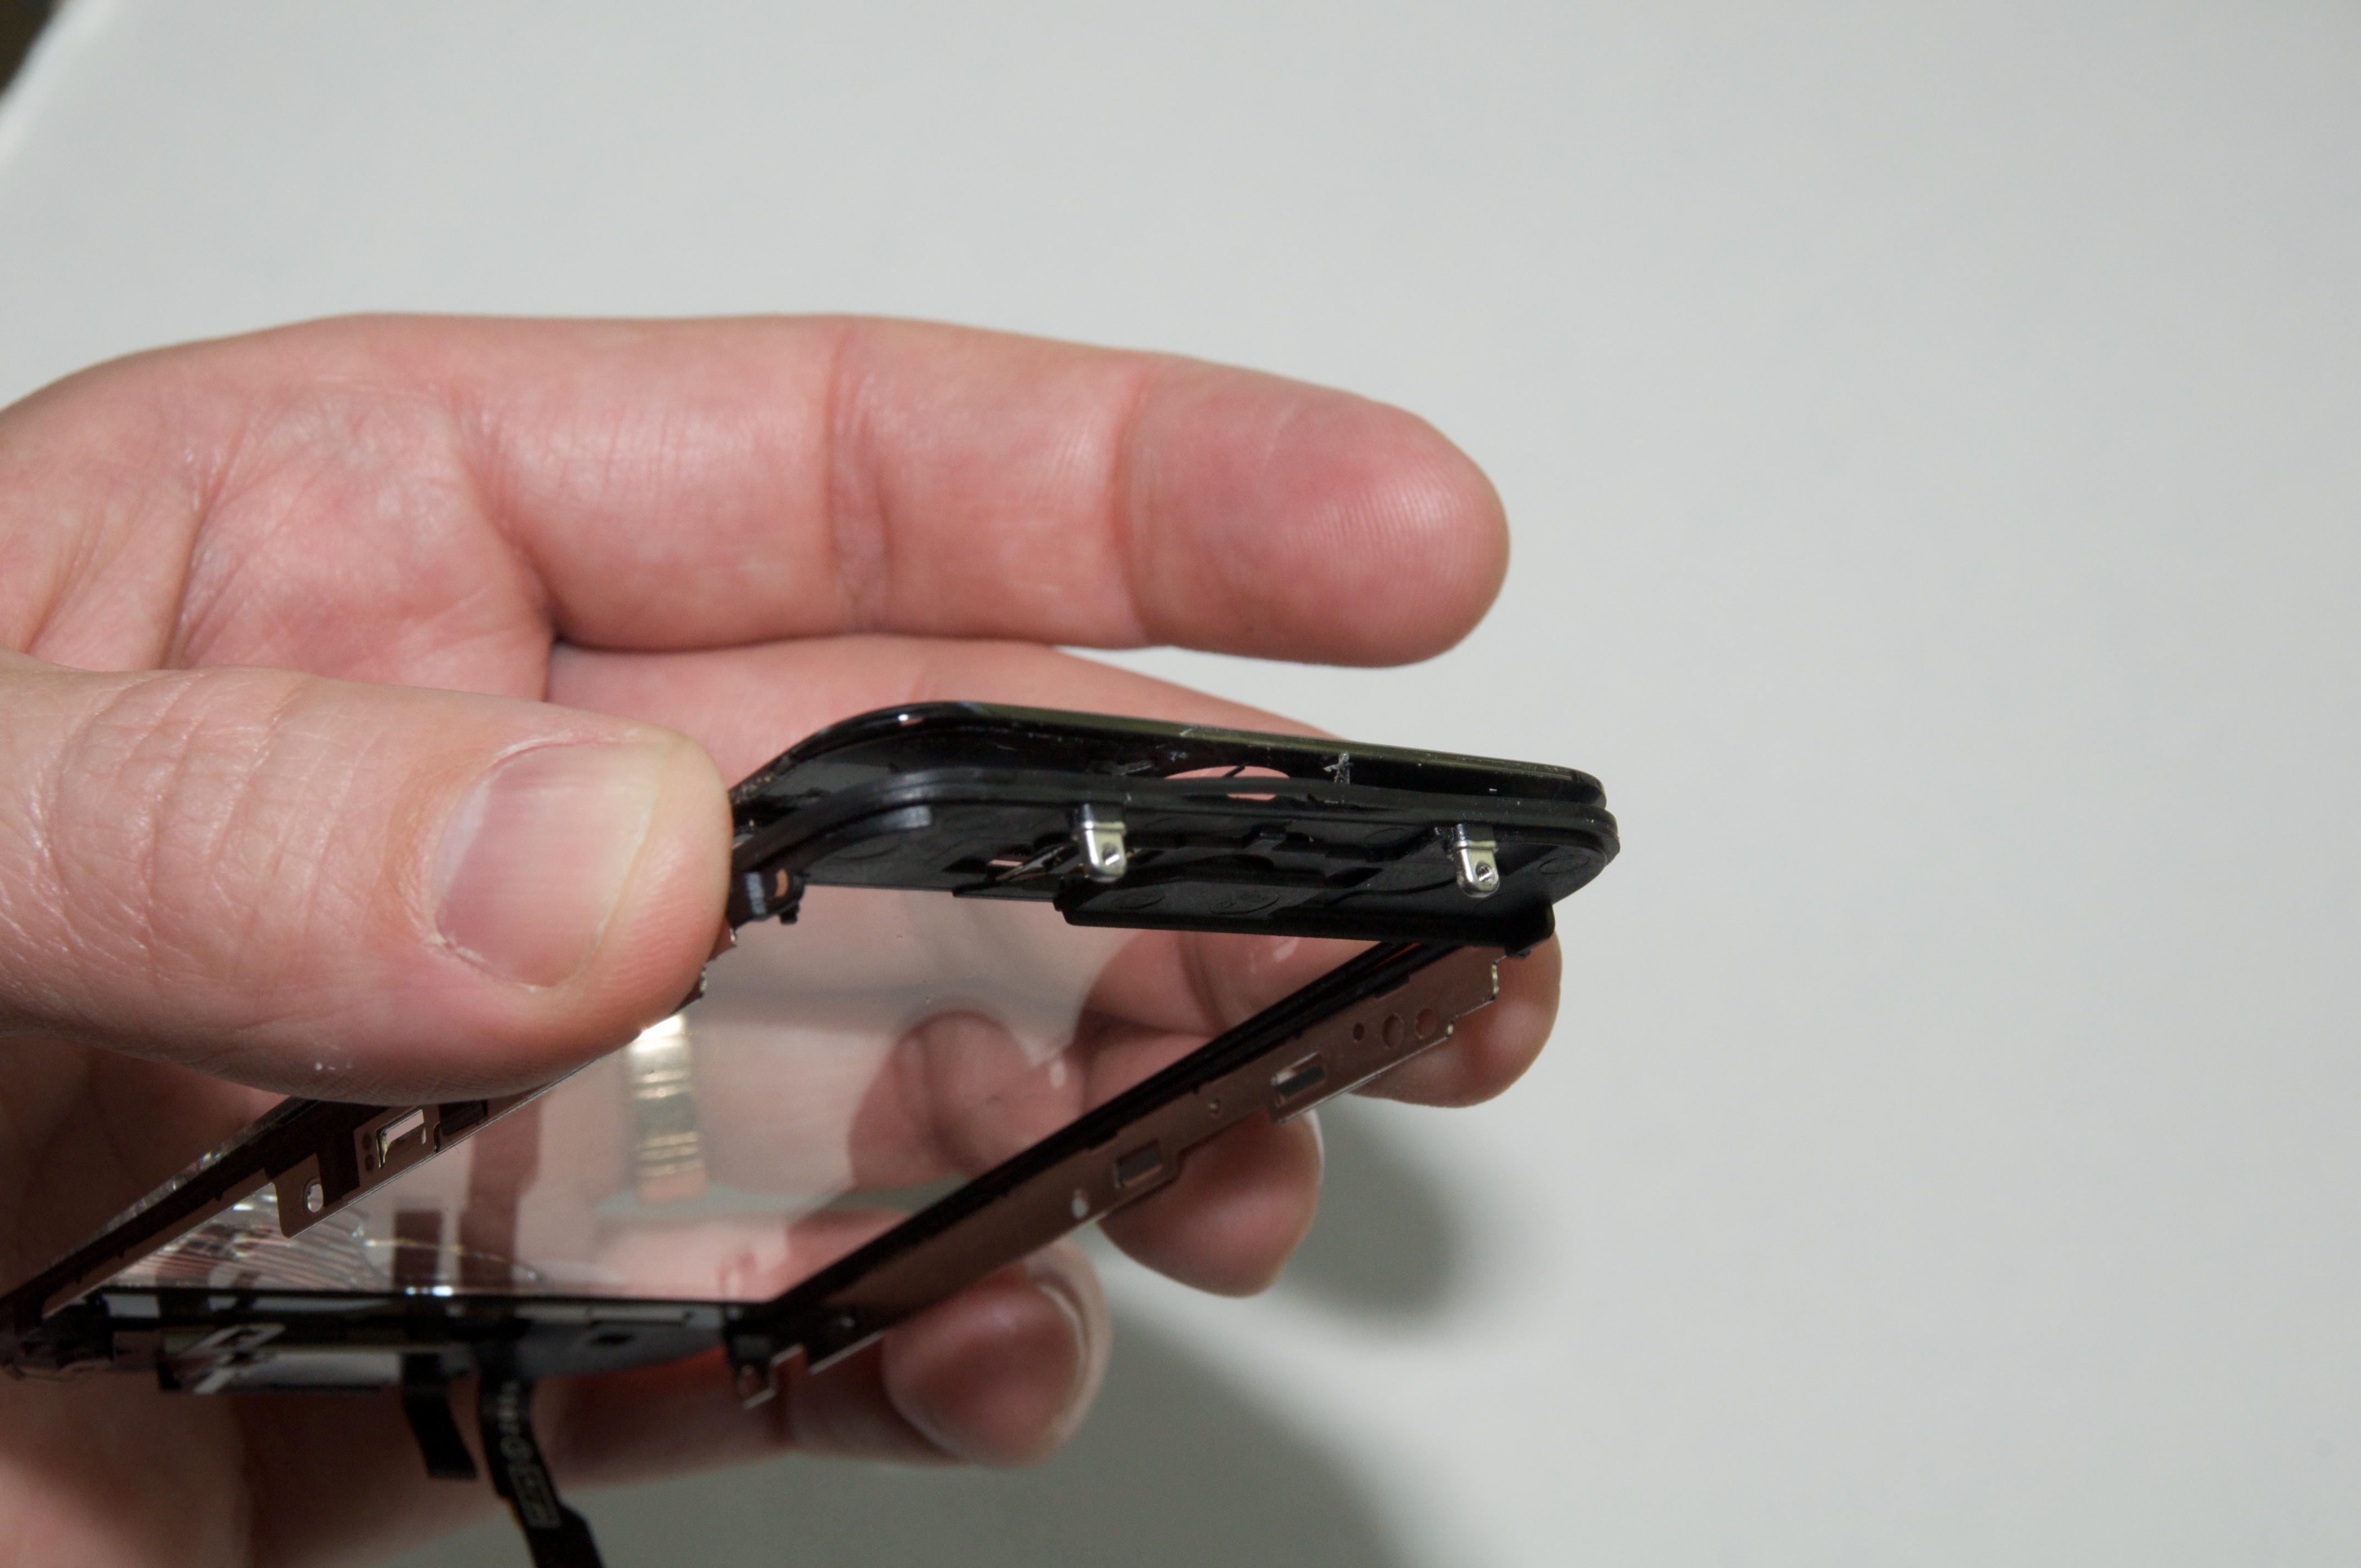
Separate the Glass — The hardest part of the entire replacement process is pulling the screen frame from the glass. The two sections are held together by adhesive, and initially appear to be just one fused part. (This step is confusing in the 3G Cracked Glass video, because the narration is not yet in place.)
I slid a knife edge into the space behind the rubber seal where I originally pried the case apart. (An X-Acto knife will work, but I used a tiny Swiss Army knife.) Once I got some purchase, I gently twisted the knife blade to separate the pieces. Some tutorials on the Internet suggest using a hair dryer to heat and soften the adhesive, but I didn’t need to try that approach.
Due to the broken glass, the screen did not separate from the frame in one clean piece. I had to pick apart the top section to remove it. However, the adhesive is applied in sheets, so if you can get the knife edge under the adhesive layer, the broken glass may come up together like peeling a hard-boiled egg.
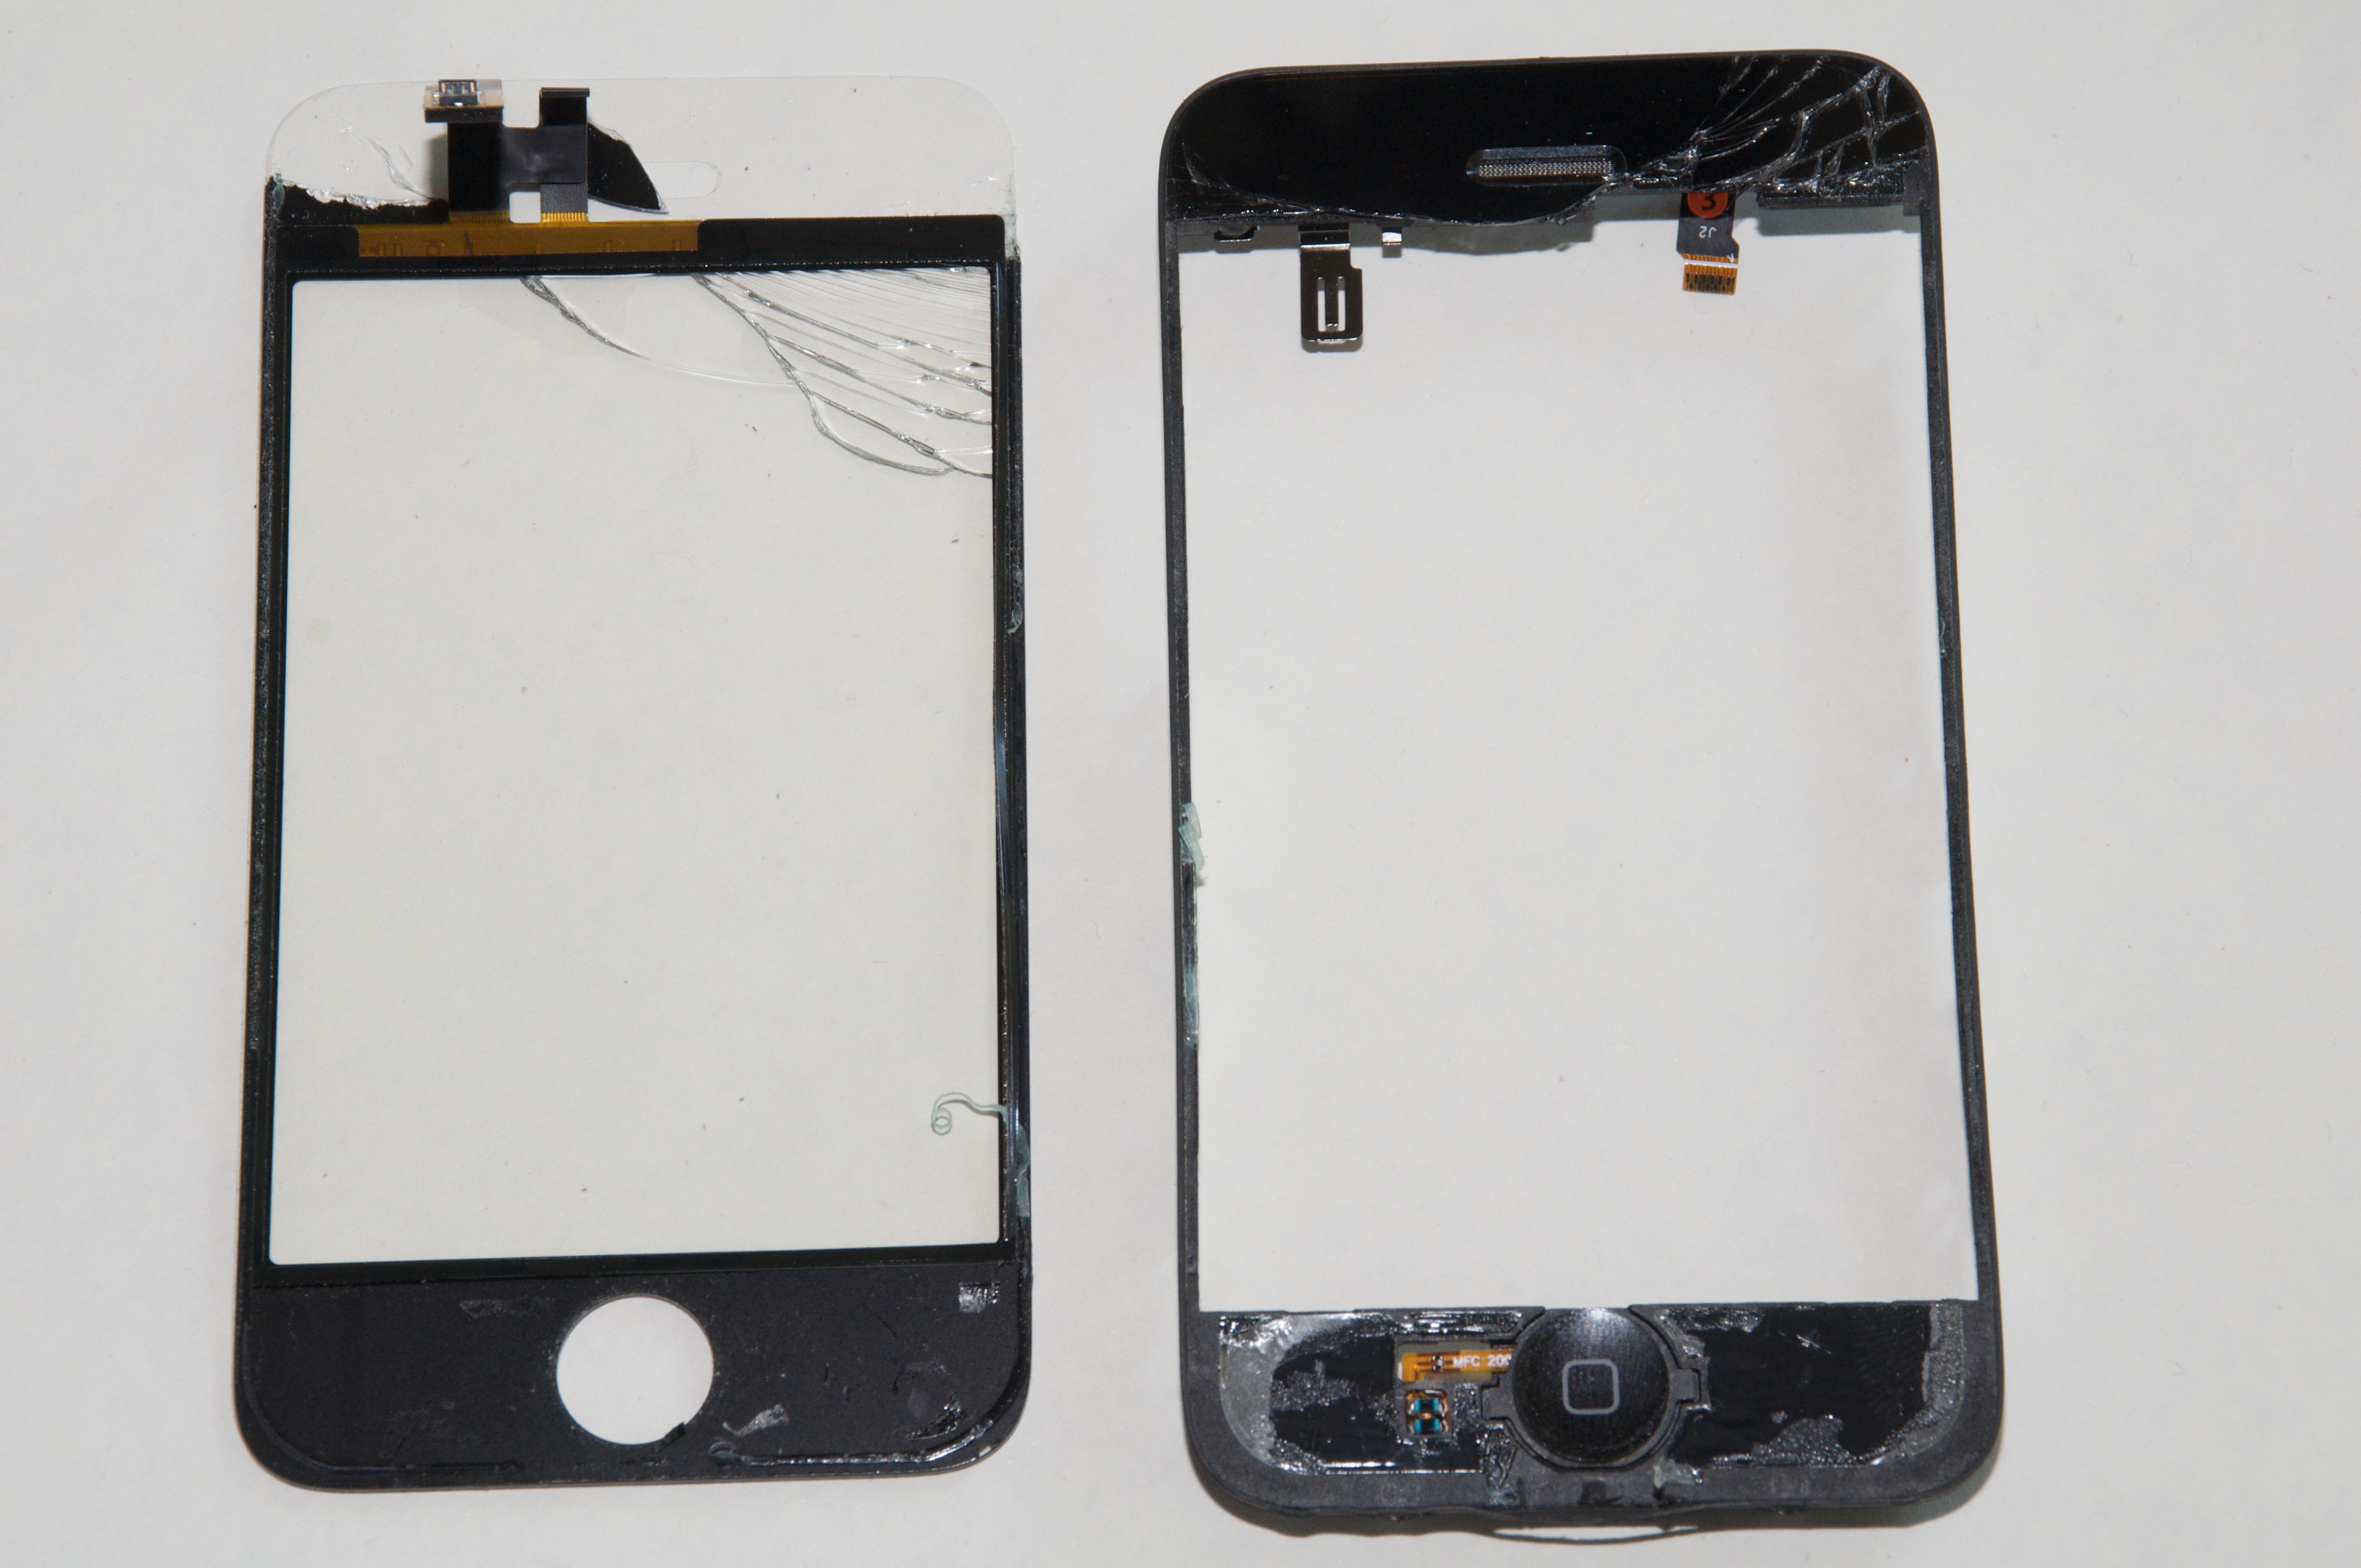
Once the glass and frame are separated, remove any remaining adhesive from the frame.
Attach the New Screen — With the old screen removed, it’s time to start rebuilding the iPhone. The new adhesive is double-sided, so apply it to the top and bottom sections of the frame and then remove the backing.
Insert the new screen into the new frame, making sure to pass the connecting cables on the replacement screen through the frame’s opening. Oh, and don’t forget to peel away the clear plastic that protects the inside of the screen.
Lastly, carefully press the new screen into place against the adhesive so you get a tight fit.
Reassemble the iPhone — After the replacement screen is attached to the frame, reverse the steps above for reassembling the phone: slide the LCD assembly into place, replace the screws, reconnect the cables, and seat the screen assembly into the iPhone’s body. Pay attention when reconnecting the cables: at one point I must have nudged connector 4, because the Home button didn’t work when I put everything back together. Opening the iPhone again to fasten the connector was much easier the second time around, however.
My wife’s iPhone 3G now looks as good as new, and I didn’t have to fall back on my alternate plan of paying Apple for a replacement. I hope I don’t have to put my new screen-fixing skills to work again, but if gravity should assert itself, I’ll be ready.
Wow! Jeff I am impressed with your hands-on skills. I am getting Adam's old iPhone 3 shortly and my first task will be to repair a crack in the screen, but I think I"ll go the send-it-in to an expert route. (Tip: If your ten-year-old puts a "lucky rock" in the carrying case on the back of your tandem bicycle, take the rock out before putting the iPhone in!)
One company that was recommended to us for repairing our cracked screen was Cupertino iPhone Repair. http://www.cupertinoiphone.com/
The other Apple option was to get Out-of-Warranty service, which costs $199 and results in a replacement (refurbished or new) iPhone.
Really, that was the only other option? I had a defect in my iPhone screen that was covered under warranty. I took it into the Apple Store this past weekend. They took it into the back, replaced the glass and had it back to me in under ten minutes. I am not sure how much it would be to just replace the glass, but I have to think it would be less than getting a whole new phone.
I've heard that the people at the Genius Bar will sometimes fix things that wouldn't otherwise be covered under warranty, so it's certainly worth asking if you have a local Apple Store, but I wouldn't bet on it.
true. my first iPhone 3G had noticeable crud under the glass. genius told me that it was "within specification" and therefore not a warranty repair, but they gave me a "one-time courtesy replacement" for no charge. unfortunately, a year later, the phone has spontaneously developed a small bubble under the glass. since i've used up my courtesy repair, unless it gets seriously bad i just have to live with it.
I'm not sure if the courtesy repair is an official documented field on your customer profile. Might be worth checking to see if you get another one-time repair. I've seen genius bar members at the austin domain apple store repair glass for free many times from dead/bricked donor phones.
I've heard different things about how ready they are to do this. My original iPhone (EDGE model) is all dinged up, and they said it would be $199 (its original cost) to replace. I wonder if they'd replace it now for cheaper. Hmm...
Glenn, the EDGE phones are a bit of a different beast. Their LCD screens are glued (or otherwise fused) with the digitizer/glass. Comparing them side-by-side, you'd notice that the 3G (and 3GS, and iPod Touch) have a more "in-set" screen than the EDGE iPhone. I remember not liking that when the iPod Touch was first introduced, as it looked "cheaper." Anyhow, the replacement part is quite a bit more expensive for EDGE phones, since the LCD is integral.
To both Glenn and Jeff: please note that, even if an Apple Store is doing glass replacement on iPhones, they're likely not doing it with the original EDGE phones. They're much, MUCH more difficult to pry apart without damaging the device, in addition to the details I mentioned above.
The Apple stores no doubt have the liberty to make onsite decisions, but the official policy is that you spend $199 and the give you a replacement.
Also, you say your screen had a "defect", which I'm assuming was something covered under the warranty--not a cracked screen like the one shown above in the article.
You can get the digitizer from Directfix.com for $39.99 and save $20
I have to ask.
Why do you not get and use a case for your iPhone?
I found a case at ebcases.com that allows me to use the phone without removing it from the case.
I figure that the type of case that you must slip the iPhone out of would be even more dangerous.
Personally, I like the smoothness and thinness of the iPhone without a case for ease of sliding it in and out of my pocket. I figure that Apple designed it to be durable, and with reasonable care, a case shouldn't be necessary. I just wasn't practicing reasonable care when my screen was cracked by Tristan's rock in the bike bag.
I fixed my iPhone's screen in the same way, although I found a replacement screen for much cheaper at Amazon:
http://www.amazon.com/Apple-Iphone-Replacement-Front-Digitizer/dp/B001ISL548/
As a veteran x-acto user, I just want to add something about using an x-acto blade to pry ANYthing apart. In terms of thickness/sharpness, an x-acto is indeed ideal for an operation such as prying the screen/LCD apart. But x-acto blades sacrifice stability for sharpness & thinness. When twisted in tight confines, as would be done here, the blade tip inevitably snaps off and goes flying. In a tight operation such as taking apart an iPhone, I would wager that supersharp shard of metal will head for your eye.
So: When using an x-acto for this business - Wear goggles. Just for this part, mind you, as the rest seems pretty safe.
I've updated the article to note that Apple Stores are now able to do this repair onsite, thanks to Jim Dalrymple's original reporting.
1. Use a sction cup when opening the case.
2. When seperating the glass from the frame use a hairdryer to heat up the glue a little bit. This makes seperating much easier. No need to use a knive.
My son did almost the same thing with his iPhone, except it looked like it went through a war zone. It was cracked in three different places.
I went to the Apple Store and after telling them the story, they replaced the iPhone on the spot.
Due to Apple's care for their customers, I now own 3 iPhones for my self and my family.
I'm not positive, but wouldn't AT&T's phone insurance cover this? I've had it for my daughter's phone (not iPhone, that's mine!) and they replaced her's due to physical damage not covered by a warranty. $5/month, but... peace of mind.
Just had this happen to me for the second time. They%u2019re great phones, but this time it cracked when I dropped it in the grass. The first time this happened, I paid $200 at the Apple Store for a new phone. However, this time, I found a somewhat more affordable solution. If you are in the Dallas area, I would recommend CrackedPhoneScreen.com. They will replace the cracked face for $89.99 while you wait. It took the technician a few minutes and the phone is as good as new. You can even mail them your phone and they will fix it and mail it back. Their number is (214) 550-0707 and their web site is http://www.crackedphonescreen.com
oh this info is awesome!!! i went into apple and it was the worst experience EVER!! but my dad lives in Dallas so this is perfect!!
I'm surprised to hear someone say going to an Apple Store was the "worst experience ever". What made it so bad?
Prying the screen off? No do not do that. Use a suction cup. If your screen has so many cracks the plunger just sucks air through them and will not pull it off, use soapy water or 'invisible glass' to seal the plunger and then it will pull right off.