Print and More from iOS with Printopia 2
Printing from an iPhone, iPad, or iPod touch. The idea sounds anachronistic: Why, with a device that delivers everything digitally, would you want to sully the experience with the inconvenience of paper?
Well, sometimes you need to review something on paper instead of scrolling around on an iPhone screen, or perhaps you need to hand a copy to a colleague who lacks ready access to a computer or handheld.
Or maybe, like me, you’re lazy. I’ve purchased airline tickets using my iPad in the living room and needed to print boarding passes. I could have gone upstairs to my computer, but when I’m nestled into a corner of the couch late in the evening, extricating myself and trudging to my upstairs office sounds like an awful lot of work. (The printer is up there, too, but I can grab the printouts later, or even the next morning.)
In iOS 4, Apple introduced AirPrint, a technology for printing directly to a printer from an iOS device — that is, as long as you have a specific AirPrint-enabled HP printer. I don’t print nearly enough to buy a new printer just for iOS wireless printing.
Before you start to worry, let me assure you that I did not have to force myself off the couch. Instead, I printed the tickets using Ecamm’s Printopia 2. But that’s not all Printopia can do. In fact, I’ve only rarely used Printopia to output something to paper, as you’ll soon discover.
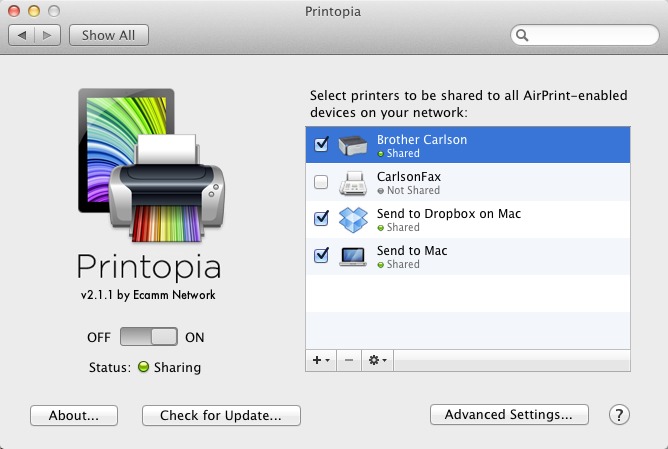
Print to a Printer — Perhaps surprisingly, Printopia is a Mac OS X preference pane, not an iOS app, and luckily, it requires little setup on the Mac and none on iOS. After you install Printopia on your Mac, it recognizes any printer that the computer can print to.
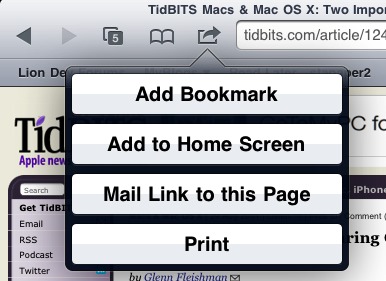
On an iOS device, open a document, email message, Web page, or other content that you want to print. Provided the app you’re using supports the print functionality of iOS, tap the Share button (sometimes known as the Action button, a rectangle with a curved arrow coming out of it) and then tap the Print button.
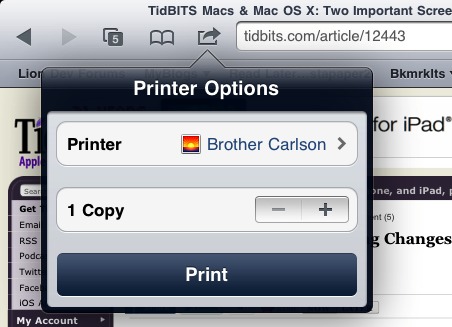
In the Printer Options popover that appears, tap the Printer button to choose the printer accessible by your Mac, choose the number of copies to make, and then tap the Print button. The print job is sent over your wireless network to your Mac, which then prints the pages in the background.
Send to Folders on Dropbox or a Mac — As I noted earlier, much of the world is moving on from paper, so Printopia offers ways to “print” a document to digital destinations. For me, the most useful alternative has been to save a file to my Dropbox folder. When I’m creating a lot of iOS screenshots, such as those for my book “Take Control of Media on Your iPad,” this feature enables me to bypass the need to connect the iPad or iPhone via USB. (Printopia wouldn’t be necessary if the Photos app supported sharing directly to Dropbox, but it doesn’t,
unsurprisingly for Apple.)
After you take a screenshot (by pressing the Home and Sleep buttons simultaneously), the image is saved to the Camera Roll, which is accessible within the Photos app. Tap the image to open it, tap the Share button, and specify the Send to Dropbox on Mac option before tapping Print.
Better yet, you can send a bunch of images at once. Instead of viewing one image at a time, tap the Share button when viewing the Camera Roll (or any album). Tap to select all the images you want to send, then “print” them. In a few seconds, the files appear in your Dropbox folder.
One downside is that the images appear as “Photo.png” and “Photo-1.png” and so forth, so you need to rename the files on the Mac. Printopia also has a preference to open each file automatically as it arrives, which quickly becomes annoying. However, that’s easily fixed. In the Printopia preference pane, select the Dropbox option, click the Action pop-up menu (with the gear icon) below the list, choose Printer Properties, and turn off the Open Sent Files Automatically option.

Printopia places the files it receives in a new Printopia folder within your Dropbox folder, but you can specify a different folder by clicking the Change Save Location button.
If you don’t have a Dropbox account, another option is to “print” to any folder of your choosing on your Mac. I prefer the Dropbox approach, because then the files are backed up and automatically copied to other computers I’ve set up.
Particularly helpful is Printopia’s capability to set up multiple Dropbox or Mac folders as possible destinations. Click the Add (+) button and choose either Save to Folder on Mac or Save to Folder in Dropbox to specify a new location. If you work on multiple projects, or want to separate personal and work items, for instance, you can create multiple print destinations.
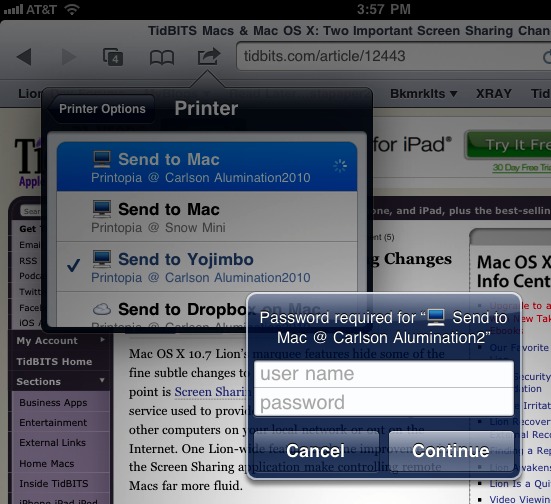
Send to an Application or PDF Workflow — Often, the destination you choose when sending a file from an iOS device to your Mac is a waystation before you open the file in some other application. Printopia can bypass that step by sending jobs directly to a program. For example, suppose you purchase something online and want to “print” a receipt to a snippet-keeper such as Evernote or Yojimbo on your Mac?
In the Printopia preference pane, add a new printer, but choose Send to Application and choose the destination app. When you print to that application, an image file or PDF is sent directly to the app.
Another option is to pass the job to an Automator workflow by choosing Add PDF Workflow when setting up a new printer in the Printopia preference pane. You could send print jobs directly to the Web Receipts folder that Mac OS X put in your Documents folder if you’ve ever chosen Save to Web Receipts Folder from the PDF pop-up menu in a print dialog. Or, use Automator to create your own Print Plugin that acts on the PDF file that you send.
Password Optional — When Printopia is running on your Mac, you can turn off sharing for any of the services by clicking the checkbox to the left of the printer name. But what if you want to restrict who can print to your printer, or if you don’t want just anyone saving files to your Mac or Dropbox folder? Every virtual printer can be password-protected by choosing Setup Password in the preference pane. When it’s enabled, you must first provide a user name and password to be able to print.
When Printopia first appeared, I thought it would be helpful every once in a while when I needed to push something to a printer, but the utility has turned out to be much more useful. It has saved me hours of work dealing with screenshots, and also made it possible for my wife (or anyone else visiting our house with an iOS device) to print documents or easily send them to Dropbox.
Printopia costs $19.95; a demo version that works for 7 days is also available.
will it let me print from iphone to usb printer
attached to time capsule?
It works for my iPad, but my iPod Touch 4 cannot find the printer dialog from Printer Options. It comes up with "No Printer Found"
When I had a problem getting photos off of my iPhone, Printopia was the only way I could do so.
As for the Photo.png, Photo-1.png, etc. naming goes, that is no different than the IMG_0001.JPG, IMG_0002.JPG, etc. that the iPhone uses.
Hey Glenn, Can Printopia reshare Airport-Express-shared LAN printers to iOS? Or if I use an OS X device to reshare the AEX printer, can Printopia make that available to my iOS devices?
Looks like this sort of feature is commonly being asked about below.
er, above.
Anything that appears as an available printer on a Mac with Printopia running can be made available—so, yes. I haven't tried this, but I have used other shared printers with no trouble. It's essentially a repackager.
Great, will give it a shot.
How do I put an icon in the dock on my iMac?
Nice, but too expensive.