Show, Don’t Tell, Where You Went with Google Maps
I went on a little dirt bike ride the other day (that’s “dirt bike” with an internal combustion engine, not a pedaled mountain bike). Instead of describing where it was and telling you how the road climbed in switchbacks from the Old Ridge Route to a mountain ridge above the Mojave high desert and parallel to the San Andreas fault, I’ll show you: the start of my route looks like this. For the full effect, though, you should look, not at a screenshot of the map, but at the map itself; to do so, please click this link to view my route as portrayed by Google Maps (don’t forget to come back here afterwards!).
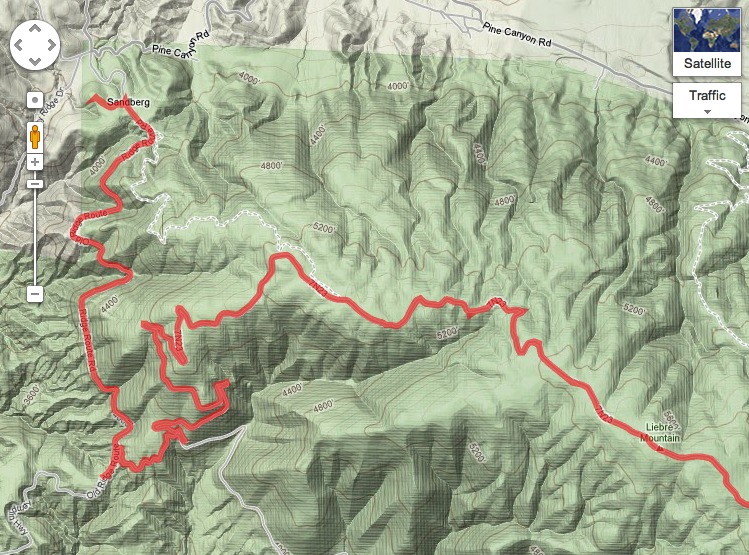
To me, that’s just incredibly cool. It’s cool because Google Maps is cool. You get all the magic of Google Maps. You can slide the map around, to view more of the route I took. You can zoom out, to get a better sense of what part of the world all this happened in. You can change to Satellite view, to see the area photographed from above. It’s a Google Map, as provided by Google — but the path I followed as I was dirt biking is projected onto it.
Perhaps this doesn’t seem miraculous to you. But it does to me, because I remember when this feature of Google Maps didn’t exist. We all have a GPS tracker these days. I was a late adopter, as usual, but as soon as I had a GPS tracker, I wanted to use it to make a record of the various places I like to go dirt biking. I discovered immediately that showing such a record to other people was not at all easy! I had to resort to mapping my tracks on my own computer and then posting a screenshot. That’s okay, but you can’t scroll or zoom a screenshot; what you see is all you see. A Google Maps map is dynamic and interactive. You can use it to learn and explore. It’s part of the great Google Maps cartographic overview of the
whole world.
An alternative, in the old days, was to give someone a KML file (or a KMZ file; it’s the same thing as a KML except that it’s compressed) containing the track. They could then open that KML file on their own machine, using Google Earth, and thus examine Google Earth’s display of the track, projected onto satellite imagery of the world. But Google Earth, while very cool in its own way, didn’t contain a topo map view. And, of course, downloading a file and opening it with Google Earth on your own machine
is a lot more work than just clicking a link and instantly seeing the map in your Web browser. But although Google Earth could display a GPS track from a KML file, Google Maps couldn’t.
I don’t know when Google Maps acquired the capability to display a KML/KMZ file. But it can now do so, and that’s why the earlier link in this article works. You, too, can export a waypoint or a track from your GPS tracking device, hand it to Google Maps, and provide your friends (or the whole world) with a link they can click to see that information in Google Maps. And now I’m going to tell you how.
- The first step is to obtain the KML/KMZ file containing the waypoint or track that you recorded while you were out doing whatever you were doing: driving, hiking, standing in some cool place. This step can be a bit tricky, so let’s pretend you’ve already accomplished it and I’ll come back to this matter later.
- Next, you need a Web site to which you can upload the KML/KMZ file. Upload the file to that Web site. For example, I uploaded a bunch of KML and KMZ files to a directory on my Web site,
http://www.apeth.com/kmz/. Google Sites and Google Docs also provide ways to host a KML/KMZ file. -
Figure out the HTTP URL of the KML or KMZ file that you want to display in Google Maps. Test that URL by entering it into your Web browser; if the file downloads, your URL is correct.
-
Go to https://maps.google.com/ in your browser. Near the top of the Web page is the Google Maps search field, where you can enter an address you want to show on the map. Instead, enter the complete URL of the KML or KMZ file, and click the search button to the right of the search field. Presto, the Google Map graphically displaying your KML/KMZ file appears!
-
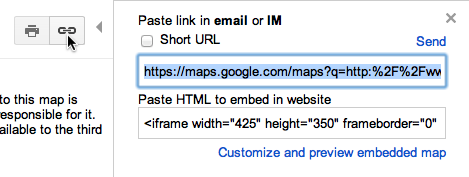
Finally, configure the map the way you want others to see it initially. Change the zoom. Change to Terrain view, or to whatever view you prefer. Scroll to the initial position you like. When the map is ready, click the Link icon (to the right of the Printer icon). A field appears containing the URL that you can share with others to display this map! Even better, select Short URL to change that URL to a very short URL more suitable for pasting into an email message (or a TidBITS article). Whoever clicks that URL will now see the map just as you’ve created and configured it.

Now let’s go back to the step where we obtain the KML or KMZ file to begin with. This can be extremely easy or quite tricky, depending on your circumstances. If you’re lucky, your GPS tracker will simply give you a KML/KMZ file, so there won’t be any problem. For example, let’s say your GPS tracker is your iPhone. If you use the MotionX-GPS app to record your track, then using the Share feature to email a track or waypoint generates two files: a GPX version of the information, and a KMZ version. That KMZ file is ready to use with Google Maps, if you so desire.
If, on the other hand, your GPS tracker provides files in some other format, then you’ll have to transform the track recording from that format to KML. For example, let’s say I’d rather not carry my iPhone on a dusty, potentially crashy dirt bike ride. Instead, I use my Garmin Forerunner 305, which I also use for running. When I get home, I attach the Garmin device to my computer, and it hands me a file in GPX format.
So now, if I want to make that track available for Google Maps, I have a conversion problem: I need to convert from GPX to KML. Luckily, GPX is a popular format, and this conversion is a common one, so there are easy ways to do it. One way is to let Google Earth do it for you. You do have a copy of Google Earth on your computer, right? Well, Google Earth can import a GPX track and then export it for you as KML or KMZ. Choose File > Open in Google Earth, select your GPX file, and select Create KML Tracks in the little dialog that appears. The file is converted to KML and imported into Google Earth, which lists the imported track under Temporary Places (and maps it onto the earth). The track’s listing is also selected, so immediately
choose File > Save > Save Place As and save it out as a KML or KMZ file.
Another approach is to perform the conversion online, using the GPSVisualizer Web site. This excellent site has many other splendid features: for example, it can split a multitrack file into individual tracks.
If the file you’re starting with is not in GPX format, the conversion is going to be trickier to perform, and I can’t tell you exactly how to do it, especially because there’s such a wide variety of formats in use. However, there are some free universal GPS file format converters that can help. The GPS Visualizer Web site, which I just mentioned, has a good converter interface.
Another option might be the free “universal” GPS file converter, GPSBabel. It’s available as a command-line tool, and if you’re reasonably adept with such things, you can easily download the source code and compile it, and use it via Terminal. Alternatively, there’s a prebuilt application wrapping GPSBabel, called GPSBabelFE, that you can download.
Unfortunately, GPSBabel is relatively difficult to use. The command-line options are numerous and confusing, and if you get them wrong, your converted file won’t turn out properly. The prebuilt application is no better; it provides a graphical interface for setting all those command-line options, but the interface itself is confusing, and defaults to the wrong settings.
To make a KML, you want your output format to be “Google Earth (Keyhole) Markup Language.” In the Options dialog, you want to deselect everything and then select Write KML Track. Another nice option is to select Line Color, which enables you to dictate the color in which the track will be displayed in Google Maps; alas, you must enter the color manually as a sequence of hexadecimal digits. I did in fact use this feature, though, to make my KML files; the track color on the Google Map from the first link in this article is 991111EE.
I’m sure there are lots of other ways to do everything described in this article (and perhaps readers would like to tell us about them in the comments). My purpose here has been to celebrate the fact that Google Maps can display data from a KML file, to explain how I’m using that fact, and to encourage you to do the same. Don’t tell your friends where you were — show them!
Google Maps can also display GPX files, they simply have to be accessible online via a URL
Wow, really? I sure didn't see that at Google's site where they tell you about this feature. I'll have to try it!
If your primary travel device is iOS based, I would highly recommend the Bad Elf Pro, which serves both as a tracker device and as a Bluetooth GPS. Its companion app allows you to extract track logs to any iOS device, and the BT allows you to use non-GPS iPads and iPod touches to use GPS-dependent apps with full accuracy. The other reason to use a GPS tracker is geo-tagging of photos - I've tried a couple of Mac applications for this, and like MyTracks the best. The process is a little finicky, but having full track of our trip to Italy, along with every photo of the trip tagged with the location where we took it is really pretty cool.
Matt, I race a small dinghy and carry a Fortrex 201 with me. Later I use Load My Tracks to download both KML and gpx versions of my track. Then I go to GPS visualizer and load my .gpx file and can adjust the settings so that I not only know where I went but how fast I was at different times. You have to use the .gpx version because it includes time as well as posiiton in the data.
The 201 sometimes loses the satellites momentarily and it usually generates one off-the-wall data point before it regains its sanity. I can find these anomalies using a text editor and remove them.
After cleaning up the text file and resubmitting it to GPS Visualizer, I create a chart of the course that I took and the speed is encoded as a color. The more toward violet, the faster my boat had been traveling.
Wouldn't you like to know not only where you went but just how fast you were traveling just before you crashed into that ravine?
Good article.
Gil Woolley
Okay, the colorization feature of GPS Visualizer is just plain cool. I didn't know about it - thanks!
I simply use Cyclemeter. It does everything you just talked about on my iPhone and I'm done emailing in seconds.
What I would like is a display of my vertical ascents and descents. I have a RV and would like a record or preview of a trip through the mountains for planning a trip. A sideways preview and record.
GPSes generally do altitude badly, but when you overlay the data on a map online, they can replace the altitude data from the GPS track with the data from the online map, making it much more accurate (except for bridges!)
I use a running site called RunningAhead.com to do this, but I'll bet there are many others that do this altitude data replacement.
Some GPSes use a barometer to smooth out the elevation data.
Ascent, a MacOSX program, can show elevation, grades, as well as other data.
You can create an elevation profile at the GPS Visualizer site, and it will correct for the poor elevation readings from the GPS tracker: http://www.gpsvisualizer.com/profile_input
I can also create elevation profiles using the software that came with my GPS, and I generally do so for my dirt bike rides; here's one: http://www.flickr.com/photos/funnelhead/8207790802/in/set-72157632071551602
Check out the site RideWithGPS.com. It provides a potential social network for just this kind of thing. Very easy to use and overlays your ride data on Google Maps. It also gives you even more map viewing options than Google Maps. E.g., OSM (Open Street Maps) that show off-road trails.
Here's a sample showing a bike ride I did last week:
The site reads direct from my Garmin. It takes about 2 seconds to download and get the ride onto a map.
link is http://ridewithgps.com/trips/1231252
Excellent suggestion. This is just the sort of thing my article didn't try to cover, i.e. Web sites that make display of a Google Map easy. Thanks!
Since 2006, wikiloc.com has allowed uploading .gpx tracks for display over Google street maps or satellite views, or other maps including OSM and Open Cycle, or USGS topo or aerial views, and others.
It generates an altitude profile automatically, allows links to pictures, and supports viewer comments.
I load hiking tracks, such as http://www.wikiloc.com/wikiloc/view.do?id=2061038 Other activities also supported.
And apparently uploaded tracks appear in a Google Earth overlay: "by clicking on the Wikiloc icon in the Gallery ... you can also use Google Earth to explore the already more than 1191536 trails shared in Wikiloc."
I love the Panoramio tie-in on this one. - There are better and worse ways to implement this sort of thing, and this looks like one of the better ones; thanks for recommending it. I've tried everytrail.com and was very disappointed.
You can actually cut out the first 3 steps of this process as you don't need to self-host a KML/KMZ file. If you log in to Google Maps, click the "My Places" button, then click the "Create Map" button, you'll see a link which says "Import". This lets you directly upload your KML file to Google Maps.
Have not these possibilities been around for soon to a decade now - nothing ever is improved at Google Maps in my opinion and there maps continue to get less accurate, not more … . I am frustrated to near death in using their mapping services for the last 5 years and really hate that they cannot fix even the most obvious bugs - they do not seem to spend more time on developing Google Maps than a one-man company spends time on anything. The only reason I am still using them (just like their mail services), is for the simple reason that there is no other better solution at the same price in relation to functionality. But that it should be something great and new, jesus help us … (just some of my frustration with them).
Google Earth is equally bad. So many obvious improvements needed, but hard to compete with Google and free. The interface is poor and of course doesn't follow MacOSX standards.
Matt, thanks for the article. I suppose I knew this could be done, but hadn't looked into it. And the article brought forth other good options.
I agree about the "brought forth other good options." We have some great comments here. For example, I tried just posting a GPX, not even bothering to convert it to KMZ, and it worked fine. I had no idea that would work, and I would never have known without the comments.