Take Control of OS X Server, Chapter 4: Directory Services
This article is a pre-release chapter in the upcoming “Take Control of OS X Server,” by Charles Edge, scheduled for public release later in 2014. Apart from Chapter 1: Introducing OS X Server, and Chapter 2: Choosing Server Hardware, these chapters are available only to TidBITS members; see “Take Control of OS X Server” Streaming in TidBITS for details.
Directory Services
A directory service is a shared repository of usernames, passwords, network resources, and other information. Mac network clients (and by “client,” I mean a computer) use a directory service to look up various things.
For the typical reader of this book, a directory service is where you’ll create and store user accounts for services including file sharing, calendar, and contacts.
The directory service is at the heart of many large networks. But a directory service is really just a database that lives on a server, along with some underlying technologies that Apple collectively refers to as Open Directory. Some directory services can have roles that are broken out amongst a number of servers, but for the purposes of this book, I’ll assume you need only one directory server (or at most two) to keep this chapter from expanding into a book of its own.
As you work through this chapter, you’ll set up your Open Directory master and (optionally) create a replica. After that, you can add users to your directory service in Work with Users and—since some aspects of user management are easier if you mange groups of users—we’ll talk about how to Work with Groups.
The chapter concludes with a topic about how to Bind Clients, a procedure that a typical reader of this book won’t need to complete, but I’ve included it for completeness.
Set Up the Open Directory Master
If you have only one server, it will be an Open Directory master. Should you happen to you have two servers, one will be the Open Directory master and the other a replica. (And, if you have even more servers, the rest of them will be clients to the directory service and so able to use the usernames and passwords entered in the master.)
Before setting up your Open Directory master, verify that the DNS and hostnames are configured properly. To do this, run the changeip command with the -checkhostname option to verify that the IP, DNS, and host name all match, as was covered in Verify That the IP and Hostname Match.
If—and only if!—you get The names match. There is nothing to change. can you move on to setting up the Open Directory service. Otherwise, go back to Set Up Host Names and make sure your DNS is set up correctly.
Run the Open Directory Assistant
To set up the Open Directory master, click Open Directory in the Advanced section of the Server app’s sidebar (if necessary, hover over Advanced and then click Show). From here, click the ON button in the upper right of the Open Directory pane, as seen in Figure 1.
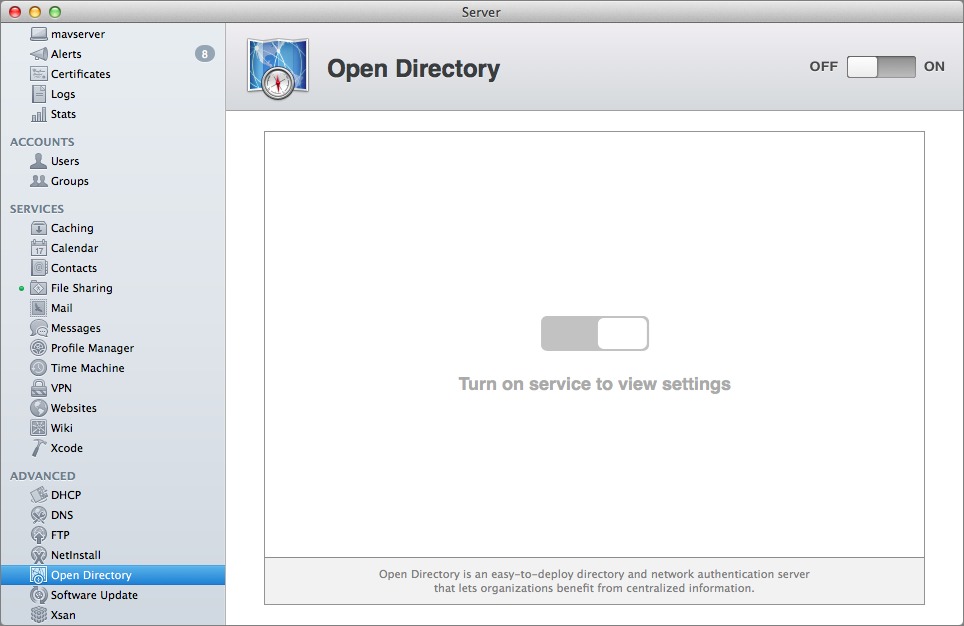
Figure 1: Turn on the Open Directory Service.
For the purposes of this example, we’re setting up an entirely new Open Directory environment. On the Configure Network Users and Groups screen (Figure 2), select “Create a new Open Directory domain” and click the Next button.
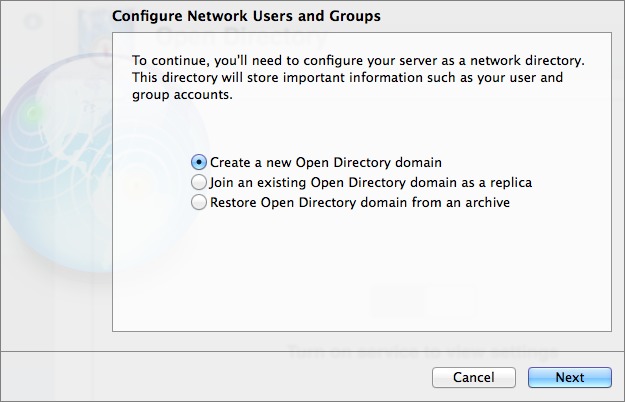
Figure 2: Select “Create a new Open Directory domain” to start from scratch.
On the Directory Administrator screen (Figure 3), it’s not necessary to change the default wording in the Name and Account Name fields, although it’s never a bad idea to use something less generic. The Account Name is the username for the directory administrator account. Once you’ve handled the name fields and entered the password twice (and made sure it’s recorded somewhere secure, like 1Password or Keychain Access), click Next.
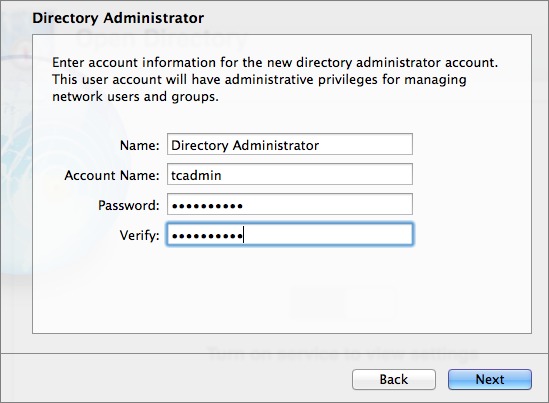
Figure 3: Enter your desired username and password for the Directory Administrator account.
Now, we’re going to configure the Secure Sockets Layer (SSL) information, which requires creating an SSL certificate. The SSL certificate is used to encrypt and therefore secure communication between client computers and the server. Luckily, this isn’t difficult, since the Server app merely asks you a few questions and creates and installs the proper certificate for you.
On the Organization Information screen, enter a name for the organization in the Organization Name field and a valid email address to be used in the SSL certificate in the Admin Email Address field, as shown in Figure 4. These names are displayed to users if they view the certificate, so make sure they are descriptive enough so as not to confuse people who are accepting the certificate. Click Next.
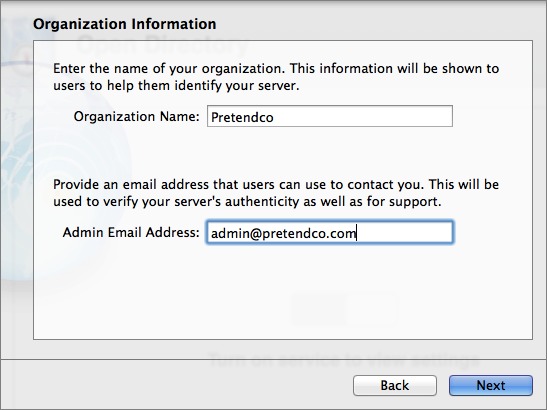
Figure 4: Create the Open Directory certificate.
At the Confirm Settings screen, make sure these settings are okay (click Back if you want to change anything), and then click the Set Up button to let slapconfig (the command that runs the Open Directory setup in the background) do its thing.
When the Open Directory master has been configured, there’s no need to reboot or anything, and the indicator status light for the Open Directory service should appear as in Figure 5.
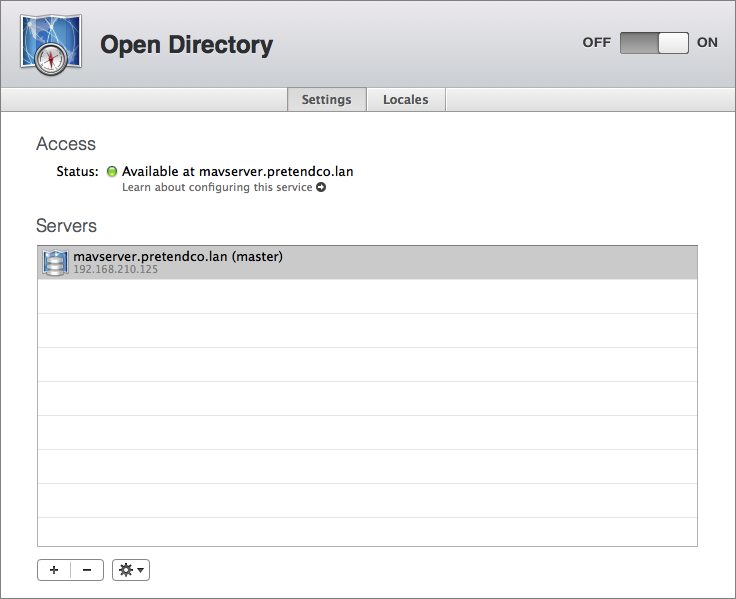
Figure 5: The Open Directory setup is complete. Notice the new server, highlighted in the Servers list.
Configure Password Policies
Once the Open Directory master setup is complete, the server appears in the Servers list. Select it and then choose Edit Global Password Policy from the Settings  menu. This is where you can configure the parameters that passwords must meet in order to be usable on the system.
Check each box that corresponds with your requirements, and then click OK ( Figure 6).
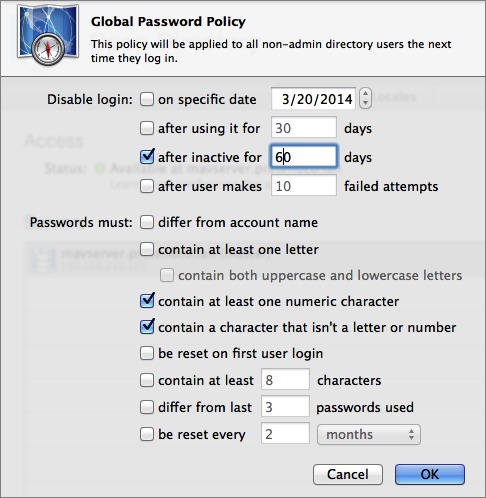
Figure 6: Set up your Open Directory global password policy.
Some policies disable accounts or force password changes on scheduled intervals, or make passwords meet certain criteria. Take a moment to consider your global password policy so that you set the right balance between security and inconvenience for your end users. A secure environment is important, but if you make your password policy overly complex, your end users will start recording all their passwords on sticky notes attached to their monitors, and that’s even less secure!
Set Up the Open Directory Replica
Previously, we set up the Open Directory master with SSL enabled. As you work further in this book, you’ll see how numerous services rely on the Open Directory master being available. But what if it isn’t? If you have only a single server, it probably doesn’t matter, since if Open Directory isn’t available, the entire server is probably offline and you have bigger problems.
But if you’re working on a larger network, where there are network services beyond those on the computer running the Open Directory master, you don’t want your users to be twiddling their thumbs while you try to bring the Open Directory master back on line. The solution is an Open Directory replica, which keeps a copy of the Open Directory database available for users even when the master goes offline.
So, skip this section if you have only a single server, but if you have two servers, on the secondary server you want to be your Open Directory replica, launch the Server app, select the Open Directory service and click the ON button to start the configuration process.
When prompted, select “Join an existing Open Directory domain as a replica” and click the Next button.
Now, enter the HostName of the Open Directory master), the directory admin username (the diradmin or custom username that you entered in the Account Name field when you configured the Open Directory master in Run the Open Directory Assistant), and the directory admin password. Click the Next button to set up the services.
At the Confirm settings screen, verify that these settings are okay (click Back if you want to change anything), and then click the Set Up button.
Provided there are no issues with your configuration, the Server app finishes setting up the replica. On both the replica and the master computer, look in the Server app and confirm that the replica server is listed under the master.
Work with Users
Once you’ve set up your directory server, it’s time to create local network users, and after that, groups. Calendar, Profile Manager, and certain other services require local network users.
There are four places you can create users when running OS X Server in Mavericks: the Server app, Workgroup Manager (available as a separate download), the Users & Groups preference pane, and the command line. I focus on creating users in the Server app because users created via any of the other approaches won’t have access to network services by default, since the other tools don’t create the access controls required for most services.
To add and manage local network users in the Server app, click Users, in the sidebar, under Accounts. As you can see in Figure 7, the list of users appears, based on the directory domain(s) being browsed. From the pop-up menu, choose Local Network Users. (The pop-up menu also lets you display only local users, or both.) If you haven’t yet created any users (you aren’t skipping ahead, right?), the list will be blank, but we’ll rectify that next.
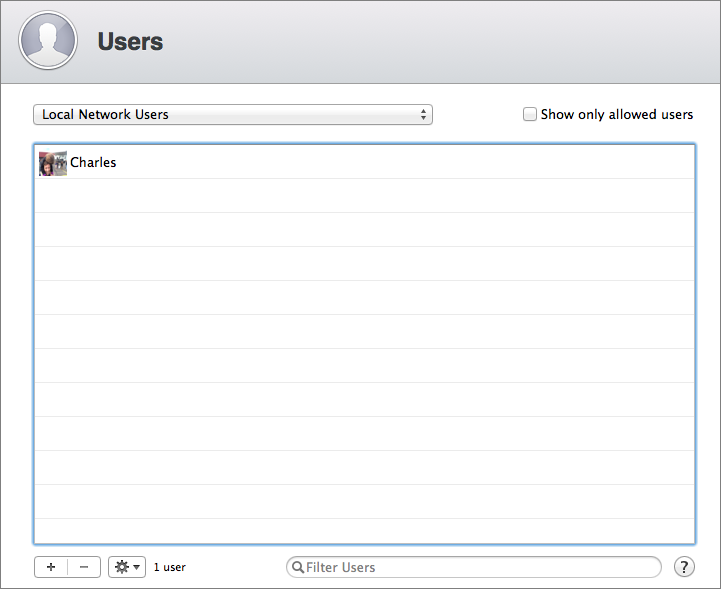
Figure 7: In this screenshot of the Directory Domain browser, you can see our Local Network Users list.
Add a User
Assuming the server is an Open Directory master, which it will be if you followed the steps above in Set Up the Open Directory Master, any accounts you create will be local network users, stored in Open Directory. You don’t have to set up all your users now; it’s fine to come back later to add more.
To create a new local network user: click the plus  button. Server asks for information about the new user (Figure 8).
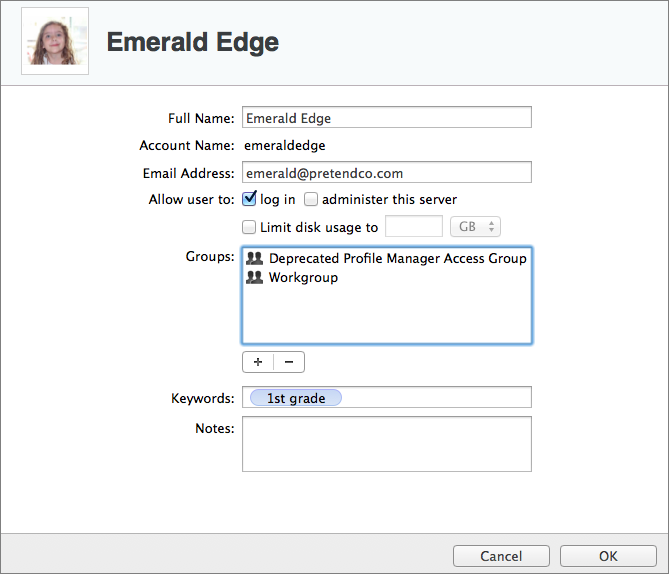
Figure 8: Enter the user’s account details.
Enter the account information, keeping these pointers in mind:
- Full Name: Usually this is the first and last name of the user. It’s easy to come back later and change this name.
- Account Name: This name, known technically as the short name, is nearly impossible to change later, so you want to get it right here. It is a short representation of the full name with no spaces or special characters. Each account on the server Mac must have a unique short name. When I mistype a short name, instead of changing it later, I delete the account and recreate it. This does erase all the user data for that account, so if you do this, make sure to first back up calendars, contacts, and other data that user may have!
- Email Address: This is the email address that will be alerted if the account goes over quota or receives calendar invitations. If you’re planning to run the Mail service, this address will also be used for email hosted on the server.
- Password: The user will use this password to access services on the server.
- Verify: Type the same password a second time to make sure you got it right the first time.
- Allow user to administer this server: Select this checkbox to grant the user administrative access to the server. (See Where to Use the Server App, just after this list.)
- Home Folder: Choose None – Services Only unless you are absolutely certain you want local home folders, which I don’t recommend.
- Limit Disk Usage To: This setting appears only if you choose Local Only from the Home Folder pop-up menu, which I don’t recommend. It’s where you define the amount of disk space an account can take up. If you’ve chosen None – Services only for Home Folder, this setting does not appear.
- Keywords: This optional field provides a place where you can enter keywords that might help you identify users on a large network, such as a room number, building, or department.
- Notes: Similarly, this optional field lets you record notes about the user that might be helpful in the future.
Once the account details are set as you would like, click the Create button. The full name associated with the account appears in the list of available accounts.
Manage Users
With at least one local network user account created, you can manage it from within the Users pane as follows:
- Edit the account information: Double-click the account in the list; you can change the user’s full name and email address, along with keywords and notes, but not the short name.
- Reset the password: Select the account in the list and then choose Reset Password from the gear
 pop-up menu.
 - Give the user access to services: Select the account, and then choose Edit Access to Services from the gear pop-up menu. (Figure 9). Deselect each service that the user should not have access to. If the service isn’t running, there’s no reason to remove access.
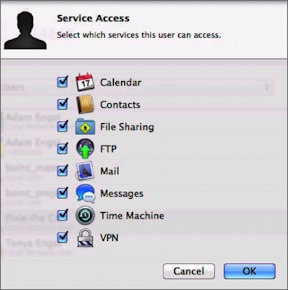
Figure 9: Choose which services the selected account should be able to access.
- Add the user to a group: I talk more about this option next, in Work with Groups.
- Disable the account without deleting it: Double-click the account and then deselect the “log in” checkbox. This disables the account from being able to log in to the server but leaves the account in place so you can reactivate it later if needed. For example, if a temporary employee is leaving, you could leave the account dormant in case the employee is rehired.
- Delete the account entirely: Select the account and click the minus
 button.
Notice that the gear  pop-up menu has more account-related commands, such as Edit Mail Options, which I cover in Chapter 8, “Mail Services”)
Work with Groups
Although you can edit service access for multiple users at once, it’s easier to control access to services by adding users to groups and then giving appropriate access to the group. That way, for instance, you could have a Travelers group whose members are granted access to your VPN service and Temps group whose members you don’t trust to access your network via the VPN.
As with users, it is possible to have both local groups and local network groups, with much the same caveats (local groups are relevant only to the Mac itself; local network groups are what you create to control service access for local network users; see Types of Users, earlier in this chapter).
Add a Group
To create a new group, click Groups in the Accounts section of the Server app sidebar.
In the Groups pane (Figure 10), choose Local Network Groups from the pop-up menu, and click the plus  button.
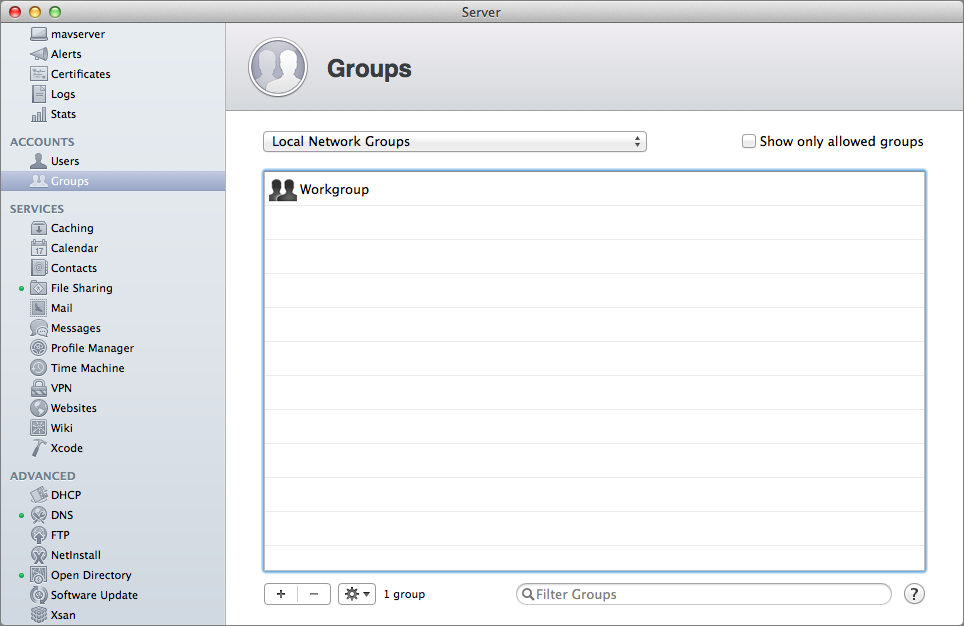
Figure 10: To add a local network group, open the Groups pane, choose Local Network Group, and then click the plus button.
In the New Group screen, provide a name for the group in the Full Name field. This can include spaces. Then enter a short name—which can’t have spaces—in the Group Name field (Figure 11). Click Create to create the group.

Figure 11: When you create a group, the title at the top of the pane becomes the Full Name of the group.
Your new group appears in the Groups list. Even though your group is created, don’t stop now. Continue with the first set of steps for managing your group, next.
Manage Groups
Group management happens in the Groups pane, so if you aren’t already there, select Groups in the left sidebar of the Server app. To manage a group, select it from the Groups list and then click the gear  pop-up menu below the list of accounts. From that pop-up menu, you can edit the group, edit its access to network services, create a template from it (if you plan to create many groups), and edit templates.
In particular, take note of these important options, which you may want to set up immediately after adding a new group:
- Double-click the group name. or select it and choose Edit Group from the gear
 pop-upmenu (Figure 12).
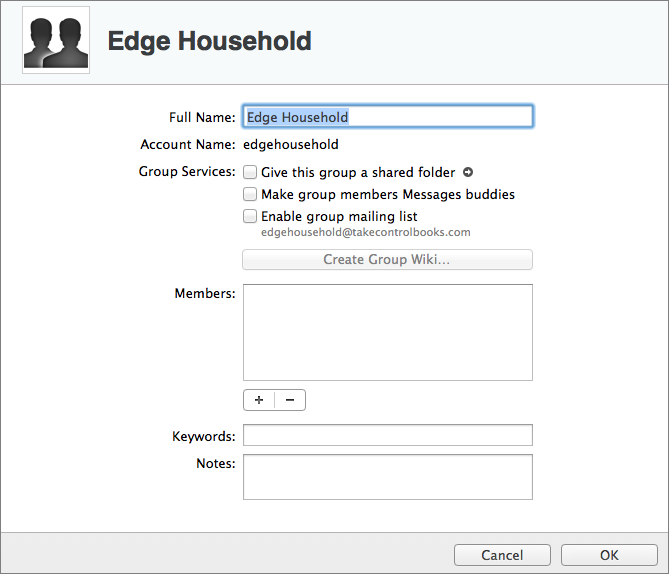
Figure 12: When you edit a group, you can specify more details than you can on the group creation screen.
In the edit group dialog, add members, keywords, and notes:
- To add a member, click the plus
 button and type the username. (To remove a member, select the account name and click the minus
  button.)
 - Put a few terms in the Keywords field. If you have many groups, typing a few keywords here now might help you find the group later.
- For documentation purposes, even if this is a personal server, leave yourself a few notes about why you created the group, and what its purpose is.
- To add a member, click the plus
- Once you’ve made your changes, click OK to save them.
- Select the group, click the gear
 pop-up menu, and choose Access to Services. Now you can turn on or off access to various services for all accounts in the group. If you aren’t sure which services you want to enable or disable, that’s okay—you can come back here any time. Click OK.
You can also configure the following options for a group, but don’t mess with anything here just yet, since I cover these options in later chapters:
- Give this group a shared folder: Select this box to create a shared directory for the group, or a group with an ACL (access control list) that grants all group members access. Read more about this in Chapter 6, “File Sharing.”
- Make group members Messages buddies: Selecting this box adds each group member to the other members’ buddy lists in the Messages client. I cover this in Chapter 7, in “Configure the Messages Service.”
- Enable group mailing list: Select this box to create an email list where all members receive email messages to an address based on the short name of the group. I’ll explain briefly how to work with the group mailing list in Chapter 8, “Mail Services.” However, I don’t recommend this feature; instead, I suggest that you consider a third-party service, such as MailChimp.
- Create Group Wiki: Click the button to open the interface for creating a wiki for the group. This option is disabled if you haven’t yet enabled the Wiki service. To do so, see Configure Wiki Services in Chapter 10.
Bind Clients
When you “bind a client,” you establish a connection between a computer and your Open Directory master. There are a few reasons to do this, and while there’s no real downside in doing it, binding isn’t necessary if you have no interest in the following features, which are primarily useful in very large networks:
- Network-based login: As discussed in Home Folder Choices, it’s possible to use a local network user account’s credentials to log in to a client Mac, either creating a fresh home folder or using the one from the server. But since I don’t recommend network-based login, it’s not a reason to bind a client Mac.
- Single sign-on: In a large network, with hundreds of users, single sign-on is huge, since it allows the user to log in using a local network account’s credentials and automatically be able to access multiple services, potentially on multiple servers. On a small network with a single server, a handful of services, and client Macs that are already set up with local users, it’s not worth the trouble.
- Server-to-server authentication: Again, in that large network with multiple servers scenario, binding servers to Open Directory is essential to enable single sign-on. If you have only a single server, this use case falls away.
- Policy management: Being able to configure client Macs from the server with policy information is again primarily of interest in large network scenarios, and binding is necessary for that. Policy management is important for two purposes, neither of which is likely to be useful for people reading this book:
- Configure new clients: Policy management enables you to set the list of available printers, configure Dock location and contents, remove the capability of connecting to external volumes (for security reasons), and so on. That’s a big win when setting up numerous client Macs from scratch.
- Update existing clients: Similarly, if you add a printer to your network, policy management lets you push the connection details for that printer to multiple client Macs, which is easier than configuring them all manually.
So, if you’re setting up only a single server for file sharing and a few other services and have relatively few client Macs on your network, you can skip binding, as it will only complicate the environment more than it likely needs to. That said, if you do need to bind client Macs, here’s what you need to know.
Binding clients can be done in a few different ways. You can use a script, a profile, or the Users & Groups pane of System Preferences, or, if you’re dealing with a very large network, build binding into the imaging process. For the purpose of this example, we’ll use the System Preferences pane, since it’s the easiest to understand:
- On each client Mac, open the Users & Groups preference pane.
- Click Login Options.
- Click the lock in the lower left of the pane, providing an administrator username and password when prompted.
- Next to Network Account Server, click the Join button.
- In the dialog that slides down, select the desired server from the pop-up Server menu if the server is automatically discovered via Bonjour, or, if not, enter the name of the Open Directory master (the HostName you set back in Set Up Host Names). (Figure 13)
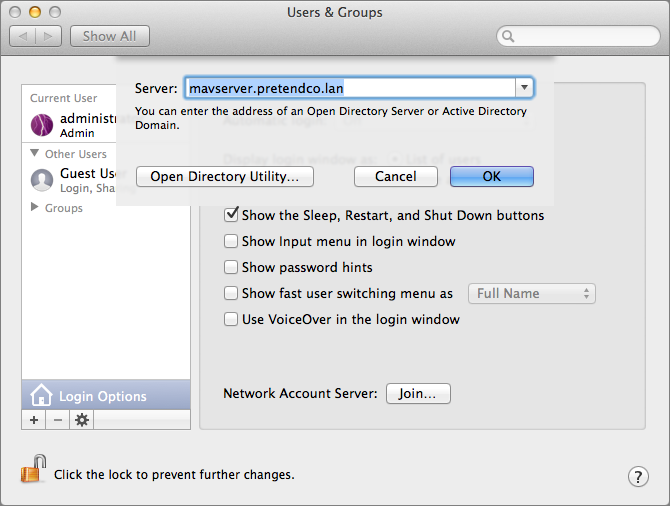
Figure 13: Connect to Open Directory by choosing the server.
- Assuming you’re using a self-signed certificate (which it is, if you created it using the steps above in Run the Open Directory Assistant), click the Trust button when prompted.
- If you’re alerted that the server doesn’t provide a secure SSL connection, click Continue. That happens with self-signed certificates, and it is nothing to be concerned about.
In some cases, the binding dialog expands to show more options when you enter the host name, although for the purposes of this chapter we’ll leave those as the default, as seen in Figure 14. If your dialog didn’t expand, don’t worry about it.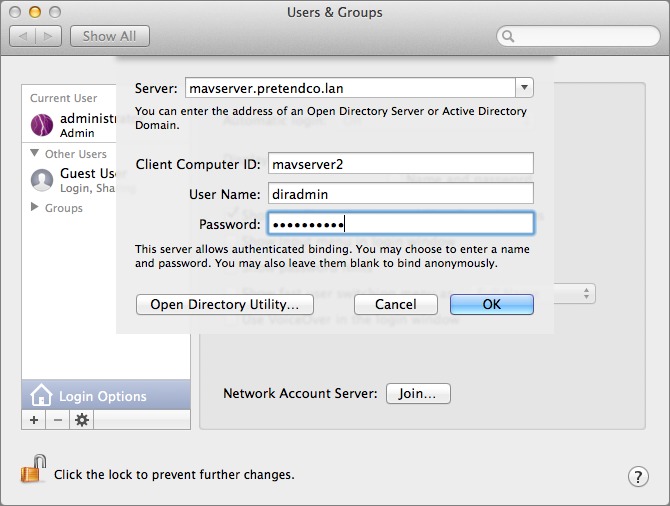
Figure 14: In this screenshot, you can see the basic Open Directory binding options.
- Click OK to accept the certificate (again assuming that it’s self-signed).
The system finishes binding and a new checkbox appears in the Login Options view, “Allow network users to log in at login window.” Checking this box allows credentials configured on the server to be entered on clients when logging in; a new Other button appears on the Login screen in the list of users, though it may take 5–10 seconds to show up.
Read More: About | Chapter 1 | Chapter 2 | Chapter 3 | Chapter 4 | Chapter 5 | Chapter 6 | Chapter 7 | Chapter 8 | Chapter 9 | Chapter 10 | Chapter 11 | Chapter 12 | Chapter 13 | Chapter 14
If you have a home folder on the server, is it right that it synchronises only at logon and logoff? And is there still an option to have the home folder stored on an external drive, or has that been deprecated?
You can control sync to run at timed intervals and delete older, unused homes after a period of time (helpful in classrooms) in Workgroup Manager. Those managed preferences can also be configured using custom mcx entries that can be cut and pasted into the mcx attributes using dscl. You can also point a home en masse to an external drive, although I've tried not to do that as it's caused inconsistent writes for actual production use. Overall, these features are being used less and less and as a consequence the body of knowledge surrounding them is decreasing. The technology is a great idea, for certain environments. Definitely outside the scope of this book, but am happy to answer questions about it here, as I have setup and managed these features a lot over the years.
Can you expand on why you think Network Home Folders are a bad idea? We just upgraded our server to Mavericks and are using it. It theory at least, it seems ideal for:
1. allowing home folder backups to be done centrally (i.e. just backup the server)
2. allowing a relatively easy way to restore home folders if we upgrade/replace computers. Just log in, let the home folder copy over to the local HD, and you're done.
I have setup Network Home Folders, with sync and without, for a long time and for a large number of users. In some cases, they are great. In others, more often the case, they take up way too much space, they cause computers to take too long to login or they have a lot of synchronization conflicts, which is probably the top issue I see trying to support them. To address the points you bring up:
1. I don't treat mobile home folders as a backup. I've seen many scenarios where sync stops working (e.g. conflicts, disconnected systems, etc) and people loose data. I use CrashPlan, Time Machine Server and another of other tools to backup data, but not mobile homes or roaming profiles in Windows for that matter. A true network home could be used in that capacity, provided the apps people need can support them.
2. Growing iTunes libraries, growing amounts of data and issues connecting to the homes can be a factor, but if you set it up and it works for you then great. When we first started working with them we loved them. But over the years, I've seen enough issues here and there that I've tried to just stop using them. Having said that, as you noted, when they work they can be incredibly helpful.
Overall, create a share, check the box, then select the home for each user. If you want to sync, open Workgroup Manager, set the sync policies and you're done. This whole process usually takes me maybe 5 minutes. And when it works, it's slick. It works for some, not for others. When Adam and I reviewed how it's used in most environments we both agreed that it's a bit outside the scope of what we're trying to do with this book. My discouragement of the use of network and mobile homes is more a reflection of the large number of sync issues, apps that don't support (or fully support at least) using true network homes and trying to cut down on potential directory service problems for smaller environments.
Hope that helps to explain the positioning!
Very helpful. Thank you! Yes, we've gotten around the long login time by having it sync only at logout. And thanks for bringing up the point about it not being a true backup solution. We've had problems with previous server versions with stability too, so I'm hoping it's better with Mavericks...though we're having a heckuva time with permissions running amuck with the file server part...ugh.
Just a minor suggestion - in Fig 3 you show tcadmin as the directory administrator but later when setting up the Open Direcory replica you list dradmin as the username - maybe have both listed as dradmin?
Thanks - we'll reshoot that. Consistency in screenshot demo data can be tricky when a book goes through various edit stages.
"Overall, these features are being used less and less and as a consequence the body of knowledge surrounding them is decreasing"
I have been struggling to use OSX server in my small business in the Seattle area for 2 years now. I have 11 users, 10 client computers. I am the ONLY user that routinely uses the same computers, all other users use different computers from day to day.
Network based logins and network based homes seem like the only way to go for this, but you are right, resources for configuring and supporting this are dismal. I've spent a few thousand on local apple support folks who were unable to give me a reliable setup, so i've been going at it alone. Not fun.
So, I completely disagree with your decision to consider this beyond the scope of your book. I think it is actually the single greatest need. Frankly, reading through your book so far, I'd say that other resources out there already do an excellent job of covering what you have chosen to address, and I'd say that if you really wanted to contribute to filling an important knowledge gap you really ought to consider something more along the lines of using OSX Server in small business.
I'm hoping that Yosemite fixes some of the network user bugs. Otherwise, I probably have no choice but to switch to a windows setup.
One thing that's become clear as we've worked through various chapters of this book is that there parts of OS X Server that Apple is focusing on, and parts they're ignoring (plus parts that they've deprecated to the extent of removing them entirely). Network home folders don't seem to be getting a lot of attention, which doesn't give much hope to Apple resolving the sync issues that Charles referred to in a previous comment. :-(
Another thing I've learned is that unlike many normal apps, where the key to making a desired feature work well is simply more knowledge, with OS X Server, when something doesn't work well, knowing more about it often doesn't help at all. Or, to be more accurate, you may be able to make various services work better by dropping entirely to the command line, but if you're going to do that, you're better off with a full-fledged Unix box running the latest and greatest versions of all the necessary apps.
So maybe, then, some help on a good strategy with how to best work with multiple users on a single computer. I've been using PHD since 10.5 (on 10.9 now) for the 6 members of my family. With 4 children, the last thing I want is to listen to is child 1 claiming that he cannot complete an assignment because child 2 is on "his" computer. With a PHD set up for all users, every computer in the house is "his" computer with his preferences, files and such there as soon as he logs in.
As Charles stated in an earlier comment, iTunes has long been an issue, even with iTunes Match, due to limitations presumably from the RIAA. Maybe 10.10 will be some help there with family sharing, but that won't solve it for the non-related people at work. At home, I share an iTunes folder with all of our content. Each user has a local copy of iTunes that downloads apps and iOS device backups and points to the media on the server (server media is not copied to the user profile to keep the iTunes library size down). It mostly works fine, except for the addition of new content.
iCloud Keychain sync is also somewhat helpful for some preferences, but that doesn't really solve everything. Users, even adults, tend to save files in their documents folder, because that is easy (rather than saving to a shared directory). Realizing I am trying to solve a human issue with technology, using a PHD solves that transparently for the end user.
So, perhaps the solution is a combination of lots of things: Network authentication by binding the client to OD; No syncing to server; Utilize iCloud for everything possible; use either server-based or cloud-based share points for everything outside of iWork; purchase iTunes Match for each user (or share a common Apple ID, which is a problem for everything else); and still dedicate a "Home" Machine for each user to sync non-purchased video content to an iOS device. I sure hope there is something better.
We only have one kid, so I can only sympathize with what you're trying to do. :-) Apple's desire, I believe, would be to have each kid have their own computer.
iTunes is a total nightmare when it comes to sharing media between people and computers. Home sharing works in some cases but very much not in others, and the iOS device syncing and backup causes a lot of problems. I've never found a good solution to that, and I don't hold out any real hope for Yosemite improving it.
Interestingly, from our son's perspective, the solution would largely be a Chromebook. He does most of his stuff in Google Docs, since he can get to it from anywhere at home or school, and all his friends use Google+ for chatting too. From the Mac perspective, he hates iTunes and uses it to back up his iPhone only under duress. He likes Pages, mostly for layout, and otherwise the main Mac app he uses is probably Minecraft. But the simple fact is that for actual work, a Chromebook would meet the vast majority of his needs.
Under the title "Set Up the Open Directory Master"
--> Run the Open Directory Assistant
you go to the next step of "SSL Certificates" without a section title and even worse, the User is lost on what to do next to find the input Screen shown in "Figure 4".
You write "On the Organization Information screen, enter a name ..."; but I have no idea on how you got there. In Certificates, when I select (gear icon at the bottom) 'Show All Certificates' it shows already 3 pre-made Certificates.
Ah - now I get it!!! That was the last screen in OD setup (was so easy I forgot already). The paragraph:
"Now, we’re going to configure the Secure Sockets Layer (SSL) information, which requires creating an SSL certificate. ..." irritated me, as I thought this is the next step.
IMHO it should be clear, that it is only an information where the input information will be used (for Certificates). Very helpful information (at given point). Please just make it clear that it is just an (albeit important) sidenote. THX for your great Tutorial.
reply to comment 24030:
----------------
A little rewording (intro sentence) would do the trick to fix this irritation.
DISCLAIMER:
I know I am a perfectionist - so if you don't like me to write 'bug reports' (relating UX) for your Tutorial, just let me know via twitter @ApfelTutor. I am just a 'think different' guy by nature like Steve Jobs was (albeit an introvert - INTJ).
Thanks, we're always happy to get feedback on this stuff, and we'll definitely look into as we do the next step of editing on the manuscript.
Sometimes we have to skip over certain details because if we included absolutely everything, the book would be 1000 pages long (and would never be done).
above Figure 7 your text:
"If you haven’t yet created any users (you aren’t skipping ahead, right?), the list will be blank, but we’ll rectify that next."
This is not true for my System! It shows my OD Admin User as 'Local Network User' (both when logged in as Admin or as OD Admin).
sidenote:
I did not skip! - but I had removed the Server.App (as described in help) after deleting ALL Users in OD via Server.App. And deleted the /Library/Server folder as you recommended at the very beginning of your Tutorial. Then rebooted and did everything as told in your TCo eBook. (-> this is my Test Server)
Trying to get a clean start on configuring Server is nearly impossible without wiping the disk, reinstalling OS X, and installing Server again from scratch. We've added more text to the book about this, since data is stored in all sorts of behind the scenes places that are impossible to clear out reliably.
I wouldn't worry about this too much as long as things are working properly; if you're running into serious errors, a clean reinstall might be necessary. I had that happen at some point during editing and had to spend a ton of time erasing and reinstalling.
I agree with ApfelTutor. The list is not blank. Under Local Network Users there is Directory Administrator listed.
BTW: I deleted my ssd and made a new clean install of Mavericks 10.9.4 and Mavericks Server 3.1.2 as advised, without importing old data. No skipping ahead.
Huh. I don't have that user showing. It's definitely on my system (you can see Local Network Users in Directory Utility, which is in /System/Library/Core Services). Just choose Users from the Viewing pop-up menu and LDAPv3/1270.0.1 from the node pop-up menu.
But it doesn't appear under Local Network Users in Server at all.
BTW, I don't recommend changing anything in Directory Utility unless you have explicit instructions that direct you to do so. Seems like a good way to thoroughly mess up your server.
So to demote Open Directory and then re-promote a system to be an Open Directory master, use the slapconfig command. slapconfig -destroyldapmaster will completely clear everything out and allow you to re-promote. You can't fully delete the only administrative user for the domain otherwise, as that would lock you from being able to manage the domain. Once you've run slapconfig you can delete the Server app and reinstall; however, if I'm going to do that much, I might go ahead and reformat and reinstall the server.
Good luck!
Figure 8. #Screenshot is not an 'add new user' window. Looks like an (older 3.0) info panel after an user has been setup (with the option 'Local Only' User home folder enabled ??).
Good eye - yes, some things change from the initial creation screen to the edit screen. I'll revisit that screenshot in the next edit pass on this chapter.
I am really impressed and love this Tutorial the more I read - You explain all the details I wanted to know (since Mac OS X Server 10.6) - and learn. #respect & big THX
Glad to hear it!
Thanks for the kind words! Will address some of your comments shortly!
I am missing a comment about the Directory Administrator. Should I continue to use the Server app, logged-in as admin of the mac, or should I restart the mac and login as Directory Administrator?
Charles can weigh in here if I'm missing something, but my understanding is as follows:
* At first, you can always use Server as the local admin of the Mac.
* Any user you create, and for whom you select the "administer the server" checkbox can also be used.
* If you are playing around with the Local User for your admin account and select that checkbox and then deselect, you will lock yourself out. Don't do this. :-) (Luckily, one of my other users had access.
* I can't see any reason you'd want to use the Directory Administrator account, but that's in part because it's not visible in my system for reasons I don't understand.
Another question: After restarting the mac, the Server app does not start automaticly. Is this a problem or is the Server app only a administration console while the server functions are working already in the background?
The Server app is merely a console (it can in fact be used over the network from another Mac, although Charles recommends against that for performance reasons on the other Mac). So if you want it to launch on boot, you need to add it to Login Items like any other app.
You'll also need to make sure that you're logging into with a user who can administer the server, and that user's password is saved in the Keychain. Otherwise, there's no real win in having it launch at startup.
Oh, one other thing. The actual services provided by Server are available as soon as the Mac has booted; the Mac can even be left at the login screen with no problems.
Just to add to what Adam said, I would not leave the Server app open for long periods of time. I find that it tends to make the system less stable when it's open for awhile. I only open it when I'm doing an administrative task. Once everything is setup, you should only need to open it when you're adding shares, adding users, deleting either, etc.