Take Control of OS X Server, Chapter 7: Collaboration Services
This article is a pre-release chapter in the upcoming “Take Control of OS X Server,” by Charles Edge, scheduled for public release later in 2014. Apart from Chapter 1: Introducing OS X Server, and Chapter 2: Choosing Server Hardware, these chapters are available only to TidBITS members; see “Take Control of OS X Server” Streaming in TidBITS for details.
Collaboration Services
Many of the services provided by OS X Server enable collaboration of one sort or another, but for the purposes of this chapter, I want to focus on three types of collaboration: contact sharing, calendar sharing, and instant messaging, which map to the Contacts, Calendar, and Messages services in OS X Server.
Before you wade into turning on these services, think about why you’re doing so, since contact sharing can in many cases be done more simply with a secondary iCloud account, you can more easily share calendars via iCloud (or Google Calendar), and Apple’s iMessage service is generally the easiest way to trade instant messages back and forth. If you’re setting up OS X Server for your family, Contacts, Calendar, and Messages may be overkill.
Also, I need to be up front about what’s feasible with contact sharing. With OS X Server’s Contacts service, you can share contacts between your Mac and your iPhone, for instance, but you cannot inherently share contacts with other people. The workaround in the Contacts services is the same as for iCloud—create an account dedicated to sharing contacts—but each time I’ve done this for a client, they’ve been unhappy when someone (or some client app) deleted or duplicated shared contacts inadvertently. Put bluntly, there’s no good solution here—sorry!
But there are good reasons to enable these services. A shared iCloud account works only within a small family group, since the password must be shared with all members, making for an awkward situation if you have to change the password when an employee leaves. Plus, some older devices and operating system aren’t compatible with iCloud but do support the underlying protocols that Contacts, Calendar, and Messages rely on. And, depending on what your organization does or your general comfort with Apple’s online services, you may not want confidential client and meeting data on iCloud, where you aren’t in control of the security measures.
Turning on Contacts, Calendar, and Messages in OS X Server is easy, but understanding how your users will interact with them and configuring their client apps is a bit more involved.
Before you begin, make sure you’ve set up Open Directory, as detailed back in Chapter 4, in Set Up the Open Directory Master, and turned on push notifications, which you did back in Chapter 3, in Configure Alerts. Push notifications are important because they enable your server to automatically send updated information to available clients that are configured to receive push notifications. Thus, if one user changes the address in a contact’s record or adds an event to a calendar, that change is rapidly sent to all other devices.
Using the Contacts Service
Unsurprisingly, the Contacts service in OS X Server is designed to talk to the Contacts apps in both OS X (10.8 Mountain Lion and later) and iOS. It does this through CardDAV, an open source protocol designed to store contact information on Web servers in a manner that is quickly and efficiently retrievable and digestible by apps on client devices. Because CardDAV is a widely used standard, you should be able to connect to the Contacts service from a variety of software and devices, not just those from Apple.
Enable the Contacts Service
I know I’ve said this about other services in OS X Server, but the Contacts service couldn’t be easier to configure. You’ll have no trouble following along with these steps:
- Select Contacts in the Services section of the left-hand sidebar to open the Contacts pane (Figure 1).
- Click the ON button at the upper right to enable the service.
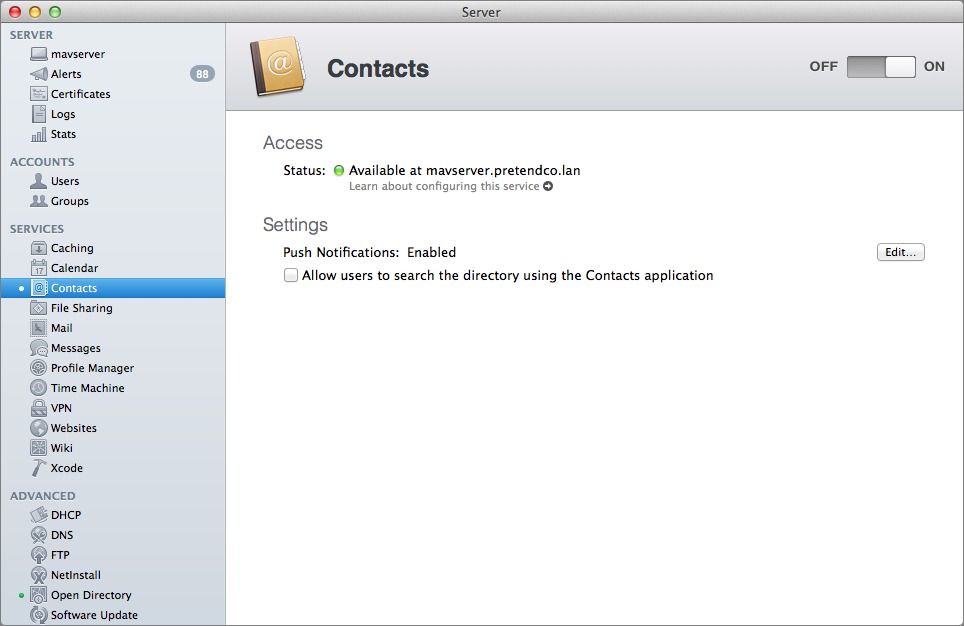
Figure 1: To enable the Contacts service, flip the switch.
The Contacts service starts and a small green light appears beside the Contacts entry in the left-hand sidebar.
Configure Contacts Clients
When you set up a client, you’ll be signing in to the Contacts service with authentication information for a user that you set up back in Chapter 4, in Work with Users. You’ll also need to have turned on the Contacts service for that user (see Manage Users) or for a group that the user is in (see Manage Groups). It’s okay to add or modify a user at any time, so go back and do that now, if needed.
Obviously, the specific steps for configuring a client to access your Contacts service depend upon the particular app. Fortunately, it’s easy to generalize from one piece of software to the next, and we’ll look at configuring the Contacts apps in Mavericks and iOS 7.
Configure Contacts for Mavericks
To connect to the Contacts service in Mavericks, follow these steps:
- In Contacts for Mavericks, choose Contacts > Preferences > Accounts.
- At the bottom of the left-hand accounts list, click the plus
 button, select “Other contacts account” at the bottom of the account types dialog, and click Continue (Figure 2).
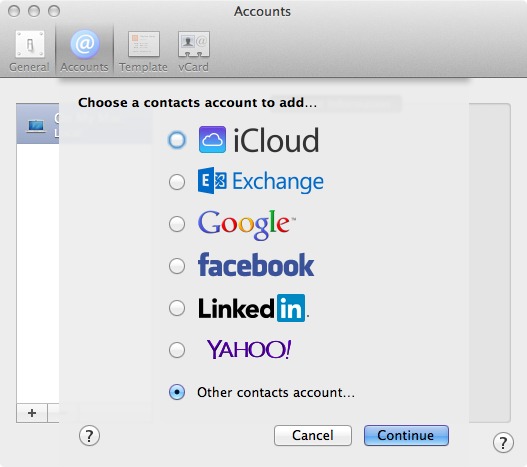
Figure 2: To connect from the Contacts client app to the Contacts service, select “Other contacts account.”
- In the CardDAV slide down dialog (Figure 3), choose CardDAV from the Account type pop-up menu and then provide a valid username and password for one of your users.
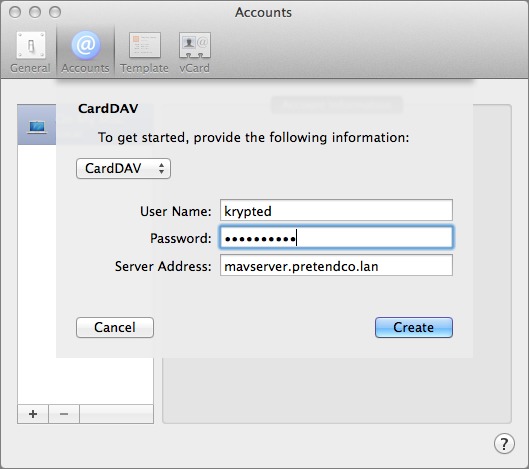
Figure 3: To make the connection, you need to authenticate as a user on OS X Server and give the server’s name.
- In the Server Address field, type the name or IP address of the server.
- Click the Create button.
Once you’re done, close the Preferences window and look at the sidebar in the Contacts app, where you’ll now see another top-level entry for your server.
There won’t be any contacts stored there yet, so try two things:
- Hover over the name of the server in the sidebar and then click the plus
 button that appears to create a new group on the server. Give it a reasonable name.
 - Drag a contact from another source (On My Mac or iCloud) to the group you just created. If it’s not selected already, click the group.
If the contact you dragged appears, you know everything is working, and you can double-check by looking for that contact from another device that connects to the same account.
Configure Contacts for iOS 7
To configure the Contacts app in iOS 7 to access your Contacts service, follow these steps:
- Navigate to Settings > Mail, Contacts, Calendars, and then tap Add Account.
- At the bottom of the list of account types, tap Other.
- In the Contacts section, tap Add CardDAV Account.
- In the CardDAV screen, enter the server name, and your username and password (Figure 4).
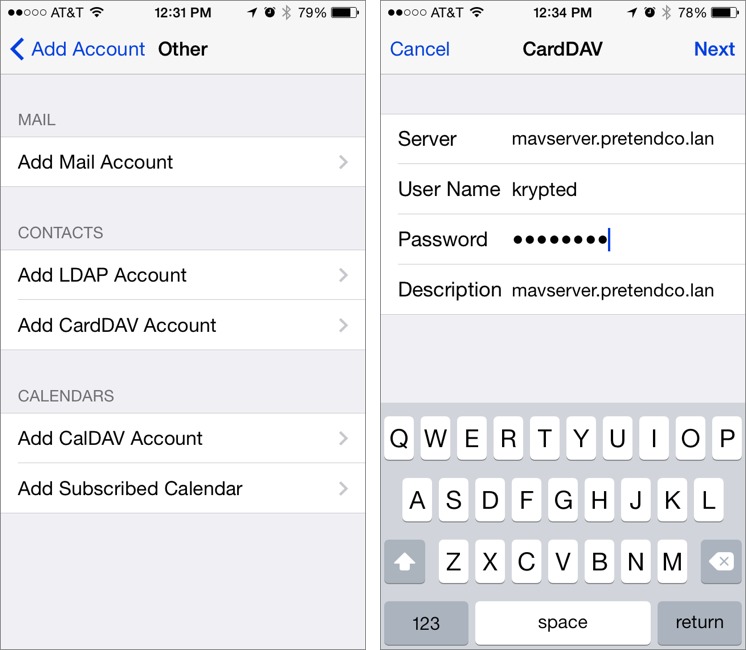 Figure 4: To connect to the Contacts services from iOS, you’ll need to add a CardDAV account in Settings > Mail, Contacts, Calendars.
To verify that everything is working, open the iOS Contacts app, tap Groups, and select only the group you created previously; you should see the single contact you added to it.
Using the Calendar Service
Where the Contacts services relies largely on CardDAV, the Calendar service is built on CalDAV, another open-source protocol that’s used by the Calendar apps in both OS X (10.8 Mountain Lion and later) and iOS. CalDAV enables clients to access scheduling information on a server, and is itself based on the iCalendar format for event data. Because CalDAV is a widely used standard, you should be able to connect to the Calendar service from many different apps and devices.
Does that all sound familiar from just above in Using the Contacts Service? It should—Apple has intentionally focused its efforts on making contact and calendars work the same everywhere, and the CardDAV and CalDAV standards are a big part of that.
When you enable the Calendar service, your users will be able to create and share calendars on your server with one another. As with the Contacts service, merely creating the Calendar service and connecting to it from clients doesn’t result in any data appearing—your users need to create calendars and populate them with events before anyone sharing those calendars will see anything.
There is one exception to that rule. You can create special calendars for locations and resources, and you do that in the Calendar service itself. You might do this to avoid scheduling conflicts, either for spaces, as might be important in an office with a heavily used conference room or even families with teenagers competing to borrow the car. By adding events to those special calendars, people can reserve places and resources on a first-come, first-served basis (or at least negotiate with those who have them already reserved).
Configure the Calendar Service
Although not quite as easy as enabling the Contacts service, configuring the Calendar service is a simple, straightforward process:
- In Server, click Calendar in the Services section of the sidebar to display the Calendar pane, as shown in Figure 5.
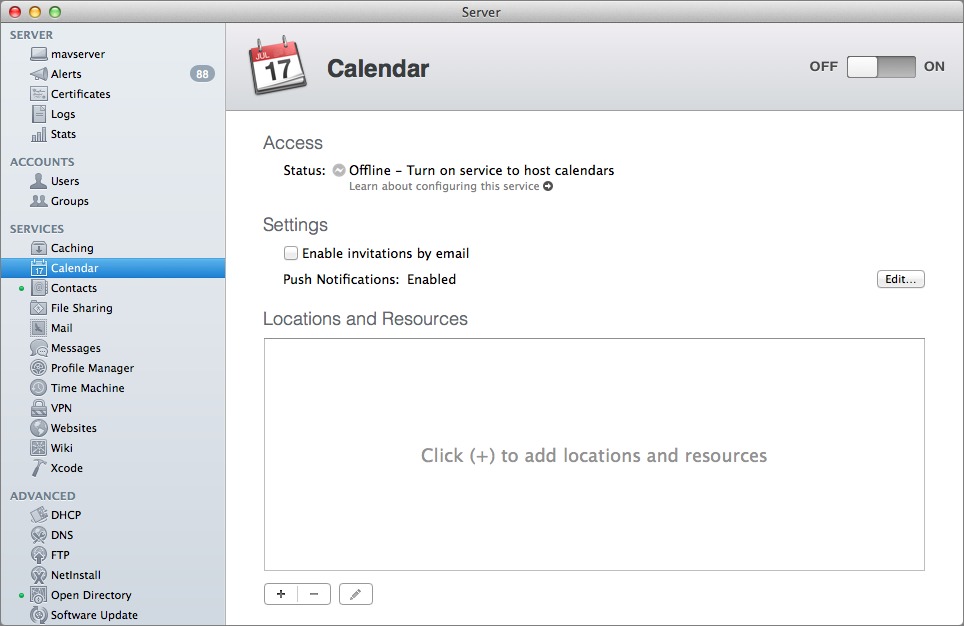
Figure 5: Turn on the Calendar service with the button in the upper-right corner; all the other settings are optional.
- Click the ON button at the upper right to enable the service.
That’s all you need to, unless you want to create special calendars for locations and resources, or you want to enable the Calendar service to send event invitations by email.
Create Location and Resource Calendars
To create individual calendars for locations (like meeting rooms) or resources (like a family car), follow these steps:
- On the main the Calendar pane, click the plus
 button at the lower left to open a configuration pane.
 - From the Type pop-up menu, choose whether the calendar is for a location or a resource and enter a name that your users will understand in the Name field (such as
1964 Dodge Dart). - From the Accept Invitations pop-up menu, choose whether requests to schedule the resource are accepted automatically by the server or if they must be approved by a delegate (or be from a user who is in an approved group; see Work with Groups, in Chapter 4).
- In the Delegate field, enter the name of users or groups that are allowed to manage this calendar (if you don’t remember them exactly, click the Browse item that appears). The people associated with these accounts can also approve requests.
- If you chose With Delegate Approval, an Accept Group field appears (Figure 6). If you enter a group here, requests from users in that group will be accepted automatically, without delegate approval.
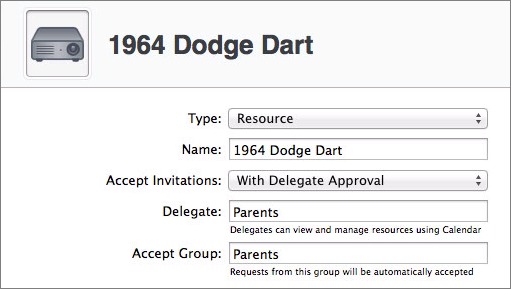
Figure 6: Working in the Server app, you can name and configure a resource calendar.
- Click Create to complete the setup.
The new calendar appears on the Calendar pane in the Locations and Resources list. If you want to adjust any of its settings, double-click its entry. Repeat these steps to create more locations and resources, as desired.
Enable Email Invitations
Let’s say you have a location calendar for a conference room, and you want to schedule a meeting for next Tuesday. (This example assumes that you’ve already connected your Calendar app on the Mac to the Calendar service, which I’ll get to in Configure Calendar Clients; bear with me for a minute.)
You can invite specific people to your meeting, and if they all have accounts on your server and have set up their calendar apps as well, they’ll receive notifications within the apps.
But what if you want to use the Invitation feature to invite people from outside your company too? You can do that too, but the Calendar service won’t send them in-calendar invitations. What the Calendar service can do, however, is create and send an email message to each invitee automatically, and if the invitee replies to it, Calendar can update the event to reflect whether or not the person is coming. But to do that, you must run through some additional steps to configure the email account will send and receive these invitations and responses.
There are two approaches here:
- External: Rely on an external mail service—even something like a free Gmail or iCloud account. That works fine—just make sure this account is used only for invitations; it shouldn’t be a personal account or one used for any other purpose.
- Internal: If you’re planning to run OS X Server’s internal Mail service, the Calendar service can use it to send and receive invitation-related email. That’s harder, not so much because configuring the Mail service is particularly difficult, but because running a mail server means trying to maintain 24/7 uptime while facing a constant onslaught of spam. Simply put, mail is a toxic hellstew, and one that’s best left to large organizations with money and people to throw at the problem.
But if I haven’t dissuaded you from running your own mail server, I need to do some hand-waving here for the purposes of this chapter in TidBITS. That’s because we won’t get to turning on the Mail service until Chapter 8, Mail Services. So, if you want to use the internal mail services, you can follow the steps below, but no email can be sent until you also turn on Mail. Or you can skip these steps for now and come back after you’ve enabled mail services.
With that caveat out of the way, follow these steps to enable email invitations, regardless of whether you go the external or internal route:
- In the main Calendar pane, select “Enable invitations by email,” which invokes the Configure Server assistant.
- In the slide-down dialog that appears (Figure 7), Server suggests an email address to use for outgoing event invites:
- If you’re going to use an external mail service, enter the address for the account you’ve created for that purpose here.
- If you’re going to use the internal mail services, stick with the default address, since it maps to an existing built-in account.
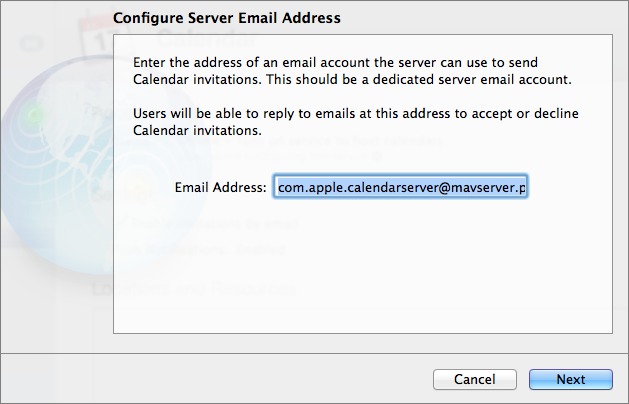
Figure 7: Enter the address that will be used to send Calendar invitations.
- Click Next to open the next Configure Server Email Address screen (Figure 8).
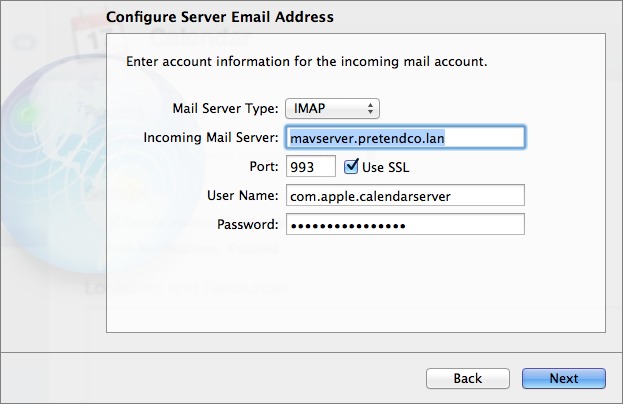
Figure 8: Configure the necessary settings for the incoming mail account.
- Specify the email account you previously defined in the Email Address field (again, this could be a mail service running on an external mail server or the mail service running on your server) as follows:
- Mail Server Type: Choose the type of incoming mail service that will receive incoming invitation replies. If the mail server you’re using offers IMAP, I recommend sticking with IMAP so you can access mail on the account for troubleshooting if needed.
- Incoming Mail Server: Enter the name or IP address of the mail server. If you’re using internal mail services, this will be the name of your server, or the name you set up as its mail exchanger (MX) record in DNS (see Configure DNS on the Server, back in Chapter 5).
- Port and SSL: Unless you’re messing around with custom ports, leave the Port field set to 993. Leave the SSL checkbox selected.
- User Name: This is the username portion of the email address you configured in Step 2.
- Password: If you’re using an external mail service, enter the password for the associated email account. If you’re using the default entries for the internal mail server, the Password field for the com.apple.calendarserver account is filled in for you. Do not change it!
- Click the Next button to move along to specifying the outgoing mail server (Figure 9) through which invitations will be sent.
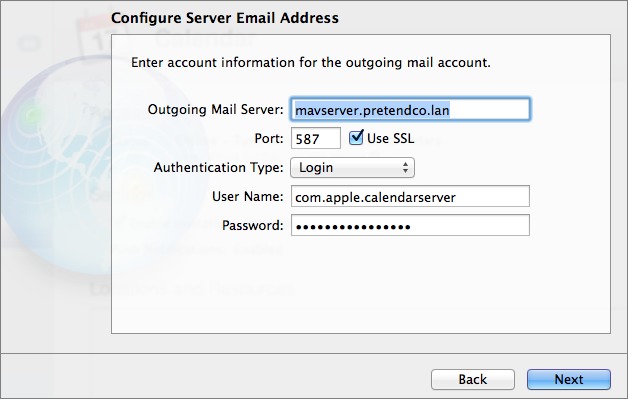
Figure 9: Enter the necessary settings for the SMTP server that will be used to send outgoing invitations.
- Set up the outgoing mail account as follows:
- Outgoing Mail Server: Enter the name or IP address of the outgoing SMTP server. Again, if you’re using internal mail services, this will be the name of your server or its mail exchanger (MX) DNS record.
- Port and SSL: Again, unless you know what you’re doing, leave the port set to 587 and leave the SSL checkbox selected.
- Authentication Type: From this pop-up menu, you can choose None, Plain, Login, CRAM-MD5, or Kerberos. Stick with Login unless you’re using internal mail services and plan to restrict the authentication methods (see Configure the Mail Service, in Chapter 8).
- User Name: This is once again the username portion of the email address that sends and receives invitations.
- Password: This password is most likely the same as the one you entered previously if you’re using an external mail service; if you’re using Server’s internal mail services, it’s pre-filled for you and should not be changed.
- Click Next.
- At the Mail Account Summary screen, review the settings and if they’re correct, click Finish. If you see any mistakes, click the Back button and make your corrections.
Configure Calendar Clients
Once the Calendar service is configured, and you’ve enabled the Calendar service for the users set up on Open Directory (see Work with Users), you can connect to it from various clients, such as Calendar in Mavericks and iOS 7. Once a user’s client has established a connection, he can create calendars that will be stored on the sever and that can be shared with other users that you’ve set up in Open Directory.
Configure Calendar for Mavericks
To start, we’ll look at how to connect from Calendar for Mavericks:
- In the Calendar app on a client Mac, choose Calendar > Preferences > Accounts.
- Beneath the Accounts panel at the left, click the plus
 button to display a dialog of account types you can add.
 - Select Add CalDAV Account, as seen in Figure 10, and click Continue.
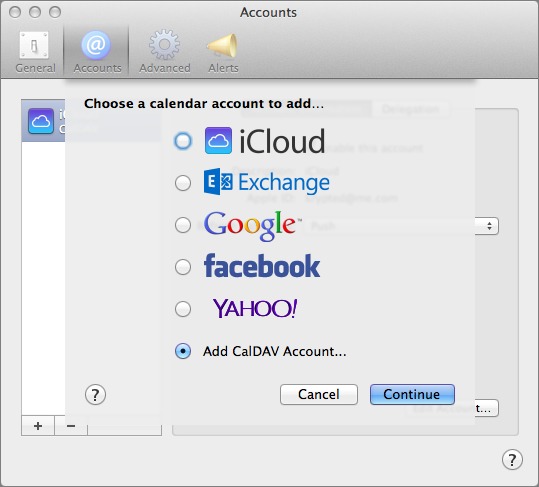
Figure 10: Add a CalDAV account to connect to your Calendar service.
- From the Account Type pop-up menu in the dialog that appears next, choose Manual.
- Enter the user’s username and password as configured on the server, and type in the name or IP address of the server (Figure 11). Click Create.
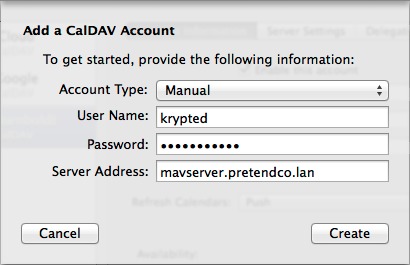
Figure 11: Enter the user’s credentials and the server address.
Once a connection is confirmed between the server and the client, the server appears in the list of accounts in the sidebar of the Calendar app (Click the Calendars button at the top left to show and hide this sidebar).
Configure Calendar for iOS 7
Adding a CalDAV account in iOS 7 is almost exactly like adding a CardDAV account, as explained in Configure Contacts for iOS 7:
- Navigate to Settings > Mail, Contacts, Calendars > Add Account > Other > Add CalDAV Account.
- Enter the name of your server and the appropriate username and password, and tap Next (Figure 12).
- Tap a switch to turn on (or off) calendar events or reminders for the CalDAV server.
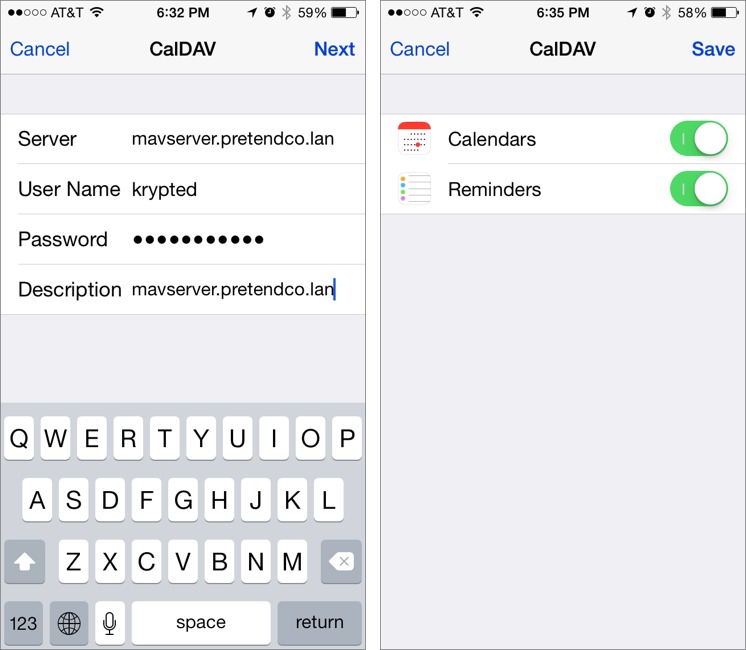 Figure 12: Add a CalDAV account in Settings > Mail, Contacts, Calendars.
You can create and share calendars in iOS, but I find it easier in Mavericks (next).
Create and Share Calendars
Back in Calendar for Mavericks, it’s now time to create a calendar and share it with other users.
To create the calendar, choose File > New Calendar > ServerName. A new calendar appears under the server’s name in Calendar’s sidebar; give it a sensible name.
Next, to share your newly created calendar, you can either hover the pointer over its name until the Wi-Fi-like broadcast button appears and click that, or just Control-click the calendar and choose Share Calendar, as shown in Figure 13.
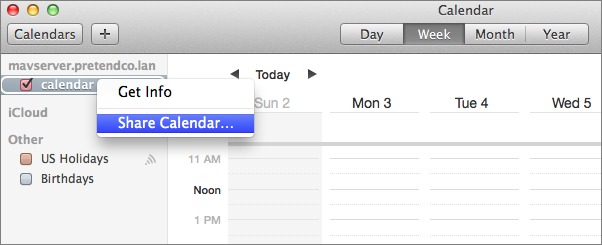
Figure 13: Share your newly created calendar.
In the Share Calendar With popover, enter the user accounts with which you want to share the calendar, as I’ve done with Emerald Edge in Figure 14.
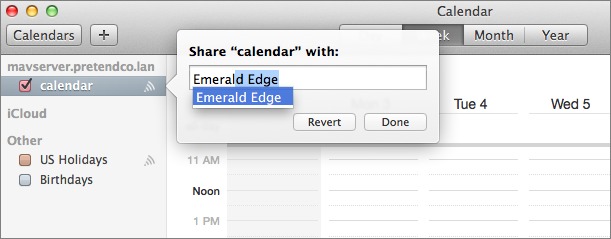
Figure 14: Enter the names of users with whom you want to share the calendar.
The invited user, once she adds a CalDAV account pointing at the server as well, will receive a notification near the upper left of the Calendar app’s toolbar, adjacent to the plus  button. Once the invited user clicks the Join button to accept the invitation, the shared calendar appears in her sidebar under the server name and changes made on one client are reflected quickly on all the rest.
Configure the Messages Service
Let’s change gears and configure the Messages service, which relies on the Extensible Messaging and Presence Protocol (XMPP) to let users exchange instant messages, using your server as the intermediary.
The big advantage of running Messages server is that your communications are never stored on Apple’s servers, and those within your network never touch the outside Internet. That’s not generally a problem, but here are a few typical reasons for turning it on:
- Transcript retention. This could be important, for example, for auditing reasons.
- Confidential conversations that need to remain under your control.
- Making instant messaging available internally while restricting the use of external chat services.
Getting started with the Messages service couldn’t be easier:
- In the Server app, click Messages in the left-hand sidebar.
- In the Messages pane (Figure 15), there are only two options:
- Enable server-to-server federation: If you’d like to enable chats between users on different servers, select this checkbox and click its associated Edit button to enter specific details. Federation links two Messages servers, or a Messages server and another server that supports XMPP, but it’s beyond the scope of what we’re trying to do here, so see the Apple server documentation to learn more about federation.
- Archive all messages: Select this checkbox if you want the Messages service to save a copy of every message sent. Once enabled, every message sent through the server will be stored in the
/Library/Server/Messages/Data/message_archivesdirectory, which you can access quickly by clicking the arrow icon adjacent the checkbox.
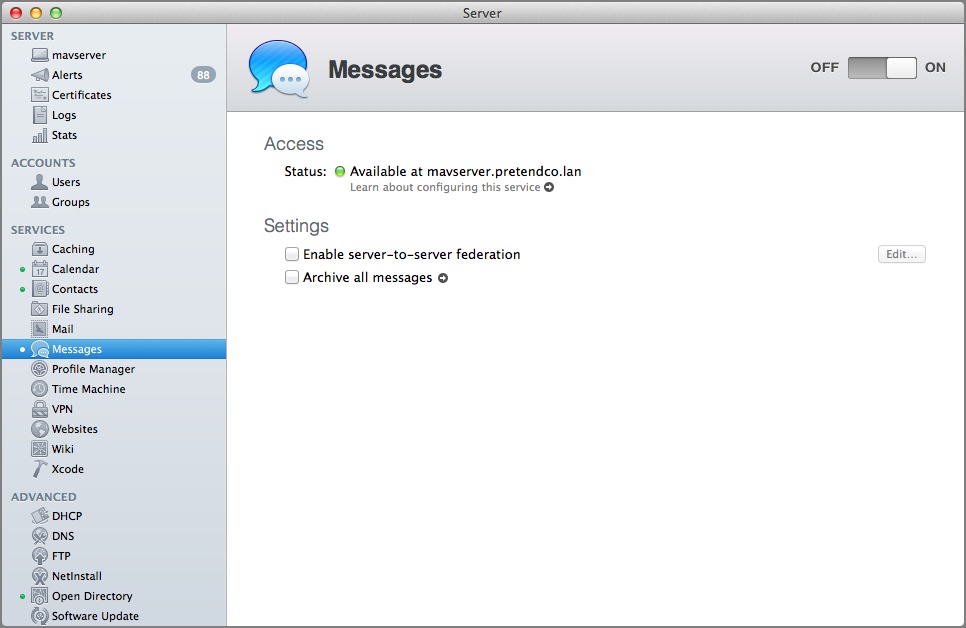
Figure 15: Configuring the Messages service is trivial—just click ON.
- Click the ON button at the upper right to enable the service.
You now have a fully functional Messages server!
Configure Messaging Clients
Now it’s time to configure client apps. Any Jabber-compatible app should work, but I’ll focus on Apple’s Messages for Mavericks.
Before you begin, make sure your users are set up in Open Directory with accounts, and that those account have access to the Messages service (see Work with Users, earlier, in Chapter 4.)
To set up Messages for Mavericks:
- In Messages, choose Messages > Add Account; then select “Other messages account” and click Continue, as shown in Figure 16.
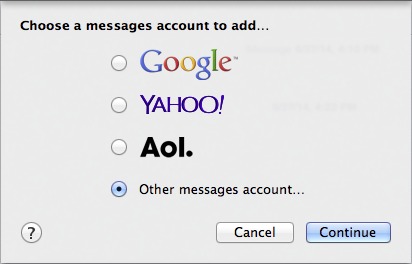
Figure 16: Connecting to Messages server from the Messages app is easy—select “Other messages account.”
- In the Add a Messages Account dialog, choose Jabber from the Account Type pop-up menu (Figure 17).
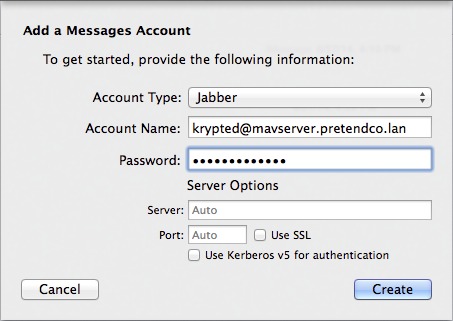
Figure 17: Tell the messages client how to connect to the Messages service by providing the account and server details.
- In the Account Name field, enter the user’s short name and the server name in the form of an email address, as in
[email protected](the short name is the Account Name described in Add a User, back in Chapter 4). - Enter the user’s password in the Password field.
- Click Create to set up the new account.
You can take the new account online and use it like any other instant messaging account in the Buddies window in Messages.
Read More: About | Chapter 1 | Chapter 2 | Chapter 3 | Chapter 4 | Chapter 5 | Chapter 6 | Chapter 7 | Chapter 8 | Chapter 9 | Chapter 10 | Chapter 11 | Chapter 12 | Chapter 13 | Chapter 14
Hi Charles
I can see why you have included contacts within Collaboration services but as you pointed out you can't "share" contacts (apart from using a shared account) which is always a big failing of iCloud IMO. I had to read the first page a couple of time to understand this as from the 1st paragraph I thought you were saying that Server can facilitate contact sharing. Maybe in the first few paragraphs it could be written slightly more clearly that with Server you CAN share calendars but NOT contacts. I would also move the Tip about BusyCal to the calendar sharing section as currently this sits directs below a paragraph about contacts. The rest of the book has been very clear to me but for some reason this chapter was not (maybe I was just tired when reading it).
Good suggestions - thanks! I'll take a look the next time I delve into this chapter for more editing.
I'm excited to read Chapter 8 and Mail services. Coming soon?
Yes, it's in the works, although we're putting it off a week because we're too jet-lagged to edit coherently this week.
Thanks for the update. Rest up. I'll try to hold off my upgrade another week. :)
I will note that we really, really don't recommend that you run your own mail server. It's a constant battle against spammers (and if you've never run a mail server before, you wouldn't believe the insane volume of spam that will hammer your server) and the stress of keeping it up 24/7 so mail isn't bounced and so your users can retrieve mail is totally not worth it. Mail is best handled by specialists these days, whether it's a free service like Gmail or iCloud, or a paid one like FastMail.
Ok, you convinced me. Switched to an outside provider for email and web. My how hosting has changed from the last time I looked at it 15 years ago.... Thanks again for your great series.
Three questions:
1. Do you have any recommendations for setting up a calendar on the server that you want other users in an organization to have read-only access to? For instance, I want my employees to see the calendar that shows when people have days off, but I don't want them to be able to modify it and give themselves the day off.
2. Messages works great with mac clients. But for iOS devices apple has no client app. There is some 3rd party stuff out there, but it mostly sucks. I've looked at Monal and others. Giant turds of software. Any suggestions?
3. How would you suggest I create a contact list within an organization that is shared by all users?
Hey Arlo,
1. When you share a calendar you can define that the calendar is a Public Calendar. Anyone can subscribe to that calendar but you need the URL to do so. There's no authentication control but it's really the only option to do this kind of thing within OS X Server. Otherwise, I'd look at a 3rd party product for that.
2. Check out Trillian at https://www.trillian.im/guide/iphone/ I know there are plenty of other Jabber clients for iOS but I haven't used a lot of others.
3. I'd suggest something other than OS X Server for that. I've used utility accounts where you create an account and then install it on all clients (we'll go into the easy way to do that in the Profile Manager chapter); however, usually what happens is someone (or some app more than likely) deletes a contact card (or all the contacts) and there's no accountability for who did it. There's also no granularity with regards to permissions in contact sharing so it can be a bit of a bear. Anyway, hope that helps! Check out http://baikal-server.com and http://trac.calendarserver.org as options for a bit more granularity (which might also help with some of the calendar options you might want).
Hope this helps!