Take Control of OS X Server, Chapter 11: Wiki Services
This article is a pre-release chapter in the upcoming “Take Control of OS X Server,” by Charles Edge, scheduled for public release later in 2014. Apart from Chapter 1: Introducing OS X Server, and Chapter 2: Choosing Server Hardware, these chapters are available only to TidBITS members; see “Take Control of OS X Server” Streaming in TidBITS for details.
Wiki Services
A wiki is a Web application that allows people to add, modify, and delete content. Wikipedia is the most popular example of a wiki, but wikis can be used for knowledge management, documentation, shared process lists, note taking, and more. Unlike blogs, which tend to use a chronological posting approach, wikis have little implicit structure, allowing users to organize the site in any way they want.
Wikis are tremendously flexible, and how you use them is limited only by your imagination. Since wikis are easily accessible from any device that can browse the Web, users can access them from anywhere, at any time.
In an educational setting, because wikis work well even from iOS devices, and since wiki pages include many basic formatting options, a wiki might be the best way for students to collaborate on projects. Plus, because files can be uploaded to a wiki and accessed via WebDAV, I’ve helped a variety of schools set up wiki pages for different classes, enabling students to submit projects for each class and teachers to comment on the work right within the wiki.
In the business world, I’ve seen companies store human resources documents, employee manuals, and more on company-wide wikis, relying on the wiki’s text processing capabilities for quick edits so the documents don’t go out of date. One company I’ve worked with even creates a wiki page for each employee, storing a wide variety of information about that employee on the page. And plenty of tech firms (including mine) use wikis to track information about the systems they manage.
In essence, a wiki is the world’s simplest database, accessible to anyone, using any device, from anywhere. That’s hard to beat.
Configure the Wiki Service
To begin setting up the Wiki service, open the Server app and select Wiki in the sidebar. Because a setting on the Wiki pane involves permissions, we’ll run through the basic configuration before clicking the ON button:
- Access permissions: These permissions tie into the users and groups described back in Work with Users and Work with Groups, in Chapter 4. To make it so only certain users can create wikis (such as only teachers or system administrators in a school), choose Only Some Users from the Permissions pop-up menu, and in the Wiki Creators dialog, click the plus
 button and type the name of the user or group you want to enable (Figure 1). Since you’ll probably want to be able to create a wiki, be
sure to include yourself or a group you’re in! Once everyone is added, click OK.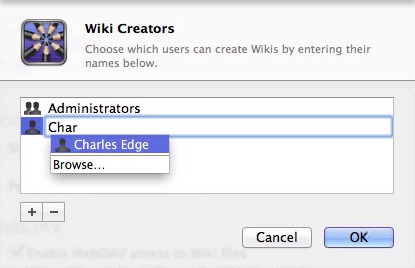
Figure 1: Enter the name of a user or group who should be allowed to create wikis.
An Edit button appears to the right of the Permissions pop-up menu; click it if you later want to adjust the permissions list.
- WebDAV: Enabled by default, WebDAV makes it possible for iWork users to access documents stored on the wiki. When “Enable WebDAV access to Wiki files” is selected, users can connect to the wiki from within Pages, Numbers, and Keynote and access those apps’ files in the wiki’s document repository.
With your access and WebDAV options set, click the ON button at the upper right. A green Status light in the Wiki pane (Figure 2) indicates that all systems are go.
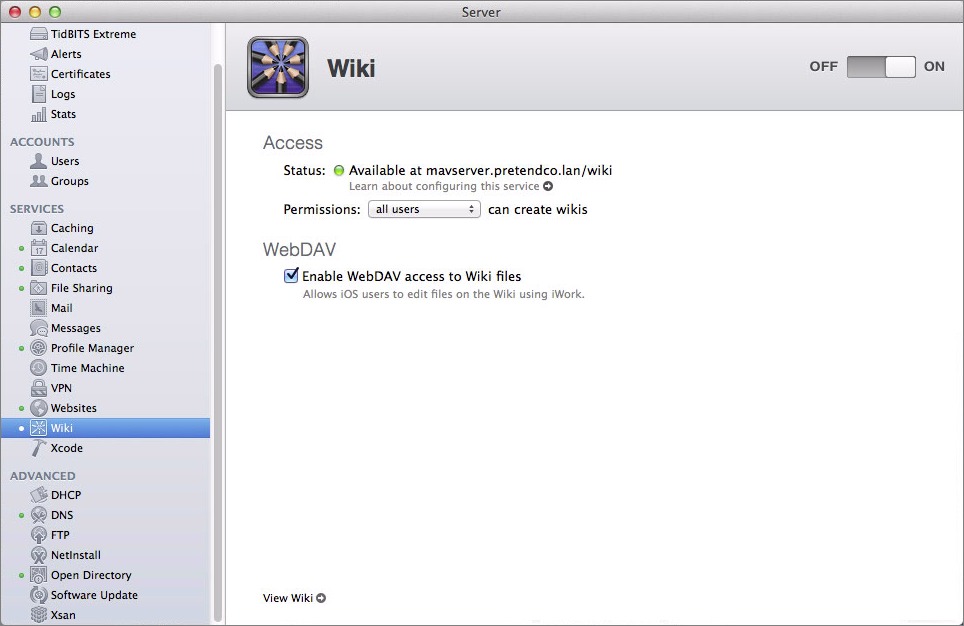
Figure 2: After you click the ON button to turn on the Wiki service, a green Status light indicates that it’s ready to go.
That’s all there is to do in Server; the rest of the wiki configuration takes place in a Web browser.
Create a Wiki
Once the Wiki service has started, click the View Wiki link at the bottom of the Wiki pane. Or, if you want to work on another computer, connect to the server in a Web browser, appending wiki to the URL. So if the hostname of your server is mavserver.pretendco.lan, connect to http://mavserver.pretendco.lan/wiki.
You should now be looking at the portal for the wiki service (Figure 3).
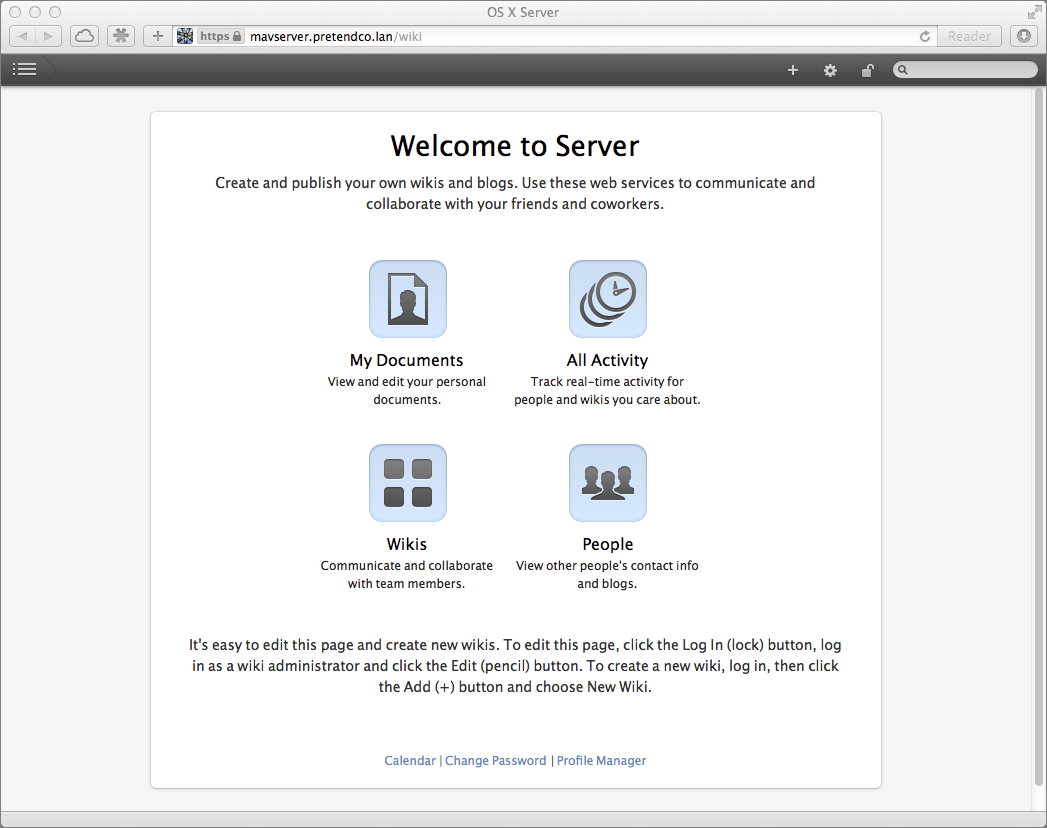
Figure 3: The main wiki page.
Now that you’re on the wiki portal page, you can create a wiki:
- In the small toolbar at the upper right, click the lock button, enter your credentials, and click the Log In button (make sure you’ve given yourself permission to create wikis). Then click the Wikis button to see a list of all the wikis you have access to—if you’re just getting started, there won’t be any listed.
- From the toolbar, click the plus
 button and then click New Wiki (Figure 4).
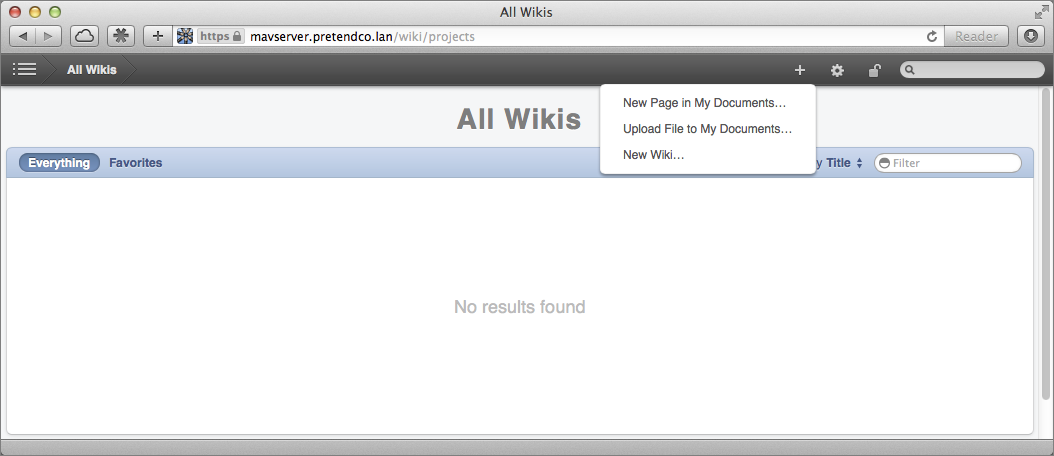
Figure 4: Create a new wiki from the toolbar of the Web page.
- In the Create a New Wiki dialog, provide a name for your wiki, as well as a brief description. Click Continue.
- In the Set Permissions dialog (Figure 5), define who can access your wiki.
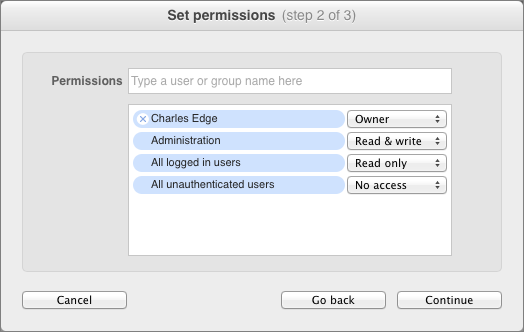
Figure 5: Add users and groups and set their access privileges in the Set Permissions dialog.
Use the Permissions field to add the name of any user or group on your server, but only if you aren’t already covered by the default built-in groups: All Logged In Users (people with accounts on your server) and All Unauthenticated Users (everyone who lacks an account). To delete a user or a group, hover over the blue lozenge, and click the blue X
 button that appears to the left of the name.
For each user or group, you can choose from four levels of access using the pop-up menu to the right:
- Owner: This option appears only for specific users or groups you add. There can be only one owner, who has full read and write access, and is identified as the owner on the wiki page.
- Read & write: Choose this to give the user or group full access to view and edit pages in the wiki.
- Read only: This option restricts the associated user or group to viewing pages. It’s useful when you want a particular group to be able to consult the wiki for reference, but not make changes.
- No access: These users and groups are locked out entirely.
When you’re done, click Continue.
- In the Set Appearance dialog, you can upload an icon for your wiki and choose a color scheme. The icon appears in the wiki list and when you open the wiki, so particularly if you’re planning to have multiple wikis, choose something that users will be able to associate with the wiki’s purpose or contents. Similarly, it’s handy to set different color schemes when you have multiple wikis, to give users some context about where they are. As with permissions, you can adjust the icon and color scheme later. To upload an icon, click the Upload button and locate an appropriate image file.
When you’re done (Figure 6), click Create.
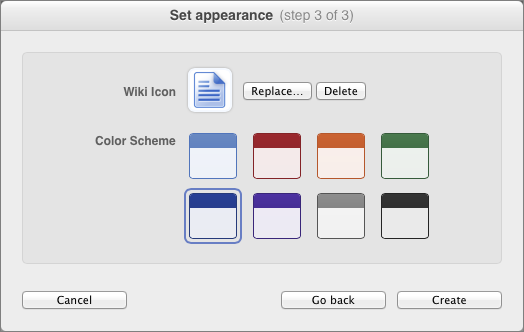
Figure 6: Choose a color scheme and representative icon.
- In the Setup Complete dialog, click Go to Wiki to see your wiki’s Home page (Figure 7).
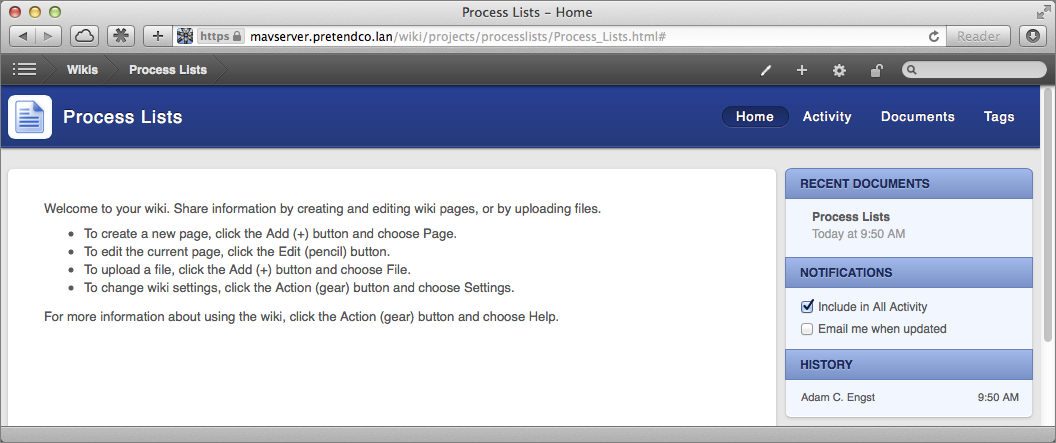
Figure 7: Your wiki is ready to use.
Customize a Wiki
Now that you’ve created a wiki, you can set more options. If you’re not already looking at the Home page for your new wiki, click the wiki in the All Wikis screen. From here, you need to do two things:
Adjust the wiki’s settings:
Click the gear ![]() button, and click Wiki Settings. The Wiki Settings dialog contains three panes, allowing you to modify the options you set while creating the wiki and giving you additional options:
button, and click Wiki Settings. The Wiki Settings dialog contains three panes, allowing you to modify the options you set while creating the wiki and giving you additional options:
- General: Checkboxes for Calendar (if you have the Calendar service in Server enabled) and Blog appear. Select Calendar to embed a shared calendar from Server, and select Blog to create a standard blog page. This Calendar option is probably most helpful if you’re hosting a wiki for unauthenticated users with whom you wouldn’t otherwise share a particular calendar, since a full-fledged calendar app will be more useful for known users.
If you select one of these checkboxes, you’ll find a corresponding top-level link in the wiki’s navigation bar, alongside Home, Activity, Documents, and Tags. - Appearance: Along with the icon and color scheme specified previously, you can upload a custom banner (124 pixels tall) and background image (keep it light colored) if you want to replace the solid colors in the scheme.
- Permissions: In addition to the previously configured users and groups and their associated permissions, the Permissions pane lets you set who should be allowed to make comments (Nobody, Anybody, or Authenticated Users) and if moderation should be available for no comments, all comments, or only anonymous comments.
If you choose Nobody for who can make comments, the feature is turned off entirely. Otherwise, how you configure these depends largely on how public your wiki is—the more open you make it, the more you may wish to exert some control over commenting.
Make sure to click the Save button after making your changes in the Wiki Settings dialog.
Set up notifications:
On the right side of the Home page, in the Notifications area, notice that “Include in All Activity” is selected by default, so all changes to the Home page will appear in the Activity page accessible by clicking Activity in the navigation bar. If you want to be alerted via email as well whenever a change is made to the Home page, select “Email me when updated.”
Navigating a Wiki
In the colored navigation bar at the top of every wiki page, there are a number of important buttons (Figure 8).

Figure 8: Use the links on the navigation bar to access different parts of your wiki.
Here’s a quick run-down of what you should know about each of the pages to which these buttons take you:
- Home: It’s a good idea to edit the text on this page to give users an overview of the wiki and to add links to any key pages that are not linked from the navigation bar.
- Activity: The Activity page logs all changes made within the wiki, identifying who made the change and sorting them newest first. Since a busy wiki could have many changes, you can click the “Mark all as read” button and then later view just unread changes. To save an important change, click the star
 button next to it, and then use the Favorites view. Click any item in Activity to jump to the associated page.
 - Documents: One problem with wikis is losing track of pages, but Server’s wiki lists all pages in the Documents screen. You can sort by title, most recent, or least recent.
- Tags: If you want to categorize like pages, assign a tag to each of them (see Use the Document Info Sidebar, ahead shortly). All tags you create appear in the Tags page, and when you click a tag there, it displays all the pages associated with that tag.
- Calendar: Assuming you’ve selected the Calendar checkbox in the General settings pane for the wiki (discussed just above), clicking the Calendar button on the navigation bar displays a graphical calendar.
- Blog: If you’ve selected the Blog checkbox in the General settings pane for the wiki discussed just above), a Blog button appears in the navigation bar. Click it to display a standard chronological listing of posts (see Add a Blog Post).
Create and Edit Wiki Pages
Now that you’ve created and customized your overall wiki, it’s time to work with individual pages. In this topic, you’ll learn how to add and edit a page (just below), Format a Page, Use the Document Info Sidebar, Add a Blog Post, and—in case a page doesn’t work out as you’d intended—Delete or Move a Page.
There are two basic ways to create wiki pages, either from the menu that appears when you click the plus  button or by creating a new page as a destination for a link. Both work, but I generally recommend the link destination approach, because then you’re less likely to end up with pages without links leading to them.
Follow these steps, starting on the Home page for now, but they’ll work on any wiki page:
- In the gray toolbar at the top of the page, click the pencil
 button to enter Edit mode. Notice how the toolbar changes to provide editing controls. Less obvious is the fact that you can now type in the white text area in the page.
 - Click at the bottom of the white text area, and type the name of the page you want to create. Then select the text, click the Link
 button in the toolbar, and click New Page on the menu that appears (Figure 9).
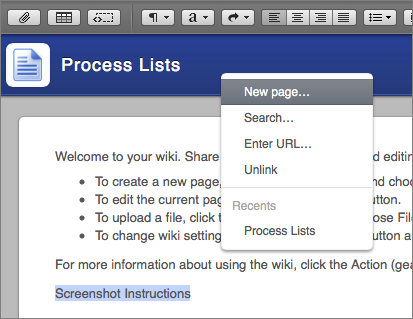
Figure 9: Click New Page in the menu that appears after clicking the Link button.
- In the New Page dialog, click the Add button.
- At the far right of the toolbar, click Save.
A new link and a new page are created, linking the text you’d selected to a new page. You see the old page, but the previously selected text now has the formatting of a link. - Click the link to jump to the new page, which has the same boilerplate instruction text as the home page—feel free to replace that as I’ve done in Figure 10!
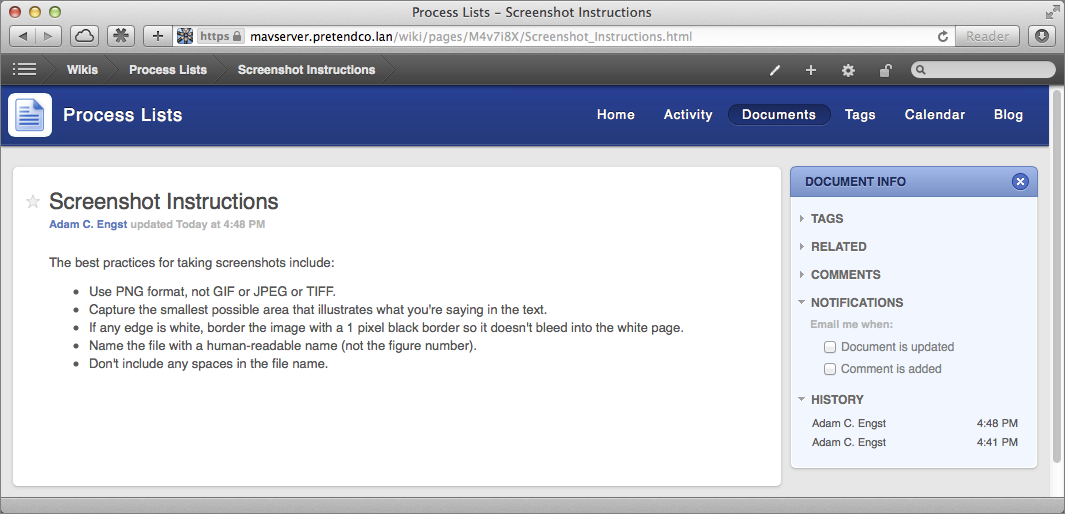
Figure 10: Notice that the new page looks basically like the home page, and can be edited in the same way.
In fact, what you’ve done here is classic wiki work—you edited a page by adding text that you turned into a link to a new page. In the real world, you’d probably put more work into writing and formatting the text on each page, but the process is the same: click the pencil ![]() button in the toolbar, edit the page, and click the Save button to save your changes.
button in the toolbar, edit the page, and click the Save button to save your changes.
Format a Page
To format a page, navigate to it in the wiki and then click the pencil ![]() button in the toolbar. Make sure the text you want to format is selected (or the insertion point is in the relevant paragraph), and then click a button on the editing toolbar (Figure 11). When you finish, click Save (or click Cancel to toss out your changes).
button in the toolbar. Make sure the text you want to format is selected (or the insertion point is in the relevant paragraph), and then click a button on the editing toolbar (Figure 11). When you finish, click Save (or click Cancel to toss out your changes).

Figure 11: Format your wiki pages with the editing toolbar buttons.
In case a button on the editing toolbar isn’t immediately obvious to you, let’s take a closer look at what they do. From left to right:
- Attach: Marked with a paperclip icon, this button allows you to upload a file and attach it to the page. Attached files appear on the page as buttons; clicking a button downloads the file. Uploaded graphics, however, appear as themselves.
- Table: Click this button to insert a table and add a Table Settings button to the toolbar. Hover over a column or row header and click the triangle that appears to add or delete a row or column, or sort the contents by row.
- HTML snippet: For formatting above and beyond what’s possible using the rest of the wiki editing controls, click the HTML snippet button and enter raw HTML.
- Paragraph: Click this button to choose a style: paragraph, blockquote, monospace, or any of three heading sizes.
- Character: For character-level formatting, including plain, bold, italic, underline, important, emphasis, and highlight, click the Character button.
- Link: Click this button to create a link to a new page (as described in the steps earlier in this chapter), search for pages to link to within the wiki, link text to a URL elsewhere on the Web, and unlink text. The bottom of the menu lists recent pages; click one to insert a link to it.
- Justification: Click one of the four justification buttons for left, center, right, or full justification.
- List: Click the button and pick a list format, including bulleted, numbered, or none.
- Indent: The two indent buttons are particularly handy for formatting nested lists.
Use the Document Info Sidebar
For pages that you add, the Document Info sidebar appears on the right (Figure 12), with expandable sections:
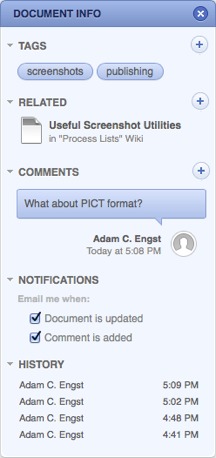
Figure 12: Clicking the left-hand expansion triangles in the Document Info sidebar reveals controls for adding tags, related pages, and comments, among other options.
- Tags: Use tags to mark pages that have something in common, like
insectsorfourth periodorplanning. All tags you enter here appear in the Tags page accessible by clicking Tags in the navigation bar; click a tag on that page to see a linked list of all the pages marked with that tag. - Related pages: While tags are useful for categorizing a large number of pages, to make it easy for users of the wiki to move from one page to another without creating an explicit link in the text of the page, add the page to the Related section.
- Comments: To have a discussion about the contents of the page without having to conduct it within the text of the page, use the Comments section. See Customize a Wiki, earlier, for more on who can leave comments and whether or not they’ll be moderated.
- Notifications: Particularly as your wiki grows, being notified of updates and comments via email can be a handy way of staying up to date on what’s happening.
- History: The wiki automatically keeps track of all changes and who made them. Even better, it keeps all those previous versions; click any entry under History to see that version, and click the Show Changes button that appears at the top of the page to see how that version differs from what’s current.
 button, and reveal it again by clicking the info
  button that appears in the wiki page.
Add a Blog Post
If you’ve enabled the wiki’s blog feature, clicking the plus  button displays a New Blog Post In “Wiki” command in the menu. Click it to create a new blog post.
Apart from how you create it and where it appears, a blog post is otherwise essentially identical to any other wiki page in terms of how you edit it and what you can put on it.
Blog posts are collected in the Blog page accessible by clicking the Blog link in the navigation bar. They don’t appear in the Documents page.
Delete or Move a Page
To delete any page on the wiki, navigate to it, click the gear ![]() button, and click Delete Page. Be aware that deleting a page will cause links to that page to stop working, which may cause confusion to users. It may be better to edit the page to indicate that its content is obsolete.
button, and click Delete Page. Be aware that deleting a page will cause links to that page to stop working, which may cause confusion to users. It may be better to edit the page to indicate that its content is obsolete.
Also available in the menu that appears when you click the gear ![]() button is a Move to Wiki command that enables you to move a page to another wiki on the server.
button is a Move to Wiki command that enables you to move a page to another wiki on the server.
Store and Access Files in a Wiki
So far we’ve created pages that contain text, graphics, links, and attachments. However, there’s another way to store files within a wiki, assuming that you selected the “Enable WebDAV access to Wiki files” checkbox in the Wiki pane in Server (see Configure the Wiki Service, earlier).
Files uploaded this way aren’t attached to any particular wiki page, but they still appear in the Activity, Documents, and Tags lists, and they have a Document Info sidebar that enables you to tag them, add related pages, make comments, sign up for email notifications, and see the file’s history (which does not include download activity, unfortunately).
I’ve found that people tend to store files in a wiki for two main purposes:
- In class situations, teachers like to use a wiki as a sort of dropbox for students to submit homework.
- In businesses and other organizations, a wiki can be used to share files; it’s similar to a normal shared folder (see Chapter 6, File Sharing) but with the added benefits of tagging, related pages, comments, and notifications.
Upload a File
Uploading a file is easy. Click the plus  button and click Upload File to “Wiki” (Figure 13).
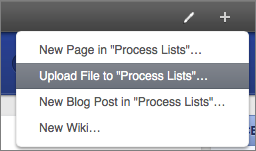
Figure 13: Start uploading files from the wiki’s plus button.
In the Upload File dialog, click Choose File, navigate to the file you want to upload, and click Choose. The filename appears in the File field (Figure 14). Click Upload.
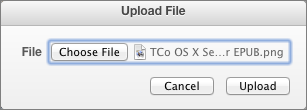
Figure 14: Click Choose File to navigate to the file you want to upload; once the filename shows in the File field, click Upload.
Once the file uploads, it appears much like a new wiki page, complete with a preview if it’s the sort of file that a Web browser can display usefully (Figure 15).

Figure 15: Uploaded files are shown much like other wiki pages.
Although you can’t add text to the page containing the file, you can add tags, related pages, and comments in the Document Info sidebar.
If you uploaded the wrong file, or want to upload a new version of a file, click the gear ![]() button and then click Replace File. You can also click Delete File there, to remove the file from the wiki entirely.
button and then click Replace File. You can also click Delete File there, to remove the file from the wiki entirely.
Access Uploaded Wiki Files
There are two main ways to access files that have been uploaded to a wiki, either directly in the wiki or in a WebDAV-enabled program like the iOS versions of Apple’s Pages, Numbers, and Keynote.
Download from the Wiki
The most obvious way to download a file from a wiki is to navigate to the file’s page, and then click the download  button in the toolbar. The file downloads instantly to the browser’s default Downloads folder, just like any other file you’d download with a Web browser.
Open in iWork
In a WebDAV-enabled app like Pages in iOS, open the document manager, tap the Add Document  button, and then tap Copy from WebDAV. In the WebDAV Sign In dialog, enter the hostname of the server, prefixed with
 http://, along with your user credentials (Figure 16). Tap Sign In when you’re ready.
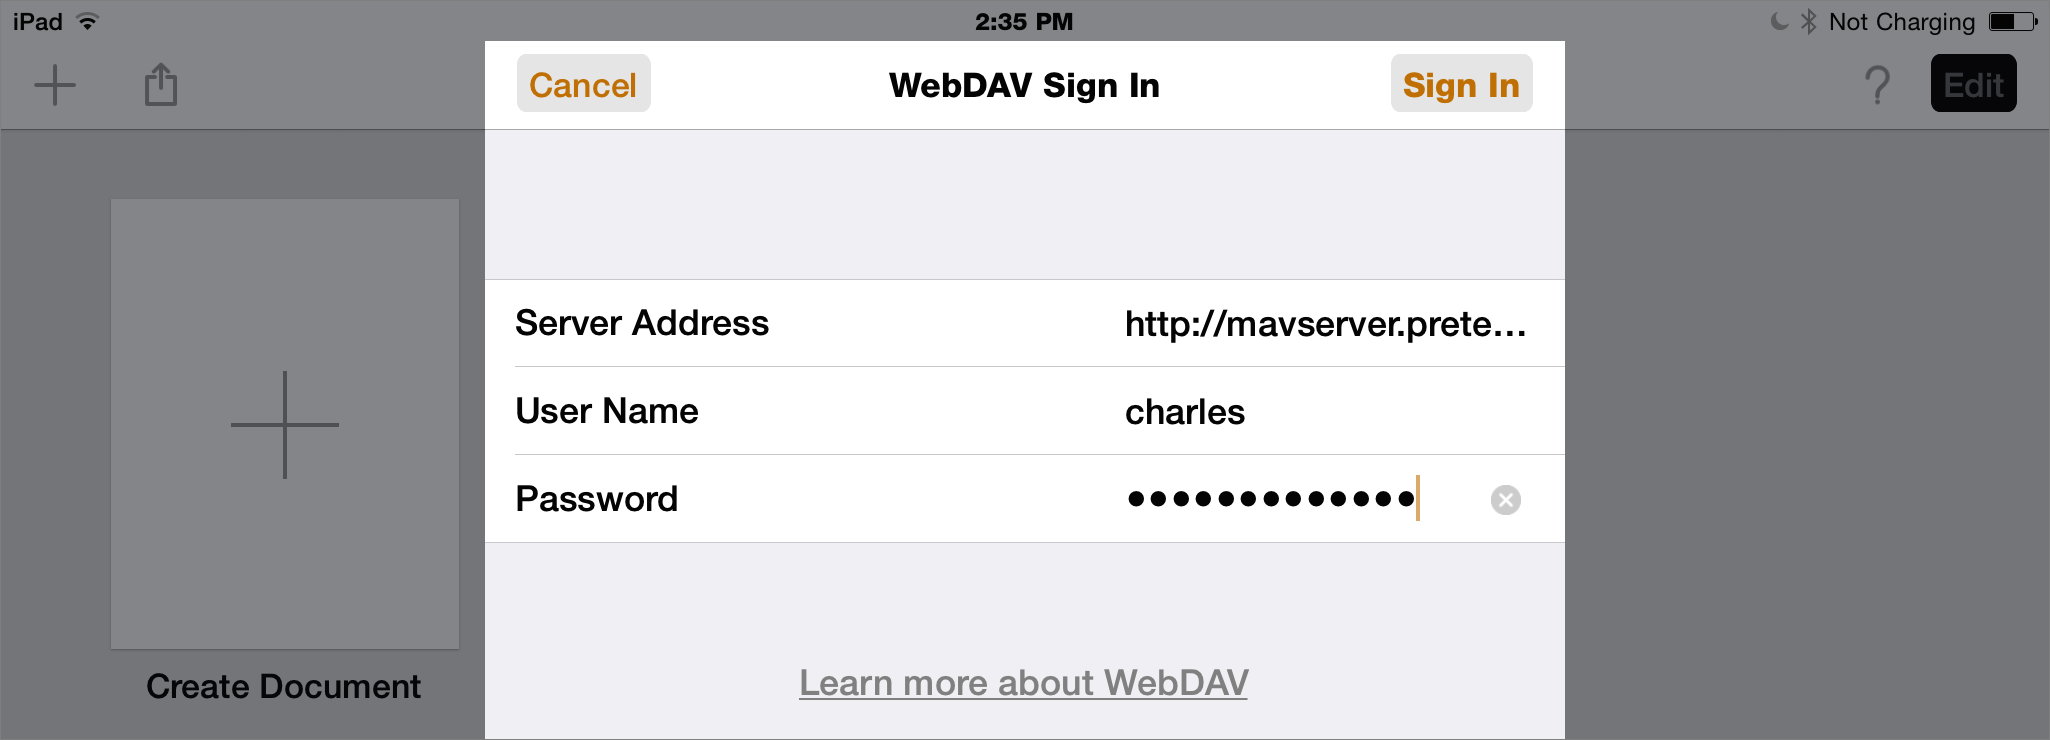
Figure 16: Enter the wiki’s address and your login credentials.
In the document picker that appears, navigate into Wikis, and then into the name of the wiki that holds the files you want. Tap the filename to copy it into Pages (Figure 17).
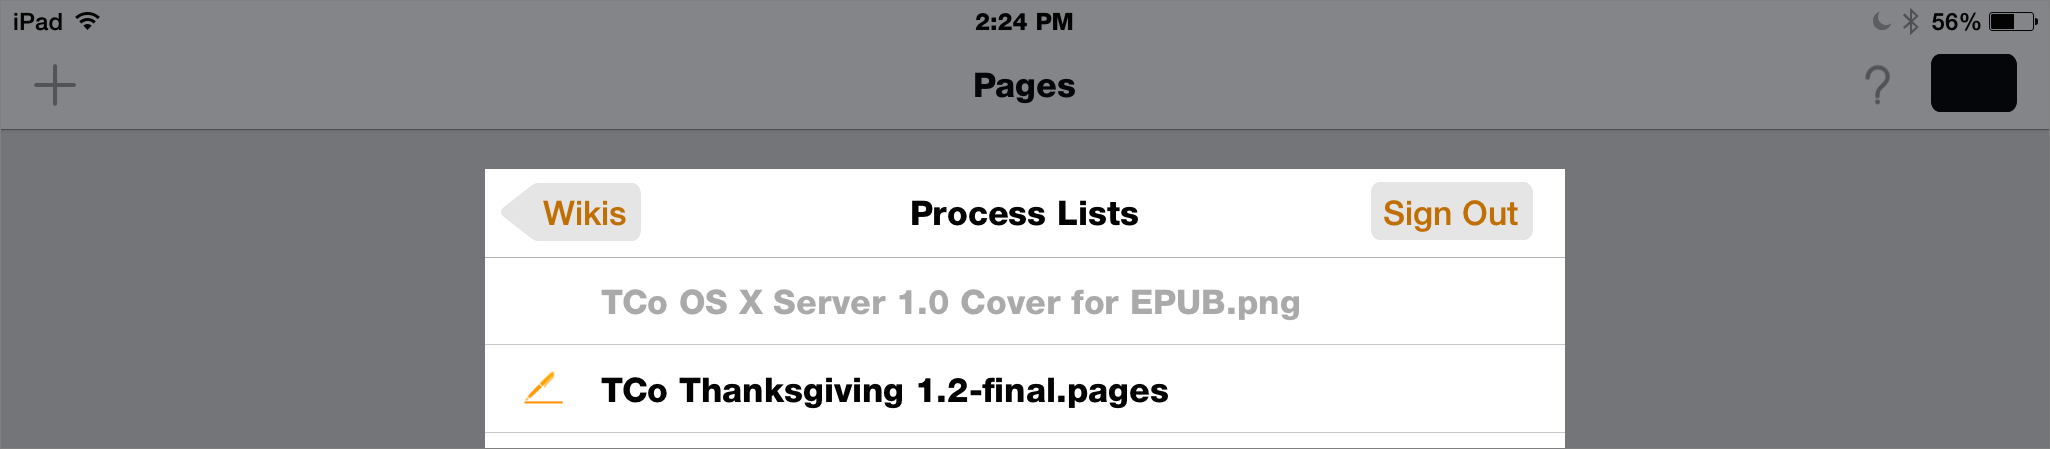
Figure 17: Tap the name of the file to copy it into Pages.
Once that’s done, you can work with the file as you would any other in Pages.
Although you can’t save your changes back to the original file on the wiki, back in the document manager you can tap the Share  button, tap Send a Copy, and tap the WebDAV icon (Figure 18). Enter the server address and your credentials, if necessary, choose a format for the file, navigate to the desired wiki, and tap the Send button to save it.
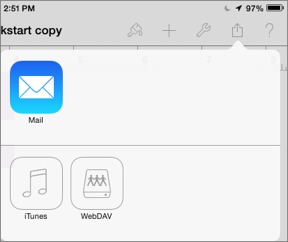
Figure 18: After tapping the share button and Send a Copy, tap the WebDAV button to send a copy of the file back to the wiki.
You can also upload a new file from Pages to the wiki using the Share  button; the file doesn’t have to originate on the wiki.
Read More: About | Chapter 1 | Chapter 2 | Chapter 3 | Chapter 4 | Chapter 5 | Chapter 6 | Chapter 7 | Chapter 8 | Chapter 9 | Chapter 10 | Chapter 11 | Chapter 12 | Chapter 13 | Chapter 14
I like the constant improvements to the wiki serice.
One disappointment is that uploaded docs using the new iWork format do not give you a preview of the doc, the way iWork 9, pdf, word etc does - probably because of its zip format.
Someone from the iWork team should talk to the wiki team.
Can someone tell me how to migrate the wiki from Mavericks to Yosemite? The old "collaboration" folder seems to be gone, though we found a folder at /Library/Server/wiki.
Long story short...Mavericks server died, incomplete backup so we can't restore the entire HD, got a new Mini w/Yosemite installed and decided to keep it on Yosemite and redo all settings, but not sure how to "move" the wiki over. That's the "why" behind this question.
If you have access to the Collaboration folder on your old server you can use the wikiadmin command to migrate the wiki. Basically, copy the Collaboration folder to a known place (in the following example, /Volumes/Backup/Collaboration) and then use wikiadmin to bring them in:
sudo wikiadmin migrate -r /Volumes/Backup/Collaboration
Basically a lot of this should now be in SQL, so you can't just drop the folder in place and restart the service. Which is too bad, but it's faster the more of the data that gets moved into SQL.
Hope that helps and good luck!
Thanks Charles. The problem is, there doesn't seem to be such a thing as a "collaboration" folder in Mavericks. There's a /Library/Server/Wiki though. I tried the command with that folder after copying it over to the new server, but got a bunch of errors:
2014-10-28 13:11:36 XPG.33486: CTL Lock: '/Library/Server/Wiki/PostgresSocket/.xpg_ctl.pid'
2014-10-28 13:11:36 XPG.33486: CTL Lock Acquired: None
2014-10-28 13:11:36 XPG.33486: Control socket _not_ locked; connecting client.
2014-10-28 13:11:36 XPG.33486: Goodbye.
2014-10-28 13:11:38 XPG.33499: CTL Lock: '/Library/Server/Wiki/PostgresSocket/.xpg_ctl.pid'
2014-10-28 13:11:38 XPG.33499: CTL Lock Acquired: None
2014-10-28 13:11:38 XPG.33499: sending Decref message
2014-10-28 13:11:38 XPG.33499: Goodbye.
Any other suggestions?
I'm all out of suggestions. Maybe try a fresh install of Mavericks, clone the parts that you actually have backed up over the top of the fresh install indiscriminately and try an upgrade in place from that... I don't feel super confident, but all the data should be in /Library/Server so if you have that folder maybe try and call AppleCare. They're pretty good about figuring out weird stuff sometimes... Sorry I'm not more help.
FWIW, I found a suggestion to just copy /Library/Server/Wiki over and reboot and that seems to have sort of worked. (This seems to work for Mountain Lion and up because of their different folder structures)
So:
move the existing /Library/Server/Wiki folder on the "current" server to a temp location
copy/move the "old" /Library/Server/Wiki folder to the current server
reboot
So far so good, except it seemed to have "lost" the links to any graphics embedded on any wiki pages.