Take Control of OS X Server, Chapter 12: Software Updates
This article is a pre-release chapter in the upcoming “Take Control of OS X Server,” by Charles Edge, scheduled for public release later in 2014. Apart from Chapter 1: Introducing OS X Server, and Chapter 2: Choosing Server Hardware, these chapters are available only to TidBITS members; see “Take Control of OS X Server” Streaming in TidBITS for details.
Software Updates
Frequent software updates have become a fact of life, thanks to Apple continually rolling out new versions of the software that runs your devices in order to fix bugs and plug security holes. Apple has put a great deal of effort into making it easier for Macs and iOS devices to discover, download, and install various updates, for both individuals and groups.
In this chapter, I’ll focus on groups, since OS X Server contains a pair of services that help you manage these updates for your home, office, or entire organization. In particular, OS X Server aims to give administrators two important capabilities:
- Limit bandwidth usage: Software updates keep increasing in size, with major updates to OS X and iOS hitting multiple gigabytes. iOS apps and Mac apps from the Mac App Store are also an issue, given the number that users download and the frequency with which they’re updated. All that data adds up, and while you can’t avoid downloading one copy of each item, if you have a few devices in a household, or a number of users in an office or school, there’s no reason to tax your Internet connection downloading multiple copies of each item simultaneously as users update en masse.
- Control update distribution: Although Apple and independent developers always intend for their updates to address bugs, it’s not uncommon for an update to cause its own unanticipated problems. I’ve seen OS X and security updates break printing, prevent certain fonts from displaying, and cause certain apps to crash on launch. In each case, a subsequent update resolved the problems, but if you support numerous users, vetting updates before allowing them to be installed can save you significant headaches.
These ideas—caching software updates to reduce bandwidth usage and giving administrators control over which updates are made available to users—underpin two services in OS X Server: Caching and Software Update. They do roughly similar things, but don’t overlap entirely, so you may wish to run one, the other, or both, depending on your needs.
Decide Which Update Services to Use
Both the Caching service and the Software Update service are designed to download updates from Apple and provide them to users on your local network. But that’s where the similarities end, so let’s look at each in turn so you can decide which to run.
About the Caching Service
OS X Server’s Caching service is one of the easiest to configure and provides an immediate benefit to any network that hosts Apple devices. The Caching service does just what you’d expect from the name—it caches all updates from Apple on your server, and all Macs and iOS devices download from your server rather than directly from Apple. This offers two big benefits: reduced bandwidth and faster updating for users.
Bandwidth usage goes down because the Caching server downloads only a single copy of each update, and each device that needs the update gets it from the server rather than going back to Apple. So if Apple releases a new version of iOS or an update to the iWork apps for OS X, your Internet connection won’t be bogged down as each device struggles to download those large updates from Apple.
Similarly, because each device gets updates from the server over the fast local network rather than over your much slower Internet connection, users shouldn’t have to wait nearly as long for the updates to download.
Other than music and video purchased from the iTunes Store, the Caching service makes a local copy of nearly everything a Mac or iOS device can download from Apple, including:
- OS X and iOS updates
- Mac apps purchased from the Mac App Store and updates
- iOS apps and updates
- Books purchased from the iBooks Store
- Apps and books from iTunes U
- Internet Recovery software
Running the Caching service is a no-brainer, since any home, school, or company with more than a couple of Apple devices will benefit, and it takes only moments to set up. The only thing the Caching service doesn’t do is let you choose which updates your users see; for that, turn to the Software Update service.
About the Software Update Service
It’s less clear that you should run the Software Update service, since it works only with Mac software from Apple (not apps from the Mac App Store) and requires more configuration, both in terms of choosing which updates to release on the server and in pointing client devices at the server.
The main reason to run the Software Update service is if you want more control over which Mac updates are made available to users on your network. This likely isn’t important in a home environment, and might not be worth the effort in a small office, but once you’re at the enterprise level, it’s essential for ensuring that users don’t install an update before you’ve had a chance to vet it.
That said, if you’re serious about wanting to centralize software updates for your organization, you may wish to investigate a third-party option. In my experience, the Software Update service has three limitations:
- Software Update cannot be configured to serve update packages from other vendors, such as Microsoft and Adobe. If you rely on Microsoft Office or the Adobe Creative Suite and want to centralize those updates, Software Update won’t help.
- You can’t release updates to only a group of Macs, making it hard to maintain a testing group.
- Although this isn’t OS X Server’s fault, many Apple updates require that the user enter an administrative password to install. If you haven’t given your users administrator-level accounts on their Macs, you’ll have to turn to another tool (including Apple’s own Apple Remote Desktop) to install automatically.
Many organizations have addressed these issues by relying on third-party solutions, such as the comprehensive Absolute Manage, FileWave, and JAMF’s Casper Suite, all of which are commercial software and offer a wide variety of features. On the open-source side, there’s Reposado, a replacement for Software Update that can run on any Unix-based hardware and lets you create an unstable/testing/release workflow.
But don’t get me wrong. Overall, the Software Update service is easily configured and managed, and works well for deploying updates to client Macs. It is what it needs to be for a large percentage of OS X Server administrators.
So which should you use? Everyone should enable the Caching service, but only those who need to approve Mac updates before they’re presented to users need to turn on Software Update.
Configure the Caching Service
To get started with configuring the Caching service, open the Server app and click Caching in the sidebar. There are only three settings: where the cached data should live, how large the cache should be, and whether or not to cache content for users on subnets. Configure them before you click the ON button.
First, decide if you want the cached data to live on the volume that contains service data for OS X Server (generally the startup drive). If not, click the Edit button to the right of Volume, and choose a new volume for the cached content.
I recommend choosing a drive with plenty of free space, since your cache size should be at least 100 GB. It’s best to do this before turning the Caching service on, to avoid needing to move gigabytes of data.
Once you’ve chosen the appropriate destination, drag the Cache Size slider to the desired amount of space. Allot at least 100 GB, but since the slider doesn’t allow for much precision, you may not be able to choose the exact size you want. The smaller the cache, the more likely older updates will be deleted to make room for new ones, forcing the Caching service to download them again when requested. Don’t worry too much about the cache size right now, since you can always increase it later, as long as there’s room on the drive.
Most people should leave the “Only cache content for local networks” checkbox selected; deselect it only if you have a complex local network with subnets and you want to provide cached content for users on those subnets.
That’s it. Click the ON button to enable the Caching service, and it will start downloading updates and purchases from Apple (Figure 1). It doesn’t do so right away, but instead waits until a particular update has been requested by a device, after which it makes that update available to all other devices on the network.
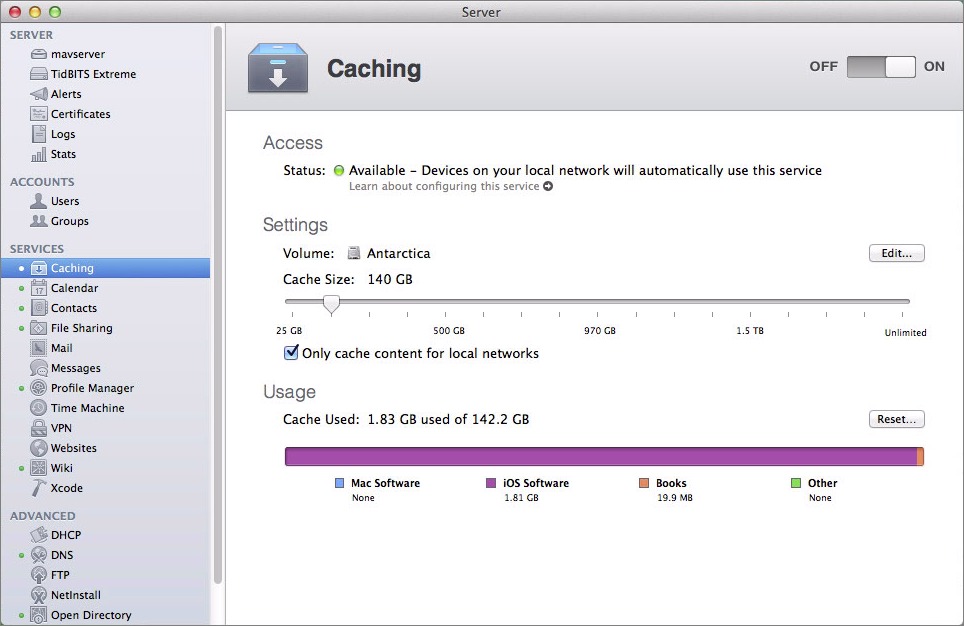
Figure 1: Configure the Caching service by choosing a destination and setting a cache size.
Nothing needs to be done to alert Macs and iOS devices on the network to the presence of the Caching server; they use it automatically, taking advantage of high-performance Wi-Fi and Ethernet connections and leaving your Internet connection free for what’s important: Netflix!
Configure the Software Update Service
Enabling the Software Update service isn’t significantly more difficult than the Caching service, but it requires a bit more thought, and potentially quite a bit more time.
To get started, open the Server app and click the Software Update service. By default, Software Updates is set to work in Automatic mode, where it simply mirrors Apple update servers, making every update that Apple publishes available to your users unless you disable a specific update manually. Plus, when updates are no longer supported by Apple, they’re removed automatically, which often isn’t desirable (since you likely wish to keep an older update available while you test the new one).
Instead, I assume you want more control which updates are offered to your users, and to get that control, select Manual. That done, click the ON button to enable the service and start downloading the list of updates (Figure 2).
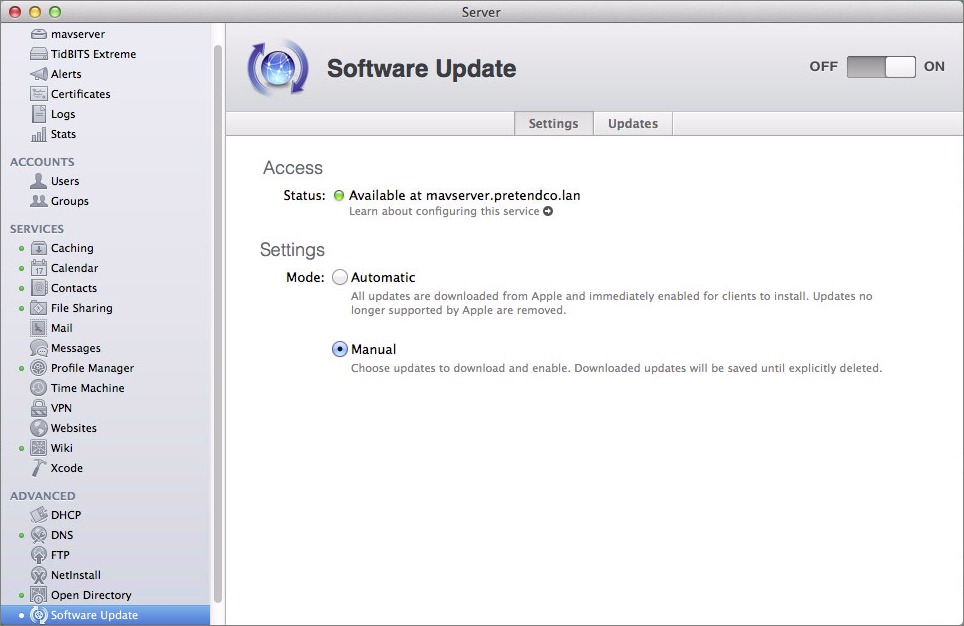
Figure 2: Run the Software Update service in manual mode to gain full control over which updates are offered to your users.
Click the Updates tab to see them, but don’t expect anything to appear right away. It can take 15–30 minutes to download just the list of updates from Apple, even with a decently fast Internet connection, so go read your email or get a cup of coffee. I’ll wait.
Once the Updates tab has populated with the list of updates from Apple (there are a lot—773 as of this writing!), you need to decide if you want to store them all locally or not. If so, select the “Automatically download new updates” checkbox, but read on before you do.
The problem is that Software Update needs a lot of space—assume at least several hundred gigabytes—and you can’t easily control how much space is used. Annoyingly, unlike the Caching service, you can’t relocate just the Software Update data; instead, you must relocate all the service data for OS X Server as a whole.
Now it’s time to work with individual updates (Figure 3). With so many items, it’s essential to remember that you can sort the list by clicking the header of any of the columns: Name, Version, Date, Size, and Status. Click the column header a second time to reverse the sort. Equally as useful is the Filter Updates field, which limits the updates listed to those that match an entered search term.
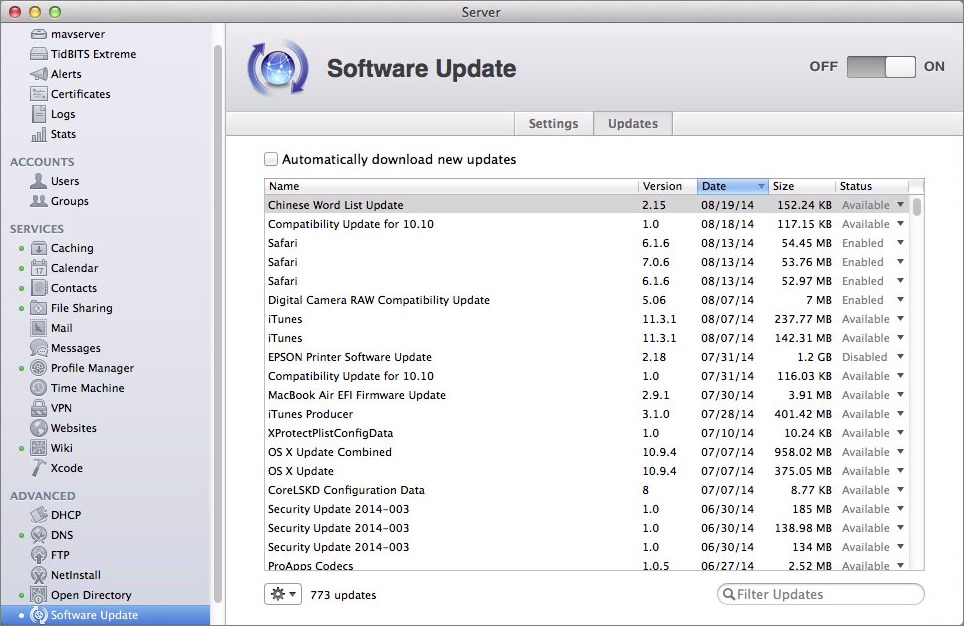
Figure 3: Work with individual updates in the Updates tab.
Each individual update can have one of four statuses:
- Available: If “Automatically download new updates” isn’t selected, this status means that the update is available to download, but isn’t currently stored locally.
- Waiting: While an update is downloading, the status changes to Waiting. You’re more likely to see it for large updates.
- Enabled: When an update’s status is Enabled, it has been downloaded and is available for users to install.
- Disabled: An update with the Disabled status remains local, but isn’t available for users to install.
To change these statuses and control the storage of each individual update, you have the following options, available from the gear  menu at the bottom of the screen and from the pop-up menu to the right of each item.
- Download: For updates whose status is Available, you can download them manually; they remain disabled after downloading and must be enabled separately.
- Download and Enable: This option downloads and enables available updates in one action.
- Enable: Updates that have been downloaded and are disabled can be made available to users with this command.
- Disable: If you want to prevent users from accessing an update that was previously enabled, choose Disable.
- Remove: To reclaim the space used by an update, whether it’s enabled or disabled, choose Remove. Needless to say, removing an update disables it as well.
- View Update: To read the release notes for a selected update, choose View Update (or just press Return). The status and gear
 menu are replicated in the Update Summary view (Figure 4).
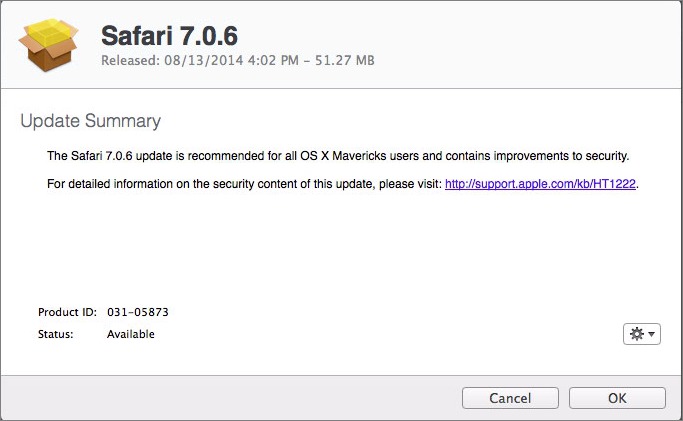
Figure 4: Learn more about individual updates by selecting them and pressing Return.
 menu to work on them all at once.
 menu: Check for Updates. When you’re working in Manual mode, if a new update doesn’t appear in the list automatically, choose Check for Updates to force a check.
Once you’ve configured all the appropriate updates as desired (and this is what takes time, since there are a lot to go through), it’s time to configure client Macs.
Point Clients at the Software Update Service
There are two ways to configure client Macs to look to your Software Update server instead of Apple’s, but neither is particularly pretty. If you’re using Profile Manager and distributing profiles to each Mac, the best approach is to add a custom setting to the profile. If that’s not possible, you’ll have to resort to the command line on each client Mac.
Configure Software Update with a profile
If you haven’t already, run through the steps in Chapter 9, Mobile Device Management, to Enable Profile Manager and Enroll Devices. Then, follow the instructions in Manage Devices to edit the settings for the appropriate group, after which you can follow these steps, clicking OK and then Save to save your changes.
- Scroll to the bottom of the list of settings, and click Custom Settings.
- In the Configure Custom Settings screen, click Configure.
- In the Preference Domain field, enter
com.apple.SoftwareUpdate. - Click Add Item to add a key/value pair.
- In the Key field, change New Item to
CatalogURL. - Leave the Type pop-up menu set to String.
- In the Value field, enter the URL of your server, on port 8080 and with
index.sucatalogappended, as inhttp://mavserver.pretendco.lan:8080/index.sucatalog(Figure 5).
Figure 5: Use a custom setting to point Macs at your Software Update server using a profile.
Configure Software Update via the Command Line
This approach is conceptually simpler, but requires touching each individual Mac. Open Terminal and enter a command like this one, replacing mavserver.pretendco.lan with the hostname of your server.
sudo defaults write /Library/Preferences/com.apple.SoftwareUpdate CatalogURL http://mavserver.pretendco.lan:8080/index.sucatalog
To verify that you entered the right information, check your work with this command:
defaults read /Library/Preferences/com.apple.SoftwareUpdate CatalogURL
If you want to switch back to using Apple’s default Software Update server again, enter this command:
sudo defaults delete /Library/Preferences/com.apple.SoftwareUpdate CatalogURL
Once all this is done, open the App Store app and click Updates to see the updates that you’ve made available for that particular Mac. Remember that only those that are necessary for that Mac will appear, so if it was up to date before you set up the Software Update service, you may not see anything until a new update appears.
Read More: About | Chapter 1 | Chapter 2 | Chapter 3 | Chapter 4 | Chapter 5 | Chapter 6 | Chapter 7 | Chapter 8 | Chapter 9 | Chapter 10 | Chapter 11 | Chapter 12 | Chapter 13 | Chapter 14
I've set up the Yosemite Server beta on a Mac mini. One reason I want to use this is for caching. It doesn't seem to work; I've been downloading iOS and OS X updates to my various devices, and the data is not going through the server, and the cache on the server isn't filling up. (It says 15 MB used for iOS apps; but I've updated much more than that.
As I understand, this should be transparent, with the server sending some sort of info to Apple's servers. It's clearly not the case here, and there must be something I need to do on the client devices. Any ideas why it's not working? I doubt it's because it's the Yosemite beta...
No, the Caching service is entirely transparent (at least in the Mavericks version), so I doubt there's anything you're missing. The Caching server does need to be behind a NAT gateway, so it and the clients it's serving are on the same local network.
You can also look at the Bytes Server graph in the Stats screen to see if anything's happening there.
BTW, I wouldn't dismiss the fact that you're using Yosemite Server beta - Apple has been known to break large chunks of OS X Server in major releases, such that many admins don't even think about upgrading for a few dot releases.
Another question about software updates and caching. I have the App Store settings set to auto-downloand and install updates. But when I go to the App Store, and see updates, they're not downloaded, and I have to enter my Apple ID password - as I'd expect - to download them.
So how will it ever auto-downloand and install updates?
I'm clearly missing something here; I've never had this setting turned on on any of my Macs, so maybe it will just work? For now, it's not; there are three updates stuck that won't download either automatically or manually.
Hmm, I'm really not sure what's going on with this - we'll see if Charles has any thoughts. The Yosemite Server beta could be involved, but there's no telling. On my Mavericks Server box, Caching just works, with no client configuration.
The beta builds don't usually do them properly as they usually point to a repo that's not updated/live yet. I've found it works on the day of the new release but often not very much time before. The Software Update service can be pointed at the old location, but Caching is dynamic and doesn't have an XML file of all the updates.
It might be worth adding to the "Differences between Caching and Software Update" box that for a client - they will update via the Internet directly if not on the servers LAN. However if software update is configured the client will not fall back to Internet updates if the server is not available.
Also it might be good to mention in the Caching Service section how the client discovers the cache service (is this via Bonjour or some other broadcast method?).
Thanks - I'll take a look at that in the final edit pass. We'll see what Charles says about the Caching discovery approach, but note that there's no configuring it in any way. The one fact we have to add is that the Caching server needs to be behind a NAT gateway so it can serve just the local clients.
Caching is still not working for me on Yosemite server, with the final release. I'm quite perplexed; yet another one of these things that's supposed to "just work" but doesn't.
Anything interesting in the Caching Service Log accessible from the Logs pane? Or in the Caching Bytes Served graph on the Stats pane?
Nov 12 00:35:01 Walden.local nsurlstoraged[149]: realpath() returned NULL for /var/root/Library/Caches/fpsaud
Nov 12 00:35:01 Walden.local nsurlstoraged[149]: The read-connection to the DB=/var/root/Library/Caches/fpsaud/Cache.db is NOT valid. Unable to determine schema version.
Nov 12 00:35:01 Walden.local nsurlstoraged[149]: realpath() returned NULL for /var/root/Library/Caches/fpsaud
Nov 12 00:35:01 --- last message repeated 1 time ---
Nov 12 00:35:01 Walden.local nsurlstoraged[149]: ERROR: unable to determine file-system usage for FS-backed cache at /var/root/Library/Caches/fpsaud/fsCachedData. Errno=13
Nov 12 00:08:56 Walden.local AssetCache[20092]: [EAPOLControl.c:66] get_server_port(): eapolcontroller_server_port failed, unknown error code
Nov 12 00:08:56 Walden.local sandboxd[300] ([20092]): AssetCache(20092) deny mach-lookup com.apple.airportd
Nov 12 00:08:57 Walden.local AssetCache[20092]: [EAPOLControl.c:66] get_server_port(): eapolcontroller_server_port failed, unknown error code
Nov 12 00:08:57 Walden.local sandboxd[300] ([20092]): AssetCache(20092) deny mach-lookup com.apple.airportd
The Stats pane shows nothing served from the cache in the past 7 days; I updated a bunch of iOS apps today, and have updated plenty of iOS and Mac apps in the past week. So it's clearly broken.
It is on, I can confirm that...