Take Control of OS X Server, Chapter 14: Server Maintenance
This article is a pre-release chapter in the upcoming “Take Control of OS X Server,” by Charles Edge, scheduled for public release later in 2014. Apart from Chapter 1: Introducing OS X Server, and Chapter 2: Choosing Server Hardware, these chapters are available only to TidBITS members; see “Take Control of OS X Server” Streaming in TidBITS for details.
Server Maintenance
Assuming you’ve worked your way through this book in order, congratulations! You should have a fully functional server that’s providing you and your users with the services you need. I’ve sprinkled a variety of maintenance tips that are specific to different services throughout the book, but to close out, I want to offer some general advice to keep your server running happily.
Don’t assume that you need to do much here—I’ve visited clients for whom I’ve installed OS X Server years before to find that the uptime on the server is over 1,000 days (that means nothing was rebooted for 3 years!). That’s pretty impressive, if only in that they didn’t install new versions of OS X or Server itself, suffer a power outage, or even need to move the server for 3 years. You shouldn’t expect that level of stability in every situation, especially given the move to annual major releases of operating systems.
Additional Resources
No person is an island, and neither is a system administrator. There’s a strong sense of community among Apple system administrators because we’ve all gone through the same things, good and bad. So if you have a problem or are confused about something, there are a number of places you can ask for help. And of course, if you run across a particularly useful tip, please share it! Here are a few of my favorites:
Internet resources:
- AFP548: The first major site for OS X Server administrators, AFP548 has remained relevant for a decade and shows no hint of slowing down. Originally started as a blog, it now offers podcasts, articles, and discussion forums.
- MacEnterprise: The “MacE” list, as I’ve always referred to it, is a great resource for a wide variety of Apple products, primarily for systems administrators. On it, you’ll find a lot of smart people who like to help others.
- Krypted: This is my personal Web site, but I post a lot of relevant content for OS X Server.
- Apple OS X Server + Enterprise Support: Apple’s main server support site contains helpful articles about OS X Server and other enterprise-related products. Also don’t miss Apple’s OS X Server Advanced Administration site, whose information varies between documenting obvious interface and providing useful behind-the-scenes details.
Conferences:
- MacTech BootCamp and Conference: MacTech BootCamp conferences are one-day intensive events in a variety of North American cities with talks aimed at consultants and support personnel. MacTech Conference takes place over several days and has an entire track aimed at IT professionals. I often speak at MacTech Conference, and Take Control’s Adam and Tonya Engst are frequent attendees—it’s worthwhile for the networking alone.
- MacIT: Held in conjunction with Macworld/iWorld, MacIT is another multi-day conference that’s a great central location to find seminars and sessions that focus on OS X-based system administration and servers.
- MacSysAdmin: The only major conference for Apple administrators in Europe, MacSysAdmin offers tons of sessions revolving around OS X, OS X Server, and iOS administration. And if you can’t make it to Sweden, the sessions are posted online (in English) for free after the conference every year!
Tasks to Perform as Necessary
Part of being a system administrator is responding to the unexpected. That’s why you turned on alerts in Configure Alerts, back in Chapter 3, Preparation and Installation. Server will notify you when various things go wrong, and you should deal with them as they come up. Some things that you might encounter include running out of disk space, OS X Server updates, certificates expiring, and so on.
Plus, you’ll undoubtedly hear about problems from your users or from the outside. If you’re running a mail server, for instance, and it ends up on an RBL, the monitoring service you configured in Check the RBLs, in Chapter 8, Mail Services, will send you an email alert. Or, if a user is having problems that might be solved by an update you’ve delayed releasing (see Configure the Software Update Service in Chapter 12, Software Updates), you may get a direct request to
enable that update.
A few tips then, about what to do in some common situations.
OS X Server Is Updated
Updates to OS X Server should be installed only if you need the fixes or promised new features. I mean it—if your server is running well, why mess with it? Most problems I’ve seen are caused by changes we administrators make to our systems. Therefore, I recommend a one- to two-week cooling-off period before installing any major updates on your server, either to OS X in general or OS X Server in specific.
When you are ready to update, first look around on the sites mentioned above to see if others are reporting problems related to the update. If you don’t see anyone complaining about any problems—and trust me, people will complain if there are issues!—you can move ahead with the update, preferably at a time when most users won’t be impacted by downtime.
Before you install the update, make a separate bootable duplicate of the server, just in case something goes wrong during the update or the upgrade causes any unexpected problems. (And you are backing up the server in general, right?) You can make your bootable duplicate with a tool like Carbon Copy Cloner or Super Duper. Once you have a good clone of the server to fall back on, use Software Update to install the update.
Once the update is complete, make sure that everything works as intended, and even if it seems fine, keep a close eye on your services for a few days!
The Server’s Boot Drive Runs Low on Space
The boot volume should fill up on a server only if your service data is on that drive, which is likely if your server has only a single drive. When this happens there are a few things you can do, listed in order of increasing difficulty:
- Reduce clutter. We all keep too much junk these days. Look into deleting or moving data off the server. The free GrandPerspective is a useful tool for visualizing where the drive’s space is being used.
- Move shared folders. This is a manual process, but an easy one; see A Shared Folder’s Drive Runs Low on Space, next.
- Reduce the amount of space used for software updates in Caching (see Configure the Caching Service) and Software Update (see Configure the Software Update Service) in Chapter 11.
- Move the service data. The destination drive should be more than large enough to store all your data, and the process will move settings for a lot of services, so it could cause a good bit of downtime. To proceed, click the name of your server at the top of the sidebar in Server, click the Settings tab, and click the Edit button next to Service Data.
- Clone your server to a much larger volume. You can buy really large drives these days, or even arrays of drives. Such a drive or array can be used as a boot volume and thus eliminate the need for the previous steps, if you want to stick with a single large volume server environment.
A Shared Folder’s Drive Runs Low on Space
As I mentioned above, when a shared folder causes a drive to fill up, the easiest thing to do is move the folder. To do so, first let everyone know that the share in question will be unavailable for a while. Next, I recommend taking a screenshot of the existing shared folder’s settings, so you have a record of what its name is, what the permissions are, and what services have been enabled (Figure 1).
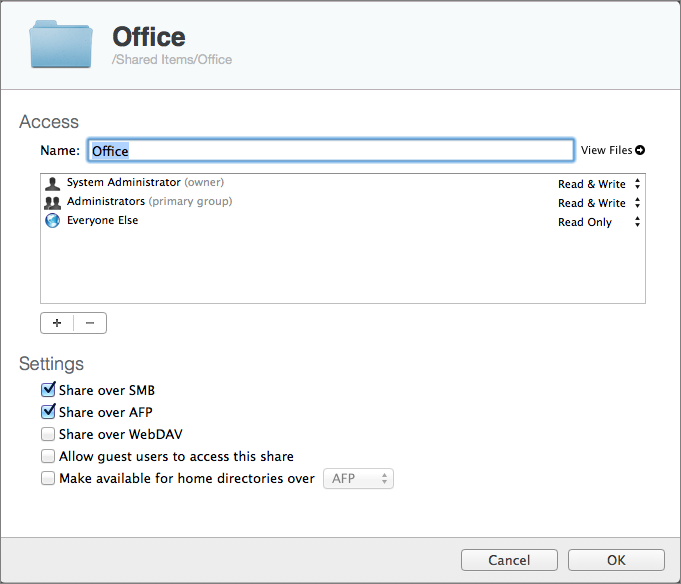
Figure 1: Record the settings for a shared folder with a screenshot before moving it.
Then, either stop the File Sharing service entirely or if you have other shared folders that should remain available, deselect the selected Share Over checkboxes. This step ensures that no files will be changed while you’re moving data.
Next, create a folder on the new drive with the same name as the old shared folder. (It’s not essential to maintain the same name, but it’s usually a good idea.) Then copy the data from the old shared folder to your new folder, and recreate the shared folder in Server with the same settings.
Once everything is configured and file sharing is enabled again, test the new shared folder. In particular, be sure to test any aliases you or other users of the server may have created to files or folders on the server.
Weekly Tasks
It’s a good idea to check in on your server every week to make sure it’s running smoothly. But it’s also all too easy to get busy and forget to do these tasks, so I recommend putting a recurring event on your schedule.
Check Free Space on All Mounted Drives
Obviously, files can’t be saved to a drive that doesn’t have enough free space, and worse, OS X can slow down or even crash if the boot drive runs out of space. I’ve discussed how to address this problem earlier in this chapter, but ideally you’d anticipate the need for more space well in advance of it becoming a problem. To do this, you should keep track of the free space on your server’s drives, as well as on how quickly they are filling up.
In general, every drive should have at least 10 to 15 percent of its overall space free. But keep in mind, storage is relative to how the drive is used. For example, for a drive with 10 GB of free space that’s being used to share a small database, that amount of free space might be fine. But if your users are editing video, 10 GB of free space could be consumed before lunch.
A number of services can track things like free drive space for you, such as Watchman Monitoring (which can report on over 100 different issues). But for just drive space, I recommend looking at your drives manually. You could do this in the Finder by selecting a drive and choosing File > Get Info, though you undoubtedly knew that. For a faster check of all mounted drives, the Storage screen in the Server app is the easiest. Click the name of your server in Server’s sidebar, and then click the Storage button (Figure 2).
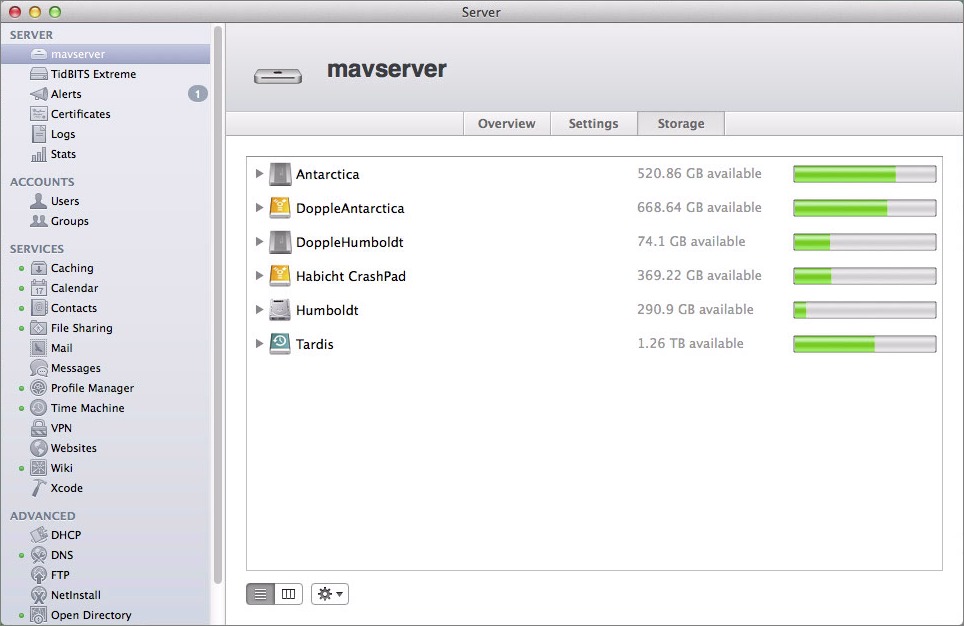
Figure 2: Check the amount of free space on all mounted drives regularly in Server’s storage screen.
Server Alerts When a Drive Runs Out of Space
Although Server posts an alert when a drive is almost out of space, that may be too late to prevent problems (see Configure Alerts, in Chapter 3). The drive in Figure 3 is a Time Machine drive, so it’s not a problem that it ran out of space; Time Machine takes that as indication to delete older backups.
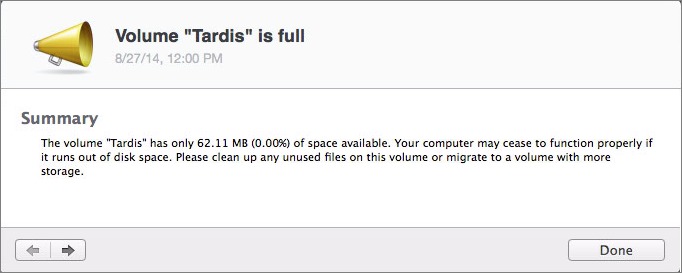
Figure 3: Server alerts you when a drive fills up.
These alerts appear in the Alerts screen in Server (click Alerts in the sidebar); depending on how you set things up, Server may alert you via email and/or push notifications as well.
Check Stats in Server
Free space is an important metric to track, but so are memory and CPU utilization, especially once you have a full complement of users hitting your server. For this, I like using two tools: Server itself and Activity Monitor.
Server Stats
On a weekly basis, it’s a good idea to glance at the Stats screen in Server; just click Stats in the sidebar. In the Stats screen, you can get a sense of the overall performance of the server by four metrics and over periods of time ranging from 1 hour to 7 days (Figure 4).
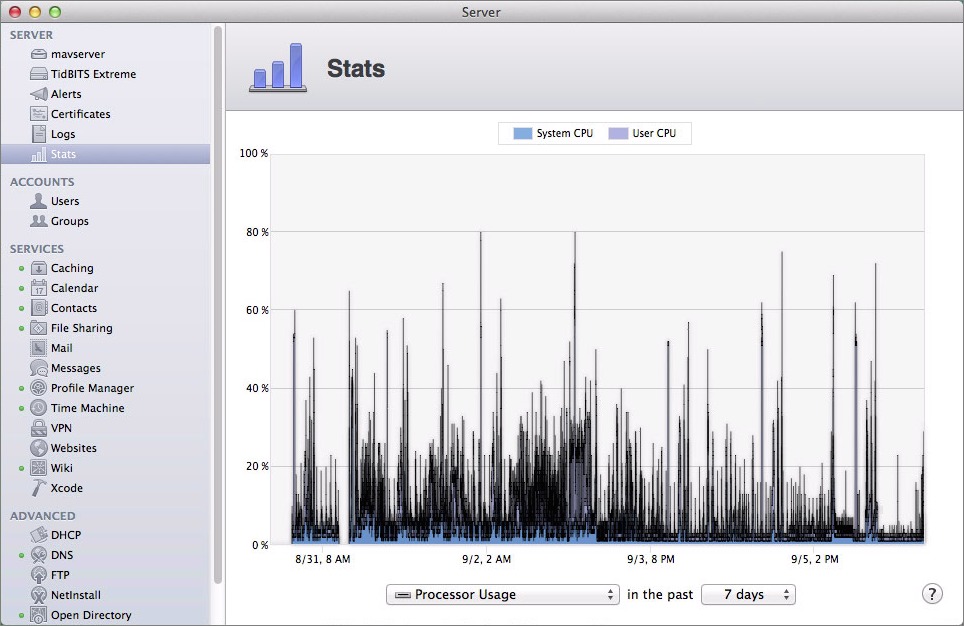
Figure 4: Check CPU, memory, and network traffic usage on a regular basis.
The graphed metrics you can see in the Stats screen include:
- Processor Usage: If processor usage spikes to 80–100% occasionally, you have nothing to worry about. But if it’s pegged in that range for lengthy periods of time, think about spinning up another server and migrating some services to it (or moving to that Mac Pro you’ve been lusting after—see the sidebar in Chapter 1, When to Add RAM or Buy a New Server). And if the server is running hot at night when no one should be using it much, look for some runaway processes with Activity Monitor.
- Memory Usage: Within limits, the solution to using all available memory all the time is to add more RAM. The limits, unfortunately, are hard—you can add only so much RAM to any given Mac. Once you’ve maxed out RAM, the only way to relieve pressure is to offload some services to another server.
- Network Traffic: Depending on how your network is designed and how your server is set up, there may not be a lot you can do if the network traffic graphs are showing excessive usage. Or, rather, there may not be much you can do reasonably—it’s always possible to replace old cabling and pre-gigabit Ethernet switches, and even add multiple network adapters to your server. But that can be difficult or expensive, given the physical environment in which you’re working.
- Caching Bytes Served: This screen displays how much data the Caching server transfers, both incoming from the Internet, and out to client devices.
Activity Monitor
Server’s Stats screen is useful for the historical overview of what has been happening on the server, but it’s not at all helpful when it comes to figuring out what’s happening now or what process is causing some sort of a problem. For that, turn to Activity Monitor, which is installed by OS X by default in /Applications/Utilities.
In Activity Monitor, I mostly look at the CPU and Memory panes; switch by clicking the buttons at the top (Figure 5). To get a sense of what’s happening, click the %CPU column header (in the CPU screen) or the Memory column header (in the Memory screen) to sort the list of processes by that column. You may have to click it again to see the piggiest processes at the top—those that are using the greatest percentage of the CPU and the most RAM.
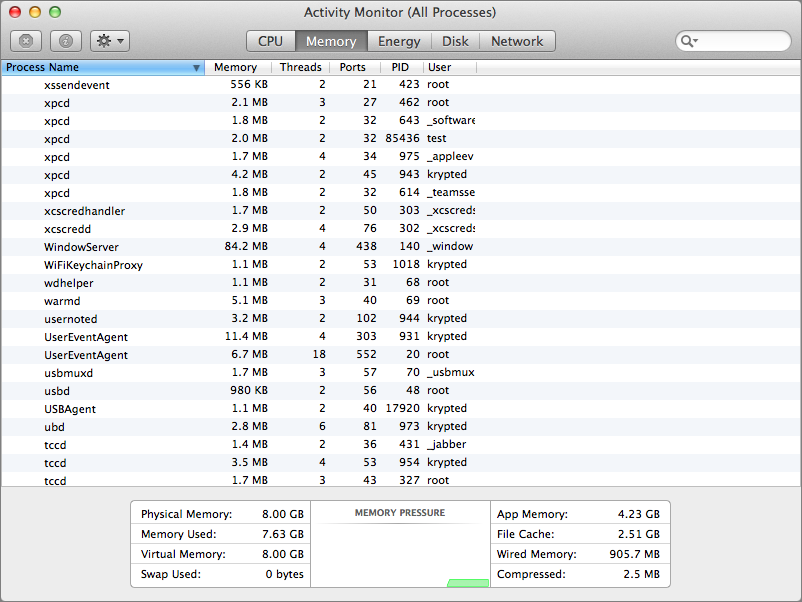
Figure 5: Using Activity Monitor to check memory utilization.
The other panes—Energy, Disk, and Network—can occasionally provide some insight into a problem, but are less useful than CPU and Memory.
Skim Logs for Key Services
Modern Unix-based operating systems like OS X are extremely chatty, logging all sorts of messages and errors for troubleshooting purposes. The same is true of the applications that run OS X Server’s various services, and if you’re having a problem with a particular service, you should always start the troubleshooting process by looking at its logs.
However, it’s also worthwhile to scan logs every so often to see if something might be happening that neither you nor your users have yet noticed. That said, don’t worry too much about errors; Unix apps are loquacious to a fault, and many “errors” are irrelevant to normal usage. If you’re uncertain, run some Google searches on the error text, removing anything specific to your server, like its name. If others have discussed the error and included the same error text, those pages can help you figure out whether it’s interesting data or just background noise.
As with processor and memory usage, Server includes a Logs screen that does a nice job of showing each individual service’s logs, along with the general System Log. There’s nothing wrong with using Server’s Logs screen for these weekly checks, but to track down a problem, I prefer using Console, another bundled utility with OS X that’s in /Applications/Utilities.
Console is a more capable log viewer than Server (thanks largely to being able to filter the log to just those entries that match a search term, rather than just being able to search for a term, as Server can do), and it helps with connecting a log entry with similar events in the same time frame. That’s key because many issues are caused by something from another service or a process that’s entirely outside OS X Server.
Each service will have a different pattern to search for. Any entries that start with mdworker, the most common entry in most logs, indicate that Spotlight is indexing a drive. You can likely disregard any issues there. servermgrd, shown in Figure 6, contains information about the global service and then most logs in Server will be called out by the impacted service (unless they’re a part of servermgrd).
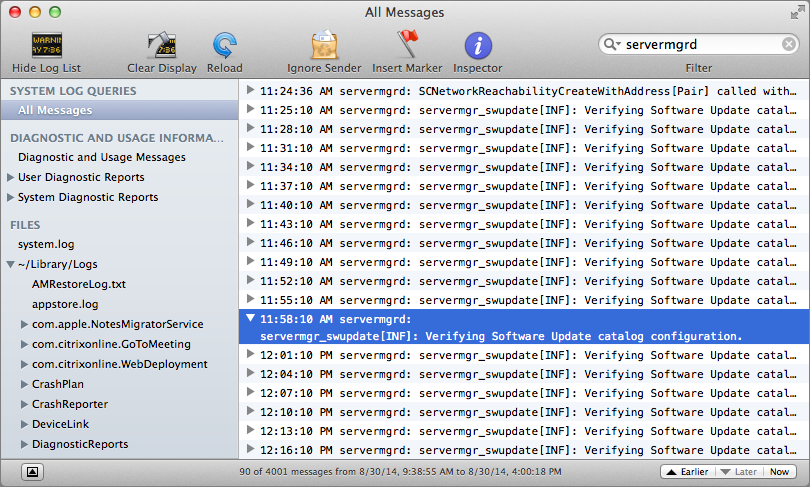
Figure 6: View logs using the Console app.
Once you identify the log entries of interest, run some Google searches on them to see if you can find some indication of what they mean. And if all else fails, ask in one of the venues I mentioned earlier, in Additional Resources.
Release Software Updates You’ve Vetted
If you’re running the Software Update service (see Configure the Software Update Service in Chapter 12), you may wish to release software updates to your users on a regular basis so they can become accustomed to updates appearing over the weekend, say, or on Wednesday mornings.
Check Backups and Rotate Backup Media
When it comes to backups, the most important thing is consistency. Years ago, I developed a checklist to ensure that I’m executing my backup strategy properly, and versions of this checklist are still in use by my old consulting company and by many of my former clients.
It starts with checking backup logs to see if any files were skipped. It then has me rotate my offsite backup drives (or replace tapes or make sure my cloud storage hasn’t evaporated). The checklist also keeps me honest by making me test a restore of some backed-up data to verify that the backups are working.
Every environment will have specific things you consider to be important. Decide what’s important to you and make your own checklist to run through each week.
Monthly Tasks
A weekly schedule would be overkill for some tasks, so consider settings aside a few minutes at a regular time each month for tasks aren’t likely to crop on an weekly basis but still need to be done periodically.
Audit Users
As users leave, you should disable their accounts to prevent them from becoming security holes. You don’t want to keep those accounts in the system indefinitely, though, so after a cooling-off period of about a month, I recommend deleting those disabled accounts.
Change Passwords
Although this is something of a personal preference and is most important in a situation where the server can be accessed by multiple people, I like to change the password of accounts that can administer my server routinely. Monthly password changes would be excessive for some environments, but I’d change them at least quarterly.
Keep in mind that by the time you’re done setting up a server like this, you may have created a Directory Administrator user, a local administrative user, the root user and local network user, all with administrative access. If you’re changing passwords for security reasons, you need to change the passwords for all these accounts and any others that can administer the server.
Annual Tasks
Finally, we come to those tasks that come up extremely infrequently. It’s not so much that you need to do these every year in January, for instance, but that they may need to be done once a year or so.
Renew Push Notification Certificates
The Apple Push Notifications certificate needs to be renewed every 2 years. If you have set up alerts (see Configure Alerts, in Chapter 3), you will receive a routine alert indicating as much.
Renewing is simple. To do so, in Server, click the name of the server in the sidebar, then click the Settings button. Click the Edit button for “Enable Apple push notifications” and then click Renew (Figure 7).
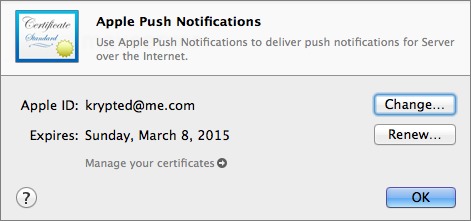
Figure 7: Renewing Apple Push Notifications certificate
You are prompted for the Apple ID credentials associated with the certificate. Enter them and then click OK to complete the process.
Maintain the Server’s Drives
Think of drive maintenance like taking Omega-3s to keep your brain in good shape! But while you can’t eat too much salmon, you can perform disk maintenance too frequently, and some people go overboard when it comes to using Disk Utility’s Repair Permissions and Repair Disk options.
I generally recommend these maintenance tools only if the server is experiencing a problem that could be traced to permissions (and only to Apple software; Repair Permissions doesn’t affect third-party software) or to directory corruption. That said, it’s worth using these tools once a year or so, to make sure that problems aren’t sneaking up on you. Always make sure you have a complete backup before running any drive maintenance procedures!
Reboot the Server
The client whose server hadn’t been rebooted in 3 years notwithstanding, computers really should be rebooted every so often. Certain housecleaning routines run only when the server is rebooted, so at least once a year, when no one is using the server, restart it. You could do this as often as monthly, or you could just reboot the server whenever it starts acting a little funky.
Clean the Server
This might seem like a strange task to end the book with. But it does matter, and far more than you might expect. Dust gets into computers, where it coats logic boards and blocks fans, causing systems to overheat and ultimately fail. So once a year or so, shut the server down, open it up, and use compressed air to clean it out well. (While you’re at it, clean your Mac as well!)
I also suggest that you take the opportunity to vacuum the area around the server so there isn’t a lot of dust for it to suck back in, tidy all the cables connected to the server to prevent inadvertent disconnections, and remove any nearby clutter. If nothing else, it shows others that you care about the server both virtually and physically.
Read More: About | Chapter 1 | Chapter 2 | Chapter 3 | Chapter 4 | Chapter 5 | Chapter 6 | Chapter 7 | Chapter 8 | Chapter 9 | Chapter 10 | Chapter 11 | Chapter 12 | Chapter 13 | Chapter 14
Start the discussion in the TidBITS Discourse forum