A Prairie HomeKit Companion: Setting Up Accessories and Rooms
In “A Prairie HomeKit Companion: Core Concepts” (3 November 2016), I discussed the general principles of HomeKit automation, such as Accessories, Rooms, and Scenes, and offered a general overview of HomeKit. In this installment, we’ll explore some of the details involved in setting up the software, and then we’ll put it all together in “A Prairie HomeKit Companion: Controlling Accessories” (16 January 2017). If you’re impatient, I have a compact guide to HomeKit in “iOS 10: A Take Control Crash Course.”
General Advice — Before you begin, you need at least one HomeKit device. In “A Prairie HomeKit Companion: Core Concepts” (3 November 2016), I recommended two categories of HomeKit device:
- A smart plug, such as the Elgato Eve Energy or the iHome SmartPlug. You plug one of these inexpensive smart plugs into an electrical outlet to turn it into a smart outlet. Then you can turn any device plugged into it — a lamp, heater, or fan, for instance — on or off by controlling the plug.
- A smart lighting system, such as the Philips Hue. The Hue system is much more expensive than a smart plug, but it offers capabilities that a smart plug and lamp combo can’t, such as dimming and color changing. For more on the Hue, see “Getting Started with the Philips Hue Smart Light Bulbs” (1 August 2016).
I recommend these devices for two reasons: they’re immediately useful and they’re not scary. A smart lock or a thermostat is a big investment that might require professional installation, but anyone can install bulbs and plugs. Plus, if you program your lamp incorrectly, it could annoy you by turning on or off at the wrong time, whereas a mistake with a smart lock or thermostat could result in you being locked out of a cold house.
Remember that not every home automation gizmo is HomeKit-compatible — Apple must approve all HomeKit devices, which is an expensive and time-consuming process for manufacturers. Apple publishes a full list, and if you have any doubts, check the box for the “Works with Apple HomeKit” badge.
![]()
Finally, when you first launch the Home app, you’ll be prompted to create a Home, name it, and choose a background photo. Don’t stress about these choices, because you can easily change them later. The name “Home” and the default background picture are sufficient. You can set up multiple Homes, but for the sake of simplicity, I’ll assume that you have only one.
Setting Up Accessories — To take advantage of Home, the HomeKit control app built into iOS 10, you have to add your HomeKit Accessories to it. As I explained in “A Prairie HomeKit Companion: Core Concepts,” Accessories are the actual home automation devices.
First, power on your Accessory. The next step depends on your device. You have to set up Hue lights in the Hue app itself and then add them to HomeKit from the app, as I explained in “Getting Started with the Philips Hue Smart Light Bulbs.” However, you can set up many standalone devices, such as the Elgato and iHome plugs, directly in the Home app. Here’s how to do that:
- In the Home or Room screens, tap the plus button in the upper right.
-
Tap Add Accessory.
-
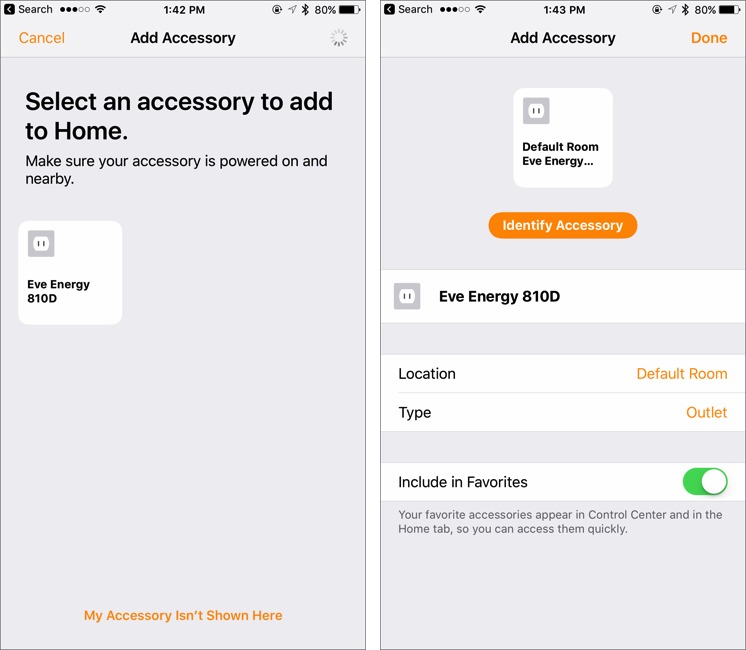
If everything is working correctly, your Accessory should appear on the Add Accessory screen. Tap it.
-
Next, you’ll be prompted to either type in or scan the device’s HomeKit code. That code can be found either on the device or in the box. Some devices, like those from Elgato, provide their codes on convenient cards. Be sure to save those codes, ideally in a secure vault like 1Password, because you need them every time you set up the devices.
The final screen offers a number of options:
-
Identify Accessory: Tapping this button activates your Accessory so you can spot it in the real world, often with some sort of blink or flash. This is handy if you’re not quite sure which device in your house you’re working with. That might seem ridiculous, but just wait until you’re setting up multiple smart bulbs with names like SMARTBULBFN2187.
-
Accessory Name: By default, this is the factory name of the device, like “Eve Energy 810D.” I recommend changing it to something more descriptive, like “Music Room Lamp.”
-
Location: From here, you should choose the Room in which your Accessory will live. The default is — get this — Default Room, which is sort of a waiting room for your Accessories. If you haven’t yet set up a Room, you can do so from the menu — just give it a name and choose a picture (the default is fine).
-
Type: This field describes the type of Accessory. You can leave it alone.
-
Include in Favorites: Enabling this switch makes it so the Accessory appears in the Home screen of the Home app, as well as in the Home pane of Control Center. Unless you have a lot of HomeKit Accessories (one TidBITS reader told me he has 75!), I recommend leaving this switch turned on.
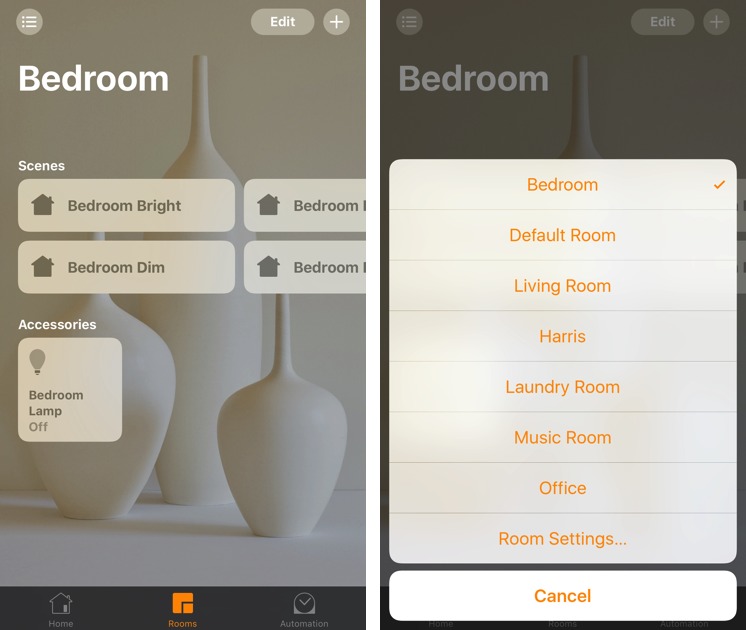
Setting Up Rooms — Now let’s talk about Rooms. As you might recall from “A Prairie HomeKit Companion: Core Concepts,” Rooms are the second level in the HomeKit hierarchy, under Homes. HomeKit Rooms, of course, should match up with the physical rooms where you have Accessories. I have Rooms like Bedroom, Living Room, and Laundry Room. You get the idea.
You access Rooms in the Rooms screen of the Home app. In that screen, tap the hamburger button to see and switch among a list of your Rooms. To add a Room, tap that hamburger button, choose Room Settings, and tap Add Room.
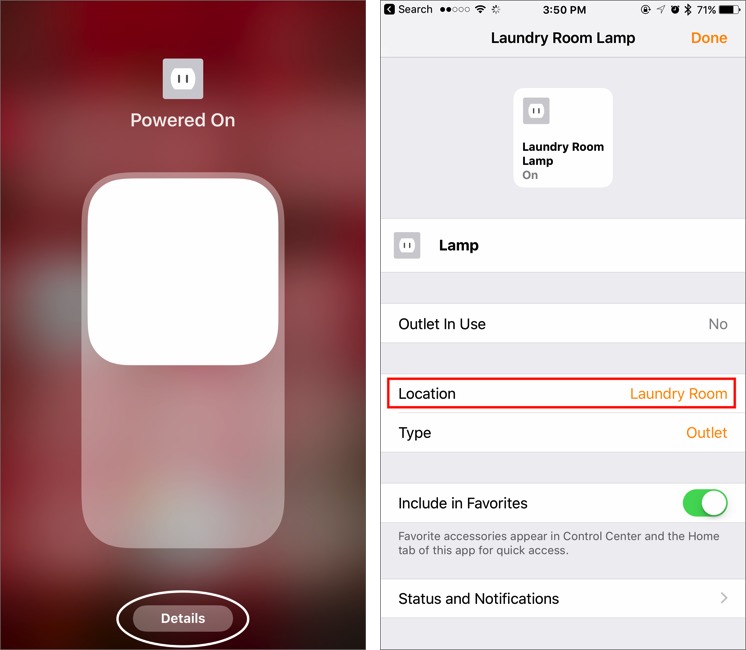
Accessories are always in a Room, even if it’s just the generic Default Room. As you set things up, you’ll want to move Accessories from one Room to another. To do this, tap and hold an Accessory (or use 3D Touch if your iPhone supports it), tap its Details button, and then choose Location to pick a new Room from the list.
Why are Rooms so important? Two reasons: they organize your Accessories in a logical manner and to support Siri. I can tell Siri to turn on my Living Room lights, and all the lights associated with that Room turn on.
Once you’ve set up one or more Accessories and Rooms, and put the Accessories in the appropriate Rooms, you’re well on your way to automating your home or office.
Just as Accessories are tied to a Room, so are Scenes, which are collected actions for your Accessories. In the next installment of this series (see “A Prairie HomeKit Companion: Controlling Accessories,” 16 January 2017), I’ll discuss additional Accessory options, controlling your Accessories, and creating and using Scenes.