Notes on Notes in iOS 9
I wrote about a lot of great new features in “iOS 9: A Take Control Crash Course,” but sadly, there wasn’t room to explore Apple’s notable revision of Notes as thoroughly as I wanted. So here I am to do that in TidBITS!
In iOS 9, Notes evolves from a simple app that supported only plain-text notes to one that offers checklists for things like grocery and to-do lists; advanced formatting to create basic outlines; the capability to attach images, videos, and documents; and sketching, which lets you draw your ideas on the screen. With these features, Notes is now capable enough to be the primary note-taking app for most people, although those who have already settled on another solution may not be compelled to switch. But first, I want to address three mild annoyances.
Notes Annoyances — First, despite being overhauled, Notes’s interface controls maintain the dull yellow text on a white paper background look that’s been around since iOS 7. Yellow on white isn’t the most readable color combination, and how the background paper texture survived Jonathan Ive’s skeuomorphism purge, I’ll never understand.
The second annoyance is that even to see the new features and sync those notes to other devices, you must “upgrade” your Notes accounts after updating to iOS 9 (or OS X 10.11 El Capitan). The problem with doing so is that the Notes app in 10.10 Yosemite (and iOS 8) doesn’t support the new format, so notes in your iCloud account won’t sync until upgraded. You have two choices:
- Upgrade Notes on your iOS 9 devices and use the iCloud.com Web app on unsupported devices.
- Skip the upgrade until you install 10.11 El Capitan. If you want to try the new features, you can do so with device-only notes.
Before you perform the upgrade, it’s also important to note that the syncing protocol has changed as well to provide increased speed and reliability, so Notes will no longer sync via IMAP or Microsoft Outlook once you upgrade. Or at least that’s what Apple says, but one commenter noted that he was able to maintain IMAP-based syncing. Plus, although it’s unclear what protocols are in place behind the scenes, you can still enable note syncing in at least Google accounts created either in the Internet Accounts preference pane in OS X or in Settings > Mail, Contacts, Calendars in iOS. In either case, toggle note syncing off and on again if it’s not recognized at first. Using
Google for note syncing would also likely provide some level of compatibility with Android devices.
Device-only notes still require that the associated account (On My iPhone/iPad/iPod) be upgraded; if you see Upgrade next to On My iPhone in the Folders screen (tap the back button once or twice to get there), tap it. Your notes will be upgraded to the new format with no data loss, and if you had a “Local Notes” folder, it will be renamed to just “Notes.”
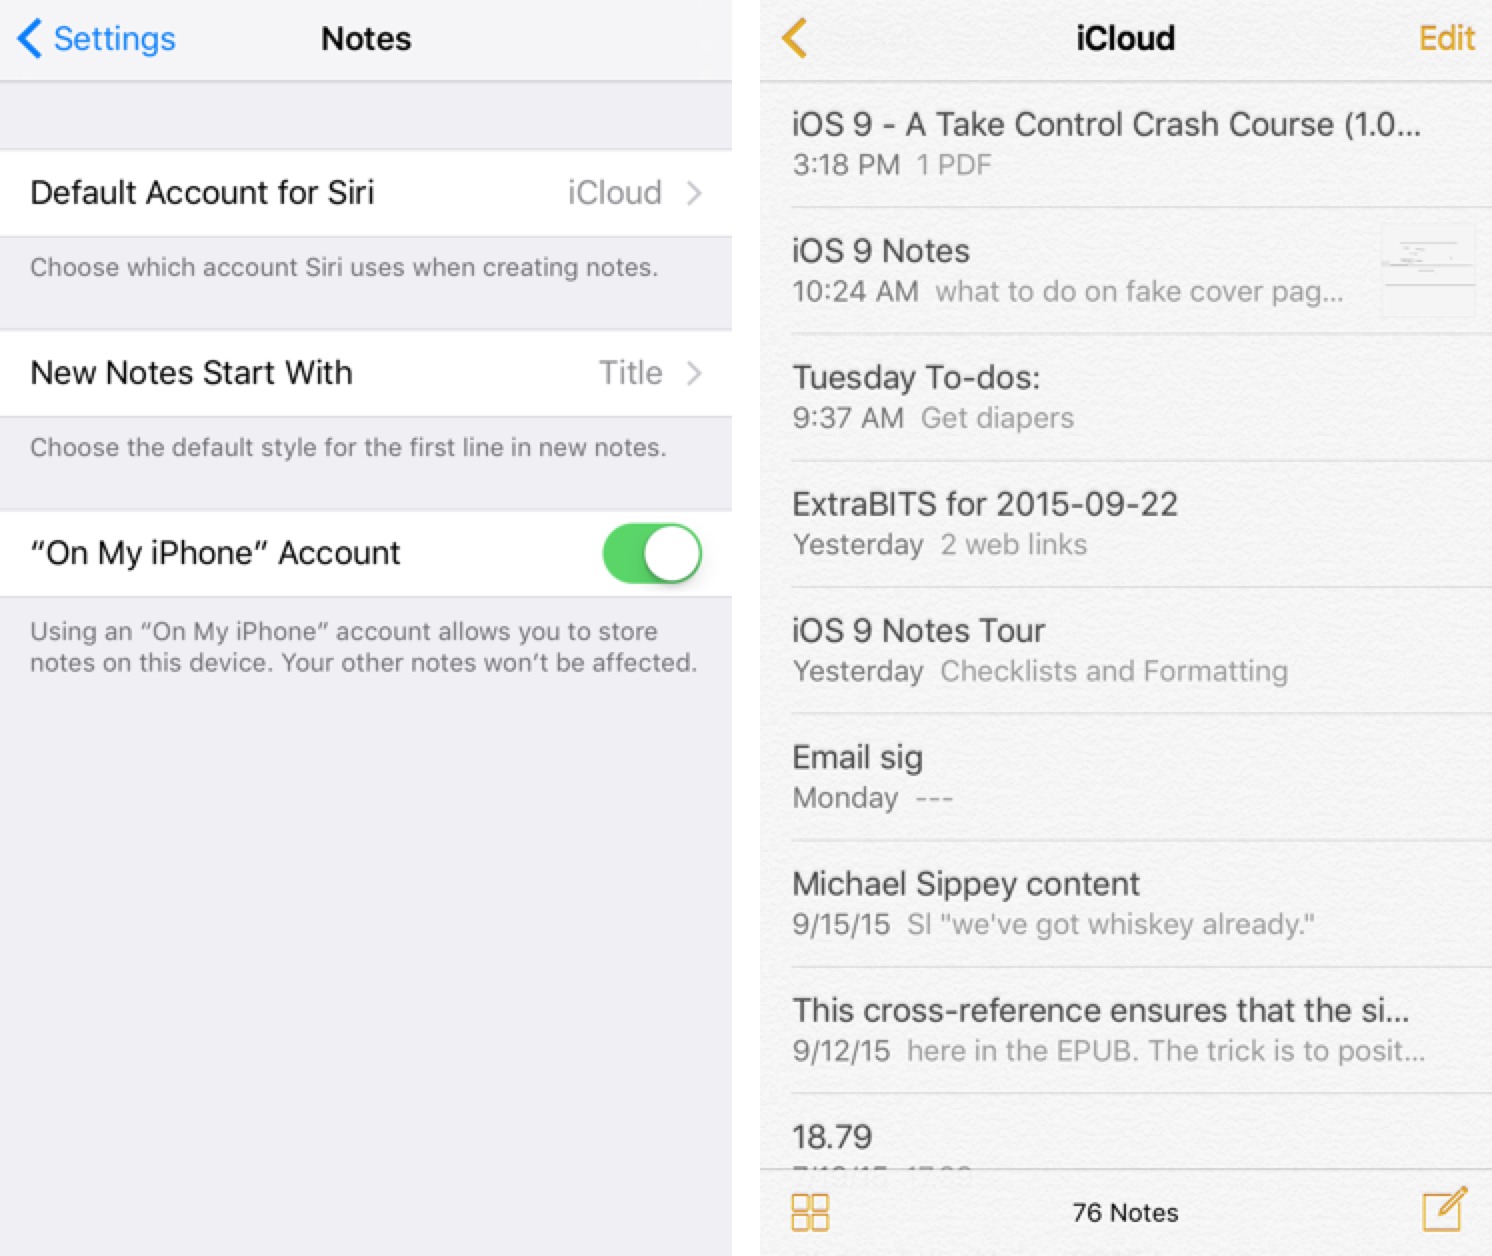
If you don’t see the On My iPhone header, you didn’t have any local notes in the previous version and there’s nothing to upgrade. However, you must then enable that account to be able to create device-only notes. Go to Settings > Notes, and turn on the On My iPhone account.
Either way, once you have On My iPhone with a Notes folder underneath it, tap Notes to go into that folder, where you can tap the new note button in the lower-right corner.
The third annoyance is that you can attach only one photo or video at a time, even though a note can hold multiple photos and videos. Also, unlike in Mail in iOS 9, it’s somewhat fussy to insert other types of attachments in a note — I’ll explain how you can do that in a moment.
Making Checklists and Formatting — To check out the new features in Notes, create or open a note, tap in it to start editing, and then tap the plus button above the keyboard on the iPhone and iPod touch to reveal their buttons. The iPad has new QuickType buttons for each of the new features, so there is no plus button.

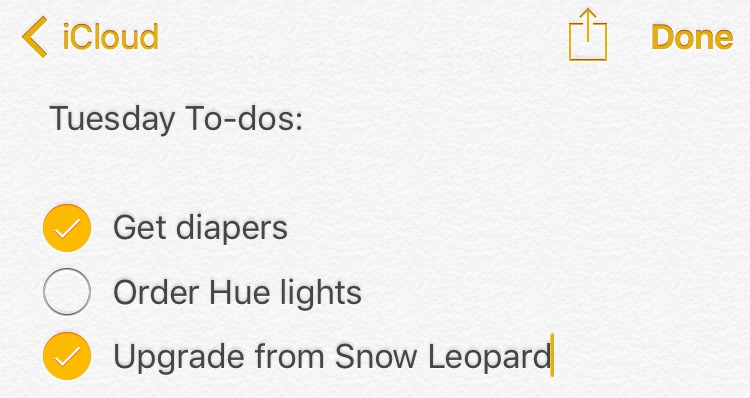
To create a checklist, tap the checkmark button. A checkbox appears to the left of your cursor. Enter your first item, and tap Return to create the next one; tap Return again to remove the checkbox from that line. To work with the list, tap a checkbox to toggle its checked state. That state is purely visual; Notes doesn’t delete or move checked items or do anything else with them.
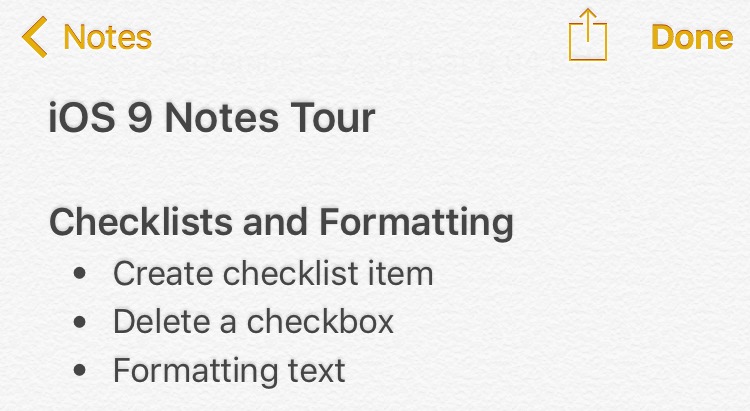
To format text, tap the Aa button. Each formatting option applies to the entire line that the cursor is in, so there’s no need to select text first. Here are the formatting choices you can apply:
- Title
- Heading
- Body
- Bulleted List
- Dashed List
- Numbered List
Unfortunately, you can’t nest lists to create proper outlines, but between Title, Heading, and the different lists, you can create a working approximation.
Adding Links and Attachments — The most obvious way to add an attachment is to tap the camera button, which lets you insert a photo or video in your note.
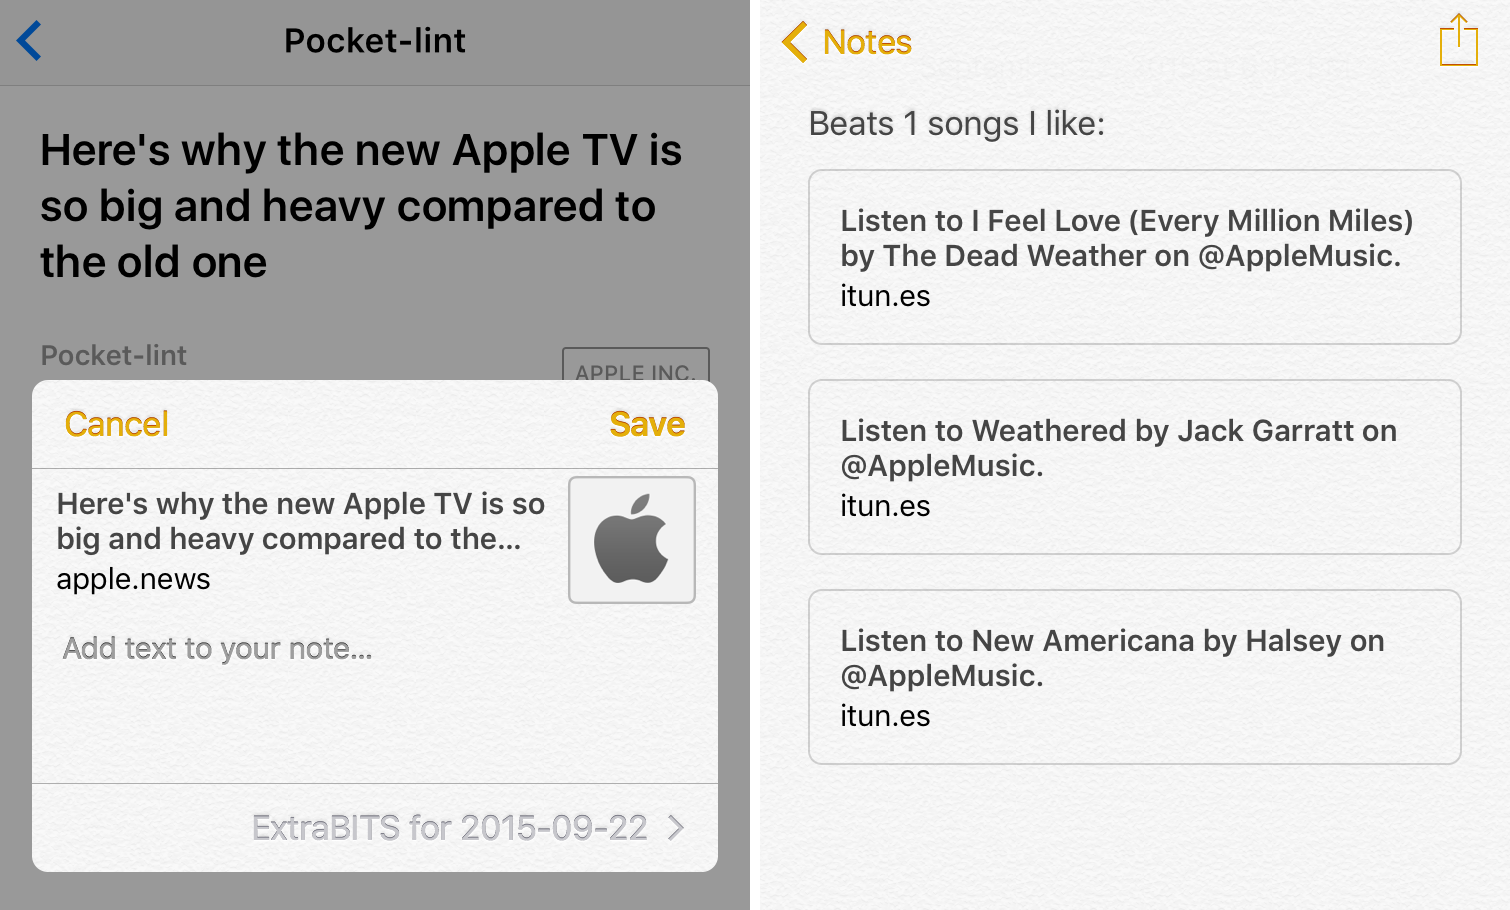
What about other types of documents? You have two choices here: a link or an attachment. With a link, all that shows up in your note is a box that, when tapped, opens the original document in its original app (or as close as Notes can get; a linked story from the News app opens in the News app on an iOS device, but in a Web browser on the Mac). An attachment, in contrast, is actually embedded in the note itself, and tapping it opens it within a viewer in Notes.
The trick is that you don’t initiate embedding a link or an attachment (other than a photo or video) from within Notes, but instead by tapping the Share icon in another app, while viewing the document you want to embed. If you tap Notes in the middle bar of the Share sheet, you’ll get a link to the original; if you instead tap Open In (sometimes called Open In Another App), and then specify Notes as the destination, you’ll get an attachment. If Notes doesn’t appear in either the middle bar (for a link) or the bottom bar (for an attachment) that presumably means that the original app can’t share data with Notes in either way.
For example, if I have a PDF open in Dropbox, I can tap the Share icon, and then tap Notes in the middle bar to insert a link to the PDF into a note. If I instead tap Open In, and then select Notes, the PDF itself will be embedded in the note. Sharing a pass in Wallet, however, doesn’t offer Notes as an option at all.

Of course, you can also send links from Safari to Notes, which I use to make a daily list of potential links for ExtraBITS. I’ve found a variety of other creative uses for link sharing in Notes. For instance, if I’m listening to a great song on Beats 1 that hasn’t yet been released, there’s no way to add it to my Apple Music collection. But I can link to that song in a note, so I can look it up later.
Either way, when sharing an item to a note, you can either make a new note or tap next to Choose Note to add the item to an existing note. Confusingly, if you have multiple accounts enabled, you’ll be able to share only to the account that’s defined in Settings > Notes > Default Account for Siri.
To delete any kind of attachment, bring up the keyboard, place the cursor to the right of it and tap the Delete key on the keyboard twice, once to select the attachment and a second time to remove it. Alternatively, you can tap and hold the attachment, and then tap Delete in the popover.
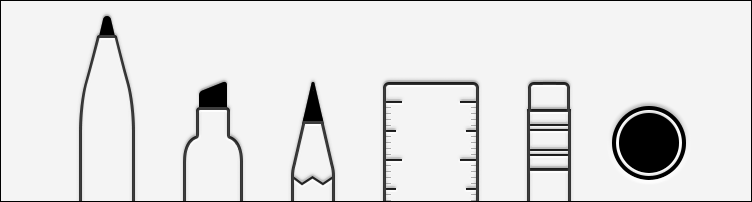
Sketching — Last, but certainly not least, you can tap the sketch button to make a drawing inside a note (sketching requires at least an iPhone 5, fourth-generation iPad, or a sixth-generation iPod touch). Here are the available tools, from left to right:
- Pen: draws a medium-sized line
- Marker: draws a thick line
- Pencil: draws a thin line
- Ruler: assists in drawing straight lines
- Eraser: erases what you’ve drawn
- Color Picker: lets you select the color to draw in
Most of the tools are self-explanatory, but I’d like to touch on the ruler tool a bit. When you tap its icon, a ruler is placed on the page. You can drag it around and adjust its angle by placing two fingers on it and rotating it. Once the ruler is in position, use it just like a real-life straightedge: draw alongside either edge to make a straight line. To hide the ruler, pinch it with two fingers until it shrinks to oblivion.
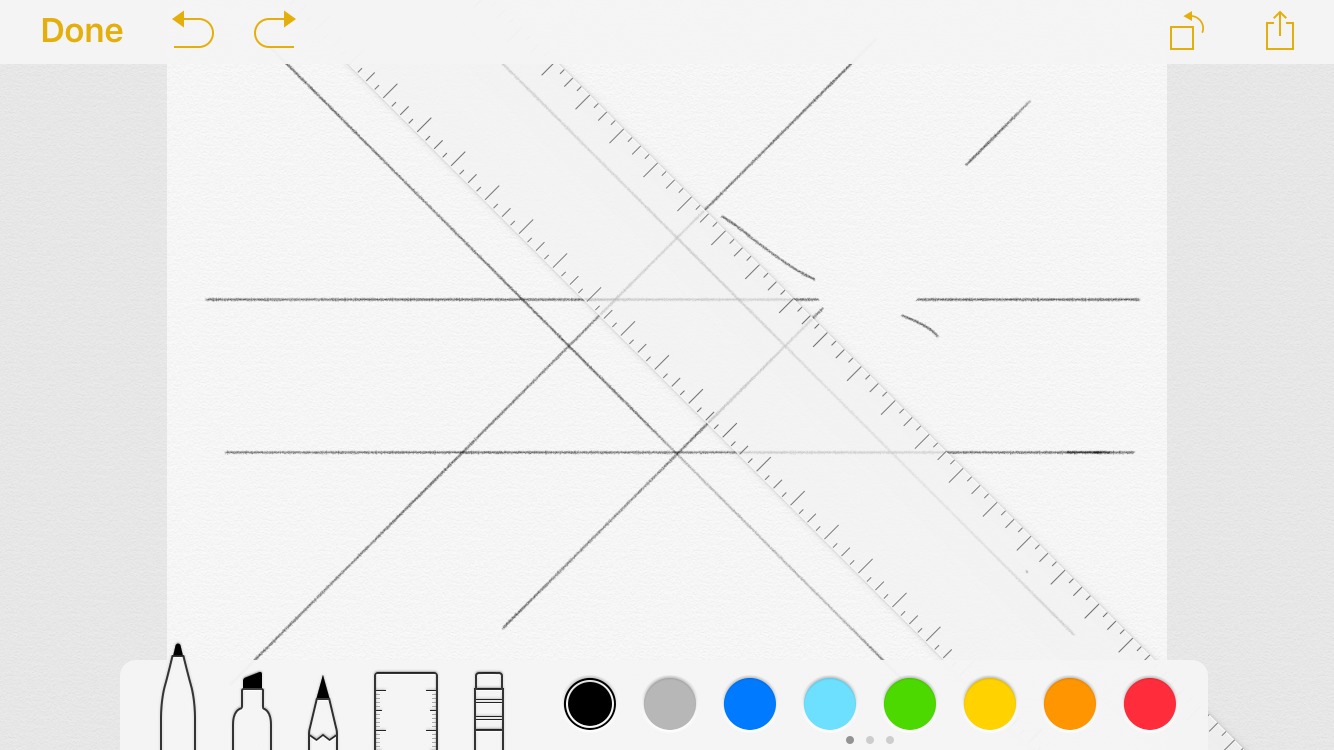
Undo and redo buttons let you fix mistakes. You can rotate the canvas by tapping the rotate button in the upper right, in case you started drawing in one orientation but wish to switch to another. You can also tap the Share button to save or share just the sketch separately from the note.
Inside the note, your sketch acts like an attachment. Tap it to edit it, or place the cursor to the right of it and tap the Delete key to remove it.
Sketching inside notes is neat on any iOS device, but I imagine that the best experience will come on the new iPad Pro paired with an Apple Pencil. Also, the iPhone 6s and 6s Plus can reportedly both take advantage of 3D Touch in sketches, so if you press harder on the screen with the pen tool, you’ll get a thicker line; the marker and pencil tools draw darker lines when you press harder.
Organizing Notes — If you’re considering switching to Notes as your main notebook app, you’ll want to know how to organize your notes. Unfortunately, Apple doesn’t offer any advanced capabilities here, just folders and search. But those two together can meet most needs.
First, if you’re wondering how to title a note, the Notes view displays whatever the first line of text says. So to name a note, just enter the name you want on the first line. To ensure that the first line is always formatted as a title, go to Settings > Notes and set the New Notes Start With option to Title.
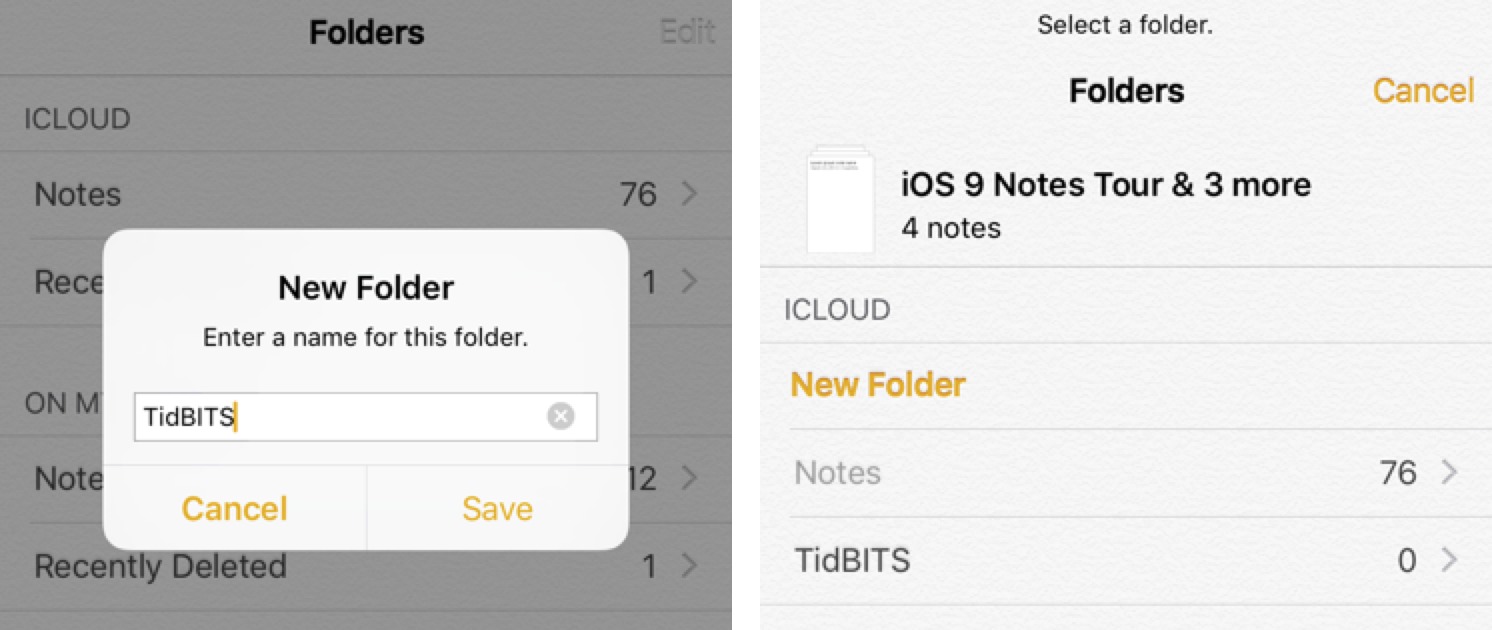
To create a folder, tap the back button until you’re in the Folders view, and then tap New Folder. Choose an account — unless you have a reason to keep notes on your device, I recommend keeping them in iCloud or another cloud-based account so they sync to other devices and aren’t lost if you want to restore the device from scratch.
The downside to folders is that they haven’t yet been implemented in the iCloud Web app, where all of your notes are instead just dumped into one view.
If you want to move existing notes to your new folder, enter the folder that the notes are in, tap Edit, select the notes you wish to move, and then tap Move To.
To search notes, pull down on the screen until you see the search box, tap in it, enter your search term, and tap Search. While Notes doesn’t have separate tagging functionality, searching finds any words you insert into a note, so you can add your own “tags” to the end of a note if you wish.
Search is more powerful than you might think, since it searches within attachments too. For instance, I inserted an entire copy of “iOS 9: A Take Control Crash Course” into a note, and searching for words in the book caused it to appear in the search results (give Notes a few minutes to process the PDF before this works). Unfortunately, you can’t find a specific location within a PDF in Notes, but that’s what iBooks is for.
Notes can’t compare to a power-user tool like Evernote — which offers power-user features like tagging, voice notes, adding notes via email, Google Web search integration, Web clipping, and more. While Notes may not offer enough features to lure away users of other note-taking apps, in iOS 9 it’s now sufficiently capable for many users, while remaining simple to use. As a bonus, since Notes and iCloud are built into both iOS and OS X, you won’t have anything else to download or configure when you set up a new Apple device.
Sorry, Josh, I like the paper texture (and the slightly letter-pressed look of type on it). Unlike some skeuomorphic interface embellishments, this one is subtle and non-distracting.
But I agree about the yellow. ?
If I had to get rid of one aspect of the design, it would be the yellow text. The paper texture isn't too bad (and certainly a lot better than the old yellow legal pad).
My eyes clearly aren't good enough - I couldn't even see the paper texture until I looked at one of Josh's screenshots. :-)
You took the words out of my mouth Adam. The other thing I don't see is yellow text. I guess you must be referring Josh to the navigation and action symbols top and bottom of the screen. I may not be able to see the paper texture, but I can certainly see these symbols, and I think they are the perfect colour — visible, but subtle.
Does Notes still require a Notes-compatible email account for synching between devices? Or can it now sync through iCloud like other Apple cross-platform apps?
You've been able to sync Notes via iCloud ever since I can remember…
EDIT: We've looked into it more, and it's a bit more complex than I had thought. Yes, you've been able to sync via iCloud, but it used iCloud's IMAP server. The new Notes format syncs via some new protocol, so it's not compatible with IMAP or Exchange syncing.
https://support.apple.com/en-us/HT204987
Thanks, that sounds like good news. I wasn't able to sync notes without an iCloud.com email address (which I did not want to sign up for). I'll remember to try sync again when I upgrade to iOS 9 in a few weeks.
Josh ~ appreciated the detailing of iOS 9 Notes capabilities. Will you be adding this as an update to the "iOS 9: A Take Control Crash Course" book (of which I am an owner)?
I would like to, but I'm not sure what the plan is.
We don't have any plans to do this at the moment. Apple makes a LOT of apps, and if we covered them all in detail in the book, it would be many hundreds of pages, which is kind of missing the concept of a Crash Course.
Thanks for the notes Josh. I've never used the app, so thought I'd take a look. A couple of observations:
1. On my ancient iPad 2 (but not so ancient it won't run iOS 9) no QuickType buttons appear above the keyboard.
2. On my equally ancient iPhone (4S) they come up when I press the plus button — but there is no sketching button.
I have screen grabs but there's no way to attach them to this comment.
Any thoughts? Is this hobbled functionality due to the age of my devices?
It's entirely possible that those features aren't supported on older devices. We keep stumbling across random things like that in iOS 9 (like Siri Suggestions). If you'd like, send your screenshots to [email protected] and we'll investigate further.
I was reading the Apple article linked in an above comment (https://support.apple.com/en-us/HT204987), and it said this about the iPad 2 in regard to the Sketch button: "The new sketching feature in Notes is only available on iPhone 5 and later, iPad (4th generation), all iPad Air models, iPad mini 2 and later, and iPod touch (6th generation)."
Yep, and I've inserted that in the article now. Sorry, I should have left a comment earlier!
There is a workaround that can be used to access the new Notes format on computers not yet upgraded to El Capitan:
Access notes in you web browser via iCloud.com.
Is anyone successfully using the new iOS 9 (or El Capitan GM beta) Notes app to sync notes with a Gmail or other non-Apple account? If yes, please add a comment here or get in touch, since I'm researching this for our El Capitan Crash Course, plus Android users and others might want to know.
I'm afraid it won't work. When you upgrade, it also changes the syncing protocol. I've updated the article accordingly.
Hmm. I activated icloud syncing, wrote a couple of test notes, then discovered they weren't syncing with notes in Yosemite (duh!). So I went back to settings and disabled icloud syncing and trashed the icloud folder in notes. Syncing still works fine with my imap account. What am I missing here?
Are these upgraded notes? Also, what sort of IMAP account are you using? (Big commercial provider, or enterprise account, or local ISP?)
Apple hasn't provided any documentation here apart from https://support.apple.com/en-us/HT204987 and that says:
"Upgraded notes don't support IMAP and won't connect to Microsoft Outlook. Go to iCloud.com on your Windows PC to view and edit your iCloud notes."
Yes, upgraded notes. My IMAP account is with a local ISP. I've never had an icloud mail account. Maybe that's the difference? I'm reluctant to try reactivating icloud syncing and following the same steps again for fear that I would lose IMAP syncing this time.
Well, that's fascinating - I wonder what Apple's not telling us? Perhaps it is the lack of an iCloud mail account. As long as it's working for you, that's great, and we'll see if we can figure out anything more here.
So now I have El Capitan on my MBP and IOS 9.02 on my iPhone. Notes are synced in iCloud. But get this: I still have IMAP notes synced as well. Both working! Just for the hell of it, I also activated notes syncing in gmail -- which also works. Curiouser and curiouser.
I was able to get Notes to sync through Gmail's Notes function, but it was interesting to "note" that some Notes features, like checklists and embedded images appearing in the Attachment Browser, don't work for a Gmail note. (When you work in Notes, you have to be careful, if you are syncing through more than one service, to create the note in the correct service. You pick the service by selecting it in the optional left-hand sidebar.)
The new Notes features are a step foreward, and any step foreward is welcome of course. But I'm "somewhat underwhelmed" considering the fact that Apple made the Newton (more than 15 years ago now) and it's Notes app was much more advanced in my opinion.
One of the new surprise features of IOS 9: Notes no longer syncs to iCloud even after trying what is suggested in the article.
The solution? I'll stick to DropBox. Much easier to understand.
I have an iPad Air 2 less than a year old running iOS 9.0.1. I see no toolbar (nor a Plus sign to open one) when I create a new note that would allow me to do all these wonderful things (although I can access the plus button >>toolbar on my iPhone 6). Really, is my iPad Air 2 already too old to make use of these features?
Ah, Josh already helped me out on this one. When I first summoned the keyboard (on my even older device, an iPad 2) there were no QuickType buttons to be seen. But at the top of the keyboard, immediately above the QWERTY line of keys, is a narrow bar, and in the middle of that bar is a small white line — which is, as it turns out, a handle. If you slide up on that handle you will reveal the QuickType buttons.
Having done that for the first time it appears that you don't have to do it again. In fact I can find no way of sliding the button panel back again.
Excellent stuff. Thanks very much. But on my new IPhone 6 I (with IOS9 ) I can't get the search function to find anything in Notes. Do I need to upgrade something else now, too?
No, that should just work - it is for me. Perhaps test to see if Spotlight can search in notes in some accounts but not others? Or restart your device and wait for it to reindex?
Tried all that just now. Still doesn't work, though everything works fine on iPad and MacBook. Is it relevant that Notes in my system is actually part of Outlook?
I hope that's not a stupid question!!
Umm, well, yes, the iOS 9 Notes app is not part of Outlook. So if you're doing something within Outlook, that's completely different.
iOS9 iPad Air and Yosemite iMac, so I turned on iCloud Drive, and turned on iCloud Syncing on both iPad Air and iMac. So I understand I cannot sync notes between them till El-Capitan, but why are my notes not syncing w the iCloud Drive when I create a note on my iPad Air?
Notes aren't stored in iCloud Drive, they're just synced between the apps.
Josh, confused here. Where is the duplicate note stored? I thought it is stored in iCloud "whatever".Apps on the iPad Air store data in the iCloud using part of my data allowance. Why not Notes?
Good God is this complex. Never mind. I have reconfigured Notes to store the Notes on iCloud within the Notes application on the iPad Air. God, I have a college education, and jeeeeesussss.
You're too over-educated to grasp these simple things. ;-)
hello,
I didn't do the upgrade Notes the 1st time on my iphone, because I wanted to wait until I upgrade to El Captain n my mac. How can I upgrade now?
Confirming earlier findings... On Phone 5S, with iOS 9.0.0 and 9.0.2, not the "upgrade" Notes app, synch with gmail works for notes in that folder, and new features such as drawing, new text format options, etc are available for notes on the device in other folders.
Another question for you... What happened to the feature of taking me to the searched-for string and highlighting it with a yellow highlighter?! This has been a very frequently used feature for me, with lots of notes, many of them large. Now it just takes me to the beginning of the note containing the match. Others tell me it's always worked that way for them. I can't find a reference to the feature at all. Have the past 4 years all been a dream?
No it's not a dream. I have used the feature for years on my ipad3. I use Notes alongside learning French with Duolingo, to add reminders of many things, and now Search cannot go back and display all the occurrences in yellow highlighting the strings throughout the Note. What a nuisance. As is the change to the views of running background Apps to overlapping sliding Panels, displaying in a different order than before, making it much harder to see text in the background when quickly switching to and from Notes. As a result it is now harder to see text by way of a 'quick reference' by double tapping the Home button, instead requiring each App to be fully opened and switched between, to read it, which is much slower. Hard to explain, but I have gone back to iOS 8.4.1 for now in the hope that it is a bug that will be fixed. Hardly a step forward if the Search feature is crippled
Q: is the IOS notes ruler set up for inches or centimeters? i think its centimeters.
Q: has anyone tried/figured out how to change its units?
Thanks :)
Hi, I need help. I got the iPhone 6s+ on Sep 26. I backed up my iPhone 6+ on iCloud before using it to restore it on my new iPhone 6s+. Everything was ok on my new iPhone (including my 200+ notes)
Suddenly on Oct 15, I noticed my notes had many duplicates. From 200+ notes, it became 20,000+ notes. I do
not know what's happening. Have contacted Apple Support Center and am still waiting for them to resolve the duplicate issue for me.
Has anyone else encountered this problem? How do we resolve this duplicate issue?
Hate to say it, but Apple is likely to be the only real solution here. You could try signing out of iCloud and back in, but that's just grasping at straws.
Apple Support asked me to sign out of iCloud n back in, but the duplicates are still there. The same thing happened to my iPad Air 2 after the IOS9.02 update. All along, the no of notes on both my iPhone & iPad are the same but now, the iPad Air has got more notes.
I started deleting the duplicate notes but it still came back
It very much sounds like an error in iCloud itself then, I'm afraid. Hopefully, Apple will be able escalate to someone who can fix it.
Notes used to find the specific location prior to the upgrade. Now it just locates which note the word being searched is located in. This is a CON in my situation. Guess I'll be using iBooks... :-(
An "issue" that I have not seen mentioned anywhere is that if you don't upgrade notes, after you upgrade to iOS 9, you can no longer find text within a note when searching. Prior to iOS 9, I could search for a word and it would take me to the place in the note where that word was. Now I have to scroll through the whole note to try to find what I am looking for. I did not upgrade notes because I sync my notes with Outlook. Anyone know of a solution to this?
Is there a way to use numbered lists to create outlines with each indent using a different number or letter? For instance the first level uses 1, 2, 3 and the next indent level using a, b, c, etc?