Photo Editing as One with Luminar
Back when most photographers used Adobe Photoshop to edit their images, many developers created plug-ins or stand-alone apps to focus on specific tasks. For example, Nik Software’s Silver Efex Pro plug-in specialized in creating black-and-white images, as did Macphun’s Tonality application. Whether you wanted more control over removing digital noise or applying lots of pre-made effects, there was usually a separate tool that you could purchase.
Recently, though, photo editing is shifting back to all-in-one tools. Google purchased Nik Software and has been working its technology into Snapseed and Google Photos (though the Nik tools are still available for free; see “Google Gives Away Its Nik Collection Photo-editing Apps,” 31 March 2016). And Macphun has released a new application, Luminar, that takes the technologies from its solo applications and combines them into one master tool. (Tonality and the other
utilities remain for sale separately or bundled together as Macphun’s Creative Kit.)
Luminar is a bold bet intended to compete against Photoshop — still the biggest gorilla in the jungle for professionals and enthusiasts — while also beckoning those who haven’t yet moved on from Apple’s long-discontinued Aperture. Luminar is also trying to appeal to casual photographers who want more image editing capabilities than provided by Apple’s Photos. Plus, with its $69 price, Luminar hopes to appeal to the folks who don’t want to pay Adobe’s monthly or yearly subscription fee to use Photoshop.
Before we get into the details, though, indulge me in one quick declaration about its core capabilities: Luminar is more than capable as an image editor — it has all the adjustment controls for manipulating tone and color that you’d expect. Trying to cover them all in this article would bore us both. In my testing, none of Luminar’s edits were inconsistent with what you’d see when editing in other applications. The tools are all there; it’s what you do with them that makes a difference. If you want to compare features with Aperture, Lightroom, and Creative Kit, Macphun has created a handy chart.
What’s most interesting about Luminar is its approach to juggling all of those tools. Like other Macphun applications, Luminar prominently features presets for one-click editing. And for the individual tools, Luminar refers to everything as “filters” that exist in “workspaces.” Other editing applications also use that terminology, but Luminar’s execution sets it apart.
First, a disclaimer: In early 2016 I wrote a short guide for Macphun about its Aurora HDR application, which the company still gives away as part of purchasing bundles. I also contract with Adobe to produce tutorials and other educational materials.
Presets — I tend to gloss over or outright ignore presets, probably because of how I learned to edit photos in other applications. I prefer digging into the adjustment controls to nudge a photo’s appearance so it’s closer to what I remember seeing when I captured it, rather than applying a preset that dramatically shifts the look of the image.
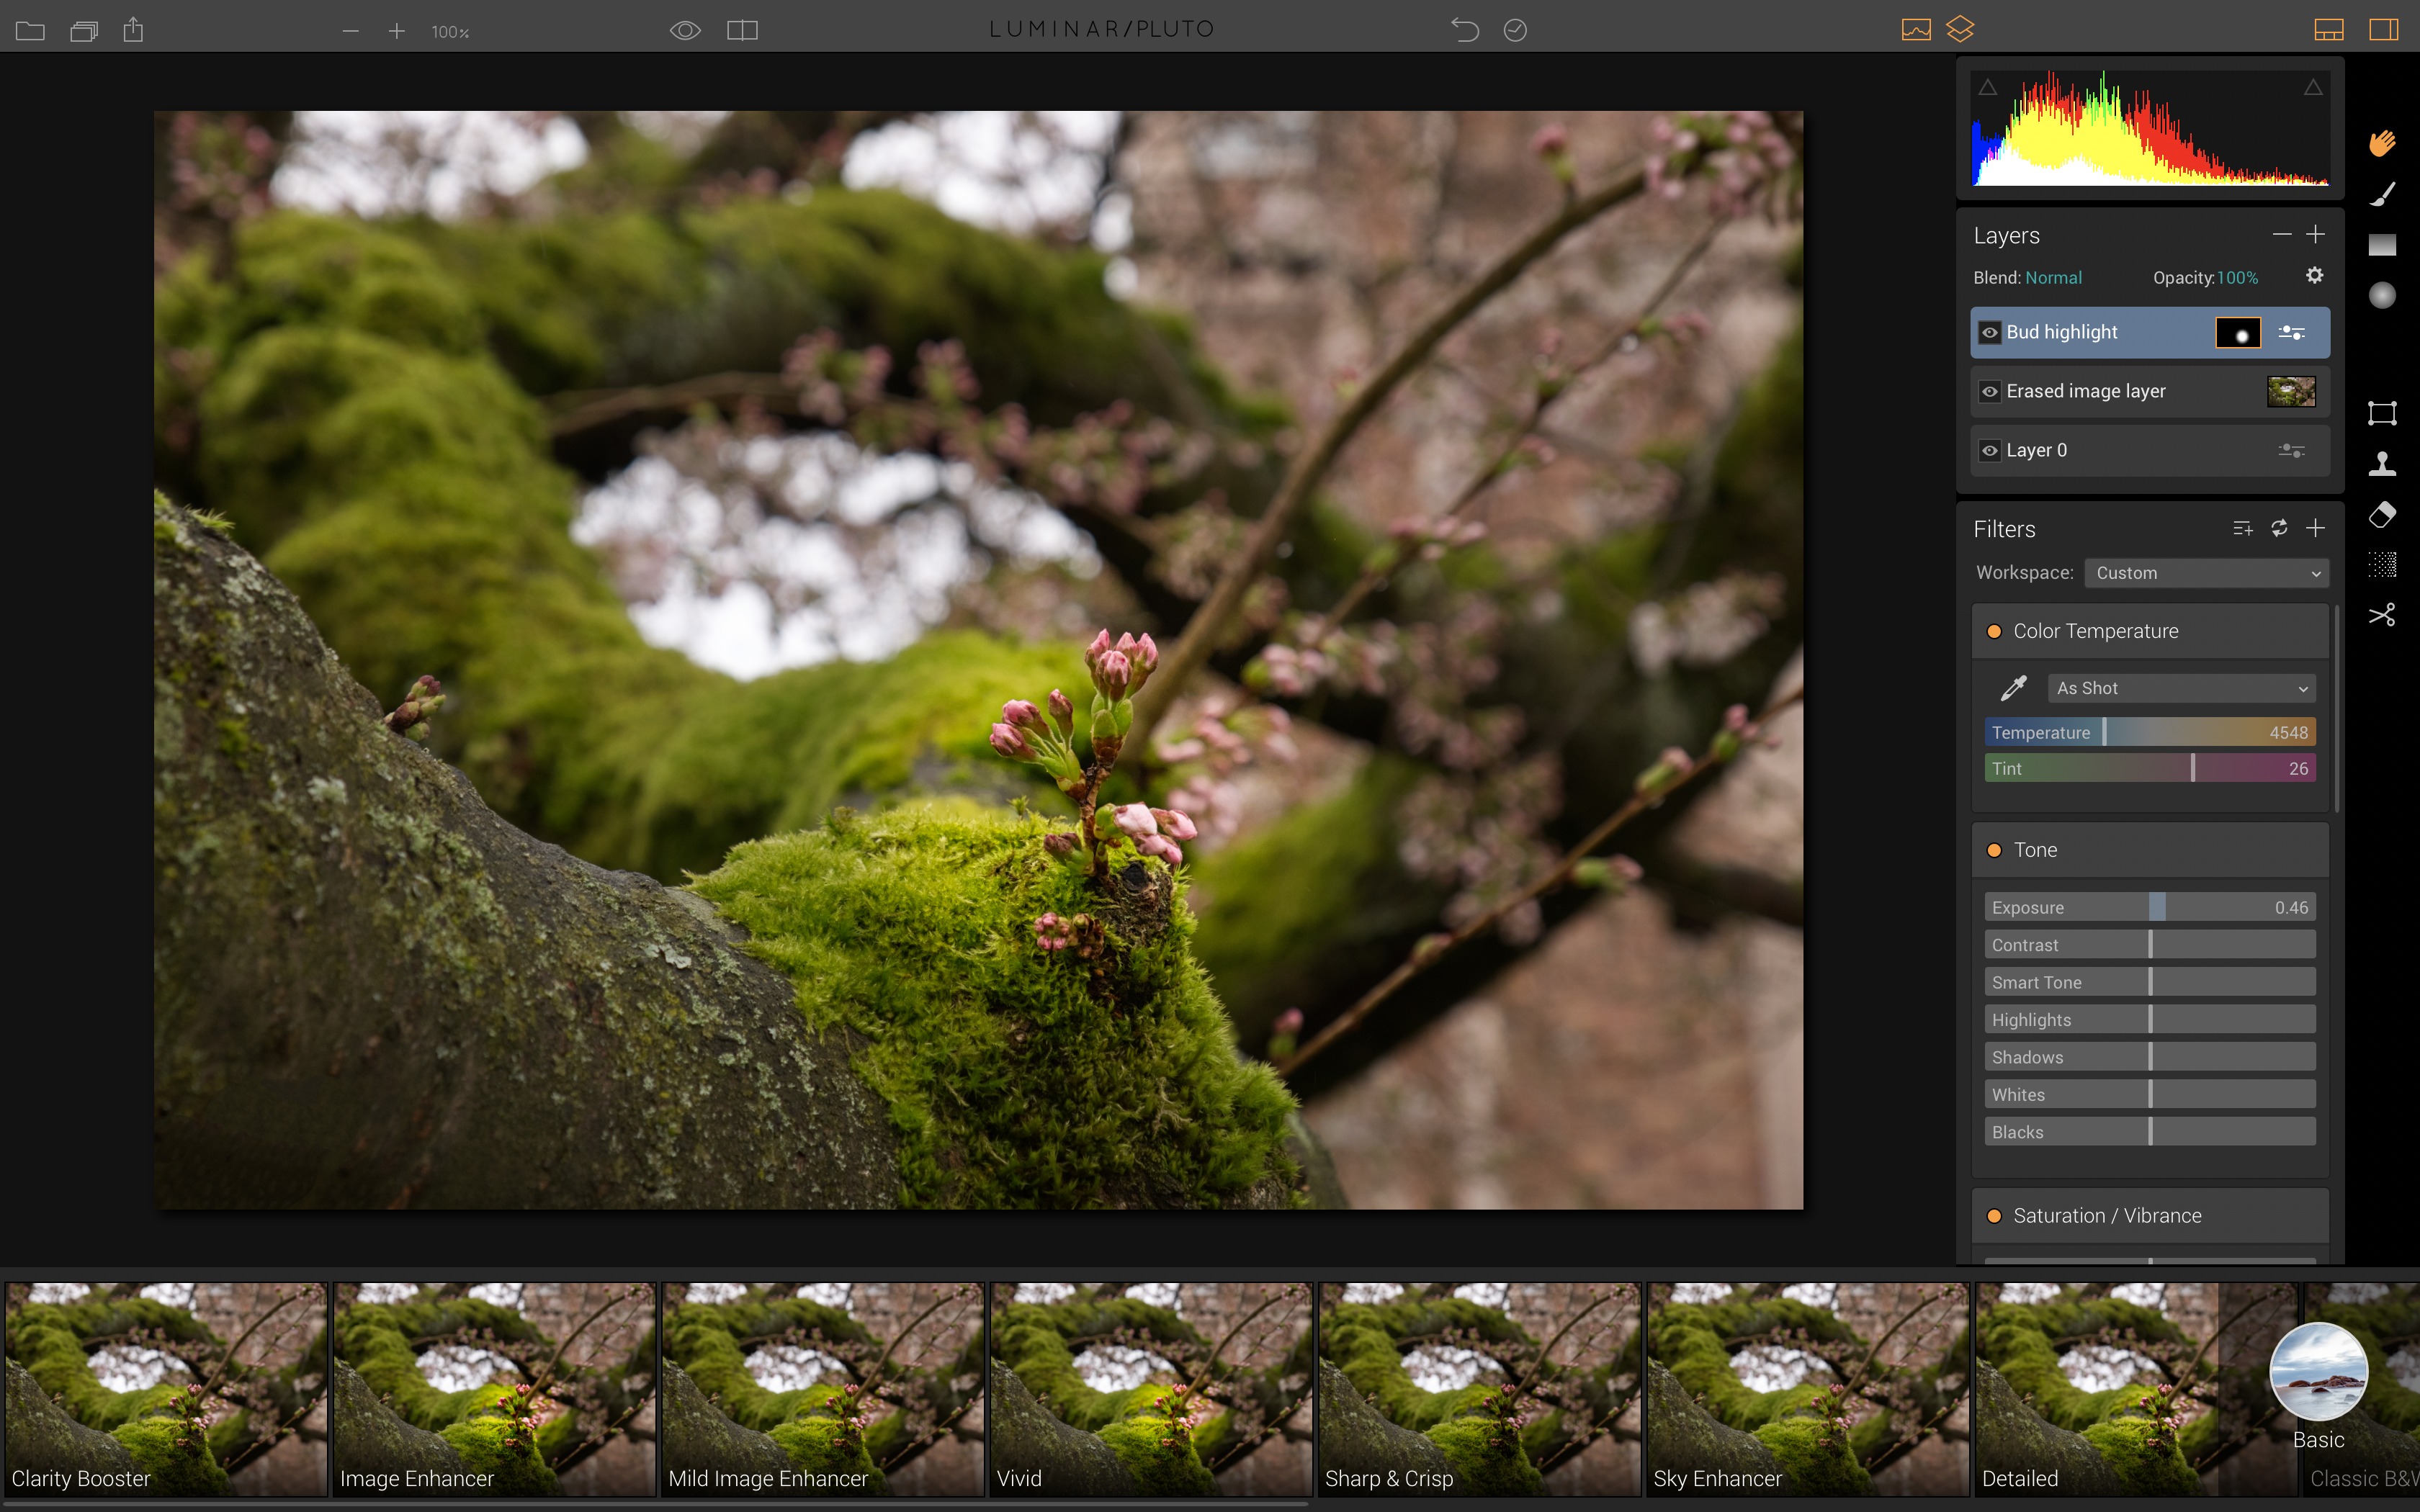
Some of Luminar’s 60 presets help with the kind of nudging I like. Image Enhancer, for instance, acts as a general make-it-better button, while Sky Enhancer and Detailed address specific goals or fixes (pulling drama out of bland upper areas and sharpening soft images, respectively).
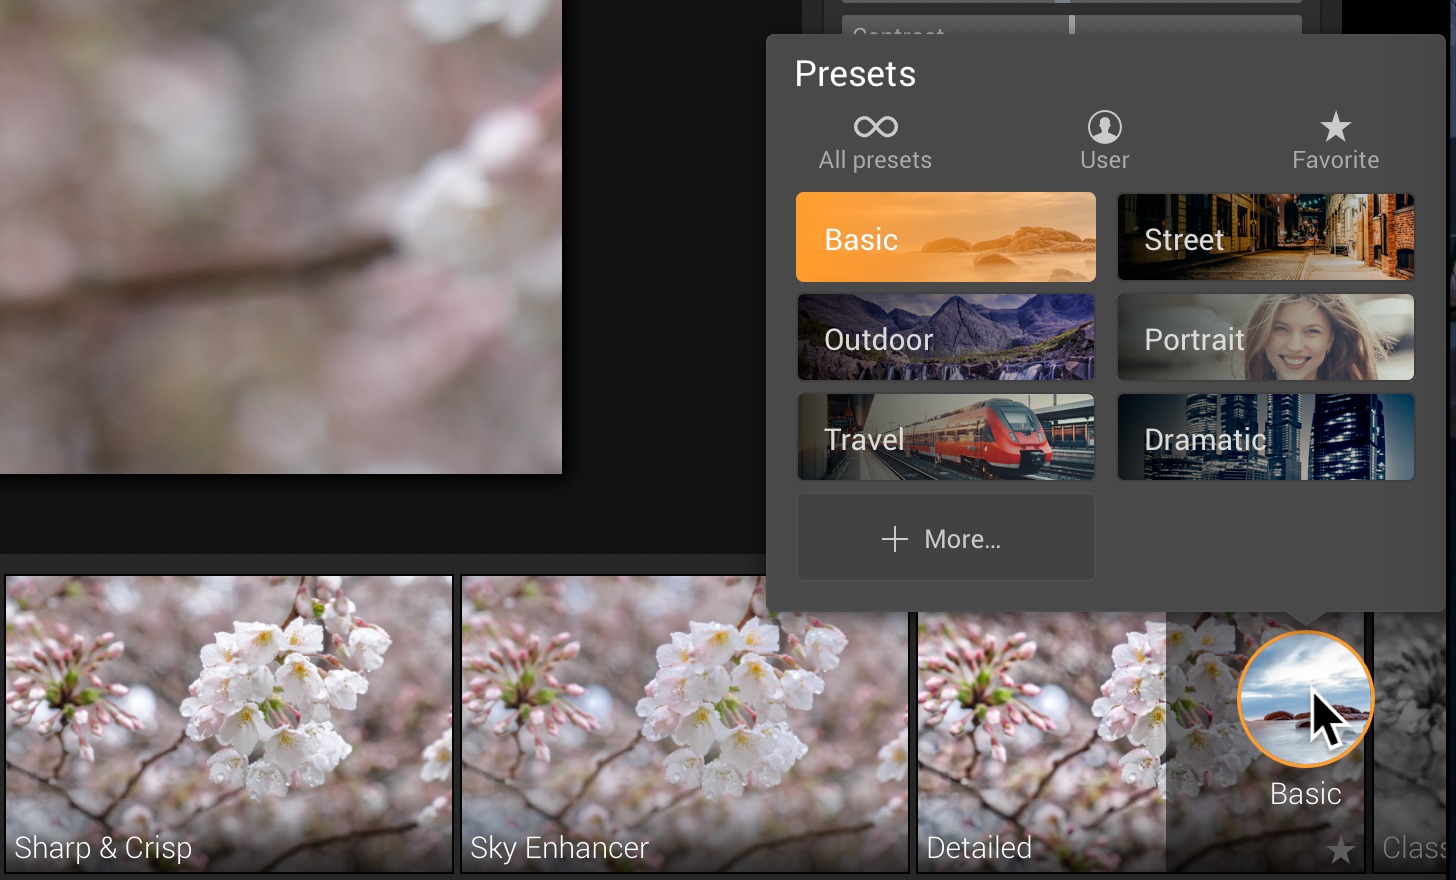
However, it’s increasingly common for photographers to want to apply stylized looks to photos. I often see Instagram photographers who have developed a signature look for all of their shots. The idea isn’t necessarily to reflect what was captured, but instead to evoke a mood, like adding a tinge of earth tones to every shot. Each of Luminar’s preset displays a preview of your image with the effect applied, so you get a sense of how it will affect the photo before you make a choice.

Applying a Luminar preset saves a lot of time adjusting the same settings for each image. The app’s six categories of presets — Basic, Street, Outdoor, Portrait, Travel, and Dramatic — are fine starting points, but it’s better to create your own based on your editing preferences. It’s easy to make new presets, share them with other Luminar users, and install presets others have created.
Editing with Filters — One of the things I like about Luminar is that it’s relentlessly non-destructive. When editing photos, you don’t want to actually change the pixels in the original image, something older software did and many of Photoshop’s legacy controls still do. Non-destructive editing makes it easy both to revert to the original and start over and to change different aspects of what you’ve edited to that point. For example, if you increase the color temperature and then later increase the saturation, the photo could end up too warm. You can go back and lower the color temperature to balance the warmth while maintaining the saturated colors you
want.
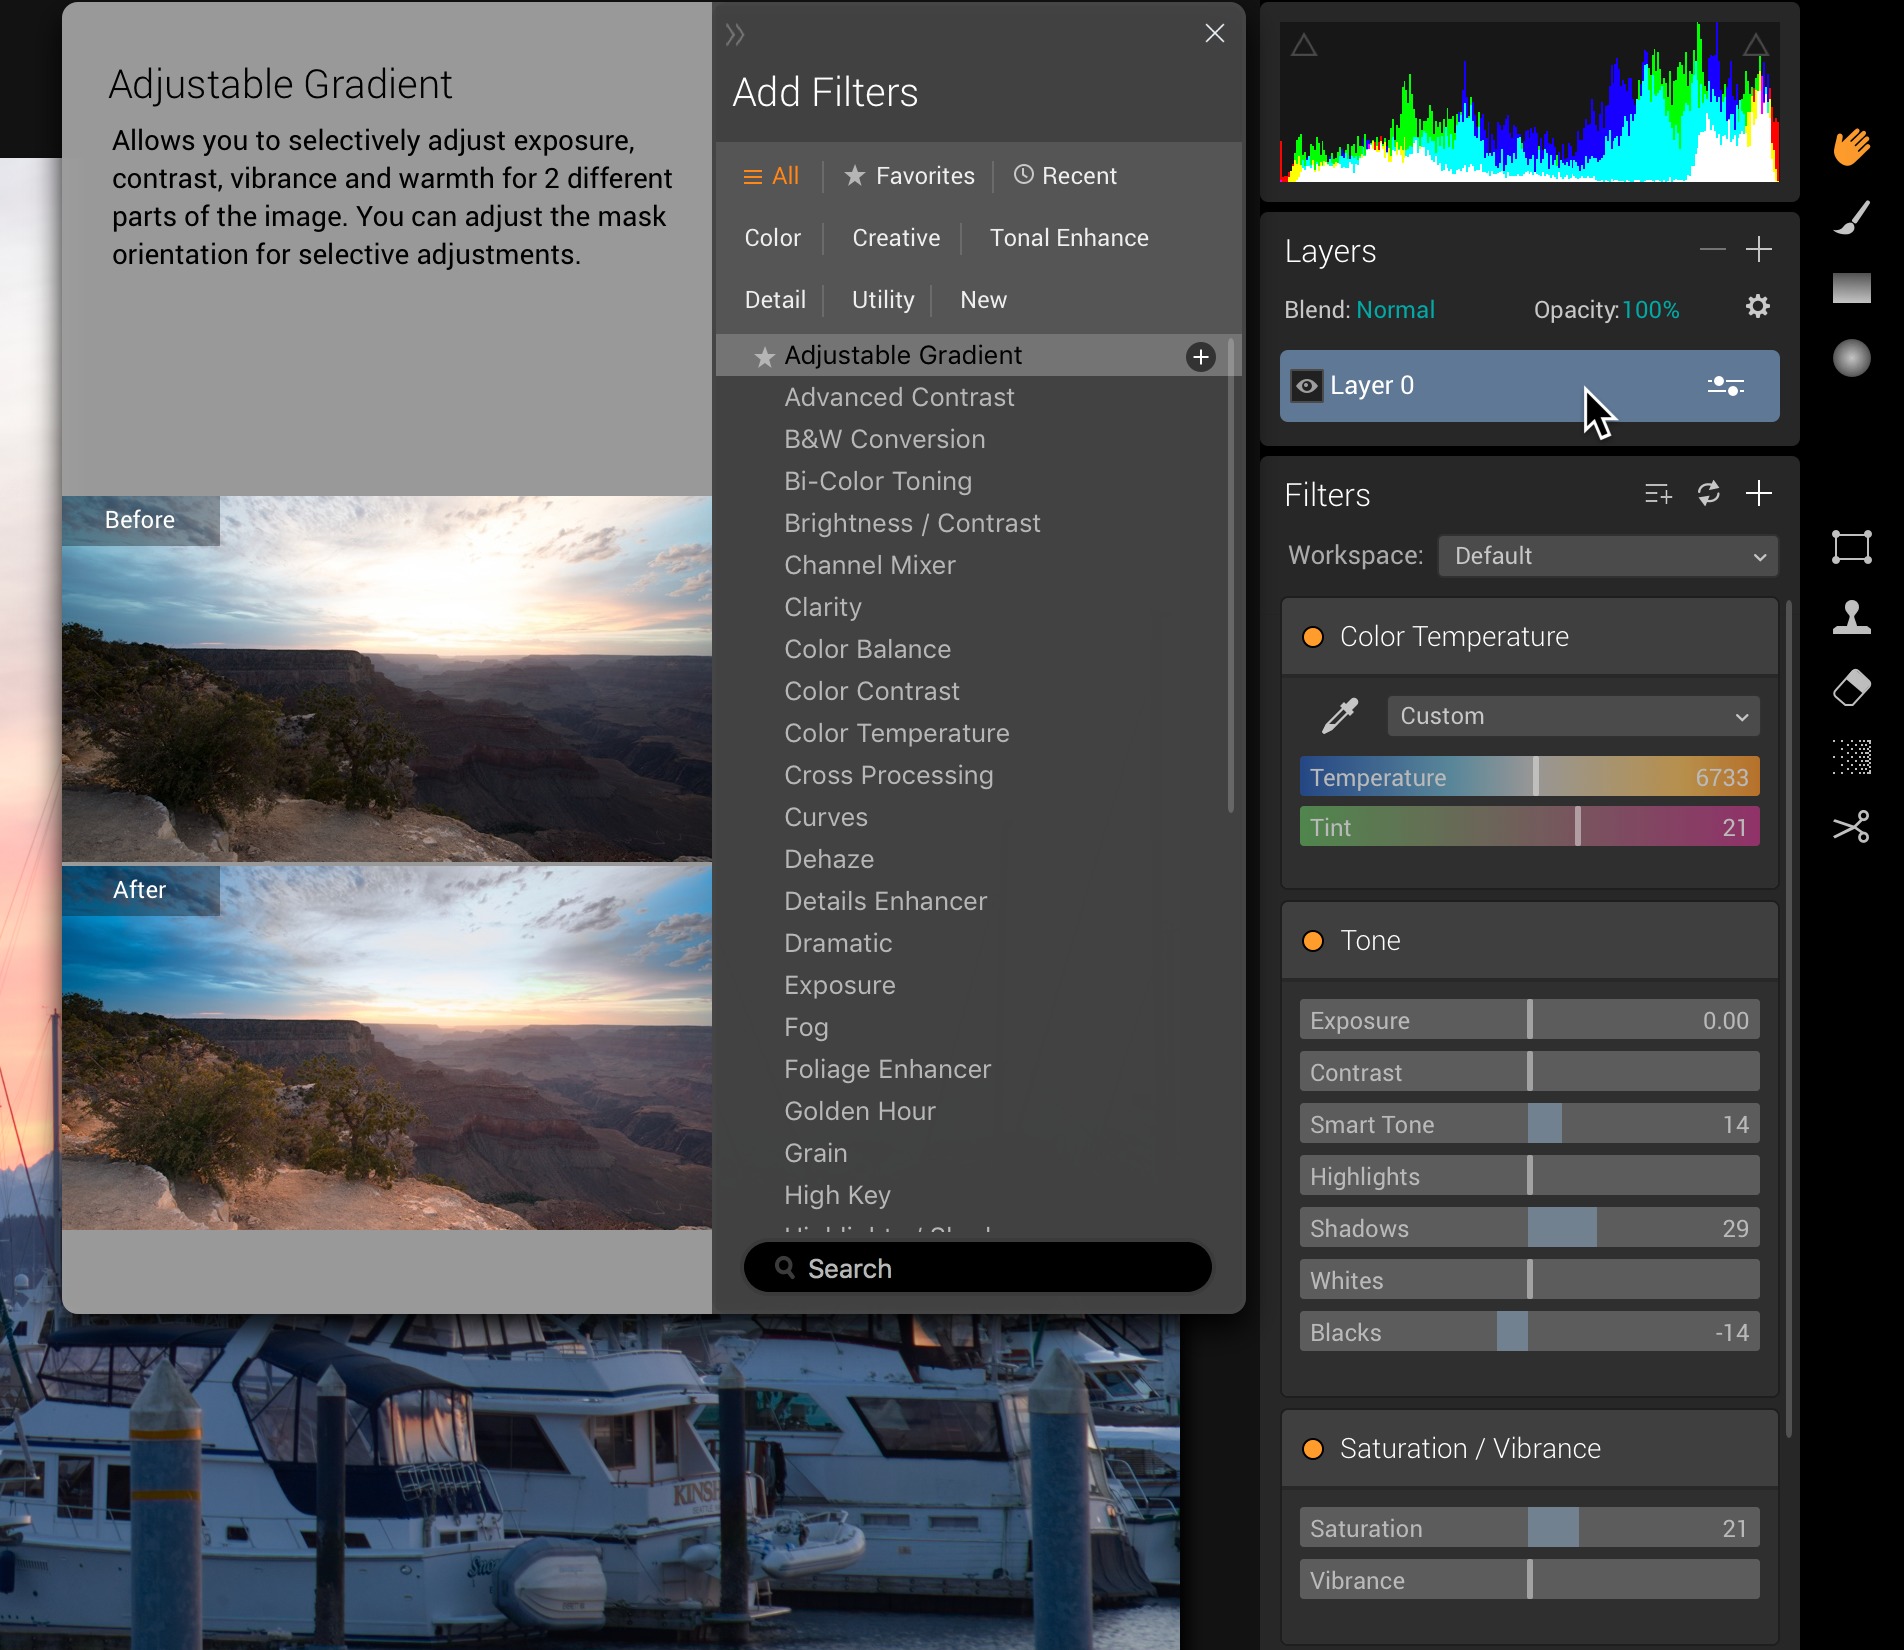
Luminar enables this flexibility by making nearly every adjustment a filter, from basic controls such as Tone to specialized ones like Adjustable Gradient, which manipulates several types of edits — exposure, contrast, vibrancy, and warmth — in the top and bottom areas of the frame. To use a particular editing effect, add a filter; the interface even explains what each effect does. You can also read more detail about each filter in Macphun’s documentation.
This approach isn’t unique; Lightroom has editing panels whose adjustments can be turned on and off, and Photos includes more adjustments than most people realize because they’re not initially visible in the Adjustments panel. Luminar takes the concept further by making almost everything a filter.
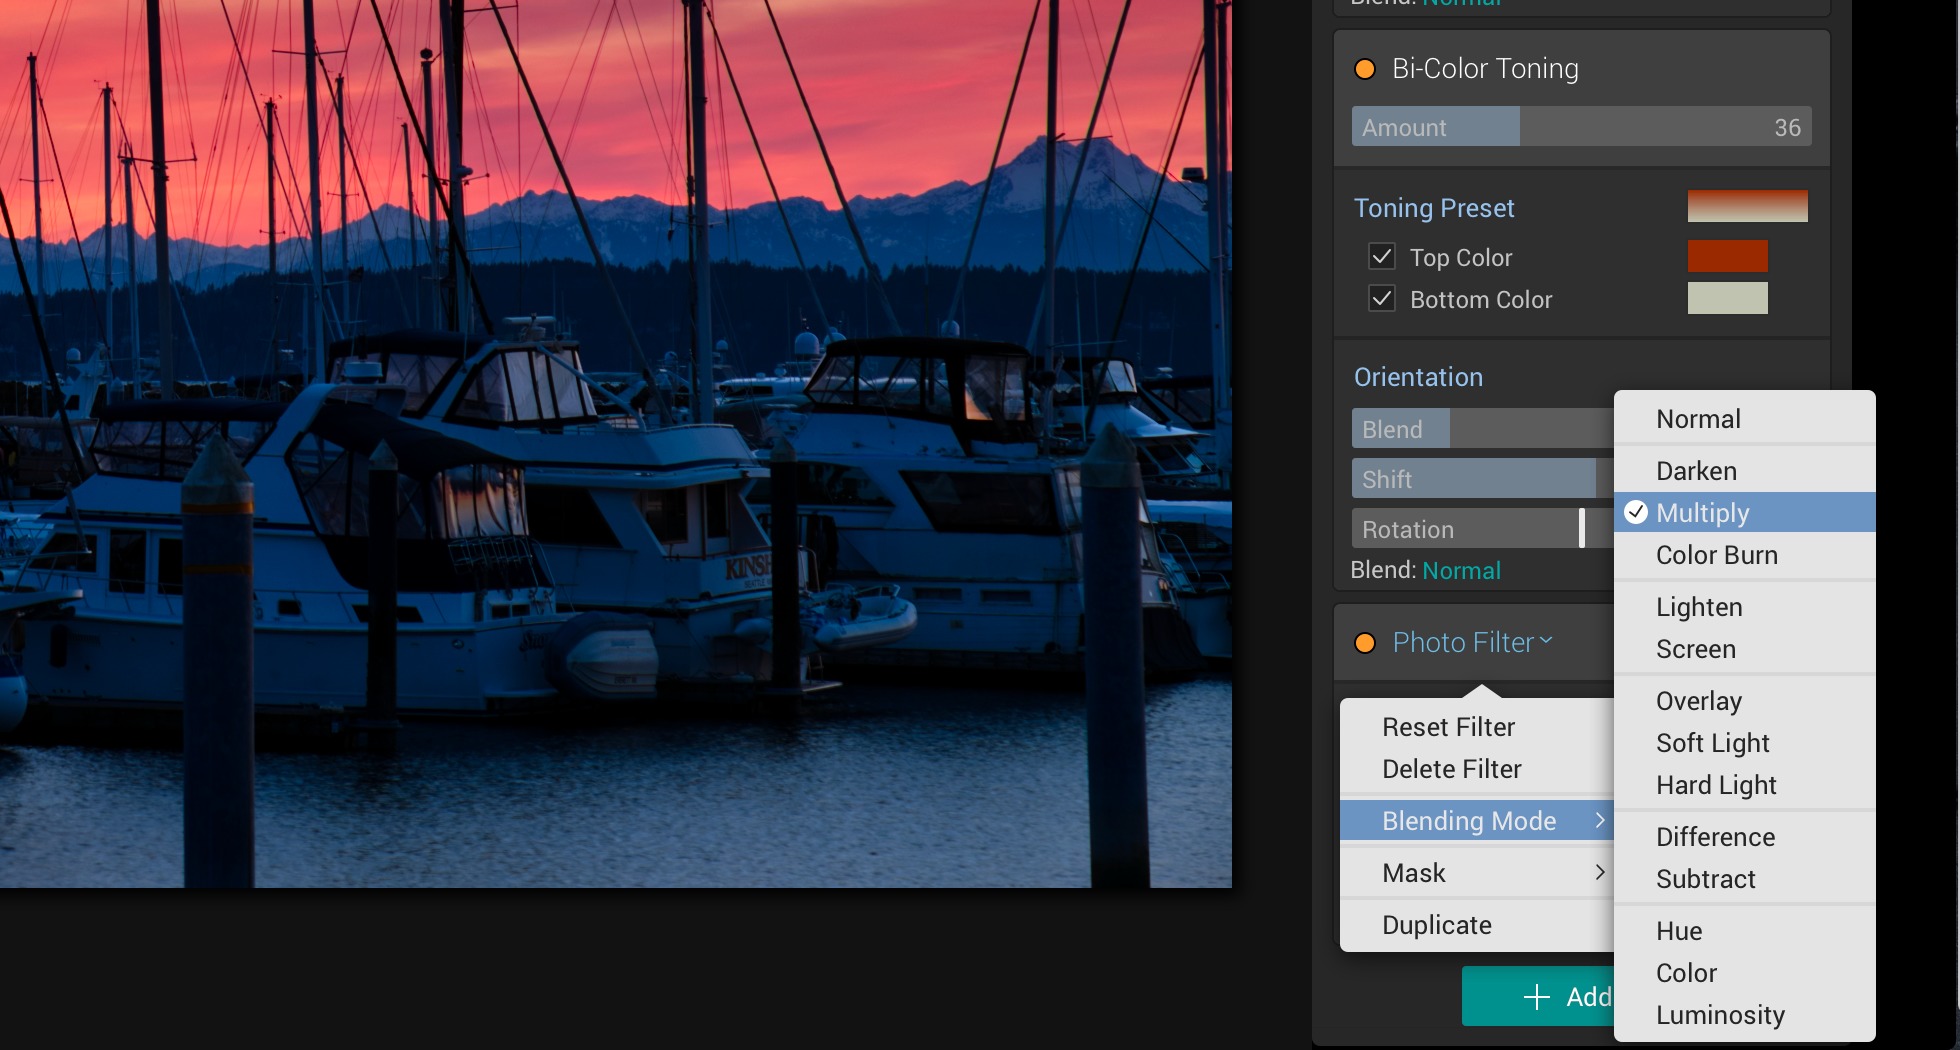
That leads to some interesting options. You can duplicate each filter, enabling you to stack multiple instances of an effect, or perhaps colorize two instances of the same effect with different hues. Filters can also have their own blend modes, something typically available only to layers. A blend mode applies the filter’s effect to a certain range of colors or tones. For example, the Multiply blend mode removes white from the scene, darkening it dramatically without having to adjust the exposure.
One feature I miss is an easy Auto option for calculating the best adjustments to make a photo look good. This isn’t due to laziness on my part (though that’s sometimes true) but is because I’m curious about how the software thinks an image should look.
In Lightroom, I often click the Auto button in the Basic adjustments panel to establish a starting point for my editing. Sometimes the software overexposes a shot compared to what I’d prefer. I’ll then adjust the settings to my liking, or choose Edit > Undo and manually start from scratch.
The closest workaround in Luminar is to choose a preset such as Image Enhancer and work your way up from there. To the app’s credit, the Tone filter also includes a Smart Tone slider that performs some of these tasks. Perhaps I just need to retrain myself, but I’d find it helpful to have an Auto button on the Tone filter, or on any filter, for that matter.
Tools and Layers — In addition to the filters, Luminar includes a handful of tools that perform specific actions. The Clone & Stamp tool, the Erase tool (which is like Photoshop’s content-aware technology), and the Denoise tool all operate like stand-alone modules, taking over the screen and presenting controls for just those actions.
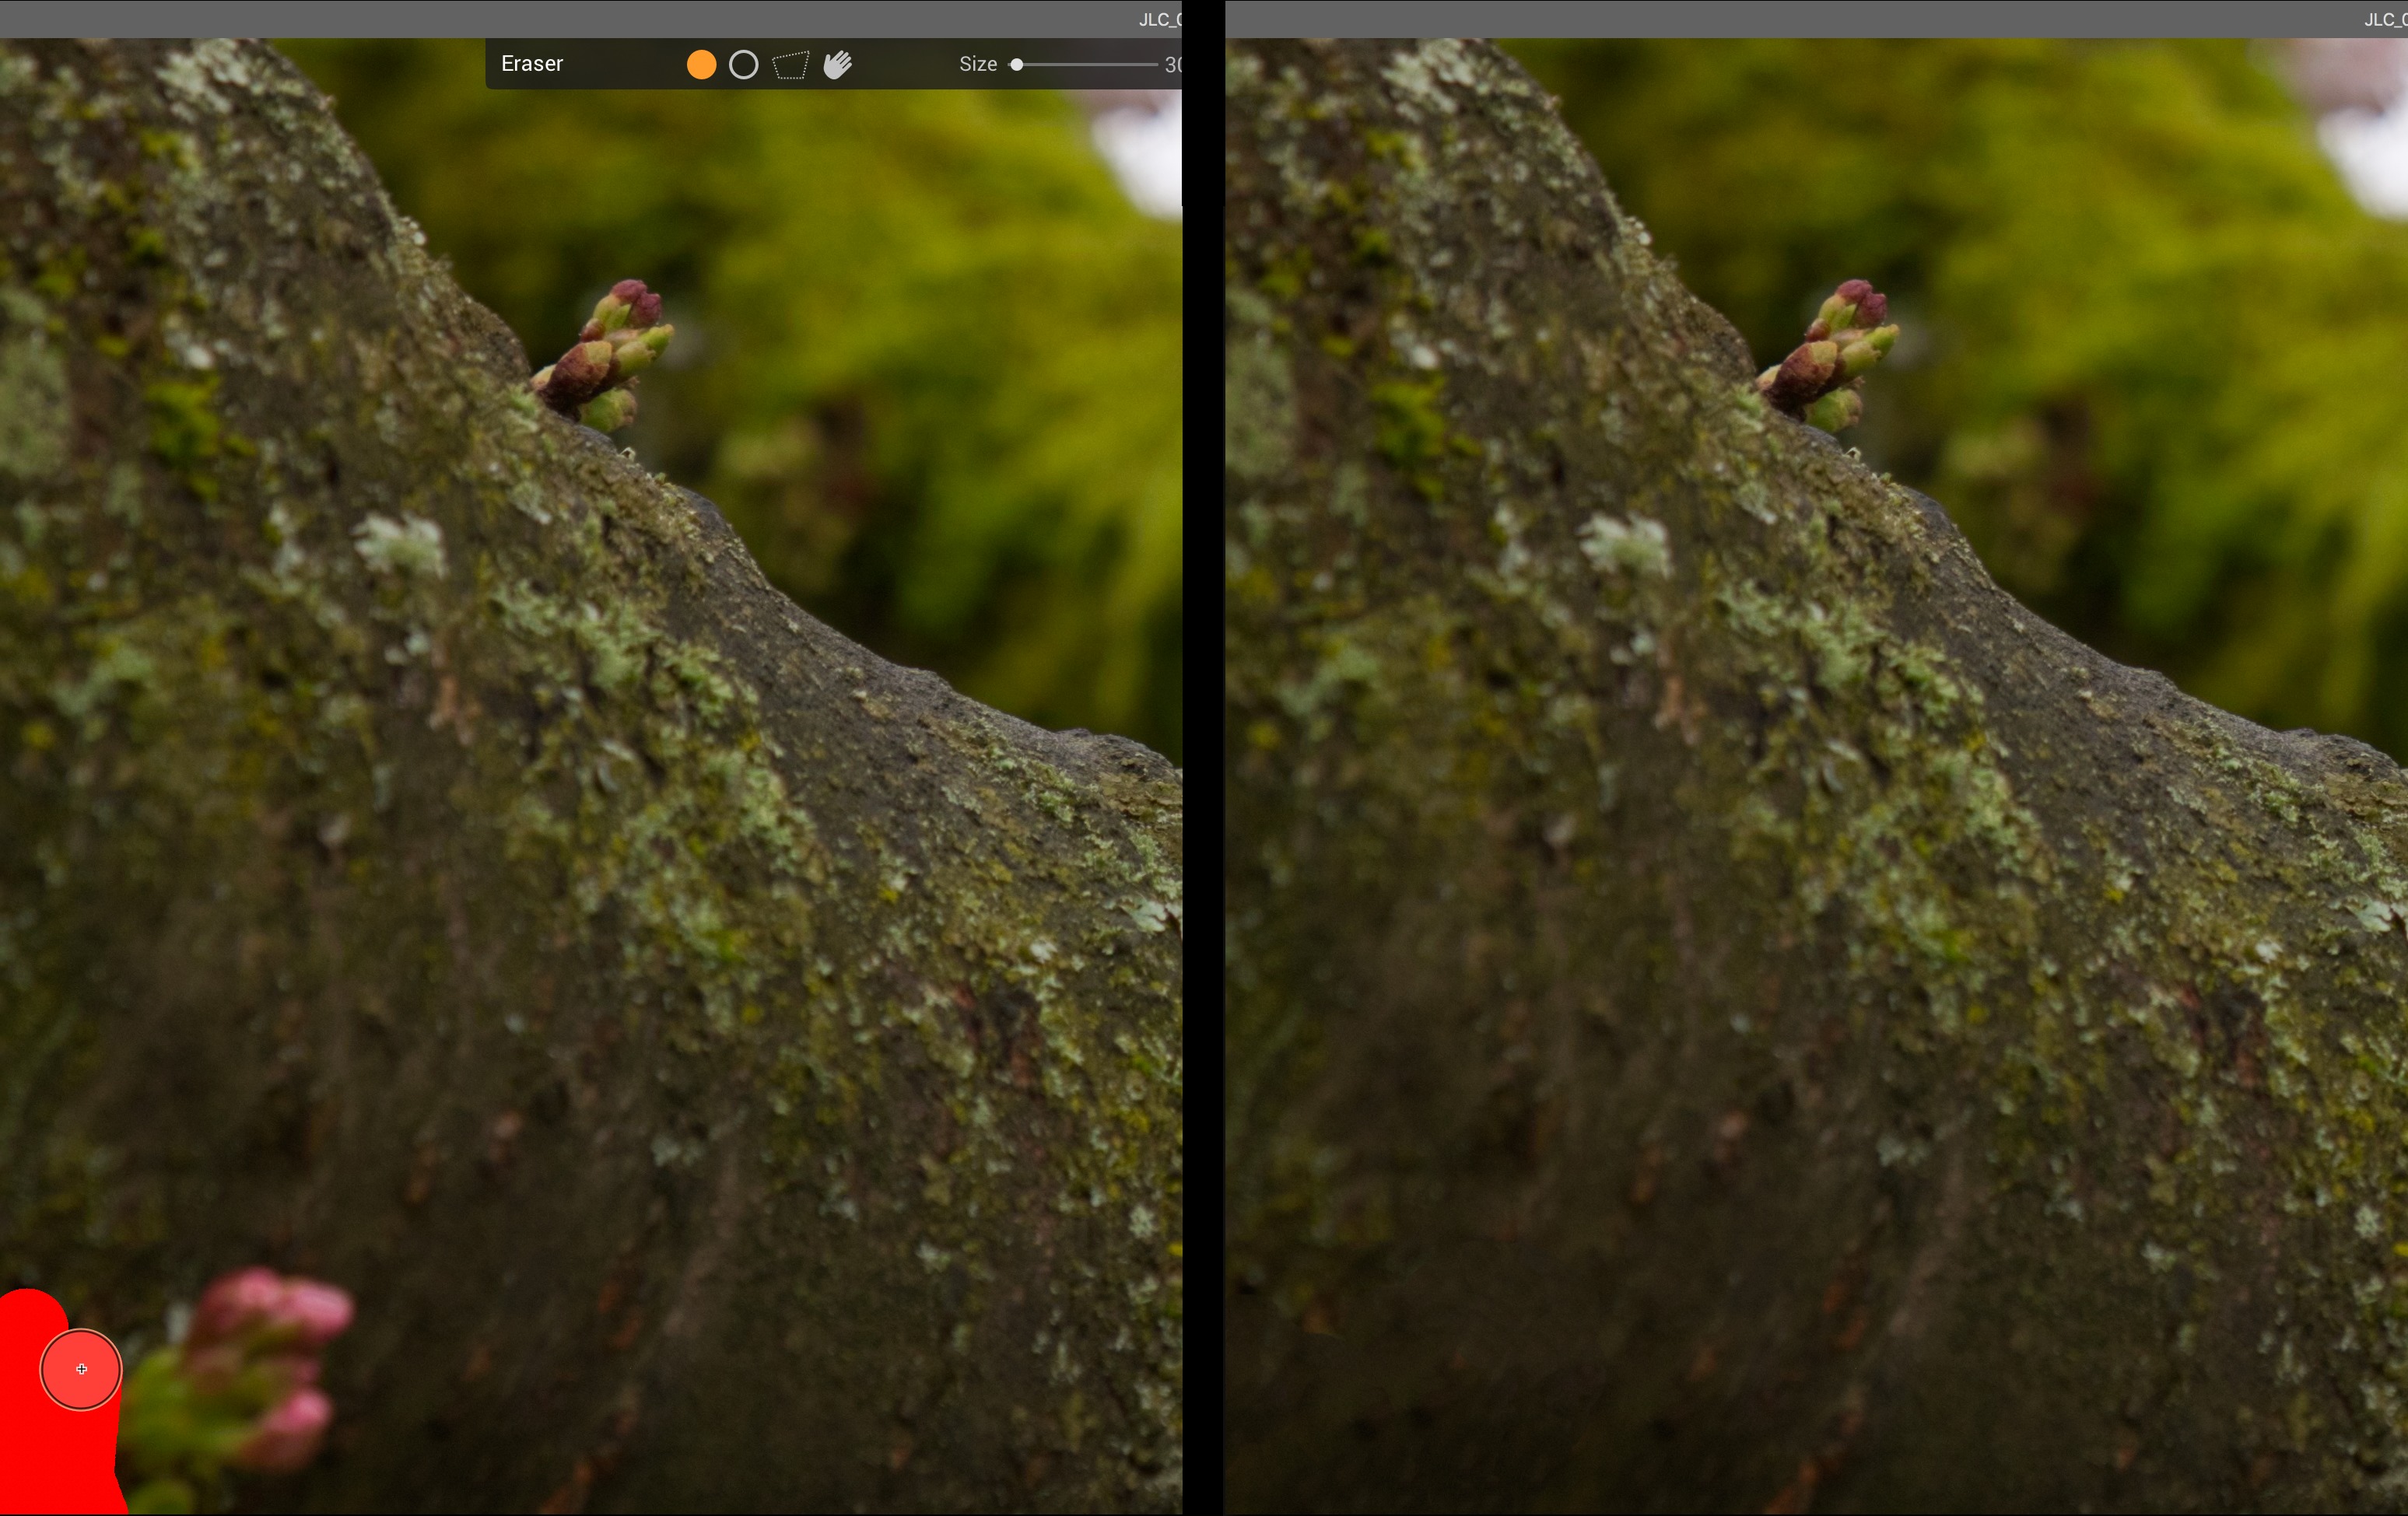
When you finish making the edit, such as removing an object from a scene using the Erase tool, Luminar adds that edit as a new layer — yet another instance of non-destructive respect for the original image. As with layers in other applications, you can use layers in Luminar to build up effects, isolate edits to specific areas, and more.

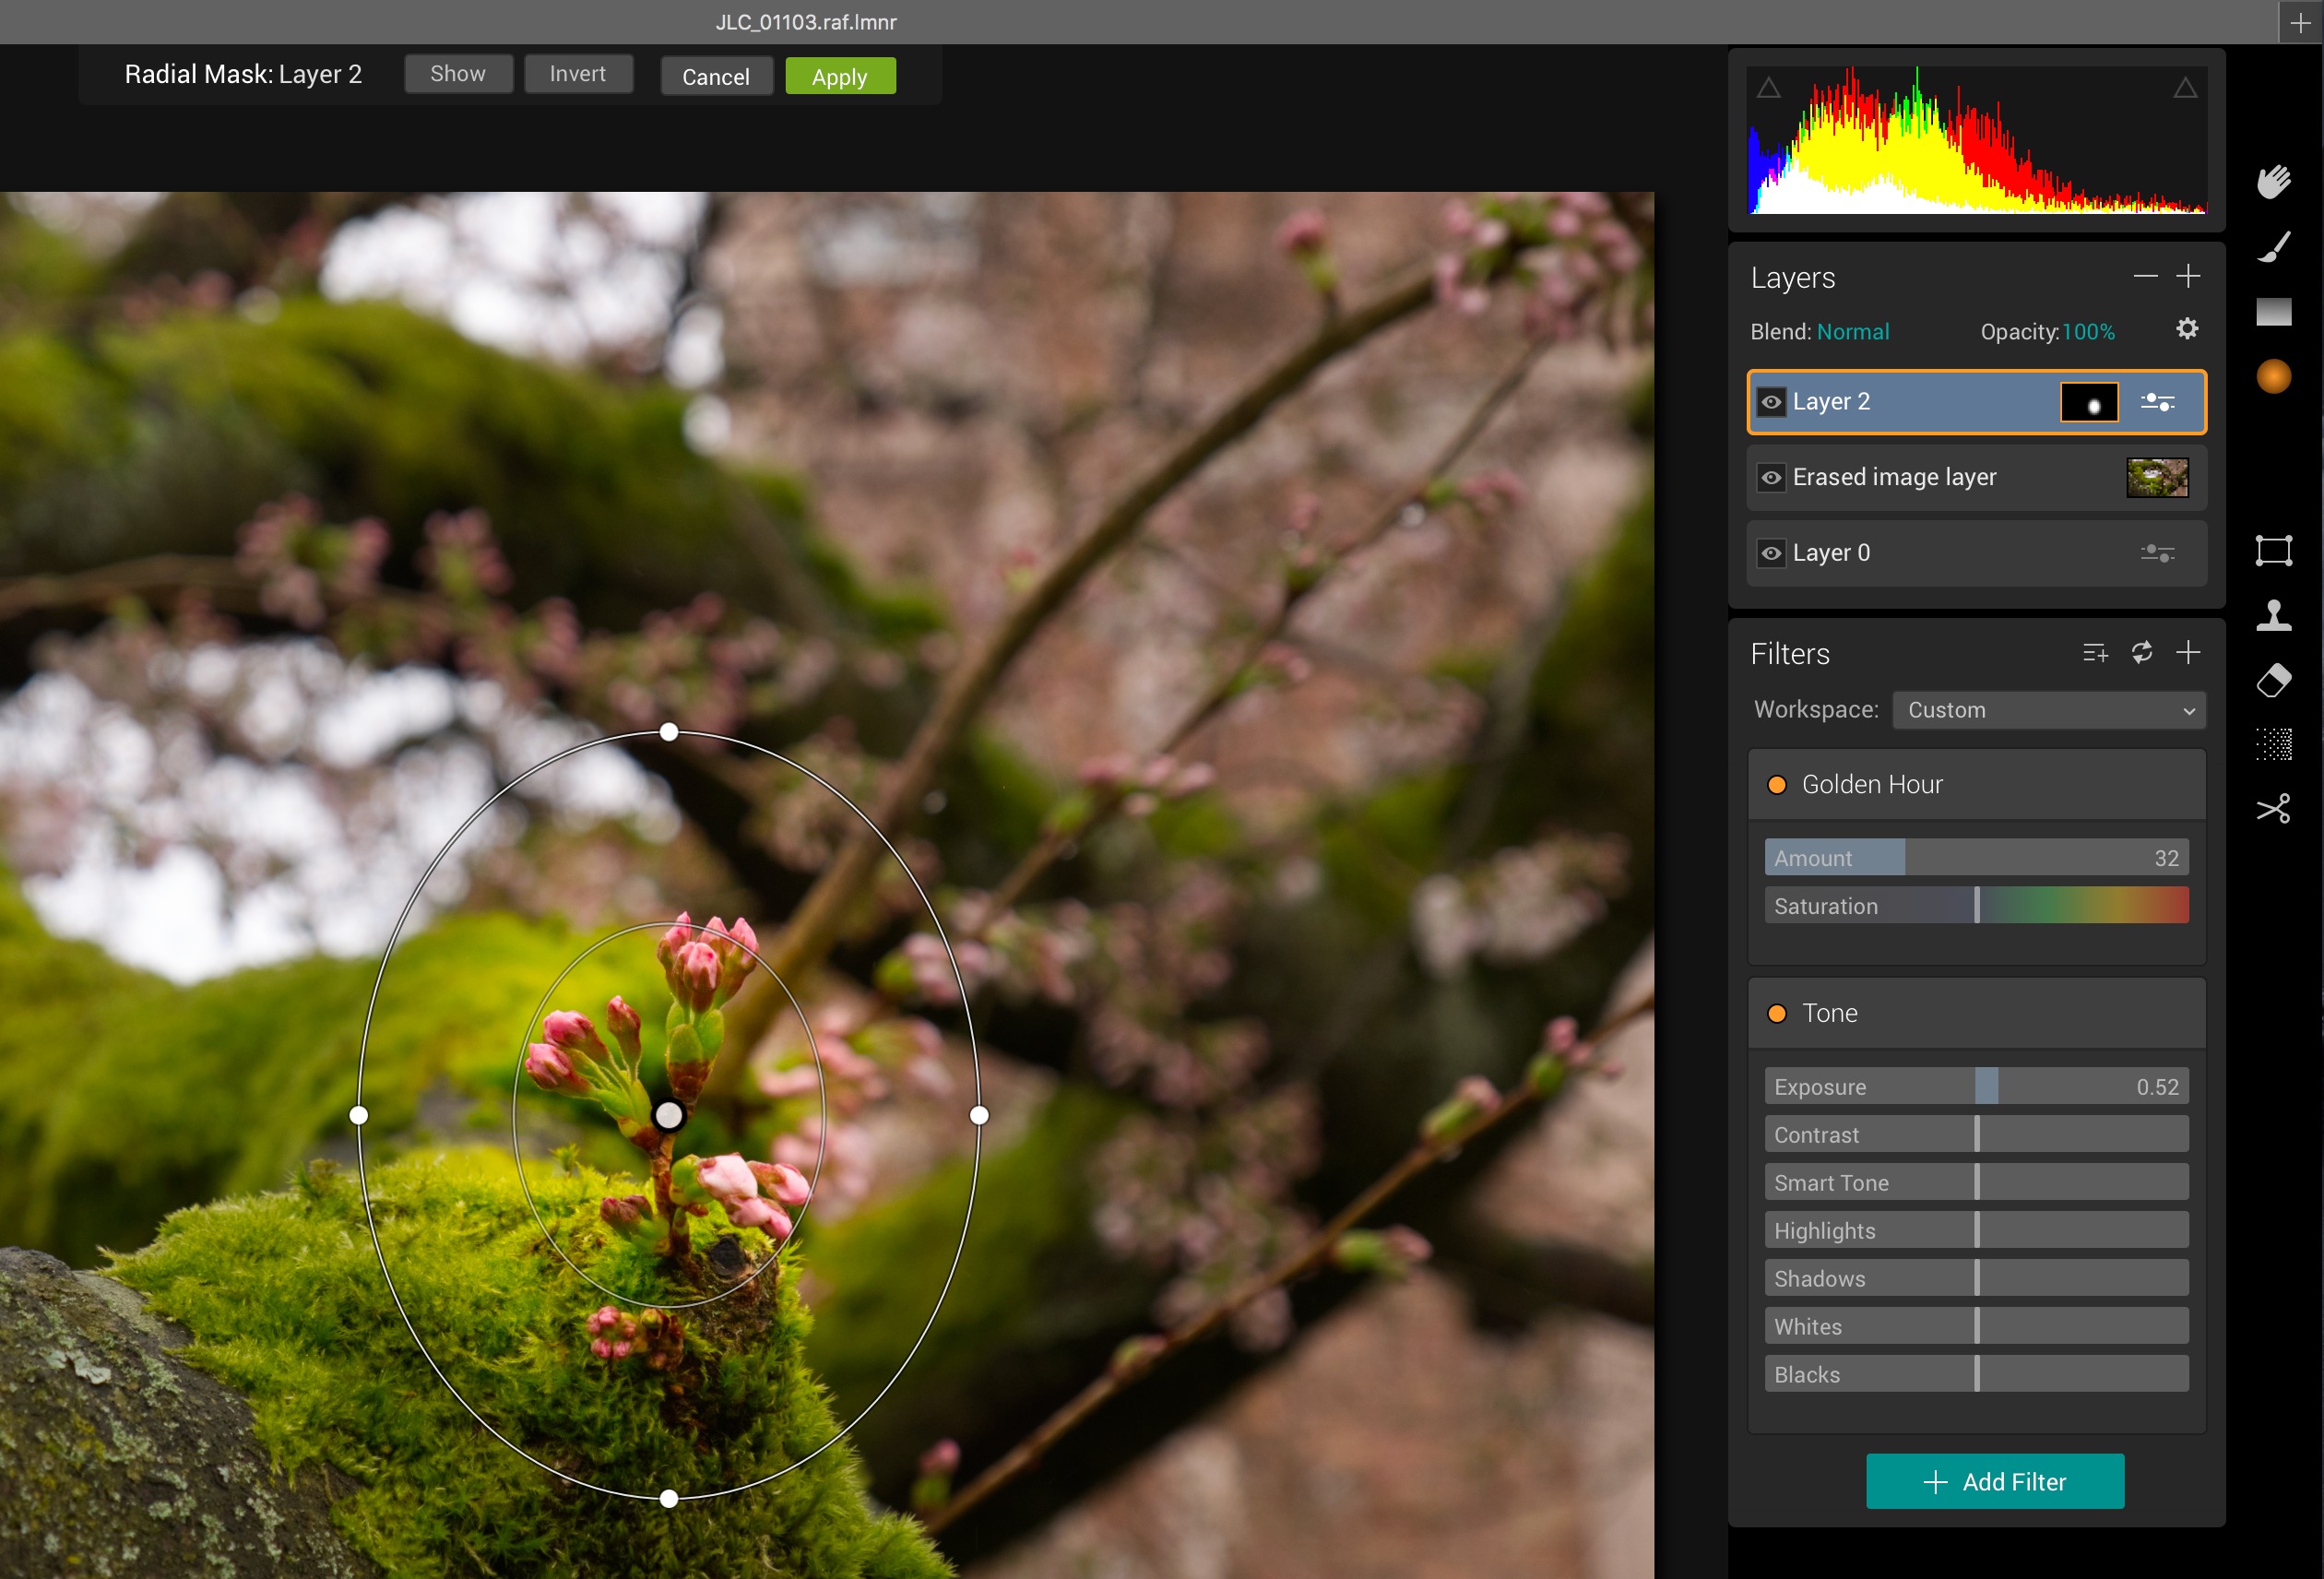
When a new layer is created, by a tool or by manually adding one, all of Luminar’s filters are available to it. For example, suppose you want to brighten just one area of a photo instead of the entire image. One way to do that would be to create a new adjustment layer (which affects the appearance of the layers below it) and add a filter such as Tone or Exposure. Next, you’d use the Radial Mask tool to drag an oval over the area you wish to highlight and click Invert so the adjustment is applying to the
area within the circle. You could then add other filters to change the appearance.
Luminar supports the Touch Bar on the 2016 MacBook Pro. When using the Clone & Stamp tool, for instance, there’s a handy brush size slider in the Touch Bar, which is far more convenient than taking a mouse trip to the options bar and changing the size there. (You can also press the bracket keys to make the brush size larger or smaller, a faster method and a standard convention among many similar applications, but that’s not obvious to new users.) However, the size slider is not present when using the Brush Mask tool,
which would be equally helpful, so it looks as though Touch Bar support isn’t yet complete.

Workspaces — The final piece of Luminar’s editing experience is its Workspaces feature, which takes advantage of the modularity of filters to create collections of filters that you use regularly or in specific situations.
Not every photo needs every filter; if you’re working on a black-and-white image, why clutter the interface with Hue and Saturation controls? Luminar offers workspaces for four common photo types, each of which includes filters you’d use for such an image: B & W, Landscape, Portrait, and Street. You can also set up Workspaces for convenience, such as by putting your preferred controls at the top of the Filters panel to reduce unnecessary scrolling.

Lightroom Plug-in and Photos Extension — It’s worth calling out the fact that Luminar does not attempt to manage your photo library. I normally wouldn’t even bring that up, since Luminar is an editing application, but Macphun has said that a future update will add library management, too. If you’re accustomed to managing, opening, and editing photos in Lightroom or Photos, it feels almost archaic to edit image files in another app.
In the meantime, Luminar includes a plug-in that lets you use Lightroom’s Edit In command to send a copy of an image to the Luminar application. When you finish, the edited version shows up in your Lightroom library.
If you instead use Photos to manage your photo collection, you can take advantage of Luminar’s editing tools via a Photos extension. That loads Luminar inside the Photos interface and offers the same controls you’d find in the stand-alone application. When you save your changes, the extension applies the edits to the image in the Photos library.

Note that when you’re using either the Luminar plug-in for Lightroom or the Luminar editing extension in Photos, you can’t go back in and adjust your settings later. Both options create a final edited version of the photo. In Lightroom, the copy sits alongside the original in a stack (Lightroom’s method of grouping photos). In Photos, you can revert to the original and start over if you don’t like the result, or you can edit on top of the edited version.
Compare that to opening photos from the Finder and editing them directly in the Luminar application. In that situation, you can save the results as Luminar files that can optionally retain their edit history. You get more editing flexibility, but if you use Lightroom or Photos to manage your photos, you need to track those Luminar files (with an .lmnr filename extension) separately.
When Macphun delivers the update that adds image management (which so far isn’t pegged to a date, but is just a promise), you will, in theory, be able to go back and access the entire edit history for any photo in your library. That’s how Lightroom works now if you use its built-in editing tools.
All in One and One for All — For pure convenience, having all the editing tools you want close at hand is better than reaching into every corner of your workshop to get them. Too often, when companies try to build all-in-one tools, the result is either lackluster or overcrowded.
Luminar strikes that delicate balance of including most everything you want in a photo editor without being overwhelming. It’s a powerful app that can also be picked up pretty easily by photographers looking for more than Photos offers without committing to (and paying for) the full capabilities of Photoshop.
Hi Jeff - Kevin from Macphun here. Hats off for a great review of Luminar that serves your readers well.
Your insights into using presets as starting points, plus explaining the flexibility of filters/layers and workspaces were spot on. I also loved the idea of stacking multiple instances of the same filter - good insight that I often forget about!
The "Auto button" is a feature I've also recommended and am advocating for w/ the dev team - nice suggestion!
One thing I'd add which I think is super-unique and really flexible is the idea of using Filter Masking within a single layer. In other words, any filter you want to apply to an image can be selectively applied with a brush/mask, without creating additional layers. Opens up a world of possibilities!
Cheers!
As a long time satisfied user of MacPhun products (FX Studio Pro, Intensify, Noiseless, Snapheal) I took advantage of the reduced price and sprung for Luminar. Am impressed at its' many capabilities.
One gripe though, and that's the file size of a 3MB image, with no layers and a minimum of editing, saved in native Luminar: 40MB!
Why so large?
Wow, I didn't notice that. It's dramatic!
If you select a Luminar file and right click, choose Show Package Contents. Drill down and you'll see what's happening. In one of my images, which was 35MB after applying a preset, I created a mask... and the file is now 640 MB. For some reason, masks take up a huge amount of space, with lots of ".miplcompressedmaskdata" files.
I have another edited file that's 1 GB.
That's... not great.
Hi - I'm w/ Macphun and have forwarded this thread over to our engineers for their comment.
I can say that if you "un-check" the Save History checkbox when saving a native file, the size should be decreased (more so if there's a lot of History!). Also... if you know that some layers can be "baked", choose Layers > Current Layer > Rasterize Layer.
Thanks for the insightful comments! Kevin
I downloaded the trial and compared the Luminar filters to a sequence of PS-CC layers that I apply in a well-developed workflow processing scanned 35mm slides. This starts with a plain ol' unsharp mask to tighten very fine details the scanner tends to soften. Luminar has a detail enhancer filter and a sharpen filter; I fiddled at length with both, comparing them, and couldn't get equal results to PS. The sharpen filter, at max amount and radius, developed a fine rhythmic pattern, almost a moiré, which might be an artifact, or might be it exposing something in the scanner output. The Luminar shadow/highlight doesn't have as many knobs to tweak as PS and seemed (like the other filters) to be quite gentle and unaggressive.
I particularly noticed that Luminar's response was seriously lagging compared to PS-CC. This on a late-2014, 27-in iMac. With a 6000x4000 image set "fit to screen", any adjustment in a filter took almost a second to display; at 100% almost 3seconds.