Screenshot by Jeff Porten
How to Work Around Wi-Fi Hotspot Captive Portals on Browserless Devices
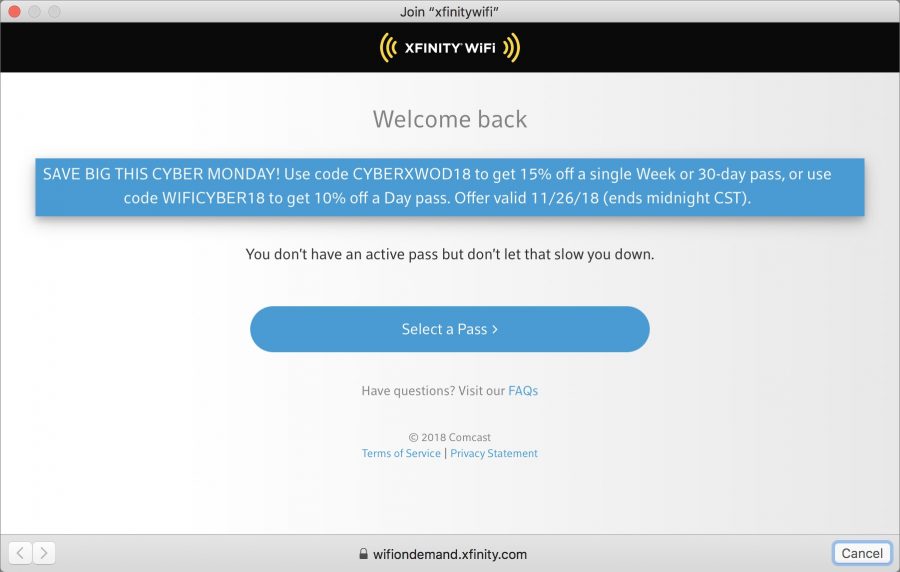
Many public Wi-Fi hotspots—such as those offered in hotels and hospitals—require you to authenticate with a “captive portal” page before allowing your device to access the Internet. Usually, this is as simple as clicking an “I Agree” button on the page. There’s just one problem: devices like the Apple TV and Nintendo Switch don’t have Web browsers and thus can’t access these pages (the Switch apparently has one for this purpose, but it has never appeared when I need it). Fortunately, if you happen to have a MacBook nearby, it’s an easy problem to solve.
 The trick is to disguise the MacBook as the browserless device you want to connect—say an Apple TV—click through the captive portal, and then disconnect the MacBook and connect the device. You can do this by spoofing the Apple TV’s MAC address, which is a unique hardware identifier for a network device. Every Ethernet port and Wi-Fi card has a MAC address. Follow these steps:
- Find the MAC address of the browserless device you want to spoof. On the Apple TV, it’s listed in Settings > General > About. If you’re using Wi-Fi, it will be called the Wi-Fi Address and will look like this: 00:14:22:01:23:45.
- Power down the browserless device, or at least make sure it’s not connected to Wi-Fi—the easiest way to do this with an Apple TV is to unplug it. These Wi-Fi hotspots allow only one unique MAC address at a time so if it’s connected it could prevent your MacBook from connecting in the following steps.
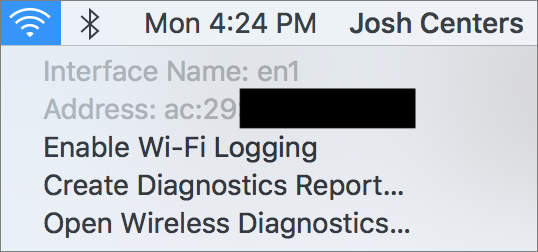
- Look up your MacBook’s Wi-Fi interface name and MAC address by Option-clicking the Wi-Fi icon in the menu bar. The interface name should be en0 or en1.
- Choose Turn Wi-Fi Off from the Wi-Fi menu.
- Open Terminal and enter this command, replacing
en0with your interface name and00-14-22-01-23-45with your browserless device’s MAC address:sudo ifconfig en0 ether 00-14-22-01-23-45Yes, you need to replace the colons with hyphens. Enter your administrator password when prompted. This command changes the MAC address of your MacBook’s Wi-Fi card, but only until you reboot!
- Option-click the Wi-Fi icon in the menu bar again and double-check to make sure your MAC address has changed.
- Turn Wi-Fi back on, connect to the hotspot’s Wi-Fi network, and bring up the captive portal by trying to visit a Web site in Safari.
- Follow the prompts to authenticate the MacBook.
- Once you’ve gotten online, restart the MacBook to restore its true MAC address.
Now you should be able to connect your Apple TV or other browserless device directly to the Wi-Fi network in question simply by powering it on or connecting to Wi-Fi.
If you have to pay for the hotspot and don’t want to incur the cost for a second device, you can use both your browserless device and your MacBook, as long as you keep the same MAC address on both and don’t connect them at the same time. So in Step 9 above, instead of rebooting the MacBook, turn Wi-Fi off, connect your browserless device, and when you’re done, disconnect the browserless device and turn on your MacBook’s Wi-Fi.
This trick could save your sanity if you’re on a business trip or stuck in a hospital for an extended stay and want to kill time by watching TV or playing video games. I was in this situation recently during the birth of my second son—welcome Jeremiah Stone Centers!—initially for his birth and then again so he could be placed under a bili light for two days to treat his newborn jaundice (he’s fine now). In my experience, most time spent in a hospital as a family member is just sitting around, but I was too tired and stressed out to be productive. Being able to play games on my Nintendo Switch helped pass the time while Stone was busy cooking under his light.

Nice tip. I was able to connect to a hotel WiFi recently with my Apple TV by calling the internet technical support 1-800 number. They were able to manually authenticate my MAC address.
Now you’ve done it, jack-booted DMCA thugs are going to rappel down your building and smash through a window for revealing how spoof MAC addresses
Seriously, thanks for this, I’ve been familiar with the concept for a long time but hadn’t bothered to look for the exact procedure and didn’t know how easy it is. Before I read this article, I thought it was going to be about using macOS’s Internet Sharing; that could work with an Apple TV (assuming you had an Ethernet cable, oh, and an Ethernet adapter for the Mac) but not for something like the Nintendo Switch.
BTW, the Nintendo Switch has a “secret” web browser, specifically for these WiFi portals. Someone figured out a way to use the Switch’s browser for portals to visit any site (in a way that advertises their business).
Yeah, I was happy when Josh suggested the article, since I’d been vaguely aware of the technique, but didn’t really know how to do it either. I’ve never had a need for the technique either, but I can absolutely see how getting stuck in a hospital or hotel with dodgy Wi-Fi policies could drive one insane.
Huh, interesting. Unfortunately, it never appeared for me. (Or maybe fortunately, because otherwise there may not have been an article!)
Thanks Josh. What a great article. I’ve long wondered if there was a way to do this. Now if I could just find a way to spoof the MAC on an iOS device
This is a nice tip, thanks!
I wonder, would this work with an Apple Watch? I have a series 3 which can’t use the public WiFi network at my gym. That’s despite my iPhone having earlier joined and learned this WiFi network.
I’m not sure where the Apple Watch limitation lies exactly. Maybe it’s not related to the interstitial agreement since watchOS has support for WebKit now, so maybe this MAC address trick won’t help. It’s a nuisance I’d love to workaround. I filed an enhancement request with Apple some time ago, but it was closed as a duplicate.
It’s very unclear how the Apple Watch uses Wi-Fi. I have a Series 2, and once it picked up Cornell’s network when I was in range without my iPhone—I was quite surprised to get the notification. But it never happened again, which in some ways isn’t too surprising because Cornell’s network generally requires visitors to log in at a portal page.
Thanks for the great tip, which I have never needed and hope never to need.
Do I need to be in an administrator’s account to make the change? In other words, is there a way to use sudo from a non-administrator account? If so, does any administrator password work or do I need to specify both an administrator account and the associated password?
Sudo is a standard *nix tool that has a configuration file that can be edited to allow use by a user who doesn’t have the macOS “admin” checkbox checked. But it absolutely should not be used by anyone who isn’t already very comfortable working the command line and knows what to do if (when) they screw up.
Instead, if you’re logged into your Mac as a non-admin and don’t want to use Fast User Switching, here’s how to do it just within Terminal:
su adminnamewhere “adminname” is the short name of an admin accountexitto close the shell running as “adminname.”It’s not relevant for running the command used in this article but note that using
sudoes not change what directory you’re in, you’ll still be in the non-admin user’s home directory. This is relevant if you’re using a command to write a file into the current directory. Thecdcommand by itself will change you to the current shell user’s home directory, i.e. /Users/adminname. When youexit, you’ll be back in the directory you were in when you ransu.pwd(stands for Present Working Directory) always tells you where you are.Sure…just edit the sudoers file and add your non admin account…alternative ugh you will need to log in as admin to do that. Once you do that and relogin as mon admin…just use sudo whatever at the prompt and I put your non admin password when required.
http://osxdaily.com/2014/02/06/add-user-sudoers-file-mac/
I travel quite a lot for business, and for both security (having a firewall) and convenience sake (avoiding having to authenticate every device in my kit), I use an inexpensive, lightweight, USB-powered travel Wi-Fi access point/router.
https://www.gl-inet.com/products/gl-ar750/
I get on the captive portal with one device through the router, and all my other devices (which already know the SSID of my router) are immediately on the air.
Because it is USB-powered, I plug it into a USB battery pack when I want to be mobile (e.g., walking around an airport).
This is a lot easier than hacking the MAC address each time.
Nice. Do you sign in to an embedded web server on the device to see a list of local WiFi networks to select the one to connect to?
Oh, that’s fascinating—have you run into any usage quirks because of adding another level of routing?
$45 is a good price too. It might be worth that just to avoid having to constantly sign in on multiple devices.
For routing, the travel router shouldn’t be any different than using a personal home access point/router in front of an ISP-supplied one or a Mac using Internet sharing. Two layers of network address translation (NAT) can create problems but I think it depends on the protocol used, web and email will probably be fine. Anything that’s peer-to-peer, including WebRTC, has a greater chance of having problems.
The cleverness of this box is using one set of WiFi hardware simultaneously as a client of one SSID and the creator of a second SSID. Years ago, I saw third-party software to make any Windows computer do this but I’ve never seen an equivalent for macOS.
Yes. The router has a HTTP-based GUI. I keep a bookmark to the LAN-side IP address, enter the admin. password, and I’m in. There are actually two GUIs, one simple and mostly graphical, and the other labeled “Advanced” (which lets you get into the guts of it, but you don’t need it for this). Once into the simple GUI (reached by default), clicking on the globe icon brings up a dialog that lets you set up the WAN side. There is a tab for wireless repeater mode, and there you pick the SSID you want to attach to (I also carry a small, retractable Ethernet cable, so if there’s an RJ-45 in my hotel room, it’s even easier). That’s pretty much all there is too it. There have been a few twists (and I’ll reply to Adam about those).
Adam, regarding usage quirks, most of the time, it’s pretty transparent (“it just works”). There are a few hotel chains (e.g., Best Western) that have portals that seem to be router-resistant. I did have a problem with one Residence Inn, struggled for most of an hour, and and it turns out there were rogue SSIDs operating on the property – it was a matter of picking the right one (and the front desk was clueless, but they gave me a number for their ISP, and we figured it out).
One caveat: Under the DNS settings, there’s a checkbox labeled “Prebind Protection” with a note to “Uncheck this if captive portal page cannot be resolved” – and I found it necessary to uncheck that box. I am planning to add my own DNS entries (likely 1.1.1.1 and 9.9.9.9, or the OpenDNS ones) vs. using the hotel default, but I haven’t made that change yet.
The device has the option to backup the configuration (download a file) and I suggest you do that (once it is set up). It once went bonkers on me, and I had to do a factory reset and restore.
Oh, one more thing… I use Encrypt.Me (formerly Cloak) for auto-enabled VPN protection on non-whitelisted networks, and you need to temporarily disable the “Over-Cloak” (Mac) or Connect On-Demand (iOS) feature in order to access the router. Once the connection is made, I re-enable the VPN.
Great stuff, Steve, and I may pick one of those up before my next trip, since it sounds like it can make things a lot easier and potentially more secure.
I happen to have an old AP Express lying around. Could something similar be achieved using just one Mac and such an old AP Express? Use the first Mac to connect to the wireless network. Then share that to an AP Express connected to that Mac through Ethernet (possibly via TB dongle). Set up the AP Express to use bridge mode. From then on just connect additional other wifi clients to the AP Express.
Hmm, use a Mac to join public WiFi, enable Internet Sharing to share your WiFi with computers on Ethernet, then connect an access point in bridge mode to the Mac’s Ethernet. Yes, that should work, other devices should be able to connect to your access point’s SSID and to the public WiFi, all the traffic will appear to be coming from the Mac. The AirPort Express would needs its own wall outlet for power.
Bridge mode might work, but I don’t know if the Express will pass the captive portal registration page. I would be very interested in the result of an experiment.
The point of Simon’s idea is the devices connecting to the AirPort Express don’t need to access the portal page, the Mac the Express is connected to has already gone through it. When the Mac is performing Internet Sharing, only it sees the MAC addresses of the devices it’s sharing with, it’s the router.
Curtis, you are right. I misread Simon’s post. It may not even need to be in Bridge Mode if the Ethernet is attached to the LAN port on the Express, since the connection between that port and the Wi-Fi access point is an Ethernet switch (on the same side of the router).
Yeah, I just realized I could basically achieve what Steve describes with an old AP Express without buying a new device. The downside of course is no battery power.
What I like about a scheme like this is that it hides all my local clients from the hotel. Especially those silly joints where they think one wifi client at a time is sufficient. Or the even sillier establishments that try to make a point about how they give you [gasp] two clients included in that $320 room rate.
Plus, once I’ve hooked up my own wifi router to the hotel wifi, all my clients will automatically connect to that known wifi and get a connection, no passwords, no tokens.
Bridge mode isn’t required but would avoid adding a third NAT layer.
Since the latest WatchOS I have been getting dismissible warnings for each Wi-Fi it’s been unable to join because of captive login pages (only once per SSID, so it must be learning)
Also, just the other day I downloaded a Wi-Fi profile to my phone (private key/certificate protected Wi-Fi) and it asked me if I wanted to install it on my phone or on my watch. That’s new, I think?
Yes! I just saw the warning about not being able to join a captive-portal Wi-Fi network too. And Spectrum wanted to know if it could install its Wi-Fi profile on either the iPhone or Apple Watch when I used the MySpectrum app.
I hope someone is still here. We are all in Catalina Hell on the Mac Platform. I managed to get it to look like it worked using terminal but after many attempts and other articles it just looks like it works but the grayed out MAC address doesn’t change. I am only trying to get an old HD Apple TV to work using my xfinity account but nothing seems to work. Searching for "Change wifi in Catalina just gets miles of reports that everyone else is having trouble. Do you have any solutions?
Hi there. My Wi-Fi address is not changing. I get the message “ifconfig: ioctl (SIOCAIFADDR): Device power is off” after entering the sudo command. Is that correct?
Appreciate any help with this as I’m stuck in mandatory hotel quarantine in Sydney, Australia and can’t leave for 14 days, so getting my Apple TV to work would be great!
Sorry to hear you’re stuck in quarantine. I have not seen that message before, so make sure you’re specifying the correct network device in the command. It may be moot anyway because I tried it on my Big Sur install and it didn’t work. No error message, but the MAC address didn’t change. I saw a Reddit thread that claimed entering the command over and over again will cause it to eventually stick, but that doesn’t make any sense to me.
Actually I figured out that although the address doesn’t change when you option click the Wi-Fi icon, the address has actually changed when you look at en0 values via ifconfig, and it works! Thanks for the write up!
I created an account just to say thank you for the following 2 key piece of info:
and @dezobe