Take Control of OS X Server, Chapter 3: Preparation and Installation
This article is a pre-release chapter in the upcoming “Take Control of OS X Server,” by Charles Edge, scheduled for public release later in 2014. Apart from Chapter 1: Introducing OS X Server, and Chapter 2: Choosing Server Hardware, these chapters are available only to TidBITS members; see “Take Control of OS X Server” Streaming in TidBITS for details.
Preparation and Installation
Now that you have your server hardware, it’s time to install OS X Server. Don’t worry, though—there’s no reason to be intimidated by OS X Server, largely because it’s just an app, albeit one that installs and manages other apps that provide content to other computers. Plus, I’ll guide you through the entire process.
There are a few places where my instructions may seem more complicated than necessary. That’s because I’ve learned over the years that the simplest approach can lead to significant trouble later on. It’s better to put extra effort in at the start when that can prevent later problems.
This chapter covers getting the server up and running. It’s the most important chapter in the book, and one almost everyone should read, since the best way to end up with a fast, reliable server is to start from scratch and build it carefully. Only at the very end, when you’re sure everything is working properly, should you put important data on the server.
Don’t panic if you don’t get the installation right on the first try. You can delete the /Library/Server folder and reboot to start over. In the worst case, if other artifacts are hanging around due to not starting from a clean slate, you can reformat the drive, reinstall OS X, and start over. So tinker until you get everything right, then have people start accessing the server and migrating data to the drives on the server.
Understand Network Basics
Just as you needed to plan your server hardware ahead of time, so too you should prepare for the changes necessary on your network: the server needs an IP address that won’t change, and if you want your services to be accessible from the outside Internet, you’ll want to get your head around ports and port forwarding.
IP Address
The most important aspect of any server’s network configuration is that its IP address not change. If it did, clients wouldn’t be able to find the server on the network. This is particularly important for OS X Server. Also, Open Directory, Profile Manager, and other services can stop functioning properly if the IP address (or name) of a server changes.
Because there are often unexpected negative consequences from changing an IP address after the Server app is installed, you should always try to limit the amount of change to a server’s network configuration throughout the lifecycle of that computer.
I like to plan the IP address (and name) of each server even before I install the operating system, ensuring that it’s a static IP address on the local area network (LAN) and a name that won’t need to change. I also recommend you limit changing the state of the network interface by making sure that the server uses only Ethernet and not unplugging the Ethernet cable while the server is active unless you absolutely must.
If clients will be accessing the server from outside your office or home network, you need to ensure not only a static IP address within the local network (see Picking a Static IP Address) but also a consistent external static IP address, if possible.
An external static IP address costs around $5 per month from most Internet service providers, but some ISPs charge exorbitant “business” rates. If you don’t wish to afford one or can’t get one, there’s an alternative, a dynamic DNS service such as Dyn’s Remote Access service (previously called DynDNS Pro). With such a service, a tiny agent application runs on your server and updates the Remote Access service with your new IP address any time it changes, so your domain name can always point at the current IP address. If Dyn’s service isn’t to your liking, there are many other dynamic
DNS services.
Ports
A static IP address on your local network is a necessity no matter what, but if you want your server to be accessible from the outside Internet as well, there’s another thing to consider: ports, which enable your server to direct incoming requests from the Internet—for Web pages, email, and SFTP—to the appropriate service. And more to the point, you’ll need to open ports for the specific services you want accessible.
Ports are numbers ranging up into the 60,000s. Each service (or protocol) usually uses one or more pre-assigned ports (although these can often be customized).
If you’re having trouble visualizing this, imagine that your server is like a post office. Its street address is analogous to an IP address, and its post office boxes are analogous to ports. Each incoming letter needs to be routed to the appropriate box for pickup by a customer. Ports are akin to those individual customer mailboxes. So, just as an incoming letter to Stanley Frobisher might go to box 112, for someone on the Internet to access a Web page on your server, you need to open up port 80. If you are running an Apple File Protocol (AFP) file server, you’d make it available via port 443.
The analogy goes further. Just as post office boxes are locked to keep people out, you can keep a port closed to prevent access. So, if you don’t want allow anyone to upload files via FTP from the outside, you keep port 21 closed.
To sum up, if you or any of your users will be accessing your server from outside of your LAN, you’ll need to open ports for that to work. When accessing your server from inside your network there is no need to open any ports unless you have a very (and likely overly) complex network.
I’ll mention when port forwarding is necessary in upcoming chapters. For now, what you need to know is that to open a port on your server, you’ll configure your router to connect incoming traffic on one of its ports to a port on your server for each type of incoming traffic you want to support. This is called port mapping. Port mapping is done within the user interface for configuring the router or firewall, and the details are different depending on the brand of router or firewall—later on, if you need help, consult the manual that came with your device. (Take Control of Your 802.11n AirPort Network explains how to handle port mapping on
Apple’s newer base stations—including 802.11ac base stations.)
Install and Configure Mavericks
It’s time to install a fresh copy of Mavericks on your server Mac! In this topic, I talk about installation and then walk you through a few important ways to customize Mavericks before you run OS X Server for the first time.
Install OS X 10.9 Mavericks
Whether your Mac is already running Mavericks or not, it is important to start with a new clean installation of Mavericks. That’s because you want to give your server a stable foundation—when you centralize assets (files, services, etc.) on one computer, that computer becomes more important than it was before. You don’t want to use a computer that has cruft on it. In other words, don’t turn a computer with your kids’ Dora the Explorer apps on it into a server. Instead, back that computer up, reformat its disk, and install a clean version of Mavericks.
What if you set up the Mac cleanly but have been running it for some time? I recommend that you set it up from scratch again and manually migrate the data into shares or new Web site configurations. You want your new server installation to run for a long, long time without problems!
Since you are likely already comfortable with the task of installing Mavericks, I’m not going to cover that in any detail. In short, use Disk Utility to erase the partition or disk onto which you’ll be installing, and then download Mavericks using the App Store application and work through the default installation process. There’s nothing outside the ordinary to do at this point.
Configure the Server’s IP Address
Once you’ve installed the operating system, the next step is to configure the network settings for the server. This important step involves assigning a static IP address to the network interface that clients will use to access resources on the server.
Computers use TCP/IP addresses to communicate with one another. By default, these addresses on client computers can change, using a protocol called DHCP (Dynamic Host Configuration Protocol), but servers need a consistent IP address so that clients can access them. So servers typically are not configured using DHCP (in some cases a reservation for a given IP address is used, but that’s beyond the scope of this chapter).
Once you’ve picked the best IP address to assign to your server, it’s time to configure the soon-to-be server. To assign a static IP address:
- Open System Preferences > Network and choose the interface (likely Ethernet) that clients will use to connect to the server.
- At the right, choose Manually from the Configure IPv4 pop-up menu and then enter the IP address you chose, the subnet mask (generally
255.255.255.0), and the IP address of your router as seen in Figure 1. - Click Advanced.
- Click the DNS button.
- Use the plus button to add the addresses of your name servers to the DNS Server list. (If you don’t have your name server IP addresses handy, use Google’s at
8.8.8.8and8.8.4.4.) - Click OK, and then click Apply to save the changes to the interface.
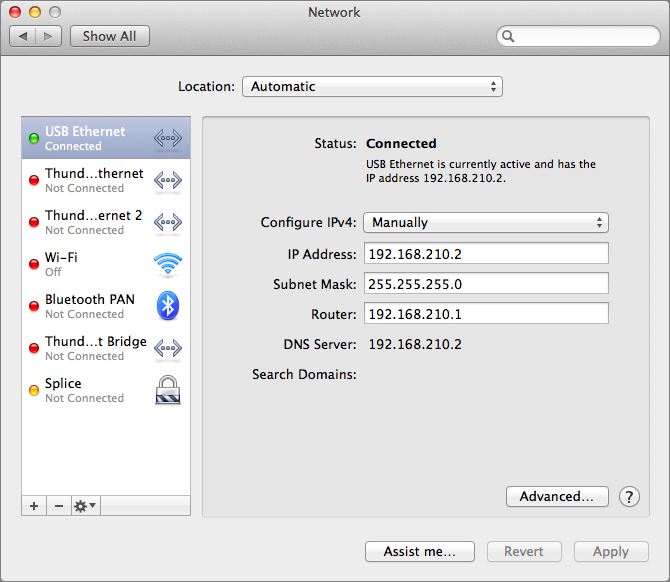
Figure 1: Configure your server’s IP address.
Once the address is configured, test that the address works by trying to ping the computer from another computer on the network. Simply use the ping command in Terminal, followed by the IP address of the soon-to-be server:
ping 192.168.210.2
The response should appear as multiple lines that look like this (stop ping by pressing Control-C):
64 bytes from 192.168.210.2: icmp_seq=0 ttl=63 time=75.184 ms
If the response looks like this, then you’re done and you can move on to configuring the name of the computer you’ll be using as a server. Otherwise, check the Network pane of System Preferences and verify that the settings are entered appropriately.
Set Up Host Names
After you’ve set up a static IP address, it’s time to give the server a name. Just as with the IP address, you don’t want to change the name once you’ve opened the Server app for the first time.
The name should be less than 16 characters long and contain only letters, numbers, dashes, and underscores. Additionally, try not to use a name that ends in .local (as in computerName.local) as that can lead to unstable connections.
A server actually has three names: the LocalHostName, and the HostName and the ComputerName, which are frequently the same. In my examples, the LocalHostName is the name of the computer, and the HostName and ComputerName add the domain name to the LocalHostName to create the fully qualified domain name of the server.
What names you choose depends on whether you want your server to be accessible from the outside Internet or not:
- Local only: If you don’t need your server to be accessible via the Internet, the domain name you choose simply needs to avoid conflicting with any real domain on the outside Internet. The easiest way to ensure this is to use a fake top-level domain, something like
.lanor.foobar. - Internet: If you plan to run a public Web server, for instance, you need to use a domain name whose settings you control via a DNS provider like easyDNS or DynDNS. For instance, you might use a domain name like
myhost.example.com. Although there’s nothing wrong with doing this, beware that it will require more setup effort and ongoing maintenance, particularly with regard to security.
For example, if you set the server’s LocalHostName to mavserver, and your domain is pretendco.lan (an intentionally made-up domain that won’t conflict with any real domain), then you could use these names:
- LocalHostName:
mavserver - HostName:
mavserver.pretendco.lan - ComputerName:
mavserver.pretendco.lan
To set the names, use scutil via Terminal on the soon-to-be server. In the steps below, replace the names shown (mavserver.pretendco.lan and mavserver) with the names you want your server to have:
- Set the HostName using this command:
sudo scutil --set HostName mavserver.pretendco.lan - Set the ComputerName:
sudo scutil --set ComputerName mavserver.pretendco.lan - Finally, set the LocalHostName:
sudo scutil --set LocalHostName mavserver
You’ll need to do one more thing to check that you’ve entered your names correctly, but that has to wait until after you’ve installed the Server app itself and configured DNS a bit more.
Disable Sleep
Luckily, servers don’t need their rest and should never go to sleep. That way, the files and services on the server can be accessible—even if it’s 2 AM.
To keep your server awake at all times:
- Open System Preferences > Energy Saver. If you’re using a laptop, it should be running on a power adapter when acting as server, so click the Power Adapter button if available (and if this is true, you’ll see slightly different options).
- Move the Computer Sleep slider all the way to the right, to Never (Figure 2). This prevents the server from sleeping automatically. If you’re using a laptop and there’s an option for “Prevent computer from sleeping automatically when the display is off,” select it.
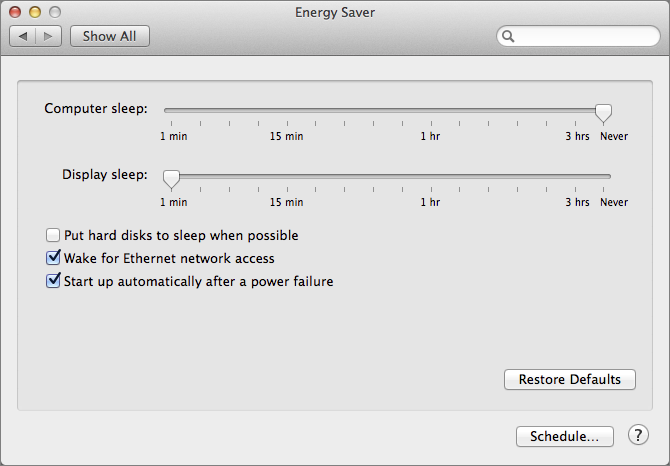
Figure 2: Configure Energy Saver options.
- To save power, set the Display Sleep slider to a short duration. If you do this, it’s best to disable the screensaver entirely, in the Desktop & Screensaver pane of System Preferences, to reduce the chance that the screensaver itself could crash or cause problems.
If you’re running the server headless, set Display Sleep to Never, since there’s no point in sleeping a non-existent screen. - Deselect the checkbox for “Put hard disks to sleep when possible.”
- Select “Start up automatically after a power failure” so your server comes back up on its own if the power goes out and your UPS can’t keep it running long enough.
Your server will now stay awake and keep its resources available to clients who need them.
Download and Install the Server App
Downloading OS X Server is as easy as buying anything else from the Mac App Store. First, open the App Store app and search for OS X Server, or visit its description page on the Web.
Next, from the App Store, click the price button to buy the software, or if you’ve already purchased the software, click the Install button as shown in Figure 3.
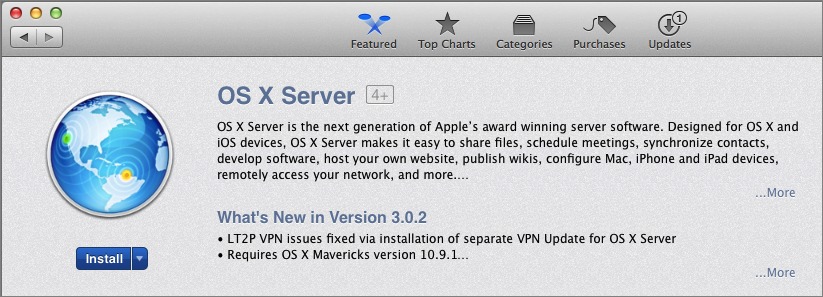
Figure 3: Download the Server app.
The Server app downloads to your /Applications directory. If you feel that the download is taking too long (it’s about 180 MB), you can check on its progress in the Purchase view of the App Store app. While the Server app is downloading, I recommend adding its icon to the Dock so you can access it quickly in the future.
Once the download is complete, restart your Mac. This is necessary because there’s a command line tool buried deep within the Server app that you’ll need to use later to confirm that the server’s names are correct.
When the Mac comes back up, open the Server app to start the initial configuration assistant. You are prompted to set up your server. Click Continue. Agree to the licensing agreement by clicking Agree, and then authenticate with an administrative password when you are prompted to do so.
Once you authenticate, services are prepared, which means all the right things for a server to be a server are being put where the app needs them. You can watch some of this by looking in the /Library/Server directory. Be patient, as stopping this process can have bad results—such as an incomplete copy leading to services not functioning when you get ready to start them.
The Server Tutorials screen opens when the process is complete. Read them all and come back in a few weeks when you’re done. Actually, you can just close this screen, although Apple’s tutorials are well done and I do recommend you read them when you have time (choose Help > Server Tutorials to access them again). Once you close the Server Tutorials screen, you are in the app and your base server install is complete.
The next thing you should do is check out the interface of the Server app. Notice that the global settings for the server are listed in the top Server section of the sidebar, as you can see in Figure 4. Below that is the Accounts section, with the Users and Groups configurations. Next comes the Services section, containing the typical services most people run on Apple servers. Finally, the Advanced section, hidden by default, contains the more advanced services at the very bottom of the sidebar. Hover the pointer over a section name and a Hide/Show control appears to the right; click it to hide or show the entries in that section.
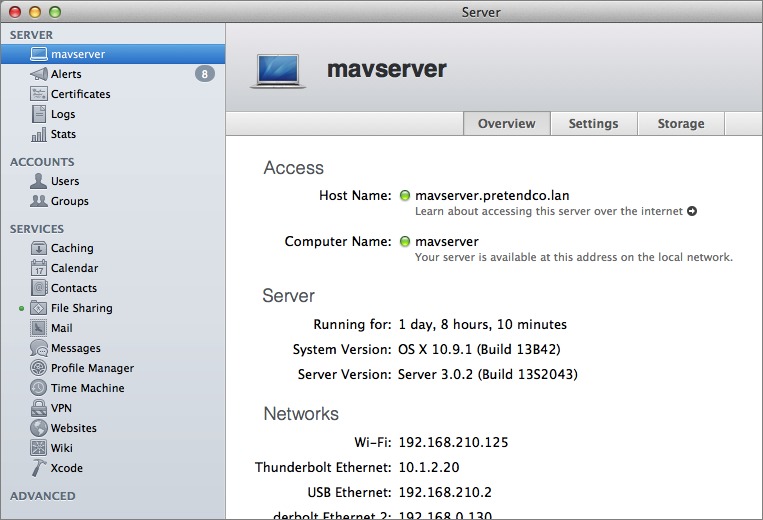
Figure 4: The basic Server App interface involves a sidebar on the left and a pane at the right. Click an item in the sidebar to work with it in the pane.
Click each entry in the sidebar to see the options that correspond with it. We’ll review most of the services in the appropriate chapter, later in this book.
Configure Global Settings
Now that the server is installed, there are a few steps that are beneficial no matter which services you plan to run. These steps help keep you informed about the server and reveal a few options that I won’t describe in detail here but that you may decide later to use.
First up, click the name of the server in the sidebar and then click the Settings button.
Figure 5: Click the name of the server in the sidebar at the left.
On the Settings pane, you’ll see the following options, which should be configured only if you need them (Figure 6):
- Allow remote login using SSH for: Use this checkbox and pop-up menu to specify if and who can use the SSH command line tool to manage the server.
- Enable screen sharing and remote management: Select this option if you plan to use the screen sharing or Apple Remote Desktop tools to take over the screen of the server.
- Allow remote administration using Server: Select this if you plan to download the Server app onto another computer in order to manage this server. This is particularly handy if you’re running the server headless.
- Enable Apple push notifications: This is where you configure the server to send push notifications for mail, calendar events, and Profile Manager. You don’t need to configure this option now as I’ll explain how to configure Apple push notifications in Configure Alerts.
- Service Data: Edit this option if you will be using external storage, such as a Thunderbolt drive, to house your service data (such as files, software updates, etc.). If you aren’t ready to configure this setting when you first set up the server, don’t worry, because you can always use it to move data to an external drive at a later time.

Figure 6: Consider the options on the Global Settings pane.
Finish Network Configuration
Remember when you configured the server’s names? Now that you have the Server app installed and running, it’s time to finish the networking setup, which—unless you have a DNS server on your network already—likely requires enabling the DNS service within OS X Server, configuring it, and updating the server’s DNS settings in the Network pane of System Preferences.
The directions here are for a quick-and-dirty job meant to get DNS working sufficiently to be able to continue with other setup jobs; if you want to run DNS to host names for other internal servers on your LAN, you should also be sure to read Configure DNS, in Chapter 5.
Turn On DNS
To enable DNS, click DNS in the Advanced section of the Server app’s sidebar (if necessary, hover over Advanced and click Show). Then click the ON button in the upper right of the DNS pane.
Under the Host Names list, click the plus button to create a new entry. In the Host Name field, enter the HostName you created in Set Up Host Names, and in the IP Addresses field, enter the IP address of the server that you set up in Configure the Server’s IP Address (Figure 7). When you’re done, click the Create button.
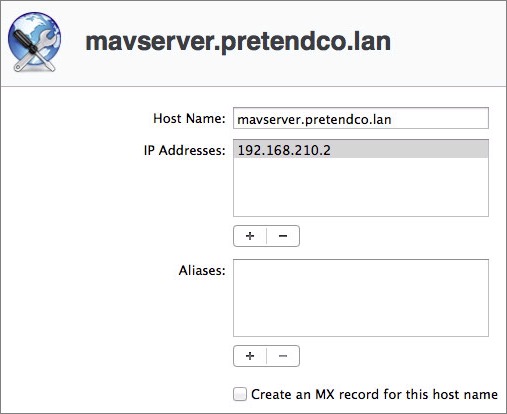
Figure 7: Enter your server’s Host Name and IP address in the appropriate fields.
That takes care of mapping your server’s host name to its IP address, but there’s one more thing to do in the DNS pane, which is to configure the DNS servers that will handle other requests. Under Settings, click the Edit button to the right of Forwarding Servers, and enter your usual name server IP addresses. Again, if you don’t have those handy, you can use Google’s public name servers (Figure 8).
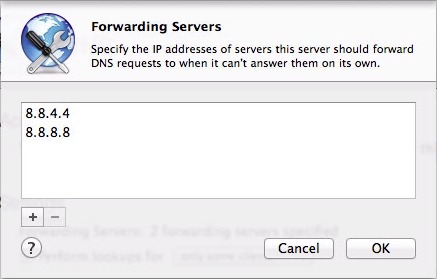
Figure 8: Enter the IP addresses of your name servers.
Update OS X’s DNS Setting
Now that you’ve configured Server’s DNS service, you need to tell OS X on the the server Mac itself to use it instead of your normal name servers. In the Network pane of System Preferences, select the network adapter in use (likely Ethernet), and click the Advanced button.
Then click the DNS button, select whatever is entered there, and replace it with the IP address of the server itself (Figure 9). Telling the server to look up IP addresses on itself may seem odd, but Server’s DNS service is doing all the work.
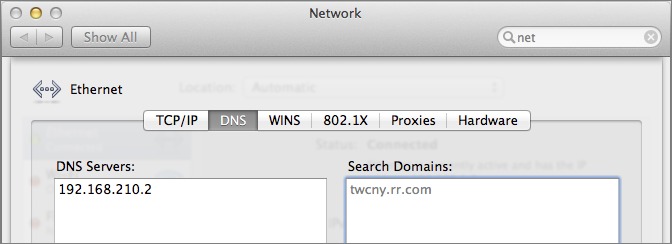
Figure 9: Enter the server’s own IP address in the DNS Servers list in the DNS screen of the Network preference pane.
Verify That the IP and Hostname Match
Lastly, you need to check that your server’s IP address and hostname match using the changeip command in Terminal. Enter:
sudo changeip -checkhostname
The changeip command should output something similar to the following:
Primary address = 192.168.210.2

Current HostName = mavserver.pretendco.lan

DNS HostName = mavserver.pretendco.lan

The names match. There is nothing to change.

dirserv:success = "success"
In the last two lines of output from changeip, if you don’t see that the names match and success, you’ll need to work back through Configure the Server’s IP Address, Set Up Host Names, and all the steps under Finish Network Configuration.
Configure Alerts
OS X Server can alert administrators with push notifications (e.g. alerts on your iPhone) or email when there are problems with the server. To configure alerts:
- Click Alerts in the sidebar, and then click the Delivery button.
- On the Delivery view (Figure 10), click the Edit button for Email Addresses, enter every email address that should receive alerts from the server, and click OK.
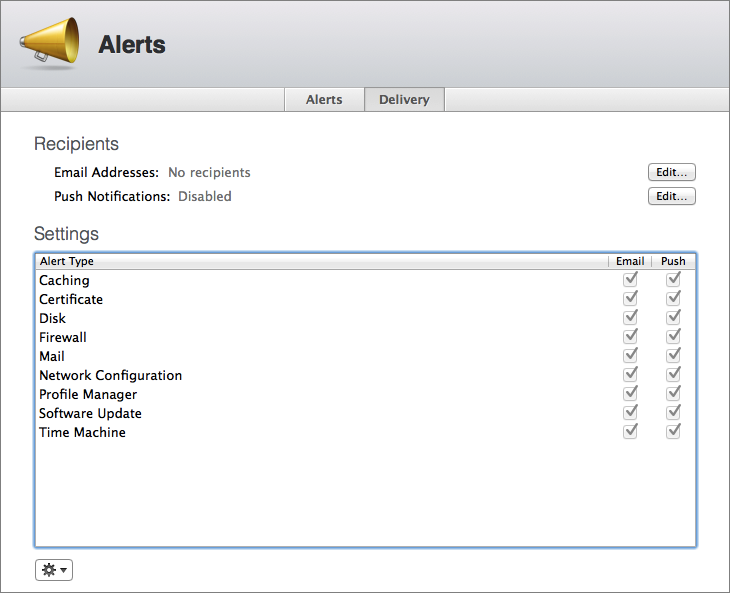
Figure 10: Pick which server alerts you want to receive, and whether you want to receive them through email, notifications, or both.
- Click the Edit button for Push, and if Push notifications are not already enabled, you will run through the Push Notification assistant, which creates a certificate after you enter your Apple ID and password. I’ll talk more about certificates and Push Notifications in Chapter 8, in Prepare for Profile Manager.
- In the Settings list, select the checkboxes for Email or Push for each alert that you want each email address to receive.
Once done, you should receive the desired alerts when appropriate. You can test this by clicking the gear icon at the bottom of the Alerts pane and choosing Send Test Alert.
Move On to Directory Services
Now that OS X Server is installed and fully functional, it’s time to install some services. The first service that I like to enable is Apple’s directory service: Open Directory. My reasoning is that if I create users and groups, which is what comes next, I want those users to go into Open Directory rather than the local directory service built into the Mac.
Here are more important reasons for setting up Open Directory next:
- Many other services require Open Directory, including Calendar server.
- If you ever get a second server, you’ll want to run Open Directory so the other server can share the users and groups you create.
- Chances are you’ll eventually need Open Directory, so you might as well configure it now. To do so, check out Chapter 4, Directory Services.
Read More: About | Chapter 1 | Chapter 2 | Chapter 3 | Chapter 4 | Chapter 5 | Chapter 6 | Chapter 7 | Chapter 8 | Chapter 9 | Chapter 10 | Chapter 11 | Chapter 12 | Chapter 13 | Chapter 14
I think you hit your goals with this chapter -- certainly seem to have hit mine. I found that the Apple tutorials told me *what* I could do, but gave me absolutely no clue as to *why* I might want to use any of these services, or in which order I should approach them. I more or less skipped dealing with DNS, on the presumption that I already had perfectly good name servers working for me.
It never occurred to me -- and I don't believe Apple raises the issue in their tutorials -- that I might want to route my server's DNS request through its own service.
After reading this article, I am already planning to consider my current, limping OS X Server experiment as v0.5 on the way to a fresh installation on a new partition. Or maybe even repurposing another Mac just for this.
Thanks!
Matt, thank you very much for this feedback and I hope others will write in as well to let us know how far on or off the mark we are. We can't write one book that covers all use cases (that's for sure!) and we are finding it challenging to not only define which core readership we most want to help but also to make sure the information makes sense for that group, keeping in mind that for some readers this will be an ultimate geek challenge while for other readers it will be the first step in a long journey with OS X Server.
Another challenge is helping readers through areas where just because OS X server has a feature, that doesn't mean the feature is known to work reliably or is generally recommended or likely to work well on typical home or SOHO installations.
And, then there are use cases for which this book flat out won't go far enough. And Charles has soooo much real-world experience that readers might like to tap. Alas. But there is room in the comments here for questions and answers, certainly, and the final manuscript for the final ebook is far from locked down.
When I ran OS X Server (ending with Tiger Server, IIRC), I found it worked well for simple scenarios, and supported more complicated ones, but each time I stepped outside the simple realm, I risked breaking Server Admin. I used aliases and a bunch of virtual hosts, and Server Admin became less and less reliable, until I had to do all my httpd management through text files because the GUI just didn't work.
Some general guidance about what OSXS is suitable for would probably be useful. I don't know my experience is still relevant, but people who read a book about OS X server could probably benefit from at least a paragraph or two on good uses for OSXS, and places where it's technically possible but just not a good idea...
It's interesting how Apple is trying to suggest that it's so easy to set up, mainly by not telling you the complex stuff. I have wasted many hours through not understanding the underlying structures. There are enough problems with wizards not working (such as importing users from an old server being very flaky) without them offering Server Tutorials that skip straight to configuring Calendar Server without mentioning basic set up, let alone Open Directory.
It's also odd that there are so few 3rd party resources. The official Apple training documentation is almost useless in the real world. So well done with this book: I look forward to the rest. fwiw it made me finally pay to become a Tidbits subscriber.
I totally second Andrew's points!
Now I can't wait to read the next chapter on Open Directory since this is what I'm struggling most with.
E.g. I can't get wiki r calendar logins authenticate against our company wide OD records. I hope to get the clues...
I'd agree, getting DNS working right was the biggest hurdle to my understanding of Server back in the Leopard days. Really looking forward to the OD chapter now, as I still struggle with getting this running right, find that following the same steps on two different servers leaves me with different results - obviously not quite the same steps :).
I hope Charles goes into the whole issue of Certificate use with some depth. I can't get my head round the interaction between Certificates in Server, and those in the System Keychain. I find I import a certificate identity into server, and that it does not 'take' in the system keychain. Trying to use Profile Manager in that case is an exercise in repetitive frustration!
I echo Henry Harrison: I hope that there is a comprehensive section on procuring and installing certificates... along with whys and got-chas.
And thank you for this Mavericks Server manual!
3 names? "A server actually has three names: the LocalHostName, and the HostName and the ComputerName, which are frequently the same." Maybe a sidebar explaining what the differences are and why 3 names exist would be useful.
Adding!
I don't get why you use the same name for HostName and ComputerName. Since this is sth. to set up very early I would love to know the reasoning behind this practice asap. Is this explained somewhere on the net, that I can read right now to get a better understanding?
THX for your excellent Server Guide (the best I found so far on the internet).
For DNS settings on server and client, what would you enter for search domain in your example setup? mavserver.pretendco.lan or just pretendco.lan?
We'll see what Charles says, but I don't think the search domains list is particularly relevant to most installations. Basically, whatever you enter there is used to complete typed domains, so if you had apple.com in the field, you could theoretically type "store" in Safari and the Mac would go to store.apple.com. I say theoretically, because Safari would probably do a Google search on that now, as would other browsers. I'm not certain what apps would use the search domains in a helpful fashion.
I'd just leave it blank - it's only a minor help if it were to work as advertised, since most Internet apps provide shortcut or bookmarking capabilities that obviate the need for typing abbreviated names.
http://support.apple.com/kb/PH6373
Correct. Search domain is really to make it easier to find things for your users. Therefore, if you set it as pretendco.lan, then they can hit the server just by using the name mavserver. It's a nice-to-have if there's a consistent domain name in use. You can also have multiple entries in here and distribute them via DHCP, to further make things easier. Good luck!
I just want to confirm, you use "sudo scutil --set ComputerName mavserver.pretendco.lan"
Then, when you've launched server.app, it shows the computer name as "mavserver" in your screenshot.
Is that correct? I used a different set of names, test.miller.lan (hostname & computername) and test (local host name) and when I launched server, it showed test.miller.lan for both the host name and the computer name. So i'm afraid that there is a typo in your instructions? However, interestingly, after turning on "enable screen sharing and remote management", the overview screen showed a computer name of "test". wacky
Yes, I also have a query in to Charles on this due to further testing that happened after this chapter went live. It seems that when you enter a standard domain-style name for ComputerName, it's later truncated to just the initial part of the name. He hasn't looped back to that chapter in the book yet, but we'll see what he says.
I usually use a Fully Qualified Domain Name as the ComputerName. The Apple books say to use a single line name (e.g. mavserver). I've found that the only thing this usually impacts is how the server appears in sidebars and as mentioned earlier, remote management. Never seen it cause any problems. But when I use the FQDN it often smooths some of the sanity checking. Hope that helps!
everywhere and "The Apple books say to use a single line name (e.g. mavserver)" for MachineName.
vs.
"But when I use the FQDN it often smooths some of the sanity checking."
I have been reSEARCHing and reading lots of hours on that very topic and could not find any evidence for your suggestion. But I value your reputation and your experience - so could you please explain what you mean with "to smooth sanity checking" ???
I've had Open Directory pass upgrade checks when using the FQDN rather than the single line domain name. You can change this later, so your HostName when you set it up and if you have any issues upgrading an ODM later, use the FQDN temporarily (scutil makes it pretty easy to change) and put the single line back in when you're done.
This doesn't matter nearly as much as it used to, when the password field had the name of the PasswordServer in it. Hope that helps.
My guess is that this used to be a big deal, but at some point Apple changed something under the hood, hence the conversion of the FQDN to the short version.
One thing I've come to realize about OS X Server is that there's a ton of spaghetti down in the works that's entirely undocumented, and as a result, the community has learned certain behaviors from hard-won experience. Since Apple does dip down into the spaghetti periodically to clean up specific issues, some of the lessons learned by the community may no longer be relevant in every situation going forward. The problem is that you never quite know until you run into the issue. :-)
@cEdge318 @AdamEngst:
Thank you for your helpful explanations. Very useful to me.
When using the FQDN as the ComputerName, the full FQDN is shown in the sidebars of the client macs. Such a long name is annoying in the sidebar.
A note on the DNS section: When I opened the DNS service, I found that the button for adding a record was labeled "+." instead of "+", and I was taken to a screen that configured Primary and Secondary Zones. I finally figured out on my own that I was seeing a filtered view. The "gear" button menu at the bottom of the main DNS screen allowed me to "Show All Records", the dot next to the "+" was retired, and I was then able to follow the instructions for adding a DNS record.
This may have had to do with my uninstalling and reinstalling Server, so I could start configuring from scratch, but I suspect other readers will run into this puzzling side road.
I'm guessing that your previous installation had some part in this; Server can be a little squirrelly about starting clean. For this chapter, things are easier if you deselect Show All Records.
Thanks, Adam. I agree with you on that. My point is that on my first foray into Server I didn't do anything with the DNS service, and had no idea what I was seeing with a "+." button. A single sentence instructing the reader to click the gearbox and deselect "Show All Records" would help. (I think there's a sentence like that in Chap. 4, but of course it's out of sequence for where it's first needed.) Thanks!
Thanks - I'll look at that next time I'm in the file. This book is tricky that way, since there are a lot of things in Server that look different if you've gone out of order. :-)
In the section titled "Verify That the IP and Hostname Match", I found that the changeip command did not work for me until I did a second restart of my Mac once Server was running. Since you imply that additional Unix commands are installed with Server, that wasn't too hard to troubleshoot, but a mention would be helpful for readers who are stymied, since in Chapter 4 you warn them not to proceed with Open Directory configuration until changeip shows that their DNS names match.
Yeah, there's some funny stuff going on there. The changeip command is located within the Server app itself, so that has to be installed and seen by the system to be accessible. The order of the previous chapter and this one were fairly carefully designed so that should work, but it sounds like it's not always consistent. We'll add some information about potentially needing another restart.
Dynamic DNS services give you a domain name consisting of three parts. If I understand aright, this results in a HostName like:
mavserver.myhost.example.com
I don't think there's any inherent restriction on what a domain name managed via dynamic DNS has to look like. It's possible that some dynamic DNS providers require a four-part domain name.
Alerts aren't working for me (Yosemite beta). Do I need to turn the mail server on for them to be sent? I don't want push alerts, because they'll get sent to all my devices, right? I just want emails.
Just so others see this - alerts don't seem to be working at all in the Yosemite beta. As push notifications, they are working in the current version of OS X Server, but it doesn't appear that they're sent to all your devices. I got an alert for the recent upgrade to v3.2.1, and it appeared only on the server Mac.
I'm looking into whether the mail server needs to be active, since I didn't get an email alert for the upgrade like I should have, but I don't have the mail server enabled, and I'm not sure how OS X Server could know where to point for SMTP without it.
The changeip command is no longer available in my configuration!! I installed a fresh 10.9.5 today, but the command: "which changeip" gives no result!
So verifying Hostname and IP no longer work.
Weird!
I did some research because I expected that this was the commandline tool that was somewhere deep down the server app.
Indeed it is! There is indeed a warning in your instructions, but even while I followed those precisely, that "changeip" tool is only available inside the app package. Can I copy it myself? to the usr/sbin location?
Finally I found out that the PATH to this app for some reason was not included in the PATH. After issueing an echo $PATH command, it finally showed up and afterwards the command worked.
Still I don't understand what has happened.
I'd just call it directly. Things change here and there, so might have been true in a .1 or .2 release and not later. I'll try and update the text to include the full uri to the file instead. Since you only really need it during setup I don't think I'd bother putting it in the path every time.
Thanks for the heads up!
I have ML server set up in a HO environment and wanted to transition to 10.10 and Server v4.0 with fresh install new Yosemite features etc. Good info but the audience this book is addressed to is so much different from typical TC book. I would much rather have a TC of your home network including OS X server v4.0. In the intro you said "Charles focuses in this book on smaller installations, such as a home user looking to set up a personal server". . . that is me and this just doesn't reach me on my level.
I fear that the simple fact is that the average user should not be running OS X Server. We can explain a lot, but running a server requires more technical experience and pretending otherwise is a recipe for confusion. That's not to say that OS X Server is inappropriate for a home office, just that you'll need to know a bit more than the average person who reads email and browse the Web to get much out of it.
I guess this is a pretty basic question, but I don't see it addressed here. Can I access my server remotely, other than using Screen Sharing? In other words, can I install the Server app on another Mac, and control my server from it? If so, what's the setup?
The Server app can work from another machine via Bonjour if remotely controlling from the same lan. I have done an ssh tunnel to access it from the wan as well. Should be port 311 and shouldn't need any special setup on the server side other than ssh.
After I posted my comment, I found an Apple support document. But I think this should be in the book; it seems like one of the most basic things to know.
This is an artifact of how the book was streamed to TidBITS - we added a sidebar about using Server as a console to another Mac in the next chapter, but in the final book it's moving to this chapter where it belongs.
In short, yes you can do it, but the book recommends against it, since it's all too easy to end up installing and enabling services on your personal Mac. It's safer to stick with screen sharing.
Hi Charles; I asked over on the TidBITS mailing list if there was a Server guru and Adam recommended I just ask you here since I’m a TidBITS member. I’m having trouble getting my Yosemite/Server 4.0 combo to login correctly. Here’s the situation
I have a current generation mini running Server 4.0 and Yosemite with all software up to date. I migrated this using Apple’s “Migration to Yosemite Server on new hardware” KB article from an older mini running Mountain Lion and Server 3.whatever was current before 4.0 was released.
The mini is always logged in with an admin account so that iTunes sharing will work, has a static IP and RJ45 connected Ethernet, and has only File Sharing and Time Machine services enabled. There’s a non admin user that is normally used for afp connections from our two daily driver laptops; both of those are running Yosemite and all updates. The server is normally managed by connecting using Screen Sharing from the laptops then launching the Server app.
Once the server was migrated back in November; all worked perfectly until a few days ago. I logged into check something and on launching Server I get the “Choose a server to connect to” dialog box. I choose This Server like always but instead of connecting to the server services to manage them I get an authentication dialog. The dialog is pre-filled out with the credentials for the admin user (susanh) that are stored in the keychain. Pressing OK gives me the login dialog again instead of connecting…like I had typed in the wrong password. I’ve tried manually typing in both the username and password, have verified the entries in the keychain to be correct, and the password hasn’t been changed in probably a year or more.
Throughout file services and Time Machine services for the laptops continue to work…so Server itself is working, I just can’t get into it to reconfigure anything.
The login keychain for the user susanh has 3 Application Password entries for the user susanh; all have the same password (verified correct)…they’re named 127.0.0.1, flatfish, and flatfish.local (flatfish is the mini hostname).
The computer identity, drive names, IP and all other settings were transferred from the old machine to the new one using Migration Assistant per the Apple KB for doing the migration. This procedure basically says to use Migration Assistant to migrate the settings from the old Mountain Lion server hardware to the new Yosemite hardware then install Server v4, then run it for auto import of the settings from the old Server 3.x installation that Migration Assistant moved over.
Things I’ve tried
-deleting and recreating the keychain entries.
-deleting and reinstalling the Server app on the mini.
-downloading the Server app to my laptop and tried to manage the remote server from the laptop.
-rebooted everything.
-verified no software updates not installed.
-tried using both a different pre-existing admin user to login to the Server app as well as a newly created (post Server 4.0 installation) admin user.
-hooked up a keyboard directly to the mini and retyped the passwords on it just in case something was getting lost via Screen Sharing; although typing in the username in the Server app as well as typing into TextEdit and other apps works fine so I didn’t expect this to help.
It looks like an authentication issue on the server itself…like I put in the wrong password.
One thing I did think of is maybe the server services aren't actually running; in which case maybe I just need to unconfigure and reconfigure it…but I don't know how to do that.
Looking in the normal System Preferences Sharing pane I see that File Sharing is turned on and all the right shares are listed…but the main data share doesn't have anything listed under Users and permissions; and doing a Get Info on that directory I see permissions for wheel and everyone but instead of the group that has normal r/w access to it and is used for mounting the share I just see the word "fetching" under the user column. This used to show the actual group name and permissions.
Is there a way to remove the configuration that Server app is using and force it to allow me to rebuild the Server configuration?
At this point…the only other thing I can think of is to nuke the boot drive on the server, reinstall Yosemite from scratch and then recreate the server services. I would rather not do this unless I have to because I don’t want to have to recreate the dozen or so CarbonCopyCloner scheduled tasks that back up the various shared directories on the server to other places. Before I go that route I wanted to check and see if the server gurus had any other suggestions I might try.
Do you have any idea what might be wrong or any suggestions to try?
Hey Neil,
I've had a couple of scenarios very similar and have a fix that might work for you:
http://krypted.com/mac-os-x-server/unresponsive-server-after-mavericks-upgrade-reset-server-app/
If that doesn't work then you could check out the launch daemons and see if they're running and possibly restart or go digging in some plists to see what's wrong. But the steps in the link have worked really well for me in similar scenarios, so maybe it'll help. Especially since you know that the password is good as it connects you via Screen Sharing.
Anyway, let us know and good luck! :)
Charles
Thanks Charles…I happened across both this suggestion yesterday as well as something I thought of and fortunately my idea worked; although it looks like this would have done the same thing.
As you know; the server settings are in a folder at /Library/Server, my copy of this folder was about 6 GB or so (mostly in the wiki folder) and there's a setup folder with a plist file in it. I figured something might be messed up in there; so I made a .zip file copy of the Server folder as well as copying it to another drive just in case. Then I deleted just the plist file and relaunched Server app…this gave me the "Install Server" option and it ran for a minute or two reinstalling the Server services stuff. Launching Server.app then allowed me to login correctly and all the previous shares came back (I guess they're not contained within the plist file but somewhere else in the configuration folder).
So it was either a damaged plist file (although I didn't see anything obviously wrong with it when I opened it in TextEdit) or one of the server services files got damaged somehow.
Glad I didn't have to rebuilt it:-) Thanks again.