Take Control of OS X Server, Chapter 6: File Sharing
This article is a pre-release chapter in the upcoming “Take Control of OS X Server,” by Charles Edge, scheduled for public release later in 2014. Apart from Chapter 1: Introducing OS X Server, and Chapter 2: Choosing Server Hardware, these chapters are available only to TidBITS members; see “Take Control of OS X Server” Streaming in TidBITS for details.
File Sharing
Despite the popularity of file sharing services like Dropbox, the most common server used on internal networks today remains the file server, a central repository that stores files for a workgroup. These stalwarts have been connecting users to their files seemingly since before time began. Whether in a home, school, or business, the impetus for for setting up a server is often a need for file sharing.
A number of protocols built into OS X Server’s File Sharing service are dedicated to serving files, including AFP, SMB, and WebDAV (the sidebar just ahead explains these File Sharing Protocols).
By default:
- File Sharing has some built-in shared folders, but not all environments require them. I recommend you remove the built-in shared folders and add your own.
- Each shared folder can make its files available via AFP, SMB, and WebDAV, or any combination thereof.
- Each shared folder has permissions that Apple provides. These permissions will work in some cases , but you may need to modify them to meet your particular needs.
The basic steps to setting up a file server are to Remove Default Shared Folders, Create a New Shared Folder, Configure Permissions for each shared folder, and finally Enable File Sharing. Because file sharing is the most mature service in OS X Server, it’s also one of the easiest to manage. When you’re done setting it up, you’ll want close the loop on file sharing by having your clients Connect to Shared Folders.
Remove Default Shared Folders
Exactly which default shared folders will have been created for you depends on what you’ve done previously. For instance, the Groups shared folder appears if you selected the “Give this group a shared folder” checkbox in Add a Group. You might also see a Public folder and one called Backups, if you’ve enabled Time Machine Server.
The default file sharing configuration won’t work for everyone, because you don’t get to say where the default shared folders actually live on your server’s drive. Therefore, before we do anything else, let’s remove the unnecessary default shared folders, after which you can create new ones that do exactly what you want. If the Backups shared folder appears, do not remove it, since Time Machine Server relies on it!
In the Server app, select File Sharing from the Services category in the left sidebar. The File Sharing pane appears at the right, showing a list of available shared folders as in Figure 1.

Figure 1: To get started with File Sharing, first remove unnecssary default shared folders.
In our example configuration, we’re going to remove the built-in Groups shared folder, if present. To do so, in the Shared Folders list, select Groups and click the minus ![]() button. A confirmation dialog appears (Figure 2). Click Remove.
button. A confirmation dialog appears (Figure 2). Click Remove.

Figure 2: Server asks for confirmation if you try to disable a built-in shared folder.
Disabling Protocols Instead of Deleting Shared Folders
If you’re uncomfortable with deleting these default shared folders, you can instead disable them by removing access to all the file sharing protocols. To do so, for example, double-click Public and then, in the Settings area, make sure all the checkboxes are deselected, as shown in Figure 3.
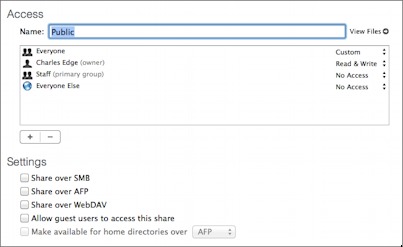
Figure 3: You can disable a folder’s sharing capability by unchecking all of its Settings checkboxes.
When you’ve deselected all the checkboxes, click the OK button to save your changes.
More generally, it’s a good security practice is to share files only over the protocols you need for accessing them. You can always enable other protocols at a later date by simply checking a box here.
Create a New Shared Folder
Now that you’ve cleaned up the default shared folders, it’s time to create one or more new shared folders. As an example, let’s assume that you have a large external hard drive sharing files for members of your household, or perhaps for a small department at work.
To create the shared folder:
- In the Finder, on the server computer, make a folder for the shared folder—perhaps call it
Shared Items. You may also want to create sub-folders within it to pre-populate the hierarchy.
It doesn’t matter where you create the shared folder in the Finder, but make sure the location is on a drive with plenty of room for future files and is backed up regularly. If you followed my recommendation in Storage and used a relatively small partition or drive to hold OS X and applications, then you’d want your shared folder to be on a larger drive or volume. - In the Server app, from the File Sharing pane, click the plus
 button.
 - In the file dialog that appears, browse to the location of your shared folder, as in Figure 4, and then click the Choose button.
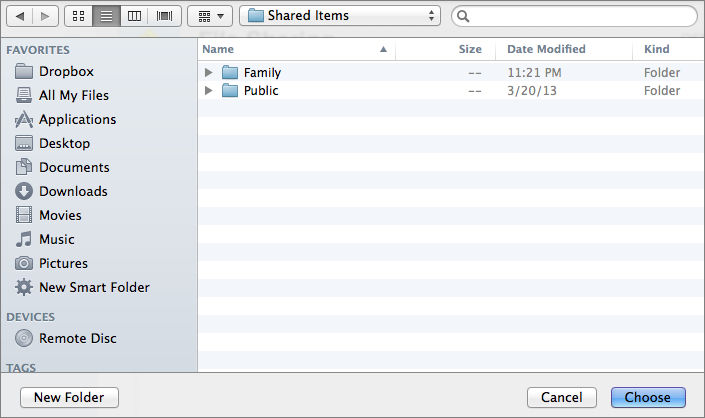
Figure 4: Find the shared folder and then click Choose.
- Back in the File Sharing pane, double-click the new shared folder (Family in this example).
- In the configuration screen for the shared folder (Figure 5), the text that appears in the Name field is the name of the folder you just selected, but you can edit it to adjust how it appears to users, if you like.
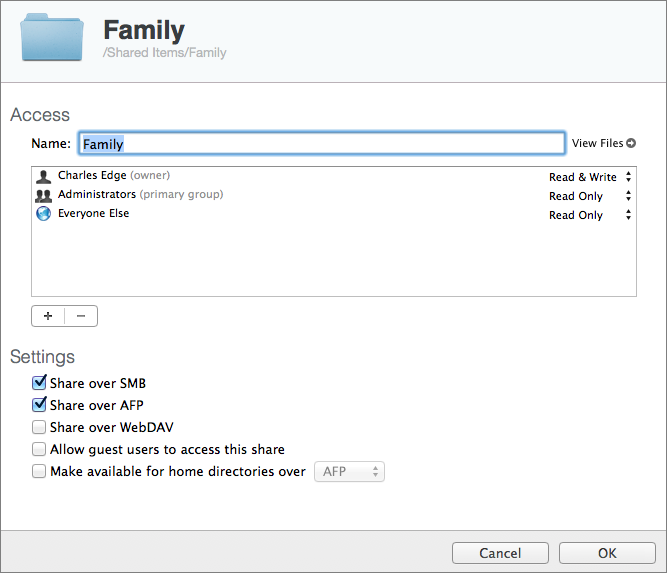
Figure 5: Specify how the new shared folder will work.
- In the Settings checkboxes, enable just those file sharing protocols that your users need, as explained earlier in File Sharing Protocols.
- If you enable guest access, then anyone who doesn’t otherwise have registered user access can log in without authenticating.
- When you’re done, click OK to save your changes.
Server creates your new shared folder. Your next step is to either set up custom permissions for the shared folder, if needed, or to turn on File Sharing. I cover each option just ahead.
Configure Permissions
The specific permissions that are assigned to a shared folder vary based on where in the filesystem the folder was created, so it’s always important to look at the permissions and make sure the correct users and groups have the appropriate access to the folder. You may also wish to restrict access to particular sub-folders within the shared folder.
Here are some examples of how you can use permissions:
- Home: A parent might allow children read-only access to a shared folder containing media. That way, nothing can be deleted accidentally by a child. Or, parents might store legal and financial documents in a shared folder where children don’t even have accounts.
- School: Each student might need read/write access to a private folder, but only write access to a folder where homework is handed in.
- Business: The human resources department might want a shared folder that most employees can’t view at all, while the marketing department might have read-write access to a shared folder that holds logos, brochures, and product descriptions. That same marketing shared folder might be available on a read-only basis to the rest of the company so that employees can distribute marketing materials.
To specify permissions:
- In Server, open the File Sharing pane and double-click the shared folder’s entry in the Shared Folders list.
- Examine the left column in the Access panel to verify that the correct users and groups have access. If you need to add a user or group, click the plus
 button and start typing the name to either enter it or choose Browse from the menu that pops up (Figure 6). Or, to delete a user or group, select it and click the minus
  button.
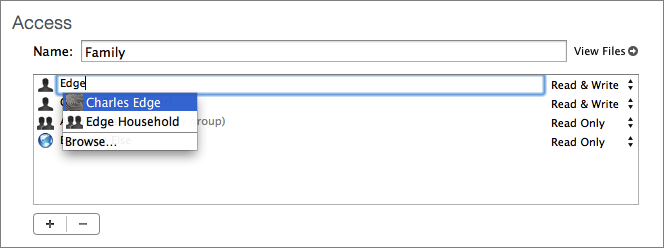
Figure 6: Click the plus button to activate a new entry in the Access panel.
- Work with the pop-up menus on the right side of the Access panel to set what each user or group may do when accessing the shared folder: Read & Write, Read Only, Write Only.
- Click OK to save your changes.
You can also limit who has access to folders within the shared folder, as you might do with a folder that contains sensitive or private items like accounting or grades. If these more granular permissions are required, follow these steps, which take place in a different part of Server’s interface:
- Click the name of the server in the left-hand sidebar and then click the Storage button.
- Using the expansion triangles or column browser (switch with the View
 buttons), browse to and select a sub-folder, click the gear
  pop-up menu, and choose Edit Permissions.
 - In the dialog that appears (Figure 7), use the plus
 and minus
  buttons to add or remove users or groups from this folder, and choose your desired permissions from the pop-up menus at the right.
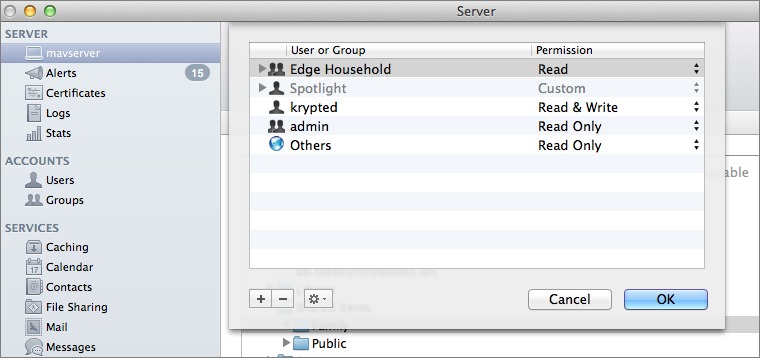
Figure 7: Manage permissions for a sub-folder within a shared folder.
- When you’re done, click OK.
- If you need to specify permissions for additional sub-folders, repeat the appropriate steps above.
Enable File Sharing
Although it’s okay to come back later and modify your File Sharing setup, before you turn on file sharing, run through this list to be sure you aren’t inadvertently exposing anything sensitive:
- You’ve deleted or removed permissions from any default shared folders that you don’t need.
- You’ve created any new shared folders that you need.
- For each shared folder, you’ve ensured that it’s using only the necessary file sharing protocols (i.e. AFP, SMB, WebDAV).
- For each shared folder, you’ve configured the appropriate permissions.
With all of the above taken care of, select File Sharing in the left-hand sidebar and click the ON button (at the upper right) to start the File Sharing service.
Connect to Shared Folders
Now that you’ve turned on File Sharing, it’s time to help users connect to shared folders.
To connect to a shared folder from the Mac Finder:
- Choose Go > Connect to Server (Command-K).
- In the Connect to Server dialog, users can type the name or IP address of your server, but they may prefer to click Browse to view servers available on the network in a Finder window, or to select a server from the Favorite Servers list or the Recent
 pop-up menu.
If your shared folder is accessible via multiple file sharing protocols, specify which should be used by prefixing the IP address in the Server Address field withafp://,smb://, orwebdav://as Figure 8 shows with AFP.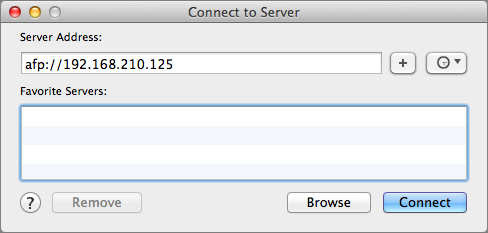
Figure 8: You can connect to a shared folder by IP address or by clicking the Browse button to locate it in a Finder window.
- Click Connect.
- If the Mac asks for authentication information (Figure 9), which it will unless the credentials have already been stored in the user’s keychain, leave the Registered User radio button selected and enter the username and password that you set up for that user in directory services (see Work with Users).
After the user enters a username and password, if he selects the checkbox “Remember this password in my keychain,” the next time he connects, he won’t be asked to authenticate. (Needless to say, remembering the password generally makes things easier.) Click Connect.
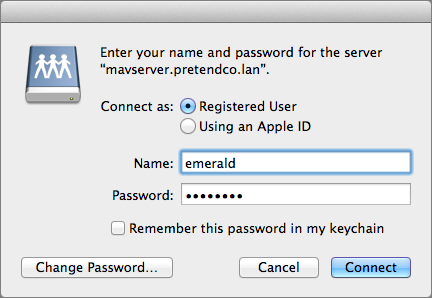
Figure 9: Enter the user’s credentials when prompted.
- If you have created multiple shared folders, a list of available shared folders appears in a dialog. Select one or more, by Command- or Shift-clicking, and click OK to mount them (Figure 10).
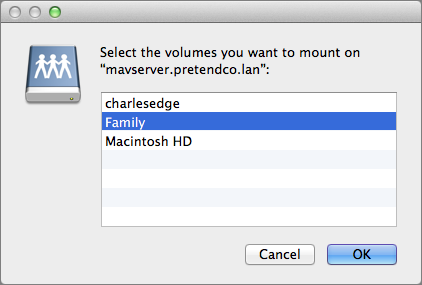
Figure 10: Select one or more shared folders to mount.
The shared folder (or folders) can now be accessed through the Shared category in the sidebar of any Finder window, the hidden /Volumes directory, and in Open and Save dialogs. Plus, the shared folder, and any folders inside it, work just like any other local folders when it comes to making aliases or adding it to the Finder window’s sidebar or toolbar.
Read More: About | Chapter 1 | Chapter 2 | Chapter 3 | Chapter 4 | Chapter 5 | Chapter 6 | Chapter 7 | Chapter 8 | Chapter 9 | Chapter 10 | Chapter 11 | Chapter 12 | Chapter 13 | Chapter 14
Several questions remain unsettled.
- Is it possible to insert an user into more than one group?
- What happens, if permissions are contradictory, e.g. group 1 gets only read permission, group 2 read and write?
- If I move a folder containing subfolders into a shared folder, do all the files and subfolders inherit the permissions of the shared folder?
- What about SMB2 ?
I'll have to let Charles answer the rest of these, but I can say that there's no problem with a user being in more than one group.
I suspect contradictory permissions are just one of those things that you as the admin should avoid - it's always best to keep groups and associated permissions as simple as possible.
When permissions are contradictory there are a few different behaviors that can happen based on which. Given that you have conflicting groups I assume they're ACLs. So ACLs are the easiest, the top ACLs get enforced first and then it goes down the list. Unless you're explicitly denying access. A deny can still deny no matter where in the order the permissions are. You can move ACLs up and down the list by dragging them higher or lower to test the behavior and get things just right.
Good luck!