Syncing iOS Devices Wirelessly with iTunes 10.5 and iCloud
While iTunes 10.5 is ready for iCloud, with the arrival of iTunes Match due by the end of the month, the marquee feature added to this version of iTunes is the capability to sync iOS 5 devices via Wi-Fi. It’s always been a bit of an annoyance to have to connect your iPad, iPhone, or iPod touch with a cable to transfer media files and data, making Wi-Fi syncing a big step forward in letting you manage your iOS device’s content without having to connect it directly to your Mac. Here’s how you set up and use Wi-Fi syncing and iCloud backups.
Get Started with Wi-Fi Syncing — The first thing you need to do is connect your iOS device (which must be running iOS 5) to your Mac; yes, the point of using Wi-Fi syncing is to no longer have to do this, but you only need to tether the device the first time. Then follow these steps:
- Select the device in the iTunes sidebar.
- If the Summary tab isn’t active, click it.
-
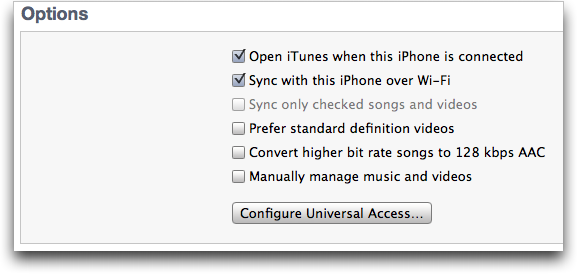
Scroll down to the Options section, and check “Sync with this iPhone (or iPad/iPod) over Wi-Fi.”
-
Click the Apply button at the bottom-right of the iTunes window to save your changes.
When syncing has finished, disconnect your device. You’ll notice that it remains in the Devices section of the iTunes sidebar, even though you’ve disconnected it.
(If, by chance, you click the little eject icon next to the device, have no fear — you can get it back by connecting the device to your Mac again.)
Three Ways to Sync Wirelessly — Once you’ve enabled Wi-Fi syncing, you have three ways to sync wirelessly. (Of course, you can still continue to connect your iOS device to your Mac via USB, which you want to do if you have a lot of data to transfer, as you would if you just ripped a lot of CDs or bought several movies. Just connect your device, wait until it finishes syncing, and then disconnect it without ejecting it from the iTunes sidebar.)
- The first method of syncing wirelessly is automatic and transparent: connect your device to a power source, such as a charger or a dock that’s connected to a charger, and it will begin syncing automatically, as long as the Mac it’s linked with is on and iTunes is running.
-
If you wish to force a sync from your Mac, as you might after downloading or adding new content to your iTunes library, select your device in the iTunes sidebar and click the Sync button in the lower right corner of the iTunes window. You can continue using your device during the sync; it proceeds happily in the background.
-
If you’re not at your Mac but wish to sync, you can launch a sync from the device, assuming you’re in range of the network your Mac is on. On your device, go to Settings > General > iTunes Wi-Fi Sync, and then tap Sync Now to initiate a sync.
If you have any problems with Wi-Fi syncing — and many users seem to have, although it has worked well for me — Apple has published a support document with troubleshooting steps.
Put Your Backup in the Cloud — In addition to syncing via Wi-Fi, you can choose to back up your iOS 5-enabled device wirelessly to the cloud, if you’ve set up an iCloud account, rather than to your Mac. The big advantage of an iCloud-based backup is that it enables you to back up data even if you’re on the road and can’t access the Mac with which your device is linked, such that you won’t lose anything should the device be lost or stolen. (The other significant advantage is that iCloud backups enable iOS devices to be used by people who don’t own suitable computers, though I expect that most people reading this article have such computers available for
traditional USB-based backup to iTunes.) For more details about iCloud, see Joe Kissell’s “Take Control of iCloud.”
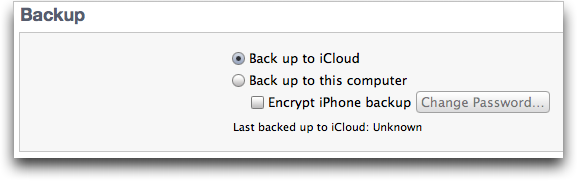
On the Summary tab in iTunes, go to the Backup section, select “Back up to iCloud,” and click the Apply button. You can also do this from the device; tap Settings > iCloud > Storage & Backup and turn iCloud Backup on, then tap the Back Up Now button. Once set up, Apple says iCloud backups will happen on a daily basis as long as the device is connected to the Internet via Wi-Fi, is connected to power, and is screen locked. In my experience, this hasn’t always been true, but perhaps that can be chalked up to iCloud launch problems that will be resolved.
After the initial backup to iCloud, you’ll be able to restore basic functionality to the device using the iCloud backup, without needing to access your Mac. iCloud backups include settings, accounts, and iTunes-purchased music, TV shows, apps, and books, plus your Camera Roll. Excluded from iCloud backups are music and TV shows not purchased from the iTunes Store, movies, podcasts, audio books, and photos originally synced from your Mac, all of which you’ll have to resync from your Mac after restoring from the iCloud backup. Because
iTunes-purchased items are already in iCloud, they don’t have to be uploaded to be backed up — this enables you to avoid uploading a massive GPS navigation app, for instance, though you’ll still have to download it again if you need to restore.
Otherwise, if you leave the setting at “Back up to this computer,” you’ll back up, as before, to your Mac, and you’ll restore it from there as well, if necessary.
Backups can take a long time, so you might want to choose specifically what to back up and what to ignore. On your iOS device, go to Settings > iCloud > Storage & Backup to see storage data — the total storage available in your iCloud account, and how much is currently available. Then tap Manage Storage, and then the name of your device to see details on your backups. Needless to say, the larger the backup, the more of your iCloud storage it will use, and the longer it will take to back up, much longer than backing up to your Mac via USB.
Also in Manage Storage for your device is a listing of five apps whose backup data takes up the most space, and how much storage space each will use. You can turn backup off for any of them using the sliders next to their names. Tap “Show all apps” to see the rest of your apps and how much data they store. Some apps may store a lot of data, but don’t need to be backed up. For example, I’m a New Yorker subscriber, and that magazine’s app consumes about 125 MB per issue. If I get behind by a few issues (which is common) it can take up 500 MB, and want to back up all that data. Since I can always re-download issues of the magazine, there’s no point in wasting both time and space, so I’ve turned off backups for the New Yorker
app. You may find you have similar apps whose data doesn’t need to be backed up, so feel free to turn backup off for those apps.
Cutting the Cord — As you’ve seen, neither Wi-Fi syncing nor iCloud backups are difficult to set up, nor are they hard to understand or use. This simplicity belies what must have been a significant engineering effort from Apple, since these technologies offer such a huge improvement in usability that it’s almost hard to imagine why it took Apple so long to implement them.
If you have an iOS device and a Wi-Fi network, you should definitely see if Wi-Fi syncing in particular is for you; iCloud backups may be less compelling for those who have a Mac at hand. Don’t get rid of that USB cable, though — there are times when you’ll want to use old-fashioned syncing.
The "Sync with this iPhone over Wi-Fi" and "Prefer standard definition videos" options that appear in your screen shot do not appear in iTunes 10.5 for my iPhone 3GS on iOS 5. It may be that I'm still running OS/X 10.5.8 on my iTunes machine.
That can't be the explanation, since I see them and I too am running 10.6.8 (I assume that's what you meant)...
If you're really running 10.5 Leopard, that may indeed be related - although iTunes 10.5 will run, I don't know if all the features are available.
On my PowerPC running MacOS X 10.5.8, iTunes 10.5 gives me the iCloud backup option, but not the Wi-Fi backup option.
Interesting - so Wi-Fi syncing really does require Snow Leopard.
Very helpful article, Kirk - thanks for getting me started with this. - Oh, on a side topic; I actually dropped my New Yorker subscription because when they came out with the New Yorker app it was separate: if you wanted the electronic issues you still had to pay for each issue individually, even if you had a paper subscription. It sounds from what you say as if they've fixed that.
Yes, initially you couldn't link your subscription, then only US subscribers could. Now it's open to anyone.
> these technologies offer such a huge improvement in usability that it’s almost hard to imagine why it took Apple so long to implement them.
Not at all. iCloud represents a *HUGE* cost for Apple. It's a major investment in improving the iOS experience, and I'm not at all surprised they took years to take the plunge.
It is a major investment, true. However, with Apple reportedly sitting on close to $50B in cash in overseas accounts alone, it would seem that the engineering undertaking was much more difficult for them than finding room in their capital budget.
iCloud costs, but not wifi syncing. They could have offered wifi syncing in the past with backups to a computer at no infrastructure cost.
There's one piece of troubleshooting that appears not to be mentioned in Apple's main support area:
I could not get wireless sync to automatically start when I connected my iOS devices to charges. It turns out that I had checked 'Prevent iPods, iPhones, and iPads from syncing automatically' in the iTunes->Preferences->Devices panel. Once I fixed that all was (almost) well. I have had sync fail a few times when the iOS device can't be found even though its within a few feet of one of my base stations.
Yes, several times my devices wouldn't sync even though they were in the exact same place as when they did sync.
One thing I'm not completely clear on is whether you can have iCloud backup AND iTunes Wi-Fi backup at the same type? Would be very grateful if someone could clarify this for me.
You cannot. There's a radio button in iTunes that lets you choose between iCloud and iTunes. Wi-Fi Sync is a separate option related to how the iOS device communicates with iTunes, but the backup choice has to be set separately. Even with Wi-Fi Sync on, if iCloud backup is chosen, the backup doesn't get handled by iTunes at all.
You can't have them at the same time, as Glenn says, but you can change whenever you want. For example, a local backup one day, and an iCloud backup the next, as long as you remember to check the other radio button.
The wi-fi sync works a little too well for me. If my iPhone is on my computer opens up iTunes...repeatedly whether I need to sync or not.
Wait, that's freaky. So on your Mac, iTunes is not running. You plug your iPhone into a power source (not your computer). And iTunes launches? That doesn't happen in my testing.
Since iOS5 I have had a lot of trouble of double entries in my calendar. It may have been due to my trying iCloud sync. I have now moved to WiFi sync only using my iMac, and may be this will sort itself out.