TidBITS#1044/13-Sep-2010
We’re all about digital photography and iOS this week. Tonya Engst leads off with a look at iOS 4.1, what it provides, and how well it works; and Adam Engst examines Apple’s loosening of iOS development restrictions and more-transparent App Store review guidelines. Guest writer Jeff Lynch explains how photographers can ensure that digital portfolios look their best on an iPad. Finally, Charles Maurer contributes a detailed editorial – okay, a detailed rant – about what’s wrong with today’s digital cameras (hint, it’s not a lack of features). We’re also pleased to welcome our latest sponsor, The Data Rescue Center, and announce a discount on Raskin for those who didn’t win in last week’s DealBITS drawing. Notable software releases this week include Carbon Copy Cloner 3.3.4, Firefox 3.6.9, PDFpen/PDFpenPro 5.0.1, Safari 5.0.2/4.1.2, iWeb 3.0.2, and Cyberduck 3.6.1.
iOS 4.1: Does it Work? Should You Install It?
As Apple announced last week, iOS 4.1 is now available for download and installation via iTunes. I recommend that you install it, assuming you have an iPhone or iPod touch that can run it, meaning any iPhone or iPod touch other than the first generation of either model. iPad users must wait for iOS 4.2, scheduled for release in November 2010, before they get iOS 4 features.
Lots of people have already updated to iOS 4.1 without a hitch, and the new features and fixes make it a worthwhile update. Some changes, such as better performance for the iPhone 3G, more complete Bluetooth support, and HDR photos on the iPhone 4, make these devices more useful; other changes, such as iTunes Store TV rentals and the new Game Center, will make them more entertaining to many users.
If you have an iPhone 4, you’ll find a few iOS 4.1 changes that aren’t available on the other devices:
- In the Camera app, HDR (high dynamic range) photo support should help you take a better photo with no extra effort, but at the expense of a few more seconds of post-shutter-click processing. Look for an HDR On/Off button on the screen as you take a photo.
- If you record HD video, you can now upload it via Wi-Fi to YouTube and MobileMe.
-
While you hold your phone up to your ear during a call, the proximity sensor should be smarter about realizing that any button taps are being accidentally made by your head, not by your finger. This should prevent some calls from dropping.
I’ve read a few reports that suggest that this fix isn’t working for everyone. If it’s not working for you, try holding the iPhone normally against your ear and cheek during a call – you may have trained yourself to hold it away from your face because of previous dropped calls. I’ve also read the suggestion that you may solve residual proximity sensor problems by resetting the iPhone’s settings in Settings > General > Reset. Tap Reset All Settings. Of course, you’ll now have to recreate various user-generated settings, so don’t do this unless your desire for a possible fix outweighs the trouble of losing your settings. You may also want to wait a few days and see if more information becomes available.
If you have any iOS 4-capable device besides the iPhone 3G, the new Game Center app will appear on your home screen, giving you access to multi-player games.
And, iOS 4 makes these changes, no matter which iOS 4-capable device you install it on:
- In the iTunes app, you can now rent TV shows.
-
Playback controls on AVRCP Bluetooth accessories should all now function properly. For example, buttons on a Bluetooth headset for advancing music to the next or previous track should now work. AVRCP, in case you’re wondering, stands for Audio/Visual Remote Control Profile.
-
If you have the Nike+iPod device, look for changes in the Nike+ app. According to the impressively detailed article at iLounge about iOS 4.1, the Nike+ app now can sync with its Web site and has fancier options for interacting with the site.
-
Parental controls in the Settings app now let you disable FaceTime “phone” calls, as well as the multi-player option in Game Center.
You can read more about the new features and fixes in “Apple Previews iOS 4.1 and 4.2” (1 September 2010).
An important additional fix listed in Apple’s release notes is better performance for the iPhone 3G. Following up on my article “Speed Up Your iOS 4-Based iPhone 3G ” (27 August 2010), I installed the update on my iPhone 3G. I can’t tell if the iPhone 3G is exactly as fast with iOS 4.1 as it was with iOS 3.1.3, but it seems about the same. Many reports on the Web confirm my impression. If you’d like to see for yourself, watch the iPhone 3G Speed Test: iOS 4.0 version iOS 4.1 video at Lifehacker. Thumbs up to Apple for not leaving the iPhone 3G abandoned on the highway of progress, though it would have
been better if iPhone 3G owners hadn’t had to suffer months of poor performance and poor communication about the problem.
Although several people have reported that iOS 4.1 has solved performance problems on the second-generation iPod touch, Apple said nothing about it in the release notes for iOS 4.1.
Further, a new feature of iOS 4 overall is that notes from the Notes app can sync with MobileMe. In iOS 4.1 Apple inexplicably removed this feature from the iPhone 3G and the second-generation iPod touch. Apple mentions this removal briefly in a support article that was modified last week. Better release notes would have saved time and trouble for those who unexpectedly lost the capability to sync their notes wirelessly.
(By the way, several readers have commented that one tip or another in the article about speeding up an iPhone 3G improved the speed of an iPhone 3G running iOS 3.1.3. The article is likely worth a read if your iPhone – whatever model – is running slowly.)
Installing iOS 4.1 will take some time, so don’t start the update right before you want to leave the house. It took about 30 minutes to download and install iOS 4.1 on my iPhone 3G and about 20 minutes on my iPhone 3GS. In both cases, I was already running iOS 4.0.2. If you’re still running iOS 3.1.3, expect the update to take as long as a few hours, especially if you have a lot of content on your device.
Apple Eases iOS Restrictions, Publishes Review Guidelines
In an unusual move, Apple last week released a statement announcing changes to the iOS Developer Program License Agreement that relax previous restrictions, possibly with the goal of reducing exposure to antitrust scrutiny.
Simultaneously, Apple announced that it would be releasing the App Store Review Guidelines to developers and creating an App Review Board to which complaints about rejections could be addressed. It’s none too soon – I’m sure that 99.99 percent of rejections have been for good technical reasons, but the remaining controversial rejections have been embarrassing for Apple and the entire Apple community. Let’s look at the App Store issues first.
App Store Review Guidelines — Honestly, the App Store Review Guidelines sound pretty reasonable on the whole, while still being sufficiently vague as to allow Apple to do anything it wants. However, they are written in plain English, and Apple clearly differentiates between apps and books or songs, neither of which the company curates in the iTunes Store. If nothing else, it’s nice to have that fact stated officially as well.
Apart from the many specific guidelines that will primarily interest developers, Apple lays out some broad themes that boil down to:
- Since lots of kids are downloading apps and many parents don’t set parental controls, Apple will pay closer attention to apps that might be inappropriate for kids.
- Apple is looking for apps that do something useful or provide lasting entertainment. The money quote: “We don’t need any more fart apps.” Thank goodness!
-
Put some effort into it. Apple – and serious developers – don’t want the App Store to be overrun with amateurish apps.
-
Apple will reject apps for any content they believe is “over the line,” where “the line” is defined with a quote from the late Supreme Court Justice Potter Stewart, referring to a no-longer-used definition of obscenity: “I know it when I see it.”
-
The guidelines are constantly evolving to address new situations.
Finally, you can appeal to the App Review Board if your app is rejected, but Apple goes on to say, “If you run to the press and trash us, it never helps.”
I hope that last bit proves true in the future, because in the past, it repeatedly appeared that the only reason that bans were lifted from certain apps was because of public outcry, and media coverage that made that public outcry possible. (See the Wikipedia entry on censorship in the App Store for links to coverage). Would Apple have reversed those decisions on its own? Doesn’t seem likely.
Shining a light on situations like this is exactly what the press should be doing – the public does not have a right to know everything about Steve Jobs’s private life, but knowing that Apple is rejecting political satire from the App Store is absolutely in the public interest.
App Development Language Restrictions Lifted — Let’s look next at the changes to the iOS Developer License Agreement. First, a clause stating:
Applications must be originally written in Objective-C, C, C++, or JavaScript as executed by the iPhone OS WebKit engine, and only code written in C, C++, and Objective-C may compile and directly link against the Documented APIs (e.g., Applications that link to Documented APIs through an intermediary translation or compatibility layer or tool are prohibited).
has been removed entirely. This clause was added a few months ago to prevent the use of cross-compilers such as Adobe’s Flash-to-iPhone compiler (see “iPhone Developer Agreement Change Bans Flash-to-iPhone Compiler,” 9 April 2010). The ostensible reason for this was to reduce the likelihood of security vulnerabilities and to avoid the poor interface quality of cross-platform apps.
Keep in mind that this all happened during Apple’s dustup with Adobe over Flash, and while Steve Jobs claimed Adobe started it (see “Steve Jobs Answers (Nearly) All at D8,” 11 June 2010), there’s no question that emotions were running high and could have resulted in this blanket ban that still managed to target Adobe’s Flash-to-iPhone compiler.
But why the change, and why now? According to a brief New York Post article, Apple’s ban of cross-compilers generated antitrust scrutiny from the U.S. Federal Trade Commission and from European regulators. While all parties have refused to comment, if there is truth to the Post’s report, Apple’s backpedaling would make sense in an antitrust context.
Interpreted Code Allowed in Apps — Next, a clause that previously restricted apps from installing or launching other executable code by any means has been recast. Previously, it banned plug-in architectures, calling other frameworks, using other APIs, and downloading or using interpreted code other than code that was provided or approved by Apple.
That clause continues to ban the downloading and installation of executable code, but explicitly allows interpreted code as long as all scripts, code, and interpreters are packaged within the app and not downloaded. An exception is carved out for code downloaded and run by Apple’s built-in WebKit framework.
Again, this change would seem to be designed to allow developers to create and use their own interpreted languages within apps, as long as they aren’t downloaded, which would open up a gaping security hole. And again, along with the technical aspects of the decision, it may also make sense in the context of an antitrust investigation.
User Data Collection Restrictions Simplified — Finally, a clause that was previously quite specific about the situations in which user or device data could be collected has been greatly simplified. Previously, this clause carefully laid out when and how data could be collected (basically, to provide a service or function that was directly relevant to using the app, or for advertising, but then only a subset of data designated by Apple as available for advertising purposes). Now, it simply says that apps cannot collect user or device data without user consent, it must be for enhancing the app or serving ads, and that apps cannot use analytics software to collect and send device data to a third
party.
According to an earlier New York Post article, there could also be antitrust scrutiny associated with Apple’s iAd service, and this change to the iOS Developer License Agreement can easily be construed as loosening restrictions on third-party advertising services. In fact, Google has already said as much.
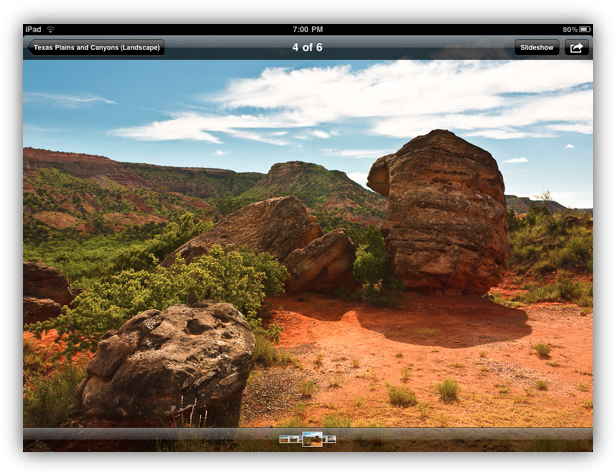
Look Your Best with an iPad Photo Portfolio
I recently bought an iPad to use as my photo portfolio. Frankly, I believe the handwriting is on the wall, and after a week with my new iPad, I can’t imagine going back to a printed portfolio. However, getting your images to look their very best on the iPad is not as simple as it first seems.
Like many photographers, I use Adobe Photoshop Lightroom 3 to manage my raw files and prepare them to be output as JPEGs. Over the past few years I’ve developed several different Export Presets that I use, depending upon how the final image will be used, whether in print or on the Web. After exporting several images using my presets and importing them into the iPad using iTunes, I found that not all my images looked as crisp on the iPad as they had in Lightroom on my MacBook.
Part of the problem is physical. The iPad is not a MacBook and the iPad’s 9.7-inch screen is considerably smaller than even the smallest MacBook Pro’s 13.3-inch screen. The resolution of the iPad is a fixed 1024 by 768 at 132 pixels per inch, which is considerably less than the MacBook Pro’s 1280-by-800 resolution at 101 pixels per inch. These differences ensure that your images will always look better on your MacBook than your iPad. However, there are a few things that you can do in Lightroom to even the playing field a bit.
Collection Sets & Virtual Copies — The first thing is to create a separate Lightroom Collection Set to hold your iPad images. I generally create a Virtual Copy of each image to go into my iPad portfolio and move these into a Landscape or Portrait (horizontal or vertical orientation) collection.
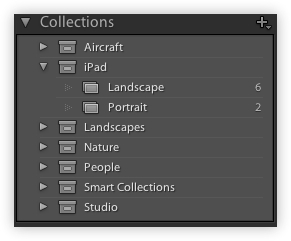
I separate my images this way so clients looking at my portfolios are not constantly rotating the iPad from horizontal to vertical and back when swiping though the images. Using virtual copies is also important since you’ll need to process these images a bit differently than you would a print or Web image.
Crop for the iPad — The next thing you’ll want to do is crop each image using the iPad’s native 4:3 (1024 by 768 pixel) aspect ratio. If you’ve ever created images to be used in a projected PowerPoint or Keynote presentation, you’ll understand why this is so important. For presentations, you generally want your images displayed as large as possible on the projected screen. The iPad is no different, except you carry the screen with you.

Once your image is cropped correctly, there are two Lightroom settings that I’ve found to make a huge difference in how sharp and vivid your image looks when displayed on the iPad.
- Noise Reduction and Sharpness: To obtain the sharpest image possible I use Lightroom 3’s “Sharpening – Narrow Edges (Scenic)” preset and set the Luminance slider in the Noise Reduction panel to zero. Since I’ll never display this image larger than 1024 by 768, I don’t care if there is a little noise in the shadows. At this resolution it’s almost impossible to see the noise onscreen.
- Saturation: I rarely touch the Saturation slider in Lightroom’s Basic panel and much prefer the effect that the Vibrance slider provides. For images meant to be displayed on the iPad, however, I’ve found that setting the Saturation slider to 10 percent seems to work best. I have no quantitative data to back this up, but adding 10 percent saturation seems to make the images on my iPad match those on my MacBook more closely.
Exporting for the iPad — The final key I’ve found after hours of experimentation is to export your images sized to fit the iPad’s native resolution exactly, as shown below. This prevents the iPad’s Photos app from resizing (and resampling) the images on the fly, which can hurt the quality.

The difference in image sharpness as displayed on the iPad is significant, and to confirm this I exported several full-size JPEGs taken with my 21-megapixel Canon 5D Mark II. Those 15 MB files looked softer and less vibrant than the 780 KB files exported using the settings in the screenshot above.
Conclusions — The iPad is an incredible device and may change the way we think about personal computing. For a photographer who still meets with clients face-to-face (and if you think face-to-face is passé, you couldn’t be more wrong), it’s a cost-effective tool for presenting your ever-changing portfolio – whether you’re showing off stills or video. It’s also a whole lot of fun to play with (but don’t tell the kids).
[Jeff Lynch is a commercial, landscape, and nature photographer, blogger, and author based in Sugar Land, Texas.]
The Data Rescue Center Sponsoring TidBITS
We’re pleased to welcome the data-recovery firm The Data Rescue Center as our latest TidBITS sponsor. Although you may not be familiar with The Data Rescue Center name, you’ll likely recognize their parent company, Prosoft Engineering, makers of the Data Rescue and Drive Genius software packages. Prosoft has been around since 1985, writing drivers and disk-related code that was licensed to Apple for Drive Setup and the disc burning features in iTunes.
When founding The Data Rescue Center in 2009, Prosoft’s goal was to provide affordable data recovery services from both hard drives with logical problems and drives that had suffered physical damage. Although there are many highly reputable data recovery firms out there, they’d heard stories of other companies charging hundreds or even thousands of dollars for recovery jobs that required only running their $99 Data Rescue software.
When I talked with Gordon Bell, president of The Data Rescue Center, he told me that they first encourage people whose drives aren’t making unusual noises (or evincing some other sign of physical damage) to try the demo version of Data Rescue, which can show files available for recovery and can recover a single file. If it works, it’s easy to register it online and use it. (Keep in mind that Data Rescue recovers files to another disk; it does not attempt to repair disk structures, so you’d want to recover, reformat, and restore the data. And keep better backups!)
If you’re at all unsure, you can talk with a technician and get advice about the best plan of action for free. If you end up sending in a drive with logical problems for diagnosis and recovery with Data Rescue via their Red Box program (they send you a prepaid shipping box designed to hold a hard drive securely) it will probably cost about $150, and they include a copy of Data Rescue when they return your data or give you a $100 discount if you already own the software.
For drives with physical problems, the costs are of course higher and variable, so within a day or two of receipt, a technician sends you a full diagnosis in email along with calling to answer any questions. The minimum price for a physical recovery is $300, and Gordon Bell said most recoveries end up costing between $600 and $1,000 due to the extra labor, the need for a clean room environment, and any necessary donor parts. All that said, they won’t charge anything for a physically damaged drive if they can’t recover any data, with the exception of recoveries involving damaged drive heads, since it’s not uncommon for replacement heads to be damaged as well in the process of attempting to recover data.
Although The Data Rescue Center’s drive recovery services sound great, it’s always worth remembering that they won’t be necessary at all if you keep good backups. However, The Data Rescue Center offers other services that fall under the data recovery rubric. For instance, they do a lot of photo archiving – scanning of physical photos to digital formats so you aren’t vulnerable to losing the originals (and so you can use them like your modern digital photographs). For that, they use fancy Kodak scanners, and whether or not you could do the scanning yourself on your own scanner, many of us haven’t. When I asked about the pricing ($0.29 per photo for 300 dpi images, $0.39
for 600 dpi, and $0.49 for 1200 dpi), Gordon Bell said that for all but significant enlargements, only 300 dpi is necessary and that the scanning is done at their offices in Silicon Valley, so photos aren’t shipped to India for the actual work, as some services do.
Similarly, if you have data that’s essentially stranded on an old hard drive, tape drive, Zip or Jaz cartridge, or floppy disk, The Data Rescue Center will “rescue” it by migrating it to a hard drive or DVDs for you. They’ll even digitize audio from old cassette tapes or video from old videotapes, in a wide variety of formats. Data migration costs vary, of course, and don’t include the cost of a destination drive or DVDs, which they can provide.
Honestly, I’ve never needed to use a data recovery service, since I keep good backups. But I do have a bunch of old photos that I’d love to have in digital form, along with some videotapes that I’ve planned to digitize for years without actually accomplishing anything. So I’ll be testing out some of The Data Rescue Center’s services as soon as I can find the time to sort through all the archives and figure out what I want to protect from the ravages of being analog.
Thanks to The Data Rescue Center for their support of TidBITS and the Mac community!
DealBITS Discount: Save $20 on Raskin 1.1
Congratulations to James Smith at aol.com, Dave Gerlits at gmail.com, Stephen Narron at earthlink.net, and Ernest Friar at aol.com, whose entries were chosen randomly in the last DealBITS drawing and who each received a copy of Raskin 1.1, worth $49. But don’t fret if you didn’t win, since Raskin Software is offering a $20 discount on Raskin 1.1 to all TidBITS readers through 27 September 2010, dropping the price to only $29. To take advantage of the discount, order from Raskin Software’s store. Thanks to the 408 people who entered this DealBITS drawing, and we hope
you’ll continue to participate in the future!
What’s Wrong with Digital Cameras
I feel snappish today, as you can see:

I’m feeling snappish because my wife Daphne’s point-and-shoot camera died after only three years of infrequent use, and because I cannot find a sensible replacement. Each “simple” point-and-shoot that I have looked at is more complicated than the next.
A century ago George Eastman made his fortune with the slogan, “You push the button, we do the rest.” Today his successors say, “You read the hundred-page manual, decipher its ambiguities, remember it, and apply its lessons to every picture; and then you push the button and we do the rest.”
A “Simple” Point-and-Shoot — Daphne and I decided to buy a Samsung EX1 (in the United States, it’s the Samsung TL500 and costs $400). We chose this model by following my advice in “How Not to Buy a Digital Camera” (17 June 2010) for buying a point-and-shoot: we looked for a model with the fewest megapixels that has image stabilization, a zoom lens, and a display that is easy to see. This model has image stabilization, a lens that zooms threefold, and an exceptionally good display. Not only does the
display use a kind of LED instead of an LCD, it also tilts and swivels, so that you can adjust the angle to avoid reflections from the sun.
This display is the main reason we chose the camera. I can see the screen flat against the camera even in bright sunlight, unless the sun is reflecting directly off it straight into my eyes, and then I can change the angle of the display and still see it fine.
A lesser reason we chose the camera is that its sensor has fewer pixels than most other point-and-shoots (10 megapixels) on a somewhat larger sensor. This results in one-half the usual number of pixels per square centimeter, a difference that ought to mean a little less noise and a little more detail in shadows before they go dead black. (But just a little less. To have the clean and broad range of tones of a DSLR requires not one-half the usual density of pixels but 1/20th.)
Moreover, the EX1 will save unprocessed images as raw files, as well as converting them to JPEGs. When a camera creates a JPEG image, it throws away information. Daphne is usually satisfied with whatever her camera spews forth, but occasionally I want to take a “real” picture when her camera is the only one around. When I edit the picture, I want to have available all of the information in the original photo – a raw file, not a JPEG. Few point-and-shoots will save raw files.
Like every other point-and-shoot, the EX1 is purportedly simple to use. Indeed, it actually seems to be one of the simpler on the market, which was another attraction. However, this level of simplicity takes a 128-page manual to describe, and, even after studying the manual, I’ll be damned if I can figure out what all of the settings do and when to use them.
Simply Ambiguous — For example, look at the picture of the marketing managers below. The manual implies that for the best results I ought to tell the camera which of eight categories a scene falls into, but which category does this picture fall into, “landscape” or “beach & snow”? (It may be hard to tell in this reduced image, but the crocodiles are on a sandy beach and all of the vegetation is growing on sand.)

The manual does not explain how to clarify ambiguities like this, nor does it explain how the various categories are treated differently, so I have no way to determine which to use.
Alternatively, I could let the camera choose the category by setting it to “smart auto.” “Smart auto” chooses among 17 categories, so it appears to be more discriminating (although it does not offer “beach & snow”). But if “smart auto” works and is more discriminating, why would I not use it all the time? The manual gives no clue.
Or take this next photo. I shot it from a bobbing canoe, so I was worried that the movement of my camera would blur it. The EX1 uses optical image stabilization by default, but since I was unusually worried about camera movement, had I been using the EX1 I would surely have been tempted by another of the camera’s features, “dual image stabilization.”

Samsung claims that this feature adds some kind of digital stabilization atop the optical stabilization, and they tout the feature heavily. The setting to choose it is on a dial on the top of the camera, the same dial that lets me choose “smart auto” – which means that I cannot choose both it and “smart auto.” But if this feature works well, why wouldn’t it be used automatically in every mode? If it works only some of the time, or has some disadvantages, when would I not want to use it? When would it be better to have “smart auto” selection of scene
modes and when would it be better to have digital stabilization? The manual explains none of this.
Simply Absurd — If I assume that all of these settings actually do something useful, that they are real features, then I cannot figure out who would use them. I think my wife and I fairly represent the two poles of the photographic market. Daphne knows nothing about photography, and I know rather more than nothing. If Daphne had wanted to take the pictures above, she could not possibly have decided which special setting to use, she could only have chosen “smart auto” and hoped for the best. On the other hand, with her camera I also could not have decided sensibly which special setting to use, so I would have done the same.
Those features are supposed to help people who want better pictures than they can get from a basic point-and-shoot but who do not know how to use a camera. The industry calls them “transitional features,” but the transition is for the industry, not the consumer. Their purpose is to entice people to make a transition from a cheaper to a more expensive camera. They cannot be transitional for learning photography because they are nothing like conventional controls. There is not the ghost of a hint of resemblance. If those features could help anybody learn how to use a conventional camera, then a shortcut to teaching a child to read English would be first to teach him Greek.
The EX1 is also marketed to serious photographers who want a pocketable camera that they can control, because it can be used in the manual, aperture-priority and shutter-priority modes of a DSLR. Indeed it can be, but to do something routine like adjust the exposure compensation you need to push “menu,” right arrow, down arrow, down arrow, down arrow, and “ok” – and that only takes you to the screen that lets you change the setting. Moreover, to bring up exposure information on the display and then hide it so that you can frame the picture, you need to press a button that toggles through four modes. I am not sufficiently serious a photographer to want to put up with this. When I use the camera, I would prefer to use it in its “smart
auto” mode. Unfortunately, “smart auto” is too dumb to save raw files.
“Smart auto” is also arrogant. It will not permit you to modify the exposure if it gets the exposure wrong. This arrogance is almost deserved. I walked around taking pictures in difficult circumstances – bizarre lighting, back-lighting, sun in the picture, nighttime – and every photo came out looking acceptable. However, many of them could have benefited by slightly less exposure, and I’m sure that they all could have been improved by later efforts with the raw files.
Digicam Cars — The Samsung EX1 differs in detail from other digital cameras but as far as I can see, every camera on the market is littered with useless complexities. Canon, Kodak, Nikon, Olympus, Panasonic, Pentax, Ricoh, Samsung, Sony – the user interfaces of every company’s cameras range from bad to abominable. For taking pictures, all that a point-and-shoot needs is a button for the shutter plus a three-position switch (off/on/auto-flash), a switch for the auto-timer, and a dial to let you increase or decrease the exposure by halves of an f-stop, in case a picture turns out too dark or too light and you want to try again.
I can’t help imagining what a car would be like if a camera manufacturer built it. The Pentacanakon Zoom 8 does not need a transmission lever or light switches or heater controls because a computer replaces all of these and more. Moreover, the Zoom 8’s computer offers numerous useful features not found in a conventional car. For example, it can disable cylinders. The Zoom 8 drives smoothly with eight cylinders, but the computer will also permit driving roughly with seven, or bucking on six, or inching forward on five. Imagine how much gasoline this saves!
The Pentacanakon Zoom 8’s computer does so many things that it needs a complicated set of menus. Since menus are awkward to read while driving, the more useful settings are programmed into a rank of pushbuttons. Thus, pressing only two buttons in the correct sequence will disable cylinders. In consequence, if you are trying to switch on the radio but push the wrong button, you may find yourself lurching to a crawl during rush hour on the freeway. Fortunately, a single button will floor the gas pedal and keep it floored until you manage to find it and press it again.
If the cylinder-disabler sounds far-fetched, consider that every camera made today has a set of tiny buttons and associated menus that enable you to take a perfectly good picture then throw parts of it away – controls that make the camera compress the file to various levels as lossy JPEGs, controls that reduce the resolution of the image, and controls that cut off parts of the image wholesale. Cutting off parts of the image is marketed as “Digital zoom! Four aspect ratios! Seven artistic effects!”
I often compress or shrink or crop an image, and occasionally I delete the full-sized original after doing so – when using my camera as a photocopier, for instance – but I do this on the computer’s large screen, not the camera’s minuscule screen, and I cannot conceive of throwing away the original without looking at the lesser version first, to make sure that it’s okay. I don’t know anybody who would throw away originals automatically and only then look at the lesser version, yet those wonderful “features” do exactly this.
As for a button to floor the gas pedal, the EX1 has this too: a button to shoot video without the need for deliberately changing modes. If you press this button accidentally, it will helpfully fill your memory card and drain your battery.
In principle it is possible to ignore many of these “features,” but in practice menus often get changed accidentally, either when you try to change some other setting or when you hold the camera in your lap and touch some buttons accidentally, buttons like the “Fn” button on the EX1, which has no evident function save to facilitate destroying images by throwing away resolution. Indeed, it was just such an accident (on one of my DSLRs) that piqued me into writing this article.
I know that professionals shooting events often want numerous JPEGs instantly, so that they can offer pictures for sale as quickly as possible. Also, snap-shooters will want JPEGs most of the time but might occasionally want the option of going back to the raw file. For these reasons I can understand a setting that would allow saving pictures as JPEGs as well as in a raw format. However, with that exception I cannot see any reason for a camera’s being able to save files in any format other than the best it can.
Better Cameras Aren’t Always Better — Let me make clear again that I am using the EX1 as an example. As I said, the EX1 is actually one of the simpler models on the market. I am not criticizing Samsung alone, I am criticizing the entire industry. As far as I can tell, every digital camera suffers from needless complexity.
Or rather, every photographer suffers from his digital camera’s needless complexity. I have lost some spectacular pictures because I changed ISO speeds and file formats accidentally while carrying the camera or holding it in my lap. I have finally learned that every time I wake up the camera, I need to push the button that displays those settings, to make sure that they are still correct, and then push the button again so that I do not push another button that changes them.
Digital images are incomparably more practical than film, and the automation of point-and-shoot cameras is invaluable, but the automation of DSLRs is of virtually no utility. Consider auto-focus, for example. To focus a manual camera I turn the lens until the part of the image that I want to focus on is sharp. This is straightforward and quick. On my DSLRs, I move a switch from “manual focus” to “autofocus,” point the camera at the part of the image I want to focus on, depress the shutter halfway until the camera focuses, then move the switch from “autofocus” back to “manual focus,” so that I can maintain the focus while framing the photo. This is far from straightforward and is little if any faster than focussing manually, especially
if I accidentally press the shutter more than halfway and take the picture before I’m ready. (Mind you, I do realize that some people have difficulty focussing a camera manually. For these folks – my wife is one – fully automatic focus is invaluable.)
Neither is automatic exposure significantly easier or faster. Before I take a picture with a camera – with any camera – I need to think. I need to consider the largest aperture I can use that will provide adequate depth of field for the picture I am envisioning, and I need to consider if the subject is sufficiently different from the average subject that I shall need to adjust the exposure meter’s reading. After thinking about these things, I adjust the camera. With either a manual or an automatic camera, first I set the aperture, which usually requires turning a knob. With a manual camera I then turn the shutter-speed dial until the exposure meter’s needle points to a mark, either the normal mark or a mark indicating less or more
exposure, a straightforward operation that takes hardly any time at all. With my DSLRs, if I am willing to accept the normal exposure, then I don’t need to do anything else, but if I want to modify the exposure, then I need to push a button and turn a knob while the button is depressed, which is more awkward than lining up a needle with a mark.
If this automation is a significant improvement, then I am fluent in French. Indeed, when setting the aperture or exposure compensation involves menus, an automated camera is slower to use than a manual camera.
If you want to control what your camera is doing – if you want to do anything more than just push the button – then for taking pictures there is only one significant advantage to a digital camera over film: you can instantly see how your pictures turn out. This has nothing to do with the camera’s automatic operation.
Speed Kills… Pictures — “But,” I hear somebody object, “Even milliseconds matter when reacting to a fast-moving scene.” That may be true if you are trying to react to things, but reacting rarely gets good pictures. You may be lucky occasionally, but to be lucky reliably you need to plan ahead and make your own luck: you need to see what is unfolding before you, imagine a photograph that you might be able to take, envision where you and the subject would need to be if you are to get that photograph, go there, arrive there in time to relax your arms (because taut muscles cannot hold a camera steady), and then wait for your picture to develop.
The crocodiles illustrating this article were not stuffed, yet planning my movements gave me sufficient time to think about exposure, and sufficient time to focus manually (which I find to be more reliable than autofocus with the extremely long lens that I was using). If I had been unable to gain this time, then I would have got no pictures, because crocodiles will dive underwater if they see you even 150 meters away.
In movies, you may see a photographer whip out a camera and snap a picture so quickly that his arms are still in motion. You may also see the Lone Ranger whip a pistol from his holster and shoot a pistol out of somebody’s hand on the far side of the street, also while his arm is in motion. These images are comparably absurd. Professional photographers do not shoot from the hip, we plan what we are going to do. We may plan quickly and sketchily, sometimes very rapidly and roughly, but still we plan. Photographers need cameras that will let us observe the scene and plan without distraction.
The Cognitive Limit — Distraction is a serious matter because with a camera as with a computer, the limiting factor is not the hardware or software, it is the cognitive capacity of the person using the thing. To understand the problem, look at this picture:

I am sure that you see the head of a crocodile. But look again: no crocodile is actually to be seen. There is an elongated splotch with a circle in the middle, and a smaller elongated splotch to its right. This bears little resemblance to the head of the crocodile in the first photograph. That head is all tooth and jaw. Here you are not seeing a crocodile, you are inferring a crocodile.
This is how we see most of what we look at. The eye samples a few spots of a scene and the brain infers the rest through probabilistic weightings of previous experience. That is why so many snapshots do not turn out as the photographer expected. That is why you can be surprised that a photograph shows a tree growing out of Aunt Zelda’s head. When you looked at Aunt Zelda in the flesh, your eyes focussed on her, not on the tree. You were concerned with her, not with trees, so your brain did not notice the tree behind her. To avoid that tree you would have needed deliberately to look not at her but behind her.
Now take another look at those splotches of crocodile. One aspect of the composition that helps you to infer a croc is that everything in the picture emphasizes horizontality. Crocodiles are long and low – horizontal – and the horizontality of the composition both establishes a strong horizontal reference and serves as an associative clue. To effect this I made sure that the riverbank and the waterline and the two parts of the crocodile are all horizontal, and I put the bank close enough to the crocodile to suggest horizontality yet far enough from it not to distract. To come up with this composition required concentrated attention.
Every feature of his camera that a photographer needs to think about distracts from the concentrated attention required to take good pictures. The controls for taking pictures ought to be so simple and straightforward that no thought is diverted to the manipulation of the camera. Menus, interlocking buttons, scene modes – all of these interfere cognitively with the job at hand, which is visualizing a photograph and figuring out how to get all of the elements where and as they need to be.
A Simpler DSLR — Minimizing distraction requires simplicity. An automatic camera suitable for serious photography needs to be more complicated than a manual camera or a point-and-shoot, because the automatic functions must have manual overrides, so I would prefer a fully manual camera. However, assuming that a modern camera must be automated, these are the controls that I would want to have for taking pictures with a DSLR or electronic equivalent – all of the controls:
- A button to focus, using a central spot in the viewfinder. This button should be on the left side of the lens, so you can hold it in to follow a moving object without lifting your finger from the shutter. When you are not pressing this button, you can focus manually by turning a ring on the lens.
- A dial with detents to set the aperture. The aperture takes priority over shutter speed for automatic exposure because depth of field (which is determined by the aperture) usually matters more than shutter speed and at the very least is of comparable importance. This dial should be someplace where a finger can find and turn it without looking.
-
A dial with detents for exposure compensation with a button in the middle that locks the exposure until it is pressed a second time. The exposure compensation is by halves of an f-stop because the usual thirds of a stop are needlessly fine and fussy. This dial and button should be someplace where a finger or thumb can find and use them without looking.
-
A dial atop the camera with detents to switch off the power, choose among single and continuous exposure, 2- and 10-second timers, mirror lock-up, and access to a special menu for shooting. This menu appears on the display and is accessible only with this dial, so that you cannot change its settings accidentally.
-
A four-way controller with a central button to maneuver through menus, including the one menu that is used occasionally for shooting.
-
An onscreen menu for shooting that is accessed from the top-mounted dial and that lets you (1) set the ISO speed, (2) switch from automatic to manual exposure, and (3) set the shutter speed for manual exposures. (I do not mind burying the latter two settings in this menu because manual exposure would rarely be used except with studio flashes, so the shutter speed would rarely need to be changed on the fly.) The ISO speed steps up and down with the top and bottom buttons of the four-way controller; the central button toggles between manual and automatic exposure; the left and right buttons set the shutter speed. There are no other menus applicable to taking pictures other than basic configurational menus like time and date, and a
choice of saving high-res JPEGs as well as the normal raw files. The display’s brightness varies automatically to suit the ambient light. -
On the back of the camera, a pair of buttons arranged one above the other plus four distinct buttons, all for reviewing photos. (While in shooting mode, pressing any of these buttons shifts the camera into viewing mode; while in viewing mode, pressing the shutter button halfway returns to shooting mode.) The pair of buttons magnify and shrink the image on the display. One distinct button toggles between a plain image and an image overlaid by exposure information (ISO speed, shutter speed and aperture) and by a histogram of whatever portion of the picture is displayed. When the histogram is shown, any saturated or empty pixels appear a brilliant colour. The second distinct button is “cancel,” the third one is “delete,” and the fourth
is “menu.” In viewing mode, the button in the four-way controller is “okay.”
Note that these controls do not include the usual button for previewing depth of field. This feature is all but useless, because a viewfinder is too dim too see much when a lens is stopped down. A digital camera lets you assess depth of field more easily and more accurately by magnifying a test exposure.
Seeing the Leitz — If you think these shooting controls are stark, consider Leica cameras. The Leica (Leitz camera) was the original 35mm camera, and the Leica models that focussed with rangefinders have always been costly darlings of the photographic market. They have always sold for a premium, despite always being less versatile than the more common professional cameras of the day. In the late 1970s my primary 35mm system was a pair of Leica M4s with all of the lenses that fit, but the Leicas were sufficiently limiting that I also needed to lug around a heavy SLR with a second set of lenses. My Leica gear was well-designed and well-made, but it was not obviously exceptional
in any way save in its limitations and high cost. I chose to use Leicas for the same reason other pros used theirs, because they were compact and had straightforward controls that were quick to operate. While using my Leicas it was easy to concentrate on the subject instead of the camera.
I have not bothered to look at the latest M-series Leica, the digital successor to mine, because its price is preposterous: $7,000 for a body that is less versatile than the cheapest DSLR, with an image sensor that may or may not be capable of better image quality than the Foveon sensor in my $1,000 DSLR, plus $6,000 for a lens that is less versatile than any cheap zoom lens and, after digital processing, is unlikely to provide a sharper image. Indeed, since the Leica lens offers no image stabilization, under many circumstances its images are likely to be less sharp than those from a cheap zoom lens. However I do wish that the folks who designed my cameras had looked at older Leicas while designing theirs.
If the Leica’s price were commensurate with its capability – if it lacked one of its zeros – then I might have considered it for a particular project I am working on, but instead I bought a camera that is 1/20th the price, the Sigma DP2s.
Cheap and Cheerful — The $700 DP2s is a remarkably limited camera, even more limited than an M-series Leica. It lacks interchangeable lenses, it lacks a zoom lens, it lacks image stabilization, it lacks a viewfinder, it will not shoot pictures in rapid succession, its display is relatively small and dim, and its controls are almost as preposterous as the Leica’s price. However, for this particular project I was concerned above all else with the camera’s size and image quality. The DP2s is about the size of the EX1 (and noticeably lighter) yet its Foveon sensor can produce image quality comparable to a big DSLR with a full-frame sensor. (For a comparison of the Foveon sensor with a Canon
full-frame sensor, see “How Not to Buy a Digital Camera,” 17 June 2010.)
The DP2s is aimed at camera enthusiasts and indeed, you would need to be mighty enthusiastic not to find yourself swearing at its limitations and controls. However, to my surprise, I have come to think it the most appropriate camera on the market for a particular niche: pedagogy. If I were teaching a course on photography, I would want my students to use it.
The DP2s enforces a professional approach to taking pictures. It works so slowly that when you are shooting a portrait with the DP2s, you cannot haphazardly snap off dozens of shots and choose the best, you need to set up the picture carefully and observe the model closely enough that you can be ready to squeeze the shutter at just the right moment to capture the evanescent expression that you want. And when you are shooting a landscape, you can see few details through the display, so you need to position the camera without looking at the display at all – by studying the scene from above the camera – and use the display only for framing.
This is how professionals work when taking pictures with big, bellows-fronted view cameras. The image on the camera is upside-down, backwards, and dim, and it disappears altogether once you insert a sheet of film. Using one of those teaches you how to take a picture.
Another pedagogical advantage of the DP2s is its lens. The camera has a fixed lens of normal focal length. You cannot change its lens or zoom from wide angle to telephoto. For learning how to see and frame pictures, I think that this limitation would be worthwhile. If you want to learn to draw, it is more efficient to use a pencil than a box of brushes.
Since students of photography usually love gadgets and features, most of them would object mightily to being forced to use a DP2s. If I did teach a course in photography and required its use, I would rapidly lose all my students. However, any student who did work with it would probably learn more than the norm, and the technical quality of his images would be out of proportion to the camera’s size and price.
Bag the Gadgets — Photography has always been a hobby for gadgeteers. Gadgets are tied so closely to photography that one of the Oxford English Dictionary’s illustrations of the word “gadget” is “Gadget bag, a case for camera accessories.” But where gadgets used to be separate from the camera, now they are built in. This is a significant change. Gadgets buried in a gadget bag are easier to overlook.
Moreover, the gadgetry of digital cameras is bizarre. Consider light-balancing filters, for instance. Film often requires tinted filters to balance colours, but if you did not want to use one, you could leave it in your gadget bag and not know you had it. Digital cameras never need colour-balancing filters, because the automatic algorithms are usually good enough and because you can always adjust a tint afterwards, in the computer – yet every digital camera contains a set of digital colour-balancing filters (“Customizable white balance!”), and the controls to use them are never far from your face.
Every film camera I ever owned was manually operated, yet I found most of them easier to use than any of my digital cameras, all of which have been automatic. I fully appreciate digital imaging, and I enjoy it far more than film – I am not a Luddite in this regard – but neither can I avoid an inescapable conclusion: if taking pictures with an automatic camera is more difficult than taking pictures with a manual camera, then something about the automatic camera is wrong. Digital cameras are more complicated than they need to be.
Before 1888, a tourist who wanted to take pictures would need a packhorse to carry his photo gear around – literally. George Eastman decided to make the camera “as convenient as the pencil,” and he succeeded. He invented roll film and the box camera. Its pictures weren’t very good, but the newfangled Kodak did not require even a backpack to carry, let alone a horse. You pushed the button (and turned the knob to advance the film, and moved a lever to cock the shutter), and then The Eastman Company’s dealers did all the rest. They even changed the film for you. The corporation that grew out of this became one of the giants of the world. Surely it would be profitable for some manufacturer to build cameras more like pencils again.
[If you found the information in this article valuable, Charles asks that you pay a little for it by making a donation to the aid organization Doctors Without Borders.]
TidBITS Watchlist: Notable Software Updates for 13 September 2010
Carbon Copy Cloner 3.3.4 — Bombich Software has updated its backup software Carbon Copy Cloner to version 3.3.4, resolving a host of bugs and making a variety of other small improvements. Among the issues fixed are an error with files with more than 126 Access Control Entries, errors where extended attributes were not re-applied to files in certain situations, a Leopard-specific issue with saving passwords for encrypted backups, and an issue where the software’s log file could be unwritable for the current user. Numerous other bugs, including hangs while authenticating and missing permission checks, are also corrected. Bombich provides full release notes. (Donationware, 3.7 MB)
Read/post comments about Carbon Copy Cloner 3.3.4.
Firefox 3.6.9 — Mozilla has released Firefox 3.6.9, updating the popular Web browser with support for the X-FRAME-OPTIONS HTTP response header that enables Web site owners to prevent their content from being embedded in other sites, which can lead to clickjacking attacks. The update also addresses a number of security vulnerabilities and bugs, some of which could result in crashes. (Free, 19 MB)
Read/post comments about Firefox 3.6.9.
PDFpen/PDFpenPro 5.0.1 — Users and abusers of PDF rejoice, since Smile (née SmileOnMyMac) has released PDFpen and PDFpenPro 5, significantly beefing up the PDF editing and manipulation tools. Most notably, both versions of PDFpen are 64-bit, and include performance enhancements that speed the editing of large documents. Plus, when performing OCR on a scanned document, PDFpen can now take advantage of multiple CPU cores for added performance. If you need to redact (black out) information in PDFs, PDFpen can now do that easily, and there’s even a Search & Redact command to do so across an
entire PDF in a single step (Search & Replace provides normal text replacements). Image editing capabilities have also been improved, with the added capability to deskew scanned documents and adjust image settings such as contrast and saturation. Plus, PDFpen can now resample images to a lower resolution or color depth to reduce PDF file size. PDFpenPro 5 gains the capability to convert a Web site into a multi-page PDF document, can create list widgets and pop-ups in PDF forms, and can create a Submit button to submit PDF form data via the Web or email. Version 5.0.1 is current and requires Mac OS X 10.6 Snow Leopard; full release notes are available. ($59.95/$99.95 new, $25
upgrade, free update for purchases after 14 February 2010, 42.8/43.1 MB)
Read/post comments about PDFpen/PDFpenPro 5.0.1.
Safari 5.0.2/4.1.2 — Apple has released Safari 5.0.2 and Safari 4.1.2 (the former for users running Mac OS X 10.5 Leopard or later, the latter for users still running 10.4 Tiger). The updates patch a pair of vulnerabilities that could allow maliciously crafted Web sites to execute their own code or crash Safari. Beyond the security fixes, both updates correct issues with submitting forms. Safari 5.0.2 also addresses bugs with viewing Google Image results with Flash 10.1 installed, and uses an encrypted connection when surfing the Safari Extensions Gallery.
The updates are available via Software Update or direct download from Apple, and are recommended for all Safari users. (Free update, 37.56 MB for Snow Leopard, 46.71 MB for Leopard, 29.46 MB for Tiger)
Read/post comments about Safari 5.0.2/4.1.2.
iWeb 3.0.2 — Apple has bumped iWeb to version 3.0.2. According to Apple’s sparse release notes, the minor update improves comments and search support for blogs and podcasts published to Apple’s MobileMe service. Assorted MobileMe publishing issues are also fixed. ($79 as part of iLife, free update, 177.14 MB)
Read/post comments about iWeb 3.0.2.
Cyberduck 3.6.1 — The open-source file transfer utility Cyberduck has been updated to version 3.6.1. Cyberduck 3.6 unleashed a torrent of new features, including the capability to connect to Google Storage. (That’s in addition to the software’s existing capability to connect to FTP, SFTP, WebDAV, Rackspace Cloud Files, Google Docs, and Amazon S3.) It also lets you edit Access Control Lists (ACLs) for S3, Google Storage, and Google Docs; adds a slew of S3-specific file control features; introduces the capability to import bookmarks from other file transfer utilities; shows the number of active file transfers on the Dock icon; and more. Cyberduck 3.6 also
corrected bugs with Eucalyptus Walrus, Dunkel Cloud Storage, and Akamai NetStorage interoperability, and the quick 3.6.1 release corrects two minor FTP and SFTP bugs introduced with 3.6. You’ll find plenty more fixes and additions in the full release notes. (Free, 19.2 MB)
Read/post comments about Cyberduck 3.6.1.
ExtraBITS for 13 September 2010
If you’re looking for some commute-time listening, Adam was a guest on both MacBreak Weekly and the Tech Night Owl Live this past week, talking in both cases about the recent Apple announcements. Also, for those considering a new iPod nano, note that you can now easily turn it into a wristwatch, and if you’re wondering what happened to VersionTracker, it was subsumed into CNET Downloads.
Put an iPod nano on Your Wrist — The iPod nano has finally shrunk enough to live in the most obvious spot on your body – your wrist. iLoveHandles is selling the $19.95 Rock Band, a leather strap to which the new iPod nano clips such that it looks just like a wristwatch. Now we’re wondering if there will ever be an iPhone nano that could be attached in a similar fashion.
More Apple Announcement Discussion on Tech Night Owl Live — For yet more analysis of Apple’s recent announcements from Adam and host Gene Steinberg, tune in to this week’s Tech Night Owl podcast.
Adam Discusses Apple Releases on MacBreak Weekly — Last week, Adam was a last-minute guest addition to the popular MacBreak Weekly netcast, joining host Leo Laporte and Andy Ihnatko to talk about all the recent Apple news: Ping, Apple TV, the new iTunes interface, mobile gaming, and much more. It’s an enjoyable bit of Apple-centric chatter, in both audio and video formats.
VersionTracker Subsumed into CNET Downloads — Thanks to Ted Landau for pointing out the story behind the shutdown of VersionTracker, which readers had started to ask us about. CNET, which acquired VersionTracker several years ago, is merging VersionTracker into CNET Downloads. It doesn’t look like the overall functionality will change much, but the VersionTracker name will go away.