TidBITS#1169/08-Apr-2013
If you’ve been planning to attend Macworld/iWorld in early February next year, think again, since it’s moving to late March. And if real-world conferences are too much trouble these days, check out what’s possible with the free Google+ Hangouts On Air, which we’ve used for TidBITS Presents and Take Control Live — Adam Engst explains how to use it for both giving and attending presentations. Adam also looks at how to take advantage of the new gestures in version 2.1 of the Gmail iPhone app; Matt Neuburg reviews Cloud Mate, which makes iCloud’s Documents in the Cloud work more like Dropbox; and David Rabinowitz shares his real-world experiences with electronic textbooks in today’s college environment. Notable software releases this week include Snapz Pro X 2.5.2, TextWrangler 4.5.1, and BBEdit 10.5.3.
Macworld/iWorld Changes 2014 Dates to Late March
Macworld Expo is moving again! Back in 1999, playing off the then-recent move of Macworld Boston to New York City, we published a short April Fools piece about how Macworld San Francisco would be moving to Austin, Texas, because “everything is bigger in Texas.” (For a “This is Spinal Tap”-inspired quote from Steve Jobs and a prescient comment about cheap labor, see “Macworld Expo SF Moving to Austin,” 1 April 1999.)
So please forgive us for holding off briefly on publishing the real news that broke on 1 April 2013 that IDG World Expo was changing the dates of Macworld/iWorld 2014 from early February to late March. Specifically, the pre-conference workshops will take place on 26 March 2014, and the conference itself will run from Thursday, 27 March 2014 through Saturday, 29 March 2014. The San Francisco-based show is moving locations as well, but only across the street to the North Hall of Moscone Center. Registration will open toward the end of 2013.
In a prepared statement, IDG World Expo said, “Exhibitors and attendees alike expressed interest in moving the event further away from the holidays and other winter travel complications, and IDG World Expo is pleased to have been able to act on this feedback.” Of course, the desire to escape winter travel complications has been true forever, and there’s no telling what enabled the change to happen this year. The new timeline is welcome, thanks to eliminating the previously scheduled awkward Saturday/Sunday/Monday dates and preventing a conflict with the Super Bowl. (We’re looking forward to a higher level of attendance from NFL players next year because of this.)
The only downside is that many people have built a mid-winter Macworld/iWorld into their annual schedules, and moving it by several months may hurt attendance from those who have other events scheduled for late March. In 2013, IDG World Expo pegged attendance at 25,000, so we’ll see in a year if the date change turns out to be positive or negative.
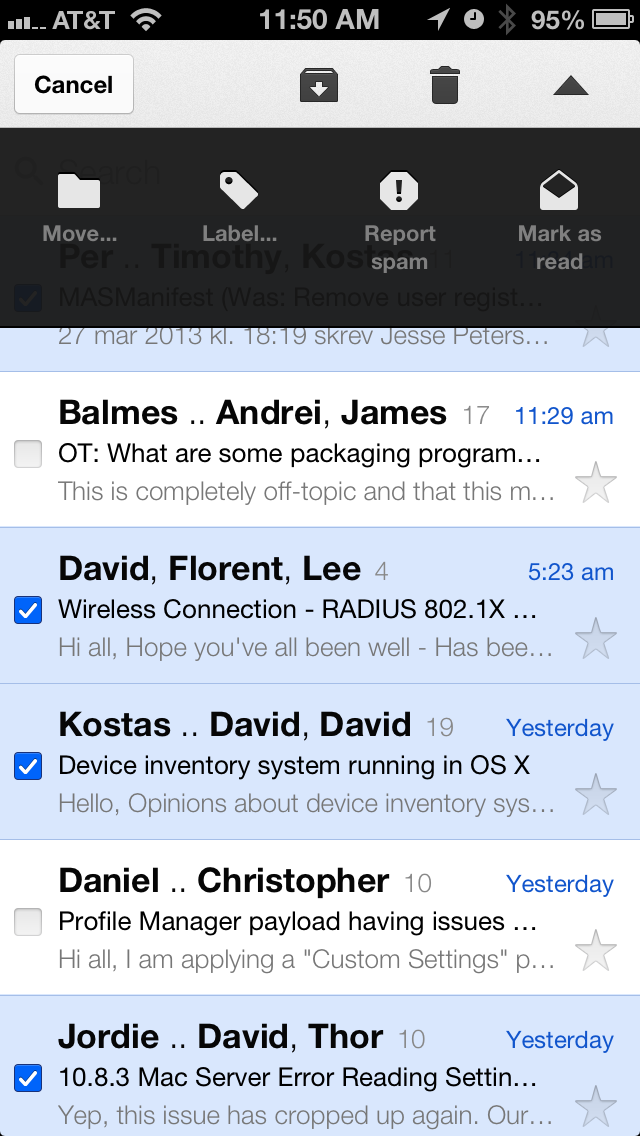
Gmail for iPhone 2.1 Improves Message Navigation
If you’re like me, when reading email on an iPhone, you spend a lot of time moving between messages, which generally entails either tapping a tiny arrow or switching back and forth between a list of messages and the actual content. That’s no longer necessary in the recently released version 2.1 of the free Gmail app for iPhone or iPod touch (but not iPad), in which you can now swipe left and right to move between messages while reading.
Like many gestural interfaces, this approach is simple and sensible, but what it isn’t is obvious, until you’ve learned that it exists at all. In this particular case, all that it takes is being told, but other gestural and small-screen interfaces often need more explication.
For instance, there’s another new feature in version 2.1 of the Gmail app that is again simple and sensible, but not necessarily obvious. When you select a message in the list by tapping its checkbox, that puts you in an edit mode in which you can continue to select additional messages and then tap one of the three buttons at the top to archive or delete the selected messages, or (if you tap the down-pointing arrow) move them, label them, report them as spam, or mark them as unread.
To give credit where it’s due, Google did provide clear directions for using these features in both a blog post and in release notes for the app, but most people don’t read the Official Gmail Blog, and many people don’t read the release notes for apps when updating a bunch of them en masse (I know I don’t).
So, two points. First, gestural interfaces are good, because they can be both easy and powerful while occupying no precious screen real estate on mobile devices. Swiping between messages is a step in the right direction, but it would be nice to see more experimentation in this field, as in the Mailbox iPhone app (see “Mailbox for iPhone Eases Email Triage but Lacks Key Features,” 22 February 2013).
Second, developers need to keep user education in mind, and should build in-app hints for otherwise hidden gesture-based features, such as swiping between messages, pull to search, and swiping in lists to delete. Otherwise, we users must resort to “playing” apps like games to discover what they can do, with the price of failure being inefficient usage patterns.
Cloud Mate: Turning iCloud into Dropbox?
Ask me how I move documents from one of my Macs to another, or from my Mac to my iPad or iPhone, and I’ll probably say, “Dropbox.” I hardly ever think of using iCloud’s Documents in the Cloud feature to share or transfer documents among my devices. The reason, I think, is that Apple’s interface to iCloud is so poor, especially on the desktop with OS X 10.8 Mountain Lion, and especially in comparison to Dropbox’s interface.
My Dropbox folder is, happily, just an ordinary folder in the Finder, giving me direct Finder access to a central repository holding everything I’m keeping in the cloud through Dropbox. Simple, obvious, direct, and easy to use.
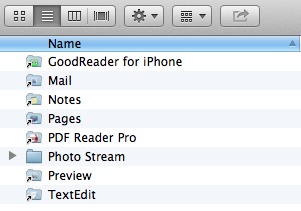
In contrast, iCloud documents maintained as Documents in the Cloud are shown in a totally different way. They aren’t usually visible in the Finder at all! Instead, you see them only in a peculiar, substandard, iOS-like Open dialog, and only within one particular application. That situation is frankly ridiculous. I shouldn’t have to launch (say) TextEdit, let alone choose File > Open within it, just to see my TextEdit documents, merely because they happen to be mirrored into the cloud! And there’s no reason why my iCloud documents should be tied to a single application in the first place, especially seeing as the division is arbitrary: a document kept in, say, TextEdit’s cloud folder doesn’t have to be a TextEdit
document — it can be anything at all.
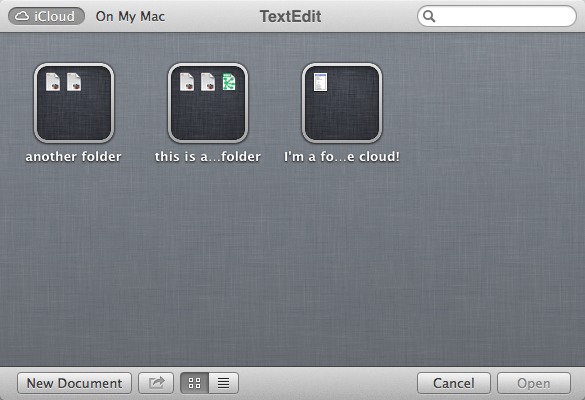
With some difficulty, and if you’re willing to play the role of Power User, you can see your iCloud documents in the Finder’s folder hierarchy, if you really want to. They are stored in your Library folder, in a subfolder called Mobile Documents. The Finder, however, fights quite hard to prevent you from seeing what’s really going on here. The Library folder is normally invisible (though you can fix that; see “Dealing with Lion’s Hidden Library,” 20 July 2011), and the
Finder insists on titling the Mobile Documents folder’s window as “iCloud”. And is this view of your iCloud documents, even if you can be bothered to arrange to see it, of any real use? It might be more of an invitation to damage something.
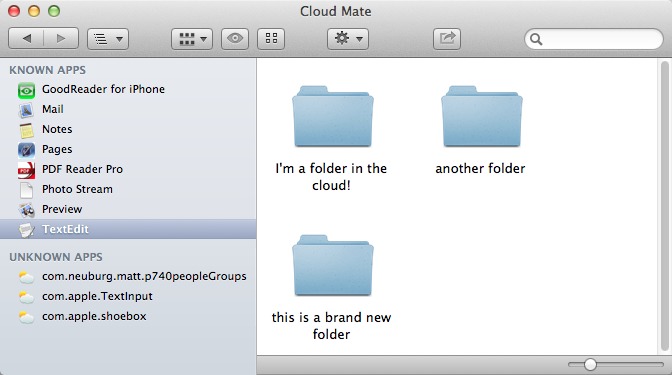
The promise of the Cloud Mate utility, from Red When Excited, is to make your access to iCloud documents more like your access to Dropbox documents. It does this in two ways.
Cloud Mate’s first way of showing you your iCloud documents is through its own window. The Cloud Mate window’s sidebar lists your iCloud-enabled applications, and you can view only one application’s documents at a time; but at least the window is somewhat Finder-like. You can create folders, and rename files and folders, in Cloud Mate’s window, and you can drag files and folders from the Finder into it. You can also drag files and folders out of this window, or from one application’s domain into another application’s domain. (If you try this, note that there’s a slight delay where you must hold down for a while on an icon before it becomes draggable.) And the Cloud Mate application helps you avoid losing data by
ensuring that just about every form of dragging makes a copy rather than moving files.
The second way in which Cloud Mate shows you your iCloud documents is via a virtual Finder volume that unifies access to the various iCloud document folders. This magic is performed through an installation of OSXFUSE. OSXFUSE, the successor to MacFUSE, is a low-level piece of software that enables developers, in effect, to construct their own file systems. That scares me somewhat, but I suppose my fears are irrational, and besides, you don’t have to use this feature if you don’t want
to.
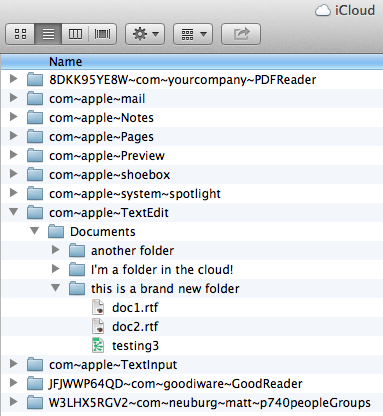
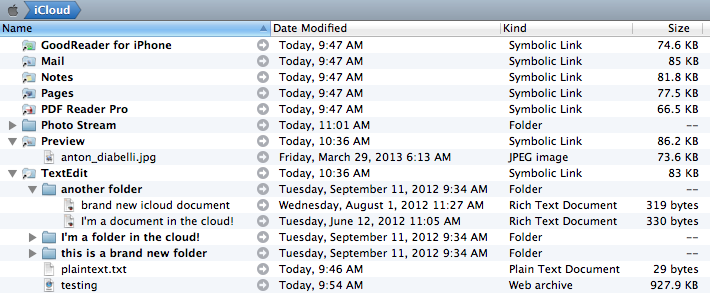
In this case, OSXFUSE is being used to gather up the contents of ~/Library/Mobile Documents and make those contents appear more normal. The funny folder names such as com~apple~TextEdit are turned into ordinary names such as TextEdit, and the contents of their Documents subfolders are hoisted up to the top level. The resulting virtual file system forms a volume that you can then access in a genuine ordinary Finder window, giving you all the normal power of the Finder but with a cleaner interface than looking into the Mobile Documents folder directly.

The resulting Finder window isn’t quite as magical as one might hope. Column view works well, and I recommend that you stick to it. But the iCloud document folders, although you can dive into them one at a time in column view, are portrayed as file aliases in list view, so they have no “flippy triangle” that might be clicked to open them hierarchically to view their contents simultaneously within the same window. Nevertheless, this is a clever and useful way of exploring your iCloud documents directly in the
Finder.
As with Dropbox, you need to be a little careful if you don’t want to commit your only copy of something to iCloud. If you drag a file into an iCloud document folder on this virtual volume, you move the file; alternatively, of course, you can hold Option as you drag, or use Copy and then Paste, to get a copy. Similarly, if you drag a file out of an iCloud document folder onto, say, the desktop, you are removing it from iCloud (and a dialog warns you of this). None of that,
however, is surprising; indeed, it’s delightful. This is just the Finder acting the way the Finder normally acts and having those actions reflected on iCloud.
The virtual Finder volume generated by OSXFUSE has another advantage: it’s visible from any application’s Open and Save dialogs, at least in theory. For example, BBEdit’s Open dialog can use it to see and open a text document stored in TextEdit’s iCloud folder, and once open, there’s no problem with saving changes. Unfortunately, this doesn’t work symmetrically for saving a new file via the Save dialog. What an application can do in its Save dialog seems to depend on what kind of application it is. BBEdit’s Save dialog can’t open or enter TextEdit’s iCloud folder to save a new file into it, nor can the Save dialogs in Microsoft Word or TextMate, neither of which are Cocoa apps. Both Pages and Safari can use
the Save dialog in TextEdit’s iCloud folder, presumably because they’re Cocoa apps, but they can’t see or save into the subfolders inside TextEdit’s iCloud folder.

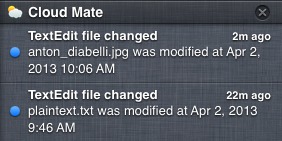
Another way that Cloud Mate emulates Dropbox is with notifications. Dropbox has long supported Growl notifications, and thus Mountain Lion’s Notification Center. Similarly, Cloud Mate posts notifications to Mountain Lion’s Notification Center when there’s activity related to iCloud documents. Also, Cloud Mate has its own iCloud Monitor window that displays recent iCloud-document activity — though unfortunately its listings of activity vanish almost immediately after they appear, so too bad if you weren’t looking at the necessary
moment.
Cloud Mate, to me, is an excellent start on a really good idea. A unified, reasonably nimble view of your iCloud documents might very well make you more willing to use Documents in the Cloud in the first place. Certainly what Cloud Mate provides is a heck of a lot nicer than what Apple offers through its linen-backed document-based Open and Save dialogs. If Apple had any sense, they’d look at Cloud Mate and slap their foreheads: “Oh, this is the sort of thing we should have done!”
Cloud Mate does have its limitations, though. The Cloud Mate main window’s imitation of the Finder isn’t complete, and not even all that Finder-like. It displays only icon view, a view that I never use in the real Finder. The developers, I sense (based on the response I got when I asked about this), intend to add other views, such as list view and column view, so perhaps they’ll get around to it eventually. Similarly, many Finder-like moves that you might try because of Cloud Mate’s Finder-like quality don’t work like the Finder. For example, selecting a file and pressing the Space bar does summon a window similar to Quick Look’s, but it isn’t really Quick Look, and pressing the Space bar again doesn’t dismiss it. Other
keyboard shortcuts, such as pressing Command-Up arrow to go up a level in the hierarchy, are missing as well.
All of that, however, is forgivable; the truth is that writing an application that works enough like the Finder to make you feel you’re in the same powerful world as the Finder itself is really difficult, and perhaps Cloud Mate’s developers are wise not to have set their sights so high. Indeed, I know of only one application that succeeds in doing such a thing, and that’s Path Finder (see “Path Finder 5 Beats the Finder’s Pants Off,” 29 June 2009). The best view of my iCloud documents that I achieved while playing with Cloud Mate came from marrying Cloud Mate with Path Finder; viewing the OSXFUSE virtual volume created by Cloud Mate
through Path Finder in list view does display the entire hierarchy, and is an absolutely delectable experience.
If you think that Dropbox-like access to your iCloud documents would be useful, you don’t have to pay much to obtain it. Cloud Mate costs just $6.99 (you purchase your license through FastSpring; an app like this doubtless stands no chance of being approved by Apple for sale in the Mac App Store). It’s a 9 MB download, and requires Mountain Lion.
Living through the Evolution of Etextbooks
As a college senior due to graduate from the University of Virginia shortly, I’ve been a firsthand witness to the dawn and slow advancement of etextbooks into higher education. Although the technology necessary for etextbooks has been around for years, only recently have I seen them gain a foothold in the market. Writing this piece three years ago would have been difficult since I wouldn’t have had much to say or many experiences to share. But now, after only a few short years, I have used numerous etextbooks and digital education platforms. I hope that my history with etextbooks will provide a clear picture of the current digital book landscape, viewed from within, rather than from the lofty heights occupied by publishing pundits.
You may have gotten the impression that etextbooks are ubiquitous since the media is so optimistic about the rate of change, but as a student in the thick of it, I can say that etextbooks are only now starting to catch on and that the change is happening slower than you may think.
My foray into digital textbooks started in 2007 during my junior year of high school. Teachers and librarians made students use academic databases to do the bulk of our research, as Wikipedia was off-limits. One of the databases my high school subscribed to was Questia, which offers full-length academic ebooks and other scholarly research material via the Web. It was my first time accessing books with a computer, so I was impressed.
Despite a few ebook databases in high school, etextbooks weren’t feasible since not every student had persistent access to a computer. Granted, we had plenty of PCs in school, and my K-12 education was interspersed with various pieces of technology as educators tried to incorporate it into the curriculum. I have fond memories of using Kid Pix on the Mac during elementary school and watching movies on laser discs. But the hardware was neither cheap nor mobile enough for every student to have. In college however, it’s omnipresent. Every student is required or highly encouraged to buy a laptop, and free Wi-Fi is everywhere on campus. Also, by the end of my freshman year there were alternatives to laptops, like the Kindle and iPad.
Sadly, despite the abundance of all this technology, not a single textbook was available electronically for any of my freshman year classes in 2009. My parents told me that things hadn’t changed much since they were in college and gave me tips on how to save money buying used textbooks. Apparently, textbook publishers had failed to embrace the modern world’s technological advancements and were still stuck in the last century. I had a brand new laptop with pervasive access to Wi-Fi, but it was outweighed (literally!) by my big, heavy textbooks.
The first time I used an etextbook was in my second year of college. One physical textbook that I had purchased came with a complimentary electronic version available on the publisher’s Web site. That book had, and still has, a Flash-based interface that doesn’t allow copy and paste, which makes creating personalized study guides a chore. And the book always opens to the cover page, no matter where I previously left off reading. I needed the same textbook again this semester for a different class, but was able to purchase just access to the etextbook version without buying a physical copy. The publisher even sells the electronic version at a slight discount from the physical book. Much to my disappointment, even though more than two
years have passed, the interface is exactly the same.
During my last two years of college, I’ve seen a large increase in etextbook offerings. Now, only one of my classes has a textbook that isn’t available in a digital form, and even that book has supplemental material that is available only online.
A year ago, I was lucky enough to be part of a pilot program sponsored by the University of Virginia to try out etextbooks in an integrated fashion. Students in my Database Systems course were given access to an etextbook, free of charge. Authentication was handled by UVA’s course management software and we accessed the book through the Web app for CourseLoad, a third-party etextbook service. CourseLoad is a digital distribution platform that enables you to read and search etextbooks, make highlights and notes, and collaborate with other people. It’s device-independent and is similar to the Kindle Web app.
Everybody in class was enthusiastic to use the etextbook, despite participation being voluntary. We were still given the option to purchase a physical textbook, but as far as I know no one bought it.
This year I’ve been able to purchase etextbooks for the majority of my classes and have been pleased with the experience so far. I now prefer etextbooks to physical textbooks. While getting a free one during the pilot program was great, I have no problem paying for a digital version of a book. The price point of electronic textbooks is still in flux so different retailers have significantly different prices. They tend to be about 10 to 40 percent cheaper, and the discount can even surpass 50 percent. However, since I can’t sell them back to the campus bookstore at the end of the semester, the initial savings can easily be negated.
My favorite feature of etextbooks is the capability to search through the text by just typing a keyword. I no longer have to turn to the index at the back of a book and then flip to the right page. This handy feature saves me a lot of time and makes finding information much easier, especially since the quality of indexes varies between books. Also, keywords can link to their definitions and some ebook platforms will bring up a definition whenever a word is highlighted. I no longer have to fumble around in the back of the textbook for the glossary. With a tap, I can find the definition of any word on the screen.
Another advantage of etextbooks is instant electronic delivery. I didn’t have to make a single trip to my college bookstore this year because I could either rent or buy my physical textbooks from Amazon, or access the etextbook through the Kindle app or other service. I used to buy my textbooks well in advance of the semester to make sure I got one, since the bookstore can run out, but I don’t have to anymore. Heck, I bought my anthropology textbook online via my laptop in the middle of the first class. Digital delivery enables me to hold off and make sure I need to buy the necessary materials. Many students drop a course after a class or two, so not having to return textbooks to the bookstore is a big time saver. And, if you’re
skeptical that the professor will even use a particular textbook on the reading list, you can just wait to buy it until it’s needed without worrying that the bookstore will have returned their extra copies.
Digital delivery also facilitates textbook rentals. Through some online retailers, like Amazon, you can rent an etextbook for a specific length of time. Instead of buying and then selling back physical textbooks at the end of the semester for a fraction of the purchase price, the rental just expires. I was able to rent my economics textbook for $65, which was $40 cheaper than buying the Kindle version and $105 cheaper than buying a new paperback copy. In this case, it cost about $0.30 per additional day and there was a 60 day minimum rental period.
Unfortunately, I didn’t find out until after I had spent the money that the rental was incompatible with my Kindle Touch, which isn’t as capable as the Kindle Fire models. But, I was still able to use it in the Kindle app on the Mac and Web, and I didn’t mind not being able to use it on my Kindle Touch. The digital rental was more convenient than renting a physical copy of the book because I didn’t have to ship it back at the end of the semester. Amazon even saved my highlights and notes after the etextbook expired so they’ll be available if I ever download the etextbook again.
Going into UVA’s pilot program, I was aware of many of the advantages of etextbooks, but one that I had little experience with was the sharing and collaboration features. CourseLoad enables the sharing of highlights, notes, and annotations with other students and the instructor. Despite the potential, I didn’t see any notes from other students or the professor. In fact, UVA’s official report on the program even says that the features weren’t widely used and that there was little benefit from having them.
In my opinion, it wasn’t that the tools were necessarily inadequate or hard to use, but that students and teachers have to become accustomed to them and incorporate them in their workflows. When I asked my instructor, Mark Sherriff, Associate Professor of Computer Science, about the collaboration tools afterwards, he said that they would have to interface with his current workflow, which includes a lot of email. Some types of automatic data aggregation and sharing, like the Kindle underlining frequently highlighted passages, will definitely be more widely used since they require no additional work on anyone’s part.
The etextbook pilot also exposed some weaknesses that physical textbooks don’t have. The most prominent of these were technical issues and the need for a constant Internet connection. Although this didn’t happen frequently, whenever the CourseLoad service or the UVA course management system went down, there was no way to access the material. The Kindle app downloads all content, so it’s available offline, and in my opinion is better for the mobile student. Another issue with CourseLoad was that some students complained about having trouble viewing and navigating the text on their devices. The technical problems weren’t a major issue, though, and I would expect them to be ironed out with future iterations of the software.
Of course, the elephant in the etextbook-filled classroom is piracy. When doing a Google search for a textbook, one of the suggested links almost always has “pdf” at the end. BitTorrent is another common way to find copyrighted course material. This is a widespread problem, and while talking to friends from UVA and other universities, many confessed to having not paid for some of their etextbooks. One friend even mentioned that professors have given out free copies of textbook PDFs, so students aren’t the only guilty parties. By limiting etextbooks to a cloud service or some type of proprietary software, publishers could eliminate much of the piracy, but doing so could hurt the user experience if the service has issues or requires
an Internet connection.
Finally, one of the most annoying disadvantages of etextbooks is the fragmentation and inconsistency across various platforms. There is no one service for selling and reading them, and each publisher seems to have their own idea of how to do it. Right now, I’m bouncing between Amazon’s Kindle app, PDFs, a proprietary Web app, and physical textbooks. Amazon Kindle’s application is by far my favorite, and it trumps other services because it doesn’t require an Internet connection, is cross-platform, underlines frequently highlighted passages, has convenient reference tools, and offers a decent search feature. However, it too has some problems that lead to friction and frustration in the learning process. For instance, many Kindle
books lack page numbers, so I have to pull up a publicly available table of contents online in order to figure out where I should be reading. I also can’t export any highlights, notes, or annotations to another platform, so I’m locked in.
Now that I’m finishing up college and have some broad experience using etextbooks, I can confidently say that I prefer them over physical textbooks. They aren’t even close to being perfect, but since they are digital, they can at least be iterated upon and improved, hopefully quickly. Traditional textbooks have stayed essentially the same for decades, and in a world that is becoming increasingly digital, I don’t see why an antiquated publishing medium should still be the norm. Students should be given the option to purchase physical textbooks, but every textbook should also have an electronic version that is priced fairly. And I’m willing to bet that the etextbooks win out in short order.
How to Set Up and Use Google+ Hangouts
When we came up with the idea of doing TidBITS Presents and “Take Control Live: Working with Your iPad,” we knew we’d need some serious technology backing it up. Joe Kissell had some strong opinions about features he as a presenter would want, and we set about checking out the many different services that offer webcasting and videoconferencing options. We were rather surprised to discover that Google+ Hangouts On Air had the best combination of features, and as an added bonus, it was free to use. So we did.
But then something funny happened. As much as we had planned on using Google+ Hangouts On Air only for major events, we found ourselves using it more and more for small groups as well, including our staff meetings and even person-to-person calls that we had previously done in Skype.
Why Google+ Hangouts? — So why choose Google’s solution, instead of Apple’s FaceTime, or video chat via iChat/Messages (AIM) or Skype? Google+ Hangouts — and the public Google+ Hangouts On Air — has a lot going for it, and key benefits over the alternatives.
- It supports up to 10 users, on multiple platforms, including Mac OS X, Windows, Chrome OS, Debian-based Linux distributions, iOS, and Android. (Although iOS users cannot participate in public Google+ Hangouts On Air, they can participate in private Google+ Hangouts and watch a public Hangout On Air using the Google Chrome browser.) FaceTime is person-to-person only on iOS and the Mac and iChat/Messages is limited to four participants and is Mac-only. Skype also supports up to 10 users, but…
- It’s free. For a Skype video call with more than two users (person-to-person), the person initiating the call must have a Skype Premium account, which starts at $4.99 per month.
-
It’s good. Although we switched from iChat audio to Skype for staff calls some years ago because Skype’s audio was better then, Skype’s audio quality has been highly variable over the last year. Some calls are fine, but many more become increasingly garbled-sounding as they continue, and must be broken down and restarted to bring the quality back to a listenable state. Although Google+ Hangouts hasn’t been perfect, its audio and video quality have been more reliable than the alternatives. (We did see more trouble with private hangouts on the iPad than on the Mac.)
-
It can be public. When you start a hangout, there’s a checkbox that, when selected, turns a normal private Google+ Hangout into a public Google+ Hangout On Air that anyone can tune into via Google+ or YouTube.
-
It records. There are of course ways of recording any video call with additional software, but when you run a public Google+ Hangout On Air, Google automatically records the entire presentation to the YouTube account of the person initiating the hangout. If you want to record a private Google+ Hangout without taking it public, you’ll need additional software. But you can always mark a public Hangout On Air recording as private in YouTube later. It’s a bit like recording a talk in a university lecture hall. You can’t keep people out, but it’s unlikely that many people will wander in, and even if they do, they can’t watch later.
What Do You Need? — There are a variety of requirements to participate in Google+ Hangouts, whether or not they’re On Air.
- Fast Internet connection. The minimum bandwidth required is 512 Kbps incoming (down) and 256 Kbps outgoing (up). For person-to-person hangouts, Google recommends 1 Mbps in both directions, and for group hangouts, that’s increased to 2 Mbps down and 1 Mbps up. For the best results, you’d want at least 2.5 Mbps down for person-to-person hangouts, and 3 Mbps down for group hangouts. Frankly, the more bandwidth you have, the better, though it’s entirely possible that a hangout would work with less bandwidth than specified.
-
Although Google says nothing about this, we’ve seen better luck with the computer-to-Internet connection being made through Ethernet than via Wi-Fi. Although Wi-Fi has plenty of bandwidth, Wi-Fi connections seem to be a bit flakier, particularly with complex networks.
-
Supported Web browser with the Google Talk plug-in. This should be easy, since the Google Talk plug-in (you may also see it called Google Voice and Video) works in all recent versions of Google Chrome (10+), Safari (4+), Firefox (3+), and Internet Explorer (8+). To install the plug-in, go to the Google+ Hangouts page, click the Download Plugin button, open the
GoogleVoiceandVideoSetup.dmgdisk image (for those of you on the Mac — I’m sure it’s similar in Windows), double-click theGoogle Voice and Video.pkgfile, and run through the installer. -
Recent computer. Google says the minimum processor requirements are any 2 GHz dual core processor or greater, although I’ve seen it work fine on MacBook Air models in the 1.7 to 1.8 GHz range.
-
Video camera and microphone. If your computer doesn’t have a video camera and microphone, or if you want a better one, check out the Logitech HD Pro Webcam C920 (several of us have and like its predecessor, the C910). It offers excellent video and decent audio, and while it lists for $99.99, it’s only about $78 on Amazon.com. [Update: It turns out that the C920 doesn’t support the Mac officially, so while it should work for basic stuff, for advanced features, you’ll need the $7.99 Webcam Settings
app.] For even better audio, look at the desktop USB microphones from Blue Microphones — I use a Blue Snowball that’s about $70 on Amazon — or try a lapel mic that you clip to your clothing. You can also use a headset, of course, but you may not want the Princess Leia look with big earphones. -
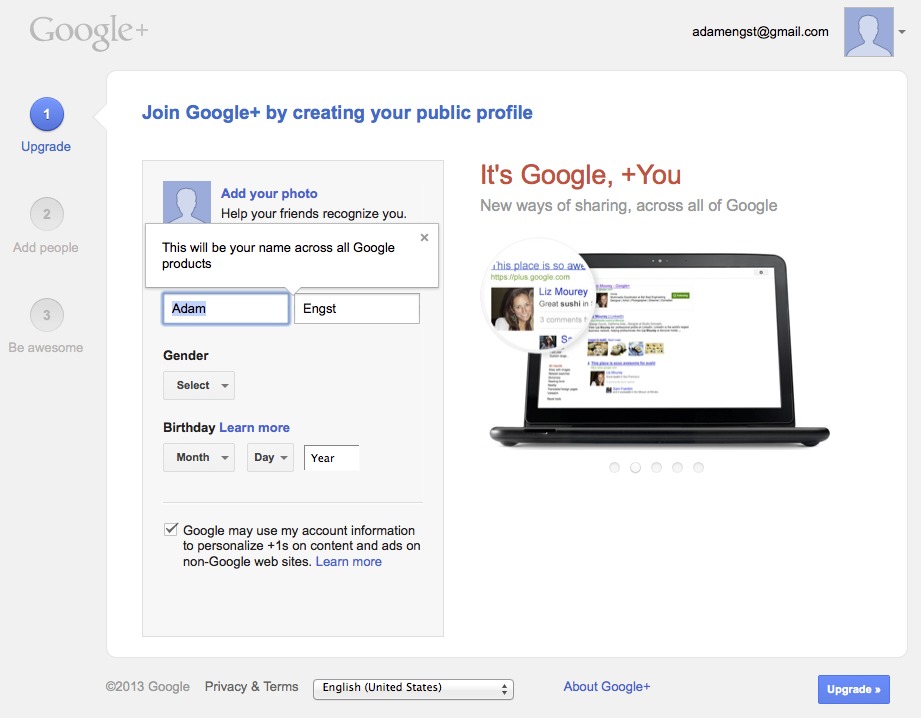
Google account, enabled for Google+. It’s likely that you have a Google account, if you’ve ever signed up for Gmail or YouTube or Picasa or any of a host of other Google services. But you do have to “upgrade” it for Google+, which involves merely going to the Google+ page, entering your desired name, gender (Other is an option) and birthday (for age-related verification).
Setting Up a Hangout — One of the places we’ve found Google+ Hangouts to be a bit confusing is in the “call” phase. With Skype and Messages, for instance, you generally make sure everyone involved is running the application and is available, and then starting the call generates notifications that are nearly impossible to miss.
With Google+ Hangouts, though, since it’s mostly being used in a Web browser, notifications aren’t nearly as obvious. (This is an advantage of having the Google+ app for iOS or Android — it has notifications that alert invitees.) So there are three basic ways to set up a hangout.
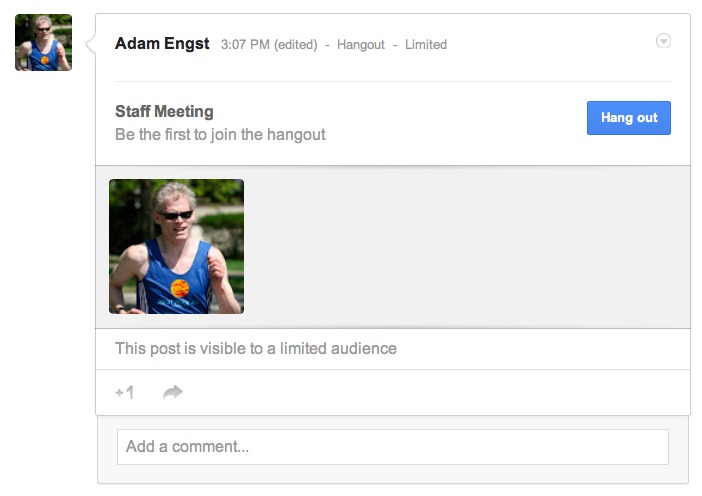
- Set a specific time at which attendees will know to visit their Google+ home page, see the hangout invite, and click a Join button.
-
Start with an out-of-band text chat in Skype or Messages or Google Talk, and tell people when you’re starting a hangout, so they can check their Google+ home page.
-
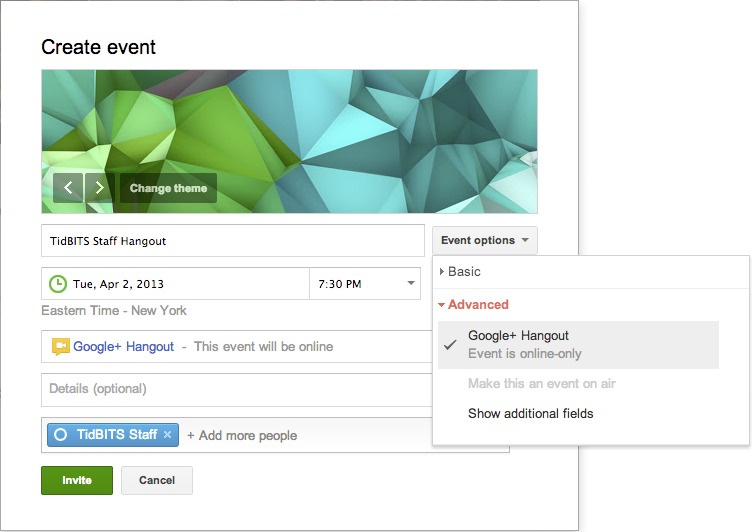
Use Google+ Events to schedule a hangout in advance (look in Event Options > Advanced for the controls to make an event a hangout). In this case, the hangout will be started automatically, and you and all your invitees will be notified to join at the given time.
For the first two methods, here are the basic steps you as the coordinator should follow to start your hangout.
- Visit your Google+ home page or the Google+ Hangouts page.
-
Look for a Hang Out or Start a Hangout button, and click it.
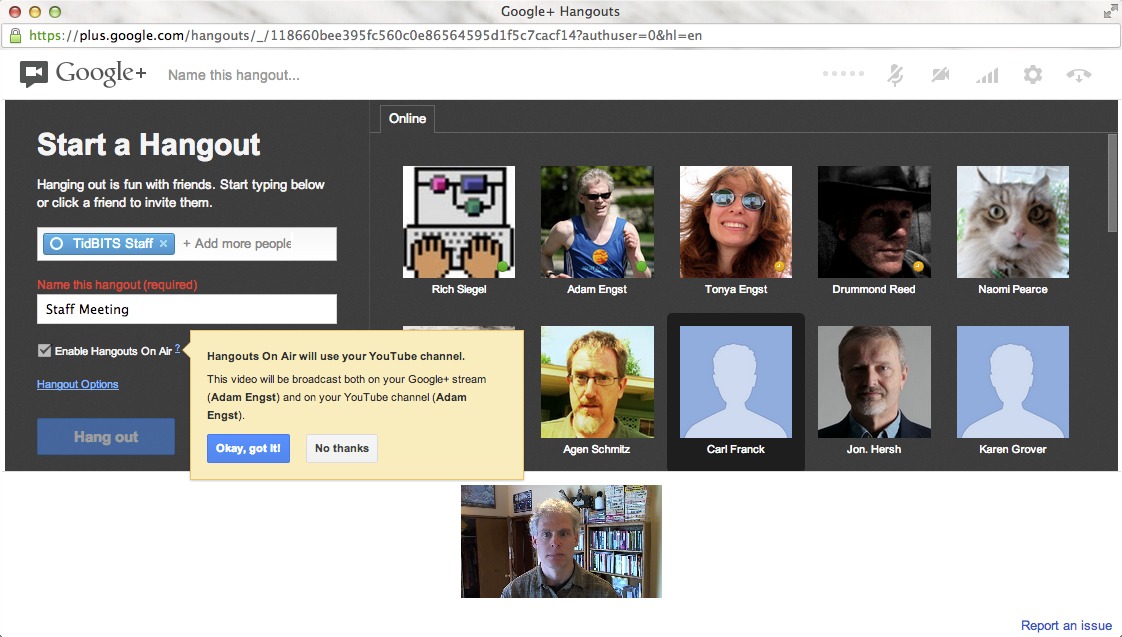
-
A new Hangouts window opens, showing thumbnails for your friends who are online and giving you a few fields to fill in. Click desired thumbnails or type the names of people or groups in the top field (you can make a group by creating a Google+ circle and adding people to it), and in the second field, give your hangout a name.
-
If you want your hangout to be a public Hangout On Air, select the Enable Hangouts On Air checkbox, and click the Okay, Got It! button to acknowledge that the hangout will be broadcast in your Google+ stream and on your YouTube channel. Make sure the accounts match what you want — only the initiator of a public Hangout On Air can record automatically to YouTube.
-
Click the Hang Out button to start the hangout and issue invitations to the people you invited.

A few usage tips: If you’re doing a public Hangout On Air, you choose when to start the broadcast and recording by clicking the Start Broadcast button in the Hangouts window. Similarly, when you’re done, you click End Broadcast. Starting and stopping broadcasting doesn’t affect the people in the hangout, so you can talk before and afterwards without fear of being overheard or recorded.
For the most coherent recordings, make sure you have the desired person in the top spot (click their thumbnail in the bottom row — more on that shortly) when clicking Start Broadcast so there isn’t a confusing switch right at the start. There’s a 10-second countdown before going live, and my experience is that it’s best to make sure it’s live before starting in on the introduction.
Similarly, before clicking End Broadcast, make sure the top spot is focused on the appropriate person so other people saying goodbye don’t cause it to swap among different video feeds.
When you’re done with the hangout, click the hangup button (the phone icon) in the upper right corner. If everyone leaves a hangout, that has the same effect.
Joining a Hangout — On the other side of the equation, when you’re invited to a Google+ Hangout, the most reliable way to join in is to go to your Google+ home page and look in your notification stream for the invite. As noted before, the Google+ mobile apps will also notify you, and if you have Gmail’s Web interface open, you may also hear a sound and see a Google Talk message box appear in the corner with a Join Hangout link to click.
Once you click the appropriate Hang Out button or Join Hangout link, a Hangouts window opens, showing you a preview of your video image and giving you a chance to adjust audio and video settings via the gear button, before you click the Join button. (In general, the default audio and video settings are fine, unless you want to use a particular headset for audio input and output that’s not set as the system default.)
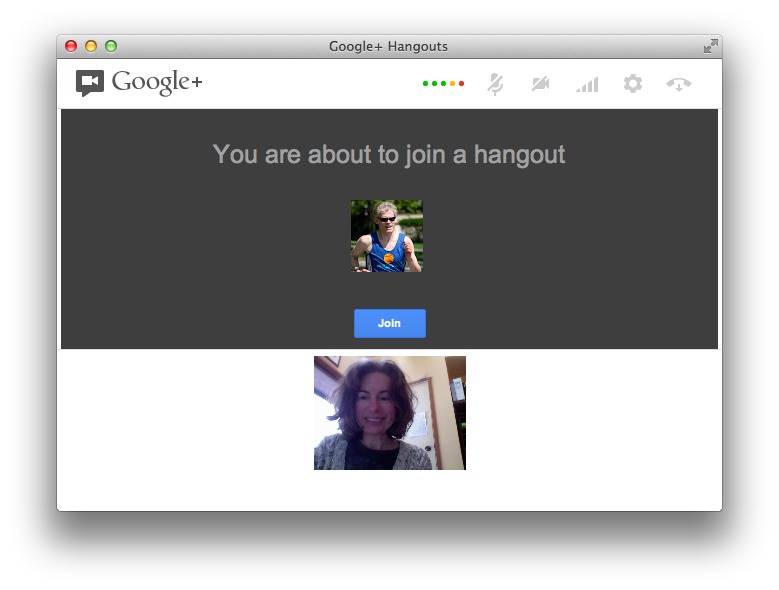
Thumbnails of each participant show up on the bottom of the window, with the large image up top showing the person who is currently talking. If you want a certain person to appear in the top spot, click that person’s thumbnail below to lock them in — a blue outline indicates which thumbnail is locked in the top spot. You can click a different person’s thumbnail to switch to them manually, or click the locked thumbnail to unlock it and let Google’s audio detection code take over again.

A series of buttons along the left side provides access to more functions. (Click the hamburger button at the top to toggle between icons and icons with text.) The Invite People button lets you add more people to the hangout, the Chat button opens a group text chat on the right side (handy for sharing links or for maintaining a back channel during a public Hangout On Air), the Screenshare button lets you share your entire screen or a particular window instead of your face, and the Capture button takes a picture of what’s
happening on screen and saves it to an album that’s shared with everyone invited to the hangout. (Fortunately, when someone opens Capture, everyone else is given the opportunity to turn off their cameras.)
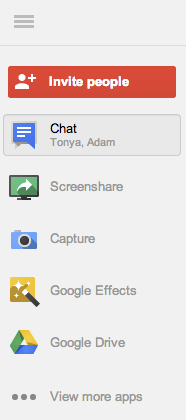
The rest of the buttons are apps that you can add or remove — Google Effects is particularly fun, letting you play sounds to all the participants, and add headwear, eyewear, and facial hair to the video image of your head. I’ve also loaded Google Drive, which promises to provide shared note-taking and sketchpad spaces. There are other apps that you can add, but I’ve had minimal success in using them.
Two quick observations about the screen-sharing capabilities. First, they’re view-only — you can’t control someone else’s screen through a hangout. Second, you can share your entire desktop (or, in my case, either of my desktops, since I have two monitors), or any particular window that’s open. That’s key, since sharing a specific window makes for a more-focused presentation that’s easier for participants to see.
I also want to share a screen-sharing trick we’ve used very successfully with our TidBITS Presents and Take Control Live presentations. Once you’re invited to a hangout, you can join multiple times from different computers logged in with the same Google+ account with no problem. So you can join once from a computer on which you’ll share your face, and a second time from another computer that will be sharing only its screen. That way you can have both your face and a presentation showing in the hangout at all times. Of course, you must mute the microphone and the speakers on the second computer to avoid feedback, and the people watching will have to lock the presentation in the top spot in the window to be able to read it.
Once you’re in a hangout, there’s not much to do but interact with your fellow participants. A few more usage tips:
- If something goes wrong and you have to relaunch your Web browser or even restart your computer, you can rejoin an in-progress hangout from your Google+ home page.
-
When you’re not talking, try to be quiet — don’t type on a loud keyboard, for instance — because Google’s audio detection code can notice the sound and move your picture into the top spot for everyone else. You can also mute yourself manually by clicking the microphone icon at the top the screen.
-
Particularly if there are a lot of people in the hangout, try not to interrupt others unnecessarily, since it makes the top spot change, which can be annoying for others.
-
Position the hangout window just below your computer’s camera, and try to make a point of looking either at the person in the top spot or, even better, straight at the camera. It’s too bad the thumbnails are at the bottom, since they tend to attract attention, and the best video results come from looking right into the camera.
-
Light is good — the more light the better, generally. If your room is dark, you can get inexpensive clamp-on shop lights from a hardware store to throw more light on your face.
-
If you’re the person who initiated the hangout, what you see is what will be recorded, so you may want to do a bit more work to focus the top spot on particular people when they’re talking, rather than letting Google’s audio detection code swap video feeds.
Watching a Hangout On Air Live or Later — To watch a public Hangout On Air to which you haven’t been invited, the only key is knowing its link, which the people giving the Hangout On Air can copy from within the hangout — there’s an Embed link at the top that provides both the raw URL and a snippet of code that enables the YouTube video player to be embedded in any Web page. When we do a TidBITS Presents event, for instance, we always copy that link and share it around on Twitter, Facebook, and Google+. In addition, we embed the video in a particular page that we’ve told our audience to visit at the appropriate time.
Watching one of these videos after the fact is no different than any other YouTube video, but we’ve learned some useful tricks for watching a Hangout On Air live.
- For reasons we don’t understand, some people have better luck viewing it on YouTube versus in the Google+ stream. Or vice versa. If you have trouble in one place, look in the other.
-
Although any modern Web browser should have no trouble viewing a hangout, since it’s just video, if you have trouble in one browser, try another. In particular, we recommend Google Chrome, since you have to figure that Google has tested the combination more than anything else.
-
Don’t want to watch in a tiny window? You can’t expand it to an arbitrary size, but you can make it full screen by hovering over the player and clicking the full screen button in the lower right corner.
-
What if you need to take a break during a public Hangout On Air? This is really clever on Google’s part — it turns out that the Hangout On Air player is like TiVo, in that you’re always playing recorded video. As a result, you can pause, go to the bathroom, and resume playing without missing anything. Of course, you’re messing with the time-space continuum when you do this, so don’t be surprised when your version of the hangout ends after the real one is done.
-
If something goes wrong and you get kicked out of the player, you can reload to get back to it. If you just want to pick up where you left off, that’s fine, but you can also click the Live button in the player to jump to the present.
-
Watching on an iOS device can be tricky. The Google+ app can’t do it, and Google’s YouTube app didn’t work either. We had no luck with Safari, but at some point recently the free Google Chrome browser started working fine. We had one report that Safari now works as well, but we haven’t been able to confirm that yet.
Give It a Try! — I’ll be honest. It took us a couple of tries to become comfortable with Google+ Hangouts, in part because it’s not nearly as app- and call-centric as Skype or iChat/Messages. But it’s more reliable than either, and has become our go-to solution for group calls, and even some person-to-person calls. Google+ Hangouts may not be the ultimate video chat service ever, but it’s pretty darn good, and we haven’t found anything better on today’s Internet, particularly for the price.
TidBITS Watchlist: Notable Software Updates for 8 April 2013
Snapz Pro X 2.5.2 — Ambrosia has released Snapz Pro X 2.5.2 to fix an issue with accurately capturing the precise pixels of a selection and bring back support for several styles of image borders (which was excised in version 2.5). The update also improves the reliability of movie encoding, improves compatibility with both OS X 10.8 Mountain Lion and Retina displays, and adds Chinese and Russian localizations. ($69 new, free update, 15.8 MB, release notes)
Read/post comments about Snapz Pro X 2.5.2.
BBEdit 10.5.3 — Offering a veritable festival of fixes, Bare Bones Software has released BBEdit 10.5.3 with over 50 bugs squashed (many of them also found in version 4.5.1 of the free general-purpose text editor TextWrangler). Most amusing is this release note:
The display glyph for invisible spaces (when “Show Invisible” and “Show Spaces” are both turned on) is now U+00B7 (MIDDLE DOT). If spaces don’t display when those settings are turned on, then your display font is missing that glyph, and you should report it to your font’s developer as a bug. (I would have used U+1427 (CANADIAN SYLLABICS FINAL MIDDLE DOT) for the humour value alone, but not enough fonts supported that glyph. Sorry.)
Amongst the other fixes that are exclusive to BBEdit 10.5.3, this update once again looks for URLs in plain text dragged into project lists to aid in the addition of remote file references from FTP apps, ensures that the Close All in Project command now works for instaprojects, fixes a crash that occurred when attempting to Convert to XML (under Markup > Tidy), ensures that relative path references in HTML and CSS documents are correctly resolved, and fixes a performance bug where the Functions floater would impose a “heavy penalty” in conjunction with a source file that contained a large number of function entries. ($49.99 new from Bare Bones or the Mac App
Store, free update, 12.5 MB, release notes)
Read/post comments about BBEdit 10.5.3.
TextWrangler 4.5.1 — Bare Bones Software has also released TextWrangler 4.5.1, mirroring the bulk of the fixes found in the simultaneously released BBEdit 10.5.3 — TextWrangler’s more powerful (and non-free) sibling. Among the highlights, the general-purpose text editor fixes an issue where the Text Encoding pop-up menu in the Save dialog didn’t reflect the current encoding setting; squashes a bug that used excessive memory and would crash the app when opening large, complicated files; reduces the amount of time displaying startup progress; fixes a bug that caused Show Hidden Items in the Open dialog to
be ignored; and corrects some artwork for enhanced viewing on Retina displays. (Free from Bare Bones Software and the Mac App Store, 9.6 MB, release notes)
Read/post comments about TextWrangler 4.5.1.
ExtraBITS for 8 April 2013
We focus on the underworld this week, with news that patent troll Lodsys is once again targeting iOS developers, the story of how security writer Brian Krebs unmasked the author of the Flashback malware, and why the iPad is a good bet for reading about super villains.
Patent Troll Lodsys Continues to Harass iOS Developers — Nearly two years ago, a company called Lodsys made news by suing a number of iOS developers, claiming their use of in-app purchasing infringed a Lodsys-owned patent. Apple intervened, saying that its patent license with Lodsys covers iOS developers. Despite that, Eric Slivka at MacRumors reports that Lodsys has filed ten more lawsuits against iOS developers, ranging from the large (Disney) to the small (TLA Systems, makers of PCalc). Apple has yet to respond to these
new suits.
Brian Krebs Identifies Author of Flashback Malware — Flashback was one of the most significant pieces of malware to affect Mac OS X, morphing quickly and infecting more than 650,000 Macs. Security writer Brian Krebs has now identified a 30-year-old Russian man as being responsible for Flashback. It seems unlikely this outing will make any significant difference in the guy’s behavior, but it’s interesting to have the human element brought into malware coverage.
Why the iPad Is a Superhero for Reading Comics — Jason Snell likes to read comics on his iPad and has the credit card bill to prove it! His piece in Macworld is an outstanding survey of the digital comic landscape, describing how traditional print comics correspond to digital offerings, comparing several methods for acquiring comics, and discussing which mobile devices work best for comics.