TidBITS#1195/14-Oct-2013
OS X 10.9 Mavericks is coming soon, and to get ready, you can order an early-bird version of Joe Kissell’s “Take Control of Upgrading to Mavericks” and pre-order Sharon Zardetto’s “Take Control of iBooks.” But Mac OS X isn’t the only thing being updated — 1Password 4 for iOS has been updated to bring back Wi-Fi Sync, and Amazon’s new Kindle Fire HDX models are coming with some major improvements. If you’re holding off on the iOS 7 update, you may have a lot of wasted space on your device; Adam Engst has the details and a possible fix. Alicia Katz Pollock joins us with a solution for jumpy cursors in Microsoft Word. Josh Centers rounds out the issue with a breakdown of how podcasts work in iTunes 11.1, a look at his home office, and our latest FunBITS feature about Rogue Amoeba’s Intermission, which is like an audio TiVo for your Mac. Notable software releases this week include KeyCue 7.0, Microsoft Office 2011 14.3.8, SpamSieve 2.9.9, and ClamXav 2.6.1.
1Password 4 for iOS Updated to Support Wi-Fi Sync
Earlier this month, when 1Password 4 was released for Mac, I raved about the return of Wi-Fi Sync (see “1Password 4 for Mac Better Than Ever,” 3 October 2013). There was just one problem: AgileBits hadn’t yet updated the iOS version to enable the feature.
Thankfully, 1Password 4 for iOS ($17.99) has now been updated to version 4.3 to support Wi-Fi Sync. Once you have the update, follow these steps to enable the feature.
In the Mac version of 1Password, choose Window > Wi-Fi Sync (Command-9) to display a pairing code.
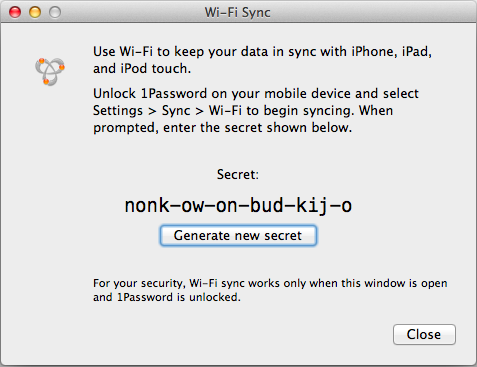
Then, in the iOS version of 1Password, tap Settings > Wi-Fi Sync, select your computer from the list, tap the Secret field and enter the code.
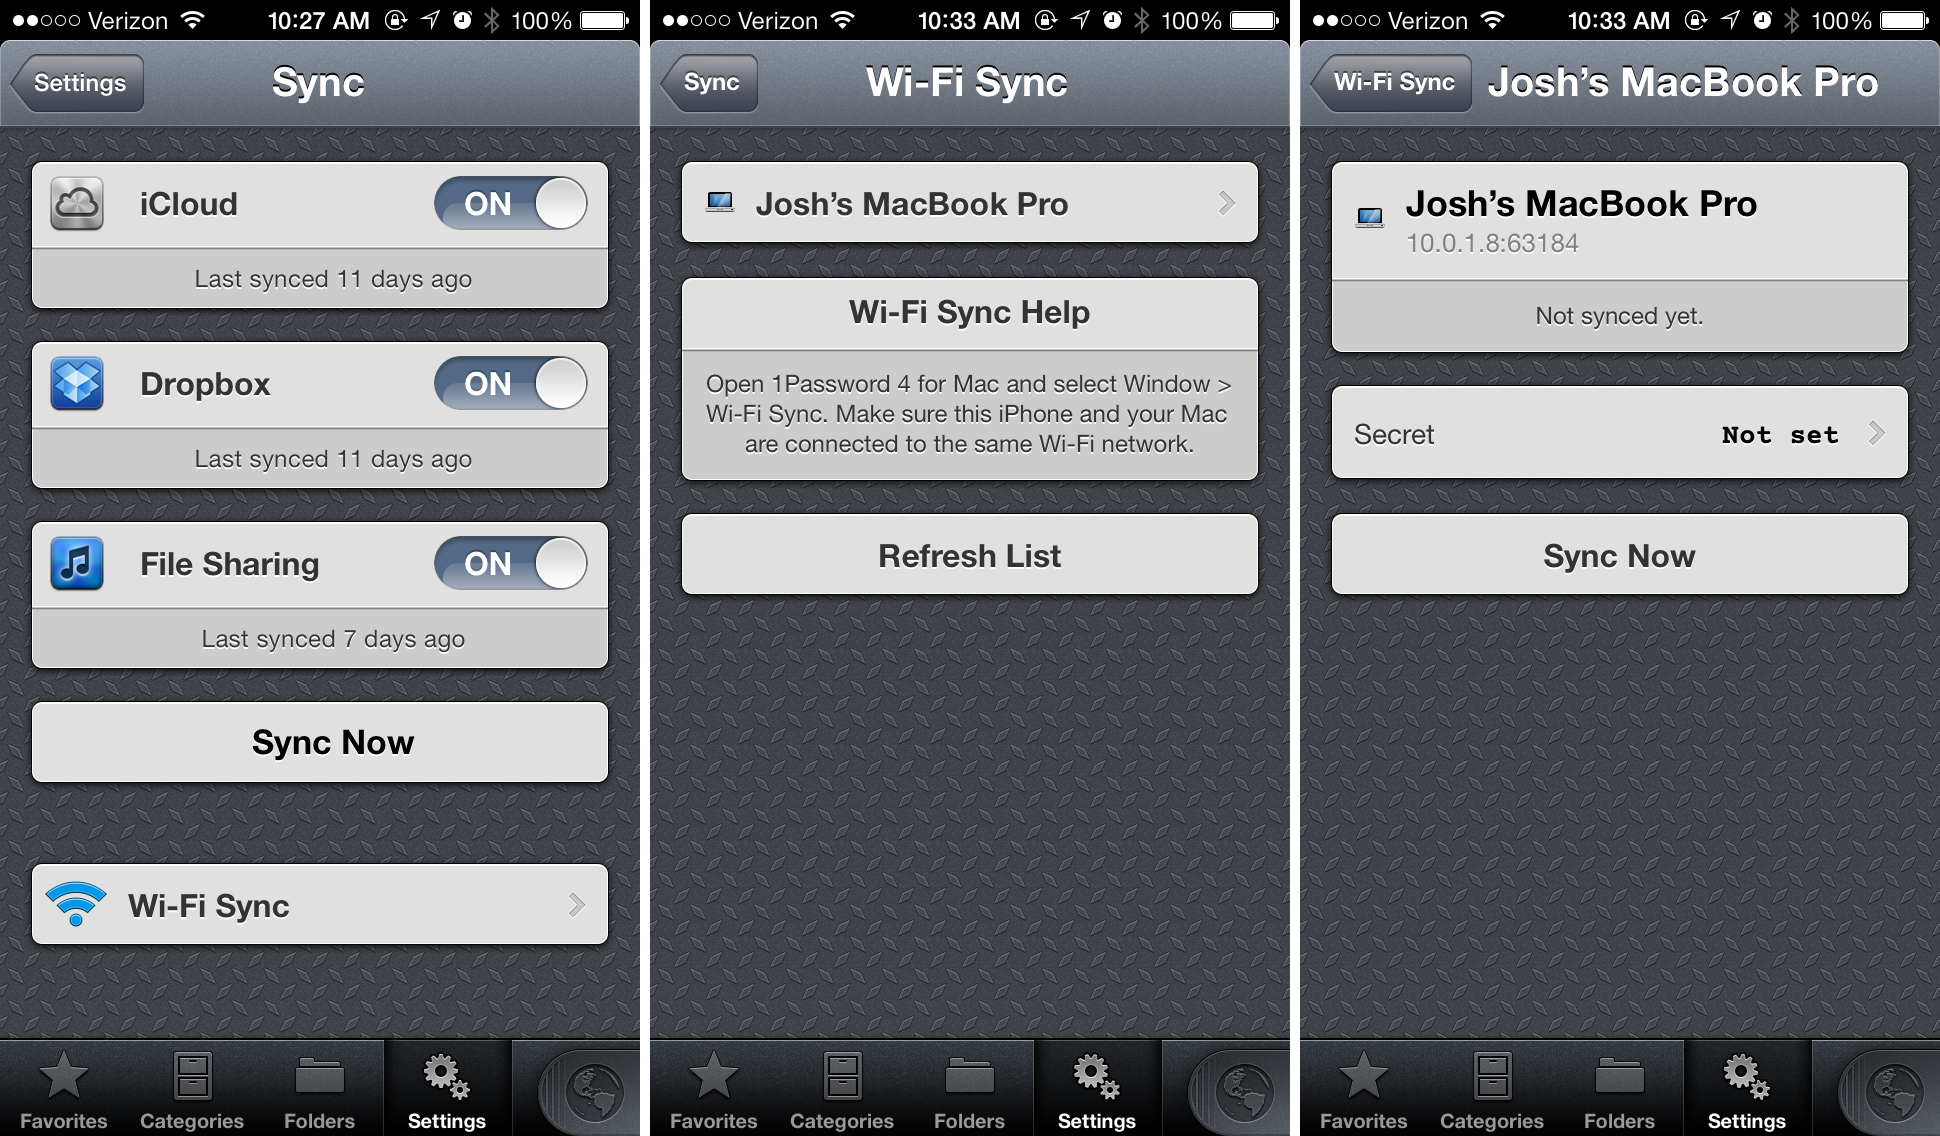
After you’ve finished the setup, to sync your logins over Wi-Fi, make sure you have the iOS app open and unlocked, and then choose Window > Wi-Fi Sync in the Mac app.
Prepare for Mavericks Now with Take Control Books
Apple has been touting the major features in OS X 10.9 Mavericks for months, and we’re eagerly anticipating better battery life, iCloud Keychain, Finder tabs, document tagging, the new iBooks and Maps apps, interactive notifications, better multiple display support, and AirPlay Display. To help everyone get ready to surf the Mavericks wave that we expect in late October, we have an early-bird version of Joe Kissell’s “Take Control of Upgrading to Mavericks” for sale now, along with Sharon Zardetto’s new “Take Control of iBooks” available for pre-order, both with introductory discounts.
Together, the books cost $25 normally, but you can save $7 on both, take $5 off “Take Control of Upgrading to Mavericks,” or drop $2 from the price of “Take Control of iBooks.”
Despite a San Diego heat wave (and the distractions of fish tacos and scenic beaches), Joe spent a good portion of the last few months researching the Mavericks installation process. In “Take Control of Upgrading to Mavericks,” you’ll stay in control as he explains how to ensure that your hardware and software are ready for Mavericks, prevent problems by making a bootable duplicate of your main disk, eliminate digital clutter, prepare your disk, and decide on the best installation method for your particular situation, whether you’re upgrading from 10.4 Tiger, 10.5 Leopard, 10.6 Snow Leopard, 10.7 Lion, or 10.8 Mountain Lion (phew!).
Because you may want to start preparing now, we’ve made the 75-page “Take Control of Upgrading to Mavericks” available before Mavericks is for sale. Once Apple has released Mavericks — and our non-disclosure agreement is lifted — we plan to publish a version 1.1 update with installation steps, post-installation advice, troubleshooting help, and all the good stuff we can’t talk about now. Look for “Meet Me Back Here on Upgrade Day” in the ebook to learn how to get the free 1.1 update, or just watch for an email message with direct download links.
When Sharon Zardetto pitched the idea of an ebook to document Apple’s debut of iBooks in Mavericks, we were all over the idea, since we have a lot of experience with iBooks in iOS already and know what sorts of questions people have about reading ebooks. Along with answering the big question of what the heck happens to your ebooks when you launch iBooks under Mavericks and agree to let iBooks take them over from iTunes, “Take Control of iBooks” will explain how Mavericks fits into your ebook-reading setup, plus help you become more adept with iBooks on an iPad, iPhone, or iPod touch. Sharon will discuss how to optimize your onscreen reading environment, use the
navigational controls (which differ depending on which type of ebook you’re reading!), manage bookmarks, highlight important passages, make notes, and more. You’ll also learn about auto-downloading and re-downloading purchases from Apple’s iBooks Store, and where to find ebooks outside the iBooks Store (yes, Apple has renamed it from “iBookstore” — sigh).
We plan to publish the full “Take Control of iBooks,” containing approximately 100 pages of tips and techniques, once Mavericks is available. For now, it’s available for pre-order with a 20 percent introductory discount as a one-page PDF. When it’s ready after Mavericks goes live, we’ll send purchasers email with direct download links.
Kindle Fire HDX Tablets Available for Pre-order
Amazon has announced two new tablets in its Kindle Fire line: the Kindle Fire HDX and the Kindle Fire HDX 8.9, featuring faster processors, a slimmed-down design, and a new operating system that brings a variety of enhancements aimed at making the Kindle Fire more competitive with Apple’s iPads.

The Kindle Fire HDX starts at $229, and features a 7-inch screen with a resolution of 1920 by 1200, a quad-core 2.2 GHz processor, 2 GB of RAM, a 720p front-facing camera, Dolby Digital Plus audio, Wi-Fi, and up to 17 hours of battery life. The Kindle Fire HDX 8.9 starts at $379, offering an 8.9-inch screen running at a resolution of 2560 by 1600 and up to 18 hours of battery life, and adding an 8-megapixel rear-facing camera.
Either tablet can come with or without lock-screen ads and be equipped with optional 4G LTE cellular connectivity and 16, 32, or 64 GB of flash storage, making the maximum price $424 for the Fire HDX and $594 for the Fire HDX 8.9. The base models of the Fire HDX are scheduled to ship 21 October 2013 and the HDX 8.9 on 7 November 2013, though build-to-order configurations will be delayed by several more weeks.
The physical design remains similar to previous models, but one annoyance has been addressed. The power button, which was awkwardly placed on the bottom of the device, has now, along with the volume buttons, been shifted to the back, which may not be an improvement. Both Fire HDX models are slightly thinner and lighter than the previous Kindle Fire HD models as well.
A feature that will be of interest to readers is dynamic contrast adjustment, which optimizes the color of each individual pixel based on ambient light to increase readability. According to The Verge, an Amazon executive demonstrated the feature by shining a bright flashlight on the screen.
Along with the HDX tablets comes Fire OS 3.0, dubbed Mojito. Existing Fire owners will be happy to hear that the sluggish carousel interface is now optional, with a grid-based alternative. The calendar and email apps have reportedly seen a massive improvement. You can now download Prime Instant Videos for offline viewing. A Quiet Time feature acts like Apple’s Do Not Disturb, and a global Quick Switch gesture enables moving between apps without returning to the home screen. Email has been enhanced, printing support has been added, and Amazon has improved the Kindle Fire’s accessibility tools.
One of the more interesting features is Amazon’s expansion of its X-Ray search and data feature. It can now show auto-scrolling song lyrics, identify songs playing in videos, and provide trivia from IMDB.
With the new Second Screen app, due with a scheduled mid-November update, the Fire gains AirPlay-like media beaming, which will be compatible with the Sony PlayStation 3, PlayStation 4, and some Samsung smart TVs. With Second Screen, you can mirror your Kindle Fire’s screen to your TV, just like mirroring an iPad’s screen via an Apple TV.
That update will also bring integration with the Amazon-owned Goodreads book recommendation site, let you organize your content into collections that sync across all Kindle devices and apps, allow you to free up space by moving infrequently used items to the cloud, and further enhance printing.
Perhaps the most interesting feature of the new Kindle Fire models is Mayday, which is like a built-in Genius Bar for your device. Tap the Mayday button and within 15 seconds you’ll enter a video chat with a support representative, who can control the device to show you how to use it and help solve problems.
Fire OS 3.0 also offers native Android compatibility, which should bring more Android apps to the Amazon Appstore, and it supports HTML5 apps.
Unfortunately, Amazon says Fire OS 3.0 is exclusive to the new Kindle Fire HDX models, so older Kindle Fire devices won’t be able to upgrade.
I was never impressed with the original Kindle Fire tablets, which were sluggish and felt cheap. However, with significant hardware upgrades and a streamlined interface, the HDX models push the Kindle Fire closer to being a true iPad competitor. And if it works, Mayday could be a godsend for the technically challenged and their beleaguered geek relatives.
Unwanted iOS 7 Occupying Space on iOS 6 Devices
Are you intentionally holding off on upgrading your iPhone, iPad, or iPod touch to iOS 7, perhaps until you’ve had a chance to look at someone else’s device to see if the visual changes will prove problematic? Maybe you’re unhappy about the requirement that you upgrade to iTunes 11.1 to be able to sync your Mac with your iOS device? Or perhaps you’re just hesitant to commit to an upgrade that you can’t back out of, since Apple has made downgrading to iOS 6 impossible, no matter how reasonable your issues with iOS 7 may be? (To be clear, I like many things about iOS 7; I just think it’s unacceptable to lock users into an upgrade if they have problems with it.)
Unfortunately, Apple’s zeal to encourage everyone to upgrade has resulted in an iOS 7 “tax” on the free space of some iOS 6 devices. In short, some people are discovering that iOS 7 itself has been automatically downloaded without having been requested. Once downloaded, it takes up a significant quantity of space on the device and can’t be easily removed. Thanks to alert reader Dave Laffitte for identifying this issue and running it down with Apple — I’ve been able to confirm his findings on my father’s iPhone 5.
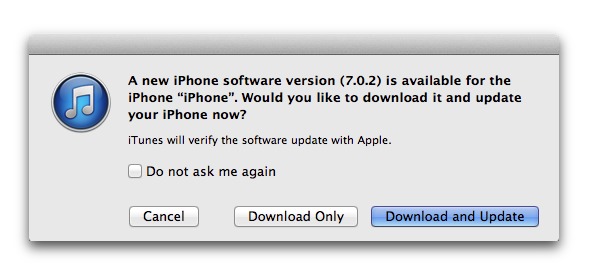
To discover if iOS 7 has automatically been downloaded to your device, navigate to Settings > General > Software Update. In that screen, you’ll see one of three things. If your device is too old for iOS 7 — our old test iPhone 3GS, for instance — you’ll see a message telling you that you have iOS 6.1.3, and that your software is up to date. On a newer iPhone, though, you’ll see a screen advertising iOS 7.0.2, with one of two buttons underneath: “Download and Install” or “Install Now.”

In the former case, you’re fine — iOS 7 has not been downloaded to your iPhone already. But if all you have is the Install Now button, that means that iOS 7 has been downloaded and is ready to install.
If we were talking about a tiny update, like the move from iOS 7.0 to 7.0.2, which was a 21 MB download, that wouldn’t be a big deal. But iOS 7 itself is far larger. As you can see in the screenshot above, when you’re given the opportunity to download iOS 7.0.2, it claims to be 666 MB. (Really, Apple? The number of the beast?) But it could be larger — the iOS 7 golden master was a 1.2 GB download from Apple, iOS 7 says it needs at least 2.9 GB of space to install, and both Dave and my father report that the Other category in the iTunes space usage chart is 3 GB in size. Additional types of data live in that Other category — photos and videos attached to texts in
Messages can cause it to balloon, in particular — but we’re pretty certain that the iOS 7 download makes up a good chunk of Other.
Regardless of the exact size, having Apple suddenly take over some significant amount of an iOS device for an update you don’t want isn’t a happy situation. Calls and Genius Bar conversations that Dave Laffitte has had with Apple indicate that it’s not intentional, nor is it happening to every iOS 6 device that could upgrade to iOS 7. Nonetheless, few Apple support representatives are aware of the problem, and only after calling AppleCare for a second time and asking for Customer Relations (as recommended by the Genius who was unable to help otherwise), did Dave get any useful information.
The Apple rep told Dave that the problem is related to using iTunes to back up and sync, at least on some devices, and indeed, on my son’s iPhone 4, which backs up to iCloud and almost never touches iTunes, iOS 7 was not automatically downloaded. (At first, it wouldn’t have been anyway, since he didn’t have enough free space for even a 666 MB download, but after we cleared some space, it still wouldn’t download automatically.) Other discussions indicate that there’s some combination of the device having Wi-Fi access and being charged that enables iOS updates to be downloaded; some people have prevented the problem by blocking mesu.apple.com at the router level,
but that seems excessive. It’s also possible that having agreed to let iTunes download iOS updates silently could be related.
Regardless of why it’s happening, the workaround suggested to Dave by Apple was to back up to iCloud instead of iTunes, erase the device with Settings > General > Reset > Erase All Content and Settings, and then restore from the iCloud backup. Obviously, a sync with iTunes will be necessary to restore media, but hopefully that won’t bring the iOS 7 update file back as well, and will somehow prevent iOS 6 from downloading the iOS 7 update again too. According to the Apple rep, restoring from the iTunes backup
would result in iOS 7 being downloaded yet again.
It remains to be seen if this workaround will be successful over time, but if iOS 7 has been downloaded to your iOS 6 device and you’re troubled by the loss of space, it’s worth a try. Please let us know in the comments what you experience!
Stop Microsoft Word’s Cursor from Jumping Around
It wasn’t a poltergeist, but for a short while, the supernatural seemed like a reasonable explanation for a customer’s problem. She was typing in Microsoft Word 2011 for the Mac, and the page kept jumping around, thanks to the cursor moving to different parts of the document without her doing anything.
At first I didn’t believe her, just as none of the other tech support professionals she consulted had, either. Microsoft’s Help Desk had her delete Word’s preferences, reinstall Microsoft Office, and jump through other essentially random hoops, all to no avail. They even suggested that perhaps her trackpad was accepting input from her wrists, but she wasn’t touching it. Then the problem happened to me while I was showing her how to work with numbered lists.
While investigating the problem, now that I knew she wasn’t hallucinating, I found a reference to a similar-sounding issue in an old Web post. Following that lead, I looked on the Review tab, where I noticed that, even though Track Changes was off, the Tracking panel’s view pop-up menu was set to Final Showing Markup. That’s the default setting, and shouldn’t have posed a problem, but when I changed the view to Final, the cursor movement suddenly stopped. The problem was reproducible in her other documents as well; toggling between Final and Final Showing Markup brought it back again.
I still haven’t been able to figure out why this happened, although I theorize that she may have made a change to her Normal.dot template while Track Changes was turned on, possibly pulling in a reviewer’s comment bubble. While this isn’t the only time I’ve seen this problem, it’s not common. Nonetheless, if you’re experiencing mysterious cursor movement in a Word document, give this solution a try.
Explaining Podcasts in iTunes 11.1
When Apple released iTunes 11.1, I was excited to see that it offered expanded podcast capabilities, such as iCloud syncing and the creation of smart podcast playlists, which Apple calls “stations” (see “iTunes 11.1 Adds iOS 7 Compatibility and iTunes Radio,” 18 September 2013). However, we’ve heard from a number of readers who are confused about how podcasts now work in iTunes, and after playing around with it, I was confused myself. After a couple of weeks of use, I think I’ve finally figured it out, apart from what I certainly hope are bugs in iCloud syncing.
I’ll start by explaining the easy stuff — subscribing and listening to podcasts, and managing stations — before delving into the confusing aspects of managing and syncing podcasts.
Subscribe to Podcasts — There are two ways to subscribe to a podcast in iTunes 11.1: inputting a URL manually or finding it in the iTunes Store.
To subscribe to a podcast manually, copy its URL (presumably from a Web site that’s offering it), and in iTunes, select File > Subscribe to Podcast. A window opens with a URL field. Paste in the URL and click OK.

To find a podcast and subscribe via the iTunes Store, click the iTunes Store link in the upper right of the main iTunes window or in the iTunes sidebar, if showing, assuming you’re not already in that screen. Click the Podcasts action label toward the top to see all available podcasts, or click the arrow to the right of the Podcasts action label for a menu of podcast categories. Of course, you can search for a specific podcast via the search box in the upper right, and many podcast Web sites link directly
to their pages in the iTunes Store.

Once you click a podcast to view its details, you can click the big Subscribe button in the left-hand column to subscribe.
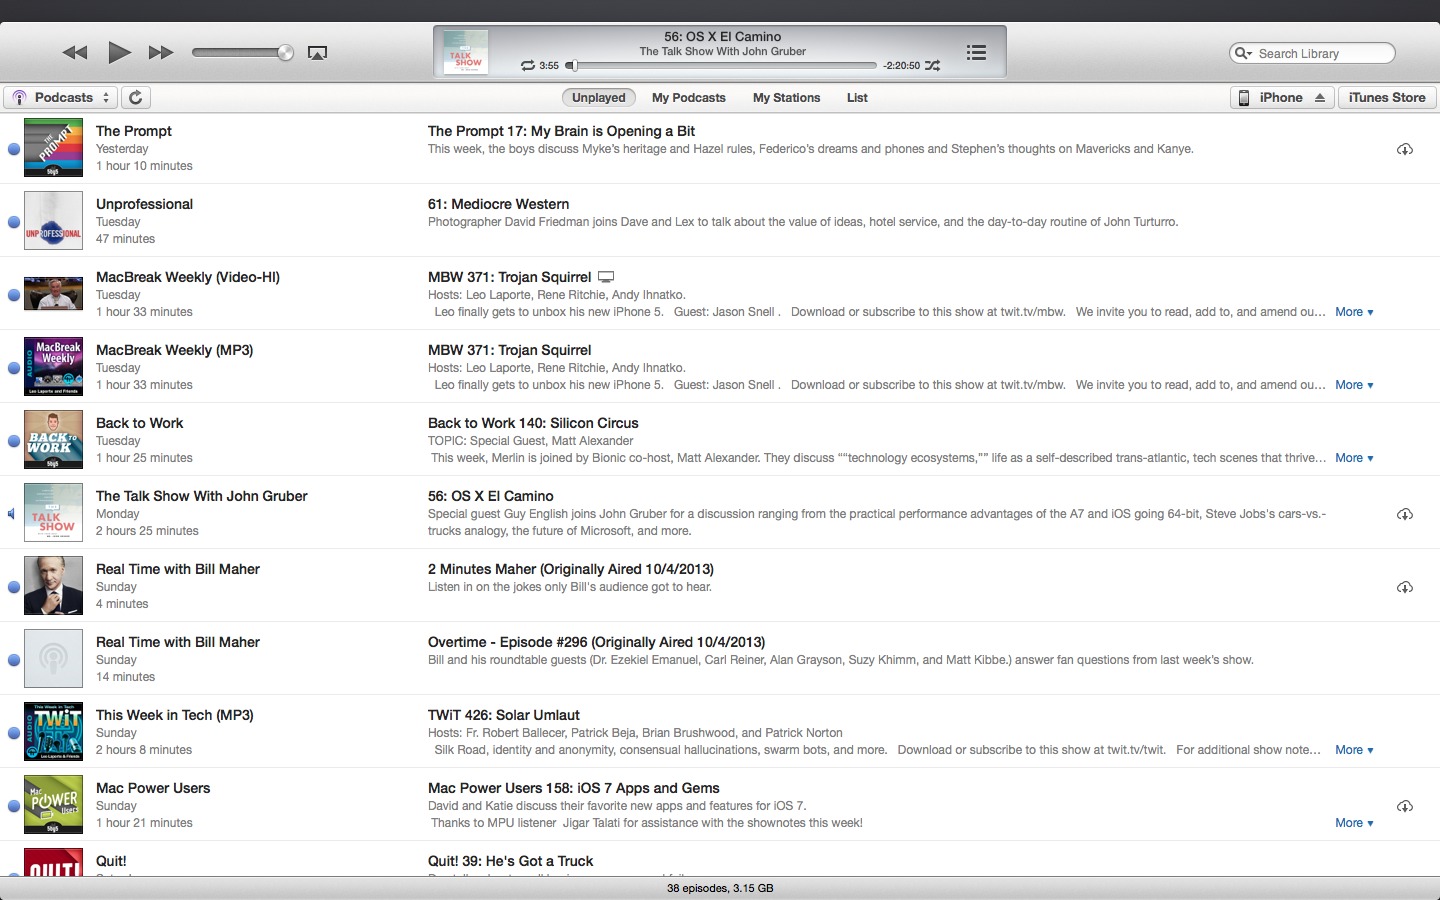
Listen to Podcasts — To listen to podcasts, first enter the Podcasts view in your iTunes Library. (If you’re not already in your Library, click the Library button on the right side of the iTunes window, and then choose Podcasts from the pop-up menu on the left or select it in the sidebar, if showing.) There are four ways to view podcasts, selectable by action labels in the top-center of the window: Unplayed, My Podcasts, List, and My Stations, the last of which I’ll discuss separately.
Unplayed shows unplayed individual episodes, sorted in order of release, with the newest episodes on top. To play an episode, just double-click it.
The My Podcasts view organizes your podcasts by show in the left column, in no particular order, although you can drag podcasts within the list to rearrange them. Click a show to see a list of available episodes and double-click any episode to play it. If you want iTunes to refresh the list of episodes to pick up new ones, click the refresh button, to the right of the Podcasts pop-up menu.

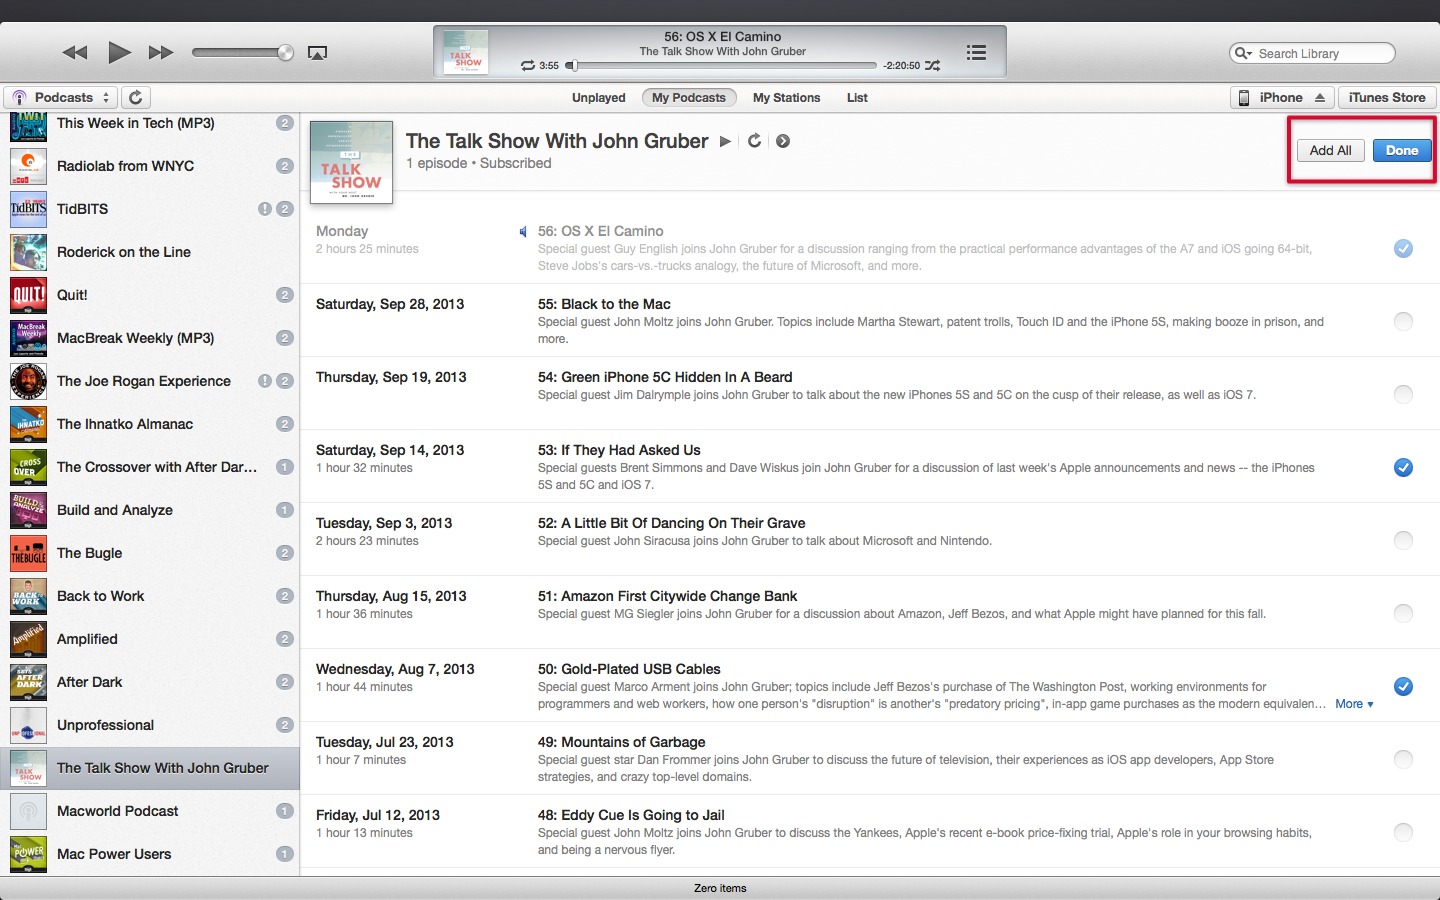
If the episode you want isn’t showing, click the Old Episodes button to the right of the screen to reveal the entire list of available episodes. To add an episode to your listening queue, click the circle to the right so that it’s filled by a checkmark, or click the Add All button at the top. Click Done and the episode(s) will be in the list.
The most familiar way to view your podcasts is probably the List view, which presents your podcast subscriptions and episodes in classic iTunes “spreadsheet” format. You can click column headers to sort podcasts by length, release date, or any number of other options available by Control-clicking a column name and adding a new column. Click the arrows toward the left of each podcast name to expand a subscription and view individual episodes. When a subscription is collapsed, it’s described by the
information from the latest episode.

Once you’re listening to a podcast in iTunes, you can use the media controls in iTunes or your keyboard’s media keys to control podcasts, but not very well in the context of podcasts. For instance, the Next Track button skips to the next podcast episode in the list, and the Previous Track button skips to the previous podcast episode in the list. And if you’re already on the first podcast in a list, it jumps back to the beginning of the episode. That is all rational, but wrong.
Why? Most podcast listeners are going to spend more time skipping around in an episode than between episodes. The reasoning is obvious. Most songs last less than five minutes. Skip between songs and lose your place? Not a big deal. But many podcasts last an hour or more, making playback position inside a single audio track much more important than which track is playing. If I accidentally lose my place in a lengthy podcast by clicking a media control button in iTunes, I’m going to be angry.
I almost never want to skip to the start of a podcast, and if I do, I can use the scrubber. The most common controls I want in a podcast player — which Instacast and Downcast both offer — are those that let me skip forward or back by a few seconds, either to skip the same ad I’ve heard hundreds of times or to catch something I missed.
Fortunately, if you use the Keyboard Maestro macro utility from Stairways Software, I have a solution for you. With help from Justin Blanton, I’ve created a pair of macros to skip forward or back 30 seconds in iTunes. Once you’ve downloaded them and installed by double-clicking the .kmmacros file in the Finder, you can invoke Skip Forward by pressing F7 and Skip Back with F9. If you’re using an Apple keyboard, that may require holding down Fn and pressing the previous (F7) or next (F9) track keys to activate the macros.
Station to Station — If you click the My Stations action label, you can create and listen to collections of podcasts of your choosing, which Apple now calls “stations.” Why not just call them “playlists,” like normal people would? Because station lists are separate from music playlists in iTunes.
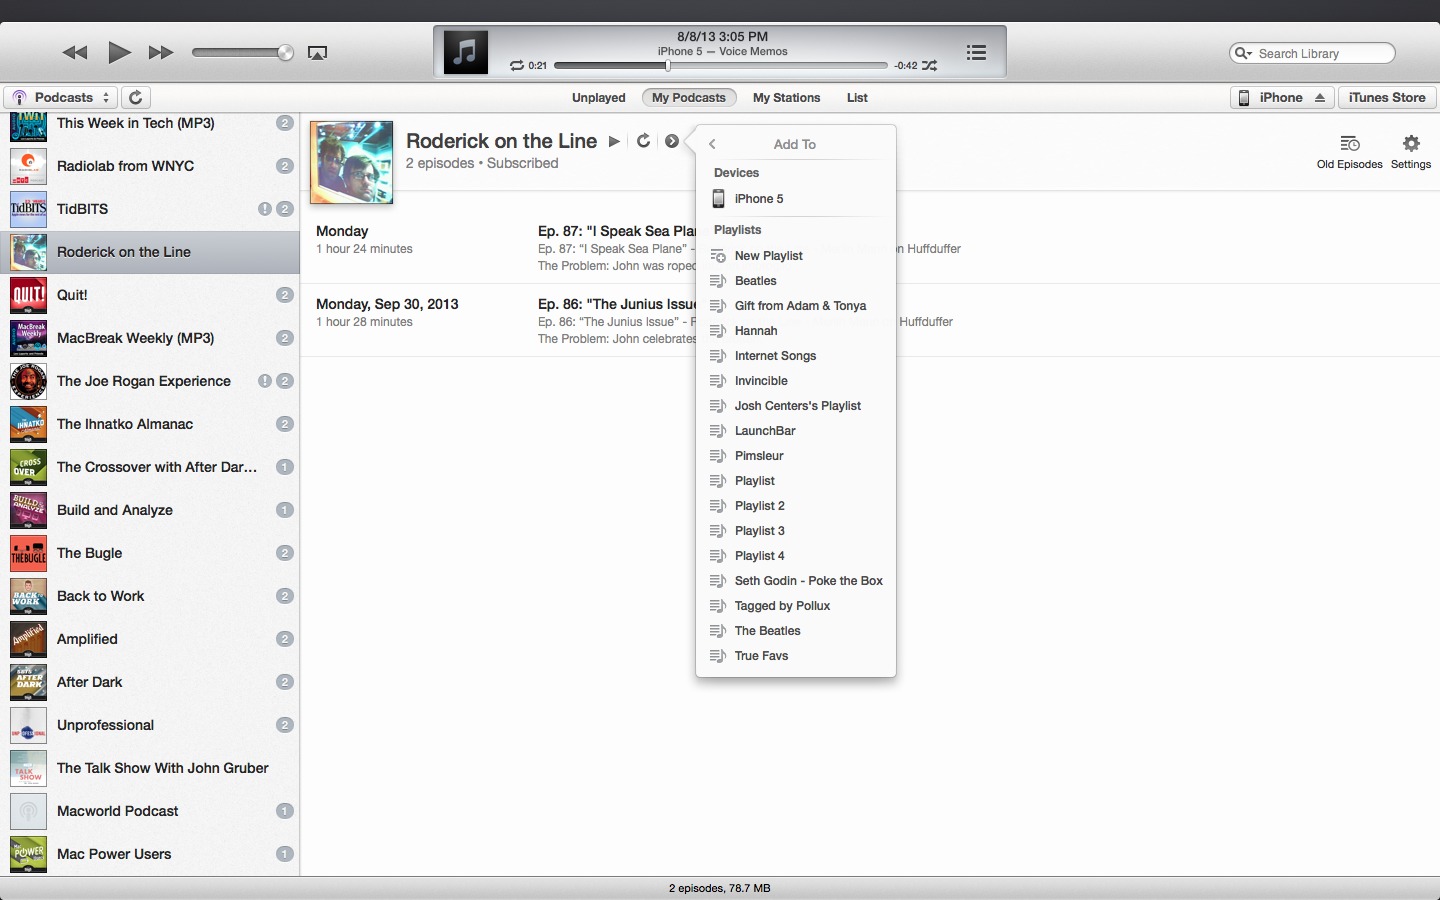
You can still add individual podcast episodes to playlists, which could be useful for playing a series of episodes on an older iPod, for instance. To do that, under My Podcasts, choose an episode (it must have been downloaded already), click the arrow to the right of the podcast title, click Add To, and then choose the desired playlist from the menu. However, if your playlist is stored in iCloud through iTunes Match, adding a podcast to the playlist will remove the entire playlist from iCloud and make it available only on your computer.
In most situations, I don’t recommend using playlists for podcasts. Stations are designed specifically for podcasts, and, in theory, sync to the Podcasts apps in iOS and on the Apple TV.

By default, iTunes gives you a station called Most Recent that features the most recent episode from each of your subscriptions. But you’re not limited to that station. To get started with adding a new one, click the plus sign at the bottom of the My Stations sidebar, and enter a name for the station.
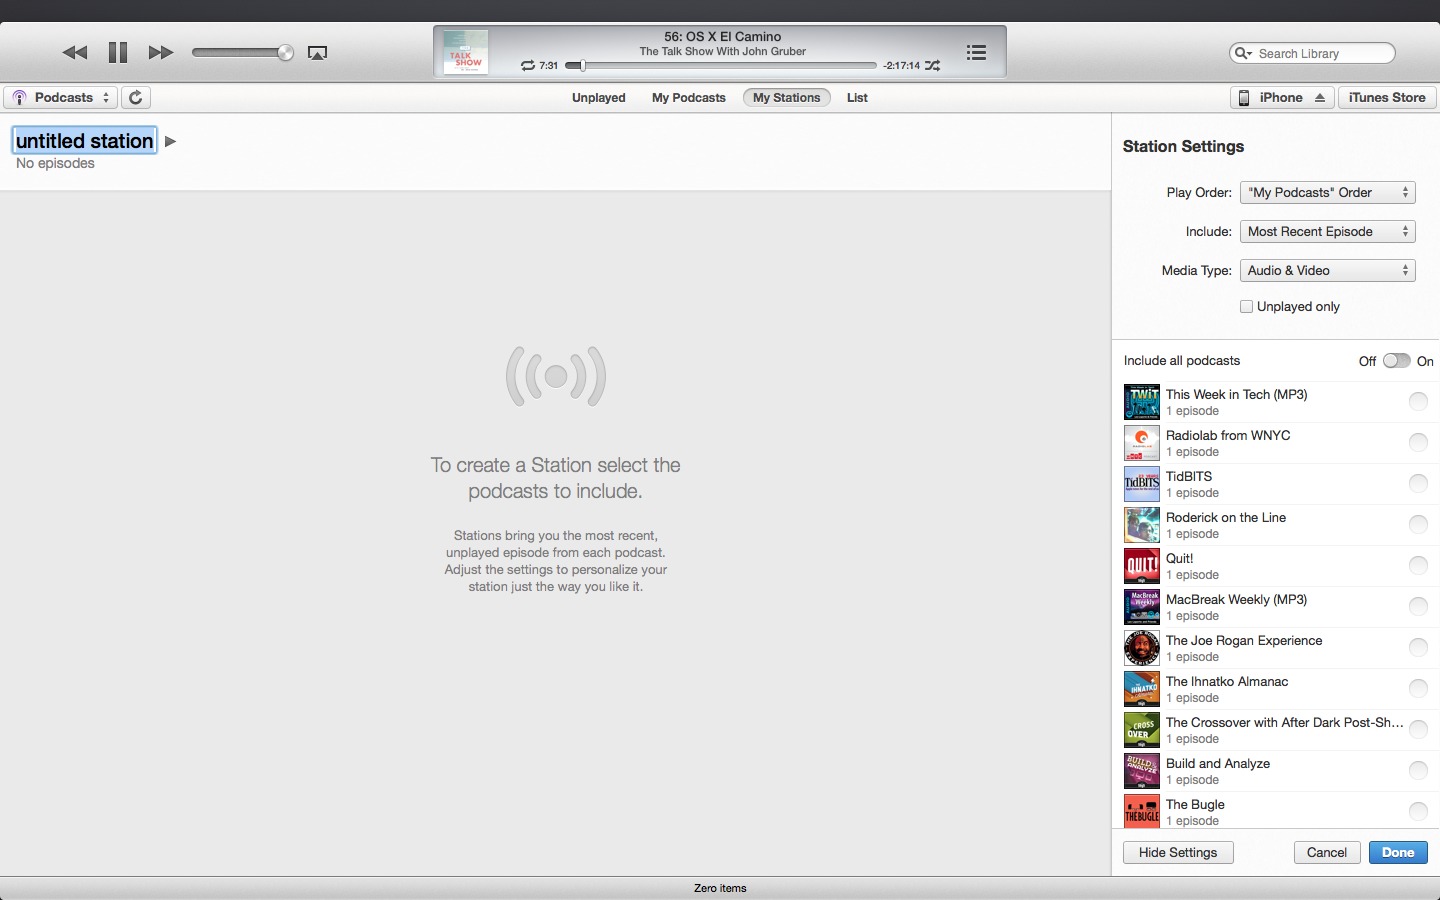
Apple provides a number of helpful options for stations. You can include all subscribed podcasts or choose them individually from the list. In the station settings, you can configure play order; how many episodes of each podcast to include; and whether you want audio, video, or both. You can also choose to include only unplayed podcasts. With these settings, you could easily set up a station that includes only the last two unplayed video podcasts from the TWiT Network, for instance, or the most recent episode from each of
four food-related podcasts you listen to.
Back in the My Stations view, double-click a station in the sidebar list to start playing its first episode, or double-click an individual episode in the list to the right. As noted previously, the media keys cycle through episodes in the station.
Manage Podcasts — So far, so good. Where things start to get confusing is when you want to delete or unsubscribe from a podcast. Part of the confusion stems from the fact that iTunes can now play either downloaded podcast episodes or episodes stored in the cloud. If an episode isn’t stored locally, its description will be badged with a cloud icon with an arrow in the center.

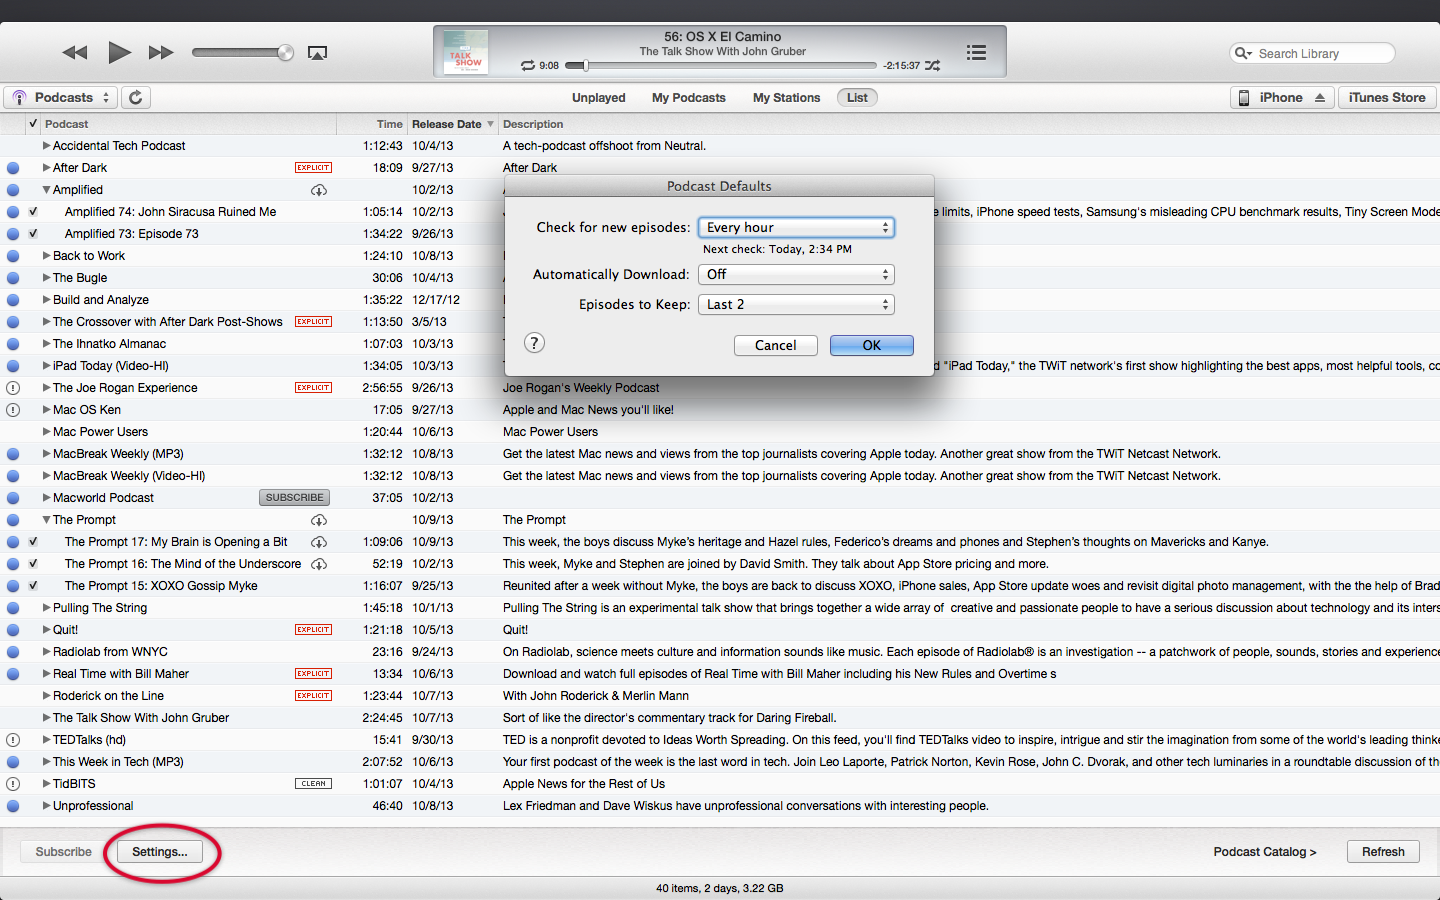
Is it preferable to download episodes or stream them from the cloud? My take is that, unless your Mac is frequently offline, it’s generally better to turn off downloads so you don’t have to waste disk space on them. To set defaults for all podcasts, enter the List view, click the Settings button at the bottom left of the screen, and then set Automatically Download to Off. In this dialog, you can also tell iTunes how often to check for new episodes and how many episodes to keep.
To override the default settings for an individual podcast, go the to My Podcasts view, select a show in the sidebar, and then click the Settings button in the upper right corner of the screen to reveal a pane that lets you tweak the options and set the sort order. Click Done when you’re finished.
To remove an episode, subscription, or station, select it, click Delete, and confirm your action. If you’re deleting something that’s associated with local files, iTunes asks if you want to delete them as well, but it does so only if they’re in your iTunes Media folder. Now that iTunes 11.1 can stream podcasts from the cloud, there’s much less reason to download at all, as I mentioned before, and there’s little worry about deleting local files since you can always get the episodes back from Old Episodes.
Figure Out Sync — In theory, iTunes 11.1 syncs your podcast subscriptions, stations, and playback positions via iCloud among iTunes, the iOS Podcasts app, and the Apple TV Podcasts app. (Check your settings to make sure syncing is enabled everywhere. In iTunes, look in the Store pane of the Preferences window. In iOS, look in Settings > Podcasts. On an Apple TV, make sure you’re signed into the same iTunes account under Settings > iTunes Store.)
What this means is that you should be able to subscribe to a podcast and have it appear on your Mac, iPhone, iPad, and Apple TV. Listen to part of an episode on any one of the devices, and when you pause and later use another device you should be able to pick up exactly where you left off. That’s how it works, in theory. In theory, the U.S. government is functional.
The reality is that syncing of this information through iCloud is confused beyond belief, rife with incorrect and inconsistent behavior. In extensive testing, we experienced a variety of problems, at least some of the time. Sometimes one problem went away, only to be replaced by another.
- Podcast subscriptions disappearing and reappearing randomly, and differently on four devices
- Subscriptions syncing from one device to another in only one direction
-
Available episodes in a podcast differing between devices
-
Stations syncing without their underlying subscriptions syncing as well
-
Playback position syncing from iTunes to an iPhone, but not an iPad
If you’d rather sync podcasts via USB between iTunes and your iOS device, you can still do so, but it’s not clear to me if it works any better (and of course won’t work with the Apple TV). If you’re accustomed to listening to podcasts in the iOS Music app, sorry. Apple stripped all podcast functionality from the Music app in iOS 7, so you must now use the Podcasts app to access podcasts synced from iTunes. (If you use Downcast for iOS, which also relies on iCloud for syncing, all of Apple’s apps will pick up your Downcast subscriptions, but Downcast won’t see changes from Apple’s apps — see “Five Alternatives to Apple’s Podcasts App,” 22 December 2012 and “Downcast Comes to Mac, but Lacks Instacast’s Polish,” 3 August 2013.)
Just Use Instacast — After trying to use iTunes 11.1 to listen to podcasts for a few weeks, I’m going back to Instacast for Mac and iOS, and I suggest you do so as well (see “Instacast for Mac Fills the Desktop Podcatcher Gap,” 31 May 2013). Even after completely overhauling the way podcasts are handled, it’s obvious that Apple just doesn’t get it. Syncing is broken, iTunes doesn’t offer sensible controls for podcast listening, and the Podcasts app’s iOS 6 aesthetic looks and feels horribly dated.
What’s so frustrating is that it’s almost good. If Apple fixed syncing so everything synced bidirectionally among all apps, implemented better playback controls in iTunes, and redesigned the Podcasts app for iOS 7, then the company would have a decent solution for most people. But after watching several attempts over recent years, I’m convinced that Apple just doesn’t have the interest in applying its usual attention to detail to podcasts as it does to other things.
For full attention to podcast detail, turn to Vemedio, developers of Instacast, which has been updated, for free, for iOS 7. The Mac version of Instacast is also excellent, and the sync between the two is nearly perfect, other than a brief outage earlier this month that was nicely and apologetically explained by Vemedio. Together, both apps cost $25, but if you’re a frequent listener who likes to switch between devices, the investment is well worth it.
Setting Up a Home Office with Josh Centers
When I was hired as the Managing Editor of TidBITS in May 2013, I was excited to be working from home, where I’d be able to spend more time with my family and less time on the road. Plus, I’d be able to choose the tools I use for my work. But every silver lining has a cloud: I was suddenly responsible for equipping my own home office.

Here are the tools I chose, why I chose them, and how I use them. Needless to say, I don’t expect that you’ll all blindly follow my lead — that would be nuts — but I hope you can take some of the thought I put into my choices and apply it to your own situation as you equip or update your work environment.
Computer — I actually purchased the laptop I use here at TidBITS almost a year before I was hired: a 15-inch MacBook Pro from late 2011.
It was my first Apple computer since the trusty iBook G4 I used in college, which I replaced in 2008 with a custom PC I built with gaming in mind. While the PC still worked great for games in 2012, it no longer suited my needs. I found myself needing the tools available on a Mac, the PC was both loud and power hungry, and all the wires and blue LEDs, which seem to be a requirement in most consumer electronics, were driving me crazy.
I’m something of a minimalist. My bedroom at the time didn’t even have a proper bed. Instead, I slept on a Japanese futon. I wanted something self-contained — either an iMac or a MacBook. The design of the iMac appealed to me, but there’s a big problem with it: the hard drive is a nightmare to access. I’ve learned over the years that if there’s one part that will fail or that I’ll outgrow, it’s the hard drive. So that ruled out the iMac and MacBook Air.
The basic 13-inch MacBook Pro is Apple’s most popular computer, but it’s not a great machine. I know, my wife owns one. It’s slow, the screen is cramped, and the video card is weak, making it frustrating for even occasional gaming. The 15-inch model is the sweet spot — fast processor, decent video card, decent screen, but it starts at $1,799, which is $600 more than the low-end 13-inch model.
But here’s a bit of buying advice for Macs. Refurbished models purchased from Apple are less expensive, are in like-new condition, and feature the same warranties and AppleCare options as a new machine. If you want the best deal, keep your eye out for a refurbished model right after a new model debuts. There’s even a site that will notify you by email when the refurbished product you want is on sale. I purchased my refurbished 2011 MacBook Pro just after the 2012 model and Retina display models were introduced for only $1,359 — $441 less than I would have paid the previous month. Since being able to use Mac software turned out to be essential to getting this gig with TidBITS, it was worth
every penny.
Something I like about the non-Retina MacBook Pro is that the RAM and hard drive are user-serviceable, without voiding the warranty. The first thing I did was upgrade the RAM from 4 GB to 8 GB. That upgrade cost only about $40 at the time, but made a massive improvement in performance — any time you can take a Mac into the 8–16 GB of RAM range, you’ll appreciate the difference.
SSD — After the RAM upgrade, my MacBook’s day-to-day performance seemed great… until I started working for TidBITS. Working on my Mac all day made me painfully aware of any performance lags, especially when switching among the dozens of windows I have open at any given time. The worst was the long, long delay when I woke my Mac up from sleep. Ironically, since OS X dumps the contents of RAM to the hard disk when the computer sleeps, my RAM upgrade probably made this worse. (There is a workaround — see “SmartSleep Solves Safe Sleep Situation,” 15 March 2008.)
Hard drives are the main bottleneck in a computer’s performance, especially the slow, yet power-efficient 5400 RPM drives included with many Macs. It doesn’t matter how fast your processor is if it takes forever to access your data.
One option was to replace the unused optical drive with an SSD, like Jeff Carlson did (see “SSD Optical Drive Replacement Speeds a Sluggish MacBook Pro,” 20 July 2012), leaving the factory 500 GB hard drive for secondary storage. I decided against this approach for a few reasons, none of them particularly major. One, I would have to buy a bracket and mounting hardware. Second, it would have voided my AppleCare warranty, while simply replacing the hard drive does not. Third, it would have meant keeping track of multiple internal disks, which complicates usage a little.
When choosing my SSD, I turned to The Wirecutter, a fantastic site that focuses on picking the best product in any given category. (Full disclosure: I sometimes write for their sister site, The Sweethome.) Their SSD pick at the time was the Samsung 840, which also happened to be the cheapest 500 GB SSD I could find on Amazon. Say what you will about Samsung smartphones, but I’ve always had good luck with their components and consumer electronics. The 840 isn’t as fast as some competitors,
but it’s far faster than a spinning hard disk, and is relatively cheap for its capacity. (Note that The Wirecutter now recommends the Samsung 840 EVO SSD.)
I also ordered a toolkit to perform the swap. It was intended for mobile phones, but the set of screwdrivers and spudgers was perfect for opening my MacBook.
Before cracking open my MacBook, though, I had to transfer over 200 GB of data from my hard drive to the SSD. For that, I purchased an external USB enclosure from OWC, inserted the SSD, then used Carbon Copy Cloner to clone my hard drive to the SSD. SuperDuper is another popular tool in this space, but Carbon Copy Cloner can copy OS X 10.8 Mountain Lion’s Recovery Partition, while SuperDuper can’t. The entire process took about eight hours. But once that was done, I just had to remove the SSD from the enclosure and
install it in my MacBook, following a handy iFixit guide. The actual installation took no more than 30 minutes.
The only drawbacks were that I lost my Boot Camp partition, as Carbon Copy Cloner can’t clone that, and I had to reactivate some of my software after booting from the SSD. But these small snags were worth it. Almost everything on my Mac is instant now, even waking from sleep, which used to take several minutes.
Monitor — My second major upgrade was an external monitor. It’s a simple equation: more screen space means more productivity.
Ah, but which one? The Apple Thunderbolt Display would seem to be a natural — it’s a gorgeous monitor and includes a built-in Thunderbolt dock. However, John Siracusa has spoken at length about the problems he’s had with his Thunderbolt display. Also, it costs nearly $1,000.
I considered the inexpensive and well-reviewed Monoprice monitors, which use the same panels as Apple’s display, but as Shawn Blanc points out, since they don’t have built-in DisplayPort, you’re left to rely on flaky adapters.
Again, I visited my friends at The Wirecutter, who recommend the Dell UltraSharp U2713HM. It sports a 27-inch screen, a non-glossy matte display, and has multiple input ports — even DisplayPort and HDMI. Better yet, it cost only $585 at the time — almost half the price of Apple’s Thunderbolt Display, leaving room in the budget for other devices.
I’m not a fan of Dell products overall, but this monitor is fantastic. Out of the box, it was easy to set up, the screen is bright and crisp, and the color is fantastic. Also, it allows for audio pass-through from the DisplayPort cable, so you can plug in headphones, speakers, or even a sound bar.
I do have one concern: the built-in USB 3.0 hub. In theory, it’s great, but if you turn the monitor off, it cuts the power to the USB ports. If you were to plug a hard drive into the monitor, you’d risk data loss and corruption if you turned the monitor off rather than letting it go into power-saving sleep mode. Fortunately, the monitor goes into sleep mode quickly, so you never really need to turn it off. Worth keeping in mind, but as a monitor, the U2713HM is fantastic.
What did take getting used to after the relatively small MacBook Pro screen was juggling windows on the massive 2560-by-1440 desktop. Fortunately, the free BetterTouchTool enables Windows 7-esque window snapping to the sides of the screen. I usually keep Chrome on one side and BBEdit on the other.
Microphone — When I wrote my first TidBITS article, I was taken off guard by having to record an audio version of the article. My first few recordings were rough — I had no idea how to edit and I was recording with the EarPods that came with my iPhone 5. While the EarPods weren’t terrible, as a podcast fan, I was adamant about improving my sound quality.
But microphones are expensive! The Rode Podcaster is the podcast standard, but costs over $200. A kit with the shock mount and stand costs over $300. I asked for recommendations, and went with the Blue Yeti that Glenn Fleishman was using at the time. The Yeti can be had for around $100 — still not cheap, but is decent enough for professional work and less than half the price of the Podcaster.
I record into Rogue Amoeba’s Audio Hijack Pro, monitoring my recording with an old pair of Sony MDR-V6 headphones, which are professional quality, inexpensive, and built like a tank, and then I transfer my recordings into GarageBand for editing.
Data Ports — As I said earlier, I hate wires. But for some applications, Wi-Fi just isn’t enough. In particular, our staff Google Hangouts tend to stutter quite a bit over Wi-Fi. An Ethernet port in my office was essential.
I had an unused phone jack in my office, which was the perfect spot to install it. I picked up a three-hole Keystone jack from Monoprice and inserts for a Cat6 Ethernet coupler, a phone jack, and some HDMI couplers. The couplers let me run pre-made cables without having to crimp my own. I then ran an Ethernet cable from the
AirPort Express in our living room to the hall closet that sits on the opposite wall from my desk, widened the existing phone cable hole with a utility knife, then plugged the Ethernet cable into the back of the coupler. On the office end, I ran another Ethernet cable from the port into my MacBook.
All in all, it took less than $15 and less than an hour of labor to install a plethora of data ports in my office. I have yet to use the HDMI or telephone ports, but they were so cheap and easy to install, I figured, “Why not?” One day, I may route an HDMI cable from the Playstation 3 in the living room to the Dell monitor in the office — just because I can.
Desk and Chair — All this hardware was great, but it has to live somewhere. When I started, I was using a cheap plastic desk borrowed from my brother in-law. When he finally asked for that back, I switched to a small, tall table that we kept in the music room. Standing desks are popular these days, and at Adam’s urging, I gave it a shot. The table even had a matching tall stool for when I wanted to sit down.
But after a few weeks, I decided that a standing desk isn’t for me. While our own Glenn Fleishman and Macworld’s Lex Friedman are racking up the miles on their treadmill desks, I’m lucky to walk to the mailbox without twisting my knee. Plus, I found standing distracting. Like many writers, sitting helps me concentrate.
But the problem is that I can’t use just about any desk I find in a furniture store. They’re either too tall, which hurts my wrists, or don’t offer enough leg room. Many folks suggested Ikea, but from where I live in rural Tennessee, the closest Ikea store is four hours away in Atlanta, Georgia, and their shipping costs are outrageous.
Fortunately, I was able to hire a friend’s dad to build a desk for me out of solid oak — to my precise specifications. I used an ergonomic calculator to gauge the ideal height, and took multiple measurements to ensure that it fit cleanly in my office corner. The top of the desk is smooth as glass, yet dark, so I have no need for a mousepad. I excluded drawers and other frills to maximize leg room. (You can see it in the picture at the top of the article.)
Having the desk built wasn’t cheap — around $350 — but it was a worthwhile investment in the spot where I sit for hours every day, and still a bargain compared to many high-end desks. But what can’t be measured is the satisfaction it brings me. It feels great to sit at something so nice.
As for my chair, I would have loved to buy something as nice as the Steelcase Leap, but I couldn’t stomach spending $800 on a chair alone. Instead, I tried dozens of office chairs in local stores, and settled on the Staples Ackerley. It comes with a five-year warranty and its recline suits my slack posture well. I wish it had a little more padding in the seat, but for under $100, I can’t complain too much.
Magic Trackpad — Sitting at a computer for nearly 17 years has done a number on my wrists. I’m plagued with RSI problems. My wrists click and crunch when I rotate them, and my forearms are often painfully strained, especially when I click a mouse.
However, after setting up my new desk and monitor, typing on the MacBook became impractical. Its screen blocked part of my Dell monitor, and its extra height off the desk strained my wrists. I switched to an Apple Wireless Keyboard and Magic Mouse I had laying around, but clicking the mouse bothered my forearm. I tried using the MacBook’s trackpad in conjunction with the keyboard, but that was also not an ideal solution.
So I bit the bullet and picked up an Apple Magic Trackpad, and I couldn’t be happier. Moving my fingers instead of my wrists to move the cursor is less painful, and with tap to click enabled, I put less strain on my forearms.
I love how responsive Apple’s trackpads are. They’re sensitive enough that I can even use them for first-person shooter games. If you suffer from RSI, I would strongly encourage you to try the Magic Trackpad.
Coffee — One of the things I looked forward to most with moving to a home office was a return to fussy coffee, as opposed to the burnt motor oil popular in offices across the country. I already had a trusty AeroPress, which is sort of a coffee syringe that’s popular with coffee enthusiasts. But to get the best coffee, you have to grind your own beans, and cheap grinders don’t cut it. Blade grinders burn the beans as they smash through them, and cheap burr grinders are just junk.
So I splurged on the least expensive recommended burr grinder: The Barazta Encore, which retails for $145 and which I snagged from an Amazon Warehouse deal for $115. Not cheap, but I use it every day, so it feels like a worthwhile investment. Also, Barazta’s support is top notch. My grinder came with a cracked hopper, and Barazta promptly sent me another one, no questions asked.
I also splurged on a subscription to Tonx, a subscription coffee service. They scour the world for the best beans, roast them, and then deliver them to your door within three days. It’s not for everyone. Two 12-ounce bags cost $38 per month, and you get no say over what beans or roast you receive. Also, I’ve found that top-level beans are tougher to brew. If your grind isn’t right or your water is too hot, you can wind up with sour, undrinkable coffee. But after a few months of using the service, I find it indispensable. Tonx is now a sponsor of TidBITS, and if you sign up for a free trial through our link, you’ll help us out!
I know, I know… Some of you are rolling your eyes at me right now, but here’s how I justified this minor extravagance: I spent $60 each week on gas while I was commuting to my previous job. I decided that with all the money I was saving, I could afford a bit of a luxury, and my car doesn’t appreciate the gas nearly as much as I like my coffee.
Final Thoughts — Hopefully this guide has given you some ideas about how to equip or update your own home office, even if you’re on a tight budget. My overall advice is to pick the best equipment you can afford, especially if it’s something you’re going to use every day. The best doesn’t have to be out of reach. Identify your priorities carefully and watch out for great deals. Focus on only the things you need, and you’ll be able to afford the best of the necessities. Being surrounded by things that work well, are well made, and have a definitive utility brings an indescribable feeling of satisfaction. You can’t buy happiness, but you can invest in things
that give you pleasure and improve your everyday experiences.
FunBITS: Intermission Lets You Browse Your Mac’s Audio History
Rogue Amoeba is the king of Mac audio tools, and we love them for it. Most of us record our articles with their Audio Hijack Pro and edit with Fission. In fact, Audio Hijack Pro is one of my favorite Mac utilities, as I often use it to record Skype calls. And there’s a special spot in my heart for Airfoil, which lets me send audio to my stereo or Apple TV via AirPlay from apps like Rdio, not just iTunes.
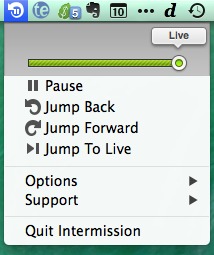
But when Rogue Amoeba released the $15 Intermission, it took me a while to wrap my head around its possibilities. Intermission is like an audio TiVo for your Mac. It continuously buffers the last three hours of audio, and lets you jump back at any time, while continuing to buffer. You can also pause live audio, and move forward through cached audio to skip ads.
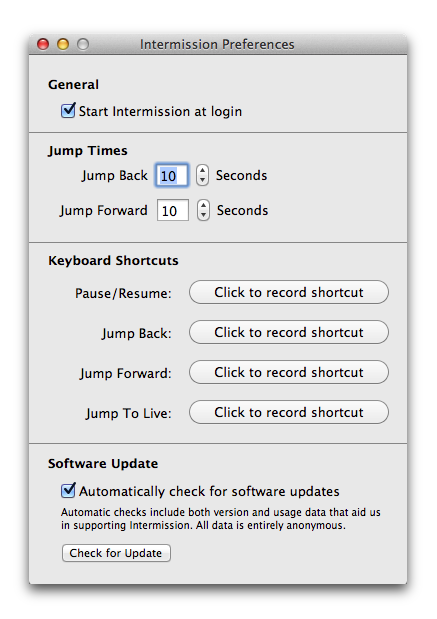
Intermission is a simple app that resides in your menu bar. Click its icon and you can use the scrubber to move backward and forward in time. The Jump Back and Jump Forward menu items skip forward or back 10 seconds, a length of time you can adjust. Choosing Jump to Live brings you back to live content. And if you prefer using the keyboard for all these features, you can set keyboard shortcuts for everything in Intermission’s preferences.
My first use of Intermission was to pause and skip back in live podcast streams, such as the ones I listen to through the 5by5 Radio app. At last I can pause a live broadcast when the phone rings or I
need to use the bathroom!
Intermission is also a useful addition to Apple’s new iTunes Radio service, which I love (to see why, read “FunBITS: Tune into iTunes Radio,” 18 September 2013). But the problem with services like iTunes Radio is that they don’t allow you to listen to a particular song again. With Intermission, I just slid the scrubber back and listened again.
Another trick is to let iTunes Radio play while you’re away from your Mac. Then, when you come back, you can listen to the prerecorded stream, skipping back and forth as you desire.
What made Intermission click for me is when I forgot to record a Skype call in Audio Hijack Pro. It suddenly dawned on me that I could open Intermission, pull back the scrubber, and review the parts I had forgotten. Unfortunately, Intermission doesn’t record input, only output, so I could only listen to the other side of the conversation — my part was missing. I’d love to see the capability to record both input and output in a future release.
It would also be interesting if a future version of Intermission enhanced the visual display of the recorded audio, indicating when no audio was playing and showing which app was responsible for different chunks of the recording. That would make it easier to scrub through and find specific bits.
Sometimes Intermission can cause confusion, because live audio keeps “playing” even as your scroll back in time — it’s just recorded to disk instead of being played through your speakers. That’s certainly the correct behavior, but in some cases, you may want to pause the currently playing audio before skipping back in time, so when you jump back to the present, you don’t have to try to find the right spot to start from again. Another small downside of Intermission is that it uses quite a bit of power, so it would be best to quit the app if you need to extend battery life on a long airplane flight.
But, for only $15 (with a free trial), Intermission is a great app to keep running, since you never know when it’ll come in handy. And if you’re a TidBITS member, you’ll receive a 20 percent discount, just as you do for every Rogue Amoeba product!
TidBITS Watchlist: Notable Software Updates for 14 October 2013
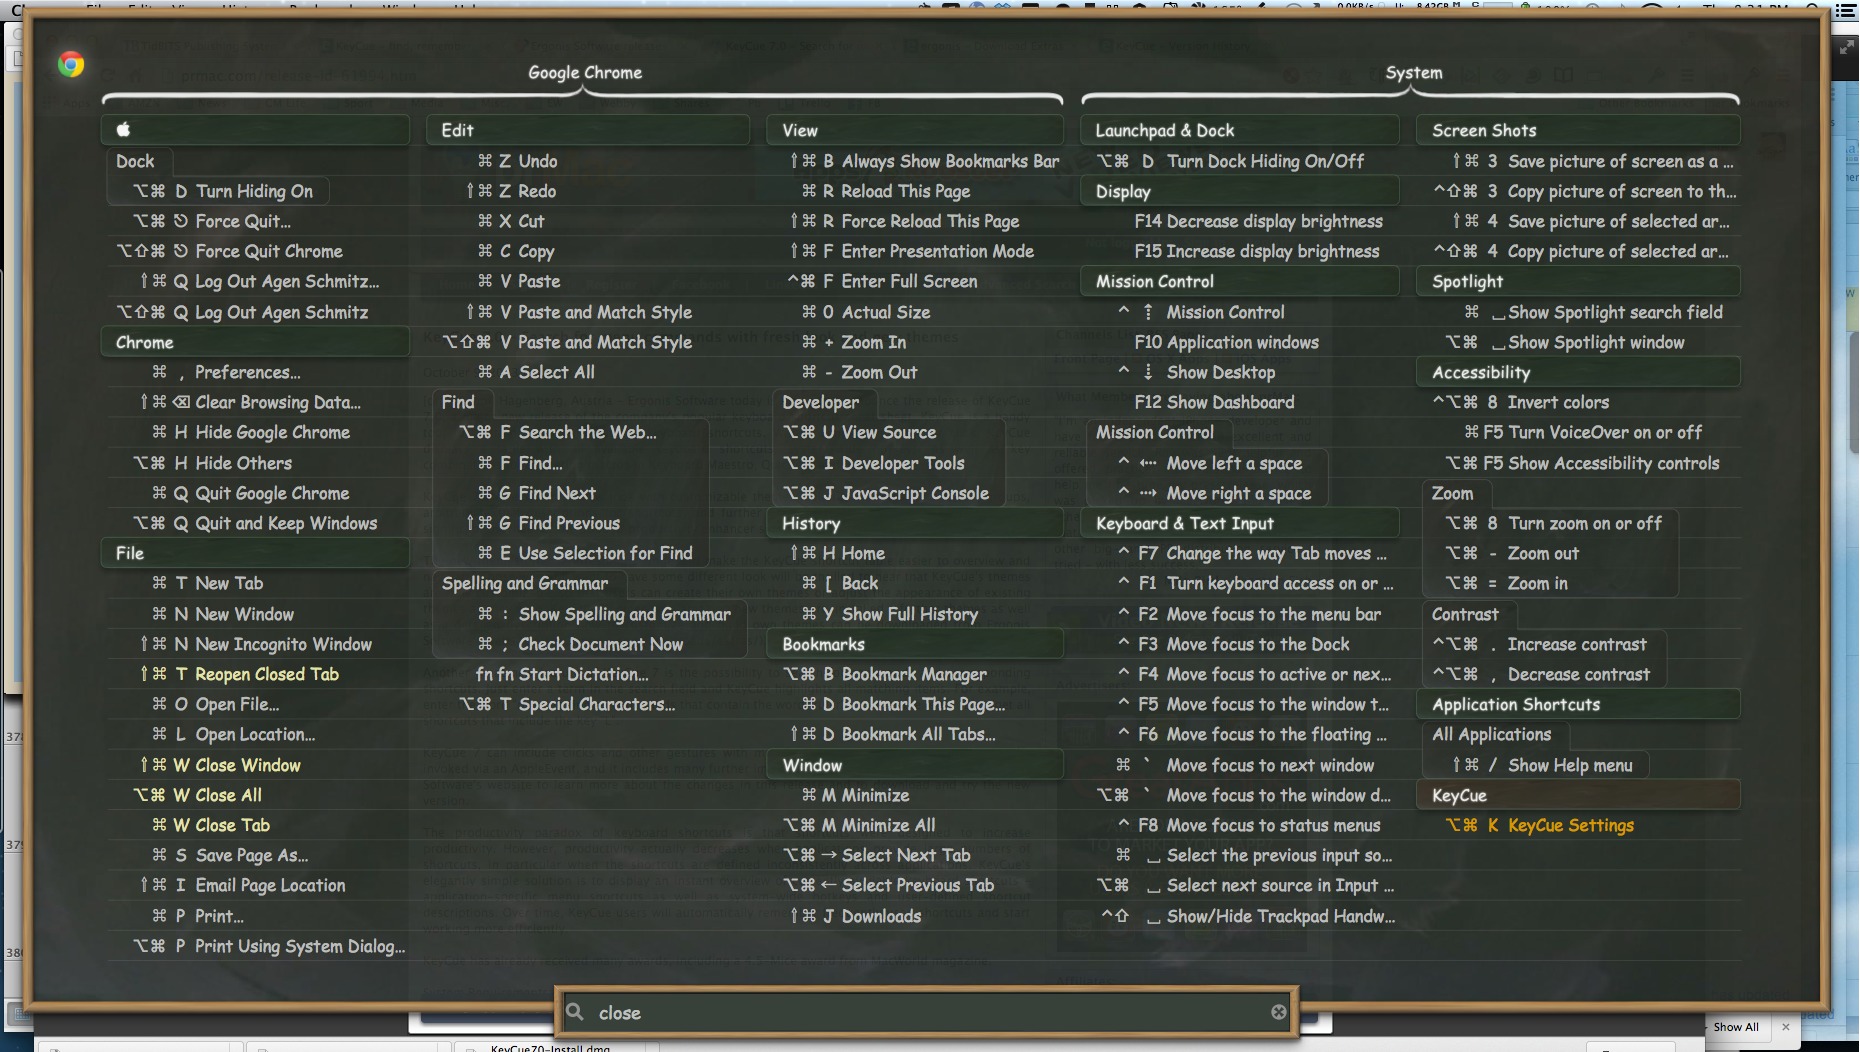
KeyCue 7.0 — Freshening up its look and adding new search and custom shortcut features, Ergonis has released version 7.0 of its KeyCue keyboard shortcut utility. KeyCue 7.0 now enables you to search for commands and shortcuts by entering a term in the search field that appears at the bottom of the shortcut table; all matching items are then highlighted. It also adds the capability to reveal hidden shortcuts that sometimes get filed away in help documents and printed manuals via user-definable custom shortcut descriptions. Additionally, these custom shortcuts can also include clicks and gestures with modifier keys.
Ergonis has posted a number of these extended shortcut descriptions on its Download Extras Web page (for Adobe Illustrator, InDesign, and Photoshop, ProTools 9, and Sibelius 7, as well as a collection of OS X system-wide shortcuts) with more promised for the future.
But the most visible change is the addition of new themes, with eight new pre-installed themes, plus more available from the Ergonis Download Extras Web page (the bonus Blackboard theme is shown below). Ergonis also provides a downloadable manual that explains how to create your own themes or modify existing themes.
Other changes include the capability to invoke KeyCue via an Apple event, a fix for an issue that would incorrectly activate a previously selected menu command after dismissing the shortcut window with the Escape key, and adding a persistent way to access the settings window in all spaces. If you purchased a KeyCue 6 license on or after 1 January 2013, you can upgrade to KeyCue 7.0 for free. For purchases made before that date, you can upgrade to the
new version for €9.99 for a single user license or €14.99 for a family pack license. (€19.99 new with a 25 percent discount for TidBITS members, free update, 3.4 MB, release notes)
Read/post comments about KeyCue 7.0.
Microsoft Office 2011 14.3.8 — Microsoft has updated Office 2011 to version 14.3.8, a maintenance release that’s focused solely on tightening security. According to the relevant security bulletin, the update addresses two privately reported vulnerabilities that could allow remote code execution with a specially crafted Excel file. It also notes that those who use Office 2011 with administrative user rights could be more impacted than those with more restrictive user permissions. (Free update via the Office for Mac Web site or through Microsoft AutoUpdate, 113 MB)
Read/post comments about Microsoft Office 2011 14.3.8.
SpamSieve 2.9.9 — C-Command Software has updated SpamSieve to version 2.9.9 with added compatibility for the golden master of OS X 10.9 Mavericks, which was recently released to developers and will ultimately be the build that gets released to the public. C-Command recommends that you update to SpamSieve 2.9.9 before installing Mavericks, but if OS X 10.9 is already installed then you should choose SpamSieve > Install Apple Mail Plug-In. The update also adds a Apple Mail — Server Junk Mailbox script, fixes some problems where the Open Window command in Apple Mail wasn’t available, adds the capability to repair ownership
and permissions of SpamSieve and Apple Mail preferences, and makes improvements to SpamSieve’s filtering accuracy. ($30 new with a 20 percent discount for TidBITS members, free update, 10.8 MB, release notes)
Read/post comments about SpamSieve 2.9.9.
ClamXav 2.6.1 — Mark Allan has released ClamXav 2.6, which updates the ClamAV engine to version 0.98. ClamXav, Sentry, and the ClamAV engine are now 32/64-bit, and ClamXav now requires Mac OS X 10.6 Snow Leopard and an Intel processor. The release also adds compatibility with Notification Center on 10.8 Mountain Lion for ClamXav (but not Sentry), fixes issues with unnecessary reporting of quarantine folders and updated virus definitions, adds a timestamp to logs of scheduled scans, and makes improvements to the French, Italian, and Czech localizations. Shortly after the 2.6 release, 2.6.1 was released with a fix for 32-bit machines
running Snow Leopard. (Free, 19.8 MB, release notes)
Read/post comments about ClamXav 2.6.1.
ExtraBITS for 14 October 2013
In ExtraBITS this week: T-Mobile cuts international roaming charges, lost Doctor Who episodes come to iTunes, and CloudPaint resurrects MacPaint for the Web.
T-Mobile Eliminates International Roaming Charges — Terrified by what your cellular bill might look like if you travel internationally? It doesn’t have to be that way, as David Pogue writes at the New York Times, thanks to a new policy by T-Mobile. Starting in November 2013, international data and texts will be free for T-Mobile customers (with an optional paid Speed Boost package for faster data), and calls cost 20 cents per minute nearly anywhere in the world. Alas, T-Mobile’s coverage isn’t sufficient for many people, but if the coverage is good where you live,
it would be refreshing to work with a carrier that isn’t hell-bent on gouging customers.
Regenerated Doctor Who Episodes Exclusive to iTunes — Doctor Who, the legendary British sci-fi series, turns 50 this year, but the BBC never expected it to last so long, and foolishly destroyed or recorded over many early episodes. Fortunately, two lost stories, “The Enemy of the World” and “The Web of Fear,” were found in Nigeria, remastered, and have been released exclusively on iTunes — to be seen for the first time in over 40 years. The two stories are available for $9.99 apiece and feature Patrick Troughton as the Second Doctor and
feature Nicholas Courtney’s first appearance as the beloved Colonel (later Brigadier) Lethbridge-Stewart. Unfortunately, episode 3 of “Web of Fear” is still missing, though the serial features a reconstructed episode with audio and still images. There are still 27 Doctor Who stories that are partially or entirely missing.
CloudPaint Brings MacPaint to the Web — MacPaint shipped with the Macintosh in 1984 and is the mother of all modern graphics programs. If you miss those days, or never got a chance to experience MacPaint for yourself, developer Martin Braun has adapted it for the Web. CloudPaint replicates both the features and interface of the original, which was developed by Bill Atkinson and Susan Kare and open-sourced in 2010.