TidBITS#1314/28-Mar-2016
In breaking news, the Department of Justice is withdrawing from the legal action against Apple — see our coverage in ExtraBITS! The iOS 9.3 update added some neat new features, but it has suffered from some problems. Apple has now reissued iOS 9.3 to address activation glitches on older devices, but a Web link bug remains. AT&T has expanded its Wi-Fi calling feature abroad, letting you make calls to or receive calls from the United States for free while outside the country. Speaking of AT&T, Adam Engst explains how to restrict the ways in which both AT&T and other cellular carriers can use your personal data. Apple has updated the fourth-generation Apple TV to tvOS 9.2, which adds numerous requested features like Home screen folders, Bluetooth keyboard support, voice dictation, and more — Josh Centers takes you through the details. We again dive into the power of Preview, demonstrating how you can use OS X’s built-in viewer to crop and resize documents and images. Finally, we have the fourth chapter of Glenn Fleishman’s “Take Control of Slack Basics” for TidBITS members, which covers message formatting, editing, deletion, and linking. Notable software releases this week include Quicken 2016 for Mac 3.2.1, Skype 7.24, LaunchBar 6.6, Tinderbox 6.5, Moneydance 2015.7, Security Update 2016-002 (Mavericks and Yosemite), Safari 9.1, and OS X Server 5.1.
Apple Reissues iOS 9.3 for Older Devices; Links Remain Problematic
Following activation issues with some older iOS devices, Apple has reissued the iOS 9.3 update for them after pulling it temporarily. Affected devices include the iPhone 4S, iPhone 5, iPhone 5c, iPhone 5s, third-generation iPad, fourth-generation iPad, iPad 2 (read on for a separate update for the GSM model), iPad mini, iPad mini 2, and the fifth-generation iPod touch.
The issue with iOS 9.3 was that those devices would get stuck at activation if users couldn’t remember their Apple ID usernames and/or passwords. If your iOS device is stuck at the activation step, Apple has posted some instructions explaining how to bypass the hangup.
To obtain the new update, issued with build number 13E237, check Settings > General > Software Update or update via iTunes.
Apple has also issued an iOS 9.3 update for GSM-equipped iPad 2 tablets, which resolves a similar activation issue.
However, many users are reporting that tapping Web links in iOS 9.3 is causing hangs and app crashes. The new iOS 9.3 release does not fix this issue. One affected TidBITS reader contacted Apple, who informed her that this is an “emerging issue” — meaning that Apple is just now learning about it, and probably hasn’t identified the solution yet. Benjamin Mayo of 9to5Mac claims to have traced the issue back to specific third-party apps installed on iOS devices, but otherwise, we don’t have much light to shine on the issue.
Given that iOS 9.3 was in beta for much longer than most minor iOS updates, it’s surprising that Apple missed these bugs in the update. Regardless, if you follow our advice of storing passwords in a password manager like 1Password or LastPass, you likely missed the activation glitch entirely. Unfortunately, the Web-link bug is still a major problem for many iOS users, and all we can do is hope Apple releases a fix soon.
If you haven’t yet updated to iOS 9.3, it’s definitely worth waiting until there’s more movement from Apple.
AT&T Adds International Support to Wi-Fi Calling
Wi-Fi calling lets you make clear phone calls in a poor service area, as long as you have a reliable Wi-Fi connection. The service was first introduced in iOS 8 for T-Mobile, became available to Sprint users later in iOS 8’s lifetime, and made its way to AT&T with the release of iOS 9. Just as Verizon finally added Wi-Fi calling support, including free calls to the U.S. when traveling abroad, in iOS 9.3 (see “iOS 9.3 Works the Night Shift, Protects Notes, and More,” 21 March 2016), AT&T has kept pace with its major competitor, expanding its Wi-Fi calling service to the rest of the world.
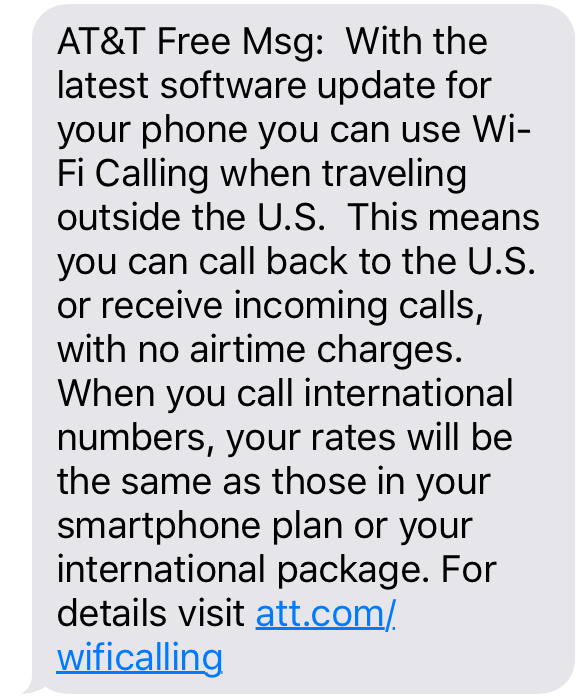
This means that if you’re an AT&T customer traveling abroad with an iPhone 6 or later running iOS 9.3, you can make calls to or receive calls from the United States over Wi-Fi for free. Calls to numbers outside the United States are still subject to the same rates dictated by your plan.
If you haven’t already done so, here’s how to turn on Wi-Fi calling, which is now supported by numerous carriers in the United States. Go to Settings > Phone > Wi-Fi Calling and enable Wi-Fi Calling on This iPhone. You’ll need to enter your home address for 911 emergency calling purposes (for more details, see “Turn on Wi-Fi Calling in iOS 9,” 28 October 2015). Apple provides more information about Wi-Fi calling as well.
After enabling Wi-Fi calling, the carrier name at the left of the status bar will probably look different when you have a Wi-Fi connection. On an AT&T iPhone 6, it displays AT&T Wi-Fi instead of AT&T LTE. From then on, when you make or receive calls while connected to a Wi-Fi network, they’ll be routed over the Internet instead of the cellular network.
Wi-Fi calling is a life-changing feature if the cellular reception in your home or office is poor, and if you’re an AT&T customer who travels abroad, it could save you a fortune in roaming charges as well.
Chapter 4 of “Take Control of Slack Basics” Available
Slack is all about messages, and that’s where Glenn Fleishman takes us next in his serialized chapter from “Take Control of Slack Basics.” Messages are of course tremendously simple at their core — type something trenchant and hit Return — but as you might expect by now, Slack provides a deep set of features that take messaging to new levels. In Chapter 4, “Post Basic Messages,” Glenn touches on the ever-important topic of etiquette before explaining composition-related actions like how to format messages, reference other people, include images and links to Web sites, and use emoji. You’ll also learn how to edit and delete messages, navigate within the message list (there
are lots of shortcuts), react to a message, mark a message for later, and even link to a specific message.

If you want to practice with Slack’s message-related features, join our public SlackBITS group, which has over 130 members and so far has hosted discussions of Slack, the Mac, iOS, and Apple TV. You’re welcome to ask anything you like there! Instructions on how to join are in Chapter 1, “Introducing Slack.” Also available to everyone is Chapter 2, “Get Started with Slack.”
However, Chapter 3, “Master the Interface,” and this new Chapter 4 are accessible only by TidBITS members, so if you’re not currently one, we hope this is incentive to join! TidBITS members receive other benefits too, but what’s most important is that the TidBITS membership program has kept TidBITS afloat the last few years — your support is essential. If you’re already a TidBITS member, log in to the TidBITS site using the email address from which you joined to read and comment on these chapters.
The full ebook of “Take Control of Slack Basics” will be available for purchase by everyone in PDF, EPUB, and Mobipocket (Kindle) formats once it’s complete.
Restricting Your Cell Carrier’s Use of Your CPNI Data
I recently received a message from AT&T, my cellular service provider, alerting me to the fact that I could restrict AT&T from using my “customer proprietary network information” (CPNI) within the AT&T family of companies for AT&T’s own marketing purposes. The message was plainly written yet utterly inscrutable. For instance, it defines CPNI as including:
“the types of telecommunications and interconnected VoIP services you currently purchase, how you use them and the related billing for those services. CPNI does not include your telephone number, your name, or your address.”
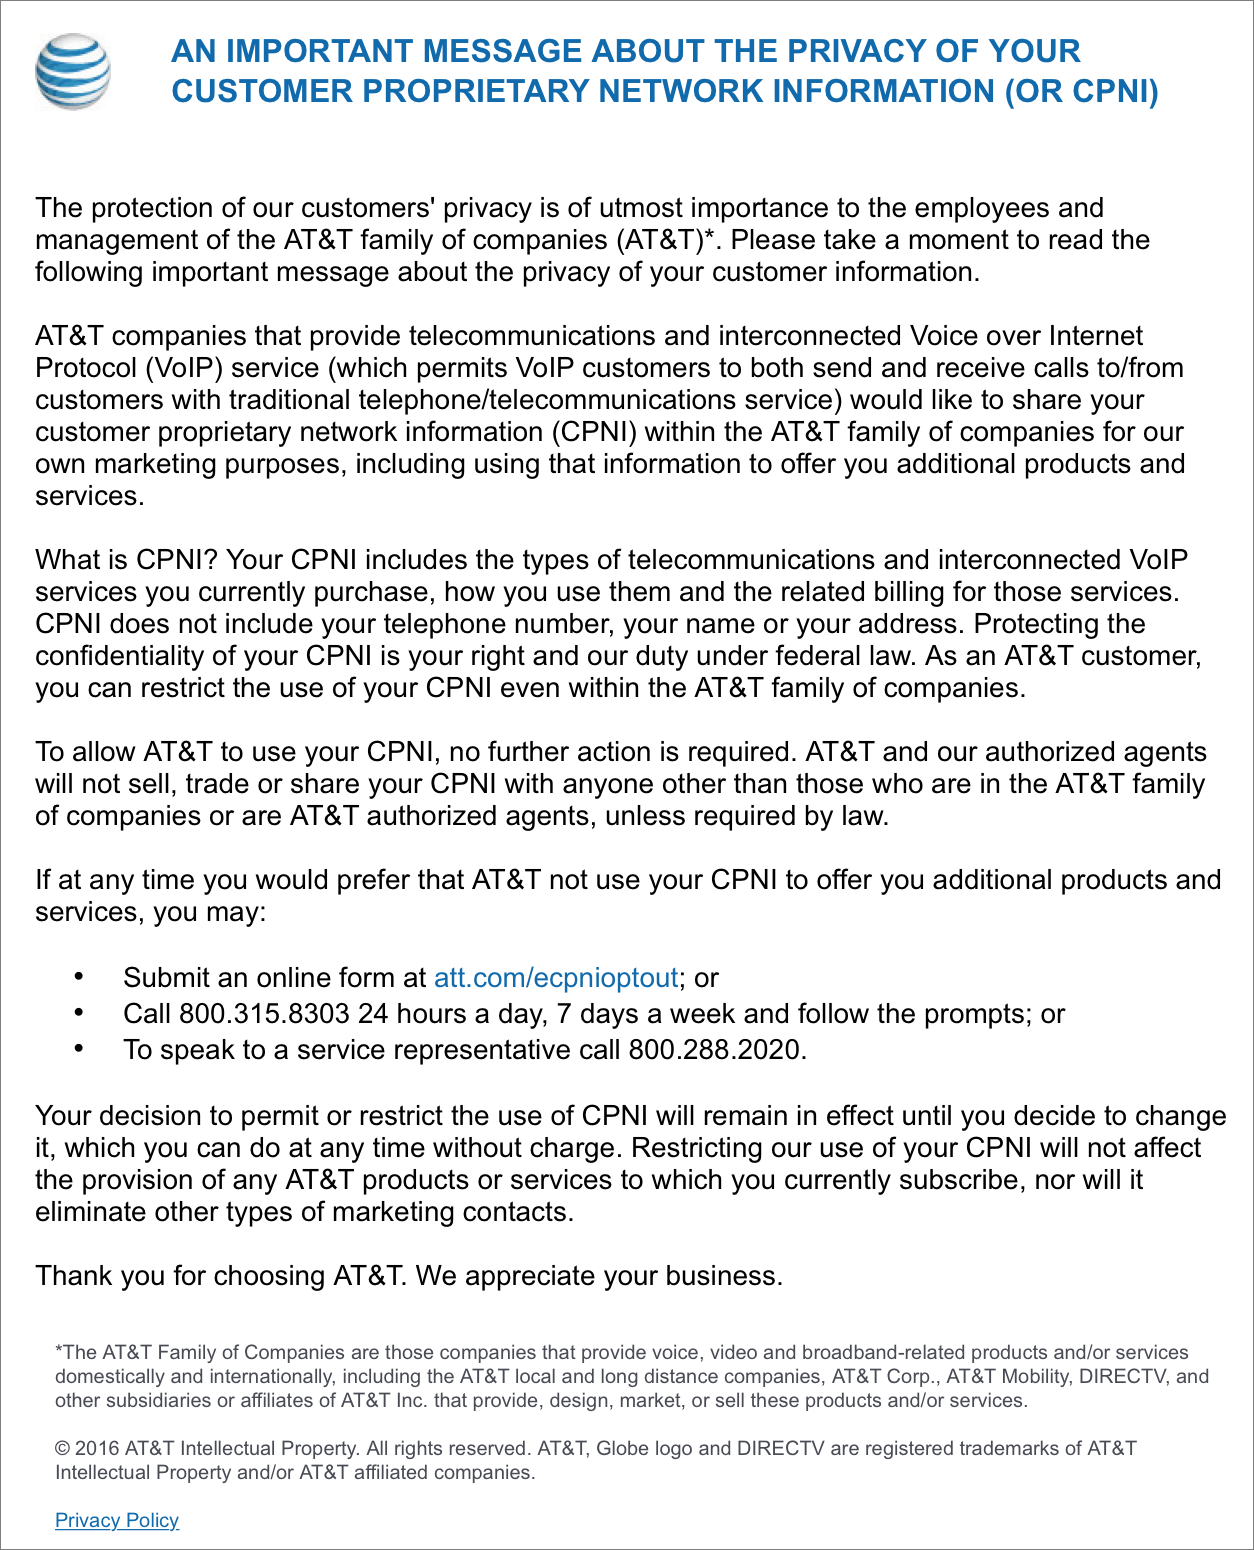
It’s reassuring to know that CPNI does not include your telephone number, name, or address, but the phrase “how you use them” is as clear as mud. In its CPNI privacy policy, AT&T provides a little more information, such as the fact that “calling details” are also part of CPNI.
Confused, I turned to Geoff Duncan, who has written extensively on telecommunications and data privacy issues for TidBITS over the years. He explained that CPNI originally referred to anything that might appear on your bill, but now varies widely by service and carrier. With cellular carriers, it might include your data plan and usage, device info, location history, Web browsing history, and even demographic information.
What is CPNI used for? AT&T says that it “does not sell CPNI to unaffiliated third parties,” and another page about CPNI clarifies just which companies qualify as being able to use this information — there are a lot:
“The AT&T family of companies are those AT&T companies that provide communications-related products and/or services, including the AT&T local and long distance companies, AT&T Corp., AT&T Long Distance, AT&T Internet Services, AT&T Mobility and other subsidiaries or affiliates of AT&T Inc. that provide, design, market or sell these products and/or services.”
Geoff said that the FCC’s original regulatory framework was intended to prevent two practices. The first is uncompetitive upselling, which could happen if a telco used its CPNI to tweak pricing for additional services for a particular customer in ways that competitors couldn’t match, for instance. The second, “pretexting,” prevents CPNI from being purchased by an outside party that would then pretend to be the phone company in order to get a customer to disclose or do something they wouldn’t otherwise.
The most recent changes to the CPNI legislation were back in 2007, but Geoff said that AT&T started notifying customers about the company’s use of CPNI in 2012. Indeed, when I searched through my email archives on “CPNI,” there was just one hit, an identically worded message from AT&T, sent in August 2012.
Are there any actual abuses of CPNI? Yes. Additional research revealed, among many other stories at the Electronic Privacy Information Center (EPIC), that in 2014 Verizon paid a $7.4 million fine for using CPNI for marketing purposes without informing customers. Worse, AT&T had to pay a $25 million fine in 2015 for disclosing personal information (and misusing CPNI data) for almost 280,000 of its U.S. customers, thanks to crooks paying off employees in three AT&T call centers in Mexico, Colombia, and the Philippines to unlock stolen
and/or grey market phones.
It’s important to realize that restricting a carrier from using your CPNI doesn’t prevent it from being collected, so opting out might not prevent such information from being swept up in data breaches like AT&T’s, but it certainly can’t hurt. Regardless, the fact that the FCC felt it was important to require telcos to offer such an opt-out makes me think it’s worth doing.
Restricting AT&T from using CPNI isn’t difficult, but it does require information you may not have handy. Follow these steps (or you can use a voice-response system at 800-315-8303 or talk to a person at 800-288-2020):
- Go to http://att.com/ecpnioptout. (Amusingly, the link underneath the associated text in the email message used a tracking link, which makes me wonder if a click on it would become part of my CPNI.)
- Enter your account number or customer ID and billing ZIP code, select Restrict Use of My CPNI, and click Submit.
The tricky part here is getting your account number, which is most easily found on your bill or by logging in to AT&T’s site and looking in your profile. AT&T says it’s also available on the CPNI notice, which isn’t true — you can see my notice above, and there’s no ID on it.

What about other carriers and other types of personal information that’s gathered and potentially shared or sold? A page in the MIT Information Systems & Technology Knowledge Base offers links to opt out of these and other programs at AT&T, Verizon Wireless, and Sprint. I’d encourage everyone to explore those links — I discovered that although our phone numbers were opted out of AT&T’s “External Marketing & Analytics Reports,” they were still set to receive “Relevant Advertising — Wireless,” whatever that is. MIT’s page says that T-Mobile does not sell CPNI, which seems to match with T-Mobile’s CPNI page.
Personally, I’m not particularly perturbed to have my information used when businesses offer me products or services. However, if this information is so valuable, why do companies get to collect it (from services we’re paying for!) and use it for free? Wouldn’t it be interesting to put personal information into a marketplace, where you would get to say for what purposes it could be purchased, and for how much? Some Italian researchers did a study on the economics of personal data back in 2014, and there’s even a firm called Handshake aiming to do
this, but it has been in closed beta since 2013, which isn’t a good sign. Still, food for thought…
With tvOS 9.2, the Fourth-Generation Apple TV Hits 1.0
As author of “Take Control of Apple TV,” which covered the second- and third-generation Apple TVs, I spent years anxiously awaiting the fourth-generation Apple TV. Although I was happy when it arrived, it struck me as unfinished. But with the just-released tvOS 9.2, the fourth-generation Apple TV is beginning to feel like a polished Apple product. Your Apple TV may have already downloaded the update for you, but if not, you can trigger the download in Settings > System > Software Updates > Update Software. (And yes, we’ll publish the second edition of “Take Control of Apple TV” shortly, as soon as we get the latest details edited. Everyone
who orders now will receive a free update.)
What does tvOS 9.2 add? In a nutshell: better scrubbing, new folders, a redesigned app switcher that matches iOS, Bluetooth keyboard support, text input via voice dictation, support for iCloud Photo Library and Live Photos, expanded Siri search, and the reappearance of Conference Room mode. Let’s look at each of these.
Pausing to Scrub — In tvOS 9.2, Apple has prevented accidental fast-forwarding and rewinding while watching video by requiring you to pause the video before swiping on the touchpad.
You can still fast-forward and rewind by pressing and holding the left or right side of the Siri Remote touchpad, without pausing. Likewise, you can also perform a 10-second skip by pressing either side of the touchpad, again without pausing. But scrubbing video now requires you to pause first. This should eliminate one of the big annoyances of the Siri Remote.
Making Home Screen Folders — tvOS 9.2 introduces folders to the Apple TV Home screen. Folders can hold an unlimited number of apps, but they display only nine icons at a time; to see more, scroll down.
There are two ways to move apps into folders, both of which start with highlighting an app icon and pressing and holding the touchpad until the icon shakes. The first method is similar to the folder-creation approach in iOS, where you move the icon until it overlays another icon, and a folder is created when you let up. Likewise, you can drag an icon into a folder to add it. Inside the folder, you can move the icon around until it’s placed where you wish, and when you’re satisfied, press Menu to set the app in place. This method
is familiar, but requires some swiping skill.
The second method involves pressing Play/Pause while a highlighted app icon is shaking. A menu appears with options to create a new folder with the app or move the app to an existing folder.
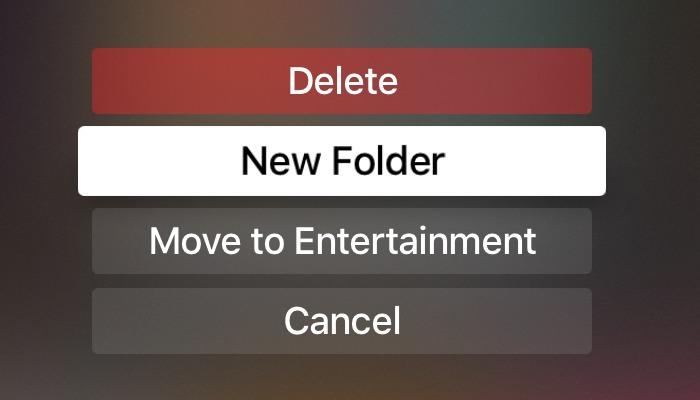
The same techniques can be used to remove an app from a folder — with the second method, select Move to Home Screen from the menu. To delete a folder, remove all the apps from it. You can’t move a folder into another folder.
When you create a folder, tvOS generates a default name based on the types of apps used to create the folder, just as in iOS. You can rename a folder by opening it and then swiping up to reveal a text input field and onscreen keyboard. Delete the default name and type or dictate your own.

Switching Apps — To see the new app switcher, double-press the Home button. Much as in iOS, you can swipe left or right to fan through thumbnails of active apps and click a thumbnail to switch to that app. Swipe up on a thumbnail to close that app, though you shouldn’t bother to close an app unless it’s giving you trouble.
Pairing with a Bluetooth Keyboard — One of my favorite features of the prior Apple TV models was that you could pair a Bluetooth keyboard to help with text entry. I was disappointed to find this feature missing in the fourth-generation Apple TV, especially given that its touchpad text input interface is appallingly awkward. Although you can largely work around this problem with the iOS Remote app (my book editor has developed a nervous tic where she whips out her iPhone to run the Remote app whenever a text input field appears), the previous lack of support for pairing a Bluetooth keyboard was confounding. Apple has at last brought this feature to the fourth-generation
model in tvOS 9.2. Here’s how to pair a Bluetooth keyboard:
- Put your Bluetooth keyboard into pairing mode.
- Go to Settings > Remotes and Devices > Bluetooth.
- Choose the keyboard, under Other Devices.
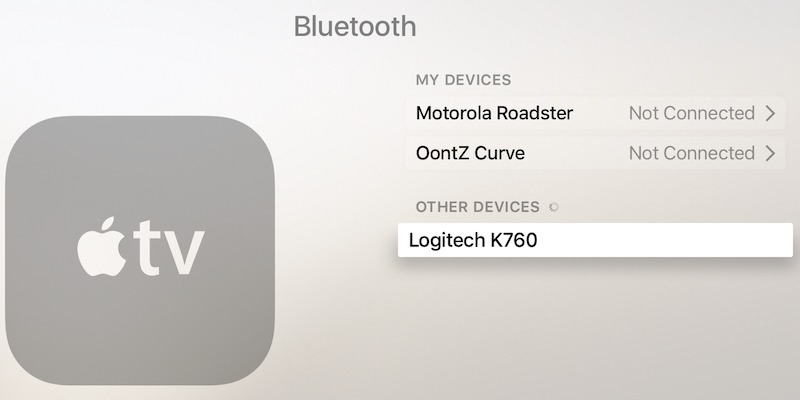
Type on the keyboard to enter text into any text input field. Press the arrow keys to navigate the Apple TV’s interface. The Return key acts like pressing the touchpad, while Esc emulates the Menu button.
Dictating Text — You can also now use voice dictation to enter text, a massive improvement over “typing” with the Siri Remote. This feature makes it far easier to search within the Apple TV interface and even to enter usernames and passwords. However, you must first enable dictation via one of two methods:
- Go to Settings > General and turn on Dictation.
-
While viewing a text-input field, hold down the Siri button to display a screen prompting you to use dictation, and then choose Use Dictation.

If you click the “About Dictation and Privacy” link on that screen, you can read about how most of your spoken text will be sent over the Internet to Apple to be processed, but text spoken into username and password fields will be processed only locally.
With dictation enabled, you can press and hold the Siri button to speak text into any text-entry field, whether or not it displays the “Hold to dictate” text. Just as with Siri commands, be sure to keep the button pressed until you’re finished speaking. You aren’t limited to having Siri recognize words; it can also understand character names, which lets you enter passwords. To enter an uppercase letter, say “cap” just prior to the letter or word. Be careful with this, because Siri can get confused — sometimes it inserts “cat” instead of capitalizing a letter. Meow!
It’s great to see Apple adding dictation to the Apple TV, but with no way to edit dictated text besides backspacing over the entire field, the feature needs work to satisfy all but the most basic needs. For example, Tonya wanted to add “Welcome to the Engst household” to her Conference Room Mode welcome message, but when the Dictation feature spelled her name “Angst,” she couldn’t put an insertion point in the field to edit just that one misspelled word.
Viewing Your iCloud Photo Library — If you use iCloud Photo Library (see “iCloud Photo Library: The Missing FAQ,” 15 April 2015), you can at long last view all of your synced photos and videos on your Apple TV.
You’ll be prompted to use iCloud Photo Library when you first open the Photos app after the update to tvOS 9.2; if you decline, you can adjust it later in Settings > Accounts > iCloud. Regardless, you’ll have to enter your iCloud password. Then, when you open the Photos app, you should see all your photos and videos, though it may take a while for everything to copy over the first time. Unfortunately, there is no way to sort your library by Moments, Collections, or Years. However, albums from other devices should be present.
Missing from iCloud Photo Library are the options to display photos as a slideshow and to use them in a screensaver; these options remain available for shared iCloud albums, available on the Shared screen.
You can’t edit or delete iCloud Photo Library photos on the Apple TV, which is probably a good thing. However, if you’re like me, you likely have a bunch of photos that won’t look great in the living room, like screenshots. You can hide those images in Photos for Mac by Control-clicking them and choosing Hide X Photo(s), the “X” being however many images you’ve selected. You can also hide images in the Photos app for iOS by selecting them, tapping the Share button, and choosing Hide. Hidden photos are moved to a local Hidden album on your device, and are removed from your iCloud Photo Library.
The Photos app also now displays the video snippets embedded in Live Photos, but it’s an imperfect implementation, because nothing indicates that a photo is “live.” If you know that you’re viewing a Live Photo, press and hold the touchpad for a few seconds to play the video.
Expanded Siri Search — Siri can now search in the App Store. Press and hold the Siri button and ask away: “Search for telescope apps,” or “Search for apps about cats.” During Apple’s special event, the company said that there are now more than 5000 apps for the Apple TV.

Conference Room Display — Available in the second- and third-generation Apple TVs, Conference Room Display was initially missing on the fourth-generation model. Handy in certain conferencing or classroom situations, it adds to the screensaver an inset panel of instructions for how to AirPlay content to that particular Apple TV. It can also contain a custom message.

To turn it on, visit Settings > AirPlay > Conference Room Display. On that screen, you can also add a custom message, choose a background photo — either from your library or Apple’s — and preview the screensaver.

Note that if you have a screensaver set in General > Screensaver, that screensaver overrides your choice of Conference Room Display background photo, although the Conference Room panel still appears. To use that photo instead of the screensaver, change General > Screensaver > Start After to Never.

These additions are extremely appreciated, but it’s too bad they weren’t in the product from the beginning. Plus, as much as the dictation feature is welcome, the fact that it needs more work shows that Apple is still feeling its way into appropriate interfaces for the living room.
Regardless, tvOS 9.2 is an important update, and it’s another example of how Apple may be becoming more responsive to customer needs (see “Apple’s March Event Reflects Increased Customer Responsiveness,” 21 March 2016). Now, instead of lamenting painfully obvious missing features, we can look forward to seeing what Apple can come up with for the future of television. And I can look forward to launching the second edition of “Take Control of Apple TV,” which is due very soon!
The Power of Preview: Cropping and Resizing Images
In “The Power of Preview: Pulling Files into Preview” (25 February 2016) and “The Power of Preview: Viewing Images and PDFs” (13 March 2016), we walked you through the basics of opening and viewing files in Preview, OS X’s venerable, all-purpose document and image viewer. This time, we begin digging into Preview’s image manipulation capabilities.
As writers of technical articles and books, we work with screenshots constantly, and Preview saves us time over using more full-featured tools like Pixelmator or Photoshop, thanks to Preview’s focused tool set. You can even take screenshots from within Preview itself, as noted in “The Power of Preview: Pulling Files into Preview”.
The most common tasks we perform when editing screenshots are cropping and resizing, to cut out unneeded elements and keep images from being too large. Preview excels at both of these tasks.
Cropping Images with Preview — To crop an image means to remove everything outside of a selected area, and Preview makes that easy. But first, you have to understand how to use its Rectangular Selection tool.
The Rectangular Selection tool should be the default when viewing images, but if you need to activate it, choose Tools > Rectangular Selection. It’s also available on the far left of the Markup Toolbar, which you can display by choosing View > Show Markup Toolbar (Command-Shift-A).
Using the Rectangular Selection tool is simple: just click and drag to create a selection box. You can move the selection box by positioning your cursor inside the box so it becomes a hand — after that, click and drag to move the box. Likewise, you can click and drag the blue circles to adjust the size of the box. As you adjust the size of the box, its pixel dimensions are displayed in a small popover, a handy aid.
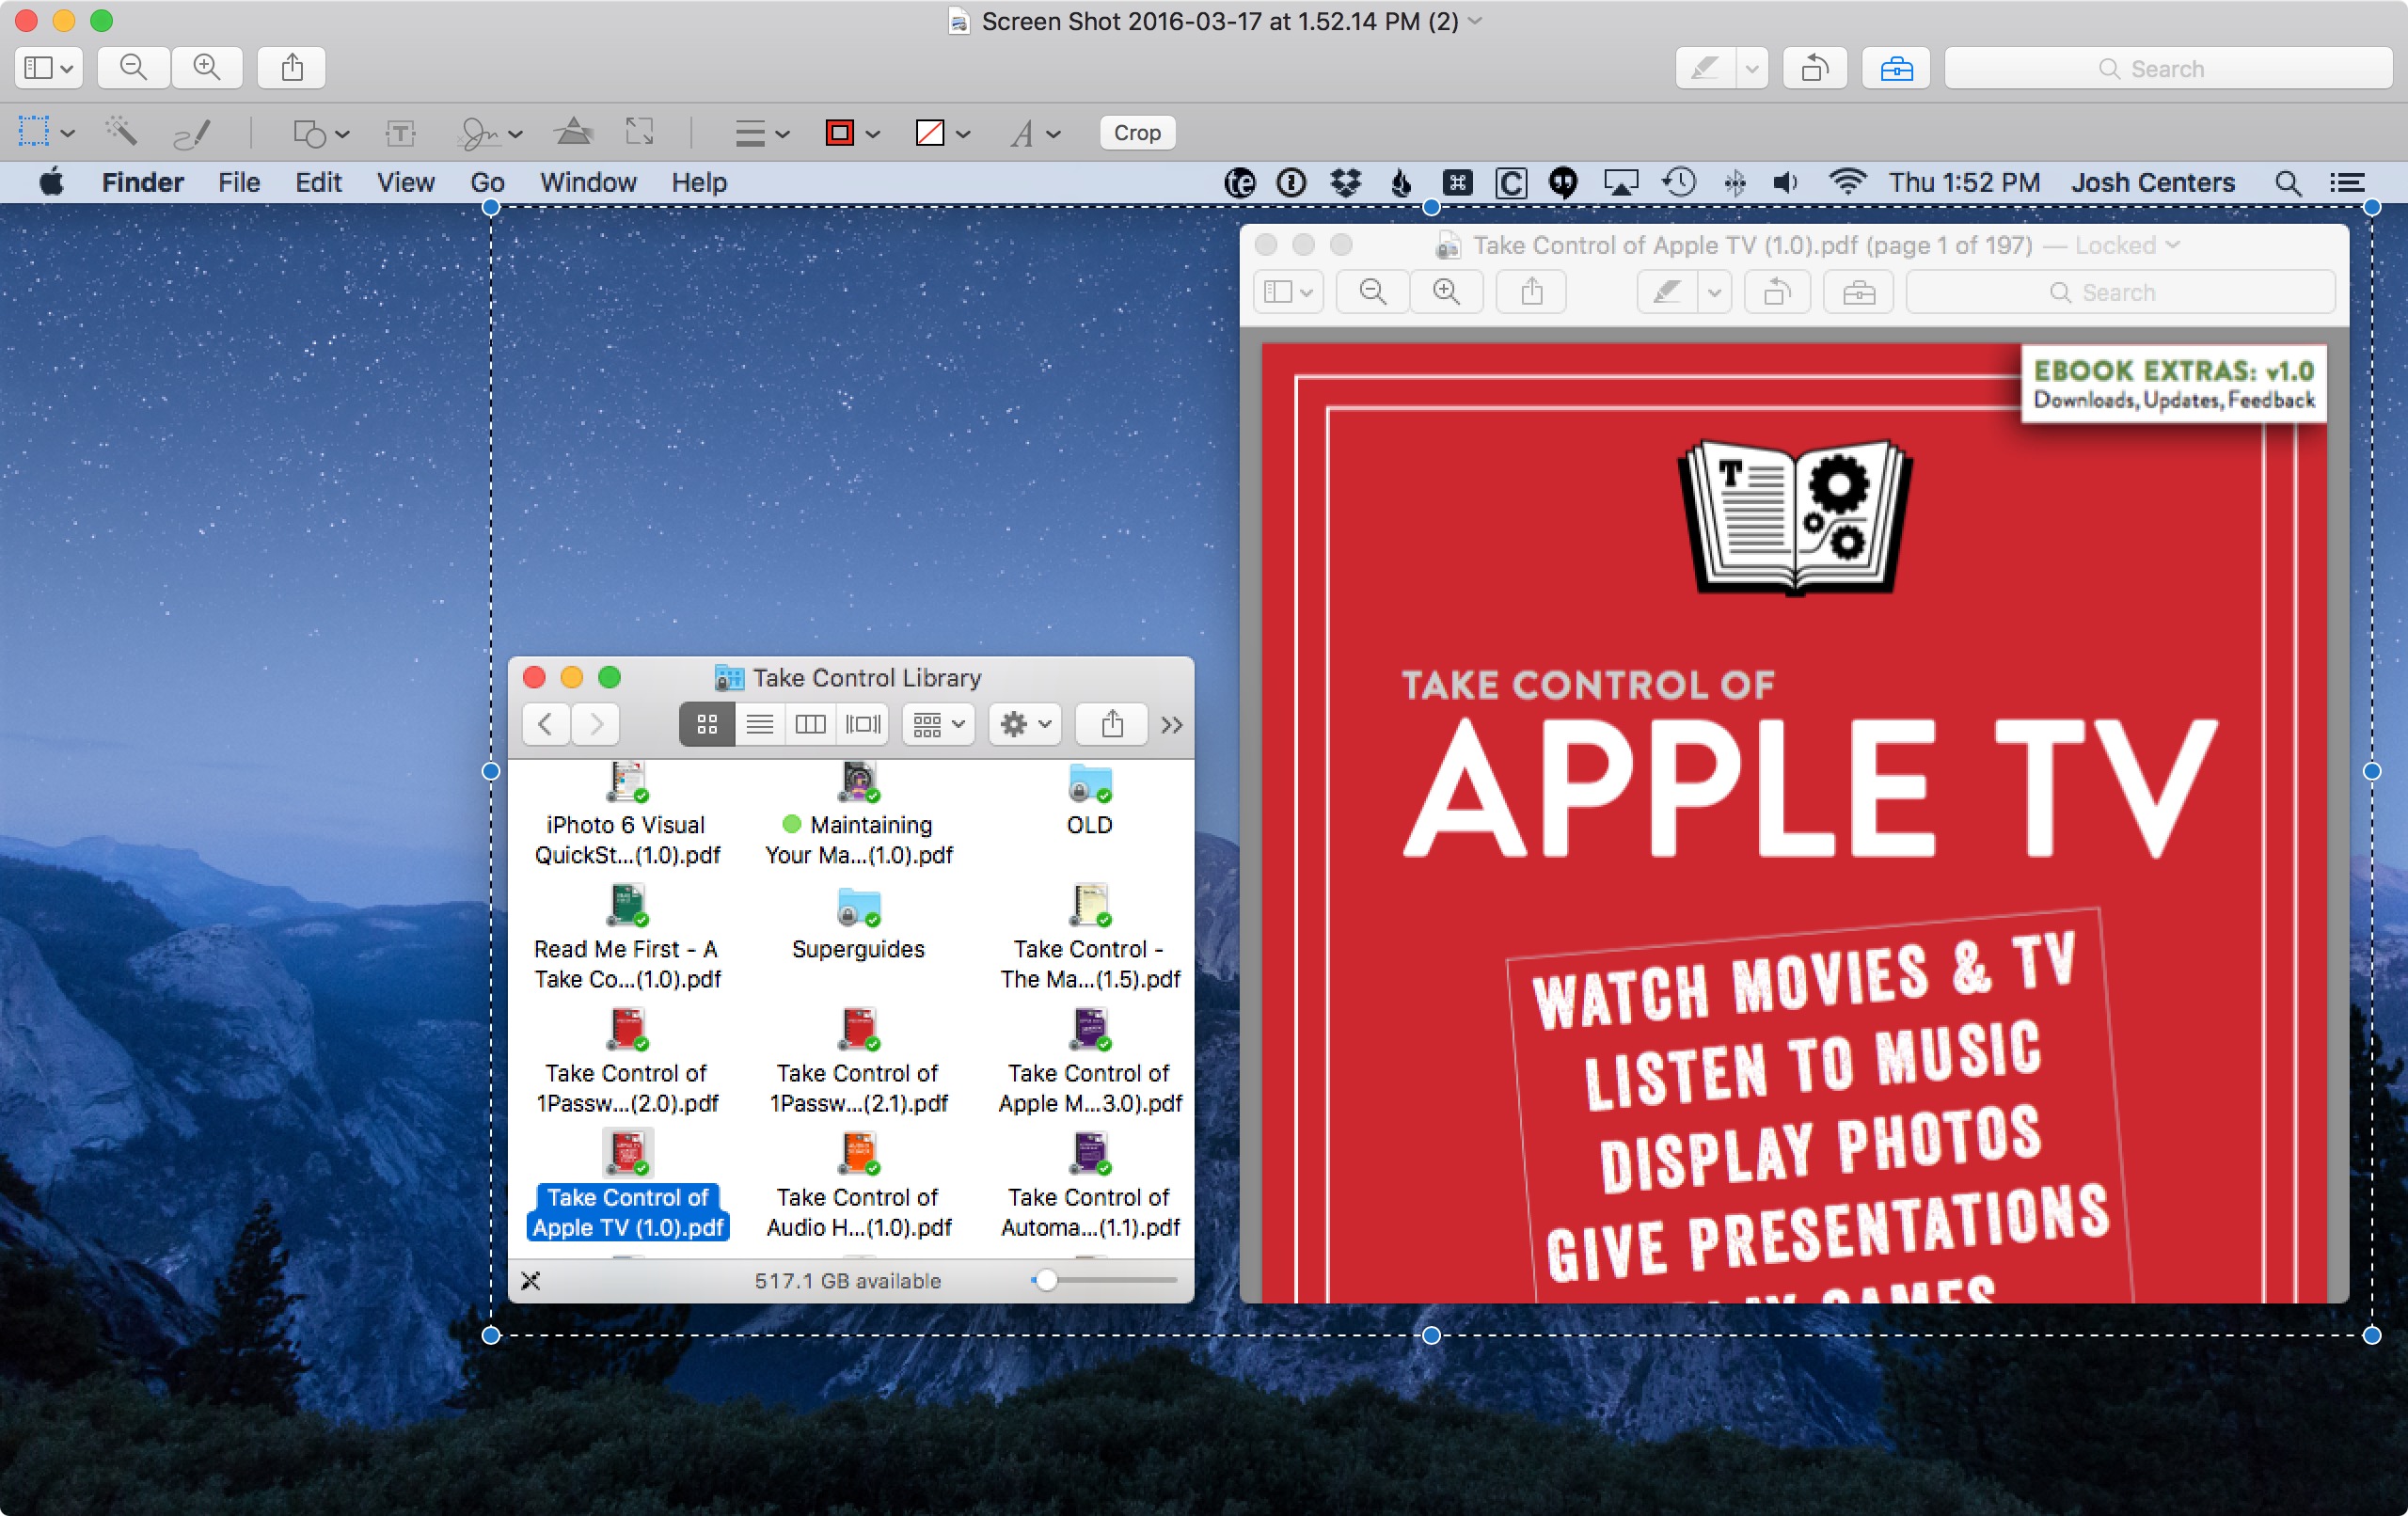
In the example screenshot, we want to crop out everything but the Finder and Preview windows. Once the selection box is over the windows, select Tools > Crop (Command-K) to cut out everything that’s not wanted.

That’s not hard, but here’s a technique that simplifies creating precise crops around windows, dialogs, and other objects.
First, don’t attempt to make a precise selection, since that can be tricky. Instead, drag out a rough selection around the desired object that includes some of the background, and then press Command-K to make an initial crop.
Then use the blue handles in the middle of each side of the selection rectangle to move each side in to exactly the desired position before cropping again. That requires four actions, but can be more precise than using the corner handles, which resize the selection in two dimensions at once. It can be hard to get both sides exactly right at the same time.
If you’re cropping a very small object, such as the buttons we use as inline graphics in Take Control books, after making that initial rough crop, zoom in closely so you can see the object’s exact edges before dragging the side handles in to make your final selection and then cropping. For zooming instructions, refer back to “The Power of Preview: Viewing Images and PDFs.”
Here’s a final tip to remind you of a feature we mentioned in “The Power of Preview: Pulling Files into Preview.” If you make a rectangular selection, instead of cropping, you can copy the selection and then choose File > New from Clipboard to create a new document containing the copied data. In other words, a selection followed by Command-C and Command-N is a quick way to get a new file containing your desired content — it’s another path to a cropped image that might be more appropriate in certain workflows.
We’ve focused on images here, but you can also crop PDFs using the same method. This is rarely useful, and note that Preview crops only a single page at a time. Plus, since Preview doesn’t actually delete content, but instead just hides it, the PDF will likely appear uncropped in other apps. Preview even warns you of this fact.
Resizing Images with Preview — You’ve cropped out the parts of the image you don’t need, but it’s still too large, either in terms of dimensions or file size? Again, Preview makes it easy to shrink the image.
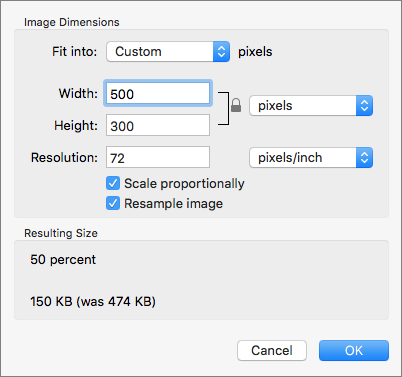
Choose Tools > Adjust Size and a handy dialog appears. Play with the settings and either click OK to apply your changes or Cancel to back out. Here’s a quick overview of what each of the controls does:
- Fit Into: This dropdown menu gives you a set of predefined sizes to fit the image into. These sizes match common screen sizes, and are most useful for making wallpaper images. If your image doesn’t match the aspect ratio of the pre-defined size you choose, Preview fits the longest side of your image to the appropriate dimension. So a portrait image will always be fit to the height of the pre-defined size, and landscape images will be fit to the width. When you adjust the width and height yourself, this menu sets itself to Custom; you don’t need to choose that manually.
-
Width and Height: In these fields, you can manually set the width and height of the image. The pop-up menu on the right lets you set the unit of measurement: pixels, percent, inches, centimeters, millimeters, or points. Which of these you choose depends mostly on how you think about your output.
If you’re planning to use the image on a Web site, pixels likely makes the most sense, whereas if it’s destined for a printed document, a real-world measurement like inches, centimeters, or millimeters may be more helpful. If the actual size doesn’t matter too much, you can shrink it by a percentage.
One tip that applies to all image editing: you can always scale images down, but you don’t want to scale images up. Unlike what you may see on TV shows, scaling an image up almost never works well, because Preview has to generate pixels out of thin air, and the resulting image is always blurry.
-
Resolution: Here you can adjust the resolution of the image, in either pixels per inch or pixels per centimeter. Resolution is a tricky topic, but in short, for images destined for the screen, it’s usually irrelevant and can be ignored. For screen display, all you care about is how many pixels the image has — whether it’s 72 ppi or 144 ppi should make no difference in how it looks onscreen. Don’t assume that reducing the resolution will make the file size smaller either; it will if you select Resample Image because you’re throwing away pixels, but if you don’t resample the image, the file size will stay roughly the same and may even increase somewhat for JPEGs.
For images you want to print, resolution is important to know. If you have a 72 ppi image, it will need a lot more pixels to print at a decent size on paper than if it’s a 300 ppi image. But you can’t change the resolution to get better results because any change in resolution must either throw pixels away or add pixels in, neither of which is good for the image. In short, unless you know what you’re doing, leave the resolution setting alone. For a good discussion of resolution, see the Photoshop Essentials site’s explanation.
-
Scale Proportionally: In nearly all cases, leave Scale Proportionally selected, because otherwise your image will be stretched or squished in the dimensions that change.
-
Resample Image: As noted above, resampling changes the number of pixels in the image. Thus, it should be selected in most situations, particularly when the image is destined to be displayed on a screen, where you want to control the pixel dimensions. And in fact, if you deselect Resample Image, you can no longer choose pixels in the pop-up menu next to Width and Height, Scale Proportionally is locked on (since disproportionate scaling would change the number of pixels), and any changes you make in Width and Height also change Resolution. All you can do then is change how large the image will print. Again, Photoshop Essentials has a nice
explanation. -
Resulting Size: This feedback area is useful to watch, particularly if you’re trying to reduce the file size of your image. As you adjust the image’s pixel dimensions, it tells you the resulting percentage size of the original image, the resulting file size, and the previous file size. Changing resolution while resampling doesn’t affect size much, and Preview doesn’t report on such changes.
It’s extremely easy to get confused when playing with image size settings because Preview honors the physical dimensions (which are based in part on resolution) when displaying images and attempts to open all images at actual size. In our discussion of Preview’s preferences in “The Power of Preview: Viewing Images and PDFs,” we said that we had no idea why you’d choose between 1 Image Pixel Equals 1 Screen Pixel and Size on Screen Equals Size on Printout for Define 100% Scale As. Now we understand. When you see “100%,” think “Actual Size.”
If you’re working with images primarily for display on screen, such as on Web pages, it’s probably most sensible to choose 1 Image Pixel Equals 1 Screen Pixel. That way, if you open a 1920-by-1280 image that’s 300 ppi, Preview displays it at its actual size in pixels. A 1920-by-1280 image that’s only 72 ppi opens at exactly the same size. That’s what you’d expect, since resolution isn’t relevant to publishing on screen.
However, if most of your image work is destined for print, selecting Screen Equals Size on Printout may be helpful, since then, assuming the same pixel dimensions, a higher-resolution image appears smaller and a lower-resolution image appears larger, just as would happen on a printout. In that case, Preview displays the 300 ppi image at a much smaller size than the 72 ppi image when both are at actual size.
The problem with Preview honoring the resolution-dependent physical dimensions is that other graphics programs, like Graphic Converter, focus only on pixel dimensions. If you work in other graphics apps too, Preview may confuse you by displaying the same image differently. So don’t get too wrapped up in how something looks in Preview; just focus on the pixel dimensions for screen-destined images.
Undoing It All — The safest approach when editing an image is to make a copy before modifying it, but it’s easy to forget to do that. In that case, you have two ways to undo unwanted changes.
The first is the hoary Edit > Undo (Command-Z) command, which lets you undo recent actions. There’s also Edit > Redo (Command-Shift-Z), which lets you redo actions that you’ve undone. Nothing new there.
But if you’ve already saved and closed a file, and later reopened it, you can’t use the Undo command. Thankfully, you can still revert to an older version, thanks to Preview’s support for the Modern Document Model (see “The Very Model of a Modern Mountain Lion Document,” 7 August 2012). Choose File > Revert To, where you see two options: Last Opened and Browse All Versions. Last Opened reverts all changes made to the file since you last opened it.
Browse All Versions displays a Time Machine-like interface, with the current version of the document on the left and previous versions on the right. Use the arrow buttons to move between versions — unfortunately, it’s usually impossible to discern the differences between versions that have just been resized, so you may have to guess based on the timestamp. Click Restore to restore the file to the version showing on the right, or click Done to cancel.

We’ve barely touched the modifications you can make to documents and images in Preview, but this article lays the groundwork for future exploration. You now understand how to select parts of a file and undo unwanted changes. Next, we’ll dig deeper into Preview’s image-editing power.
TidBITS Watchlist: Notable Software Updates for 28 March 2016
Quicken 2016 for Mac 3.2.1 — Intuit has released Quicken 2016 for Mac 3.2.1 (a top vote-getter in our recent poll, “Your Favorite Mac Personal Finance Apps,” 29 February 2016) with a number of bug fixes. The update fixes a problem with transfer transactions in the Windows Converter (as well as adds the capability to convert very old Quicken Windows files), improves the Online Transfer process to allow credit card payments to properly display as transfers from banking to credit card, makes a calculation correction to adjust bond face values to align with Quicken Windows, improves
hotkey support for Dates, fixes a crash that occurred when running background tasks, and fixes a bug that prevented Reprint Checks from actually printing the checks. ($74.99 new, free update, release notes, 10.10+)
Read/post comments about Quicken 2016 for Mac 3.2.1.
Skype 7.24 — Microsoft has released Skype 7.24 with some improvements to the user interface. The Internet telephony and messaging app introduces a new adaptive layout for small windows sizes (dubbed SlimView), adds detailed sidebar view items under the View > Sidebar menu (Compact, Regular, and Detailed), enables you to receive directions to shared locations, and adds keyboard shortcuts for Skype Home, Contacts, and History. (Free, 42.4 MB, release notes, 10.9+)

Read/post comments about Skype 7.24.
LaunchBar 6.6 — Objective Development has released LaunchBar 6.6 with several improvements related to how the keyboard-based launcher works with iTunes. The update now displays both album artist and title when browsing the Albums category, displays artist or album information for the currently playing track in the iTunes/Now Playing info, resolves a problem causing some iTunes actions to fail if the iTunes Today Widget was enabled in Notification Center, fixes an issue when reindexing the iTunes Library, and fixes a bug with Identically Named Songs.
LaunchBar 6.6 also adds an optional modifier tap for accessing snippets (configured in Preferences > Shortcuts), enables you to use the iCloud Drive item as a target for Send To operations, adds metadata to images when Info Browsing in the Clipboard History, improves the Send To operation in the calculator, adds a dedicated hotkey for opening the list of emoji, sorts emoji by most recently used selections, adds support for Quick Look in the Resources tab of the Action Editor, and improves Copy (and Paste) File Contents to work with more plain text file formats (including Markdown). ($29 new with a 20 percent discount for TidBITS members, free update, 13.3 MB, release notes, 10.9+)
Read/post comments about LaunchBar 6.6.
Tinderbox 6.5 — Eastgate Systems has released Tinderbox 6.5 with a new Word Cloud feature, which gives you at-a-glance visibility to the most common terms in a note, section of a document, or an entire document. The personal content assistant also enables you to draw broad links between project items, supports large icons (and improves map layout so that larger icons work well with different shapes), adds a new dashboard option that displays project progress in a percentage ring, improves how Tinderbox uses your Mac’s processors, and adds support for importing from Freemind and tab-delimited value files. ($249 new, free
update, 54.1 MB, release notes, 10.8+)
Read/post comments about Tinderbox 6.5.
Moneydance 2015.7 — The Infinite Kind has released Moneydance 2015.7, a maintenance update to the personal financial management application that scored well in our recent survey (see “Your Favorite Mac Personal Finance Apps,” 29 February 2016). The update adds approved certificate authorities for OFX connections, enables you to allow the confirmation popup window to be docked next to the register (as in Moneydance 2014), improves calculation speed in the budgeting interface, ensures that credit card accounts can accept all banking data, fixes the way memos are saved on
splits in the register, and improves Portuguese and Brazilian/Portuguese translations. If you have a license for Moneydance 2014, you can upgrade to Moneydance 2015 for free. If you purchased Moneydance 2012 or earlier, you can upgrade to Moneydance 2015 for $24.99. ($49.99 new from the Infinite Kind and the Mac App Store, free update, 74.2 MB, release notes, 10.7+)
Read/post comments about Moneydance 2015.7.
Security Update 2016-002 (Mavericks and Yosemite) — Apple has issued Security Update 2016-002 for OS X 10.9 Mavericks and 10.10 Yosemite with a few security fixes that cross over from the concurrently released 10.11.4 El Capitan (see “OS X 10.11.4 Improves Notes, iBooks, and Live Photo Support,” 21 March 2016). The update patches an Apache-related vulnerability associated with processing a maliciously crafted .png file that could lead to arbitrary code execution, multiple memory corruption issues related to XML, and an issue with OpenSSH that could expose an
information leak and a buffer overflow. (Free. For 10.9.5 Mavericks, 370.8 MB; for 10.10.5 Yosemite, 462.1 MB)
Read/post comments about Security Update 2016-002 (Mavericks and Yosemite).
Safari 9.1 — Apple has released Safari 9.1 for OS X 10.9.5 Mavericks, 10.10.5 Yosemite, and 10.11 to 10.11.3 El Capitan — it’s bundled into 10.11.4 El Capitan (see “OS X 10.11.4 Improves Notes, iBooks, and Live Photo Support,” 21 March 2016). The update brings an updated version of WebKit with enhanced support for images, CSS, and Web formats, plus it improves Web Inspector performance and prevents JavaScript dialogs from blocking access to other Web pages. It also receives several security patches, including fixes for a cookie storage issue that existed in the Top Sites
page, memory corruption issues that could lead to arbitrary code execution when processing maliciously crafted Web content, and a caching issue with WebKit character encoding (see this security content article at Apple’s Support Web site). Safari 9.1 is available only via Software Update. (Free, 10.9+)
Read/post comments about Safari 9.1.
OS X Server 5.1 — Apple has released OS X Server 5.1, which has been updated for compatibility with OS X 10.11.4 El Capitan (see “OS X 10.11.4 Improves Notes, iBooks, and Live Photo Support,” 21 March 2016). In fact, OS X Server 5.1 now requires 10.11.4 El Capitan, and previous versions of OS X Server won’t work on 10.11.4 El Capitan, so you’ll need to make sure to install both updates. The release also adds support for TLS (Transport Layer Security) 1.2, adds support for the new education features in iOS 9.3 (see “iOS 9.3 Works the Night Shift, Protects Notes, and More,” 21 March 2016), adds new restrictions to the Profile Manager, and offers performance optimizations for iCloud data caching. According to this Apple security note, the update also addresses an issue in Time Machine Server that neglected to warn administrators if permissions were ignored when performing a server backup and patches a file access issue that existed in Apache with .DS_Store and .htaccess files. ($19.99 new, free update, 186 MB, release notes, 10.11.4+)
Read/post comments about OS X Server 5.1.
ExtraBITS for 28 March 2016
In ExtraBITS this week, we focus on Apple’s battle with the FBI. The breaking news is that the case seems to be over, with the Department of Justice withdrawing. Before that, the judge in the case said that the court order demanding Apple provide a backdoor to the iPhone was likely unenforceable, which might have caused the government to pull out rather than face losing in court. Finally, science fiction author Charles Stross ponders whether the Apple/FBI fight over privacy is an indication that Apple is looking to open its own bank.
Justice Department Withdrawing from Apple Case — The New York Times is reporting that the outside party engaged to unlock the San Bernardino terrorist’s iPhone has been successful, and the Department of Justice is withdrawing from its legal action against Apple. It’s unclear what, if any, useful data was found, or if the FBI will publicize the contents of the iPhone or share with Apple how the information was accessed. We wonder how much money the misguided case cost Apple, but there’s no question that the company’s principled defense also generated some
significant loyalty.
Apple Versus the FBI: Is It All About Money? — Science fiction writer Charles Stross, whose novels often turn on issues of economics and trade, looks at Apple’s current legal conflict with the FBI through an economic lens. He notes that Apple’s enormous pile of cash puts it into a position similar to that experienced by General Motors last century, when its enormous pension fund led the auto maker to become “an insurance company with a car-manufacturing subsidiary.” Stross suggests that Apple’s push for greater customer security is tied to Apple Pay and the
company’s possible long-term strategy to use its cash hoard to create “a retail banking subsidiary to provide financial services directly.” Whether or not you can take that speculation to the bank, it is worth investing some time in reading Stross’s analysis.
iPhone Backdoor Court Order Likely Unenforceable, Says Judge — When the Department of Justice suddenly backed out of its court hearing with Apple, it claimed that the FBI had found another way to unlock the iPhone connected with the San Bernardino terrorist attack. But Adam Engst may have been right when he said, “…it might be an indication that the FBI feels that its chances of compelling Apple to create the equivalent of a backdoor are dropping, and is looking for a face-saving way out.” Sarah Jeong, writing for Motherboard, reveals
that the judge repeatedly told the attorneys in a pre-hearing conference that the original court order demanding an iPhone backdoor was “unenforceable,” and always had been. We aren’t calling the case over just yet, but signs are good that Apple will prevail in the end.