TidBITS#1316/11-Apr-2016
This week in TidBITS, we have another installment in our Power of Preview series that teaches you how to use Preview to annotate PDFs and images. The single USB-C port of the MacBook can be limiting, but Acer has released a monitor that connects via USB-C, provides additional USB-A ports, and can even charge the MacBook — Julio Ojeda-Zapata offers his impressions. For those interested in a standing desk but perturbed by the prices, Julio also rounds up some affordable options for your home office. Finally, we have the latest chapter of Glenn Fleishman’s “Take Control of Slack Basics,” in which Glenn explains all you need to know about channels. Notable software releases this week include GarageBand 10.1.1, Pixelmator 3.4.4, and 1Password 6.2.1.
Chapter 6 of “Take Control of Slack Basics” Available
Messages were the focus of the last two chapters of Glenn Fleishman’s serialized “Take Control of Slack Basics” book, and now it’s time to examine the main place those messages go: channels. (We’ll get to the other spot, direct message conversations, next week.)
Chapter 6, “Work with Channels,” focuses on how to find and join channels, both public and private, and explains the different ways they can show up in your sidebar. You’re not limited to joining channels that others create — following Slack’s “power to the people” philosophy, all team members can create public and private channels by default (team administrators can prevent this, if it’s not appropriate for the organization). Once you’ve created a channel, you can give it a name, purpose, and topic, and invite others to join in. Finally, Glenn explains how you can pin important messages, make channel-wide announcements, leave a channel, and archive a channel that’s no
longer needed.
Want to play with some of these capabilities? Try them out in our public SlackBITS group, which has over 150 members and has hosted some interesting discussions of Slack, the Mac, iOS, and Apple TV (and Josh Centers is fielding questions about the fourth-generation Apple TV there now that his “Take Control of Apple TV, Second Edition” is out). I’ve made sure that the channel-creation capabilities are open to all users now, so feel free to go nuts — you can’t break anything. Instructions on how to join are in Chapter 1, “Introducing Slack.” Also available to everyone is Chapter 2, “Get Started with Slack.”
If you’re just getting started with “Take Control of Slack Basics,” note that Chapter 3 and the rest are limited to TidBITS members, so if you’re not currently one, we hope that early access is incentive to join!. Those generous folks receive other benefits too (like a full-text version of our RSS feed!), but what’s most important is that TidBITS members are the reason you’re reading TidBITS today — we wouldn’t still be publishing without their support. If you’re already a TidBITS member, log in to the TidBITS site using the email address from which you joined to read and comment on these chapters.
- Chapter 1, “Introducing Slack”
- Chapter 2, “Get Started with Slack”
-
Chapter 3, “Master the Interface”
-
Chapter 4, “Post Basic Messages”
-
Chapter 5, “Go Beyond Basic Messages”
-
Chapter 6, “Work with Channels”
The full ebook of “Take Control of Slack Basics” will be available for purchase by everyone in PDF, EPUB, and Mobipocket (Kindle) formats once it’s complete, along with the administrator-focused “Take Control of Slack Admin.” We’re also planning to make the final books available as heavily discounted bulk buys for entire Slack teams, so if you’re interested in that, let us know.
Acer H277HU USB-C Display Is an Affordable MacBook Companion
Apple’s 12-inch MacBook with Retina display is a fantastic mobile computer for the right kind of owner, but it does have limitations.
Its compactness is a plus for those on the go but becomes a liability for users in a home or office where more screen real estate will increase productivity (see “The 12-inch MacBook: A Different Mac for a Particular User,” 29 April 2015).
In particular, the MacBook’s single USB-C port can be annoying for those wanting to attach peripherals while still being able to charge the laptop (see “MacBook Accessories Reduce Single USB-C Port Inconvenience,” 10 March 2016).
Both of these problems can be addressed in one fell swoop, if not perfectly, with a new product that is tailor-made for the MacBook.
Acer’s H277HU display is a 2560-by-1440–pixel (or WQHD) beauty with a 27-inch IPS panel, a 16:9 aspect ratio, a thin gold bezel, and a gold brushed-metal stand in the stylish shape of a ring.
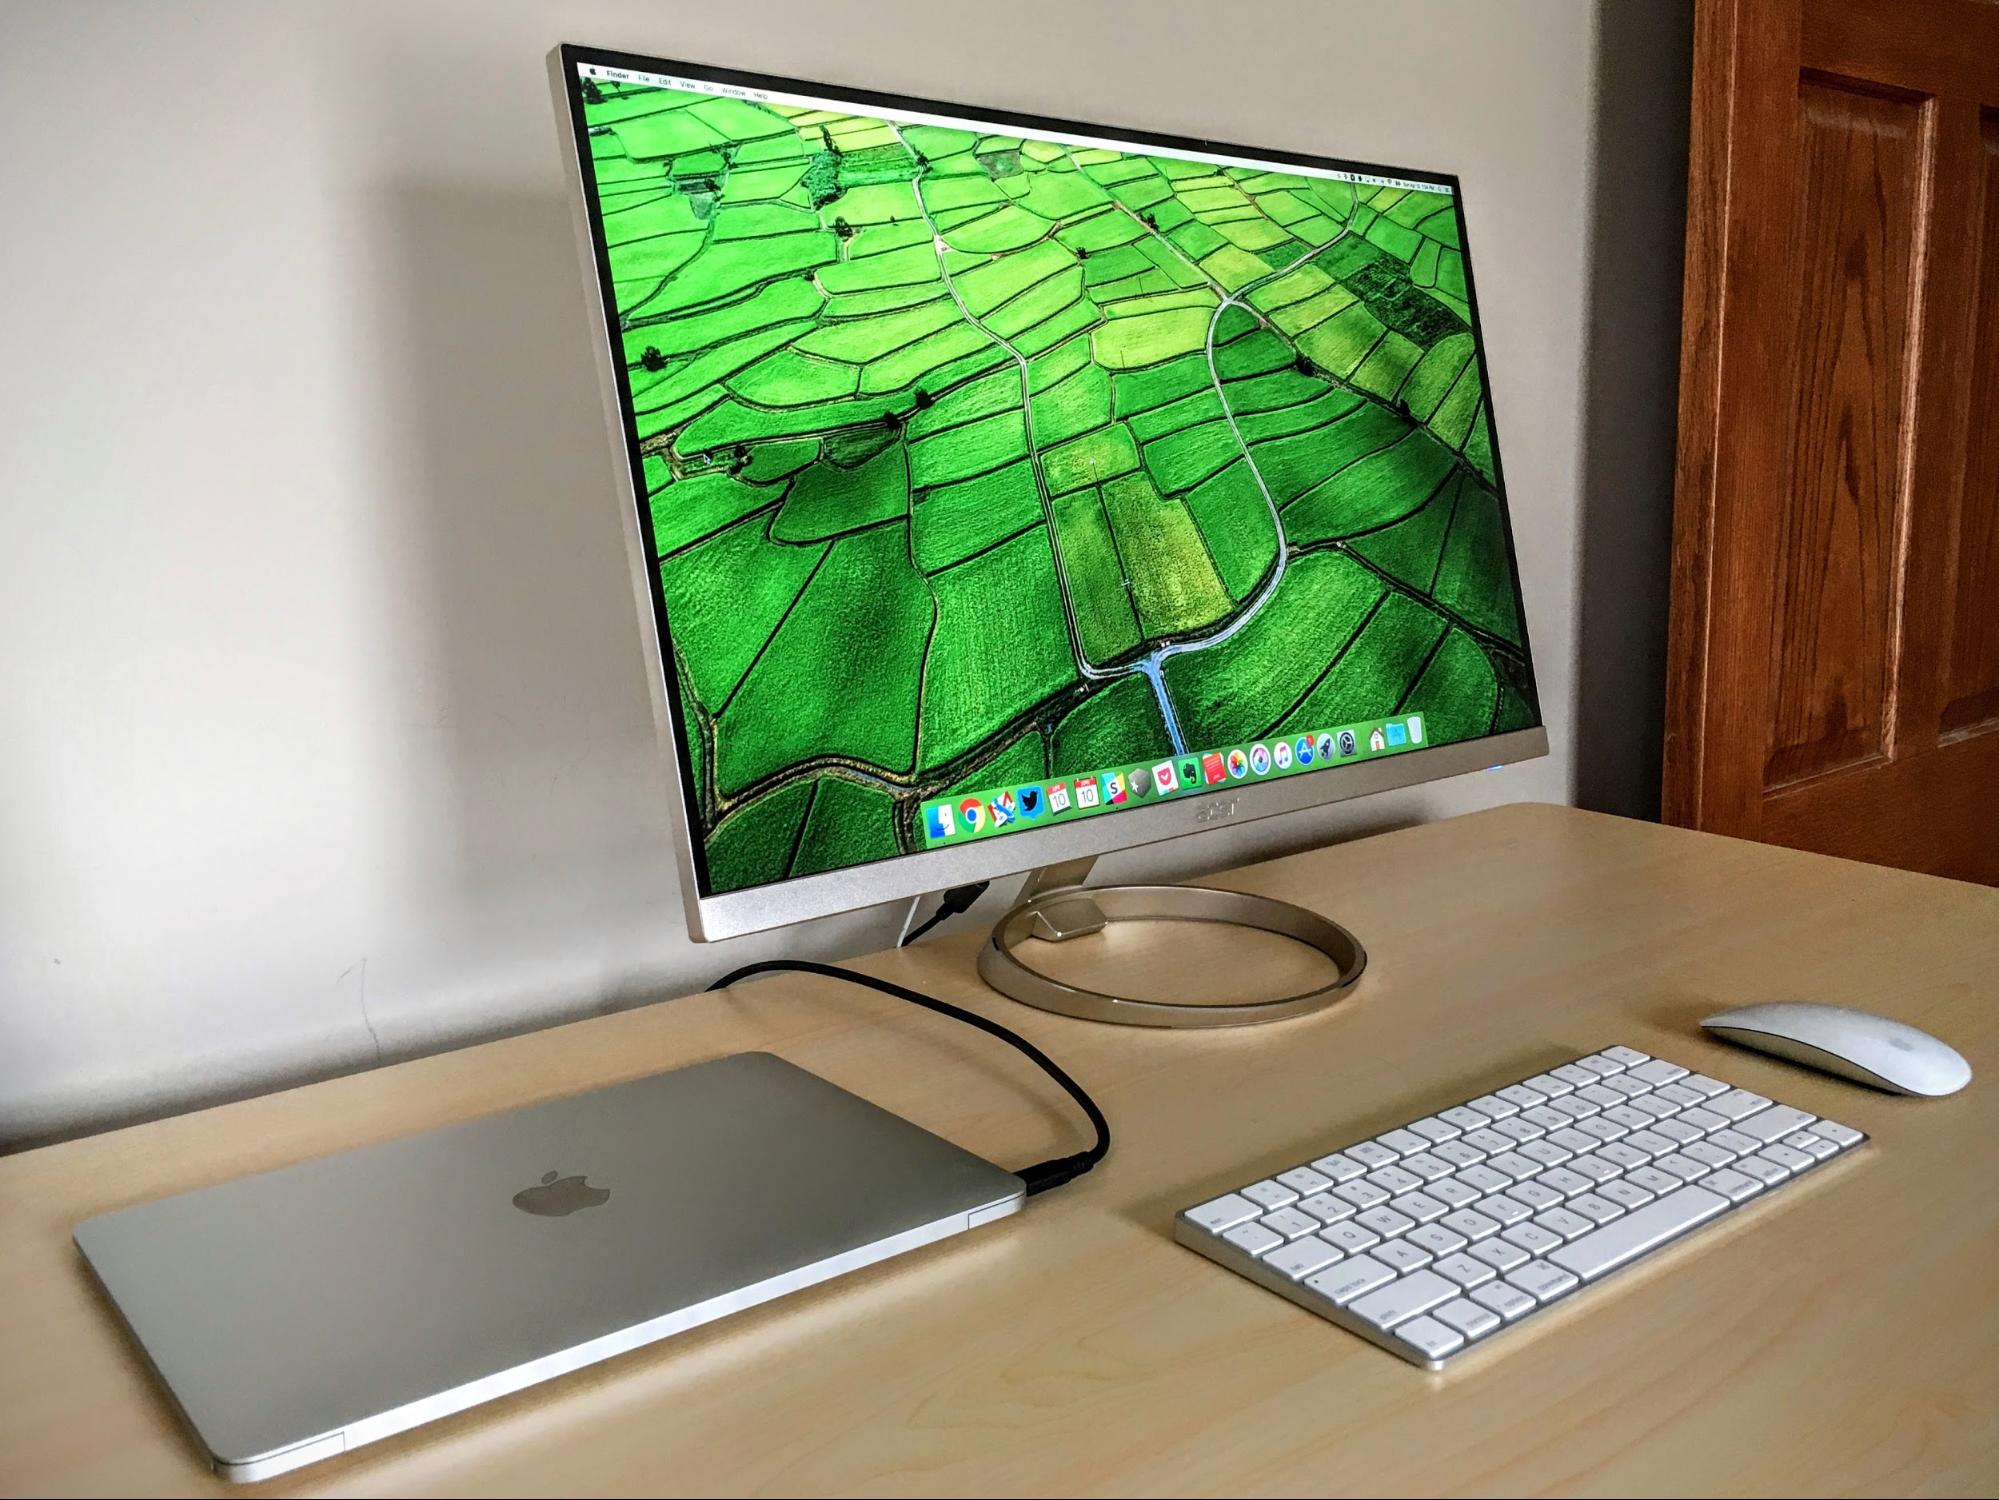
Key for MacBook owners is the H277HU’s USB-C port, meaning that you can plug the laptop into the monitor directly in a pleasingly minimalist fashion, instead of via clunky adapters.

Once connected, the MacBook gets power via the display’s AC adapter. The screen also acts as a USB hub, providing a couple of USB 3.0 ports with USB-A connectors on the back.
Most important, MacBook users score a gloriously ample working area that can be used as an extension of the laptop’s screen. It can also mirror the MacBook’s screen, but the two are such different sizes that it’s not a big win.
I prefer the third option: shutting the MacBook and using just the display, which offers more than enough space for side-by-side working windows or the use of interface-heavy apps like Final Cut Pro. TweetDeck, a multi-column Twitter client that works best on larger screens, is great on this display, with room for up to nine columns.

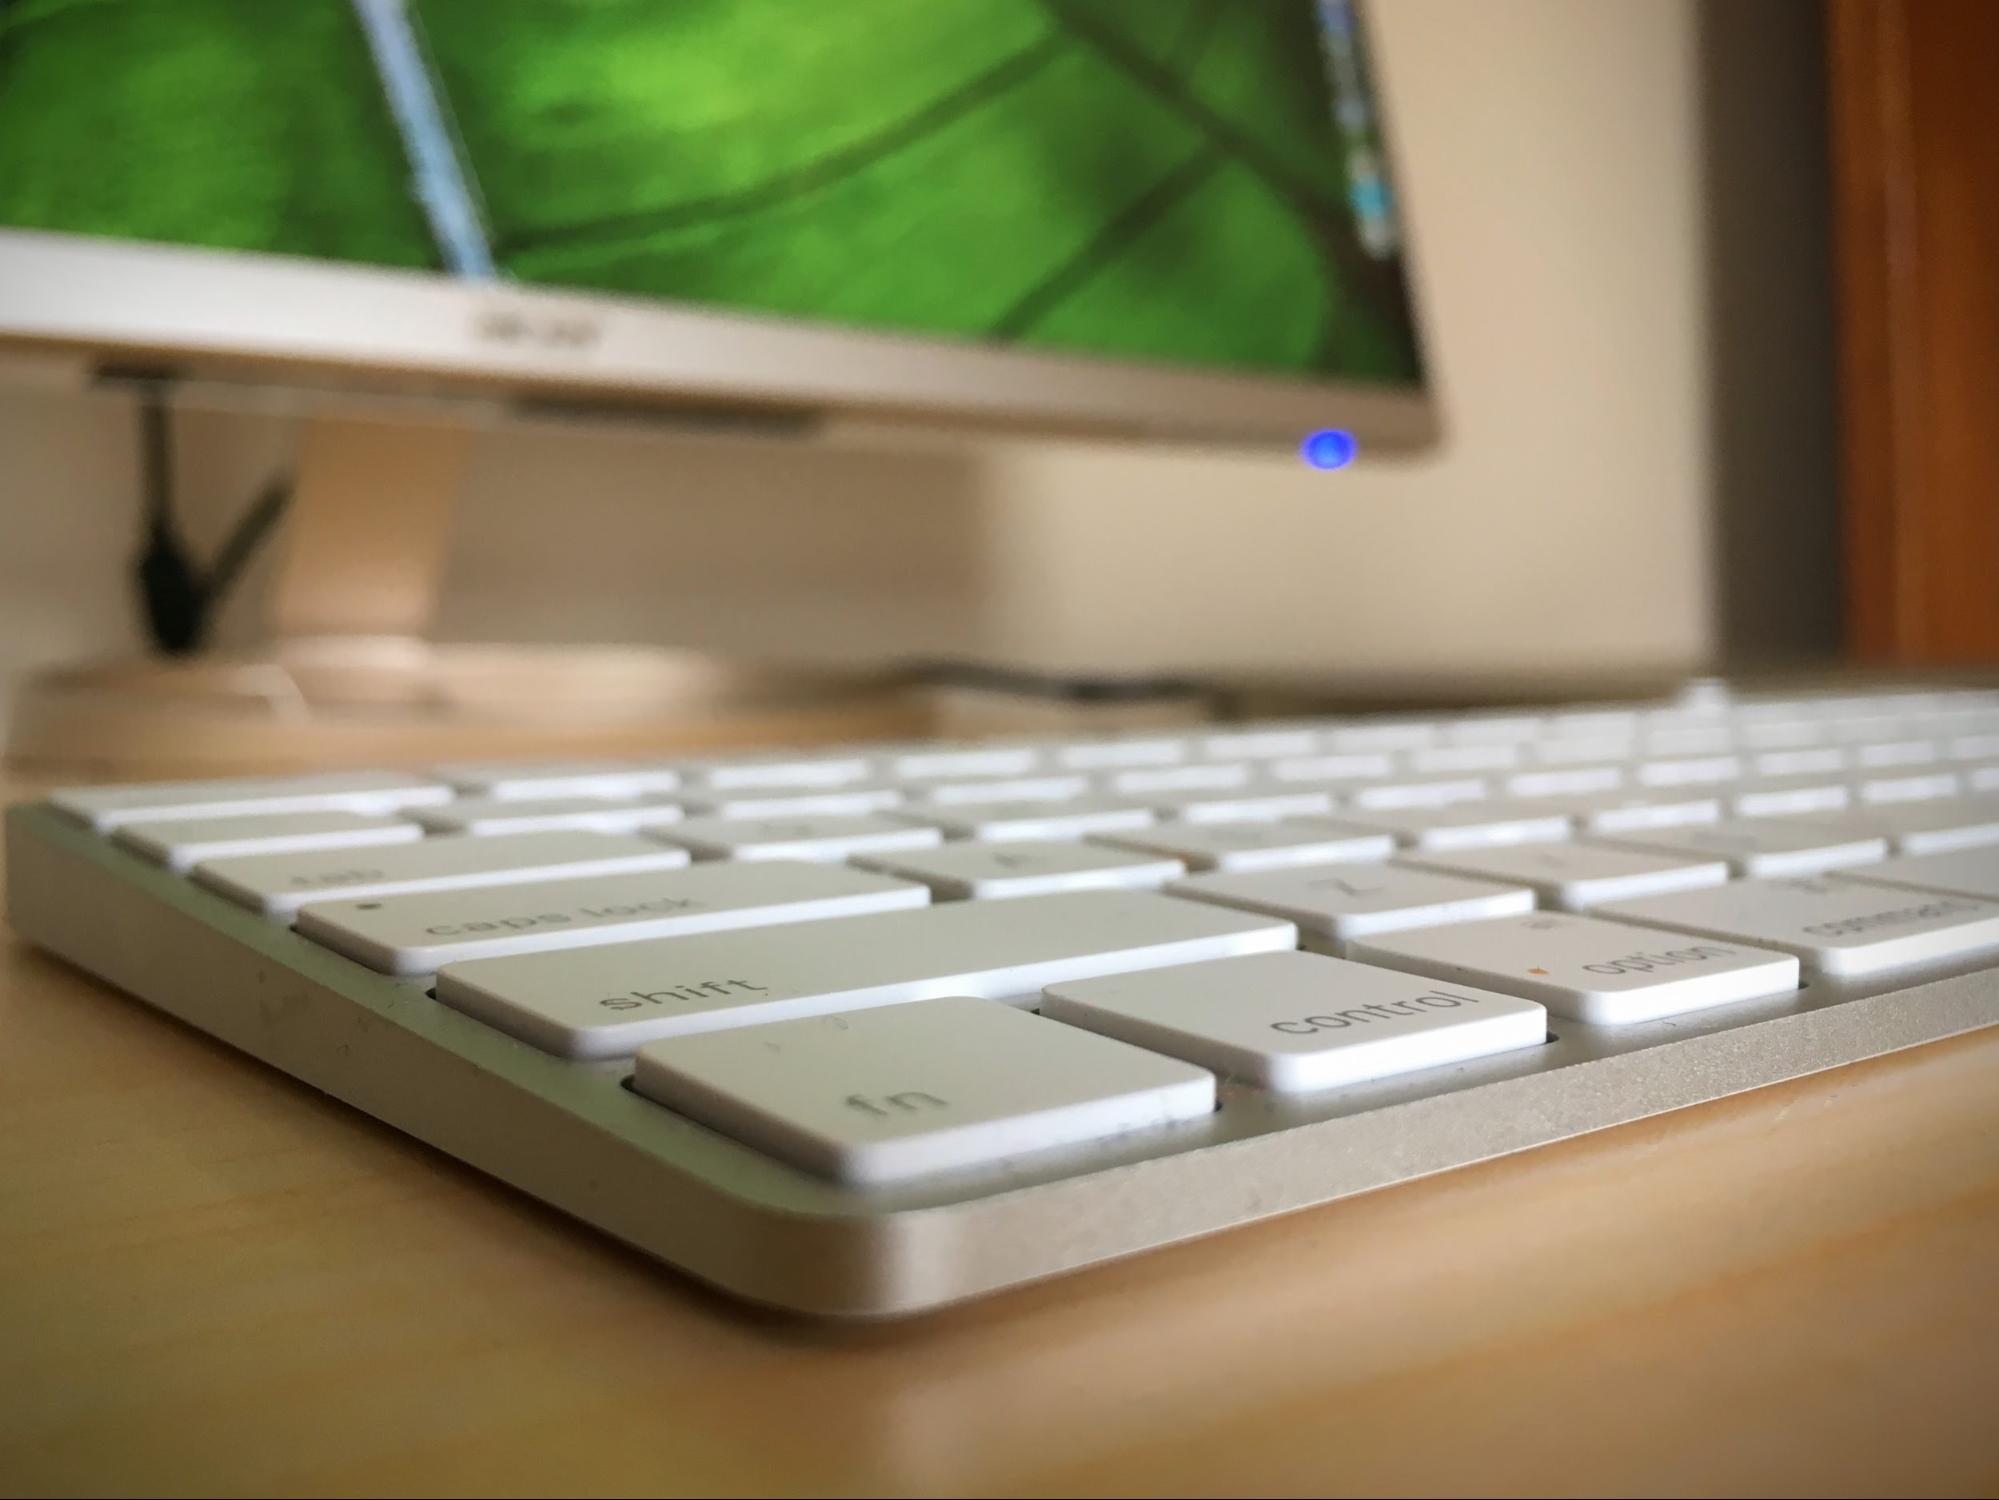
Apple’s Magic Keyboard and Magic Mouse 2 complete my setup (see “Apple’s New Magic Peripherals Offer Modest Change,” 25 November 2015).
To be clear, the Acer H277HU is not a Retina display. By comparison, Apple’s 27-inch Retina iMacs boast an astonishing resolution of 5120 by 2880 pixels, exactly four times the H277HU’s 2560-by-1440 resolution. Even the 21.5-inch Retina iMacs offer a resolution of 4096 by 2304 pixels. However, Acer’s display beats non-Retina 21.5-inch iMacs that provide only 1920-by-1080–pixel resolution, and it’s a little better than the MacBook’s own 2304-by-1440 resolution.
The H277HU’s sub-Retina design could be a deal-breaker for some. Indeed, after heavy use of Retina-grade Macs and iOS devices, my eyes rebelled a bit with this monitor, but I got used to it quickly.
The $499.99 price is right, too. This means, for those who have already invested in a premium-priced MacBook, that an external display can be added to the mix at a reasonable cost.
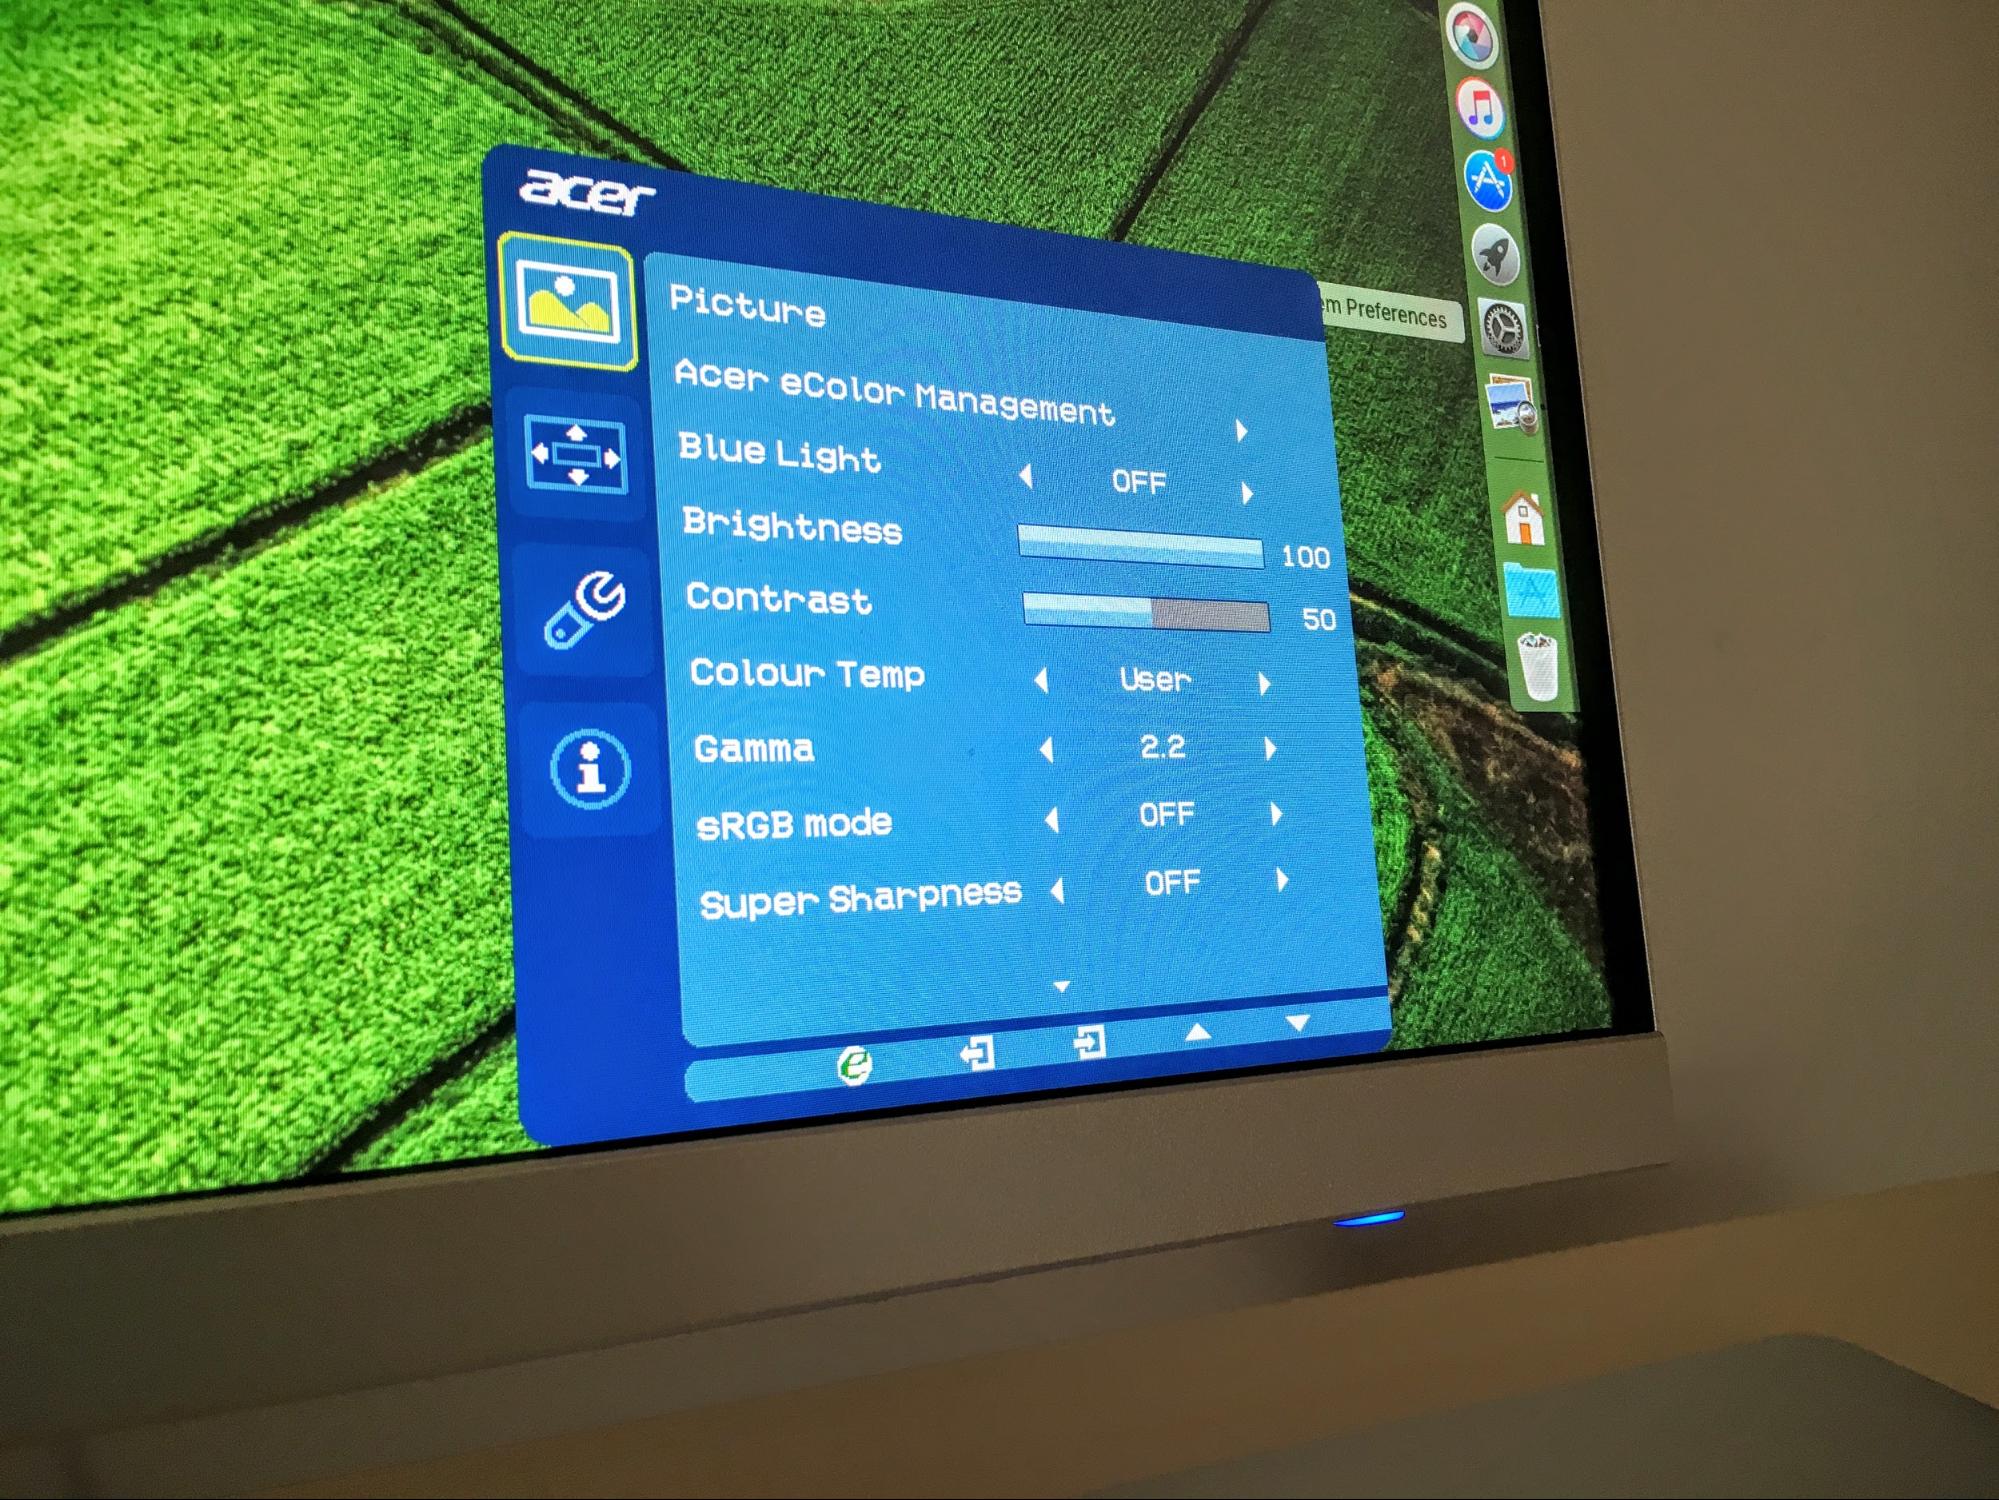
The H277HU’s image quality won’t win any awards. The screen isn’t super bright and lacks vibrancy. Colors seem accurate apart from whites that are subtly tan. Not being a graphics guy, I didn’t mind this and have happily used the display as my main work screen for weeks with no eyestrain or other issues.
It offers a suite of fairly sophisticated color controls for those with high sensitivity. But some of these — like “blue light,” “warmth,” and “super sharpness” — just seemed to make things worse.
Overall, Acer’s display largely works as advertised. Connecting it to the MacBook via the sole USB-C port in the back was plug-and-play — most of the time. A couple of times, the MacBook desktop wouldn’t come up on the large screen until I futzed a bit. The USB-C cord bundled with the display seemed to work best, even though any USB-C cable should be fine in theory.
For those listening to music, the H277HU has built-in speakers, but they aren’t very powerful and can’t be controlled using the Mac’s on-screen audio controls or with the Magic Keyboard’s audio buttons. The speakers are on the back, which is necessary for achieving those razor-thin bezels, but that makes the sound muddier than with front-facing speakers. There is no audio jack for connecting external speakers. I stuck with the MacBook’s internal speakers most of the time. Bluetooth speakers are another option, or you can plug speakers into the laptop’s own audio port.
In terms of ergonomic options, the monitor can tilt forward or backward up to 15 degrees, but it can neither swivel nor be raised or lowered. It’s quite stable on its base, swaying a bit only if jostled.
Don’t assume this display is only for USB-C users. It also provides full-sized DisplayPort and HDMI ports on the back, and I had no troubles connecting a 13-inch MacBook Pro via HDMI.
The H277HU is one of the first in a new wave of USB-C monitors, as I observed in “MacBook Accessories Reduce Single USB-C Port Inconvenience.”
But, after using it, I’m not scanning the horizon for better prospects. Although the display isn’t perfect, it’s capable and affordable, and would be a terrific sidekick for any MacBook owner seeking an external screen.
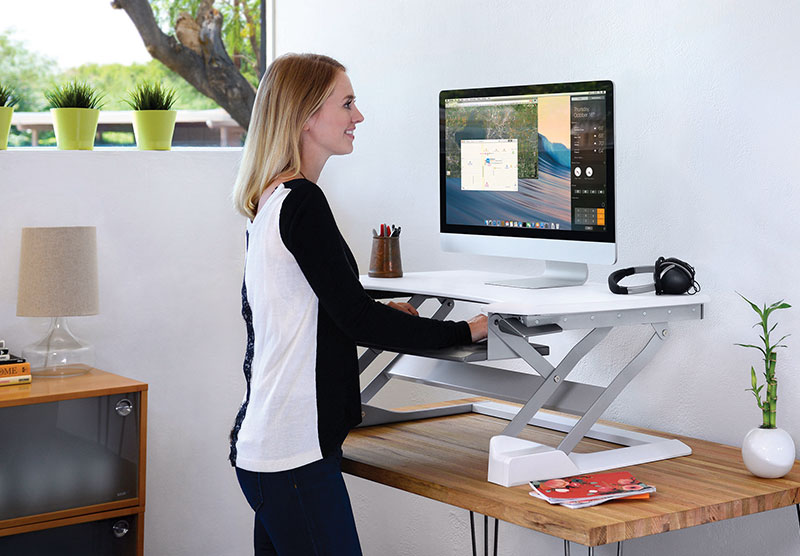
Cheaper Alternatives to Expensive Standing Desks
I was delighted when my employer recently moved out of its old, decrepit offices in downtown St. Paul, Minnesota, and into a modern complex just across the Mississippi River.
The new offices have awesome amenities. For instance, I have a motorized standing desk of the sort that can be raised or lowered with the push of a button so I can work while standing or sitting.
Such height-adjustable furniture is increasingly commonplace in offices because of its supposed health benefits, though experts have lately cautioned that such claims are more speculative than research-backed. I’m still a fan of standing desks because getting on my feet every now and then while I’m working makes me mentally sharper and less physically fatigued than sitting for hours on end.
Not all office workers are lucky enough to score fancy motorized standing desks, and those who are self-employed often do without, since these desks run from the high hundreds into the thousands of dollars.
Fortunately, lower-cost alternatives exist. Many are inexpensive DIY standing desks, but such jury-rigged setups typically can’t be lowered for use in a sitting stance (and for me, non-stop standing is no less problematic than sitting all day).
A better option is a work platform that sits atop a regular desk or table to replicate the functionality of full standing desks. A traditional fixed surface becomes, in effect, height-adjustable.
A host of such products are available from a variety of vendors, and I wrote about some in “Ergotron Lets Mac Users Stand and Deliver” (5 December 2014).
Since then, I’ve broadened my horizons to try out products that are not quite as Apple-focused, but are suitable for use by either owners of desktop Macs, users of mobile Apple computers (Mac or iOS), or both. In the past year, I have tried a half-dozen such products with a range of designs. None are motorized, like my office’s standing desk, instead adjusting their heights by other means.
Ergotron Home — I’ll start by revisiting Ergotron, whose headquarters is just down the road from where I live and work.
The company recently unveiled an Ergotron Home line aimed at making adjustable work gear more appealing and accessible to the masses. I’ve been testing a couple of these products.
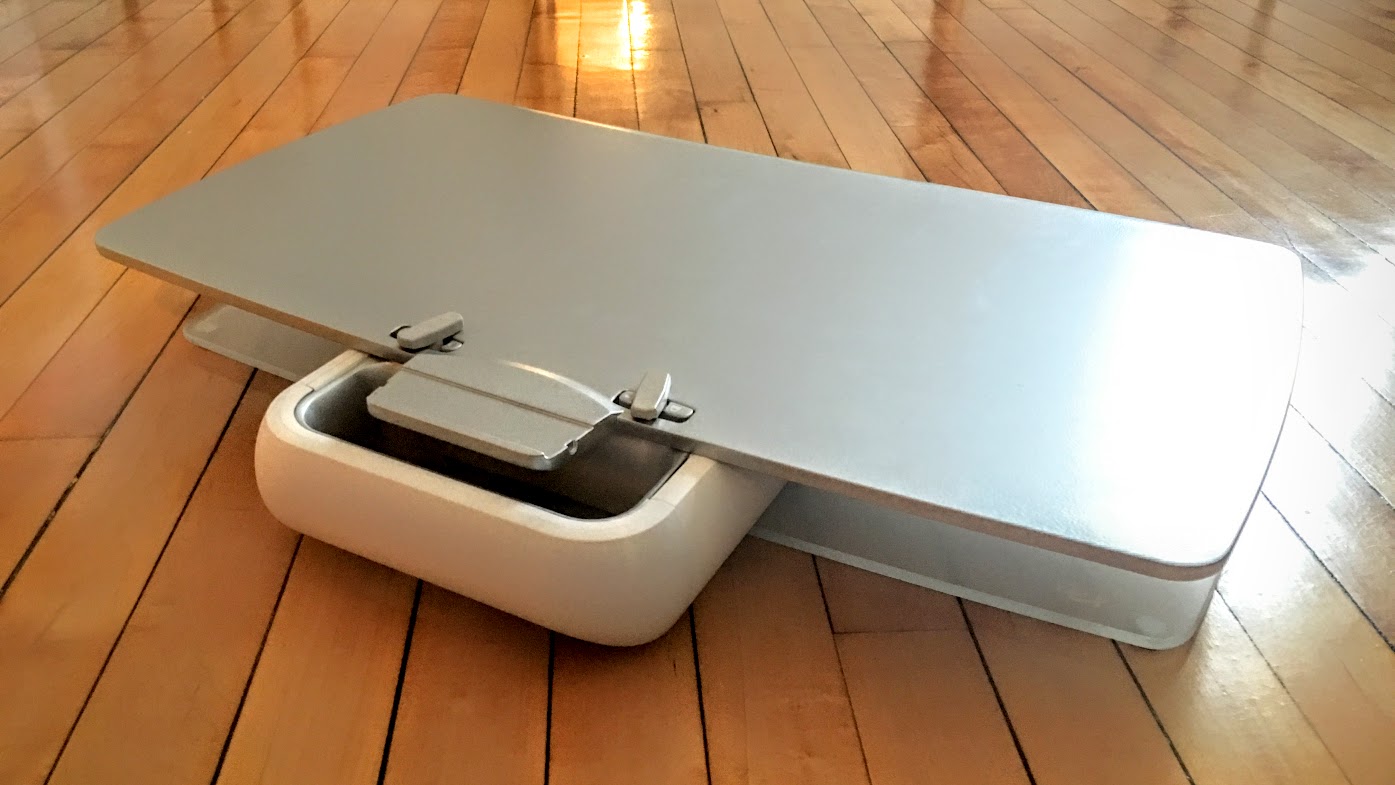
The most unusual of these, the Lift24 laptop platform, is a bargain at $249.95, and is designed somewhat for mobility. The apparatus can be set up at a desk, table, or counter for standing use, and then collapsed and transferred via a carrying handle to another location.
I’ve been using it outdoors, on a wooden table on my front porch when the weather is nice, and indoors, deployed at various locations around my house.
The Lift24’s pieces include a sturdy tempered glass base and an elevated stainless steel laptop shelf, both of which are attached to a frame-like vertical body with a trigger mechanism at the top for height adjustment.
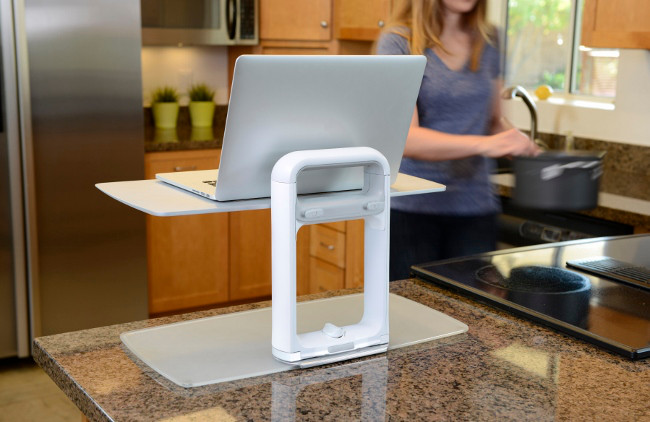
The Lift24’s design is ingenious, but not without minor problems. Wobble is one. People requiring a rock-solid laptop surface might dislike this stand because the shelf has some give and jiggle. I did not mind this too much after using the unit for a while, however.
At 12 inches deep and 23 inches wide (30 by 58 cm), the shelf is also a tad cramped as a workspace when using a laptop with a mouse. Much of the time, I was using an iPad Pro with an add-on keyboard, which was fine.
The shelf has another quirk, but Ergotron said it’s a part of the design. The slab isn’t level with the ground, but inclined slightly upward on the user end. Ergotron calls this “negative tilt” and says it’s “ergonomically friendly for your wrists. It keeps them straighter, which helps prevent carpal tunnel.” This annoyed me initially, but grew on me after a while.
Unlike other products detailed in this article, the Lift24 can’t be lowered to desk level for use while sitting. Such a feature would be pointless, though, since you can just take the computer off the shelf when you want to sit down.
Collapsing the Lift24 for storage or transport is a bit of a process, but it becomes a tight bundle, and it can be lifted and toted around like a small suitcase. You wouldn’t want to carry it long distances, but it’s fine for schlepping to the office.
The laptop shelf also can be used by itself as a lap desk for working with a laptop on the couch. Having a big slab of metal across my lap was a bit odd at first, but I came to appreciate the flexibility it offered.

The Lift24, though serviceable, is too compact to qualify as a full standing desk and is unsuitable for use with desktop computers. But for notebook users who need mobility and do not mind cozy conditions and a bit of give, it could do nicely.
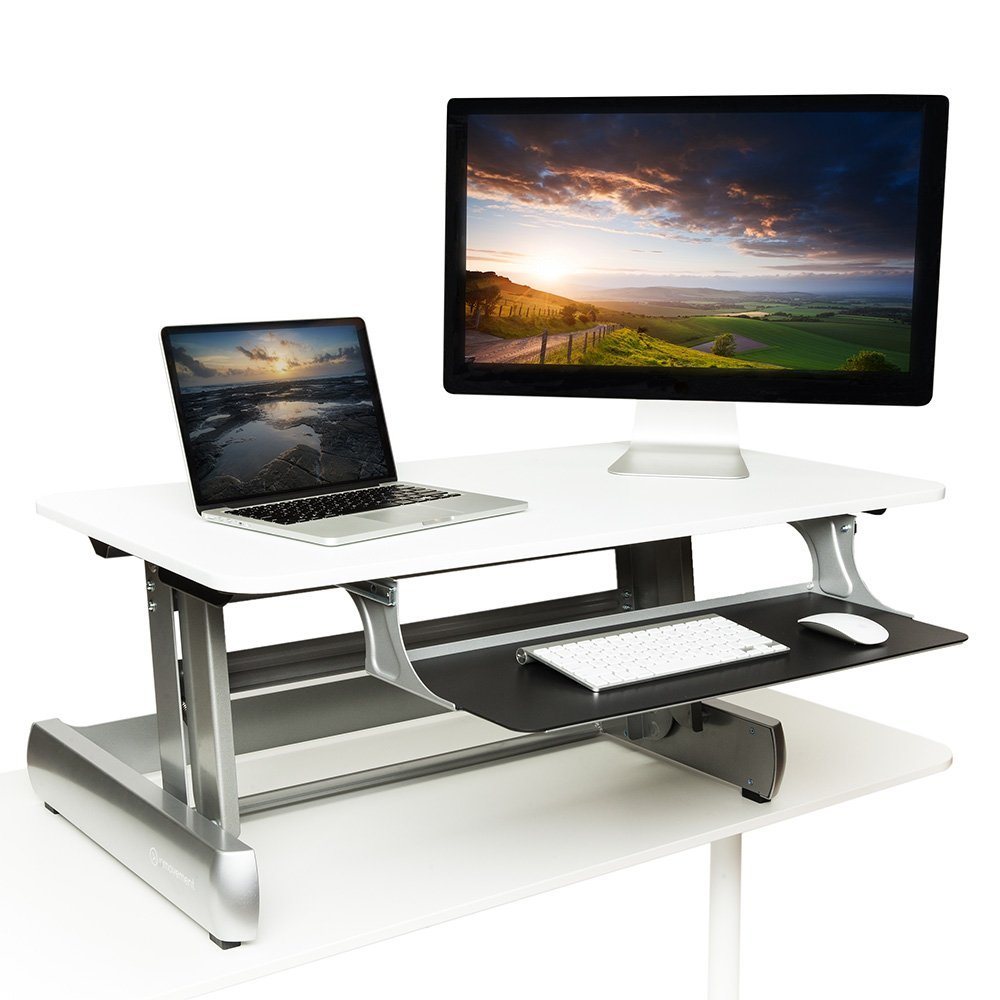
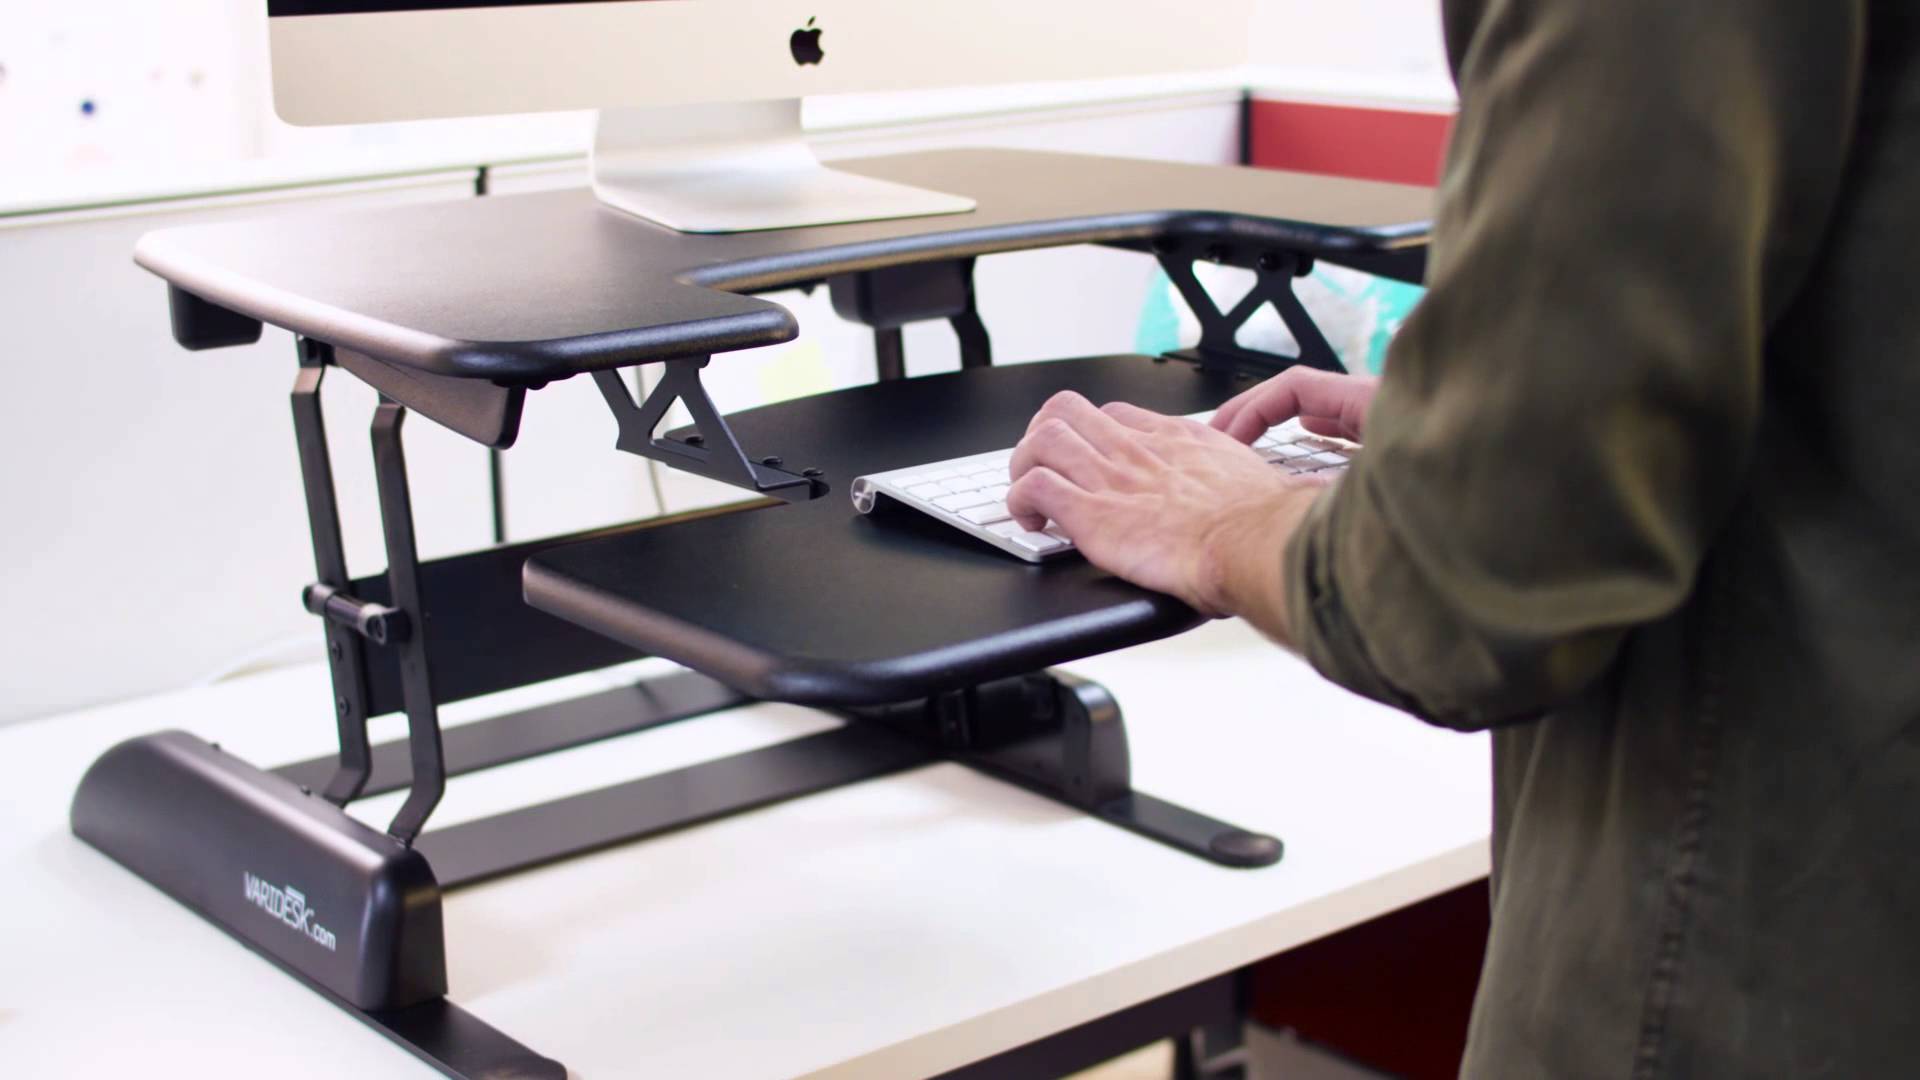
The other Ergotron product I tried, dubbed the Lift35, is a more conventional standing desk. It’s a consumer variation on the WorkFit-T, an entry in Ergotron’s corporate line of adjustable work products.
The $449.95 Lift35 is much simpler than the Lift24. It consists of a large platform for one or more monitors or all-in-one computers (like an iMac), along with a smaller and slightly recessed platform in the front for a keyboard and mouse. The unit has an ample 35-inch-by-25-inch (89 by 63 cm) footprint and can hold up to 35 pounds (16 kg).
On the left and right of the Lift35, two mechanical levers can be flipped upward to lift and lower the rig. This is mostly effortless thanks to a counterbalancing mechanism that makes the raising and dropping super smooth.
The Lift35 is a beast, which is one of its strengths. It feels sturdy and solid, with virtually no give. Even the keyboard platform is a rock, though it is a bit on the cramped and narrow side for those using a full-size keyboard with a numeric keypad, along with a mouse. Apple’s Magic Keyboard fits in nicely, however, alongside a Magic Mouse 2.
The Lift35 lacks some features found in its WorkFit-T cousin, including pre-drilled holes for use with specialized expansion kits, but Ergotron said these would be of minimal interest to average consumers. On the other hand, the Lift35 has a few features the WorkFit-T lacks, like the choice between three optional wooden work surfaces (each raising the cost of the desk to $699) and even the option of real bamboo (which hikes the price to a whopping $899).
Ergotron Alternatives — The Lift35 has competition, which is to be expected since this kind of standing desk is quite popular.
I tried a couple of Lift35 alternatives from two Ergotron rivals, VariDesk and InMovement. Their standing desks work in much the same way, but with a number of design variations.
InMovement’s entry, the $399 Elevate DeskTop DT2, is true to its name in that its upper surface looks a bit like a desk with rounded edges and a couple of wood-finish options (along with a white option). The rest of this rig is shiny, curvy metal that looks quite stylish. The desk as a whole is lovely, in fact.
As with the Lift35, levers on the left and right allow for smooth raising with a counterbalancing mechanism.
The DT2’s keyboard tray, unlike the fixed Lift35 version, is a thin, slide-out variant that flexes a bit too much for my taste. However, colleagues who used a couple of DT2 test samples extensively said they didn’t mind this in the least.
A movable keyboard tray has one big advantage: it can be pushed inward and out of the way if the user wants to use just a single, flat work surface that is more appropriate for laptop use.
VariDesk, a prominent maker of standing desks, has a dizzying selection of desktop work units, with something for everyone in a range of styles and sizes. Some have distinct, separate display and keyboard platforms. Others feature a single all-purpose surface.
The model I tried, the $375 ProPlus 30, is much like the Lift35 in that it has a small platform for a keyboard and mouse, and a bigger one for a screen or all-in-one computer. It has levers on the right and the left for raising and lowering, which is smooth and effortless thanks to a counterbalancing mechanism.
The ProPlus is curvier than the Lift35, with a typing area that is more open and feels much less restrictive. The unit is constrained by its 30-by-30-inch (76 by 76 cm) footprint, however, with room for only one display or iMac. But other models in the ProPlus series, the 36 and the 48, add width while working in the exact same way.
The ProPlus 30 has another big flaw. When its lift mechanism is engaged, it does not move straight up, as the Lift35 does, but arcs a bit towards the user. This can be a problem for those typing in tight quarters since the station ends up gobbling space the user otherwise would be able to occupy.
VariDesk has remedied this shortcoming somewhat with standing desks in its Pro, Compact, and Cubicle lines. These still have a bit of an arcing movement when they are elevated, but it’s much less pronounced.
Simpler Options — The products described so far are a bit elaborate and bulky. Those wanting greater simplicity have other options.
For laptop users, VariDesk provides an ingenious (if not terribly attractive) mini-standing desk called the Soho. It consists of a typing platform along with metal legs that expand and contract to adjust the unit height via left and right levers.
The platform, with nicely curved edges, is 14 inches deep and 31 inches long (36 by 79 cm) — just right for a laptop along with a mouse. It’s made in white and black.

The Soho is intended to be somewhat mobile, though the lack of a carrying handle makes this a bit awkward. Even so, at $175 it’s a steal.
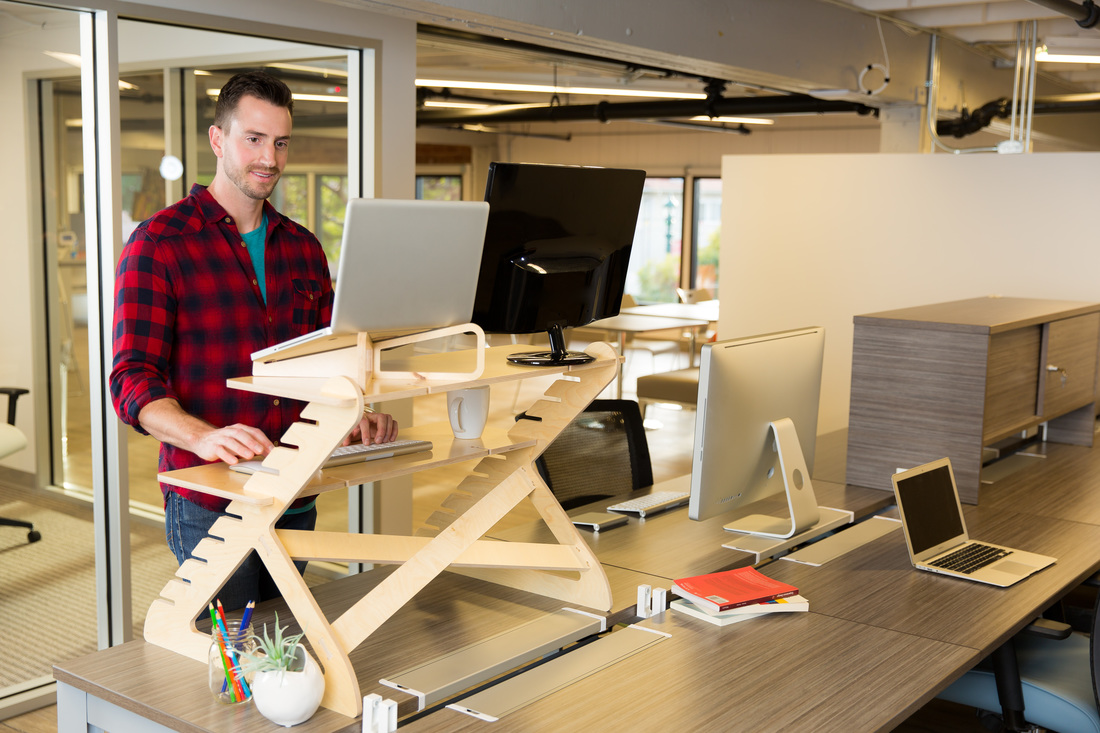
Another product I tried, the Readydesk 2, is unusual in that it’s entirely non-mechanical, made solely from wooden slabs. Two of the slabs are notched upright supports, and two other pieces fit, shelf-like, into the notches. Height-adjustability is achieved by picking the correct notches for the shelves.
The Readydesk 2 provides several work configurations, depending on what kind of hardware is being placed upon it.
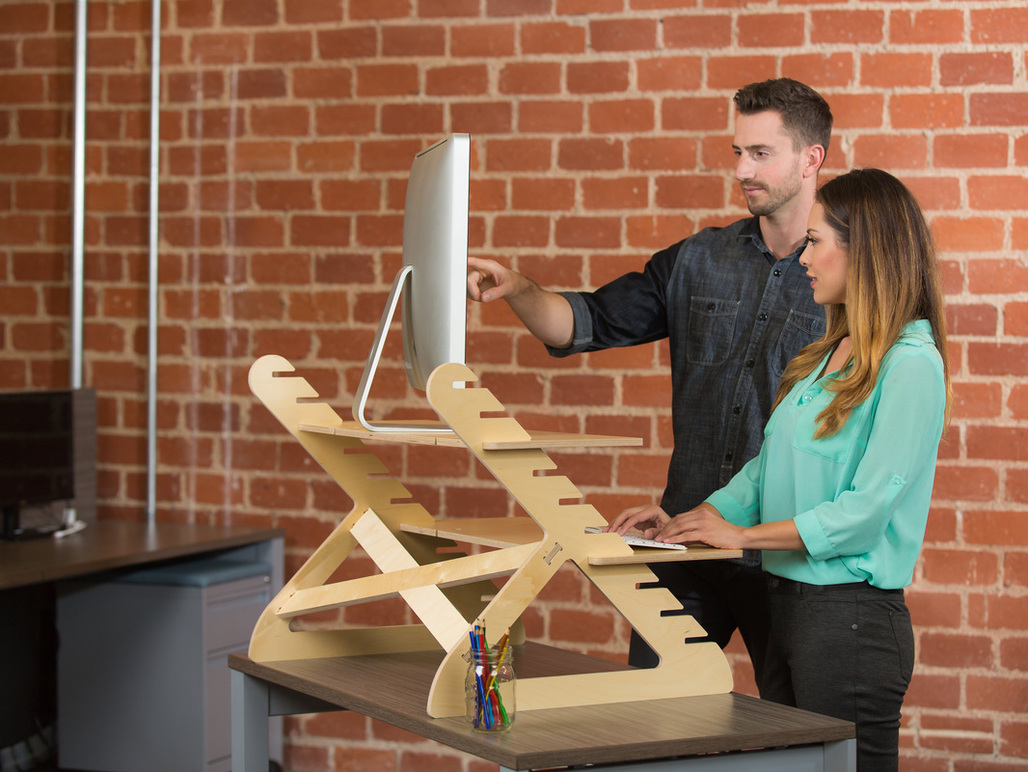
A single shelf suffices for those using notebooks. Both shelves are required if notebook users add an external keyboard and mouse, with the laptop on the top shelf, as a display, and the peripherals on the lower one. This setup also would apply to those using a standalone monitor or all-in-one computer, along with a mouse and keyboard (as pictured below).
The Readydesk 2 is much sturdier and more stable than it looks, thanks in part to crisscrossing struts on the back that hold the upright elements together. It’s also carefully designed to place the display at about arm’s length, which is considered to be the optimal distance (about right for me). Some prefer their screens farther away from their faces, but the Readydesk does not allow for this.
The Readydesk 2 also won’t work well for those who like to shift between standing and sitting stances. Adjusting the display height is a hassle, since you have to remove an iMac or monitor to reposition its shelf in a new slot, and there’s no obvious desk-level option for typing while sitting. Laptop users could remove the Readydesk from desks and tables when it’s not needed, but its size and weight makes this a chore.
I’d also suggest the maker sand down the shelves’ sharp, slightly uncomfortable edges so they are a bit rounder and softer for the delicate undersides of users’ wrists.
The Readydesk 2 costs $169.99 (or $179.99 with a laptop-elevating kit called Readyriser that tilts a notebook for better viewing; see the picture below).
Wrap-Up — In an ideal world, everyone would have fancy motorized standing desks like the one in my office.
There are full standing desks of the non-motorized variety, too. I have tried and liked Ergotron’s WorkFit-D, which substitutes the motor with an ingenious one-lever manual height-adjustment system that is quick and simple to use.

Likewise, VariDesk offers a Pro Desk series, each with those familiar levers on the left and right to tweak the working surface’s height in a jiffy.

But all these products, motorized or not, are priced at least in the high hundreds — too steep for some. Besides, many people will not want to get rid of a traditional desk to make room for a standing desk.
That’s where standing-desk products that rest atop desks, tables, or counters come in. If you’re interested in doing some of your work while standing, you should be able to find a solution that fits both your space and your budget.
The Power of Preview: Annotating Documents and Images
The last time we explored Preview, OS X’s built-in document and image viewer, we discussed using it to crop and resize images, as well as how to undo those changes (see “The Power of Preview: Cropping and Resizing Images,” 18 March 2016). Although Preview has many more image manipulation tools, we’re focusing this week on Preview’s annotation capabilities, which you can use to mark up an image or PDF (you can’t annotate Microsoft Office or iWork documents).
Most of Preview’s annotation tools are available in the Tools > Annotate menu, but it’s often easier to find them in the Markup Toolbar, which you can display by clicking the toolbox icon on the main toolbar, or by choosing View > Show Markup Toolbar (Command-Shift-A).
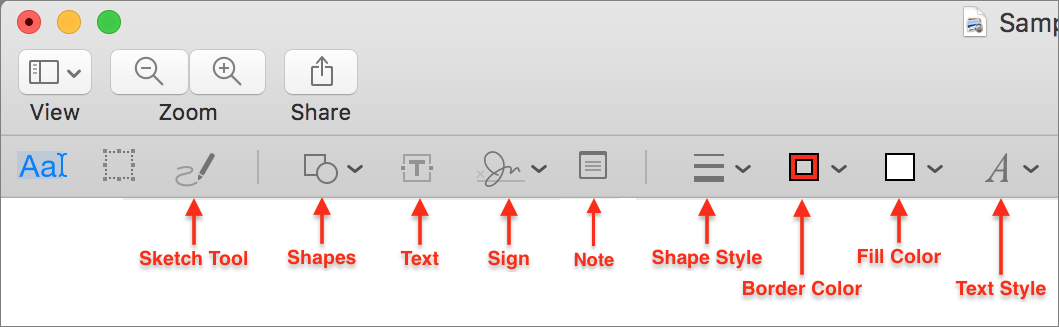
The Colour and the Shape — The Preview annotation tool we use most often is Shapes, which makes it easy, for instance, to call out a particular interface element in a screenshot. You can find all available shapes under Tools > Annotate > Rectangle, Oval, Line, Arrow, Polygon, and Star. However, it’s usually faster to access Shapes on the Markup Toolbar.

Whether using the menu or toolbar, choose a shape to insert it into your document or image. It appears in the center of your document; to insert a new shape at a particular spot, click Shapes on the Markup Toolbar, and then drag the desired shape to the spot you want.
A selected shape is surrounded by blue drag handles you can use to adjust the shape’s dimensions. As in many image manipulation apps, you can press Option while dragging a handle to resize from the center, and press Shift to maintain the shape’s aspect ratio. For lines and arrows, the Shift key constrains the line to 45-degree angles.
You can, of course, move the shape, by placing your cursor on the shape anywhere other than on a drag handle — when your cursor becomes a hand, click and drag to move the shape. Or just click once to select the shape, after which you can use the arrow keys to nudge it more precisely.
As is often the case, if you need more than one shape of the same type, you can either use copy and paste, or simply hold down Option and drag the shape, as if to move it, to create an exact duplicate.
The line, polygon, and star offer additional possibilities. When first inserted, lines are straight, but a green drag handle in the middle of the line lets you make it into a smoothly curved line. By default, inserting a polygon adds a hexagon to your document. But if you select it and look closely, you’ll see another green drag handle. Move that handle counter-clockwise to remove sides, down to three, or clockwise to add sides, up to 12. The star shape works similarly, except it has two green handles, one that adds or remove points and another you can use to change the length of the points. For both the polygon and the star, the Shift key’s behavior is reversed; the resizing handles maintain aspect ratio by default, and the Shift
key lets you change the horizontal and vertical dimensions independently.
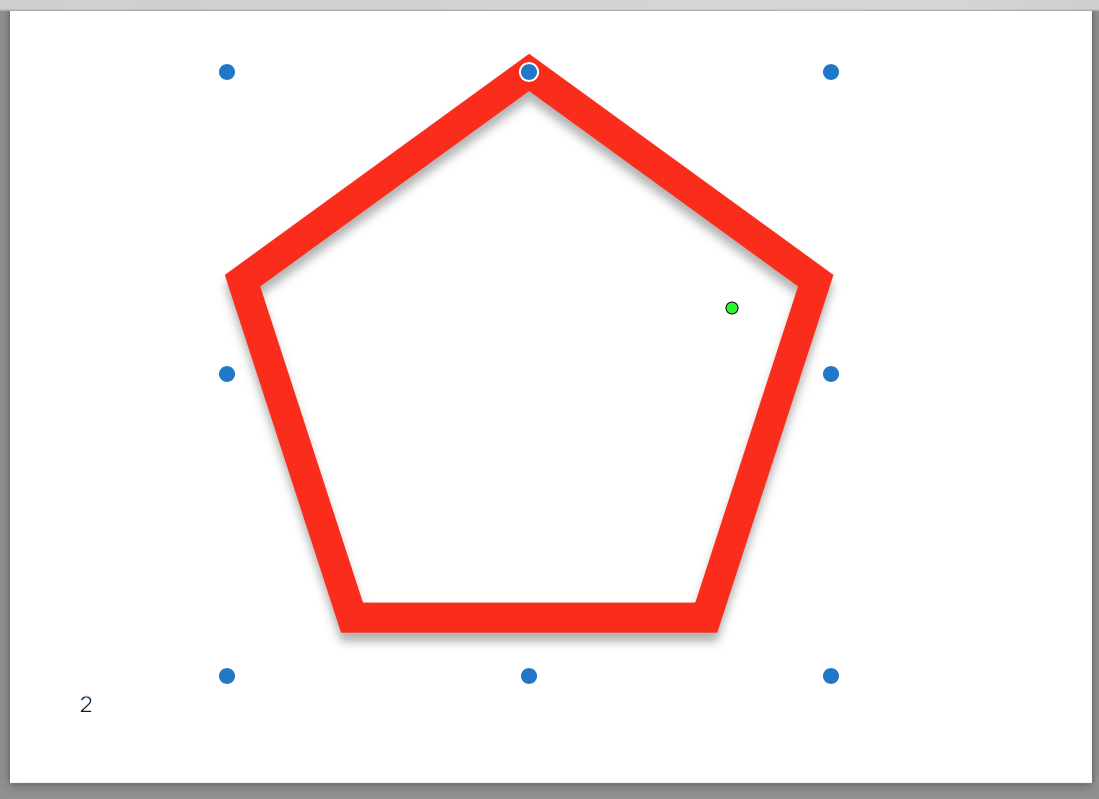
It’s possible to rotate a shape, too, but only if you have a trackpad. Select the shape, put your thumb and forefinger on the trackpad, and twist. Make sure you have a shape selected first, because otherwise Preview rotates the entire image (in 90-degree increments).
After adjusting the shape, size, and position, you can further customize the shape’s look with options on the Markup Toolbar:
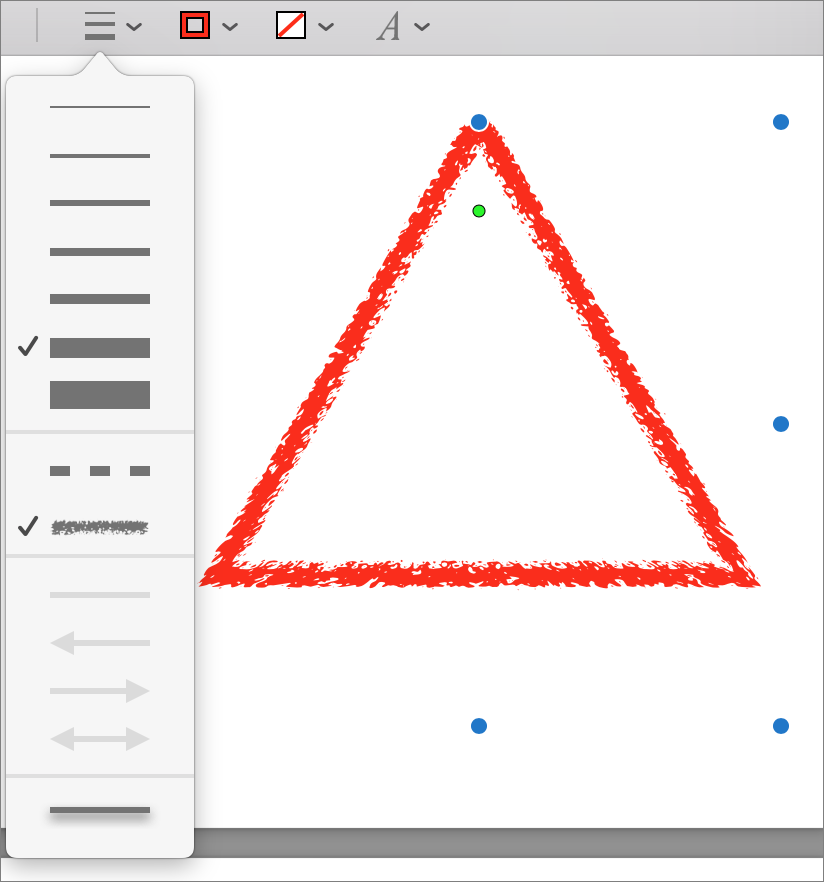
- Shape Style: Use this menu to adjust the thickness of the shape’s exterior line, generally called the “stroke.” You can also make the stroke dashed or rough-drawn, as well as add or remove a drop shadow. For line and arrow shapes, you can also choose where to place arrows.
-
Border Color: Click this button to display a color picker that lets you adjust the color of the shape’s stroke.
-
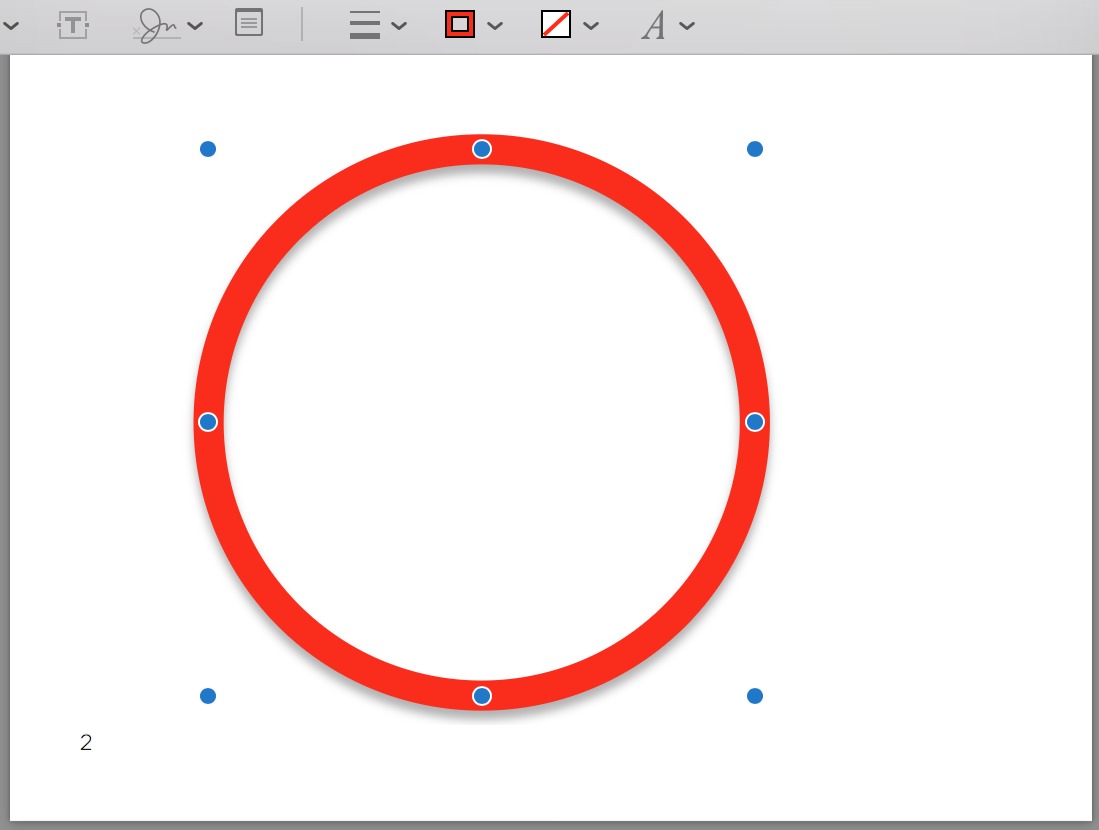
Fill Color: Similarly, this button reveals a color picker that lets you adjust the color of the “fill” — the space inside the stroke. By default, it’s set to “no fill,” signified by a red line across a white square.

There are a few ways to use these tools in constructive ways other than inserting pretty shapes. A technique we use frequently at TidBITS and Take Control is to place a red oval or rectangle with no fill around interface elements we want to draw attention to. Even if you’re not a technology writer, snapping a quick screenshot (which you can do from within Preview, as you learned in “The Power of Preview: Pulling Files into Preview,” 25 February 2016), highlighting an onscreen item, and
sending the annotated screenshot to a friend can save time and frustration when trying to assist with a technical issue. Arrows can also be useful for pointing out specific details.
Shapes can also be helpful for redacting text from PDFs that you’re planning to print. Create a rectangle with a black stroke and a black fill and drag it over a portion of a document you wish to obscure. When you print the document, the black rectangle will cover the sensitive material. (Josh once had a job that involved doing this for thousands of documents, albeit not with Preview.) Don’t assume this technique will work for PDFs you’re distributing digitally; the shapes remain editable objects that can be moved and deleted in both Preview and Adobe Reader. For a true redaction capability that deletes the text underneath the black bar, use Smile’s PDFpen or Adobe’s Acrobat Pro.
Preview remembers your settings, so if you generally want shapes with 3-point red strokes and no fill, you’re all set. Unfortunately, there’s no way to save different settings, so if you switch to a black rectangle, reverting to your previous settings must be done manually.
With PDFs, annotations remain unique, editable objects, even after you save, close, and re-open a document. However, with images, that’s not true. Once you close an edited image, all your annotations are flattened into the underlying bitmap of the image and can no longer be selected and manipulated individually. In other words, make certain that you’re done adjusting annotation shapes before you close the file.
One final tip here. You might think that you could use Edit > Select All (Command-A) to select all the annotations you’ve made and delete them. You’d be wrong; that selects all the previously existing picture content instead. However, you can Shift-click multiple objects to select them simultaneously for moving or deleting all at once.
Who Was That Masked Loupe? — For an alternative way to call things out, check out the Mask and Loupe shapes, both available from View > Annotate and the Shapes button menu in the Markup Toolbar.
Mask is a bit tricky to use because it’s sort of a reverse shape: the actual shape is a large gray border that deemphasizes what it covers. Inside that border is a “no fill” rectangle that you position over the portion of the image you want to highlight. The blue drag handles work as you’d expect, but to select or move the rectangle, you must click outside it, not inside, like every other shape. Play with the mask shape on a throwaway image so you can get a sense of how you might use it.
Loupe inserts an onscreen magnifying glass, which is a helpful way to highlight small details, but it also distorts the image, which can be confusing to the viewer. You change the size of the loupe with the blue drag handle and adjust the zoom level with the green drag handle.
The Pen Is Mightier — If you’d rather draw shapes yourself, Preview lets you do that. In the Markup Toolbar, the third button from the left activates the Sketch tool, which doesn’t appear to have a menu equivalent. Select it, and click and drag to draw the desired shape.
What Preview does next depends on what you drew. If Preview thinks you were trying to draw a square, for instance, it changes your drawing to be a proper square shape. Likewise with triangles, ovals, lines, arrows, and other shapes — it’s a loose interpretation. Usually, if you draw an unidentifiable squiggle, Preview will leave the squiggle as is, but its behavior isn’t always predictable.
Thankfully, if you don’t care for Preview’s interpretations, or if Preview couldn’t see that you meant to draw a dialog balloon, you have a chance to correct it. After drawing a shape, look closely at the upper left of the window, where a small popover appears with your original and a choice of possible replacement shapes. Click the one you want, but be aware that you get only one shot, since the popover vanishes forever after you choose, or if you deselect the shape.

If you happen to have a trackpad equipped with Force Touch, note that the Sketch tool is pressure-sensitive, so you can press more firmly to darken the line as you draw.
The Sketch tool can be useful in ways you might not expect. For instance, imagine that you’re trying to give someone directions on a trail. Bring up the area in satellite view in Google Maps, take a screenshot, and then use the Sketch tool to draw a freehand line indicating where to go.
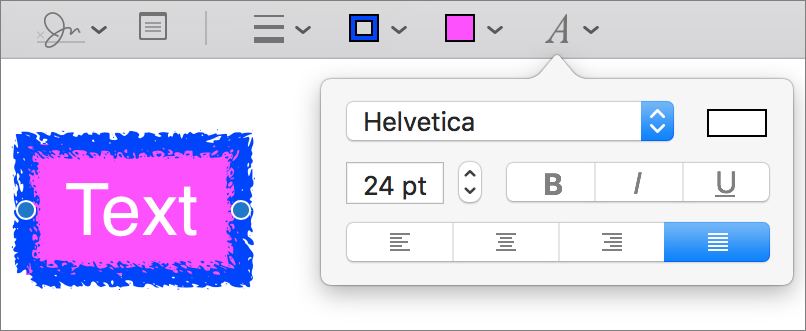
Texting While Annotating — Shapes are great, but what about when you want to add a description to an annotation or complete a PDF form that lacks interactive form fields? For that, you can insert text. And, not surprisingly, Preview offers quite a few ways to do so.
The main way to insert text is to choose Tools > Annotate > Text (Command-Control-T) or click the Text button in the Markup Toolbar. Preview inserts a text box, with “Text” as a placeholder. You can move and resize this text box just as you would a shape, although it can be a little fussy, since clicking inside the text box edits the text instead of grabbing the box. Try these techniques to make moving it easier. First, click anywhere else to deselect the text box, hover over the deselected text box until you see the hand cursor, and then click and, without letting up, drag. Second, if the text box is already selected, hover over the outlined edge to get the hand cursor and drag.
To change a text box’s typeface, point size, color, style, and alignment, select the text box and click the Text Style drop-down menu in the Markup Toolbar, which is the rightmost button. You can’t style individual words or characters in the text box separately.
You can also use the Shape Style, Border Color, and Fill Color menus to further customize the look of the text box, just as you can with shapes. Border Color lets you add a border to the text box and give it a color, Shape Style offers stroke thickness and style choices, and Fill Color adds a background color to the text.
For more fun, try speech bubbles, which you insert by choosing Tools > Annotate > Speech Bubble or from the Shapes button in the Markup Toolbar. They work just like regular shapes, with the addition of two green drag handles for controlling the tip and base of the arrow. They can be fun for snapshots, but we’d caution you against using them in professional documents.
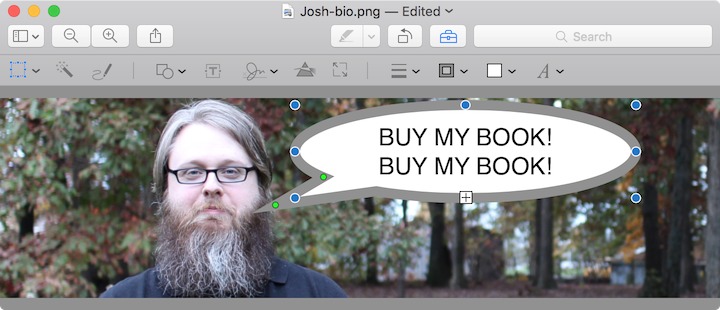
In fact, although it’s not inherently obvious, you can actually add text to any of the shapes, including lines and arrows. For those two, the text appears off to one end of the line; for the rest, the text shows up inside the shape.
Take Note — In “The Power of Preview: Viewing Images and PDFs” (13 March 2016), we discussed highlighting text in PDFs and adding notes to your highlights. That’s all fine and nice, but what if you want to leave a comment that’s not associated with text? For that, Preview lets you insert free-floating notes, which are represented by small yellow squares that only coincidentally resemble Post-it® sticky notes. (You can’t insert notes into images.)
To insert a note into a PDF, choose Tools > Annotate > Note (Command-Control-N) or click the Note button in the Markup Toolbar. Preview adds a small yellow square to the center of the current page, popping out a larger yellow rectangle into which you can type text. Enter as much text as you want; the yellow rectangle expands to hold it. Click anywhere outside the yellow rectangle to close it, leaving just the little yellow square.

There are five things you can do with the square after clicking to select it:
- Click it again to open it for editing.
-
Move it next to the portion of the page on which you’re commenting, which is usually a good idea.
-
Option-drag it to make a copy; this could be helpful if you need the same comment applied to multiple spots on the page.
-
Use Copy and Paste to put it on another page. Cut works too, if you created the note on the wrong page.
-
Press Delete to remove it from the document.
Remember that you can navigate to these notes in the sidebar, by choosing View > Highlights and Notes. Plus, you can add text to the notes in the sidebar, or edit them there, which is often easier than opening and closing the editing rectangle.

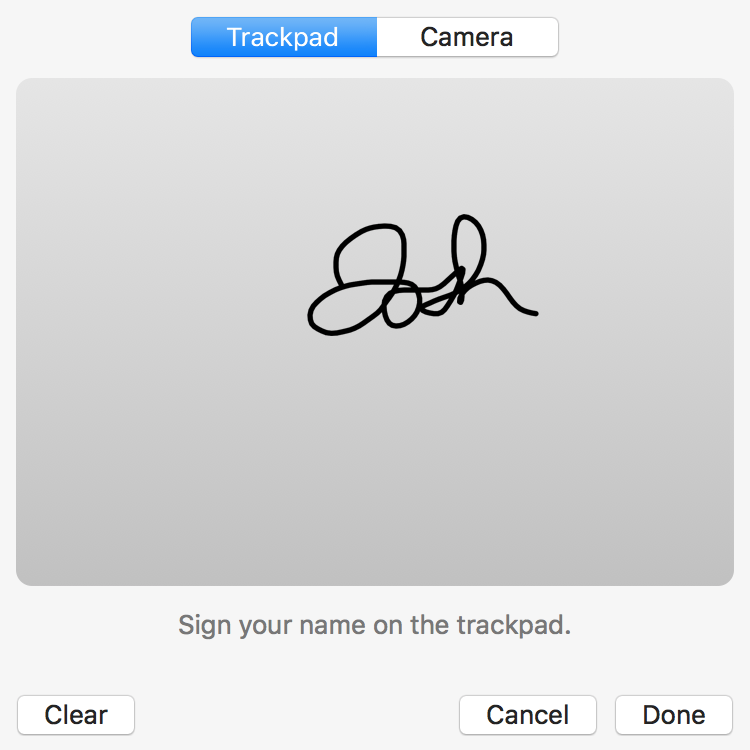
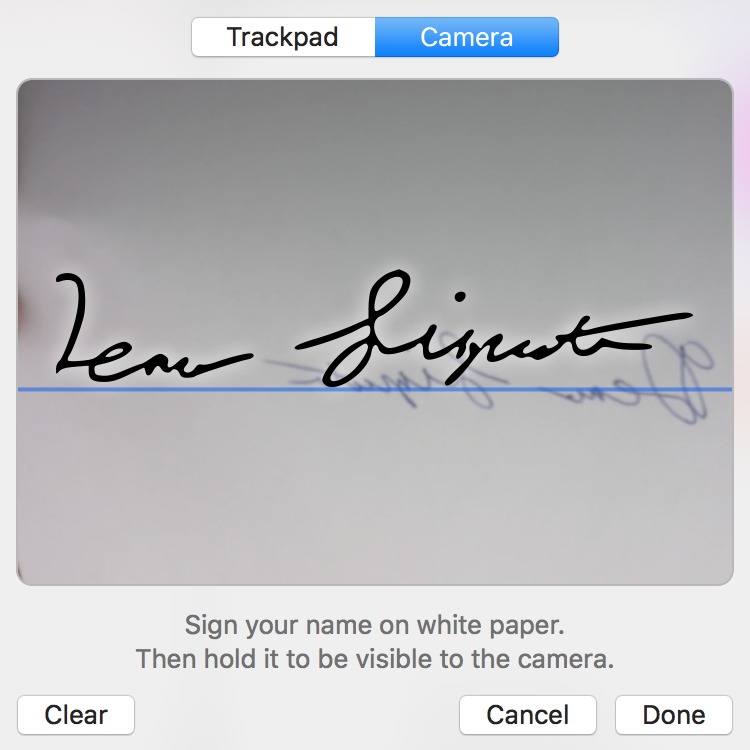
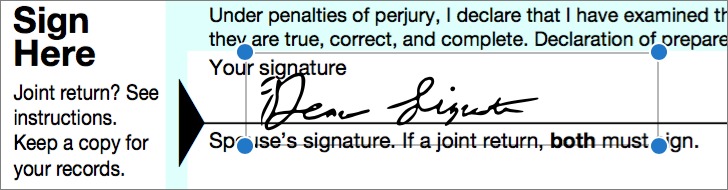
Sign on the Dotted Line — Here’s a classic problem: someone sends you a form to sign via email. You have to print it, sign it, and then scan it back into the computer so you can email it back (or, horrors, fax it). Preview solves this problem neatly with its signature feature, found in Tools > Annotate > Signature, but more easily accessible in the Markup Toolbar. It enables you to create one or more signatures, and then easily add them to images and PDFs.
There are two ways to create a digital signature: by scanning a handwritten signature with the Mac’s webcam or by writing it on the trackpad. Obviously, if all you have is a mouse, you’ll want to use the camera method.
To create a signature with a trackpad, click the Sign button in the Markup Toolbar and choose Create Signature. Click the Click Here to Begin button and write out your signature on the trackpad with your finger — if you have a capacitive stylus for an iPad (not an Apple Pencil), it will likely work better. There’s no way to erase, so if you’re unhappy with the results, click Clear and try again. When you’re satisfied, click Done to add the signature to Preview’s list.
However, using a webcam like the FaceTime camera built into most Macs is arguably the better way to make a signature. Sign your name on a blank, white piece of paper, preferably with a black marker. Choose Create Signature and click the Camera button. Inside the popover, a window appears displaying what your camera sees. Hold your paper signature up to the camera, making sure to get it close and lined up with the blue line. When Preview detects the signature, it displays the digital version in the camera window.
Again, if you don’t like the results, click Clear and try again, or if you’re happy, click Done to save the signature.
Once created, your signature is easy to insert into an image or PDF. Choose Tools > Annotate > Signature or click the Sign button again. This time, you’ll see your new signature there. Choose it to insert it into the document, where you can move and resize it like any other shape. You can also adjust its color by modifying the Border Color settings, although signatures can’t use the Fill Color option.
Although we’re not suggesting illegal forgery, if you find yourself in a situation where you often need to sign things for your boss or for an incapacitated relative, getting that person’s signature into Preview can make signing electronic forms for them much easier.
Once you save the PDF, the signature is embedded into the PDF’s visual layer, so it can’t easily be copied out and reused. Of course, someone could extract it by taking a screenshot of it in the PDF, but they could also scan or photograph a paper document to get the signature, so there’s no real difference in security either way.
Note that these signatures will sync to other Macs if you have iCloud Keychain turned on in System Preferences > iCloud > Keychain, and you can use your signatures when marking up images in Apple Mail.
We’ve now shown you how to use Preview to open and import files, efficiently view images and documents, crop and resize documents and images, and annotate documents and images. But it will be another few articles before we’re done — stay tuned for more on the power of Preview!
TidBITS Watchlist: Notable Software Updates for 11 April 2016
GarageBand 10.1.1 — Apple has released GarageBand 10.1.1, updating compatibility with GarageBand for iOS and Live Loops projects (which enable you to create music by triggering instrument loops and DJ-style effects in real time using Multi-Touch gestures). The release also adds support for opening Music Memos projects and using Logic Remote for iPhone and iPad Pro, adds over 2600 new Apple Loops and sounds, improves reliability when downloading additional content, and adds multiple enhancements to Accessibility. ($4.99 new from the
Mac App Store, free update, 938 MB, 10.9+)
Read/post comments about GarageBand 10.1.1.
Pixelmator 3.4.4 — The Pixelmator Team has released Pixelmator 3.4.4 with improved Intel HD 3000 graphics card support in OS X 10.11 El Capitan. The image editing app quickens the pace of moving layers in Transform mode, fixes a crash that occurred when applying effects that add noise (such as Noise, Vintage, Snow, and Rain), corrects an issue with missing metadata when sharing images to the Photos app, fixes a memory leak that occurred when exporting PDFs, ensure that PDFs are exported with transparency in El Capitan, and rectifies a problem that would cause the canvas to disappear when editing images with a large number of
layers. ($29.99 new from the Mac App Store, free update, 46.7 MB, release notes, 10.9.5+)
Read/post comments about Pixelmator 3.4.4.
1Password 6.2.1 — AgileBits has released 1Password 6.2 for Mac (dubbed The New Tricks Edition) with better accuracy when filling in login forms and a simpler import workflow to make it easier to transition from competitor LastPass. The update adds support for restoring from iCloud when running the AgileBits Store version of 1Password for the first time, improves the accuracy of filling in Credit Card and Identity items, speeds up search in 1Password mini, fixes a bug that failed to properly limit the list of Logins when filling on certain sites, improves how 1Password deals with multiple active Chrome profiles, and
requires you to give 1Password permission to decrypt Documents. After the release of 1Password 6.2, AgileBits followed up with a quick 6.2.1 update to fix a few bugs in the Mac App Store release and add support for Apple’s Safari Tech Preview. ($49.99 new from AgileBits and the Mac App Store with a 25 percent discount for TidBITS members when purchased from AgileBits, free update, 44.4 MB, release notes, 10.10+)
Read/post comments about 1Password 6.2.1.
ExtraBITS for 11 April 2016
In ExtraBITS this week, since the FBI has admitted that its existing iPhone crack doesn’t work on newer models, the Justice Department is still pursuing court orders to force Apple to unlock encrypted iPhones. Beyond that ongoing story, an exploit could let your cable modem be knocked offline, your Netflix bill may be higher next month, Bill Atkinson offers insight into the Mac’s origins, and Macminicolo is merging with MacStadium.
FBI’s iPhone Hack Limited to Older iPhone Models — While the FBI has successfully cracked the iPhone 5c, you can breathe a sigh of relief if you own an iOS device with Touch ID. Speaking at Kenyon College in Ohio, FBI Director James Comey said, “We have a tool that works on a narrow slice of iPhones. The world has moved onto [the iPhone] 6s and this doesn’t work on 6s or on iPhone 5Ss.” The Guardian speculates that this is due to the Secure Enclave baked into Touch ID devices, which acts as a lockbox for sensitive information.
Justice Department Presses Apple in More Locked iPhone Cases — Despite the Justice Department backing down after finding a way to unlock the iPhone 5c connected to the San Bernardino terrorism case, the U.S. government is continuing efforts to compel Apple to unlock iPhones associated with a Brooklyn drug case and a Boston gang conspiracy. In the Brooklyn case, Magistrate Judge James Orenstein has already said that the Justice Department overstepped its authority in trying to use the All Writs Act of 1789. But in the Boston case, a federal judge
has directed Apple to assist the FBI. In short, it ain’t over till the Supreme Court rules.
SURFboard Cable Modems Vulnerable to Remote DoS Exploit — A vulnerability has been discovered in the popular line of Arris (formerly Motorola) SURFboard cable modems. The exploit allows remote attackers to reset the modems, knocking victims offline for up to 30 minutes — it’s a denial of service attack, not one that exposes personal information. The problem could be fixed with a firmware update, but unfortunately, there’s no mechanism that enables users to update their cable modems. Updates must be pushed out by Internet service providers, many of whom update only leased
modems, not those owned by customers. If you have one of these modems, talk to your ISP about an update.
You May See a Netflix Price Increase Next Month — If Netflix grandfathered you into the $7.99 per-month price for its Standard streaming plan, your monthly price will increase next month to $9.99. Netflix raised the monthly price for new subscribers to $8.99 in 2014 and then to $9.99 in 2015, but allowed existing customers to pay the old price for up to two years after the original increase. While the price hike is unfortunate, Netflix would still be a good deal at twice the price.
Bill Atkinson Discusses the Birth of the Mac — Bill Atkinson was a member of the original Macintosh team, developing concepts like the menu bar and the double click, as well as creating classic Mac applications like MacPaint and HyperCard. Atkinson recently sat down with TWiT’s Leo Laporte to discuss the development of the original Macintosh. The interview offers a lot of interesting tidbits, such as why Steve Jobs took control of the project from Jef Raskin.
Macminicolo Merging with MacStadium — Brian Stucki, founder of Mac mini server hosting company Macminicolo, has announced that his company is merging with MacStadium, another Mac-centric hosting company. He’ll remain president of Macminicolo and will serve as vice president of MacStadium.