TidBITS#1331/01-Aug-2016
Apple recorded $7.8 billion in profits and beat analyst expectations in Q3 2016, but the company is still battling falling sales and revenue, with only two bright spots: its burgeoning Services category, and the high-margin iPad Pro line. Speaking of the iPad Pro, Julio Ojeda-Zapata brings you a thorough comparison of both models, so you can decide which is right for you. Finally, Josh Centers dives into home automation with a detailed look at the Philips Hue smart light bulbs, explaining why they’re interesting and how to set them up correctly. Notable software releases this week include iTunes 12.4.3, Mellel 3.5.1, Lightroom CC 2015.6.1 and Lightroom 6.6.1, GraphicConverter 10.1, and TextWrangler 5.5.
Apple Beats Expectations in Q3 2016, but Slump Continues
Reporting on its third quarter financial results, Apple has announced net profits of $7.8 billion ($1.42 per diluted share) on revenues of $42.4 billion. The company’s revenues are down 6.9 percent compared to its record-breaking year-ago quarter, which brought in revenues of $49.6 billion and profits of $10.7 billion (see “Apple Posts Record Financials for Q3 2015,” 21 July 2015).
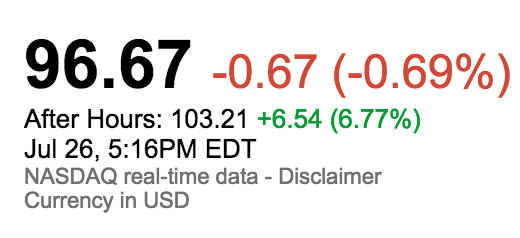
However, Apple’s investors are not suffering. Despite declining revenues, Apple beat analysts’ expectations, prompting the stock to rise nearly 7 percent in after-hours trading. Furthermore, the company returned over $13 billion to investors in the last quarter through share repurchases and dividends. The company has now completed almost $177 billion of its $250 billion capital return program.
iPhone sales, as Apple predicted last quarter, are again down year over year: 15 percent in units sold and 23 percent in revenue. Unfortunately, not even the seemingly popular iPhone SE has reinvigorated interest. If anything, the iPhone SE might have hurt revenues, given that CFO Luca Maestri indicated that it lowered the iPhone’s overall average selling price. However, unit sales were also down, so perhaps customers are awaiting the next-generation iPhone, expected in a few months. Given that current rumors
indicate that the forthcoming iPhone 7 won’t be a huge leap from the iPhone 6s, iPhone sales may continue to show continued weakness. Nonetheless, Apple is seeing the highest percentage of switchers to iPhone from other smartphones than it ever has, and CEO Tim Cook remains optimistic about the iPhone SE, saying, “It’s opening the door to customers we weren’t reaching before.”
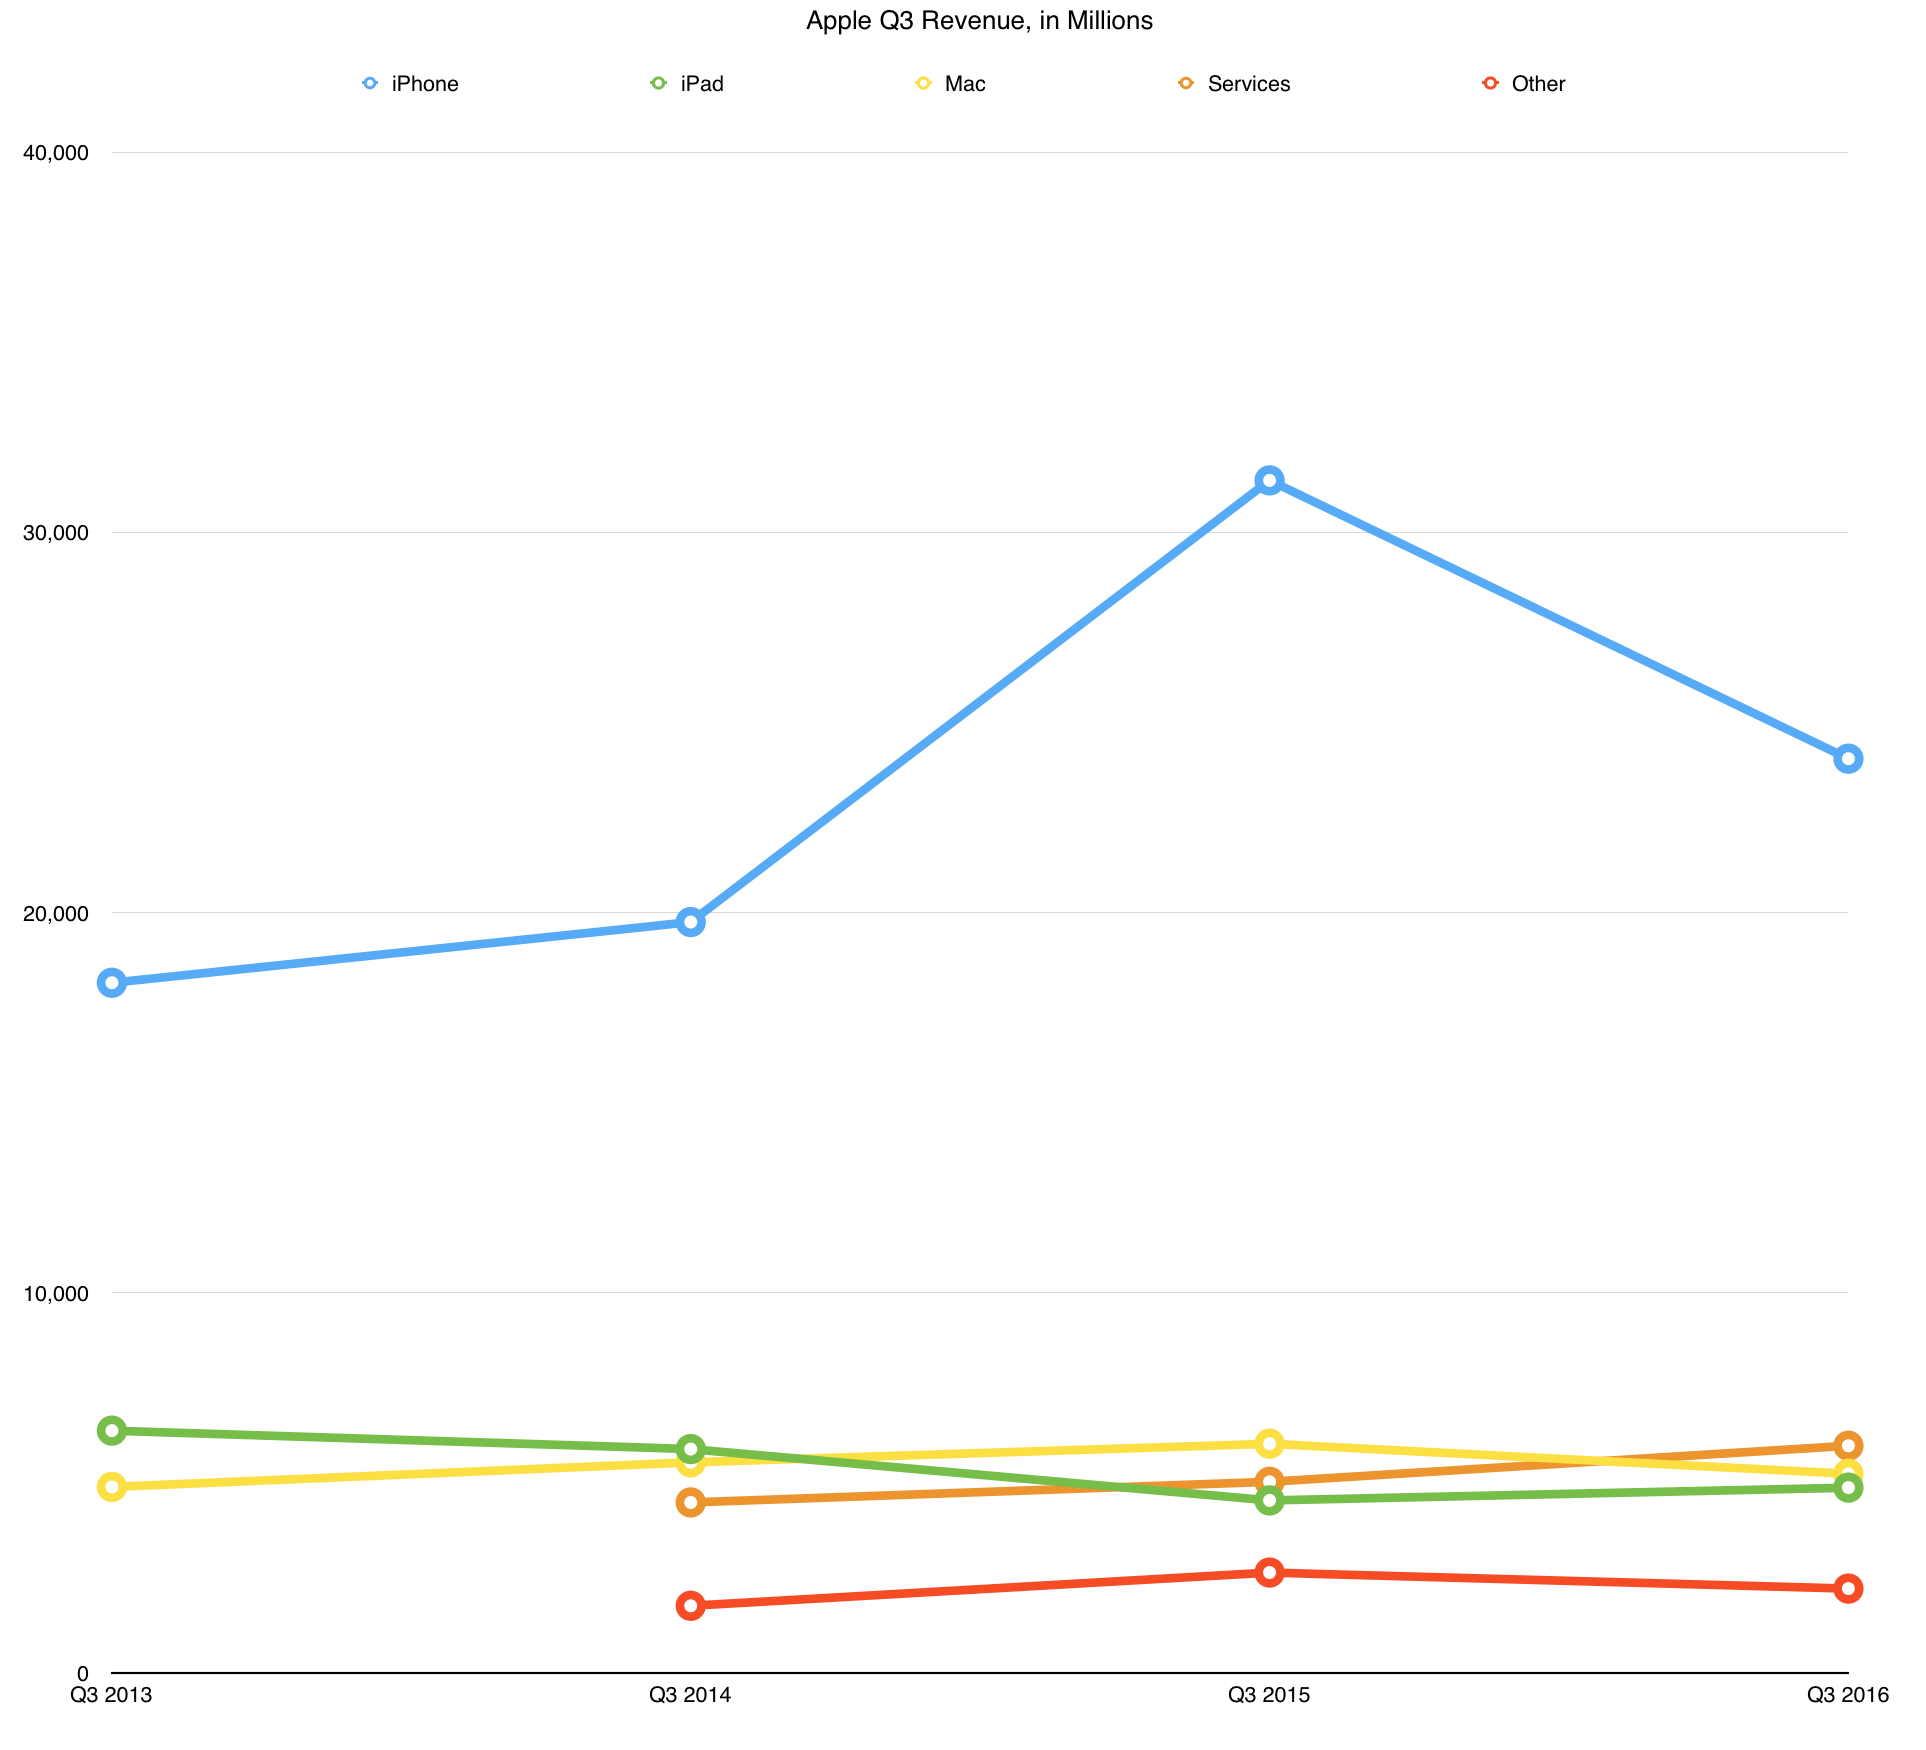
In a surprise twist, while the number of iPad units sold continued to decline, this time by 9 percent year-over-year, the decline is slowing. Moreover, iPad revenue has now turned around, exhibiting a 7 percent year-over-year increase, and Apple continues to hold an 84 percent share of the market for tablets that retail for more than $200. The obvious explanation for the iPad’s incipient turnaround is that the higher margins on the 9.7-inch iPad Pro have picked up the slack in the face of an overall decline in consumer
tablet sales. With the iPad Pro sales being particularly robust in businesses, and with iPad Pro getting 91 percent satisfaction ratings from corporate customers, the financials seem to confirm that Apple was wise to target the deep pockets of the professional market.
Mac sales are also slumping, tallying an 11 percent year-over-year decline in units sold and a 13 percent drop in revenue versus the year-ago quarter. Nonetheless, the decline for that product line also appears to be slowing, with Mac sales up over the previous quarter, with 4.2 million Mac sold versus 4 million sold last quarter. Still, the year-over-year Mac sales decline comes as no surprise: almost every product in the Mac lineup is desperately in need of an update. Except for the 12-inch MacBook (which received a processor update in April, see “Apple Updates 12-inch MacBook, Bumps MacBook Air RAM,” 19 April 2016), every Mac in the
MacRumors Buyer’s Guide is rated a Don’t Buy. Most notably, it has been almost 1000 days since Apple updated the high-end Mac Pro. Maybe Apple should apply the lessons learned from iPad Pro corporate sales increases to the Mac Pro.
The Services category continues to be a bright spot in Apple’s quarterly results, with a whopping 19 percent year-over-year increase in revenue. Cook said that Services was up by $4 billion year-over-year, and he expects it to reach the size of a Fortune 100 company by this time next year. The App Store, included in this category, brought in 37 percent more revenue year-over-year, a new all-time high.
Speaking of services, Cook was excited by the success of Pokémon Go (see “What the Heck Is Pokémon Go?,” 17 July 2016), saying that Apple is “hot on AR.” (Just a note, Tim, it’s pronounced “po-kay-mon,” and not “pokey man.”)
Unfortunately, the picture isn’t as rose-tinted in the Other Products category, which includes product lines like the Apple TV, Apple Watch, and Beats headphones: the category saw a 16 percent year-over-year drop in revenue. Cook did say “We’re just getting started with the Apple Watch,” and noted that it remained the best-selling smartwatch available and ranked number one in the J.D. Power survey of customer satisfaction.
International sales continue to give Apple some reason for optimism. Cook pointed out that “India is now one of our fastest growing markets,” (prompting his tour of the country; see “Apple Increases Focus on Asia,” 20 May 2016), and he noted that sales in Russia have doubled year-over-year.
The question remains whether Apple is losing its touch, or if a slower world economy is dragging Apple down. There are some indications that the economy is softening: gold and silver prices are up, along with the stock prices of discount retailers like Dollar General and Dollar Tree — usually reliable economic counter-indicators.
Plus, in a year dominated by tumultuous politics, people may be more conservative with their wallets. As a counter to that, Cook has smartly expanded Apple’s Services category, which helps keep the money rolling in during lean times: built-in iOS 10 apps, such as Messages, are getting their own App Stores, and we can expect even more emphasis on such services in the future.
Comparing iPad Pro Technologies and Intangibles
The iPad Pro, released in a 12.9-inch model in September 2015 and a 9.7-inch flavor in March 2016, has been touted as a breed apart.
Though the iPad Pros resemble previous iPad models, they’re tricked out with a magnetic Smart Connector for use with a Smart Keyboard cover, and they also work with the new Apple Pencil stylus.
Apple’s emphasis with the iPad Pro is on productivity, an angle I’ve embraced with gusto. Though I have long been fond of writing and doing other work on an iPad, the iPad Pro has taken over for an Apple laptop as my preferred workhorse while on the go.
The question is, which iPad Pro? There’s the rub.
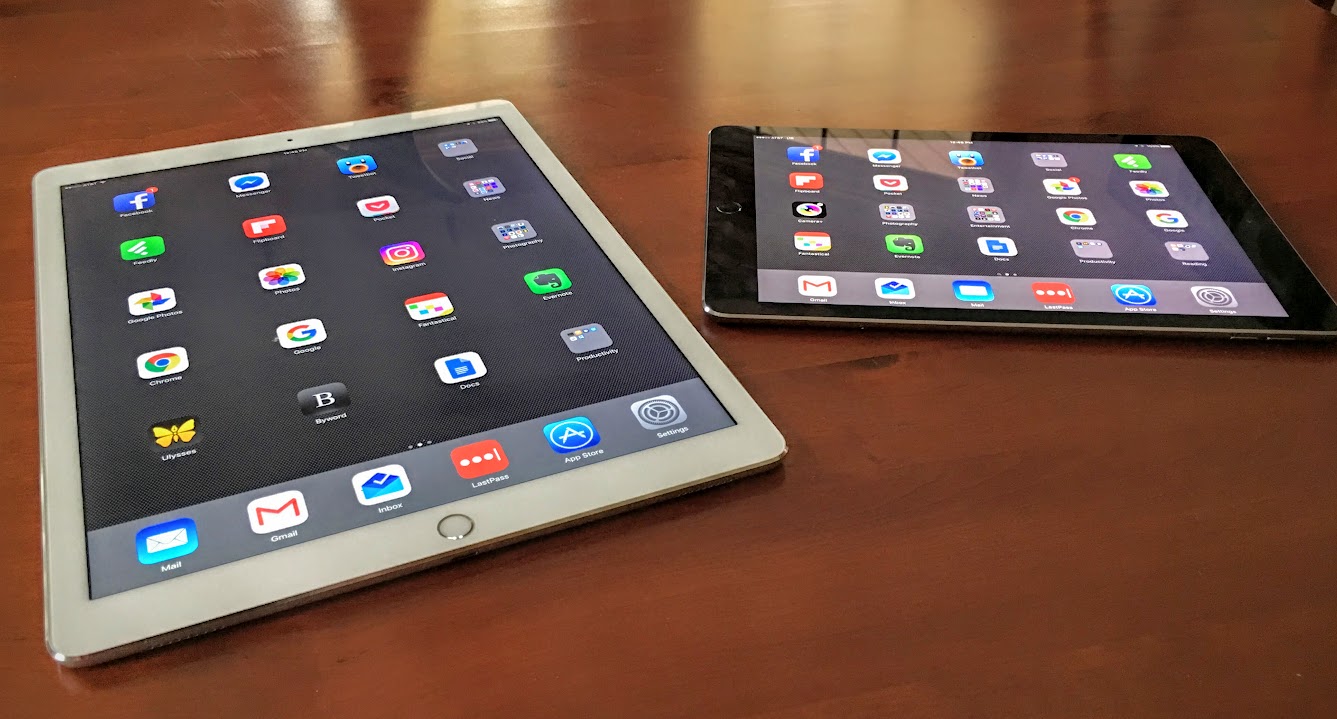
I’ve made extensive use of both models in recent months and love them both for different reasons. While they seem nearly identical on the surface – apart from size and weight, of course – they are quite distinct in some ways.
The newer 9.7-inch model boasts certain advanced features that its older 12.9-inch sibling lacks, while the big iPad Pro outpaces the smaller one in several significant ways.
Advantages of the 9.7-inch iPad Pro — The smaller iPad Pro, because it’s newer, incorporates cutting-edge technology that presumably wasn’t ready when Apple released the bigger iPad Pro.
- Display: Apple advertises the small iPad Pro as having the “brightest and least reflective” screen anywhere, with colors that “are more vivid, true to life and engaging.” It adds that the smaller tablet “uses the same color space as the digital cinema industry,” with a wider color gamut that gives the device up to 25 percent greater color saturation than previous models.
Fair enough, but I’m not sure I would have noticed this without being prompted. And, after much squinting at the two displays, I can’t honestly think a user of the bigger iPad would feel cheated.
In another respect, the display on the smaller tablet is starkly different. It offers a “True Tone” screen with built-in sensors that alter its appearance based on ambient lighting conditions. This feature adjusts the display color and intensity to match lighting around it.
I found True Tone jarring at first but grew to like it. Peering at the two iPads in my customarily dim home office on a late afternoon, for instance, the screen on the larger iPad Pro had a decidedly bluish tint while the smaller iPad appeared warmer and more inviting.

True Tone is different and separate from the Night Shift feature that aims to make a screen more comfortable to read in low-light conditions. True Tone and Night Shift often seem to behave similarly, although Night Shift is based on timers and not physical sensors. I solved the confusion by keeping Night Shift switched off on the 9.7-inch iPad.
- Cellular access: Integrated support for cellular data connections in some iPad models sets them apart from Apple laptops, none of which can yet boast such connectivity. However, the two iPad Pro models have different cellular capabilities.
The 9.7-inch model supports a cellular data feature called LTE Advanced that is available from some carriers, including AT&T. LTE Advanced can boost Internet performance dramatically. In my speed tests, cellular downloads tended to be as much as 50 percent faster on the smaller iPad Pro model than on the large one.
Apple also eliminated the need for an add-in Apple SIM in the 9.7-inch iPad Pro, though the tablet still has a nano-SIM tray if your carrier requires a physical SIM. Instead, it has a new feature called embedded Apple SIM that internalizes the SIM card’s features.
Regardless of whether the Apple SIM is embedded or not, it exists to make life easier for those who need cellular service in foreign lands. Obtaining a physical SIM for such service has been a longtime ritual for overseas travelers, but Apple SIM users can sign up for cellular service right on their tablets as they move from place to place. So the difference between the two Apple SIM types seems a minor one, allowing most users of the smaller iPad Pro to ignore the nano-SIM tray.
-
Camera and photos: People like taking photos with their iPads, no matter how awkward it may look, and those who do should know that the cameras on the iPad Pro models differ in significant respects.
The larger iPad has an 8-megapixel rear-facing camera with an f/2.4 aperture that shoots 1080p video. Its front-facing camera has a 1.2-megapixel resolution with an f/2.2 aperture and takes 720p video. Neither camera has a flash, which is a distinct disadvantage.
The smaller iPad has a 12-megapixel rear-facing camera with an f/2.2 aperture that shoots 4K video. It adds a True Tone flash, found on certain iPhone models, whose white and amber LEDs can produce more than 1000 different color temperatures to achieve a better white balance.
Its front-facing camera has a 1.2-megapixel resolution with an f/2.2 aperture and shoots 720p video. It adds a Retina Flash feature that, as on the iPhone 6s and 6s Plus, turns the screen into a flash and makes for an unusual selfie experience as the screen momentarily turns bright white for subtle illumination.
The smaller iPad can take Live Photos, a capability absent from the larger model.
-
Hey Siri: Only the smaller iPad boasts the always-on feature that puts Apple’s intelligent assistant at your beck and call.
Advantages of the 12.9-inch iPad Pro — The larger of the iPad Pro models, though older, is superior to the small one in several tangible ways.
- Lightning port: The Lightning port on the bigger iPad incorporates the zippy USB 3.0, while the one on the smaller iPad offers only the slower USB 2.0.
This difference likely means little to most people, but it has serious ramifications for certain types of users, such as photographers.
“For photographers who want to transfer photos for review or editing from a camera to the iPad, this is almost crippling,” my TidBITS colleague Jeff Carlson recently observed on his personal blog. Jeff found that transferring 1.5 GB of images took 30 seconds via USB 3 and 2 minutes 20 seconds via USB 2.
-
Performance: Though roughly similar to the 9.7-inch model in terms of internal specs, the 12.9-inch model offers slightly superior performance.
It has 4 GB of RAM, compared to the smaller tablet’s 2 GB. And while both tablets have an A9X chip, both raw processing and graphics are zippier on the larger iPad.
Honestly, though, I seldom noticed the difference while using both iPads.
-
Faster charging: As I noted in “iPad Pro Charges Faster with MacBook Adapter and New Cable” (27 April 2016), charge times on the large iPad can be reduced by about half by swapping out its standard charger for the 29-watt USB-C Power Adapter that comes with the 12-inch MacBook and pairing it with one of Apple’s new USB-C to Lightning cables.
The fast-charging capability in the 12.9-inch iPad makes this trick possible; alas, the 9.7-inch model lacks the fast-charging feature.
The Intangibles — In many ways, purchasing an iPad is a highly personal decision. One potential buyer might find the larger iPad Pro too big and heavy, while it might be just right for another. For some, the version of the Smart Keyboard for the 9.7-inch iPad might feel intolerably cramped, but not for others.
I’ll focus here on my experiences while broadening my discussion to include others who might be considering a purchase.
- Smart Keyboard: The dimensions of the Smart Keyboard for the bigger iPad are deliciously ample. I expected the smaller Smart Keyboard, like other keyboards and keyboard cases designed for 9.7-inch iPads models, to feel scrunched to me.
However, my concerns were laid to rest when I started using it. I did serious work on the thing with little discomfort. Your mileage may vary; I recommend trying both in a store.
-
Screen considerations: The larger iPad’s generous screen size can be critically important for some people. On the larger iPad, each side of the screen in Split View has as much display area as the smaller iPad’s display, which is great for productivity. Split View on the smaller iPad is less useful given the narrowness of each panel.
This, of course, assumes app developers have updated their offerings to support Split View. Some have not. As I’ve previously noted, Google’s refusal to implement this basic feature in some of its iOS apps (such as Google Docs, which I’m using to type these words) is one of the great mysteries of the universe.
That issue impacts both iPad Pro models, but there’s a related one that involves only the big iPad. In many cases, developers have been slow about updating apps to take advantage of the 12.9-inch screen. I’m looking at you, Facebook. Google has been maddeningly inconsistent in this regard, updating some apps (such as Inbox) but not others (like Gmail).
-
Size and weight: At just under 1 pound (454 g), the 9.7-inch iPad Pro feels much more portable than the 12.9-inch model, which weighs 1.6 pounds (726 g).
The larger iPad Pro initially struck me as ridiculously large. It seems like a cafeteria tray – and I have even used it to transport meals from the kitchen to the front porch a few times.
For those with similar concerns but lusting after that big screen, I’d suggest a couple of strategies. Go for the Smart Cover (and, optionally, the matching Silicone Case) instead of the bulkier Smart Keyboard. With the cover and the case, the 12.9-inch iPad Pro struck me as a thin and light laptop.
Then, when you need it, add an external Bluetooth keyboard. There are many such options, some of which I covered in “Three Alternatives to the iPad Pro’s Smart Keyboard” (8 February 2016).
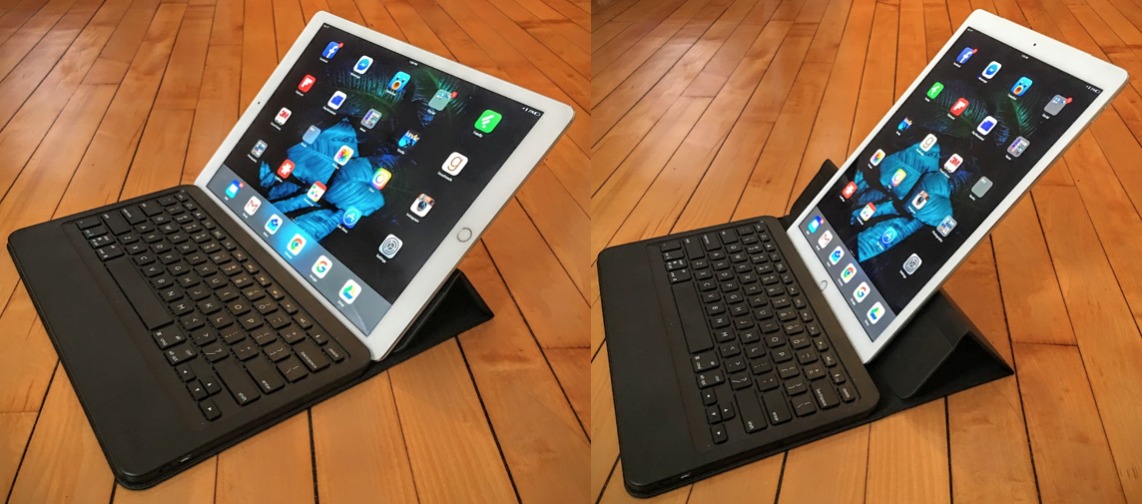
One of the accessories in that article, the Zagg Messenger Universal, remains my favorite as a large and comfy keyboard with an integrated fold-out stand that is more than stable enough to hold the larger iPad (in either portrait or landscape orientation). I get a ton of work done on it at home. The Zagg Messenger Universal is thin enough that I have been known to take it on the road with the iPad despite the added weight and bulk, though it is mostly for home use.
Keyboard cases for the larger iPad Pro don’t make a lot of sense to me — why bulk up the already large device? They make more sense for the smaller iPad.
Again, numerous options are available. I prefer Zagg’s Rugged Book, which bulks up the tablet a bit, but seems indestructible (I throw it into my bike pannier every morning for my commute without a second thought) and has four positioning/viewing modes. The tablet detaches, as well, when I just want a touch experience. When I need to type, the Rugged Book’s keyboard feels fantastic, though, of course, a bit cramped.

Be sure to buy the version for the iPad Pro. The similar iPad Air 2 model will fit the iPad Pro form factor, but does not have its magnets correctly positioned to activate the tablet’s sleep mode when the lid is closed.
Conclusion — Most people won’t have both iPad Pro models available to compare. I’m lucky to have both versions on loan from Apple, which has been a revealing experience.
I’ve found a role for each tablet. The larger iPad Pro is mostly for home use – on my front-porch workstation, for instance, when I want to get some serious work done while enjoying a bit of fresh air.
The smaller iPad Pro is my mobile model. It goes with me everywhere. I tuck it into a small messenger bag if I’m walking, chuck it into my pannier when biking, and have it with me in my car at all times.
If I had to choose? I’d get the 9.7-inch model because it does everything the bigger tablet can, though sometimes in a more cramped manner, and it has some cool new features.
You’ll make your own decision based on your particular set of needs and circumstances, but you can’t lose. Both models are great, though with key differences that you should mull over carefully before making your purchase.
Getting Started with the Philips Hue Smart Light Bulbs
I’ve long been a skeptic of home automation. It seemed like a gimmick that would cause more problems than it would solve. Bringing the bugs and security exploits of computers to my door locks, lights, and thermostat wasn’t an enticing prospect.
However, with Apple’s impending iOS and tvOS releases, both of which greatly enhance home automation, I decided that I couldn’t ignore the field any longer. The obvious choice for my first step was a set of Philips’s highly regarded Hue light bulbs. They’re useful, fun, and in the worst-case scenario, they will still work as regular LED bulbs.
The Hue universe can be overwhelming, so I’ll focus on setting up a starter kit with the official Hue app and just touch on some of the other possibilities.
What Are Hue Lights? — Hue lights are wireless, software-controlled LED light bulbs. They come in two basic variants: the rather pricey Hue White and Color Ambiance and the cheaper Hue White bulbs. Philips also offers different bulb shapes, including the standalone Hue Bloom and the Hue Lightstrip Plus. They’re controlled by a Wi-Fi bridge that connects to your home network via
Ethernet. Since the second version of the Hue Bridge, the Hue system has been compatible with Apple’s HomeKit, so you can control the lights with Siri.
The only thing I dislike about Hue is the high startup costs. There are two starter kits, both of which include the Hue Bridge: a $200 kit with three colored bulbs and an $80 kit that has two white bulbs. Additional colored bulbs cost about $60, while white bulbs run about $15.
If you do the math, the color kit makes a lot more sense. For $200, you get $180 worth of bulbs, making the Hue Bridge $20, while the $80 kit gives you $30 worth of bulbs, making the Hue Bridge $50. You can often find deals on the color kit (I got mine for $150), so if you’re just starting out, I recommend it. In fact, if you want more color bulbs later, it makes since to buy the color kit at a discount, and set the additional bridge aside as a backup (or sell it to someone stuck with a first-generation Hue Bridge that doesn’t support HomeKit).
Of course, you could also buy the Hue Bridge on its own, for about $60, and then buy bulbs individually, but the starter kits are a much better deal.
So what can you do with Hue lights? Here are a few possibilities:
- Turn your lights on or off, or dim them from your iPhone, without having to get off the couch.
- Turn the lights on before you enter a dark room, so you don’t stumble all over the place.
-
Activate a colored scene to add ambiance to a room.
-
Sync the lights with your music to turn your living room into a dance floor, via a third-party app like Light DJ.
-
Sync your living room lights with what’s on TV so the color of the room matches the dominant colors on the TV, with a third-party app like Hue TV.
These capabilities may sound gimmicky, and they can be, but I’ve found that the Hue lights have real value in my everyday life. For instance, if our toddler falls asleep on my wife, she can dim the lights without disturbing him. If our living room lamps are reflecting off the TV, I put them into “Movie Mode,” which dims them and turns them a calming shade of blue. I can turn on the bedroom lamp before going to bed, and I can set it to a night mode that won’t wake up my wife.
But more importantly, Hue lights are fun, and they make me feel powerful. With a voice command or a tap on my iPhone’s screen, I can completely change how the inside of my house looks. It makes me feel like a wizard, and isn’t that what technology should do?
Unfortunately, before you can don your robe and wizard hat, you must first set up the Hue lights, and accomplishing that can sound like the punch line to a light bulb joke.
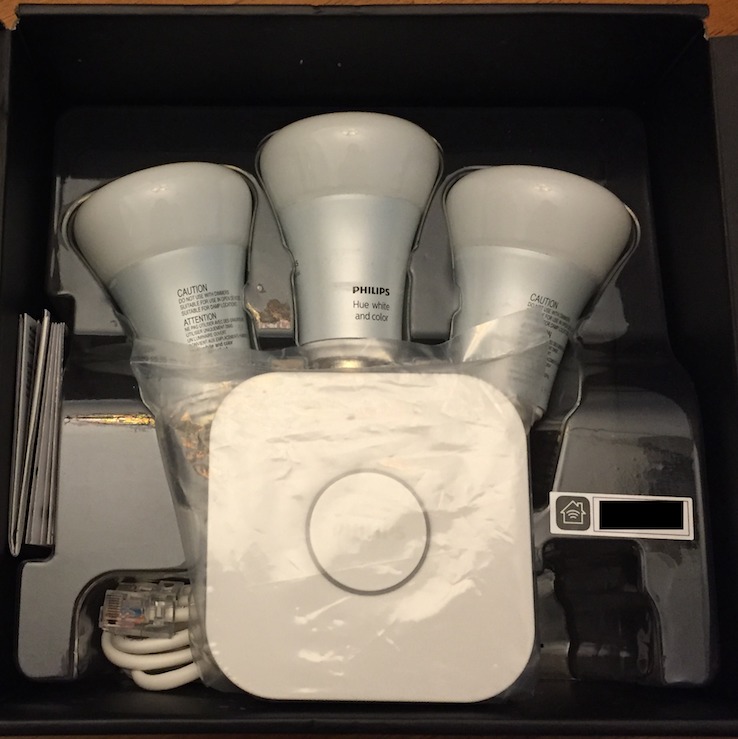
Setting Up Hue — The color starter kit contains three Hue bulbs, a Hue Bridge, an Ethernet cable, and a power adapter.
Installing the Hue bulbs is literally as simple as screwing in a lightbulb. The most difficult part is deciding where to install them. I settled on our two living room floor lamps and a bedroom light.
Installing the Hue Bridge requires a power connection and an Ethernet connection to your router — it lacks Wi-Fi. Be sure to put it in an easily accessible spot, because you must press the big button on the Hue Bridge every time you connect an app to your Hue lights. I put mine behind my TV, which is easy enough for me to access, but harder for our rambunctious toddler to reach; you can mount the Hue Bridge on a wall if you wish.
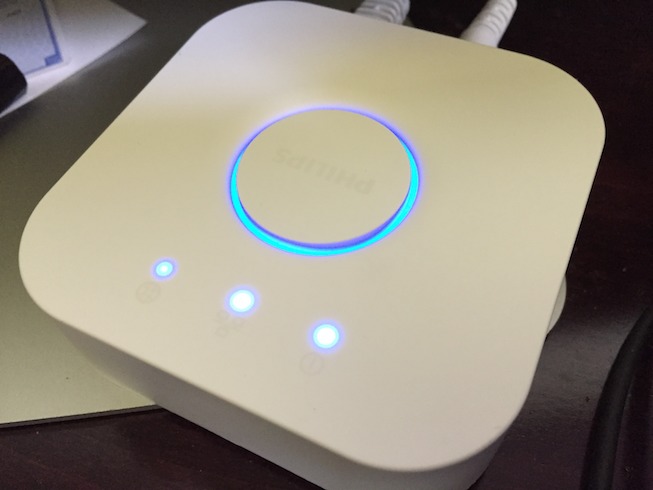
When you install the Hue Bridge, make sure it’s connected to the network properly. There are three lights on the Hue Bridge: be sure that all three are lit. I had trouble at this point, which I finally narrowed down to a faulty Ethernet cable.
Next, get the Philips Hue app for the iPhone. Make sure to download the second generation of the app, and not the first generation version, which is still in the App Store. Although you can set up your lights with the older app, I’ll focus on the newer version.
When you open the Philips Hue app, it begins searching for a Hue Bridge. When it finds yours, tap Set Up, and then tap the big button on top of the Hue Bridge. After that, follow the prompts to give the Hue app access to your Home data (needed for Siri control); you may also be prompted to update the Hue Bridge’s firmware.

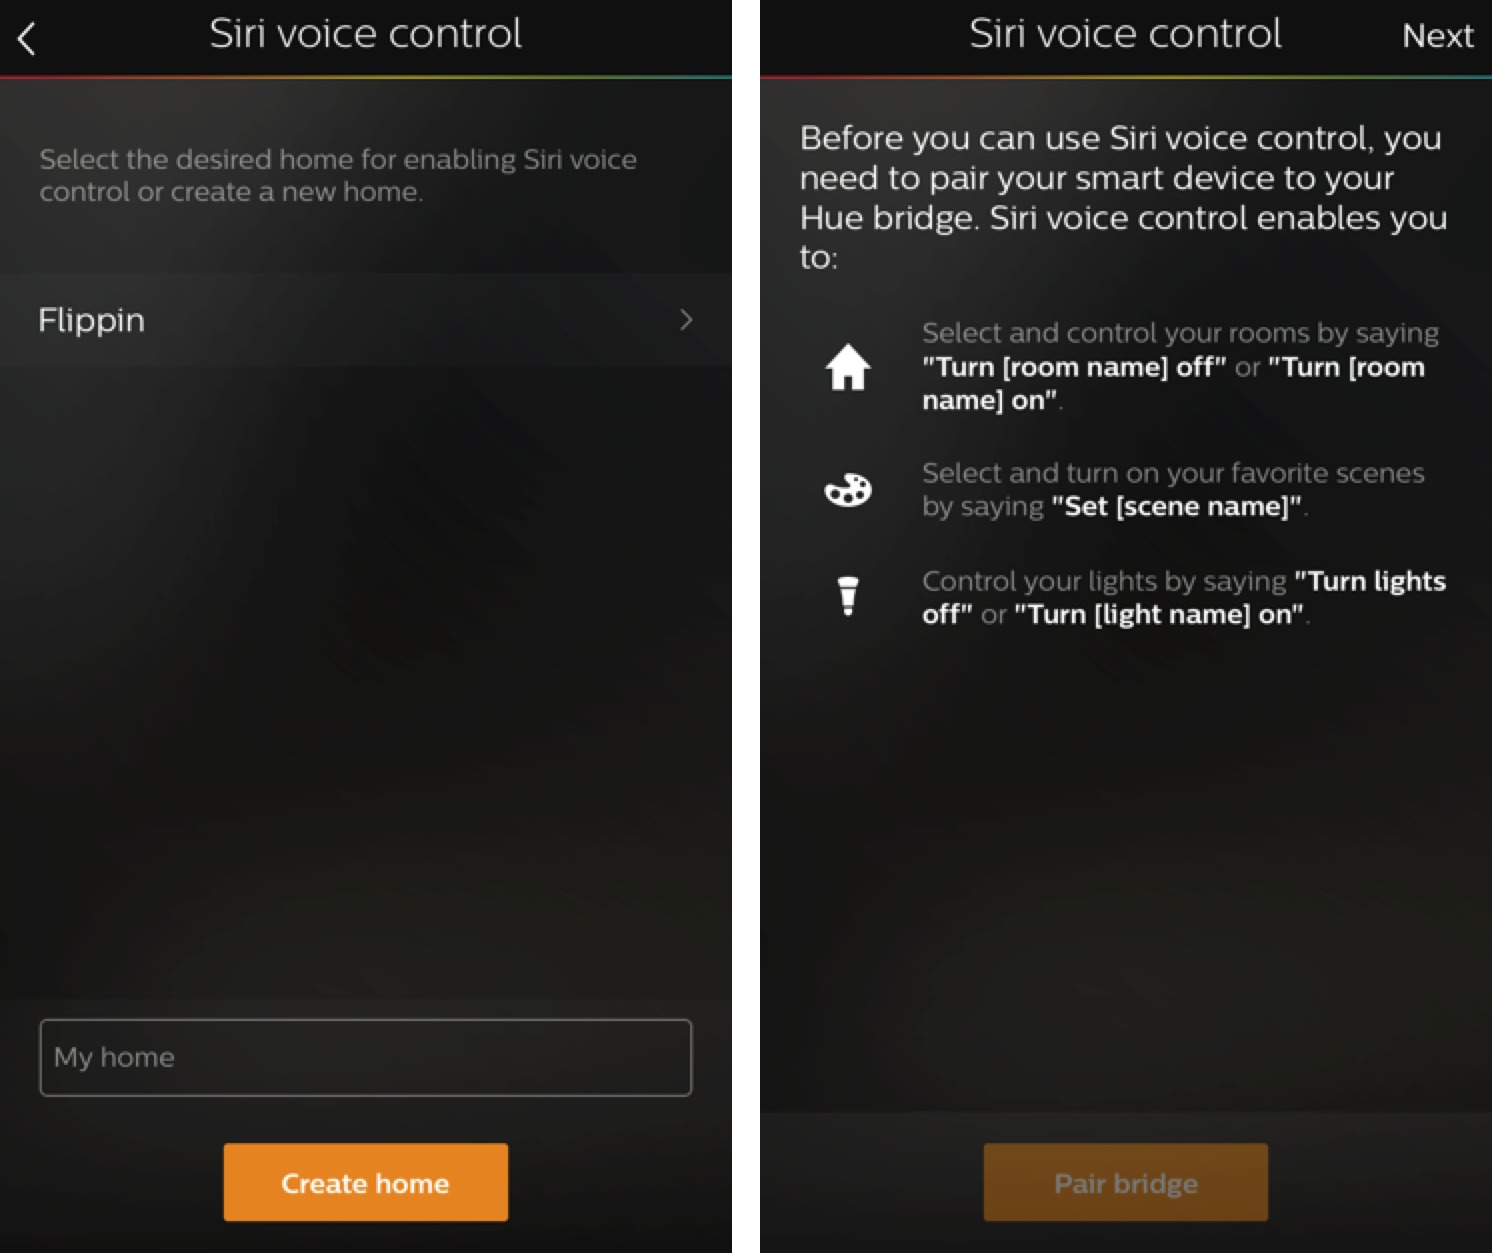
The next step sets up Siri voice control, but, as I’ll explain later, what you’re actually doing is setting up HomeKit, Apple’s home automation framework. Follow the prompts to pair the Hue Bridge, and either create or select a “home.” To finish pairing HomeKit with your Hue lights, you’ll need to enter the 8-digit HomeKit code or scan it with your camera. There is one code on the bottom of your Hue Bridge, but it’s easier to scan the one on the inside of the Hue box.
Finally, you’re prompted to set up a room. At this point you may have a problem: figuring out which light is which because they all have generic names like “Hue color lamp 1.” In my case, since two out of three bulbs were in my living room, I set them all up as “Living.” This confusion isn’t a show-stopper — you can fix it later.

Now your lights are set up — well, sort of. Let’s now explore the Hue app to finish setup.
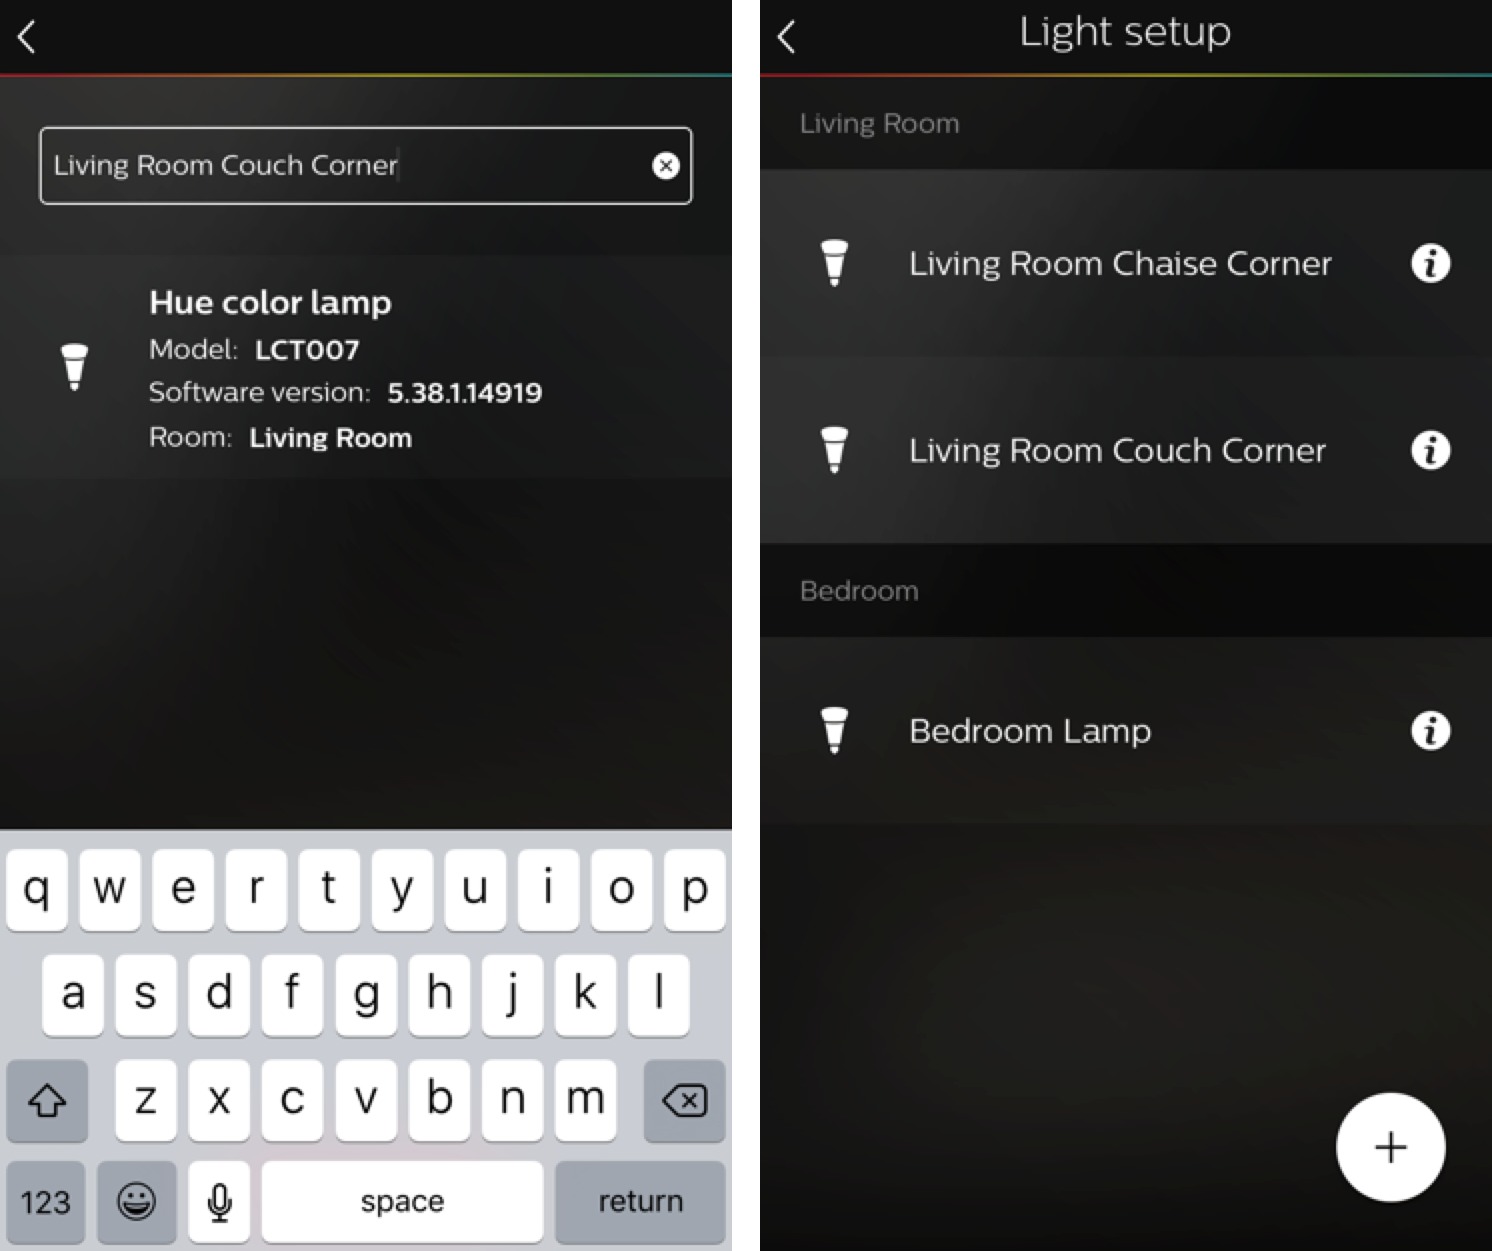
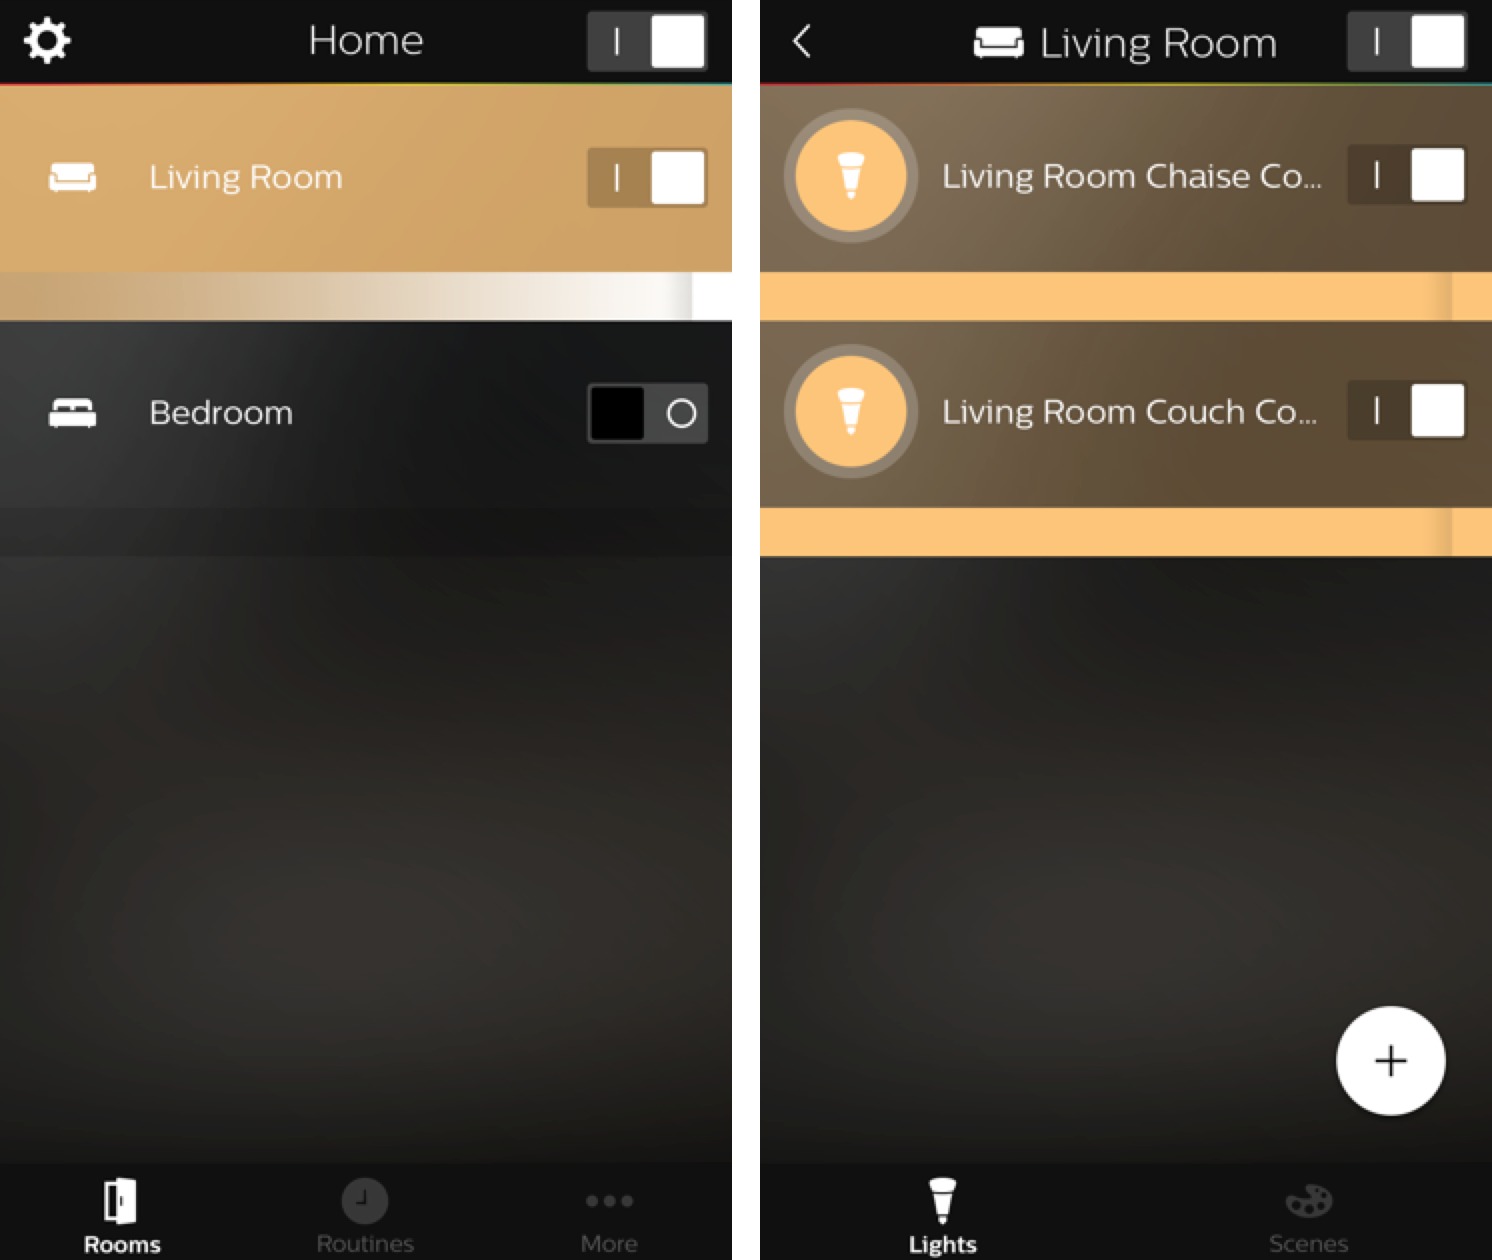
First Things in the Hue App — The very first thing you should do is rename your lights so you can tell them apart. In the app, go to Settings (the gear in the upper left) > Light Setup. To tell the lights apart, tap the listing for one and the light will flash. After you figure where that light is, tap the “i” button to see a screen where you can give the light a descriptive name, like “Living Room Couch Corner.”
Once your lights are named appropriately, teach the app where your lights are in Settings > Room Setup. Tap the + button in the lower right, enter the room’s name, set its room type, choose whether to add the default scenes to that room (a good idea), and then select which lights go in that room. In my setup, I’ve renamed “Living” to “Living Room,” created a “Bedroom” room, and assigned the appropriate lights to each room.

Making a Scene — Now that we have the basics settings in, let’s play with the lights! In the Rooms tab, the rooms you set up should be listed. The on/off switch for each room turns all the lights assigned to that room on and off.
Tap a room to see a screen with two tabs: Lights, where you can turn individual lights on and off, and Scenes.
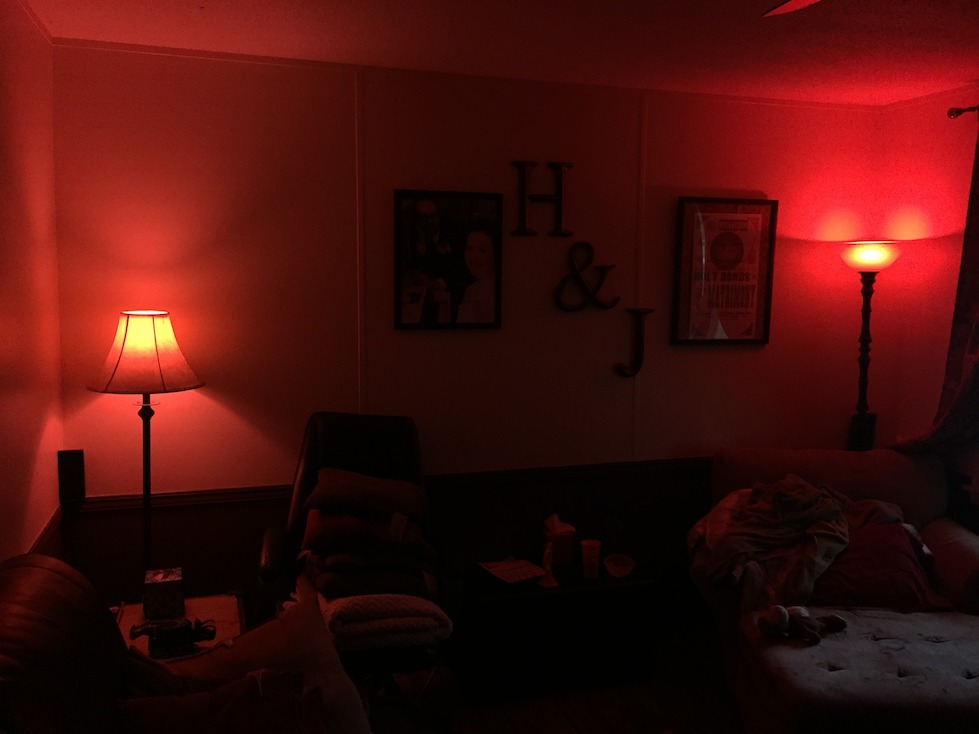
What is a scene? Simply put, a scene is a light configuration. For instance, if I select the included Savannah Sunset scene, it turns all the lights in the room a shade of red, while the Arctic Aurora scene turns them a shade of blue. When you select a scene, a circular control appears with which you adjust the brightness of the lights. The photo below shows how the Savannah Sunset scene looks in my living room.
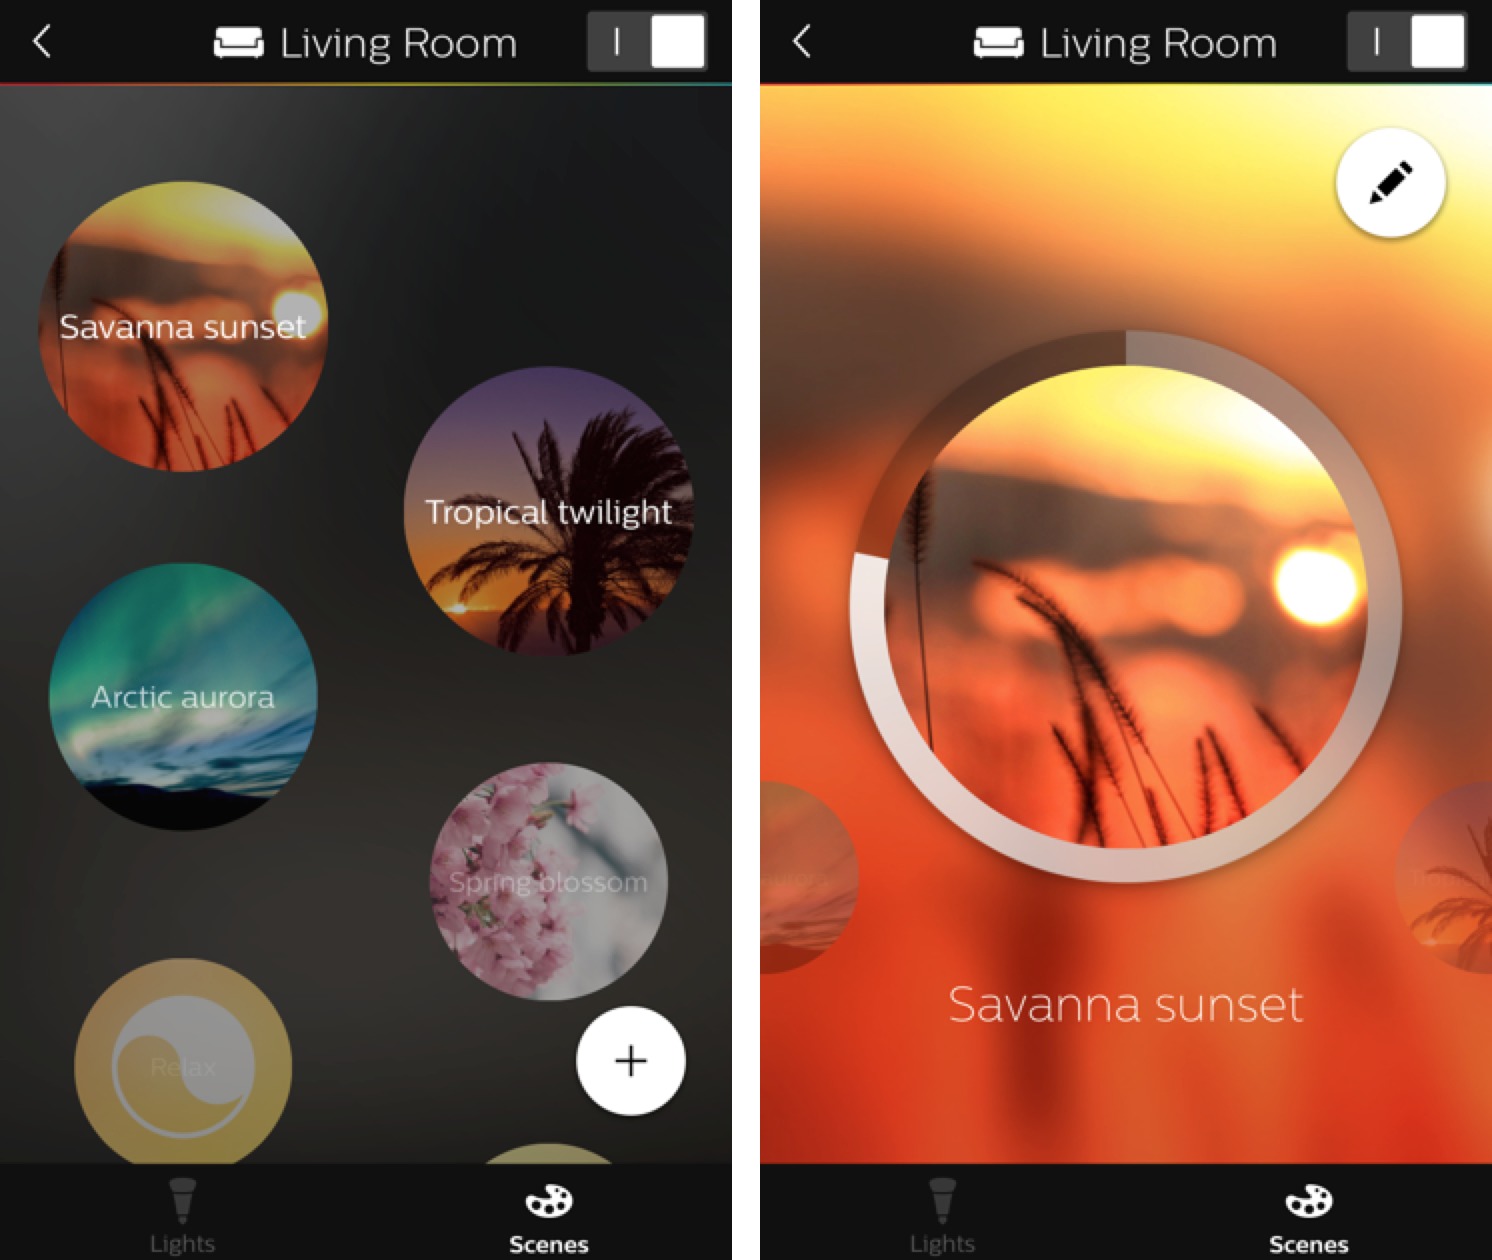
There are two ways to create a scene: manually or from a photo. To create a scene from a photo, go to the Scenes tab, tap the plus button and select a picture, either from Philips or from your Camera Roll. Move the image around to change the color profile, or tap Shuffle. Tap Save and name the scene when you’re satisfied.
You can also create scenes manually. In the Lights tab, tap a bulb’s icon to adjust that light by hand. You can choose from a color palette, a white palette, or from a number of task-focused “recipes,” such as Relax, Read, and Energize. In the Lights tab, the slider under each light lets you adjust the light’s brightness. Once you’ve adjusted all the lights to your satisfaction, tap the plus button in the lower right to save the scene.

To delete or rename a scene, go to the scene list and tap and hold on a scene bubble. You can reshuffle colors in a photo-based scene, but you can’t edit a manually created scene. However, you can enable a manual scene, go back to the Lights tab, make the desired adjustments, and then save a new scene.
Hue Automation — The Hue app’s main screen has a Routines tab, and this is where you can set up automated actions based on time and location. Don’t play with these until you get a good grip on how to control the Hue lights — otherwise, you might be baffled why all of your lights come on at 3:30 AM. Here’s a brief overview of what you can automate:
- Home & Away: Use this setting to control your lights automatically when you arrive at or leave your house. You need a free My Hue account to use this feature.
-
Wake Up: This feature turns your lights on automatically at a set time, which is useful if you have trouble getting up in the morning.
-
Go to Sleep: This routine turns your lights off at a set time — useful for kids who stubbornly refuse to go to sleep!
-
My Routines: Here you can create custom routines, such as setting scenes to activate at a particular time.
Creating Widgets — When you’re actually using your lights and not merely playing around, you won’t want to dig around in the Hue app. This is where the app’s Notification Center widgets are essential, giving you quick access to your favorite scenes even when your iPhone is locked. These widgets are also transferred to the Apple Watch app, if you have one of those, making access to your lights even easier (assuming you can get the Watch app to work).

To set up the widgets, go to Settings > Widgets & Apple Watch in the Hue app. If you already have widgets, they are listed there, and you can tap one to edit it. To create a new widget, tap the plus button in the lower right.
Start by entering a name for the widget. Keep the name short, so it fits in Notification Center. I use a short name or abbreviation for the room name, followed by a descriptor, like “L. Bright” to brighten up the living room.

Next, choose an icon. This isn’t important, because it doesn’t appear in Notification Center. Instead, you see the scene’s icon.
Select which rooms the widget controls. You can choose the entire home, multiple rooms, or just a single room.
Finally, pick a scene. I recommend making the following widgets for each room:
- Bright: The default, full brightness scene.
-
Dimmed: A scene for when you want to chill out a bit and get ready for bed.
-
Nightlight: Handy for keeping a bit of light on in a room without disturbing anyone.
-
Off: You want to be able to turn your lights off, right?
Widgets are my favorite way to control the Hue lights, because they’re easy to access and are reliable. However, you can also use Siri to control your lights, and it’s a much better party trick…
Activating Siri and Introducing HomeKit — You can configure lights, scenes, and entire rooms to work with Siri in the Hue app under Settings > Siri Voice Control. Configuring a light, scene, or room to work with Siri is as easy as tapping a checkbox.
There is a catch, though: every scene linked to Siri must have a unique name. This becomes a problem if you want to use Siri to activate the Bright scene in both your living room and bedroom. Another thing to consider is how easily Siri will recognize a scene’s name.
The trick I use is to give scenes unique names like “Bedroom Bright” and “Living Room Dim, which solves both problems. For whatever reason, Siri has a hard time understanding when I say “Bright Living Room,” but has no problem with “Living Room Bright.” Go figure.

Once you have Siri set up with your Hue lights, here are some of the commands you can use:
- “Turn on all the lights.”
-
“Dim the living room lights.”
-
“Turn the bedroom blue.”
-
“Set living room brightness to 70 percent.”
Of course, you can also activate scenes with Siri. If the scene name is easy for Siri to recognize, you can just speak it, for instance, “Savannah Sunset.” However, if Siri has difficulty understanding a scene name, the more reliable approach is to say, “Set scene Savannah Sunset.”
When you activate a Hue command with Siri, what you’re actually doing is registering that command with HomeKit, Apple’s built-in API for controlling compatible home automation devices.
In plain English, HomeKit links together all of your compatible home automation gizmos, letting you control them with Siri or a HomeKit control app. In iOS 10, Apple is introducing the built-in Home app, which you can use to configure and control all of your HomeKit devices. As a bonus, you’ll also be able to manage them from Control Center.
However, making use of HomeKit is another topic entirely. If you’ve enjoyed this overview of the Philips Hue lights and want us to write more about home automation, let us know in the comments.
TidBITS Watchlist: Notable Software Updates for 1 August 2016
iTunes 12.4.3 — Apple has released iTunes 12.4.3 with a quick fix for a problem that prevented playlist changes made on iOS devices from appearing in iTunes. (Free, 233 MB via direct download or Software Update, release notes, 10.8.5+)
Read/post comments about iTunes 12.4.3.
Mellel 3.5.1 — RedleX has released Mellel 3.5.1 with a number of fixes for the word processor. Notably, the update addresses crashes that could occur when modifying or extending a table selection using the arrow keys, after dismissing a text box or an image attributes pop-over in OS X 10.9 Mavericks, and when opening a text box in 10.8 Mountain Lion. The update also resolves bugs that prevented users from making bullet lists in comments, corrects a problem that caused text in a text box to look slightly fuzzy with some printers, and fixes a bug with line weights that affected systems where the decimal separator is a comma. ($39 new
from RedleX and the Mac App Store, free update, 128 MB, release notes, 10.6+)
Read/post comments about Mellel 3.5.1.
Lightroom CC 2015.6.1 and Lightroom 6.6.1 — Adobe has released the standalone Lightroom 6.5.1 and Lightroom CC 2015.6.1 (available as part of Adobe’s Creative Cloud Photography plan) with a fix for a bug with app-managed color management that resulted in incorrectly printed colors. The professional photo cataloging and editing applications also add support for the Fujifilm X-T2 camera, resolve an issue that prevented the SmugMug Publish Service from working properly, return access to native full-screen mode, and eliminate unnecessary resyncing of collections to Lightroom mobile after an update. ($9.99
monthly subscription or $149 for the standalone app, free update, release notes, 10.8+ for Lightroom CC 2015.6 and 10.9+ for standalone Lightroom 6.6)
Read/post comments about Lightroom CC 2015.6.1 and Lightroom 6.6.1.
GraphicConverter 10.1 — Lemkesoft has issued GraphicConverter 10.1 with some improvements for the venerable graphic conversion and editing utility. The update enables you to clear the recent browser and documents lists by pressing the Command key during launch. It also adds a new dehaze filter, an Auto Color batch option, and an optional display of autofocus points and subject area. Fixes include a correction for a numbering issue with some PDF page labels, a GPX export issue, and the incorrect display of images when using the Photos extension. If you have a license for any previous version of
GraphicConverter, you can upgrade to a version 10 single user license for $25.95 through the Lemkesoft Web site. ($39.95 new from Lemkesoft or the Mac App Store, free update, 115 MB, release notes, 10.8+)
Read/post comments about GraphicConverter 10.1.
TextWrangler 5.5 — Bare Bones Software has released TextWrangler 5.5 with more than 250 new features, changes to existing features, and bug fixes for the free text editor — including a bump in system requirements to OS X 10.9.5 Mavericks or later. The update streamlines the workflow for Find Differences with edit fields replacing the old path controls and a new folder comparison option (only compare items in common), adds a new Sidebar settings group in the Appearance preferences, adds an option to the Editing preferences that enables you to highlight selected text rather than underline it, improves
performance when soft wrapping text, and fixes a bug where autosaved document data would be lost if the application crashed or was forcibly quit after the restoration of sleep data. (Free, 9.3 MB, release notes, 10.9.5+)
Read/post comments about TextWrangler 5.5.
ExtraBITS for 1 August 2016
In ExtraBITS this week, your cheap non-Bluetooth wireless keyboard might be betraying your confidence, Apple jumps deeper into the video content game with the CBS series “Carpool Karaoke,” Apple Music video is now included in T-Mobile’s Binge On program, the Wirecutter explains why your device’s battery meter is often wrong, and Adam Engst and Josh Centers join the MacVoices podcast to discuss their latest book, “Take Control of Preview.”
Your Wireless Keyboard May Be Betraying You — Bastille, a cybersecurity company, has shown that hackers can easily intercept transmissions from eight non-Bluetooth wireless keyboards. Experts demonstrated how a $40 radio transponder combined with a $50 antenna could eavesdrop on the signals of budget wireless keyboards from Anker, EagleTec, General Electric, HP, Insignia, Kensington, Radio Shack, and Toshiba. Bluetooth and wired keyboards, however, are not vulnerable to the methods used in this attack. It’s a reason to avoid
wireless keyboards that depend on proprietary transmission systems.
Apple Music Scores “Carpool Karaoke” Series — First, the news broke about Apple’s “Planet of the Apps” TV show, and now the company is continuing its foray into original content by nabbing CBS’s upcoming “Carpool Karaoke” series. “Carpool Karaoke” is a spinoff of the popular “The Late Late Show with James Corden” bit, in which he drives celebrities around as they sing songs. Although it doesn’t sound as if Corden will host the new show, it is, nonetheless, a big “get” for Apple Music.
Video on Apple Music No Longer Counts Against T-Mobile Data Caps — While T-Mobile users have been able to stream music from Apple Music for the past year without it counting against cellular data caps, the carrier has now added Apple Music to its Binge On program, meaning that video from Apple Music will no longer count against the caps. This exemption includes music videos, as well as future video content on Apple Music, such as the upcoming “Carpool Karaoke” series from CBS.
Why Your Phone’s Battery Meter Is Wrong — Has your iPhone ever died, even though it claimed to have charge left? The Wirecutter goes over the complex reasons why mobile device battery meters are often so inaccurate. The article describes the different variables that go into computing remaining battery charge and concludes that battery meters can, at best, provide only a guess of the remaining charge.
Adam Engst and Josh Centers Discuss Preview on MacVoices — Adam Engst and Josh Centers joined host Chuck Joiner on the MacVoices podcast to discuss their new book, “Take Control of Preview.” They describe how it started out as a popular TidBITS series, outline Preview’s many capabilities, and explain why the built-in Mac app is akin to a Swiss Army Knife. Tune in for all the backstory to the book, plus a ton of tips!