#1407: WyzeCam review, iRig Mic HD 2 vs. Blue Yeti, Mac Twitter clients compared
In TidBITS this week, Josh Centers looks for (but can’t find many) faults in the $20 WyzeCam Wi-Fi security camera, and he compares IK Multimedia’s new iRig Mic HD 2 microphone to the well-reviewed Blue Yeti mic. Also in this issue, Julio Ojeda-Zapata evaluates three alternatives for the now-discontinued Twitter app for the Mac: TweetDeck, Tweetbot, and Twitterrific. Notable software releases this week include Quicken 2018 5.5.4, Hazel 4.2.3, and Logic Pro X 10.4.1.
$20 WyzeCam Security Camera Is Almost Too Good to Be True
When our previous dog mysteriously went missing, I decided that we had to get some security cameras for the house. I wanted something that wouldn’t require complex wiring, and given my role at TidBITS as “the HomeKit guy,” I ideally wanted something that would integrate with Apple’s Home app.
I first looked at the options Julio Ojeda-Zapata identified in his “A Prairie HomeKit Companion: HomeKit Security Provides Peace of Mind” (11 September 2017), but I found those options unsatisfactory. The main problem was that Wi-Fi-enabled cameras are expensive. You’re looking at about $150 per camera, and not many support HomeKit yet.
I didn’t know what to do until I saw a recommendation for the WyzeCam, a boxy little 1080p Wi-Fi video camera with limited free cloud storage, night vision, and a speaker and microphone for two-way communication — check out its video (which was not captured on a WyzeCam, alas). Those are all standard features for connected security cameras, but what seemed too good to be true was its price: $19.99. Add in $5.99 for shipping, so it’s really a bit closer to $30, but that’s still a fraction of the price of the competition.
Unfortunately, the WyzeCam doesn’t support HomeKit, but for the cost savings, I’m willing to put up with that. I wouldn’t want a bunch of home automation devices that ignore HomeKit because having to interact with each individually would be a nightmare, but it’s acceptable for one or two. That said, now that Apple lets manufacturers enable HomeKit via a simple software update, I hope Wyze Labs adds support.
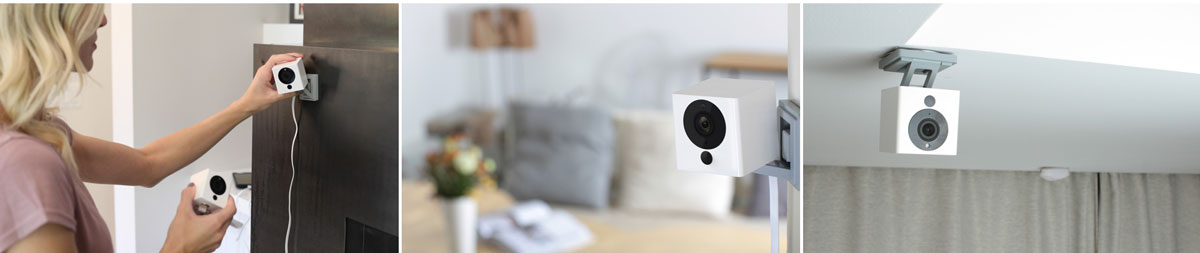
Other than a lack of HomeKit support, what’s the catch? A $20 video camera must be a piece of junk, right? No, the WyzeCam’s hardware is solidly built and attractive. There’s no creaking nor rough edges — fit and finish are fantastic. And mine (for $20, I bought a couple) have suffered a number of drops from several feet onto hard surfaces with no ill effects.
The WyzeCam is a little cube with a pull-out base stand that can rotate on three axes, so it’s highly flexible in how you position it. The base is magnetic, so it will attach to any surface with sufficient iron content. It also includes an adhesive metal plate you can stick anywhere you please. The included AC power adapter connects to the camera via a Micro-USB port, and the cable itself is detachable, so if you need a shorter or longer power cable, you can swap it for something that works better.
There must still be a catch. The software — in the form of apps for iOS and Android — has to be lousy, right? Nope. The iOS app could be better, but it’s far from bad.
The software often wants you to log in to your WyzeCam account when you first open the app, which is a little annoying. But since it supports Touch ID and Face ID authentication, the login process is quick and painless.
The first screen shows you a list of your cameras, with a photographic preview of each. Tap a picture to see a live feed of that camera. Unfortunately, the app updates the previews only when you view the camera feed, making them less helpful than they would be if they updated as soon as you opened the app. As it is, they’re useful only for helping you remember where each camera is placed.
In the iPhone screenshots below, you can see the preview on the left and the live feed on the right. As you can see, my dog has again dragged his bed into the yard because he enjoys soaking in the rain. If you’re wondering why the lens looks like it has something on it, that’s because it’s being reflected by a window directly in front of it. I explain why below.
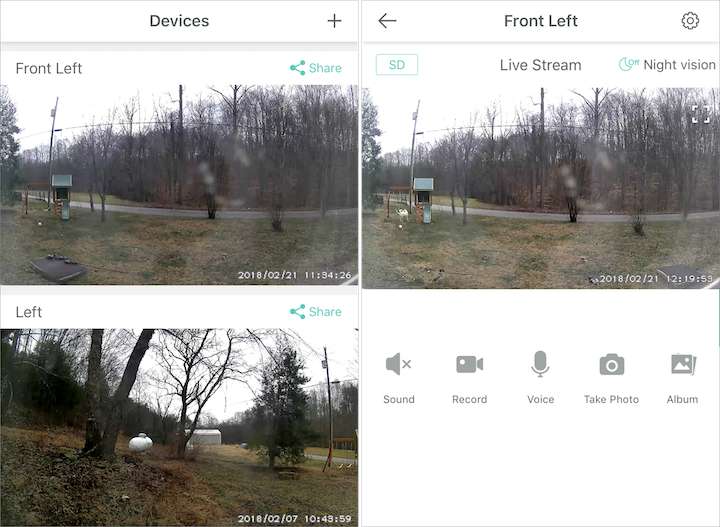
For $20, the camera feed must be blurry or blocky, right? No. The WyzeCam captures video in 1080p high definition with a 110-degree field of view. That said — and this does appear to be the catch — the WyzeCam captures only 10 frames per second, so its video isn’t terribly smooth. But the WyzeCam makes up for that by also recording video in the dark at up to 29.6 feet (9 meters), thanks to four built-in infrared LEDs.
While viewing a live video stream on your iPhone, you can manually record videos and take still photos, which are stored on your iPhone’s camera roll. You don’t have to be home to view your camera feeds or record images, either. I often check my cameras when I’m out and about.
You can enable motion detection and the WyzeCam will automatically capture 12 seconds of video when it senses motion in its field of view. It then stores that video in the cloud for up to 14 days for no charge and can notify you afterward. You can download these videos to Photos in your iPhone if you want to save them. The bad news is that the WyzeCam will record such video only once every 5 minutes at the most. I’d happily pay a reasonable fee for more frequent recording of detected motion — that seems like an obvious business opportunity for Wyze Labs.
The WyzeCam can record continuously if you insert a microSD card. Unfortunately, it supports cards only up to 32 GB, which can either record about two days of HD video or a week of SD video. And, of course, you’ll have to extract the video from the microSD card in order to view it.
The WyzeCam’s built-in microphone and speaker allow for some interesting features. It can alert you when it hears sounds, but more interestingly, it can listen for smoke and carbon monoxide alarms and notify you when it hears one go off in your house. You can schedule these alarms so you receive them only at certain times of day, like when you’re at work. While viewing a live stream, there’s also a voice button that you can hold down and speak into, which is then broadcast from the WyzeCam. I suppose you could use that to talk to a loved one or scare a burglar. In any case, it’s a neat feature.
You’re probably curious about the WyzeCam’s security. In its FAQ, Wyze Labs says:
We take our customers’ data safety very seriously. The communication between your mobile device, the WyzeCam, and the AWS Cloud Server are made via https (Transport Layer Security (TLS)). We used symmetric and asymmetric encryption, hashing and other ways to make sure users’ information cannot be stolen. Each camera has its own secret key and certificate so that we can validate its identity during handshake. The contents are encrypted via AES 128-bit encryption to protect the data. Even if a hacker intercepts the data package, the data cannot be decrypted.
More importantly, the Wirecutter had Bill McKinley, executive director of Information Security at the New York Times test the WyzeCam along with other Wi-Fi security cameras, and it received his approval.
As for privacy, Wyze Labs has a solid privacy policy, but be aware that in most places in the world, the company is required by law to cooperate with law enforcement. In other words, your monitoring devices can and will be used against you. If you’re worried about that, you’re better off just not having any.
The biggest drawback of the WyzeCam is that you won’t want to install it outdoors because it can’t handle freezing temperatures or getting wet. You could put it into a PVC enclosure, but night vision would be blocked, and you’d still have to figure out how to run power to it.
I work around that by placing it on the top rail of my windows, pointed outside. Unfortunately, that renders its night vision useless, since the infrared light is reflected by the glass. So I turned night vision off and rely instead on standard motion-activated exterior lights.
In fact, my WyzeCams mostly serve to monitor my exterior trail cams, which last for months on a battery and take still pictures whenever motion is detected — day or night. The trail cams are strapped to trees and the WyzeCams are pointed at the trees with the trail cams, so if someone messes with my trail cams, they’ll be filmed by a WyzeCam, and even if they subsequently broke in and grabbed the WyzeCam, it would be too late because the video would be uploaded to the cloud. I have the WyzeCams’ motion sensors on, but I turned off notifications so they can capture video without hassling me. If anything goes awry, I can check the footage.
If you’re interested in a WyzeCam, I have good news. You can now pre-order the second-generation model, which provides motion tagging (which puts a green box around moving objects), a better camera sensor, improved audio, and a less shiny matte finish. The bad news is that you may be waiting a while to get one — it’s backordered by several weeks.
Alas, we never found out what happened to our dog, but we got a new one, a Great Pyrenees who you can watch playing with his bed in the video above — he also made a cameo in “Rescue Blurry Photos with Live Photos in iOS 11” (7 February 2018).
iRig Mic HD 2 vs. the Blue Yeti: A New Entry-Level Microphone Champ?
Even though I’ve taken to strumming a guitar recently, I’m no musician (as my poor wife can attest). Despite that, I still need a quality microphone for podcast appearances, MUG presentations, and to record articles for TidBITS. For five years now, I’ve used the Blue Yeti, which I wrote about in “Setting Up a Home Office with Josh Centers” (19 July 2013).
To my surprise, the Blue Yeti has become something of a podcasting standard over the past five years, thanks largely to it being the Wirecutter’s pick for best USB microphone. This came as a surprise because the Blue Yeti isn’t what I’d consider ideal for podcast recording.
Microphones have different patterns of how they pick up sound. The ideal pattern for podcast recording is cardioid, which is highly sensitive in the front and not as sensitive in the rear. In plain English, you want a microphone that picks up your voice but not background noise.
In theory, the Blue Yeti can switch to any pattern you need, but the reality is that it’s extremely sensitive to background noise. Monitoring my Blue Yeti’s input makes me feel like I have superhuman hearing, even when it’s in cardioid mode. When the mic’s input is turned up, I can hear my wife drop a pencil at the other end of the house.
That sounds awesome for eavesdropping on supervillains, but it’s irritating if you want crisp, clean sound in everyday audio. A particular problem is “house noise,” which is buzzing and interference a sensitive microphone can pick up, which makes your recordings sound unprofessional. I countered the house noise in Audio Hijack by combining its Denoise and AUDynamics Processor effects, but they’re not perfect. In particular, the AUDynamics Processor can cause clipping and make things sound weird.
Marco Arment summed up the pros and cons of the Blue Yeti when he published his roundup of podcasting microphones a few years back:
The Yeti has been recommended for years as an inexpensive starter mic. Getting good sound out of it takes some work and additional gear: it needs a strong pop filter, it picks up a lot of room echo, and its included desk stand keeps the mic too far away for good sound. But it’s a great value, and under ideal circumstances — close-up use in a silent, soft room with a pop filter — it can yield excellent sound quality.
So when the folks at IK Multimedia asked if I’d like to try out their iRig Mic HD 2, I jumped at the chance. At the same suggested retail price as the Blue Yeti, $129.99, it makes for a perfect comparison. (I’ve seen the Blue Yeti sell for much lower — as low as $70 around the holidays, but as I write this, $110 seems to be the street price for the basic model.)
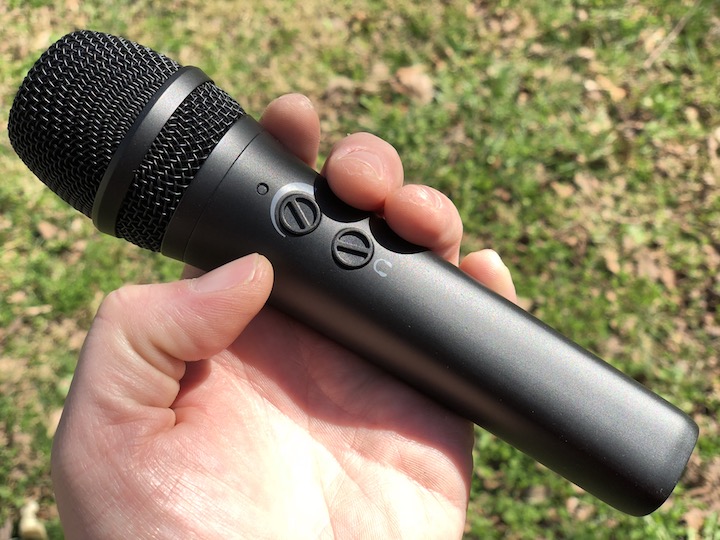
Like the Yeti, the iRig Mic HD 2 features a USB interface, though the iRig Mic HD 2 uses a micro-USB connector as opposed to the Yeti’s mini-USB. The bi-directional USB-C would be preferable because it would be impossible to orient the plug incorrectly. Like the Yeti, the iRig Mic HD 2 also features a 3.5mm headphone jack so you can monitor your input (essential to make sure you’re not screaming or whispering into the mic), and it features volume controls for both input and output. The iRig Mic HD 2 also has a little indicator light. Blue means you’re too quiet, red means you’re too loud, and green or orange means you’re just right. In practice, I don’t pay much attention to that light, and I’ve never seen it turn red.
While the Yeti is a large, pill-shaped microphone that requires a stand, the iRig Mic HD 2 is a slender handheld model. At 1.2 pounds (550 grams), the Yeti is heavier than the iRig Mic HD 2, but the iRig Mic HD 2 has some heft of its own, weighing in at 0.72 pounds (325 grams). It feels like a solid, well-constructed bit of kit, though not uncomfortably heavy.

iMic includes a variety of goodies in the box: a USB to micro-USB cable, a Lightning to micro-USB cable (to connect the mic to your iPhone or iPad), a nice zip-up storage bag, a tabletop stand with a mic clamp, and a ⅝-inch to ⅜-inch thread adapter. The stand isn’t impressive, but it gets the job done. Although I stick with Audio Hijack and Garageband, iMic also includes a great deal of software, including:
- Pro Bundle for iRig Recorder iOS
- Mic Pack for VocaLive iOS
- Mic Room for Mac, PC, and iOS
- T-RackS Classic for Mac and PC
- Ableton Live 9 Lite for Mac and PC
But enough of all that, what we’re here to talk about is sound quality.
Sound Quality Showdown: iRig Mic HD 2 vs. Blue Yeti — I could quote all sorts of specs here, but they don’t tell you much about how the microphones sound. So I made a number of test recordings with both mics side by side. I didn’t edit these clips at all other than some simple crops in Fission to trim dead air at the start and end, so be warned that you can hear breathing, swallowing, and other such noises.
For my first recordings, I set the gain (volume of capture) for each microphone at 75 percent, which is what I usually use. I recorded both simultaneously in Audio Hijack with no effects applied. My mouth was about a foot away from the microphones, which is the usual distance. To best hear the difference, I recommend listening to these with headphones:
In those two recordings, my impression is that the Yeti recording was louder, but also muddier and with more relative noise than the iRig Mic HD 2. I decided to try another recording, this time with the iRig Mic HD 2 at full gain and the Yeti at only 25 percent to see how those would sound:
- Yeti 25 Percent Gain Test Recording
- iRig Full Gain Test Recording to Compare Against Yeti at 25 Percent Gain
And to provide another apples-to-apples comparison, here are both microphones at full gain:
Finally, I decided to make test recordings with my usual Audio Hijack settings, which is a mono recording in AIFF format with a denoise effect applied:
And just as a bonus, here are two test recordings of me playing guitar with both microphones, again using my usual Audio Hijack settings:
You should draw your own conclusions, but to my ears, the iRig Mic HD 2 consistently sounds clearer and crisper, with less noise. Those I’ve subjected to blind comparisons over the past few months have regularly come to the same conclusion.
Recommendations — If you’re getting started with podcasting or some other sort of serious hobby recording, the iRig Mic HD 2 is an excellent choice. It’s portable, versatile, and has excellent sound quality for the same base price as the Blue Yeti. If you stumble across a Blue Yeti for under $100, it might seem like a better value, but I think you’ll be happier in the long run with the iRig Mic HD 2. (As for the Wirecutter recommendation, they haven’t updated the guide since the iRig Mic HD 2 was released, so I’ll be curious to see what their eventual analysis is.)
Also bear in mind that if you go with the Blue Yeti, a pop filter is an absolute must to avoid “explosive” P sounds. I use Blue’s official pop filter, which costs about $40 these days (you can see it in the comparison photo above), but you can get a serviceable one for under $10. In any case, it adds to the actual cost.
If you already own a Blue Yeti or a similar mic, I don’t think you’ll get $129.99 of additional value from the iRig Mic HD 2 — it’s just not that much of an improvement. If you are looking for an upgrade, I’d recommend you try the $250 Shure Beta 87A, which was Marco Arment’s top pick back in 2015 — microphone technology doesn’t change that much or that fast. A friend of mine just purchased one, and it sounds incredible, but he also had to buy a $150 Tascam USB interface since the Shure is an XLR mic. By the time he acquired all the mounting gear and other accoutrements he wanted, he had spent about $700. He was happy to spend the money to get optimal sound quality, but does his setup sound five times better than mine? I don’t think so.
The iRig Mic HD 2 hits a sweet spot. It’s a professional-quality mic that doesn’t break the bank. It comes with everything you need to record in macOS and iOS, it’s portable, and you can record while holding it in your hand if you need to. It can also take a beating — I’ve dropped it a few times with no ill effects. Dollar for dollar, I recommend the iRig Mic HD 2 over the Blue Yeti.
Three Alternatives to Twitter’s Now-Defunct Mac App
Twitter has seen significant changes recently, such as an increase in a tweet’s maximum character count from 140 to 280 on 7 November 2017. This update did not carry over to the company’s long-neglected Mac app, however, which suggested it was not long for this world.
On 16 February 2018, Twitter made that official, announcing it was pulling the app from the Mac App Store and would be dropping support for it entirely a month later.
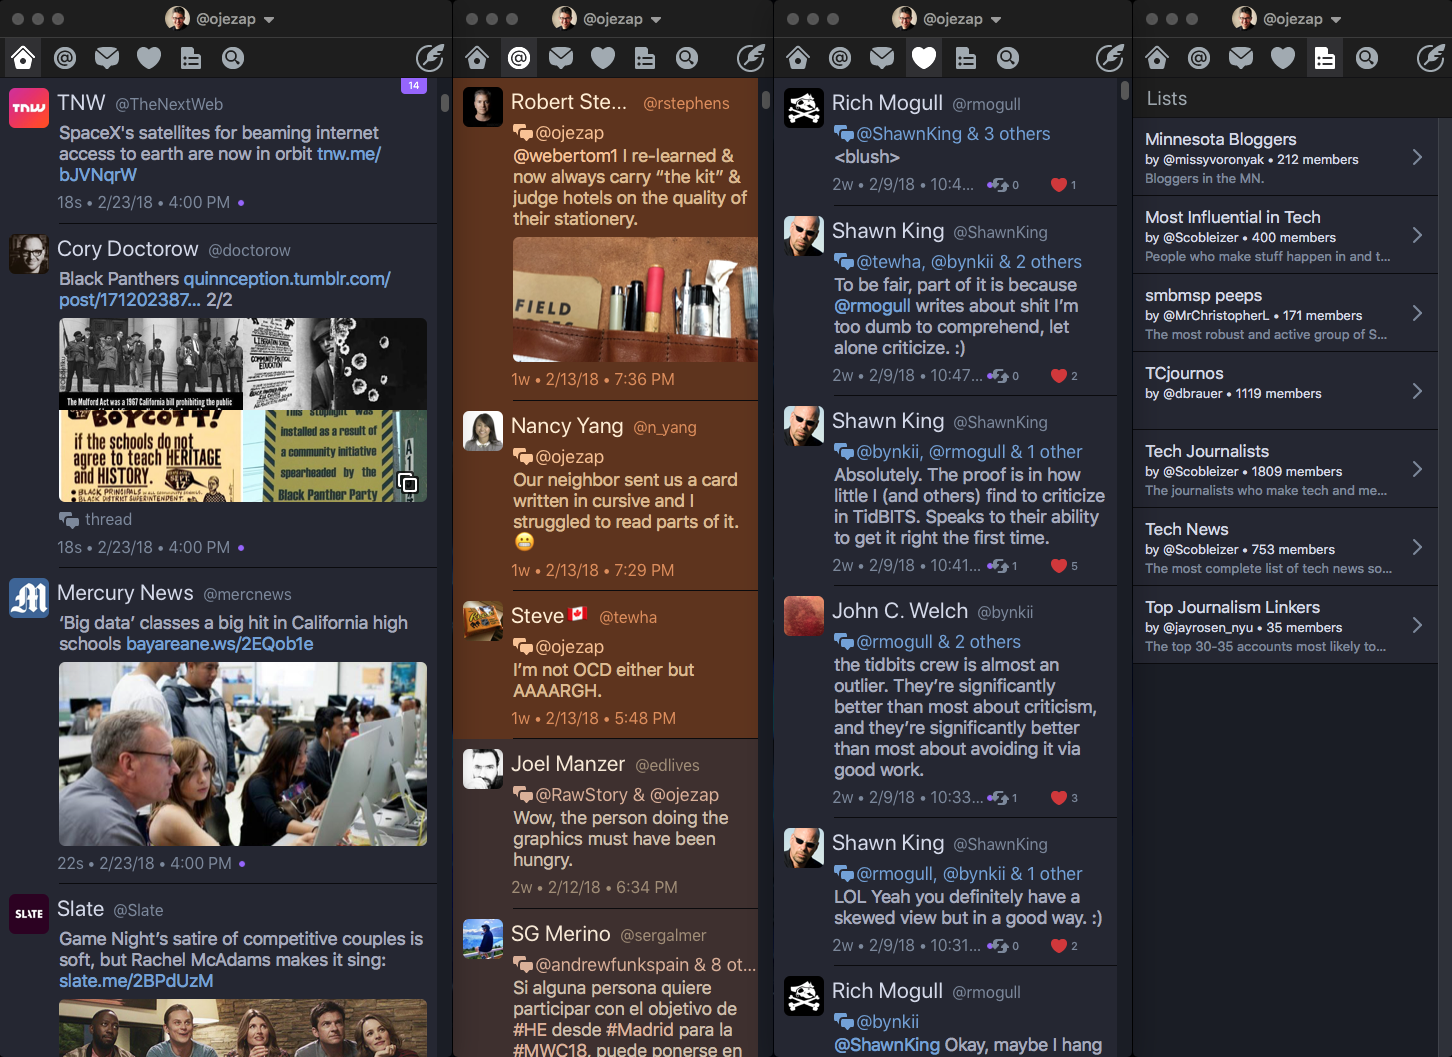
Users of the app must now find replacements. The selection has waned since Twitter made life hard for third-party apps some years ago (see “How Do We Fix Twitter?,” 11 August 2015), but a handful of alternative Twitter clients are still available and seem firmly entrenched. Two of the apps, Tweetbot ($9.99) and Twitterrific ($19.99 but on sale for $7.99 as of this writing), are native Mac clients with beloved iOS siblings. Displayed below are Twitterrific and Tweetbot, along with the now-defunct Twitter for Mac.

A third option, Twitter’s TweetDeck, is not a native Mac app, but more of a wrapper for a generic multicolumn interface that is the same in Windows and Chrome OS. Even so, TweetDeck is a decent option for those who do not want to use Twitter’s basic Web app. And it’s free.
I’ll miss Twitter for Mac. It was descended from Tweetie, a much-loved app from Loren Brichter that Twitter bought in 2010. The Tweetie-to-Twitter lineage is detailed in a recent episode of iMore’s Vector podcast that’s worth a watch, listen, or transcript read.
Twitter’s free Mac app didn’t get a lot of love in its last days, but I thought it was a paragon of simplicity and flexibility, permitting me to keep close tabs on my various Twitter accounts and to navigate effortlessly among these.
In comparison, Twitterrific and Tweetbot seemed to have too many gee-whiz features while making simpler operations harder than necessary. Now, though, we Twitter for Mac users have no choice but to cast about for a fresh Twitter client. In doing so, I’ve become more bullish about Twitterrific and Tweetbot, in part because they’ve improved since my last look.
What Makes a Great Twitter Client? — Before considering replacements for Twitter’s soon-to-be-departed Mac app, it is useful to analyze what features a good Twitter app should have. This is largely a matter of opinion, to be sure — my needs likely vary from yours. Still, I’ll take a crack at some basic parameters:
- Multi-account support: While most Twitter users have but one account, many people manage both personal and organizational accounts. It is of paramount importance that working with multiple accounts feel effortless.
- Multi-column support: Twitter for Mac’s lack of multi-column functionality was one of its huge shortcomings. The feature is crucial for power users, who often want to see tweets from different accounts simultaneously, or separate out tweets that match certain searches.
- Notifications: This is an obvious feature, one that can be implemented in many ways. Twitter for Mac boasted a clever design that let users see at a glance which accounts had activity, and of what kind.
- Stream marking: Some Twitter users like to mark their place when they suspend a session so they can return to that point in their Twitter stream, possibly even in another Twitter app.
- Muting or muffling: Sometimes you want to banish bothersome content from your stream, either just for a time or forevermore. Twitter itself provides basic muting, but some of the client apps offer more powerful filtering mechanisms.
- Customization: Want to increase the size of text or images? Modify the appearance of the user avatars? Make the app’s overall look light or dark? The various Twitter clients offer different degrees of user customization.
- Look and feel: Users’ tastes are all over the place, but I will assume a consensus here that a Mac-native Twitter app is preferable. I am also keen on software that does its job in a simple or minimalist fashion.
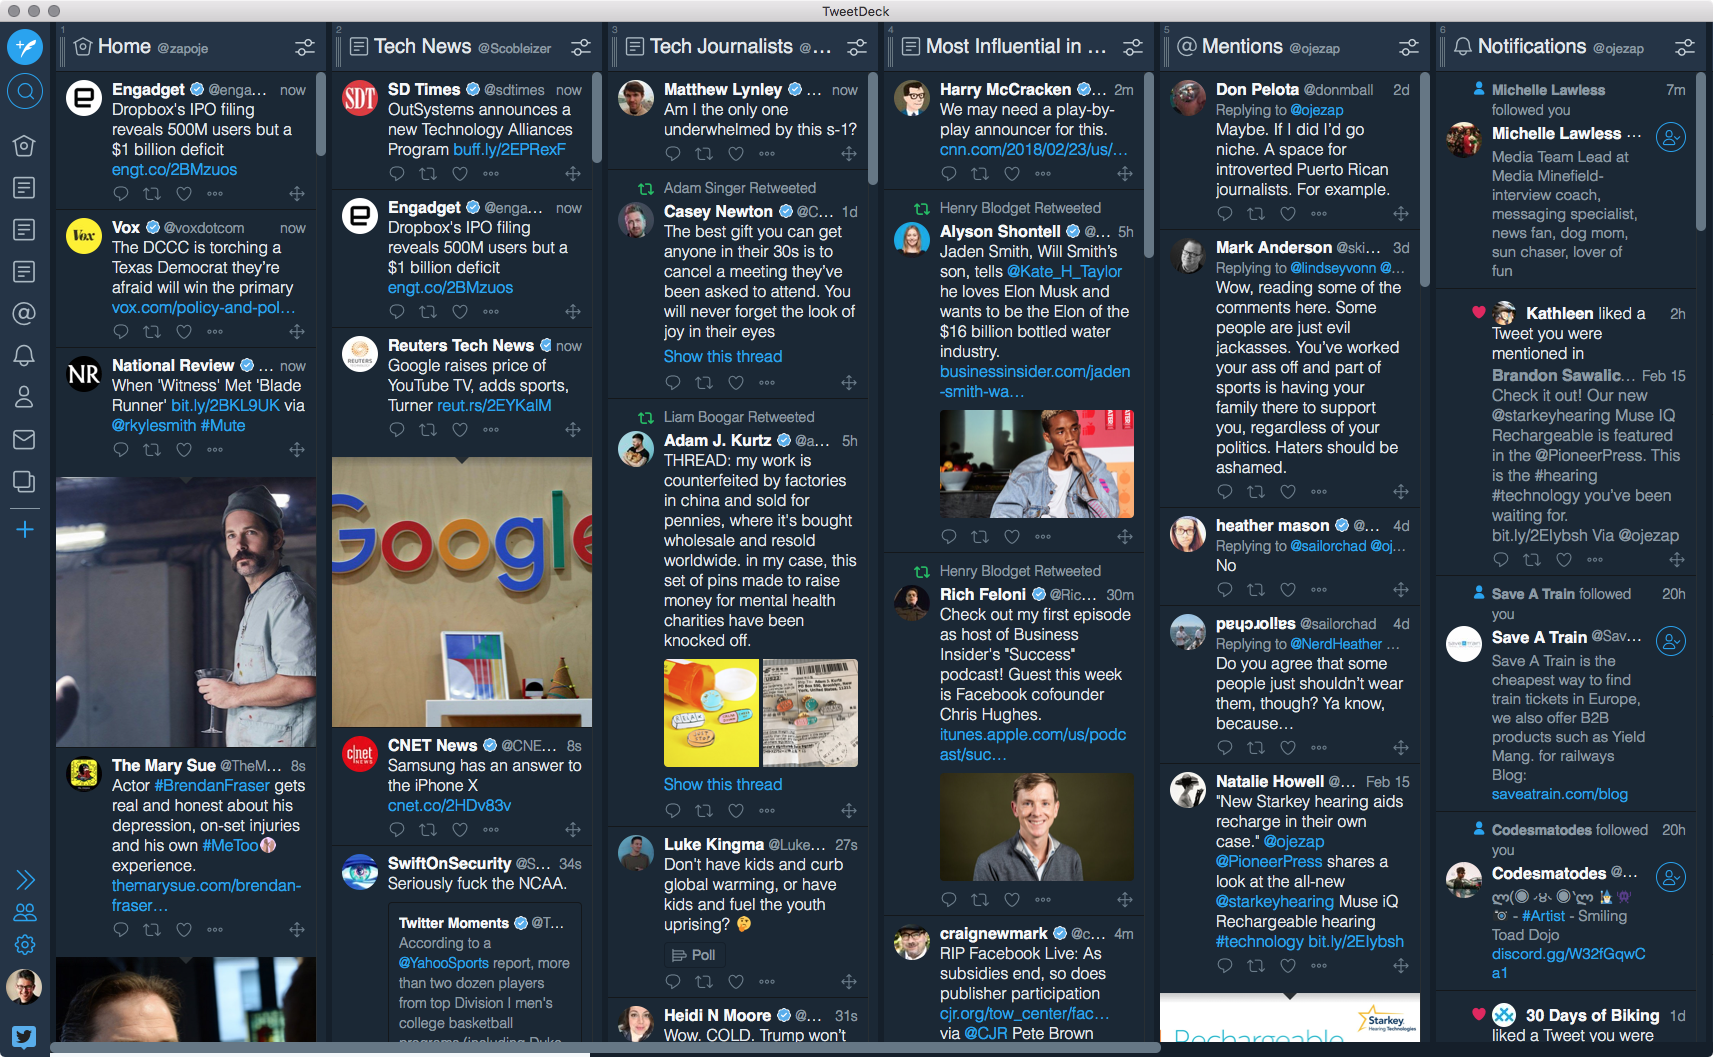
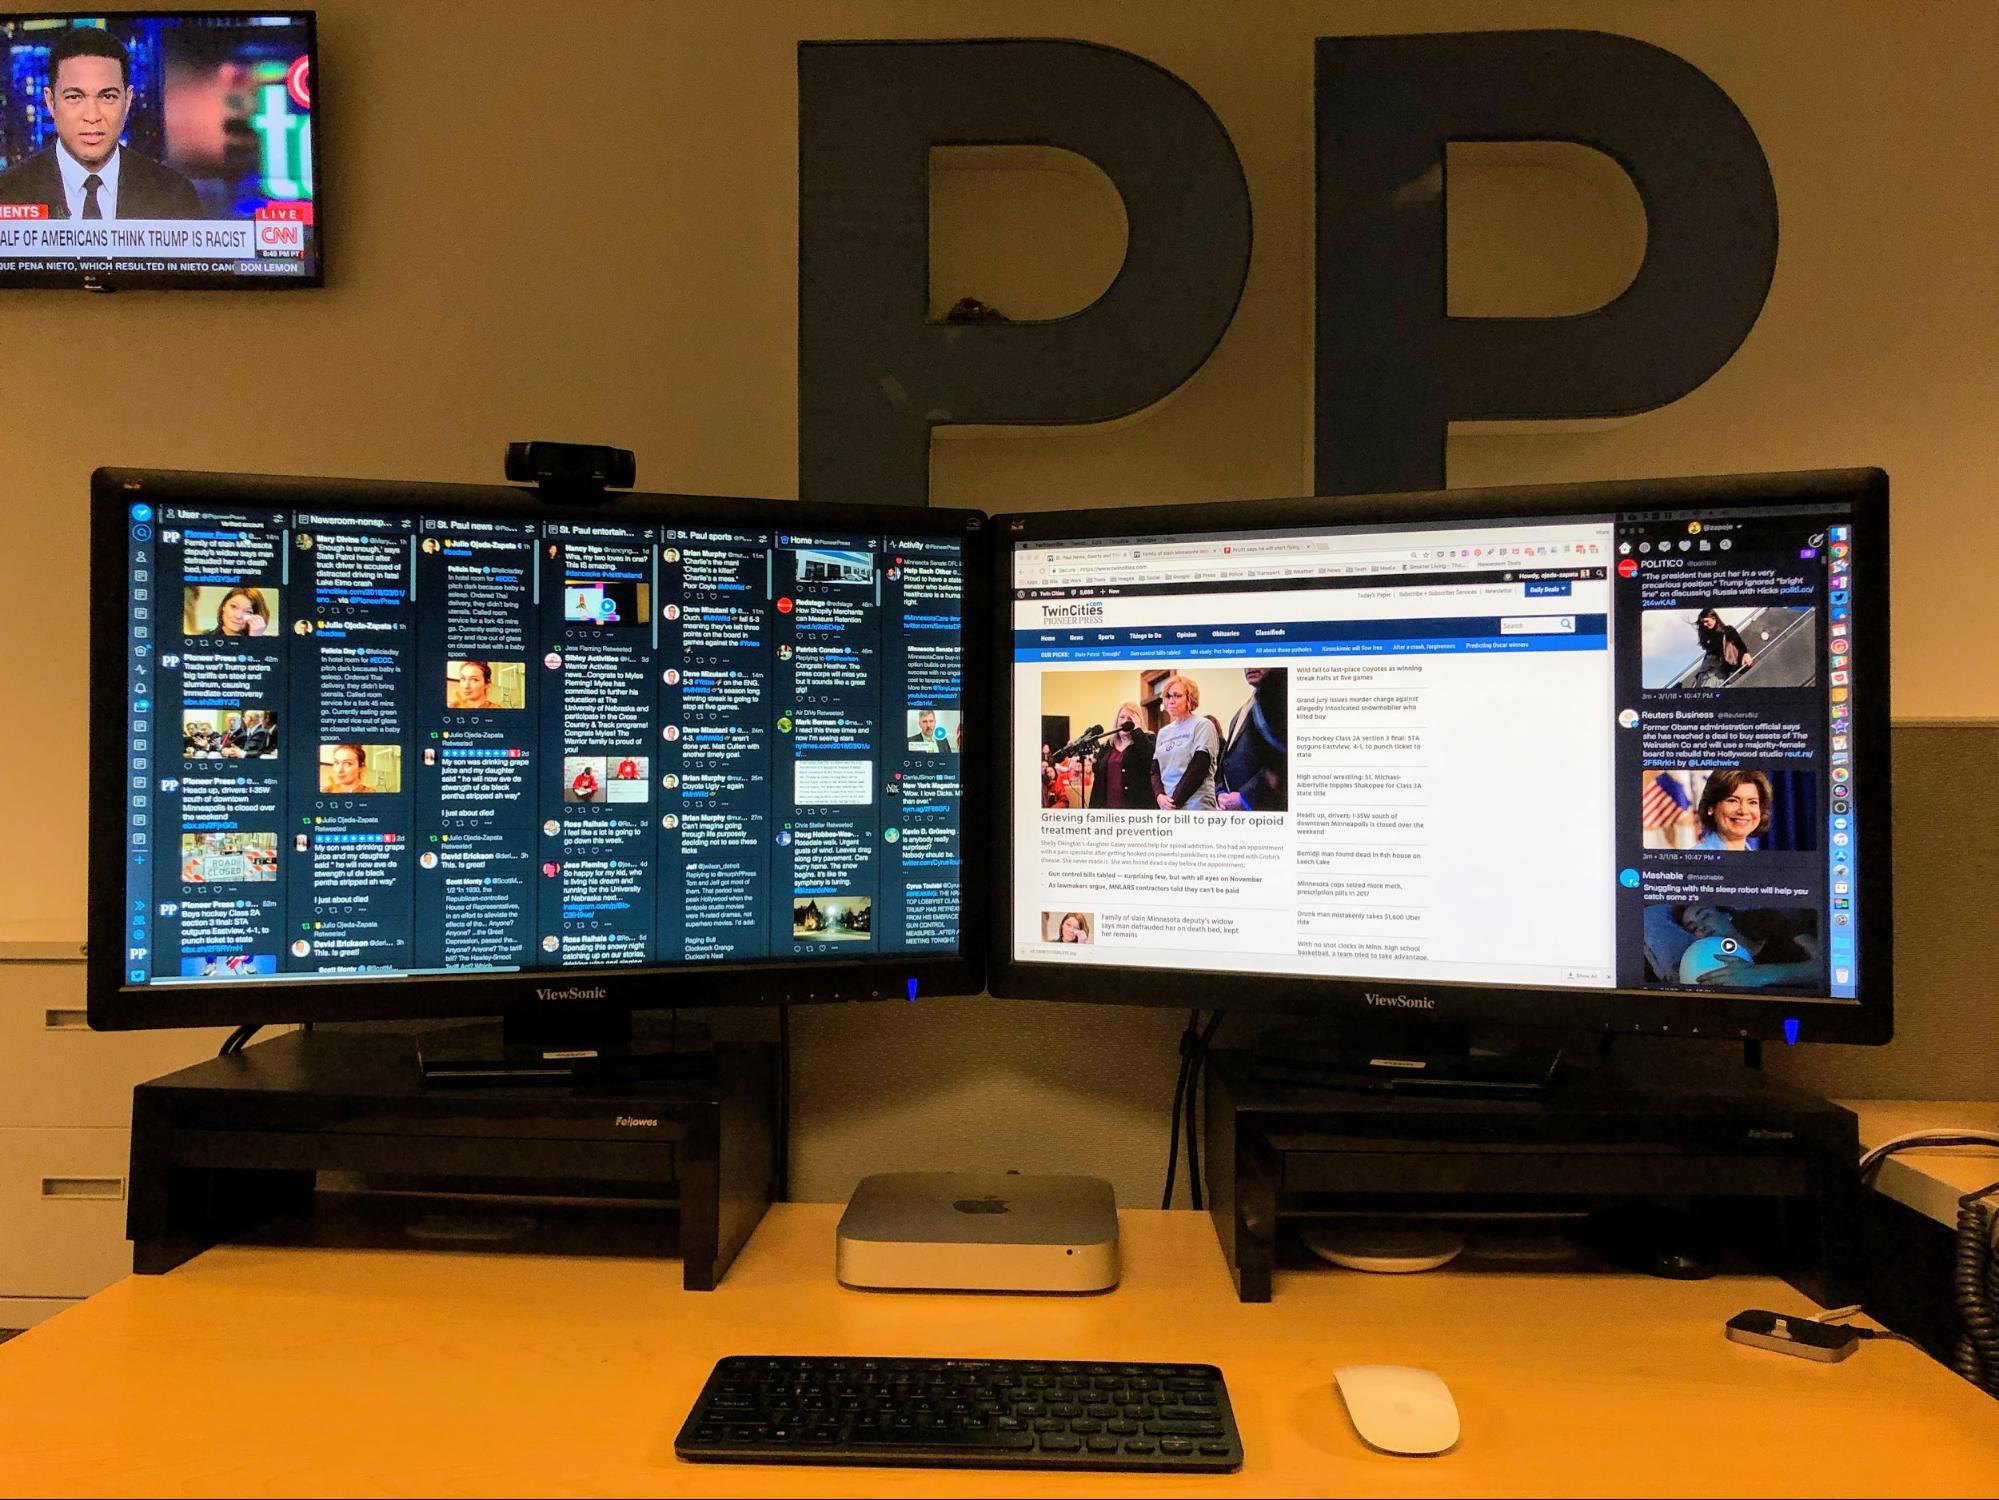
TweetDeck — I’m intimately familiar with TweetDeck because it is an indispensable tool in my work as a social media manager at the St. Paul Pioneer Press newspaper. Of the two big displays linked to my newsroom Mac mini, the left display is taken up entirely by TweetDeck’s multi-column interface. (In the photo below, you can also see Twitterrific, logged into my personal account, on the far right.)
TweetDeck is the choice for Twitter power users — the one you want if you need to stay current on massive amounts of Twitter activity at a glance.
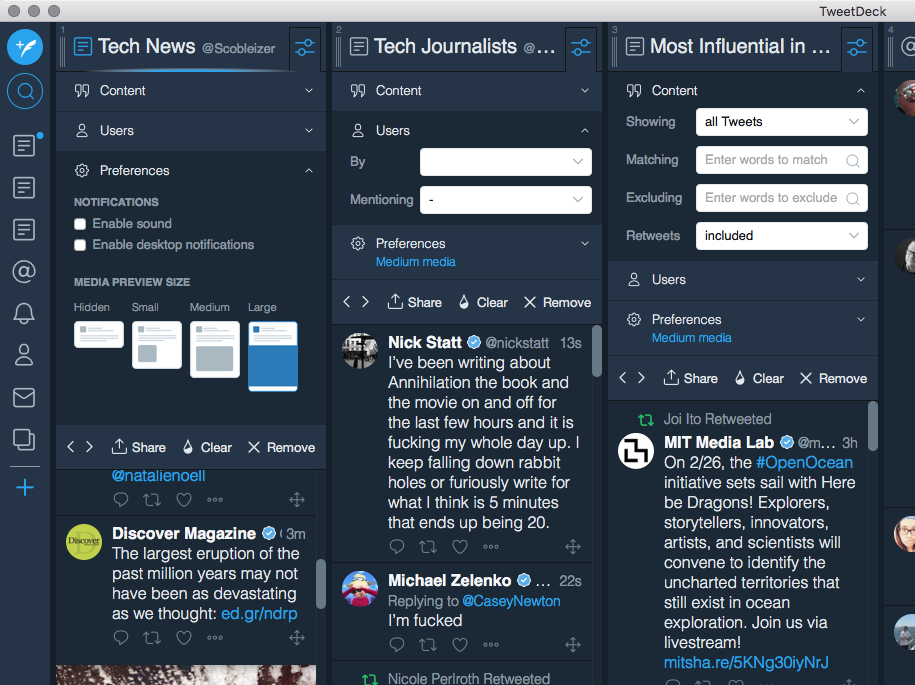
TweetDeck columns — you can have dozens set up simultaneously — can display all manner of info, including user streams, notifications, mentions, likes, lists, messages, and keyword-search results. The “scheduled” column shows tweets you have set up for automatic posting in the future, a trick no other Twitter app can match. A “collections” column stores any tweet you like, scrapbook-style — just drag it over.
(This scrapbooking capability is similar to a new bookmarking feature that Twitter announced on 28 February 2018. However, for now, bookmarking is mostly a mobile feature, available in the company’s iOS and Android apps as well as on its mobile-focused Web site.)
Even if you have a ton of TweetDeck columns, navigation is easy, though a bit poky on a slow computer, via a handy scroll bar along the bottom edge. Also, a scrolling toolbar on the left edge shows one icon for each of your columns. Click an icon and the matching column moves front and center.
TweetDeck excels at multi-user support. When viewing a tweet, you can respond to it or retweet it, with or without a comment, from any of your accounts. This seems obvious, but other apps have struggled to provide such functionality.

Unfortunately, Twitter recently removed one TweetDeck power feature: the capability to tweet, retweet, or execute other actions simultaneously across multiple accounts. The company said this change was intended to discourage spammy repetition of identical content or activity, which makes sense, but it was useful.
TweetDeck has global customization features that allow you to change the width of your columns, toggle between light and dark themes, modify text size, and so on. It has per-column tweaks, too; set media-thumbnail sizes, toggle audio on or off, and enable desktop notifications for each column.
You can also set up column-by-column filtering using a variety of content, username, and media-attachment criteria. You can globally filter by words or phrases, as well.
With pro users in mind, TweetDeck offers a “team” feature that lets you invite others to work alongside you.
TweetDeck has distinct shortcomings, particularly for those looking to find a Twitter for Mac replacement.
As an aggressively multi-column construct, TweetDeck is a bit of a monster for those seeking a thinner client to a position on the side of your screen. (You can shrink it to a single column with a left-hand toolbar, but some features don’t work quite right in such a configuration.) For me, it’s overwhelming when I am not logged on for day-job duties.
It’s also not very Mac-like. It looks the same in Windows and Chrome OS and, in fact, is a browser-viewable Web app. The Mac App Store version is just a container for that Web interface.
Alas, for those wanting to keep their desktop and mobile browsing synced, no version of TweetDeck for iOS exists — there was once one, but it is dead now.
Tweetbot — Tapbots makes my favorite iOS Twitter app, Tweetbot, so I’ve been kicking the tires on the Mac version.
As an elegant one-column app, it’s a relief after a workday spent staring at the overwhelming TweetDeck dashboard. At the same time, Tweetbot users can optionally add additional columns if warranted. This makes the app a hybrid of sorts, which is nice.
User accounts display in a left-hand toolbar as rounded avatars. Only one such account avatar is visible at a time, though. To see the others, click the active one, and the others pop into view. You can then switch to a different account. Below the active account avatar (and only that avatar) are controls for the usual actions — mentions, messages, likes, lists, and so on. Activity, such as a new mention or a message, causes a dot to show up next to the relevant control icon.
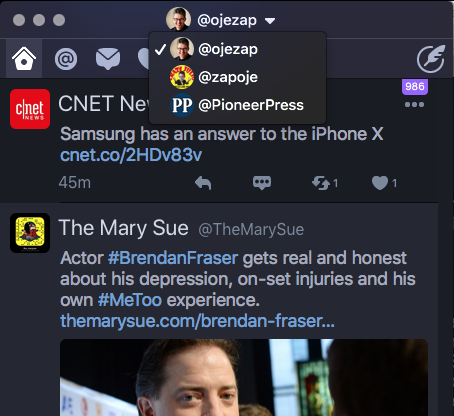
This is fine, but Twitter for Mac had a better approach. Its account avatars were visible at all times, with activity dots displayed alongside each for at-a-glance spotting at any time. Tweetbot offers a menu bar icon that changes color when new activity is detected and incorporates a pull-down menu to see which account has the activity, and what kind it is.
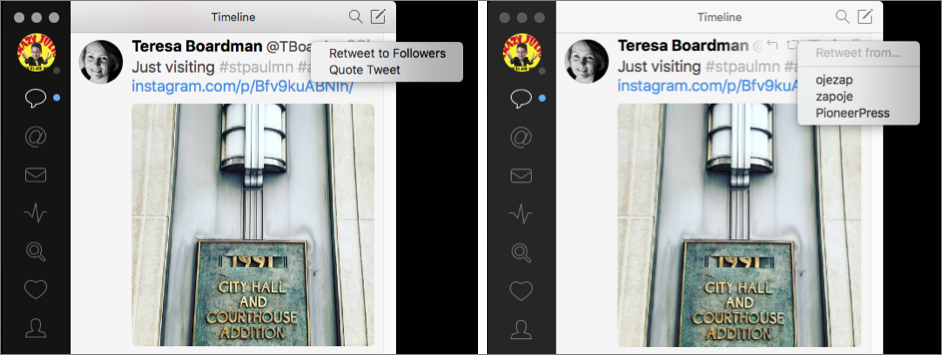
Some simple actions in Tweetbot, such as retweeting and quoting, seem overly complex. In Twitter for Mac, you’d click an icon in a tweet to open a window with a text field above it. You could then switch accounts in the window (or not), type a comment (or not), and then click to send. Simple.
The controls in TweetBot, by comparison, are more opaque. There’s a quote button, for instance, but it acts differently depending on how you click (or Control/right-click) it, and it incorporates retweeting as well as quoting functionality. It’s confusing; at least, it confused me until I tinkered a bit and I figured it out.
Tweetbot’s multi-column support doesn’t work quite like TweetDeck’s. You Control/right-click on certain items, such as icons in the toolbar, to create either a free-floating window or a column attached to the right edge of the original window. This approach works, but Tweetbot columns even at their narrowest take up more space than the TweetDeck equivalents. If cramming lots of columns onto your screen is a priority, stick with TweetDeck.
Not every kind of content can be shown in a Tweetbot column, either. User streams? Nope. Hashtags? Negative.

For those who like to control what is shown in Twitter streams, Tweetbot’s filtering is reasonably robust. You can block by user, keyword, hashtag and even point of origin (as in a particular Web site, Twitter client, or operating system).
Tweetbot has a decent degree of customizability. Along with the standard text and avatar resizing, you can pin the timeline to the top as it streams, change the shape of avatars (and banish those annoying verified badges), and more. But there’s no dark theme, which really should exist since Tweetbot for iOS has one.
The app syncs with the iOS version via either Tweet Marker or iCloud, so it maintains your position in the timeline between platforms.
To sum up, Tweetbot is a nicely executed Twitter client, but with a few annoying, if minor, omissions and needless complications. And for those who crave the best possible multi-column support, Tweetbot is probably not your answer. But it looks and feels like a true Mac app, unlike TweetDeck.
Twitterrific — When it was released in 2007, the Iconfactory’s Twitterrific was, I believe, the first Mac-native Twitter client. Development continued into 2013, alongside its iOS counterpart, then foundered. A rebuilt client emerged as a Kickstarter campaign about a year ago and has since shipped.
When I first got my hands on the revamped Twitterrific, I saw great potential but chafed at its limitations and periodically pestered developer Ged Maheux to add features (thanks for being patient with me, dude). The app has evolved nicely since then.
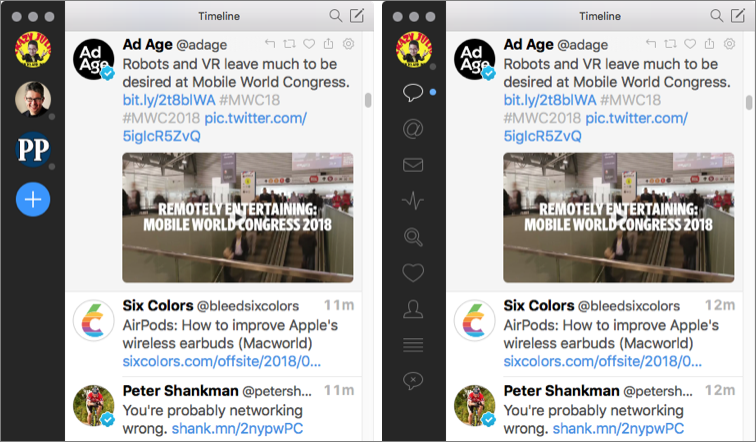
Like Tweetbot, Twitterrific is a single-column app with clickable controls for navigation, but there are notable differences. Twitterrific positions its toolbar at the top of the window and not to one side, which gives tweets room to breathe. Likewise, account switching happens at the top, directly above the toolbar, via a pull-down menu.
This brings me back to my Tweetbot beef about activity monitoring, though. Twitterrific doesn’t give me an at-a-glance way to see new activity in different accounts. Once again, there is a menu bar icon, but it’s even less useful than Tweetbot’s because clicking it reveals no useful information and just brings the app to the fore.
On the bright side, Twitterrific’s multi-account support is delightful. Within tweets, a click on the reply, quote, or retweet buttons performs the associated action with the active account, and you can Control/right-click one of those buttons to select a different account to perform that action. It’s all clean and logical, as the developer notes in a recent blog post.
Twitterrific provides a custom filtering mechanism called “muffles.” In settings, on a per-account basis, you can keep a running list of usernames, custom phrases, URL domains, hashtags, and the like. Items in this list aren’t purged from your timeline but are instead minimized by default. Another option in the settings enables you to mute these items fully. Separately, Twitterrific also lets you block users entirely via Twitter’s built-in functionality.
Like Tweetbot, Twitterrific offers some multi-column capabilities, but it’s no TweetDeck. You can create new windows for some kinds of information (likes, lists, messages, mentions, and so on) but not other kinds (usernames and hashtags, for instance). You can’t automatically create locked-together columns as you can in Tweetbot, either, only free-floating windows that you must line up manually. That’s no biggie, though, and all the windows remain in place on restart.
Twitterrific offers a wide-ranging set of customizations, including a decent typeface selection, avatar tweaking, media-thumbnail resizing, swappable Dock icons — including a variation of its birdie mascot wearing a Santa hat — and more. Along with dark and light themes, Twitterrific even includes a “black” theme that lends itself to LED screens, though such displays aren’t yet common in the Mac universe (Twitterrific for iOS has a black theme that looks great on the iPhone X’s LED screen).

Twitterrific has thoughtful design touches, like a composition window that expands as characters are typed. In comparison, Tweetbot displays a scrollbar if you compose a longer tweet, which makes it a pain to review the tweet before publishing.
In another useful touch, Twitterrific’s pop-out picture and video windows automatically disappear when you are done with them, so your desktop doesn’t become cluttered over time as can happen with Tweetbot.
Twitterrific has a distinct, somewhat eccentric visual style that sets it apart from both Tweetbot and Twitter for Mac. You’ll have to compare Twitterrific and Tweetbot — assuming that you’re not looking for TweetDeck’s aggressively multi-column approach — to see which best fits your preferences.
And, just like Tweetbot, it syncs with its iOS version via either Tweet Marker or iCloud, so it can maintain your position in the timeline between platforms.
Overall, I feel that Twitterrific is the best replacement for Twitter for Mac. It has thoughtful design flourishes along with a playful spirit. Plus, the developers appear committed to updating it regularly, so I am optimistic about its future.
The Upshot — It’s a shame more Twitter apps aren’t available for Mac users. There are a number of others in the Mac App Store, such as Echofon and Tweetings, but they haven’t been updated in years and thus wouldn’t even support the new 280-character tweet size.
This situation is, frankly, Twitter’s fault. In recent years, the company hasn’t been welcoming to app developers. It keeps pushing its mainstream users to its Web interface as well as to mobile apps (though, to its credit, it provides the highly capable Tweetdeck for advanced users). The Web approach is fine for casual use, but Twitter’s site lacks advanced features such as multi-account and multi-column support, without which it is a non-starter for many users. In any case, Mac users tend to prefer native software.
Tweetbot and Twitterrific provide a pair of fine, if not ideal, options for Mac users — but they do carry price tags. If you aren’t willing to pay for a Twitter client but want more than the service’s Web interface, you can opt for TweetDeck. It’s not a native Mac app, but it is jammed with power user features and has Twitter’s full backing, at least for now.
It’s a shame that Twitter has dropped Twitter for Mac, but with these three other apps, you should be able to find an option that meets your needs.
TidBITS Watchlist: Notable Software Updates for 5 March 2018
Quicken 2018 5.5.4 — In late 2017, Quicken Inc. released Quicken 2018 for the Mac with a new subscription model that divided the financial management app into three product tiers with annual subscription pricing: Starter ($34.99), Deluxe ($49.99), and Premier ($74.99). All three editions received updated online bill pay features with access to more than 11,000 online billers integrated into a streamlined workflow, 5 GB of Dropbox storage for backups, and access to a Windows version of Quicken 2018. The Deluxe edition includes enhanced investment and budgeting features, while the Premier tier provides free direct bill payment from
within the app using Quicken Bill Pay ($9.95/month with the Starter and Deluxe editions) plus priority access to customer support.
At the end of February 2018, Quicken released version 5.5.4 for all three Quicken 2018 editions with improved support for Canadian customers and enhancements for Bill Pay, such as informing you if a bill payment has to move because of a holiday. The update also fixes a performance issue in the investment transaction register, addresses a Quicken 2007 import issue, fixes a bug with the QIF file import for those moving from other software products, and adds Canadian Tax line items to investment categories.
All Quicken for Mac 2015, 2016, and 2017 data will convert to Quicken 2018 for the Mac. Some features from Quicken 2007 for the Mac will not transfer to the newest release, including loan amortization schedules, Home Inventory and emergency records data, explicit lot assignments, and securities watch list. There is no free trial for Quicken 2018, but the company offers a 30-day money-back guarantee. ($34.99/49.99/74.99 annual subscription, free update for Quicken 2018, release notes, 10.11+)
Read/post comments about Quicken 2018 5.5.4.
Hazel 4.2.3 — Noodlesoft has released Hazel 4.2.3, fixing various issues with dragging attributes and tokens into patterns, as well as avoiding a crash that could happen while editing a pattern. The file cleanup utility also resolves a crash related to errors caused when uploading files, enables you to drag rules anywhere into the app (previously, you could drag files only onto folders or into a rule), and fixes a problem that caused linked duplicate rules after importing rules into the same folder. ($32 new or $49 for five-member family pack, free update, 9.4 MB, release notes, 10.10+)
Read/post comments about Hazel 4.2.3.
Logic Pro X 10.4.1 — Apple has released Logic Pro X 10.4.1, a maintenance release for the professional audio app that’s filled with bug fixes and stability improvements. The update resolves some crashes, prevents unexpected spikes in CPU usage related to the ChromaVerb plug-in, displays the File Tempo Editor as expected when double-clicking on very long regions, performs tempo analysis on multiple selected audio files, and properly remembers certain key command assignments when you quit and relaunch. ($199.99 new in the Mac App Store,
free update, 1.5 GB, release notes, 10.12+)
Read/post comments about Logic Pro X 10.4.1.
ExtraBITS for 5 March 2018
In ExtraBITS this week, the Apple Watch Series 3 can now track skiing and snowboarding workouts, Apple is opening medical clinics for its employees, and Josh Centers discusses cord cutting with The Loop’s Jim Dalrymple.
Apple Watch Series 3 Now Tracks Skiing and Snowboarding — The Apple Watch Series 3 can now track skiing and snowboarding via third-party apps. Apps that include the new support include Snoww, Slopes, Squaw Alpine, Snocru, and Ski Tracks, which can record total vertical descent, horizontal distance, number of runs, average and maximum speeds, total time spent, and calories burned. The metrics take advantage of the Apple Watch Series 3’s built-in GPS and altimeter, which is why earlier models don’t gain similar capabilities.
Apple to Open Medical Clinics for Employees — Apple will soon begin opening medical clinics for its employees and their families. With the service, called AC Wellness, Apple is moving in the same direction as a new joint project of Amazon, Berkshire Hathaway, and J.P. Morgan, which also hopes to use technology to improve patient care and reduce costs. These moves are an indictment of the state of the U.S. healthcare system — the tech companies are saying, “We can do it better and cheaper” — but the question is if the lessons they learn can be applied more broadly.
Josh Centers Discusses Cord Cutting with Jim Dalrymple — “Take Control of Apple TV” author Josh Centers has extensive experience with cord cutting — trading traditional cable or satellite TV for an Internet-based service — so The Loop’s Jim Dalrymple invited him onto The Dalrymple Report podcast to talk about the available options. They discuss the complications of getting rid of traditional TV service, Josh’s favorite alternative services, and rural TV technology of yesteryear.