#1427: MacBook Pro thermal throttling and data recovery, Wireless Sensor Tags, Wyze Cam Pan security camera, Apple News
We need your help—please follow TidBITS in Apple News so its algorithm will be more likely to recommend our articles to new readers. The new MacBook Pro figured prominently in the headlines last week, with Apple releasing an update to address performance problems caused by thermal throttling and the discovery that these Macs lack a data recovery port on the logic board. We also focus on smart home topics, with Josh Centers reviewing the Wyze Cam Pan rotating security camera and Adam Engst examining the Wireless Sensor Tag system, which monitors temperature, motion, moisture, light, and more. Notable Mac app releases this week include Airfoil 5.8, KeyCue 9.0, BusyCal 3.3.10 and BusyContacts 1.2.15, Quicken 2018 5.7.2, and Moneydance 2017.8.
Please Follow TidBITS in Apple News!
Shortly after we unveiled our new Internet infrastructure, I wrote “How to Read TidBITS in Apple News” (19 April 2018). That generated a brief spike in our Apple News traffic, but the readership numbers soon dropped to single digits per day. Even more annoying, for at least some people, adding TidBITS to the Following list didn’t result in them seeing TidBITS articles in their For You section. Given that the News app is pre-installed on millions of iOS devices in the US, UK, and Australia and that we cover Apple-related topics, it was almost unimaginable that so few people would see our articles.
Frustrated, I eventually managed to make contact with Apple’s Publisher Relations team. In a call, I learned a few things about how the Apple News algorithm works that enabled me to make some adjustments to how we’re publishing there.
Training Takes Time and Quantity
First, it seems that Apple News is focused on large publishers and therefore needs quite a number of articles for training its natural language parser. Since we publish only about 50 articles per month, whereas a large publisher might release several times that per day, I was told that it could take several months before the algorithm knew what to do with our content.
Happily (if a little suspiciously), a few days after I scheduled my call with Apple, it suddenly started recommending our articles to new readers despite me not having changed anything since early April.
Follow TidBITS in Apple News
Most notably, I was told that Apple News cares quite deeply about the number of people who follow a particular publication—the more followers, the more likely Apple News is to recommend that publication’s articles to other people.
Can you do me a favor if you’re in the US, UK, or Australia? Even if you don’t use Apple News regularly, please tap the heart button in the TidBITS screen in Apple News. It would be fabulous if this significantly increased TidBITS readership.
The easiest way to follow TidBITS is to click this link while reading on your iPhone or iPad, or on a Mac running the beta of macOS 10.14 Mojave, which has the News app too. Or go to tidbits.com in Safari and tap Get TidBITS > Apple News. (On an iPhone, tap the ellipsis button to the right of the TidBITS logo and scroll down in the menu to find Apple News.) Either way, you’ll be sent to the TidBITS channel in the News app. Tap the heart icon in the upper right to follow TidBITS.
Alternatively, follow these steps within the News app:
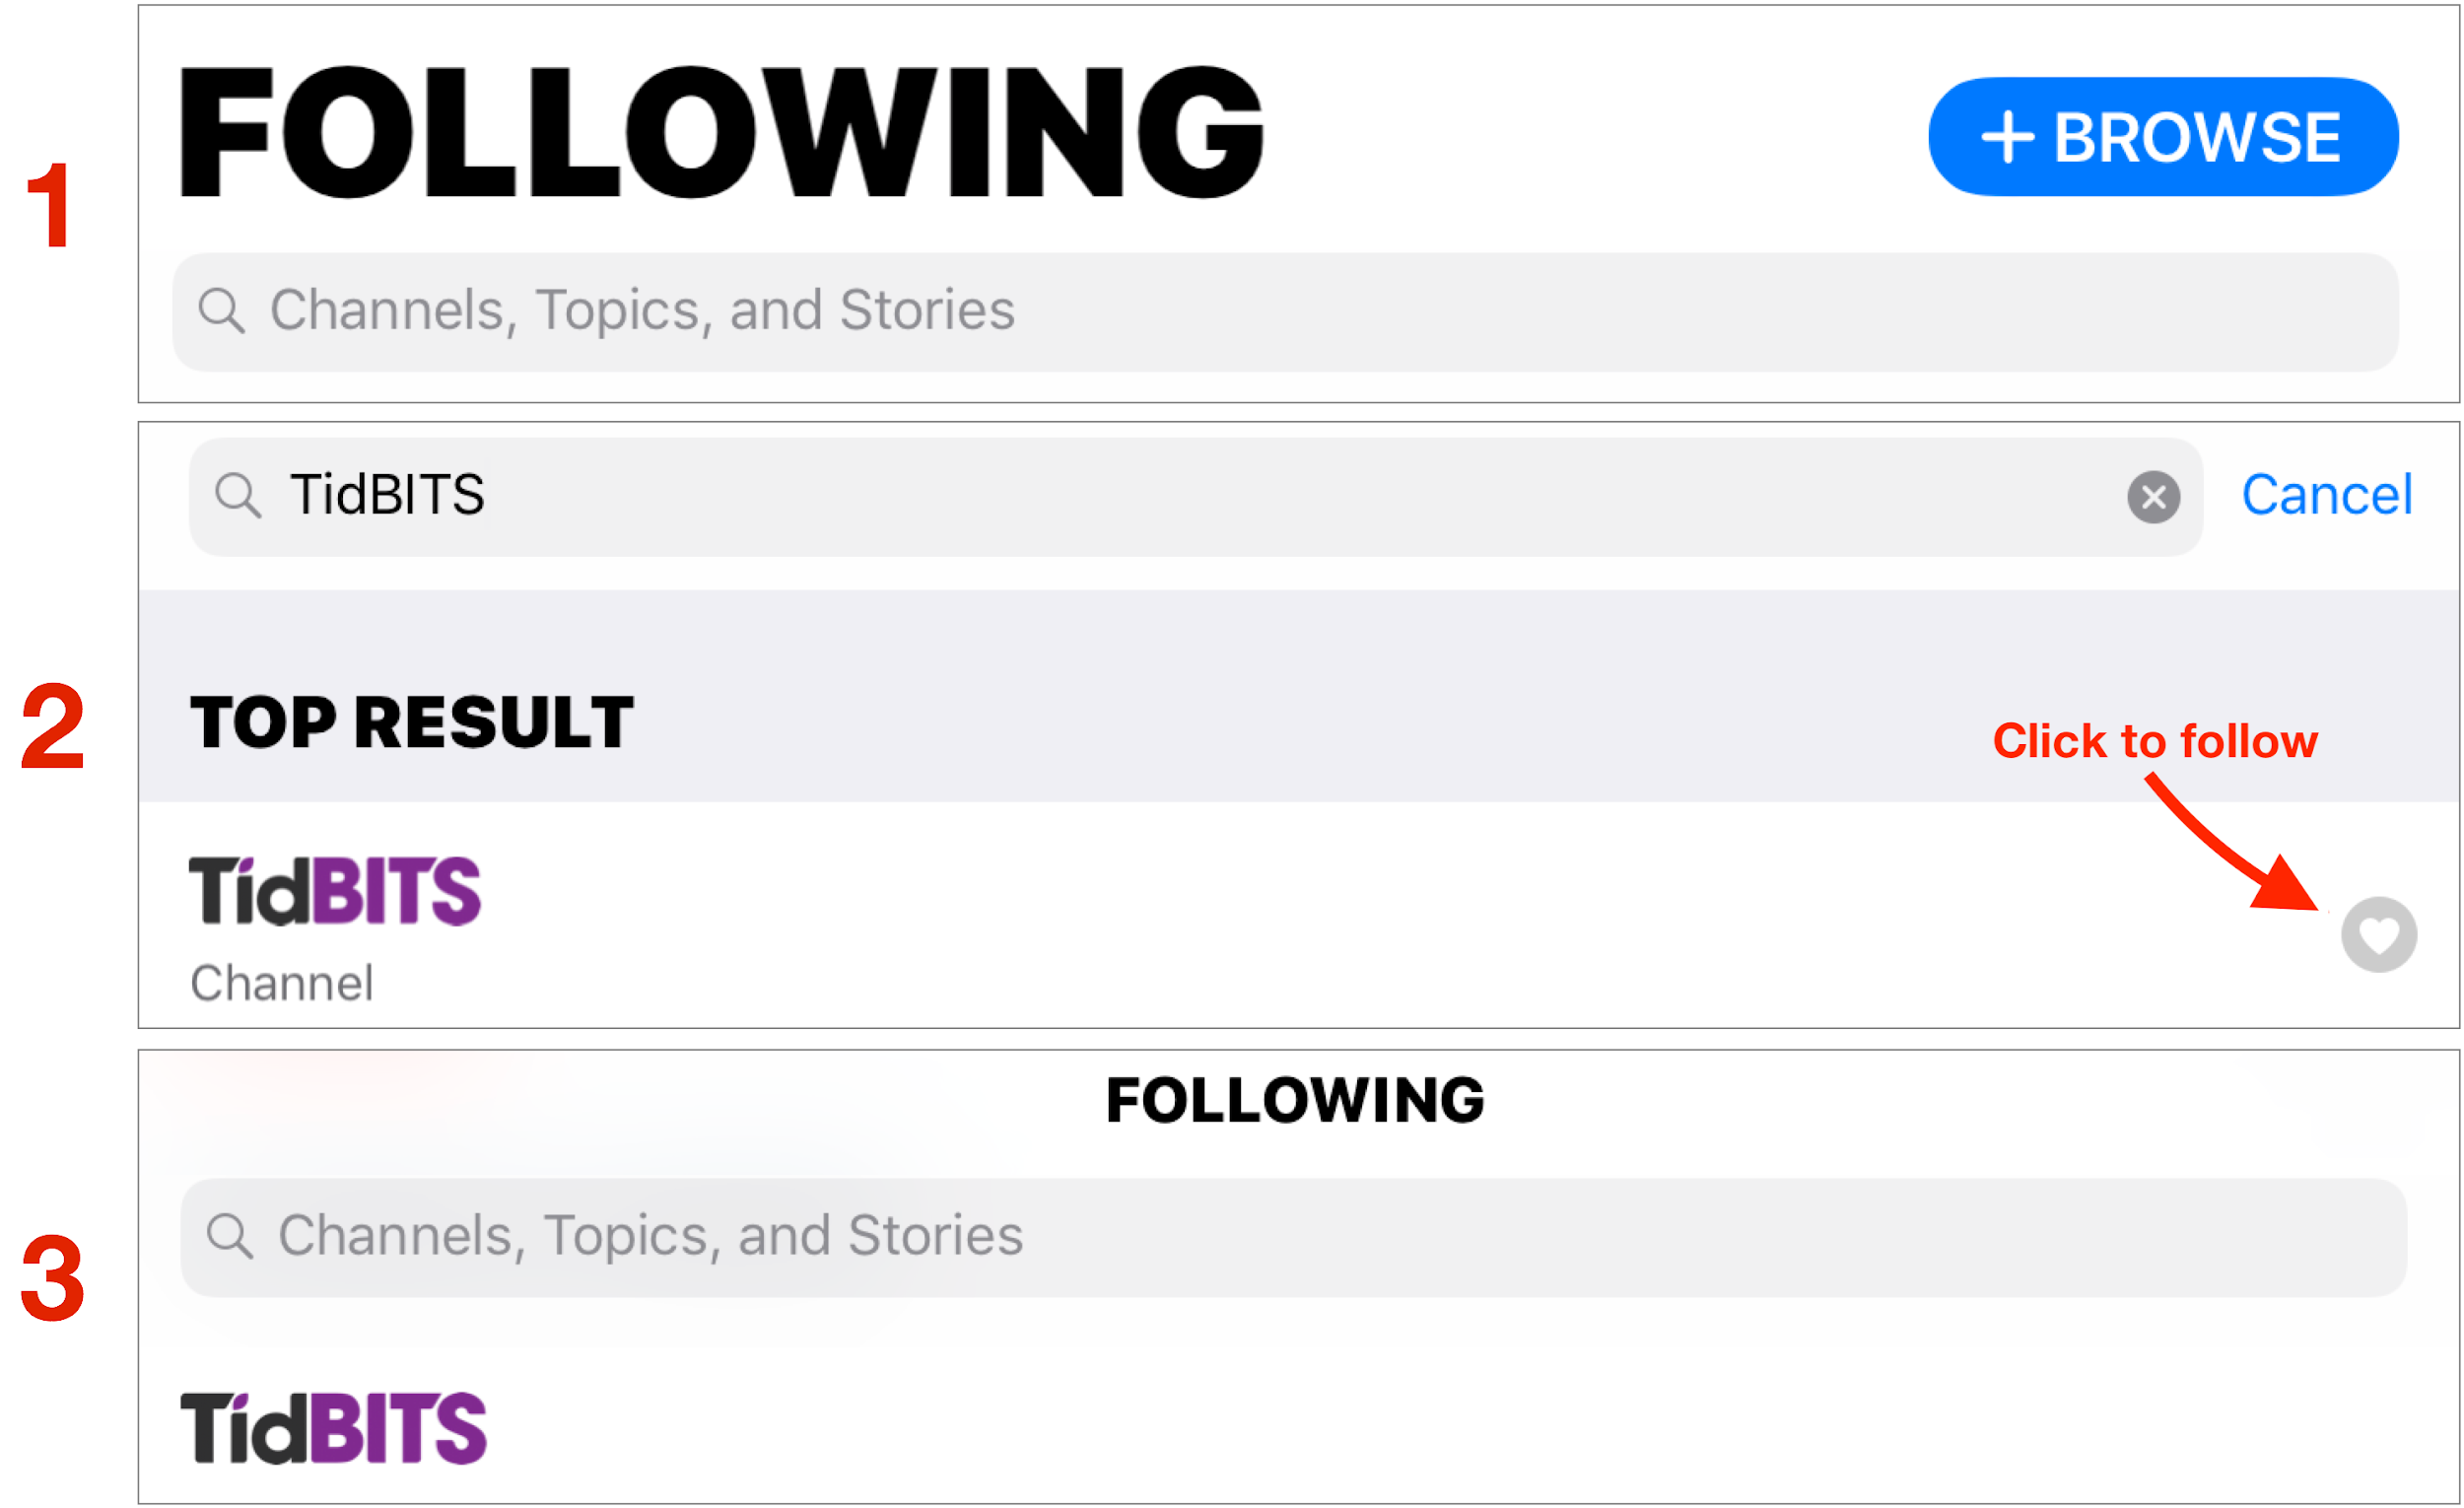
- Tap Following in the toolbar at the bottom of the News app to bring up the Following screen. (If you’re using the beta of iOS 12, Following has been replaced by Channels.)
- In the search field (in iOS 12, pull down to reveal it), type “TidBITS” and when our channel appears, tap the heart button.
- From then on, TidBITS appears in your Following (or Channels) list, and you can access the latest stories by tapping it.

New Section Names
As an Apple News publisher, I can create free-form section names and use them to categorize our articles—you’ll see those section names at the top of our channel in Apple News. Since Apple doesn’t publish any best-practices advice, I guessed that sections were mostly for users and created just two: Articles and Watchlist.
However, Apple subsequently told me that the Apple News algorithm also takes some of its cues from those names, so I’ve added more sections that match up with topic names (Apple, Mac, iOS, Cybersecurity, and so on) that people can find in Apple News when searching for specific topics of interest.
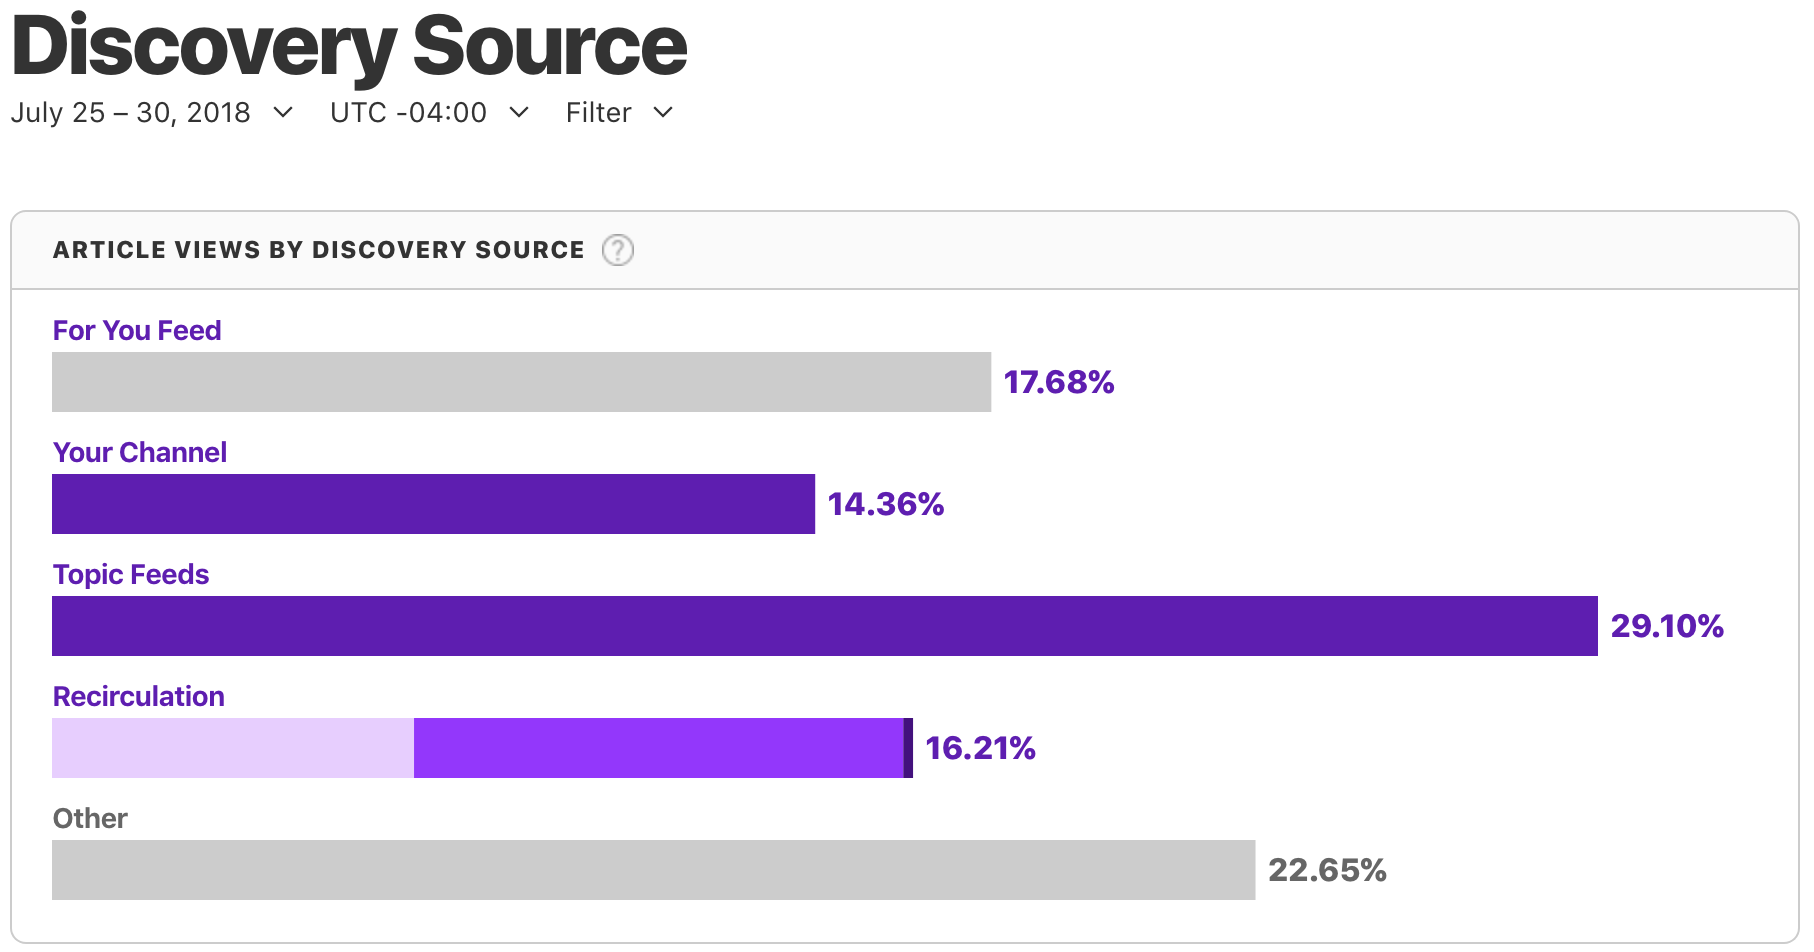
My hope is that there are a lot of people following topics like Apple and Mac, and by putting our articles into those sections manually, they’ll be more likely to be recommended to those people. Early analytics seem to bear this out—once I started populating the new sections, roughly a third of our traffic started to come from the Topic Feeds source, as opposed to about a tenth in the week before (and literally none before that).
The Continuing Saga
As you can see in this Reach chart (which shows the number of unique users who saw our headlines or viewed our articles) for the last 28 days, things started to pick up on 20 July 2018 and skyrocketed shortly after that. Traffic fell off late last week, which may have been related to not publishing many new articles for a few days, but I hope it will pick up again as this week’s articles start rolling out. I’m also looking forward to seeing if our readership increases when Mojave ships, since I believe a lot of TidBITS readers prefer to read news on their Macs.
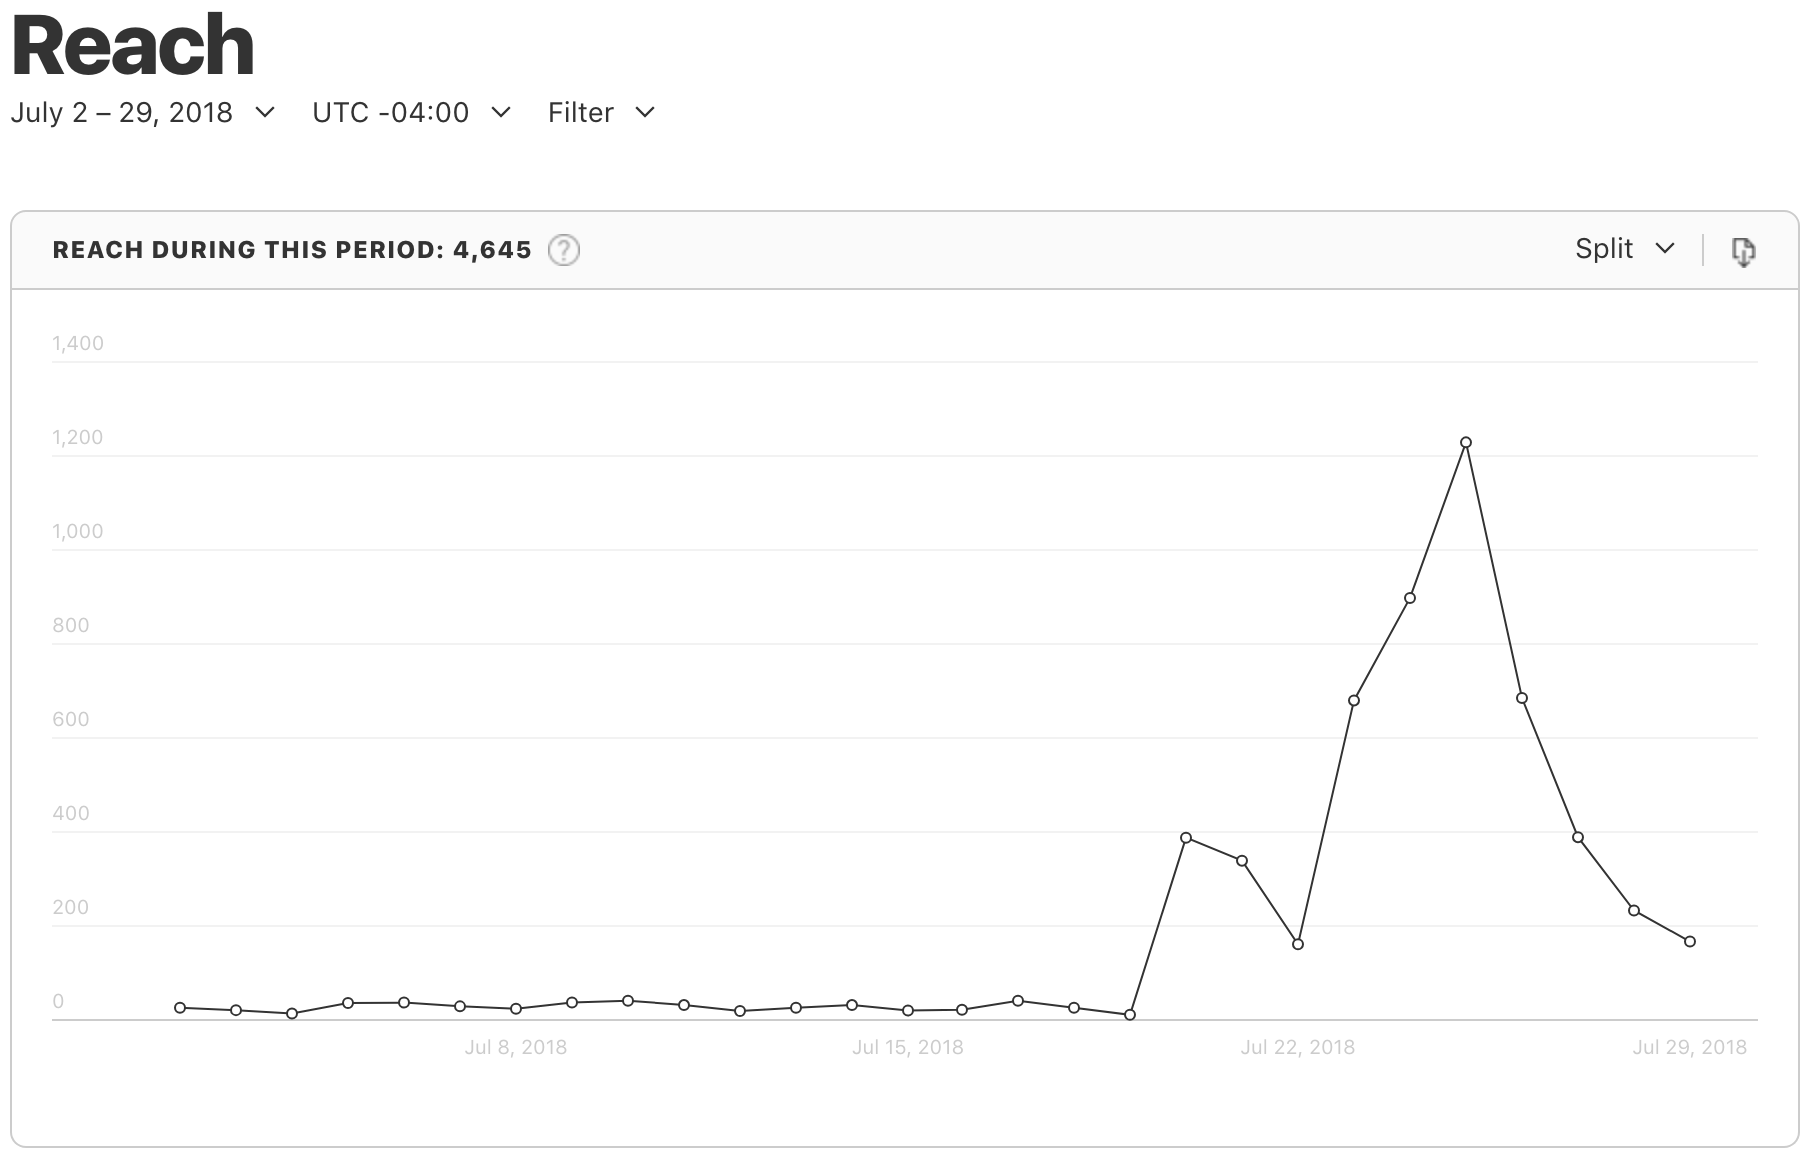
Regardless, I’d really appreciate it if you could follow TidBITS in your News app, even if you don’t use it regularly. Despite this large uptick in traffic, only 5 people have followed our channel in the last 28 days, and our total follower count is just under 900. Let’s see how high we can get that number!
Apple Addresses MacBook Pro Thermal Throttling
Apple has now acknowledged that the reports of performance problems on the new 15-inch MacBook Pro with the Intel Core i9 chip were accurate, and the company has released a software update to address them (see“Heat-related Performance Problems with Intel Core i9 MacBook Pros,” 23 July 2018). In a statement, Apple said:
Following extensive performance testing under numerous workloads, we’ve identified that there is a missing digital key in the firmware that impacts the thermal management system and could drive clock speeds down under heavy thermal loads on the new MacBook Pro. A bug fix is included in today’s macOS High Sierra 10.13.6 Supplemental Update and is recommended. We apologize to any customer who has experienced less than optimal performance on their new systems. Customers can expect the new 15-inch MacBook Pro to be up to 70% faster, and the 13-inch MacBook Pro with Touch Bar to be up to 2X faster, as shown in the performance results on our website.
The macOS High Sierra 10.13.6 Supplemental Update for MacBook Pro (2018) should now be available in Software Update for all owners of the latest MacBook Pro models. Users of all other Macs, including the previous MacBook Pro models, don’t need and won’t be offered the update. It’s a 1.31 GB download.
According to Jason Snell at Six Colors, Apple determined that the problem was not app-specific, and tended to affect heavy workloads that took place over an extended period. That absolves Adobe Premiere Pro from any culpability.
On TidBITS Talk, Alan Forkosh reported that the update also fixed another problem that prevented the user from authorizing a newly installed kernel extension in System Preferences > Security & Privacy > General.
Lastly, “Heavy Thermal Loads” would be a great name for a rock band.
Last-Ditch Data Recovery More Difficult on the 2018 MacBook Pro
Touch Bar-equipped MacBook Pro laptops have always featured solid-state storage soldered to the logic board, making it impossible to remove for data recovery, as was possible with hard disk drives. For these Macs, Apple enabled last-ditch data recovery through a special port on the logic board, combined with a custom tool for Apple Authorized Service Providers.
Unfortunately, in its teardown, iFixit discovered that the 2018 MacBook Pro models lack that port, and MacRumors learned from internal Apple documents that Apple’s internal Customer Data Migration Tool does not work with these Macs.
Luckily, data recovery firm DriveSavers says it can still recover data from these laptops, even if the logic board fails or is damaged. Mike Cobb, DriveSavers Director of Engineering, said in a statement:
None of the changes mentioned in the iFixit article regarding the MacBook Pro 2018 have had any effect on our ability to recover data for our customers. This is due to our advanced capabilities in addressing the logic board. DriveSavers has been very successful in recovering data from the 2018 model as well as all others. It is worth noting that customers need to send us the whole device to complete the data recovery service.
The lesson here is simple, though it applies more than ever before to owners of the latest MacBook Pro: Back up your data regularly!
Wyze Cam Pan Helps You Watch Your House for $30
Building on the success of the inexpensive Wyze Cam security camera, Wyze Labs has introduced the $30 Wyze Cam Pan, a rotating model that can monitor an entire room.
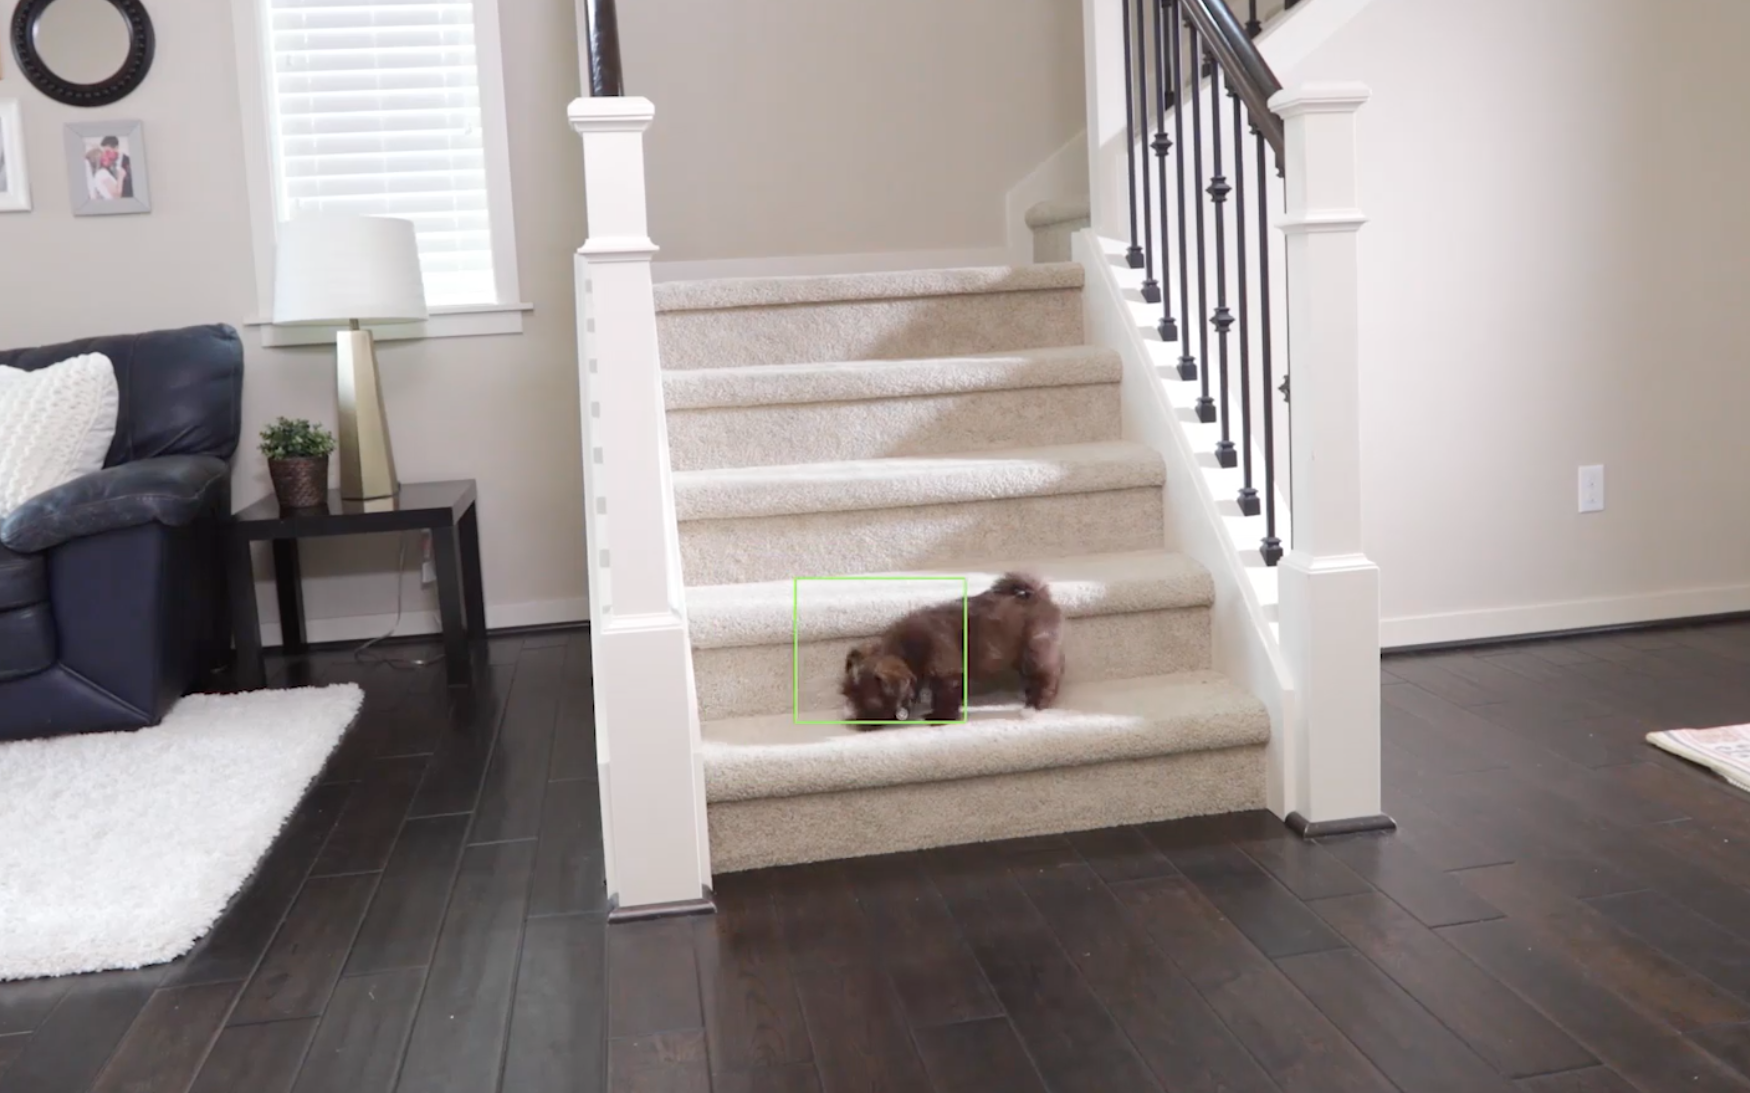
Let’s start with all the ways the Wyze Cam Pan is like its older sibling (for more details, read my previous article “$20 WyzeCam Security Camera Is Almost Too Good to Be True,” 28 February 2018). It features up to 1080p capture resolution at 15 frames per second, night vision, a speaker and a mic for two-way audio, and free cloud storage for 14 days. With a microSD card, it can record continuously for up to 8 days. Like the second-generation version of the Wyze Cam, it can track and tag movement, placing a green box around moving objects in the recorded video to highlight them.
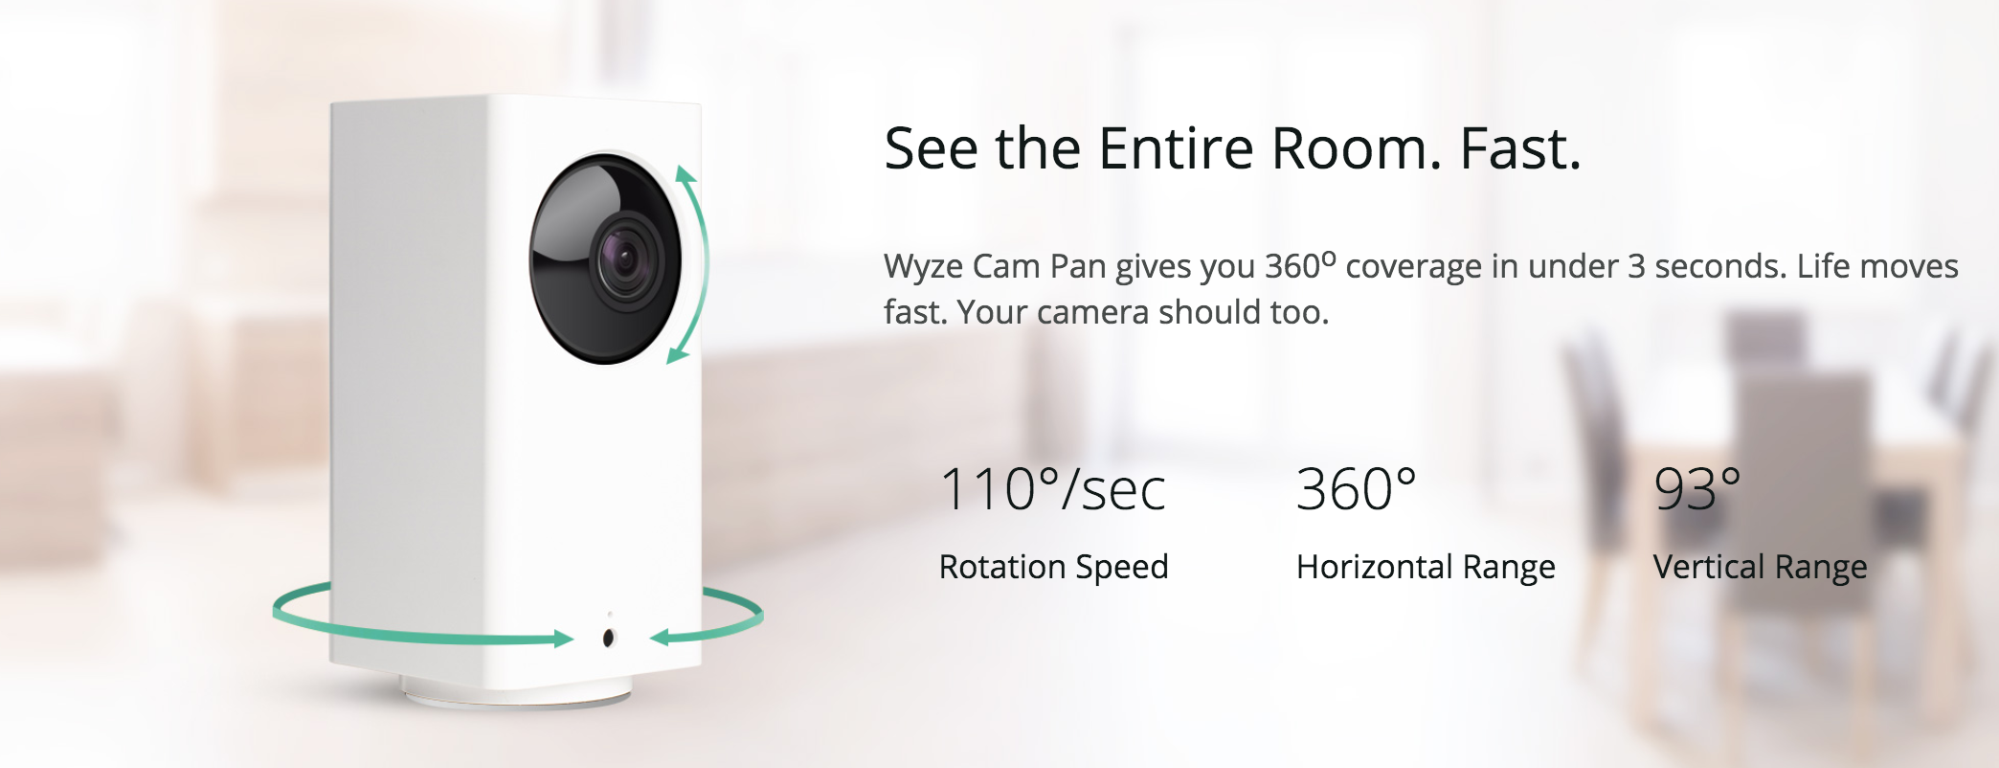
But the new Wyze Cam Pan differs from the older model in some key ways. The first thing you’ll notice is that it’s much taller than the original Wyze Cam—5.02 inches (127 mm) versus 2.20 inches (56 mm). That makes it a bit less flexible than the small, square Wyze Cam, which can be mounted in any number of orientations. Wyze Labs designed the Wyze Cam Pan to be set on a flat surface so the camera can rotate 360 degrees on its circular base. Alternatively, thanks to a standard thread mount, you could also attach it to a camera tripod. The Wyze Cam Pan isn’t limited to just horizontal rotation: the lens itself can rotate as much as 93 degrees up and down.
When I first received my Wyze Cam Pan review unit, I had some trouble figuring out where to set it up. I previously set the Wyze Cam units up on my (relatively thin) window sills as makeshift exterior cameras. That isn’t possible with the Wyze Cam Pan—it’s too big, and even if I balanced it somehow, the rotation would knock it over. Given how the camera can cover a 360-degree field of view, it’s best placed in a centralized spot. I decided on a short interior wall at the top of some stairs, where the camera can look into my great room and at two exterior doors.
There are three different methods of controlling what the camera captures. First, you can control the camera manually in the Wyze app by tapping an onscreen directional pad, which is sometimes useful.
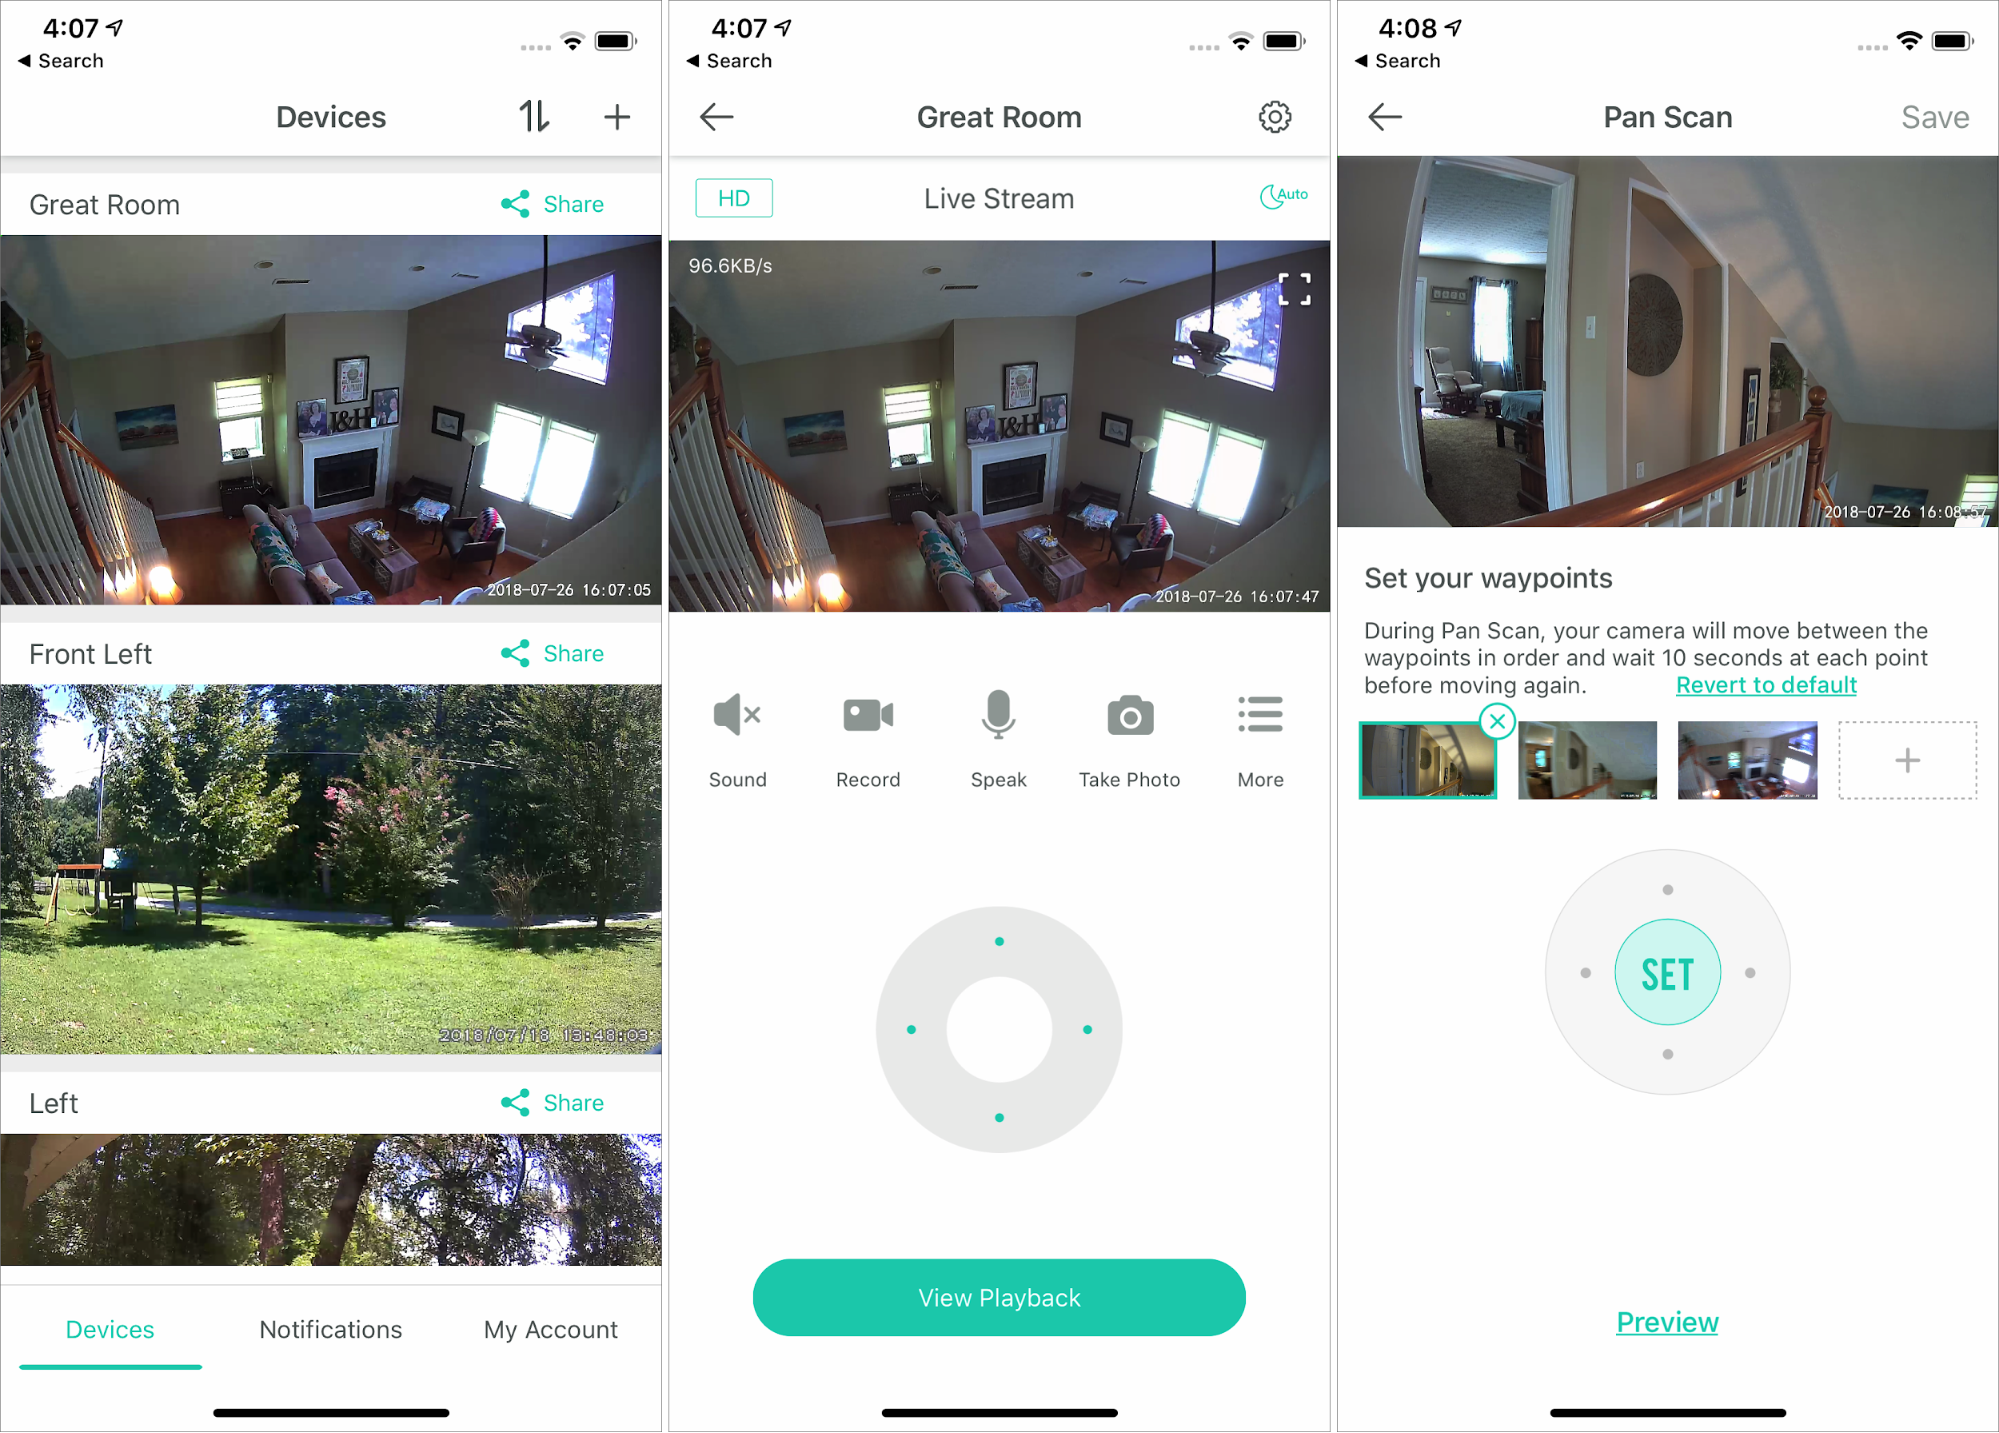
For autopilot, you can set the Wyze Cam to switch between up to four custom waypoints every 10 seconds in Settings > Advanced Settings > Motor Controls > Pan Scan Settings. Tap the + on an empty waypoint, move the camera with the direction pad, and then tap Set. Also enable automatic rotation between waypoints by turning on Pan Scan, which is under More in the Wyze App’s main screen.
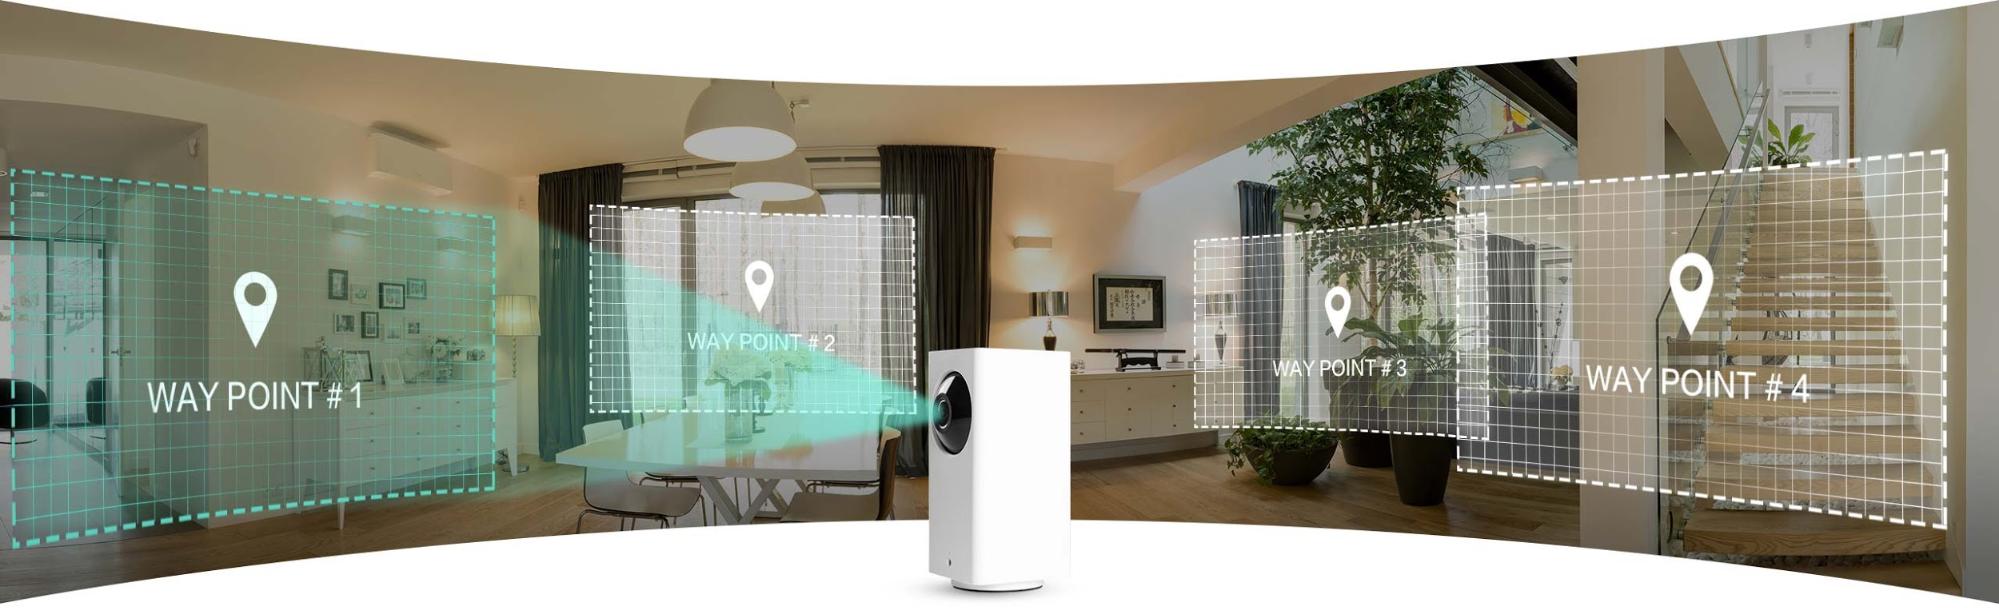
The Wyze Cam Pan can also detect motion and move to capture it in its 120-degree field of view. This setting can work in conjunction with Pan Scan, so the camera moves automatically between waypoints unless it detects motion, in which case it focuses on whatever attracted its attention. This feature worked well in my testing, but I can’t use it normally, because the Wyze Cam Pan can’t tear its attention away from the rotating ceiling fan. If I was going to leave the house for a while, I could enable motion-detection and turn the fan off.
Like its sibling, the Wyze Cam Pan doesn’t support HomeKit, so there’s no way I could build an automation that would detect when I left the house and twiddled the appropriate switches and settings. That said, both the second-generation Wyze Cam and the new Wyze Cam Pan now work with Alexa, so you can live stream video to Amazon devices that have a screen and can display video.
After using the Wyze Cam Pan for a few weeks, I’ve been impressed by how much of my house it can monitor. If you’ve been looking for an indoor security camera that can cover a lot of ground, it’s an excellent choice, particularly given the extremely low cost. But we’re still waiting for an outdoor version!
Wireless Sensor Tags Protect Against Freezer Failure
In my garage sits a 20-cubic-foot chest freezer, large enough to hold a side of beef or an entire pig—cut and wrapped, of course—along with frozen fruit, vegetables, and more. We bought the freezer when we moved from Seattle back to Ithaca in 2001, which means, somewhat shockingly, that it’s now 17 years old.
It needed a repair a few years ago, which we learned about after returning from a trip and discovering that some bags of veggies were soft. Luckily, it was as empty as it ever gets at that point, and the few larger cuts of meat were still sufficiently frozen, so we didn’t lose much.
But I have long worried about the freezer. We buy meat in bulk from a local farmer because the quality is excellent, we like supporting both the local economy and farmers who practice sustainable farming, and the price is incredibly cheap—think $5 to $6 per pound for every cut, including prime rib and massive ham roasts. (I’m a tech guy now, but I grew up on a family farm, raising cows and pigs and chickens and turkeys, so this is a familiar Old MacDonald world for me.)
The meat may be inexpensive by the pound, but it’s still a large up-front cost—$500 to $1000. Plus, a lot of work goes into picking and processing all those blueberries, strawberries, rhubarb, and peaches. So we have a lot to lose if the freezer were to fail. Freezers aren’t particularly expensive, and we could probably get it fixed or replaced in a day or two, but how would we know it had lost its cool? And would we discover it before the steaks got soggy?
Monitoring Temperature with the Wireless Sensor Tags
I’m no longer all that concerned, not because of any particular confidence in the freezer’s reliability, but because I’m using the Wireless Sensor Tags system from Cao Gadgets to alert me with an iPhone app if its temperature rises too high. Similar sensors now live inside our refrigerator and its built-in freezer too.

I came across this wonderfully practical solution back in 2016 while searching to see if Apple’s HomeKit technology could help me. It couldn’t then, and I haven’t heard of any such HomeKit-compatible temperature sensors since. But I decided that HomeKit compatibility wasn’t important since I don’t want to trigger automatic actions based on reports from these sensors or have them interact with other devices. All I want are notifications when the temperature gets too high.
That’s not to imply that automation isn’t available. The Wireless Sensor Tag system supports proprietary KumoApps, written in JavaScript. These cloud-based apps can control Wemo switches and LEDs, Philips Hue light bulbs, Honeywell Wi-Fi and Nest thermostats, and more. Plus, the Wireless Sensor Tag system works with the IFTTT automation service, providing connectivity to over a hundred types of Internet-connected products and services. I haven’t delved into any of these.
(When I asked Cao Gadgets about future HomeKit compatibility, they said that Apple’s Made For iPhone/iPad (MFi) program requirements were prohibitively expensive and that the software approach—the HomeKit Accessory Protocol Specification—is either only for non-commercial products or MFi licensees, which seems to be true.)
The sensor tags are about 1.5 inches (43 mm) square, and they’re made of white plastic, with a hole in one corner. If you pop one open, you can see that it holds just a tiny circuit board and a CR2032 battery. They communicate via radio frequency to a small base station—the Ethernet Tag Manager—that connects to your router and thus to the Internet. It doesn’t use Bluetooth or Wi-Fi, but rather a proprietary frequency with superior range, wall penetration, and power consumption. Battery life is advertised at 1 year, although I think I’ve gotten more like 9 months.

The Ethernet Tag Manager costs $39, and each of the three wireless sensor tags I bought was $26, for a total of about $120. These particular tags can sense temperature changes and motion—if I wanted, I could have them notify me whenever one of our appliances was opened, but since we don’t have a midnight snack bandit, that seems unnecessary. I can’t comment on the motion sensor capabilities, but I suspect they’re generally reliable given my experience with temperature monitoring and the associated app. They can also beep on command, so you could attach one to something small and then use the beep to find the item if it went missing.
Cao Gadgets makes other sensor tags, too, including one that detects moisture. I’m considering putting a couple of those near the dishwasher and in our utility room where all the plumbing for the house and our geothermal system comes in. Although our house is on a slab, so there’s no basement to worry about, it would still be bad if a pipe burst when we weren’t home. A friend’s parents once turned on their dishwasher before leaving for a two-week vacation—a water line failed before they boarded their flight, and two weeks worth of water flowed in, damaging floors, furniture, and even the foundation. To add insult to injury, they also got a huge water bill. Another friend has installed one of these moisture sensing tags next to his basement sump pump pit to alert him if the pump can’t keep up with a heavy rainfall or dies entirely.
Setup & Usage
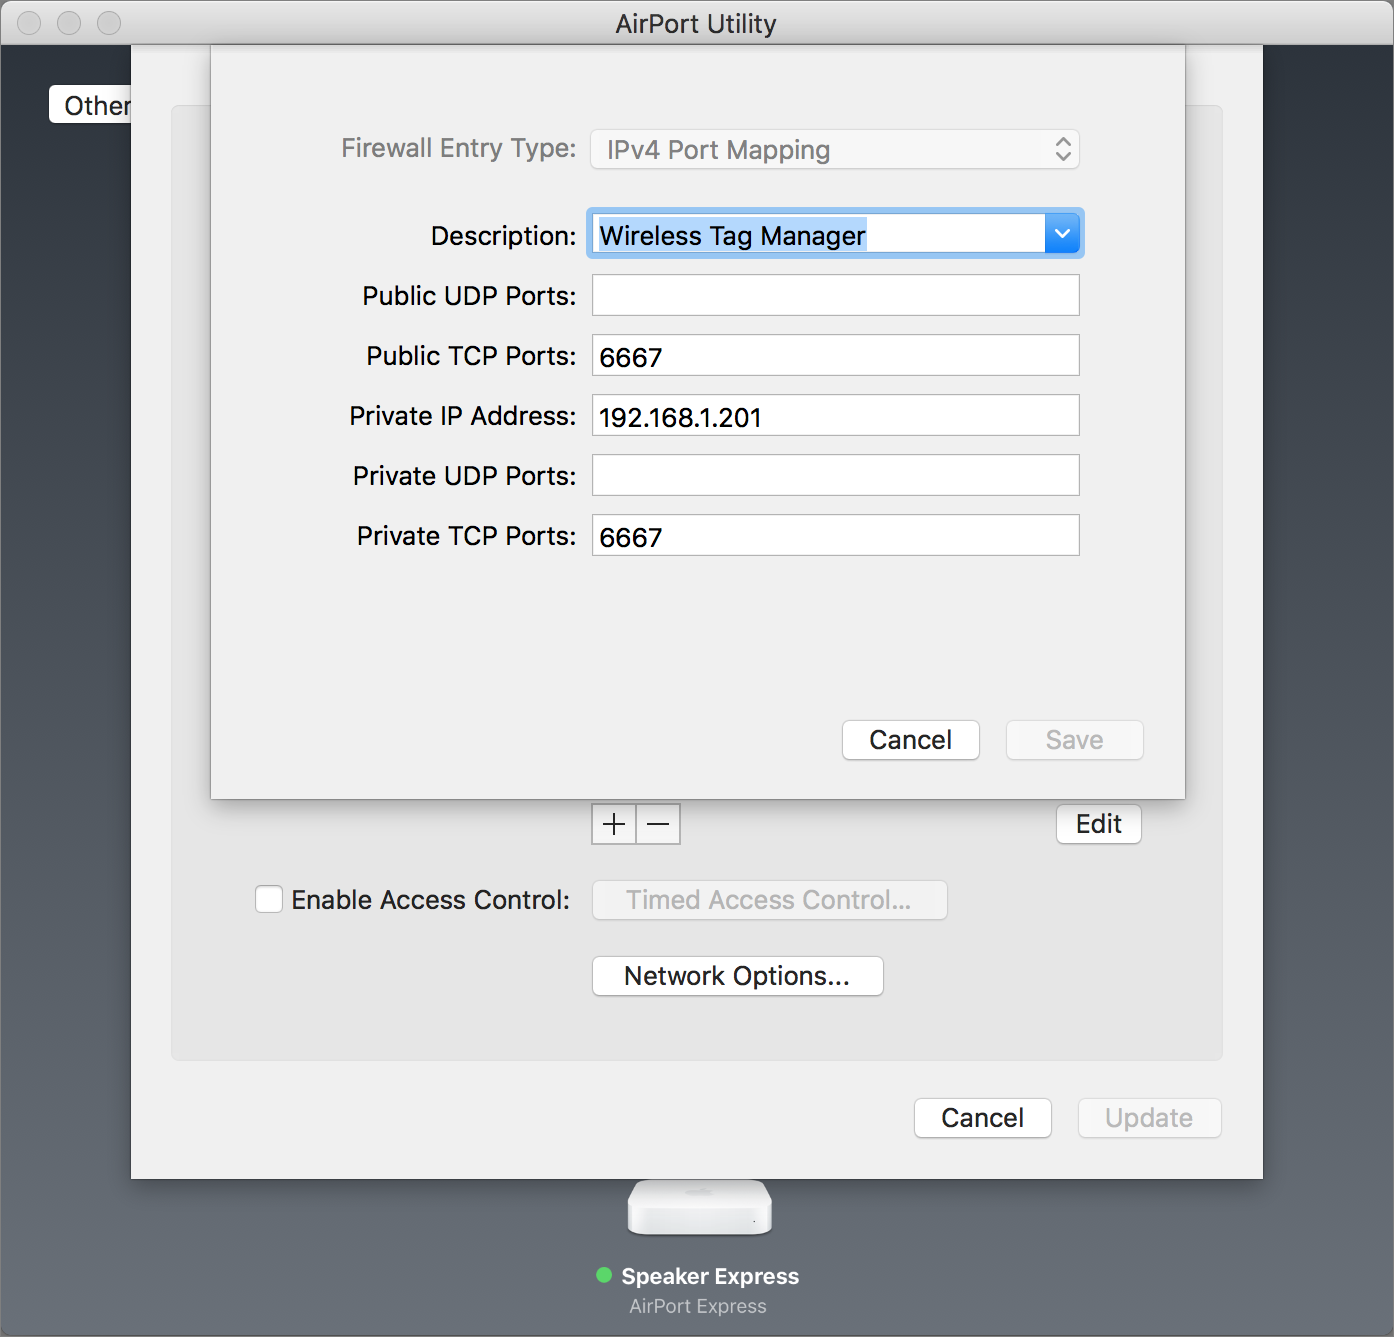
Setting up the Wireless Sensor Tags system isn’t hard, but it can be a little fussy, since you must first make sure the Ethernet Tag Manager can communicate through your router. I had some problems until I configured port mapping/forwarding for port 6667 in AirPort Utility. Cao Gadgets has a lengthy support document with suggestions like this.
The rest of the setup and management takes place in the utilitarian WirelessTag iOS app, which provides a sometimes dizzying level of flexibility. Cao Gadgets provides a concise guide to setting everything up that’s worth following, although the basics are simple enough. (There is also a Web app, should you prefer to perform some of the setup and management from your Mac.)
In brief, you associate each new tag with your Ethernet Tag Manager, name the tag, and optionally give it a picture to help keep your tags separate in the app. Once you’ve done that, you’re ready to configure temperature monitoring.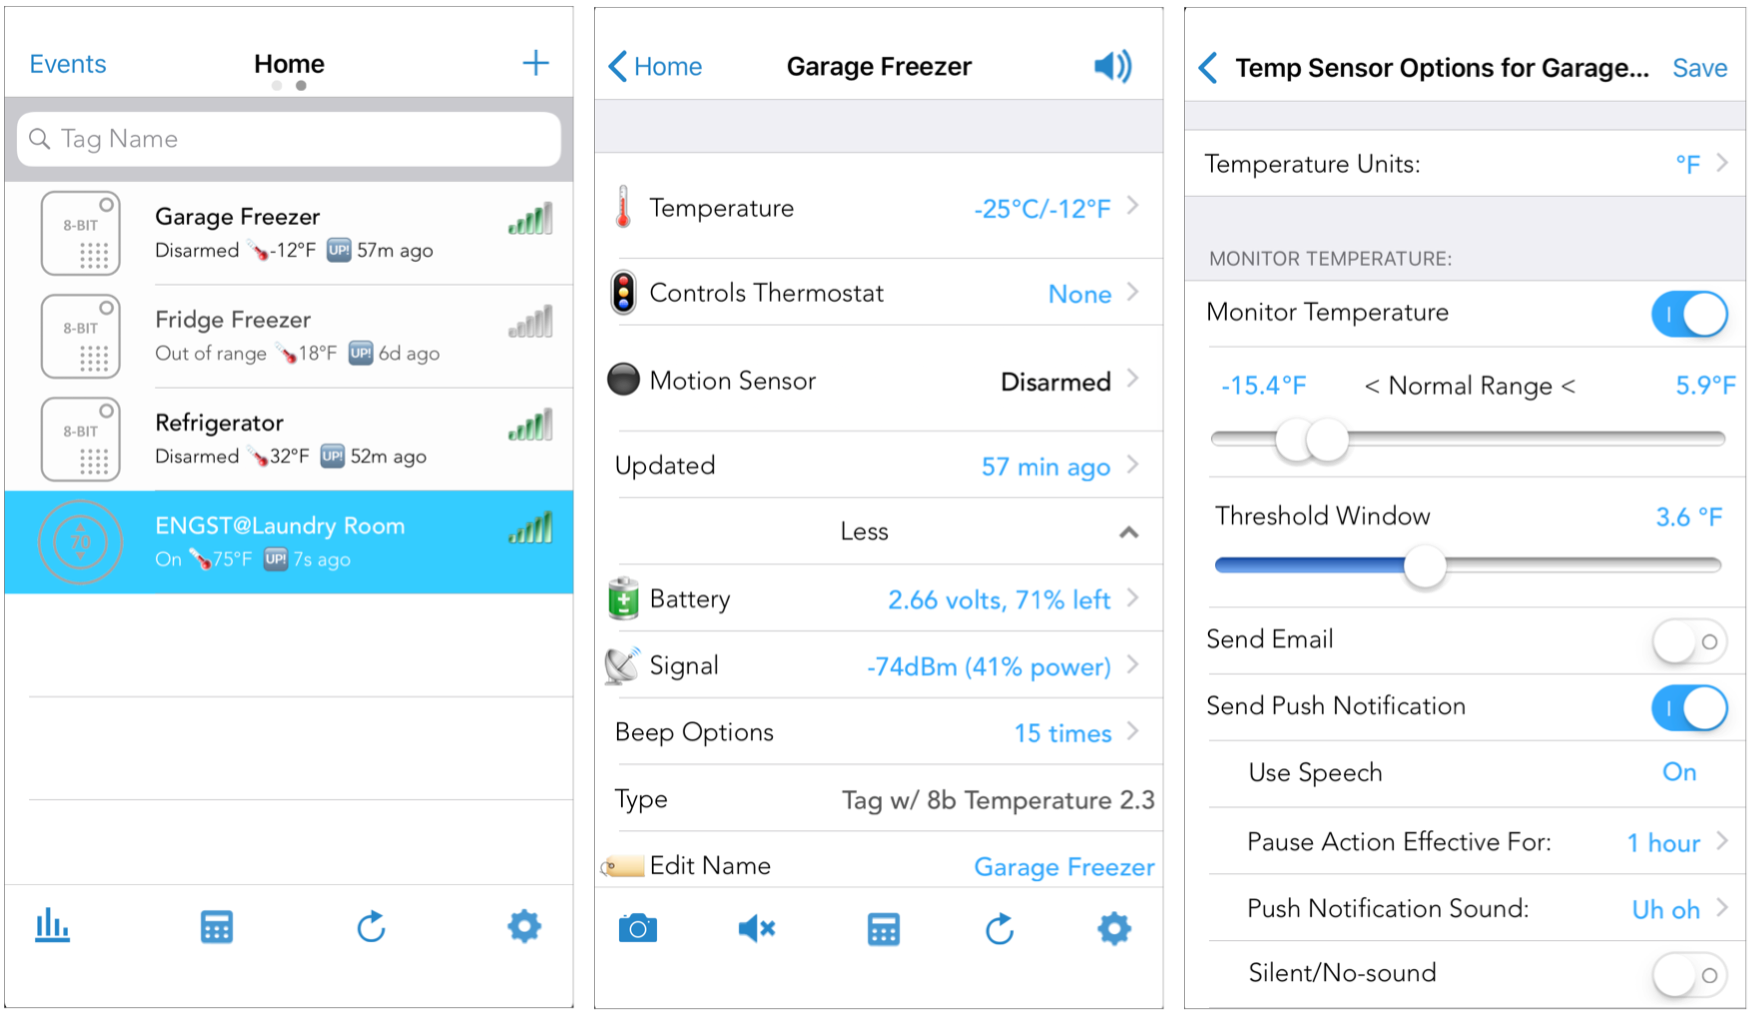
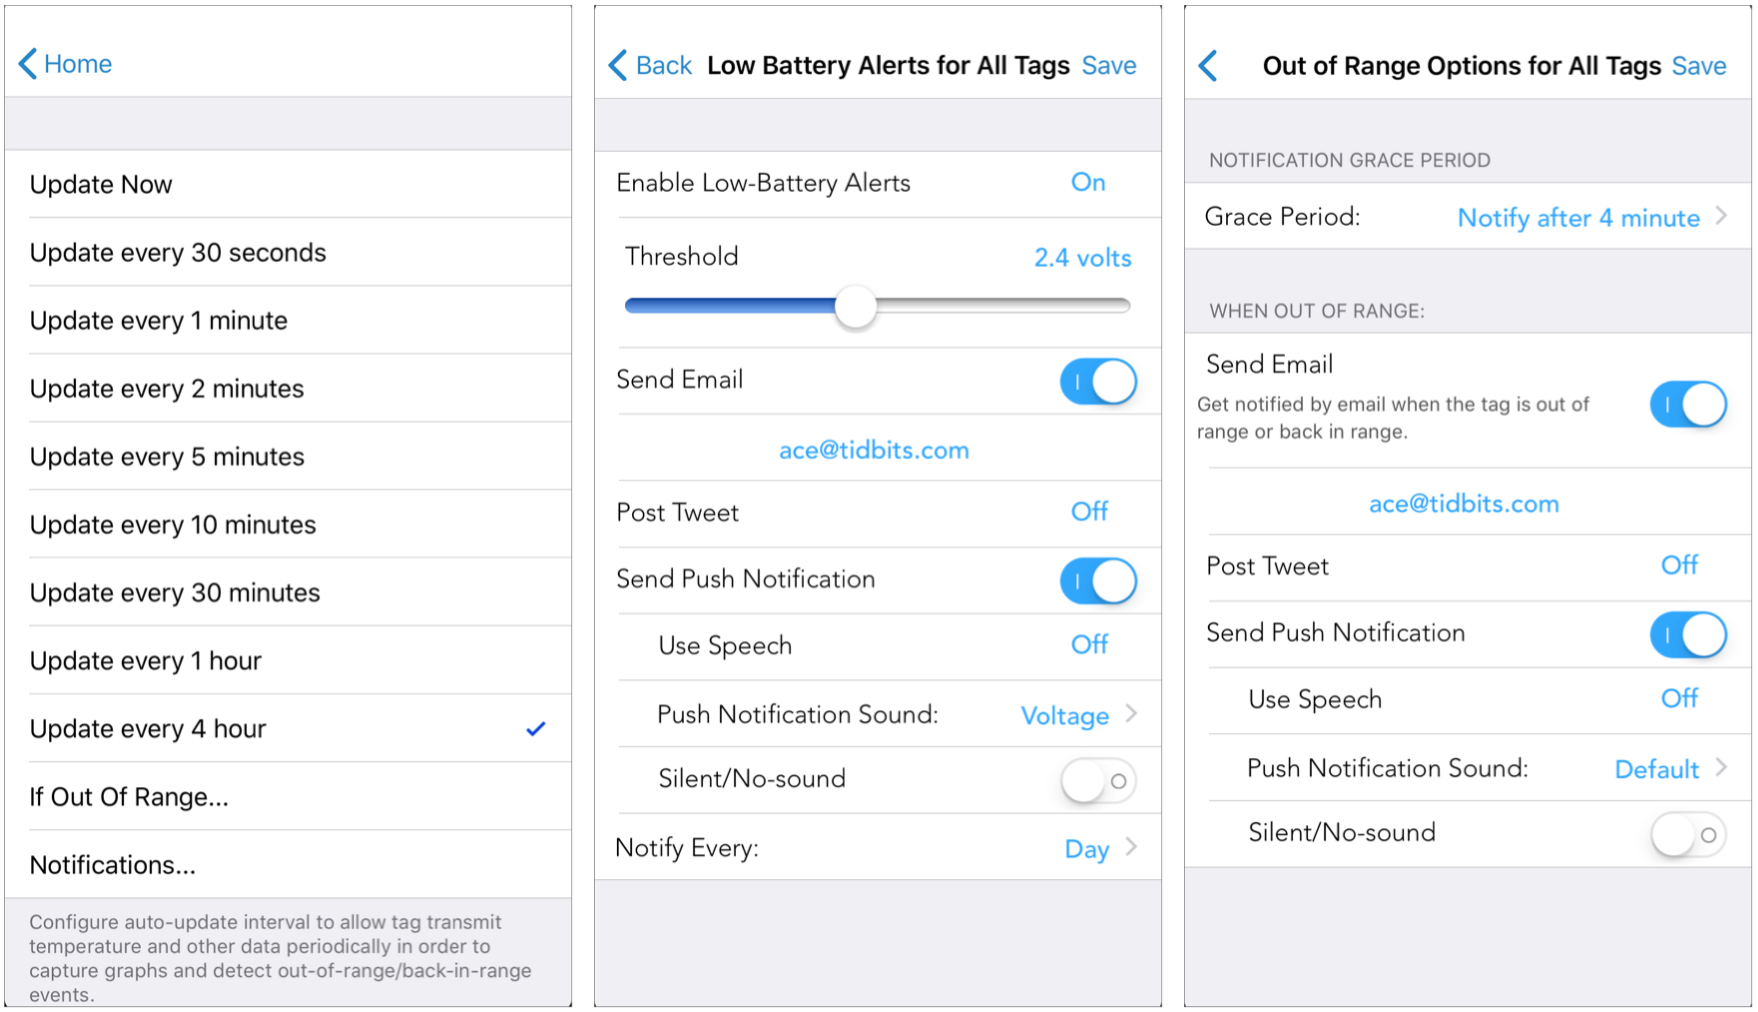
You also want to set how often the tag should update, along with notification options for low battery and out-of-range conditions. You can set these options for each tag individually, in the tag’s own screen, or for all the tags at once from the WirelessTag app’s Home screen.
Once you’ve configured each tag, you can put it where you want. Make sure to position it in a spot where the temperature won’t fluctuate too much merely from the door opening. I don’t recommend attaching the tags permanently because you will need to pull them out to replace the batteries every so often. (If you want to use the tag’s motion-sensing features, you will need to affix it to a door or other object; velcro might be the best approach.)
You may be surprised at how much the temperature in your appliances varies, and the ranges may even change with the season. Our garage freezer cycles between -5ºF and -14ºF (-20ºC and -25ºC), and as the weather has gotten warmer, its temperatures have actually dropped, presumably because it’s working harder for longer. (Although the most commonly recommended temperature for freezers is 0ºF (-18ºC), foods maintain quality longer at somewhat lower temperatures.)
When you first start looking at the WirelessTag app’s temperature charts, which you can do individually by tag or all at once, you also may discover that you need to adjust your appliances’ settings for optimal temperature ranges. Since these settings are often controlled by simple dials marked from 1 to 10, it can take a few days of experimentation to get freezers to around 0ºF and refrigerators to between 34ºF and 40ºF (1ºC and 4ºC).

Luckily, the WirelessTag app lets you set upper and lower ranges—it’s generally easier to tap the numbers and type new ones than to use the sliders—and a threshold window outside which you’ll be notified. It takes some time to get your appliances set properly, and the ranges tweaked, so you’re notified only when appropriate. You don’t want to get a notification every time the fridge is opened and warms up slightly, for instance, since it will cool itself back down quickly. But you do want to know if the door didn’t quite close, leaving the lights on to heat the inside.
(I just bought some LED light bulbs to replace the stupidly hot incandescent bulbs in our fridge. It’s not the door being open a crack that’s the problem; it’s having two 60-watt light bulbs kicking out heat. I almost burned my fingers trying to get one out. The LED bulbs are much cooler and use a tenth of the power.)
After you’ve gotten both your appliances and the temperature ranges set correctly, the Wireless Tag System fades into the background, at least until something goes wrong. Since our fridge door doesn’t close all that reliably, I’ve gotten lots of notifications that tell me it needs to be given a shove. One even came through when we were away and had a housesitter who wasn’t familiar with the door—a quick text message solved the problem.
You may go weeks or months without hearing from the WirelessTag app, assuming everything is working correctly. That’s almost dangerous, since I’ve seen a few situations where something prevented a tag from communicating or where the app ended up in an odd state, such as after switching to a new iPhone. None of these situations were hard to recover from, but they did require checking in on the app. For that reason, I strongly recommend having low battery and out-of-range notifications sent to you via email as well as via the app.
One tag did fail, after about 16 months. I got a low-battery notification and then an out-of-range notification, but replacing the battery didn’t enable it to connect again. After running through all of Cao Gadgets’ troubleshooting suggestions, I contacted the company, and they nicely offered to repair or replace the tag if I sent it back, even though it was out of warranty. The replacement tag has worked fine since.
The Wireless Sensor Tag system may not be the sexiest form of home automation out there, but for my money, it’s among the most useful and practical. And while my usage has focused on temperature monitoring, it’s clear to me that it could do a lot more. So if you have any situation where you want to monitor temperature, moisture, motion, or light, check out the Wireless Sensor Tag system.
