#1444: Apple holiday film, why not to snooze email, Jonathan Mann song, browserless devices on Wi-Fi hotspots, Ergotron WorkFit-TX standing desk converter
It’s time for our annual membership drive—we need your support to keep bringing you TidBITS each week! We’re also heading into the holiday season, which Apple is commemorating with a lovely short film. Equally fun is the hilarious “Have you tried restarting?” song that the Command Control Power podcast hosts commissioned from songwriter Jonathan Mann, the Song A Day guy. If you end up in a hotel or hospital that requires a captive portal page for Wi-Fi access, Josh Centers explains how you can get on with a browserless device like an Apple TV. Been thinking about a standing desk? Julio Ojeda-Zapata reviews the excellent—if expensive—Ergotron WorkFit-TX standing desk converter. Finally, you may have noticed more email apps offering a “snooze” feature to bring messages back at a later date, but Jeff Porten, author of Take Control of Your Productivity, isn’t a fan and suggests better alternatives. Notable Mac app releases this week include BBEdit 12.5.1, Mellel 4.1.4, CopyPaste Pro 3.5.9, VMware Fusion 11.0.2, and ChronoSync 4.9 and ChronoAgent 1.9.
TidBITS Needs Your Help in 2019!
In 1992, we started the first advertising program on the Internet, but as you can read in “TidBITS Sponsorship Program” (20 July 1992), it was more akin to the Public Broadcasting Service and National Public Radio sponsorships. Little did we anticipate that, 19 years later, we’d take another note from PBS and NPR and ask you, our readers, for direct support—see “Support TidBITS by Becoming a TidBITS Member” (12 December 2011).
The TidBITS membership program has been crucial for enabling us to afford the staff, servers, and development efforts necessary to keep TidBITS coming to you each week. Thank you for that support! It’s especially welcome given how so many of our peers have been lured to more lucrative corporate jobs. Apple’s support documentation has benefited from those moves, but now there are fewer independent voices helping Apple users with things that don’t work perfectly, or with solutions that rely on third-party products.
I’ll be up front with you—last year was tough. We lost several hundred members due to how long it took us to revamp our Internet infrastructure and switch the membership handling from eSellerate to Paid Memberships Pro and Stripe. Worse, because it was impossible to transfer all billing details between the old and new systems, those who previously had automatic renewals have to renew manually this year.
The bulk of renewal reminders will start going out in email this week, and thanks in advance for renewing—every little bit makes a difference. We hope our new system will be easier for everyone to understand and use, but if you have any troubles, send Lauri Reinhardt email at [email protected] and she will help you out.
For those of you who aren’t yet in the TidBITS membership program, would you consider joining the nearly 2400 other readers who are? You know that we focus on content that’s practical, timely, and free of the constructed drama and conflict that so many other sites like to drum up. How worthwhile is our work to you?
You can choose from different levels of support: $20, $50, $100, and $1000, or set your own monthly or yearly amount. The membership perks are the same at each level, with one exception: the $1000 level is a lifetime membership that includes a fine dinner with Tonya and me any time you’re in Ithaca or we’re in your city. Seriously—we enjoyed food and conversation just a few months ago with an Australian TidBITS member who was passing through Ithaca.
Speaking of which, we have a number of membership perks for you:
- Discounts of 20% to 40% on over 80 Mac products, worth over $900
- A 30% discount on all Take Control books
- A full-text RSS feed (non-members get a summary-only feed)
- A version of the TidBITS Web site free of paid banner ads
- Acknowledgment on our public TidBITS Members page
Be sure to scroll through our redesigned Membership Benefits page, which now features gorgeous icons of all the Mac apps on which members receive discounts. Among them, you’ll find essentials like 1Password, Audio Hijack, Default Folder X, DEVONthink Pro, Keyboard Maestro, LaunchBar, Nisus Writer Pro, PDFpen, PopChar X, Scrivener, SpamSieve, and more. (Contact me if you’d like to include your company’s product.)
So if you find TidBITS valuable, or have received personal help from one of us simply because you asked, please become a TidBITS member to help us continue publishing the kind of articles you’ve become accustomed to reading each week. You’ll have our undying gratitude, and more importantly, you can rest assured that every article you read was made possible in some small part by your generosity. Thank you!
Watch Apple’s Holiday Short: “Share Your Gifts”
As we move into the holiday season, Apple has released a lovely short film called “Share Your Gifts” on YouTube. It’s a sweet story of a creative young woman who’s afraid to share her work with the world until her dog helps her to break out of her shell. Happily, for those who are a little tired of Apple’s emphasis on iPhones and iPads, she’s shown using a MacBook to express herself—it’s nice to see Apple demonstrating its commitment to the Mac in such a way.
Set to the Apple-commissioned song “come out and play” by the 16-year-old Billie Eilish, the film relies on an effective combination of a miniature physical set and computer-generated characters. Apple’s “Making of” video takes you behind the screen to hear from the set designers, animators, and others who brought this project to life. I can only imagine what the budget must have been.
Command Control Power Podcast Gets a Hilarious Jonathan Mann Theme Song
One of my favorite parts of our TidBITS Content Network business is that I get to talk with a lot of Apple consultants and resellers, who can’t resist sharing wonderfully geeky stories of tech tribulations. Outside of conferences like MacTech, one of my regular sources for such tales has become the Command Control Power podcast, hosted weekly by consultants Joe Saponare of PsiMac, Sam Valencia of HCS Technology Group, and Jerry Zigmont of MacWorks.
When I went to play the most recent episode, though, I was stunned to discover that they had commissioned songwriter extraordinaire Jonathan Mann to write them a theme song. Taking its cue from the podcast’s motto—“Have you tried restarting?”—the song is hilariously fabulous. Give it a listen.
(Jonathan Mann is the guy who has written an original song every day since January 2009. His best-known piece is “The iPhone Antenna Song,” which Steve Jobs played before the iPhone 4 press conference.)
The Command Control Power hosts also use our syndicated TidBITS Content Network tips and articles, which have come up a few times in recent episodes. In the 2 October 2018 “Pontiac Data Loss” episode, the hosts talked about sharing the advice we provide about when to upgrade to Mojave and iOS 12 with clients and also discussed making our articles required reading for their staff. Here’s a clip.
That topic of required reading came up again in the 16 October 2018 “Hey Siri, Will you dance with me?” episode. After reading our bonus article covering Apple’s keynote announcements, Joe Saponare decided to insist that all of his employees read it to ensure that they had a least-common-denominator level of knowledge. I was also super pleased to hear Joe and Sam Valencia talk about how we’re hitting a happy medium with our technical level.
[TCN content] doesn’t dumb it down, but it doesn’t make it too nuanced for the common reader to understand. So it’s in this universal language that works for a lot of different people.
Most recently, we gave our TCN subscribers a bonus article about Apple’s announcements of the new MacBook Air, Mac mini, and iPad Pro. In the 12 November 2018 “MacMini Why For Art Thou?” episode, the Command Control Power hosts talked about the utility of sharing such news with clients to show how they’re on top of what’s happening. In particular, Jerry Zigmont commented that such Apple announcements garnered the most clicks from his email newsletter.
If you do Apple support for a living, I strongly encourage you to add Command Control Power to your podcast queue—it’s like sitting around and shooting the breeze with a bunch of guys who are immersed in the world of helping individuals and businesses make the most of their Apple devices. And, of course, if you’d like some help generating content for your email newsletter or blog, please do give our TidBITS Content Network a try.
How to Work Around Wi-Fi Hotspot Captive Portals on Browserless Devices
Many public Wi-Fi hotspots—such as those offered in hotels and hospitals—require you to authenticate with a “captive portal” page before allowing your device to access the Internet. Usually, this is as simple as clicking an “I Agree” button on the page. There’s just one problem: devices like the Apple TV and Nintendo Switch don’t have Web browsers and thus can’t access these pages (the Switch apparently has one for this purpose, but it has never appeared when I need it). Fortunately, if you happen to have a MacBook nearby, it’s an easy problem to solve.
 The trick is to disguise the MacBook as the browserless device you want to connect—say an Apple TV—click through the captive portal, and then disconnect the MacBook and connect the device. You can do this by spoofing the Apple TV’s MAC address, which is a unique hardware identifier for a network device. Every Ethernet port and Wi-Fi card has a MAC address. Follow these steps:
- Find the MAC address of the browserless device you want to spoof. On the Apple TV, it’s listed in Settings > General > About. If you’re using Wi-Fi, it will be called the Wi-Fi Address and will look like this: 00:14:22:01:23:45.
- Power down the browserless device, or at least make sure it’s not connected to Wi-Fi—the easiest way to do this with an Apple TV is to unplug it. These Wi-Fi hotspots allow only one unique MAC address at a time so if it’s connected it could prevent your MacBook from connecting in the following steps.
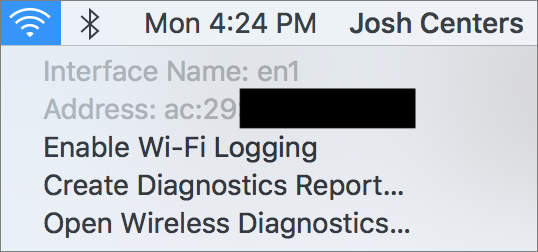
- Look up your MacBook’s Wi-Fi interface name and MAC address by Option-clicking the Wi-Fi icon in the menu bar. The interface name should be en0 or en1.
- Choose Turn Wi-Fi Off from the Wi-Fi menu.
- Open Terminal and enter this command, replacing
en0with your interface name and00-14-22-01-23-45with your browserless device’s MAC address:sudo ifconfig en0 ether 00-14-22-01-23-45Yes, you need to replace the colons with hyphens. Enter your administrator password when prompted. This command changes the MAC address of your MacBook’s Wi-Fi card, but only until you reboot!
- Option-click the Wi-Fi icon in the menu bar again and double-check to make sure your MAC address has changed.
- Turn Wi-Fi back on, connect to the hotspot’s Wi-Fi network, and bring up the captive portal by trying to visit a Web site in Safari.
- Follow the prompts to authenticate the MacBook.
- Once you’ve gotten online, restart the MacBook to restore its true MAC address.
Now you should be able to connect your Apple TV or other browserless device directly to the Wi-Fi network in question simply by powering it on or connecting to Wi-Fi.
If you have to pay for the hotspot and don’t want to incur the cost for a second device, you can use both your browserless device and your MacBook, as long as you keep the same MAC address on both and don’t connect them at the same time. So in Step 9 above, instead of rebooting the MacBook, turn Wi-Fi off, connect your browserless device, and when you’re done, disconnect the browserless device and turn on your MacBook’s Wi-Fi.
This trick could save your sanity if you’re on a business trip or stuck in a hospital for an extended stay and want to kill time by watching TV or playing video games. I was in this situation recently during the birth of my second son—welcome Jeremiah Stone Centers!—initially for his birth and then again so he could be placed under a bili light for two days to treat his newborn jaundice (he’s fine now). In my experience, most time spent in a hospital as a family member is just sitting around, but I was too tired and stressed out to be productive. Being able to play games on my Nintendo Switch helped pass the time while Stone was busy cooking under his light.

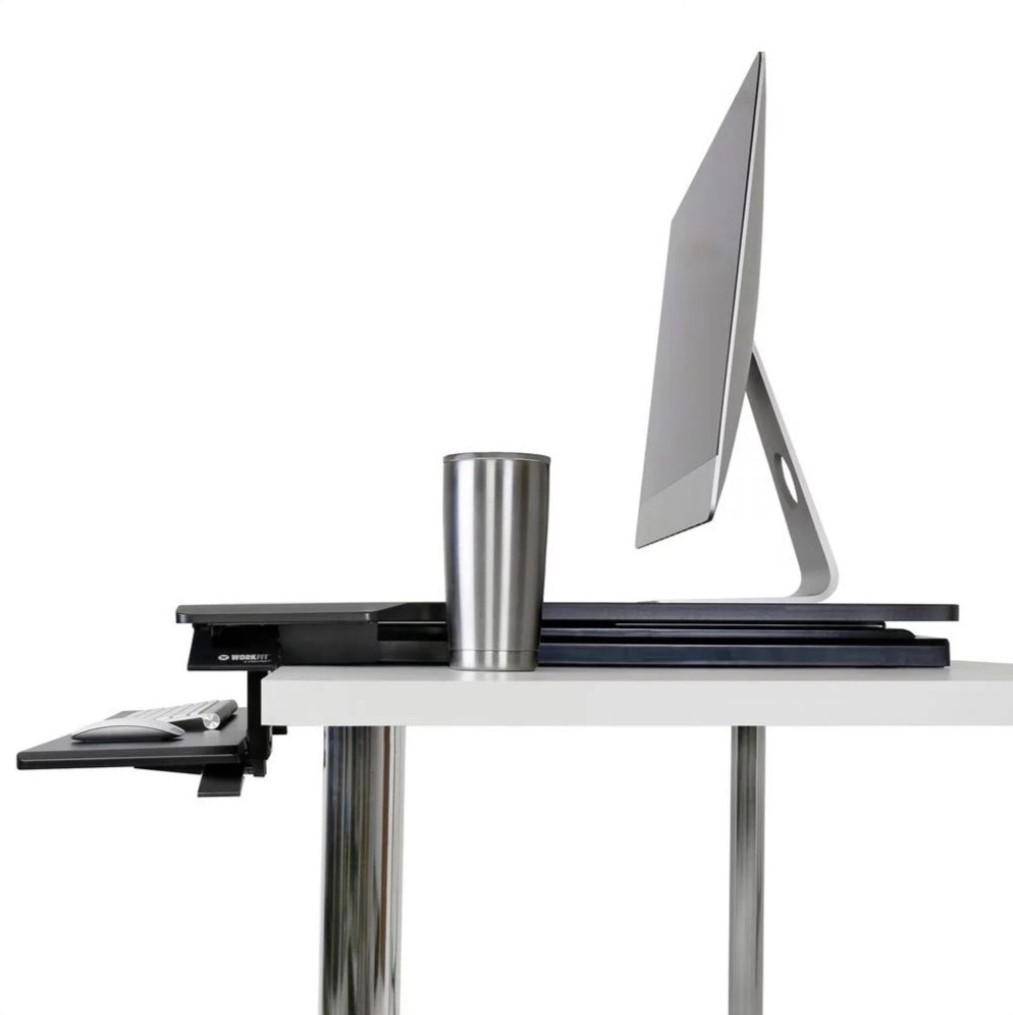
Ergotron WorkFit-TX Sit-Stand Desk Converter Works Well but Is Costly
Standing desks are all the rage, but not everyone can afford a fancy model that electrically shifts from a sitting to a stand-to-work height at the touch of a button. Most of us are stuck with traditional fixed desks.
That’s where desk converters come in. These rigs rest atop a regular desk, and you can raise and lower them depending on how you want to work. Such devices incorporate a platform for your monitor, along with a separate surface for a keyboard and mouse. Presto! You have a fully functional standing desk, often at a more manageable cost.
I’ve written about desk converters before (see “Cheaper Alternatives to Expensive Standing Desks,” 8 April 2016) and had not planned to revisit the topic. But a new Ergotron product caught my attention because it solves problems I’ve seen in other such converters. Attaining perfection is difficult with gear of this ilk, partly due to varying user tastes and needs, but the WorkFit-TX Standing Desk Converter comes closer than any other I’ve ever seen. It isn’t cheap, though.
Let’s take a tour of the WorkFit-TX’s features and how they make it stand out from the pack.
Up, Up and Away
Like other desktop converters, the WorkFit-TX relies on a lever system for manually raising and lowering the apparatus. This may be a bit of a workout for you given the WorkFit-TX’s bulk and weight.
 Crucially, the WorkFit-TX moves straight up and down. Some converters arc towards the user as they move upward, which can eat into precious workstation space.
This fact alone is not a reason to pick the WorkFit-TX out of the Ergotron hardware line since the company sells other converters that work similarly, but it’s worth pointing this out given the arcing behavior of competing products.
That’s Deep, Man
Typically, you place your monitor atop a table-like platform that rises and lowers along with the rest of the apparatus. The WorkFit-TX’s shelf is wide enough to accommodate two displays, and also optionally accommodates a metal stalk onto which a pair of displays can be mounted. Nothing new here.
But the WorkFit-TX platform is also deep. For many people, especially those of us who are getting older, this depth is crucial because too-close screens can be hard to read. I’ve found such a close-up arrangement optically untenable, which keeps me from using other converters from Ergotron and its competitors.
 With the WorkFit-TX, though, I can adjust my iMac’s depth positioning depending on mood and how my eyes are feeling that day. It’s great.
The monitor platform’s depth serves another purpose, Ergotron told me. Users have asked for extra room to accommodate smartphones and tablets, spread out work papers, deploy personal tchotchkes, arrange peripherals, and more. There is plenty of space for all of that here. However, the WorkFit-TX lacks an integrated slot or stand for keeping a smartphone and/or tablet at a comfortable viewing angle, which is a cool feature found on other Ergotron converters.
Keep a Low Profile
The WorkFit-TX’s platform can seem awfully imposing in its expanded position for use while standing. But, in a design refinement, Ergotron figured out how to reduce the profile of the platform when it’s in the lowered position. It doesn’t exactly vanish from view, but it doesn’t overly dominate the desktop and add to the inherent claustrophobia of a work cubicle.
We’d Like Your Input
When using a standing desk or desk converter, you’ll need somewhere to put your keyboard and mouse (or trackpad). Some standing desks offer just one large surface to hold everything: your monitor, keyboard, mouse, and so on.
That’s usually poor ergonomics, since your lower arms should be bent at about 90º when typing and the screen should be straight in front of your face. Given most people’s bodies, that requires separating the keyboard and the screen by a good bit. (The lack of separation is one of the glaring ergonomic problems with laptops, and even more so with an iPad Pro with a Smart Keyboard.)
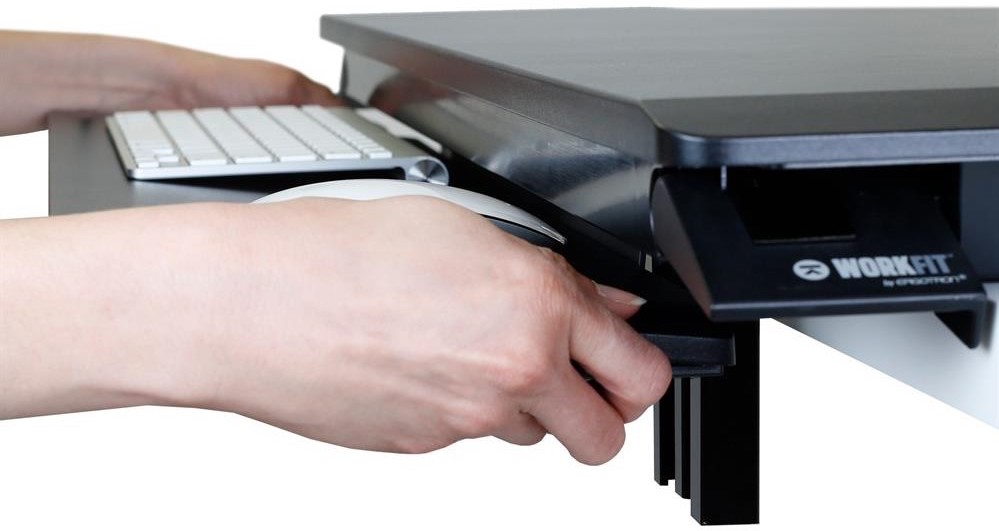
With desktop converters, a more common arrangement is to provide a separate tray for the input devices at a lower height than the monitor’s platform. Typically, the tray is locked at that height. On the WorkFit-TX, though, you can adjust the keyboard tray via its own lever system, dropping it to as much as 3.5 inches (9 cm) below the desktop. This is important since many fixed desks are too high for comfortable and healthy typing.
The tray is also tiltable. That is, you can angle the edge closest to you slightly upward, via flip-out feet beneath the platform. You might find this weird, but such a tilt is a godsend for people who need to keep their wrists straight or angled slightly down. (The way most keyboards are higher in back can be uncomfortable for those who have trouble keeping their wrists cocked up while typing.)
 At 28 inches (71 cm), the WorkFit-TX’s keyboard tray is also wide enough to accommodate a keyboard with enough extra with room for comfortable rodent manipulation, which is not true of many other converters. Even so, it helps if you use a smaller keyboard like Apple’s Magic Keyboard. The tray is 8 inches (20 cm) deep, which provides plenty of room for mousing.
Just as important, the WorkFit-TX’s device tray is thick and sturdy—unlike others that are flimsy and tend to flex—and it’s firmly attached to the rest of the apparatus so it won’t wobble.
The tray has one design element that annoyed me: a raised lip at the far edge that my Magic Mouse kept hitting. I was relieved to discover I could remove the lip with a Phillips screwdriver.
Now for the Bad News
The WorkFit-TX, though thoughtfully designed, isn’t for everyone. Its extra-deep monitor platform, though a boon in many ways, means the converter might be a tight fit on the shallow desks found in many office cubicles. It’s 27 inches (69 cm) deep and 32 inches (81 cm) wide, and it weighs a whopping 58.5 pounds (26.6 kg). Generally speaking, the WorkFit-TX is a bit of a beast, which some won’t like.
Also, at $499, it’s pricey for those without corporate expense accounts. See my earlier article on converters for a number of more affordable options. Also, check out Ergotron’s WorkFit-Z Mini; it has some of the issues described in this article, but at only $199, it’s worth a look.
If swapping out your current desk is an option, for about the cost of a WorkFit-TX, or a bit more, you can find full standing desks, the kind that raise and lower at the touch of a button. I have a standing desk at the office of my day-job employer, and I prefer it over any converter.
But for those who have decent-sized fixed desks and a bit of extra money, the WorkFit-TX is the best sit-stand converter I’ve seen so far.
No Snoozing Allowed: Better Ways to Deal with Email
Many apps today offer features designed to keep you on task and make sure you’re doing what you set out to do an hour ago. Email snoozing is one such feature that made the news recently when it was incorporated into Gmail after the obsolescence of Google’s Inbox app that first offered it. But many third-party email apps have long offered similar snoozing features.
As part of my research for my book Take Control of Your Productivity, I evaluated many such methods to see which were actually useful. Unfortunately, snoozing falls into the category of ideas that feel productive but are often detrimental to productivity.
You Snooze, You Lose (Your Control)
If you’re unfamiliar with the email snooze feature—and I hope this explanation won’t entice you to try it out—it gives you the appearance of control over how many messages are waiting for you in your inbox. Click a button while reading a message, and it seemingly goes away until a time you specify. In Gmail, the defaults are 6:00 PM today, 8:00 AM tomorrow morning, next week, or next weekend.
Many people employ snoozing in a quest for Inbox Zero, which is indicated by an empty inbox at the end of the day. With Inbox Zero, you move messages out of your inbox when you have dealt with them, or at least when you’ve triaged every message—perhaps into other folders indicating priority, category of follow-up, or issue area—and given them some consideration and planning. Inbox Zero can be a powerful technique, because that empty inbox is psychologically reassuring that you’re caught up and ready for whatever may appear tomorrow.
But you could also empty your inbox with Select All followed by a press of the Delete key. The empty inbox isn’t the point of Inbox Zero, the point is the work you’ve done getting there. You don’t review seven email messages related to a project to have seven fewer messages in your inbox, but instead to make specific plans for addressing the issues contained in them, and revise your thinking about the amount of time the project requires. (The logical extreme of the “Select All; Delete” method is sometimes called email bankruptcy, when applied to thousands of messages. It might feel gratifying, but it’s impossible to be sure that none of those deleted messages will prove essential in the future. I can’t recommend it.)
Snoozing is a Band-Aid that makes your inbox appear empty. When you snooze a message, you’re taking it off your immediate plate. Depending on the method the app uses to snooze a message, you may still be able to look at what you’ve snoozed; other times you can’t. Gmail shows a Snoozed label in the sidebar that groups snoozed messages together. Since various apps use different methods to hide snoozed messages, if you use multiple email apps on multiple devices, you may be able to see them with some apps but not others. Regardless, when the snooze timer expires, the message reappears in your inbox.
 Think for a moment about the semantic meaning of the snoozed message in the screenshot, because it can vary. For this marketing message from Amazon.com, it could be, “This isn’t appropriate now, but I want to see it again after work.” That’s a fine reason to set it aside for later, and the snooze button is likely a faster method than other ways you’d do this manually. I have no argument with snoozing this particular message for that reason.
But if you’re snoozing the message to say, “I don’t have time to deal with this message now, so I’ll delay it,” you’re implicitly saying, “I will have more time later.” That is, you’re subscribing to the belief that Future You will have fewer messages and lesser demands. When that snooze expires, the message is going to mix in with all the new messages that will have arrived by then. You have no idea how important they will be or how many you’ll have, not the least because any additional messages you snooze are currently in your future. Future You is going to be painfully aware of all of this. Unless you have a specific reason to think you’ll genuinely have less to do at a particular time, shoveling work into the future is a remarkably inhumane thing to do to yourself. (And if you will legitimately have less to do because you plan to “catch up on work” during your leisure time, I’d argue that’s also inhumane.)
Worse still, this particular method takes every snoozed email, bundles it into a wholesale bulk shipment, and delivers it to your doorstep en masse. This is useful only in very limited circumstances, such as proving that you’re Santa Claus. The only way to know how many messages are waiting is to review your snoozed list, which few people do because the whole point is to forget about those messages. Most likely, when your email client dumps all those messages on you, you’re going to use the snooze feature again to make an even bigger problem for an even later Future You.
Marginally kinder to yourself is a snooze method that delays every message by a selected number of hours, instead of until a set time. Since it takes time between each message you snooze, if you’re working with your email when those timers elapse, you’ll see your inbox growing gradually rather than exploding.
But there are better ways.
Humane Email Handling
The core thing to understand about email is that what arrives is fundamentally out of your control; anyone with your email address can choose to add to your inbox at any time. For this reason, I strongly recommend against using your email inbox as a task list. What you choose to do needs to be kept separate from what others want you to do, otherwise your task list will be similarly out of control. Since your inbox is also filled with messages that aren’t tasks at all, using it as a task list is a fast track to insanity. There’s no way of knowing how much work looms behind a large inbox number, and no easy way to separate the getting-stuff-done wheat from the marketing chaff.
The second key issue is that it takes non-zero time to consider an email when you see it, and this consideration requires some small amount of cognitive work. Snooze an email, and the only thing Future You will know about it is that you saved it for later. The context of why you delayed it requires the same consideration it did the first time. Maybe this is less than a minute, but multiply that by hundreds of messages a day, and do it repeatedly for every message you snooze. A more humane—and more productive—method preserves this context so you’re picking up where you left off, rather than starting over from scratch.
The way to preserve context is to create groupings that have meaning to you; for example, an email folder named Urgent. I use SmallCubed‘s MailTags for Apple’s Mail for this, but folders and Gmail labels also work. Avoid using flags, however, because they require you to remember that a green flag means one thing while a red flag means another. You want the contextual information you’re adding to be instantly available without requiring any additional thought on your part. (I recommend MailTags for its multiple methods of handling email and integration with Gmail labels. But its licensing is in flux right now; see below for details.)
Here then are the steps I use for handling my email, but you should see this more as a menu of techniques than as a recommended procedure. You may find some steps useful and some not; you may have additional methods that work for you that don’t for me. What’s important is that you develop a rote procedure for quick email review and handling; it need not be this exact one.
Step 1: Delete the Uninteresting
If a message is not particularly engaging and you’re thinking about snoozing it to get it off your plate right away, consider whether you’re better off deleting it entirely. If it’s unimportant to you now, don’t think it will become more important later simply because you’re undervaluing your future time.
Step 2: Deal with the Most Important; Postpone the Rest
Email apps say blue dots and bold lettering mean “unread messages,” but they mean something else to me. A blue dot in Mail or a bold subject in Gmail means a new message I haven’t even glanced at yet. When I check my inbox, all I do is look at Subject lines and senders to see if anything needs immediate attention. Those are the only messages I read thoroughly and deal with in some way.
Then, and I realize this may seem unintuitive, I mark the remaining messages as read, even if I haven’t opened them. Anything left in my inbox is then, by definition, unread and non-urgent; I don’t need any further indicators than that. Blue dots and bold lettering indicate what’s new the next time I scan. Everything else I do with my inbox, I can do when I have time; this scanning pass ensures that what’s waiting for me doesn’t have any landmines that might ruin my day.
Step 3: Triage What Remains in the Inbox by Priority
When I choose to devote time to email later, everything in my inbox needs some kind of handling. Messages that have reference value but no necessary follow-up get filed immediately. One example: confirmation messages for upcoming travel with codes you’ll need. Mark those as Reference and get them out of your inbox.
(When I say “mark,” I mean whatever method of organizing you’re using. If you’re using folders, drag them to an appropriately named folder. If you’re using tags or labels, set these and archive the message so it’s no longer in your inbox.)
The purpose of the Reference mark is to provide a quick place to look for things you know you’ll need; it’s generally faster than searching an entire archive. Periodically review your Reference emails, because once an email loses its specific relevance, there’s no reason to keep it here longer. This technique works best when you regularly prune your Reference folder to keep it small.
If you have a message that you might want in the future but aren’t sure when, go ahead and archive it. I trust search features to surface them for me later. That may be overly optimistic, because when a Spotlight or Gmail search fails in this situation, finding the necessary message can be time-consuming and painful. Follow this advice only if your searching skills generally suffice for bringing messages back quickly. (If you know you’ll need this message later for an unscheduled project you haven’t started, write down a few words of the Subject line alongside your outline or notes for the project. You’ll definitely find it when you need it.)
In most cases, the common method of creating a bunch of nested folders and archiving every email by topic takes way too much time, with limited value later. Judicious searching by subject line, sender, and date will usually surface the information when you need it. Date searching and ordering is more powerful than most people realize, as your brain naturally chunks messages in your own memory chronologically. A near-hit may give you enough context to scroll a bit to find the message you’re looking for.
Messages that need some follow-up on my part—and that I can’t dash off immediately—are triaged. I currently mark them as Urgent, High, or Later, but I’m careful not to think of Urgent as “very high priority.” The only messages in Urgent are those I need to see in the next few hours, and I work from there as needed throughout the day. Messages marked High might very well be more important, just not to today’s deadlines.
I used to have more levels of prioritization, until I realized that High, Normal, and Low effectively meant “probably get to; might get to; and will never see again” respectively. Now I delete messages in Step 1 that I once would have marked Low. Why pretend I’ll ever have the time? Meanwhile, for High and Later, if there’s something important in either that I don’t get to in time, I need better categories or I need to plan more time in the future for dealing with these messages. (This is an example of a feedback loop. The problems I have keeping up with my methods provide raw data indicating where I need to improve my methods.)
Step 3.5: Categorize Specific Messages Judiciously
Sometimes you should use more specific categories than broad priority labels. The only such mark I’m currently using is a Needs-Reply tag for personal conversations, when a message deserves a reply on a timely basis but it isn’t specifically urgent or high priority. Depending on backlog and mood, this category can be prioritized after Later, between High and Later, or sometimes even higher than High. Breaking such messages out separately from my Urgent and High priorities lets me slot them in as I like. But don’t create too many specific categories. If you have a dozen markings of this nature, you’ll need a checklist to manage your workflow, which is more structured than most people prefer.
If you want to divide your email time based on what you’re sitting down to do, that’s an argument for separate email addresses for different kinds of work. If all your email appears in the same place, you have to split up the different email streams manually during triage. Separate email addresses will do this for you automatically, as long as you’re careful to use the right address for each purpose. For my work, in which I wear many hats, I literally keep a dozen separate email accounts, which may be pressing the boundaries of the usefulness of this technique. It’s great for staying focused on a particular work area, but a pain to manage across multiple devices. I recommend trying one or two additional accounts for specific areas—an address dedicated to volunteer work, or one for family members and other VIPs separate from the home address everyone else gets—and see if it works for you. (You can also use email rules to categorize your messages by sender or keyword, but thanks to everyone checking email in multiple places these days, in my experience this workflow ends up being far more difficult to maintain than multiple addresses. Your results may differ.)
Step 4: Consider Setting a Few Messages Aside for Later
Finally, we get to something equivalent to snoozing. There are some messages you can’t deal with immediately, and other messages that are better dealt with later when you have more information. Those can be good reasons to snooze. “I don’t have time right now” is not.
I prefer the MailTags method of creating dated reminders to snoozing, because when the time comes, the fact that it was tagged for today remains part of its context. In my case, that effectively tags it as Urgent—after all, I picked the day it showed up for a reason.
Step 5: Deal with Your Messages
Of course, the purpose of all the above is to allow you to deal with your messages quickly on the first pass and approach them efficiently later. Now is later. Your priorities and categories provide an ordering for how to approach the messages you’ve triaged with the time you have, so now you put that time into those messages from most to least important. Usually this means: start with messages marked Urgent, move on to those marked High or Needs-Reply, and get to the ones that are marked Later when you have time.
It’s your choice how to approach this part of the process. The only requirement is that you must have at least enough time to deal with everything marked Urgent. After that, you can then continue through the other categories until you run out of time. I prefer a bit more structure, in that my task lists tell me to “respond to Urgent email” twice per day, with additional tasks for High, Later, and Needs-Reply occurring less frequently.
You can also alter your strategy and results by changing what mailboxes you use. I have a task that points me to my Later priority, because I can neglect it for long stretches of time—but that paradoxically means I might work on messages marked Later while there are still messages waiting marked High. So I also have a smart mailbox that shows me “later and all higher priority messages,” and I’ll use one or the other based on whatever seems to need the most attention.
Evaluating Your Outcomes
The goal of the above steps is to match your email to your available time, rather than the other way around. The only time you’ll make deliberate changes to how you approach your email is in response to a feedback loop (for example, in my case, “I need to spend more time keeping up with messages tagged High priority”). The rest of the time, this system degrades gracefully when your available time doesn’t keep up with the influx. So long as you have time to scan your new messages for alarms that are blinking red, you’re not missing anything that’s vitally urgent. As long as you have the additional time to triage high priority messages, everything that remains can wait until you get to it. The result is that while your email may “prefer” hours of your time to stay entirely caught up, it will only require the time it takes for those two steps.
You can further reduce that time with application of a few automatic procedures. I don’t recommend hundreds of mail rules for processing your messages, but there’s nothing wrong with automatically marking everything from particular VIPs as high priority. Just don’t automatically move those messages out of your inbox unless you’re fully aware of all the places where new messages might land. You may have noted that in my Gmail screenshot above, I have 1490 unscanned messages still marked unread. That’s because it shows my least important account that receives all of my bulk mail—it’s the last account I scan and the first account that falls behind when I don’t have enough time to keep up, because there are few landmines there when I don’t.
I would love to practice Inbox Zero, but it doesn’t work for me. The steps here are effectively “Inbox Recent.” Catch up on your unread (but scanned) messages whenever you can, but when you can’t keep up, some will stay in the inbox. Newer messages will push them to the middle of the pile. Effectively, your inbox will contain the newest messages, followed by a gap (created by those days you stayed up-to-date), followed by a batch of messages that slipped through, and so on. I consider myself to be minimally caught up when I’ve dealt with all new messages promptly, and I’m “really on top of things” when I have additional time to clear up some of the backlog. But there’s no need to ever “finish,” and it’s not a particular concern to let the backlog grow when I don’t have a choice.
(If you wish, you can tackle older messages as a separate project from “keeping up with email.” Sorting by date is rarely the best way to do this. Instead, try using a smart mailbox of messages older than 60 days, sorted by sender. This allows you to delete or archive large swathes of messages at once, after you give them a quick review to make sure that any issues they contain have been resolved, or are too old to still matter.)
In an ideal world, I’d have enough time to adhere to Inbox Zero and my email would always be entirely triaged. In my real world, this process optimizes not for perfect email management, but instead for satisfaction and lowered stress, and that’s what I recommend for you too. If you can find a way to make snoozing work for you in this regard better than I have, be my guest. Rule one of productivity is finding out what works for you. But for most people, most of the time, snoozing is just delaying the inevitable, and the inevitable will be an avalanche of work that’s almost guaranteed to come at an inopportune time.
Speaking of the software that works for me: MailTags is one of four Mail plugins from SmallCubed that speed up message handling in Mail, with thoughtful methods of working well with other email apps. Unfortunately, as I write this, SmallCubed has removed the individual licenses from the store in favor of MailSuite, an all-in-one package that provides all four in more tightly integrated ways—but which is still in beta and not yet completed for Mojave. High Sierra and earlier users can either try the beta, or download the older plug-ins, which will work with a new MailSuite license. MailSuite costs $60, or $30 for users upgrading from recent versions of those older plug-ins.


