#1479: Apple Card available, sharing vacation photos, Apple OS updates, 102-year-old TidBITS reader’s autobiography
Apple has updated all of its operating systems once again to fix a security vulnerability accidentally reintroduced in the last round of updates. Remember our interview with the 101-year-old TidBITS reader? George Jedenoff is now 102 and has just published his autobiography—it’s well worth a read. The Apple Card is now available to all US iPhone users, so Josh Centers explains how to sign up and opt-out of the arbitration clause. Finally, if you’ve ever felt overwhelmed by the possibilities for sharing vacation photos, you’re not alone. Adam Engst shares his thinking about the best ways to share photos within Apple’s ecosystem. Notable Mac app releases this week include EagleFiler 1.8.9, SpamSieve 2.9.37, Carbon Copy Cloner 5.1.10, Swift Publisher 5.5, Pixelmator Pro 1.4.1, and Ulysses 17.
Apple Issues Emergency Updates for All Its Operating Systems
When Apple updated its operating systems last month (see “Apple Releases macOS 10.14.6, iOS 12.4, watchOS 5.3, tvOS 12.4, and More,” 22 July 2019), the company’s engineers accidentally reintroduced a previously patched vulnerability that allowed jailbreaking. To close that vulnerability and prevent device jailbreaking, Apple has now released a series of emergency updates: macOS Mojave 10.14.6 Supplemental Update, iOS 12.4.1, watchOS 5.3.1, and tvOS 12.4.1.
Apple actually released macOS Mojave 10.14.6 Supplemental Update a few weeks ago, saying at the time that it fixed “an issue that may prevent certain Macs from waking from sleep properly”—see “macOS Mojave 10.14.6 Supplemental Update” (2 August 2019). Apple’s description now says that this updated version “resolves an issue that may cause certain Mac notebooks to shut down during sleep.” In addition, it fixes a bug that can degrade performance when working with very large files and another that could prevent Pages, Keynote, Numbers, iMovie, and GarageBand from updating.
Here’s how to install the updates:
- macOS 10.14.6 Supplemental Update: Install this 1.25 GB update from System Preferences > Software Update.
- iOS 12.4.1: Go to Settings > General Software Update. The update for an iPhone X is 99.3 MB.
- watchOS 5.3.1: Use the iPhone’s Watch app—go to Watch > General > Software Update. The update for an Apple Watch Series 4 is 55.4 MB.
- tvOS 12.4.1: If automatic updates aren’t on, you can update your Apple TV HD or Apple TV 4K by going to Settings > System > Software Updates.
Given the severity of the vulnerability, we advise installing these updates as soon as possible. While some people like jailbreaking their devices—and it’s certainly your right to do so—the security vulnerabilities that make jailbreaking possible by definition give attackers root-level access to your devices. Put bluntly, we don’t jailbreak our devices, and we don’t recommend that you do either.
102-Year-Old George Jedenoff Publishes His Autobiography
A few months ago, we published an interview with George Jedenoff, a TidBITS reader who was then 101 years old—he’s now 102. He shared a brief outline of his life, starting with fleeing the Russian Revolution with his parents as an infant, graduating with honors from Stanford University, and serving in World War II before returning to the US to work his way up in the steel industry until he became the president of Kaiser Steel.

Thanks to links on Daring Fireball and other sites, that article—“George Jedenoff: A 101-Year-Old TidBITS Reader,” 17 June 2019—has been one of our most popular pieces of the year. In it, George noted that he was using his iMac to write his autobiography. If you’d like to learn a lot more about his life and times, the 136-page My Centenarian Odyssey is now available for free in Apple Books.
George wrote the book in Pages, but when it came time to export to EPUB and publish on Apple Books, he bogged down. He decided to work with Apple Support and told me that extremely patient technicians spent at least 8 hours helping him convert the manuscript to EPUB and upload it to Apple Books. It was apparently not a simple task, even for the Apple employees, and problems with the images caused them to save the book as a fixed-layout EPUB rather than the more common reflowable EPUB. George was distressed to see how difficult it was, but as I told him, Apple’s back-end systems are often much harder to work with than the interfaces we see as everyday users. Nevertheless, he was happy to get the book out, and his grandson helped export it in such a way that Windows users could read it as well.
I’m about halfway through the book now and have skimmed to the end. It’s a fascinating read, starting with what it was like for George to grow up in the Depression and work his way through Stanford. The bulk of the book is devoted to George’s years in the steel industry, complete with numerous details about the inner workings of the management of US Steel, at one time the world’s largest corporation. George also shares lots of cocktail-party stories—be sure to look for the one about getting rescued by a water buffalo while exploring Guam—and closes the book out with scans of clippings and testimonials he collected over his long career.
Apple Card Now Available to All US iPhone Users
The Apple Card is now available to every iPhone user in the United States. The company said nothing about when it might become available in other countries.
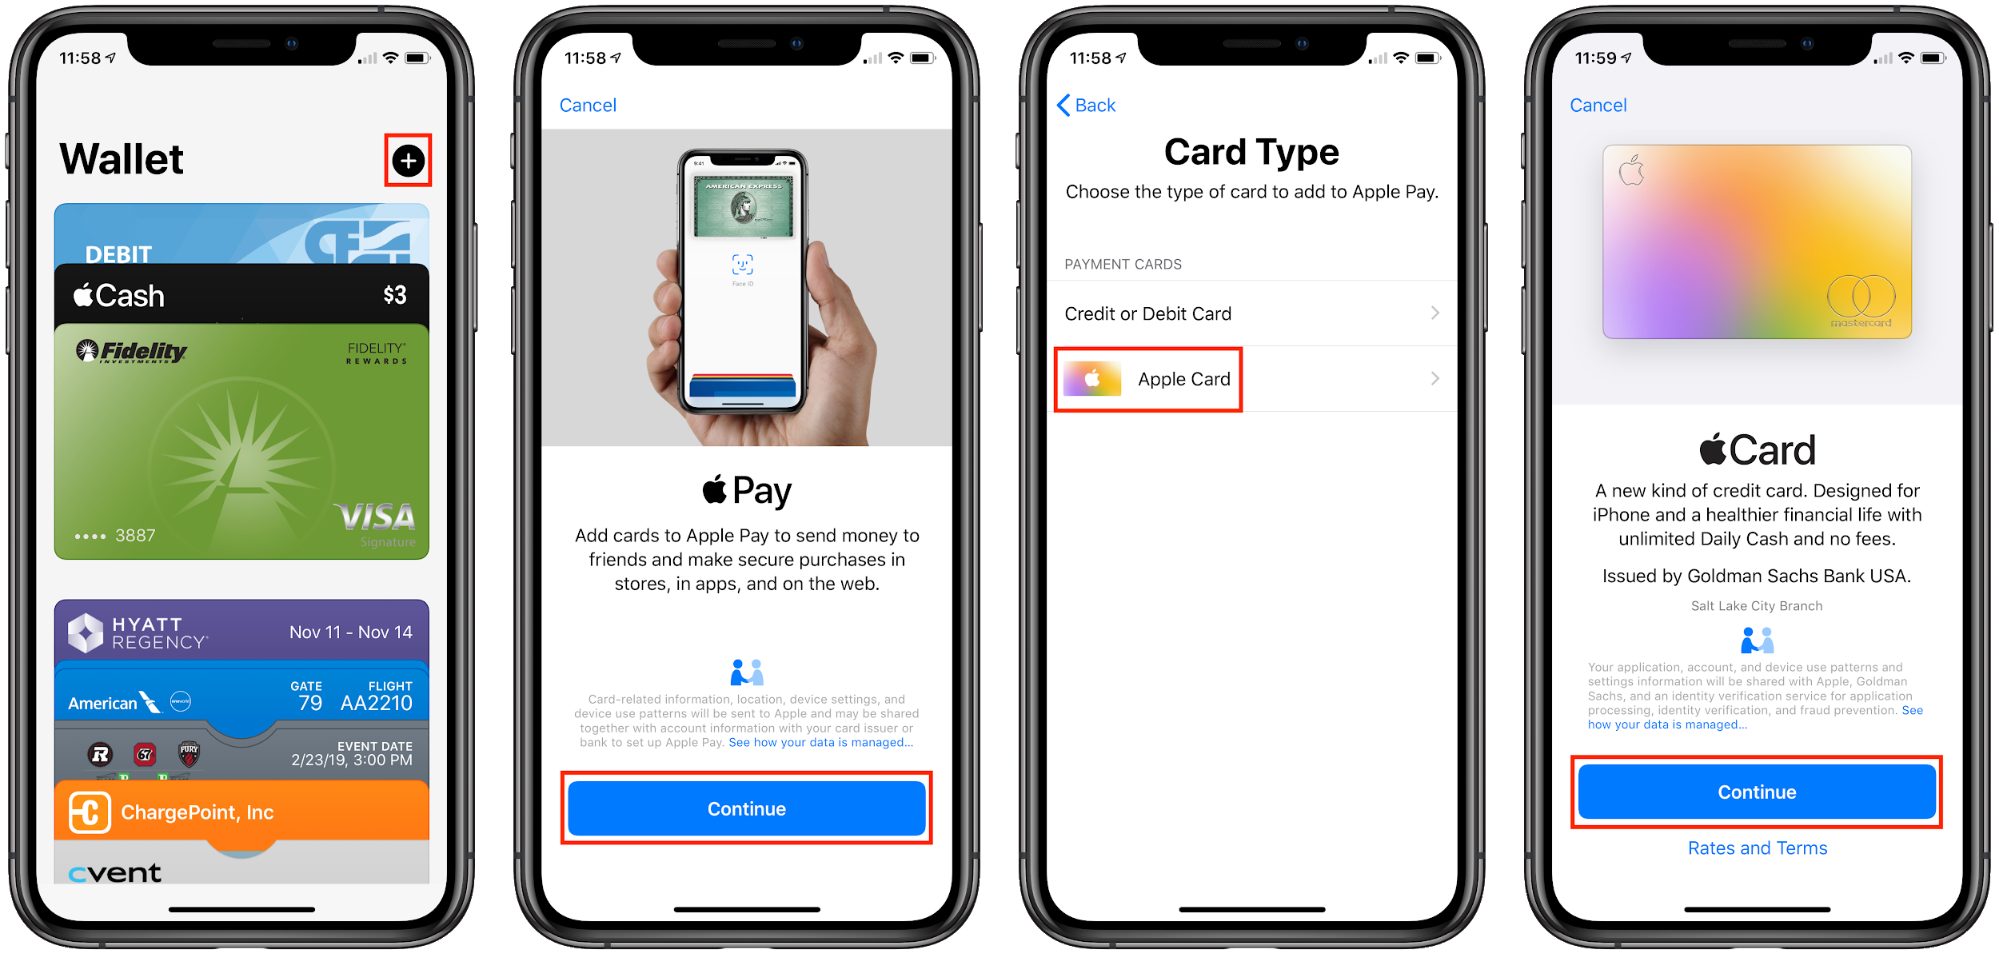
You can apply by tapping the plus button in the upper-right corner of the Wallet app. Your application is subject to credit approval, but I haven’t heard of many rejections, and some people are being approved for the Apple Card with relatively low credit scores—CNBC had an article about how Apple and Goldman Sachs were dipping into the subprime lending market. If you apply and are rejected, let us know in the comments.
As we’ve noted before, the Apple Card carries no fees, but you’ll be subject to an APR between 12.99 and 23.99%, depending on your creditworthiness.
Once approved, you can begin using the Apple Card immediately through Apple Pay and in non-Apple Pay online transactions. You can find your Apple Card number and other information by opening Wallet, tapping your Apple Card, then the ••• button, and finally Card Information.
In addition to accessing your card through Wallet and Apple Pay, you’ll receive a titanium card in the mail a few days after your approval. If you regularly engage in gunplay with international terrorists, note that it is bullet-proof.
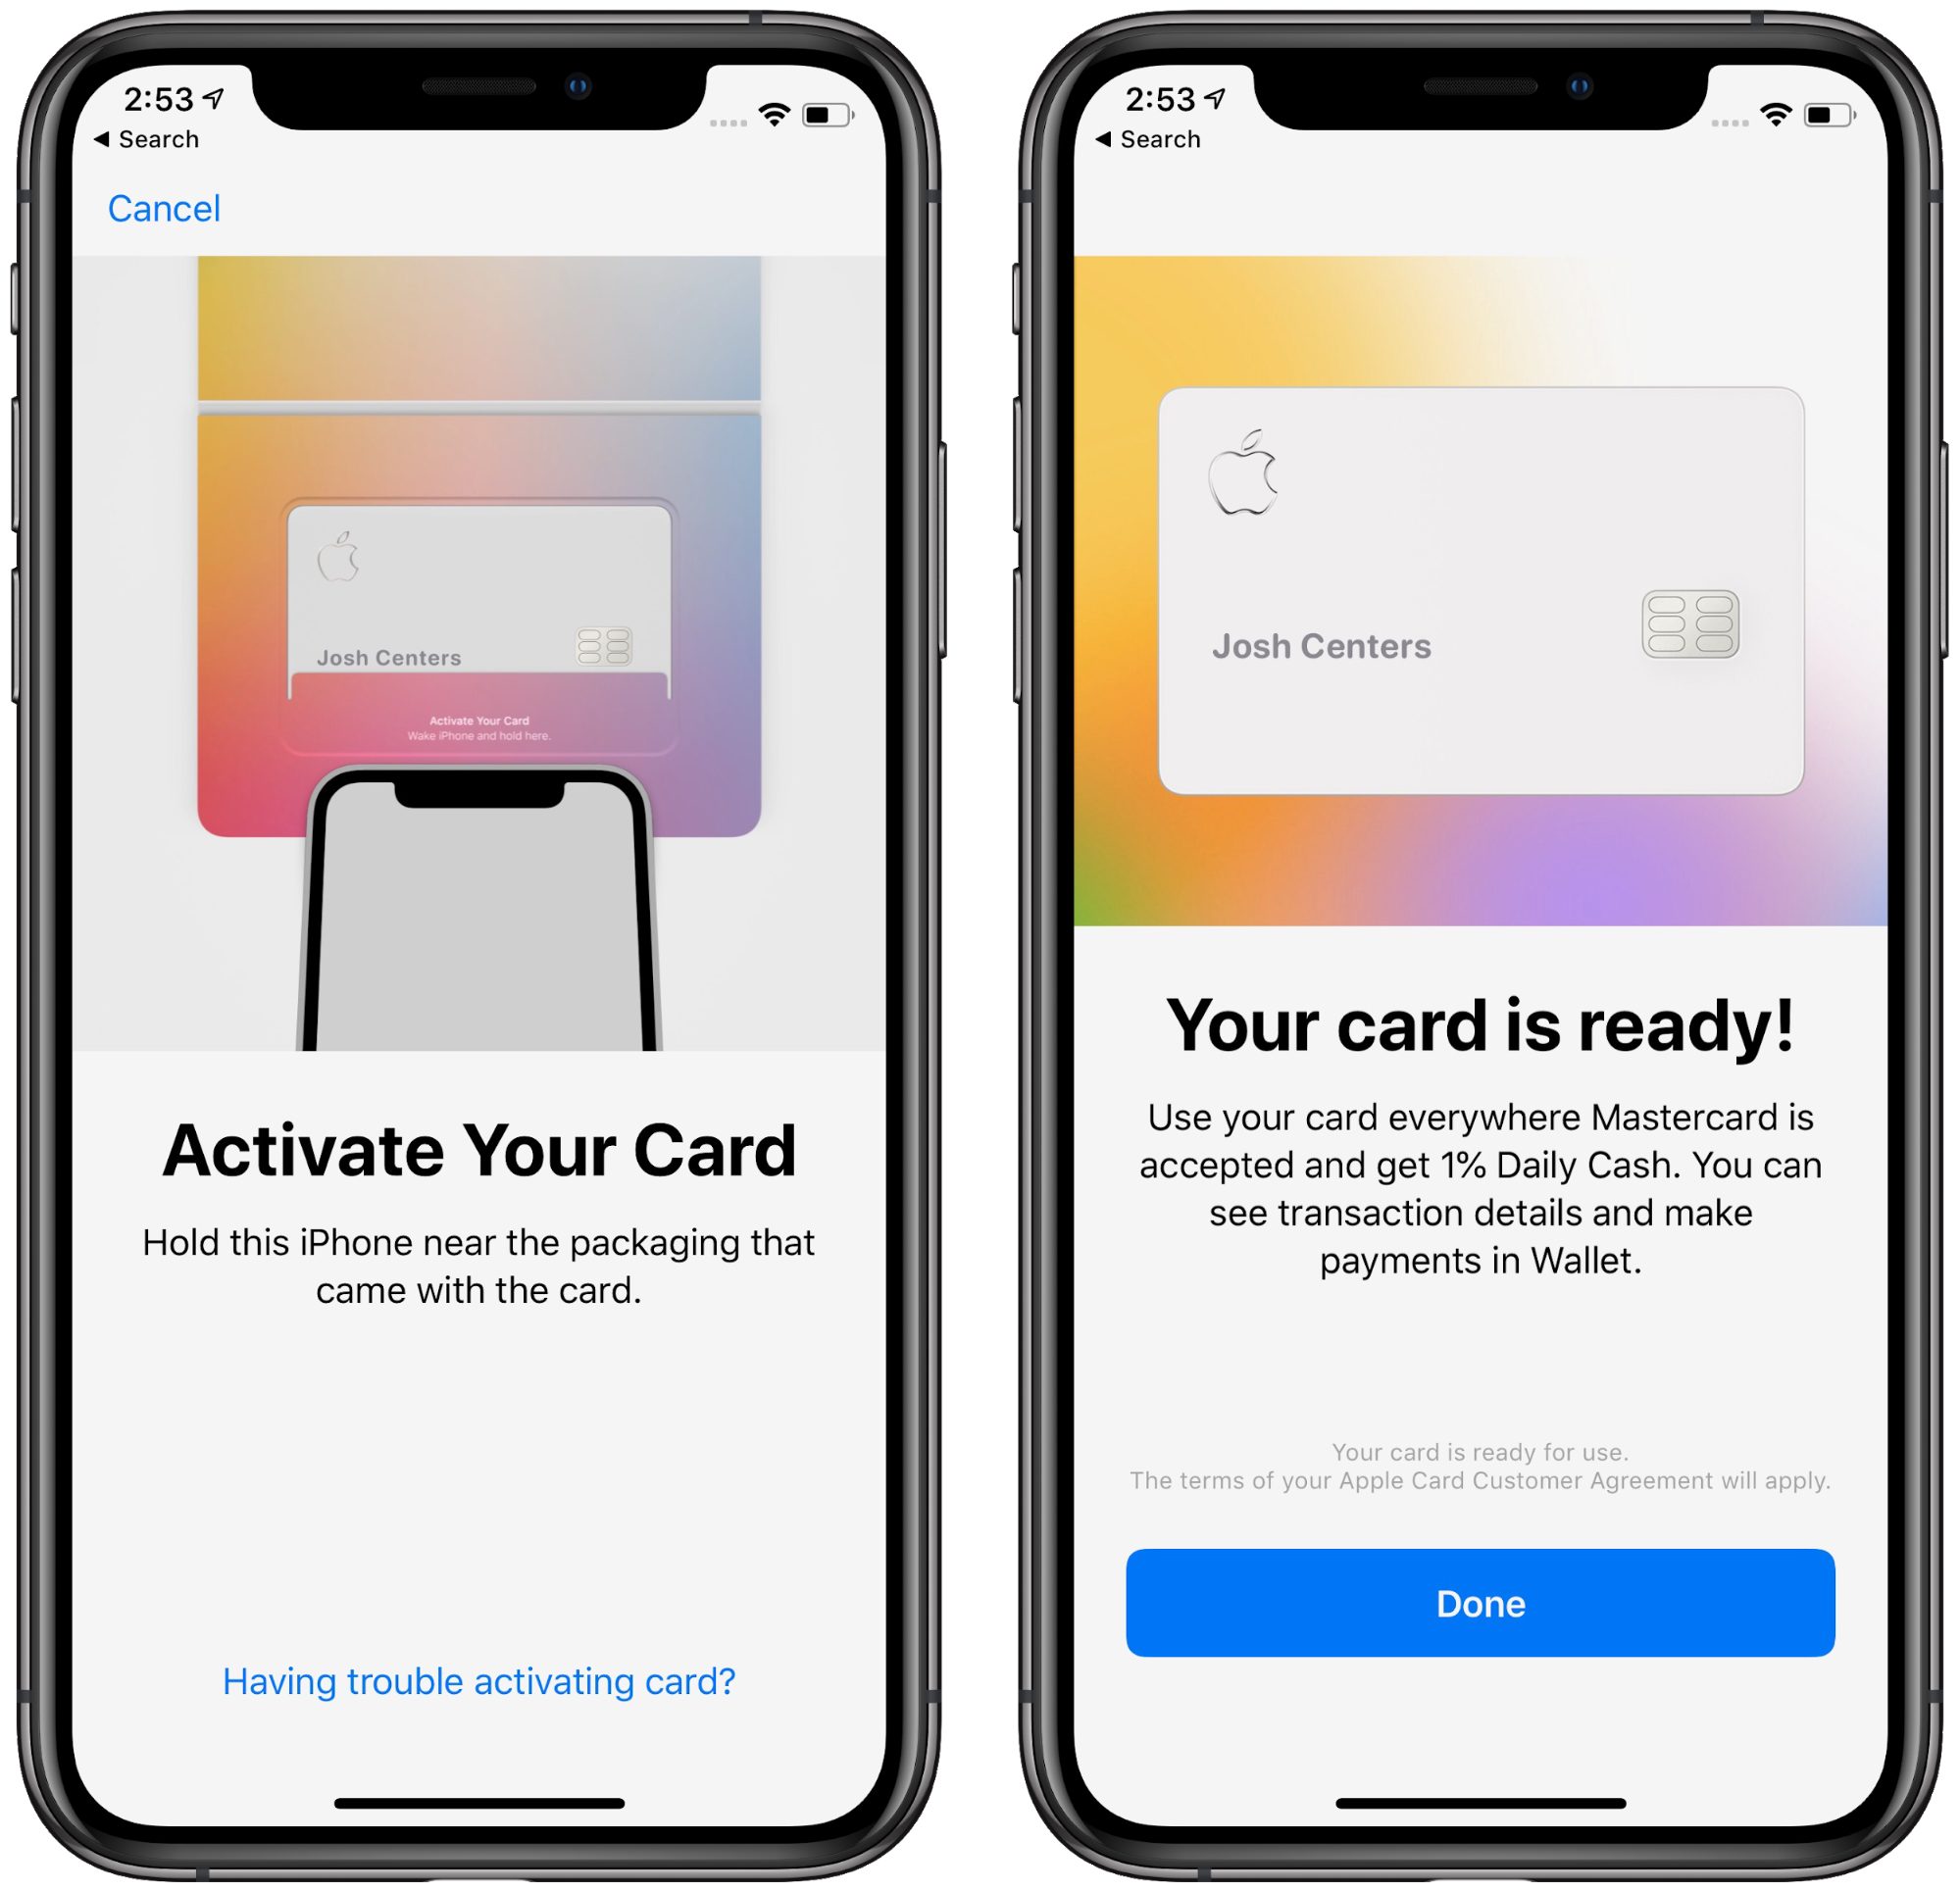
Activation of the physical Apple Card is as easy as tapping a few buttons on your iPhone and placing the iPhone against the packaging, which contains a hidden NFC tag.
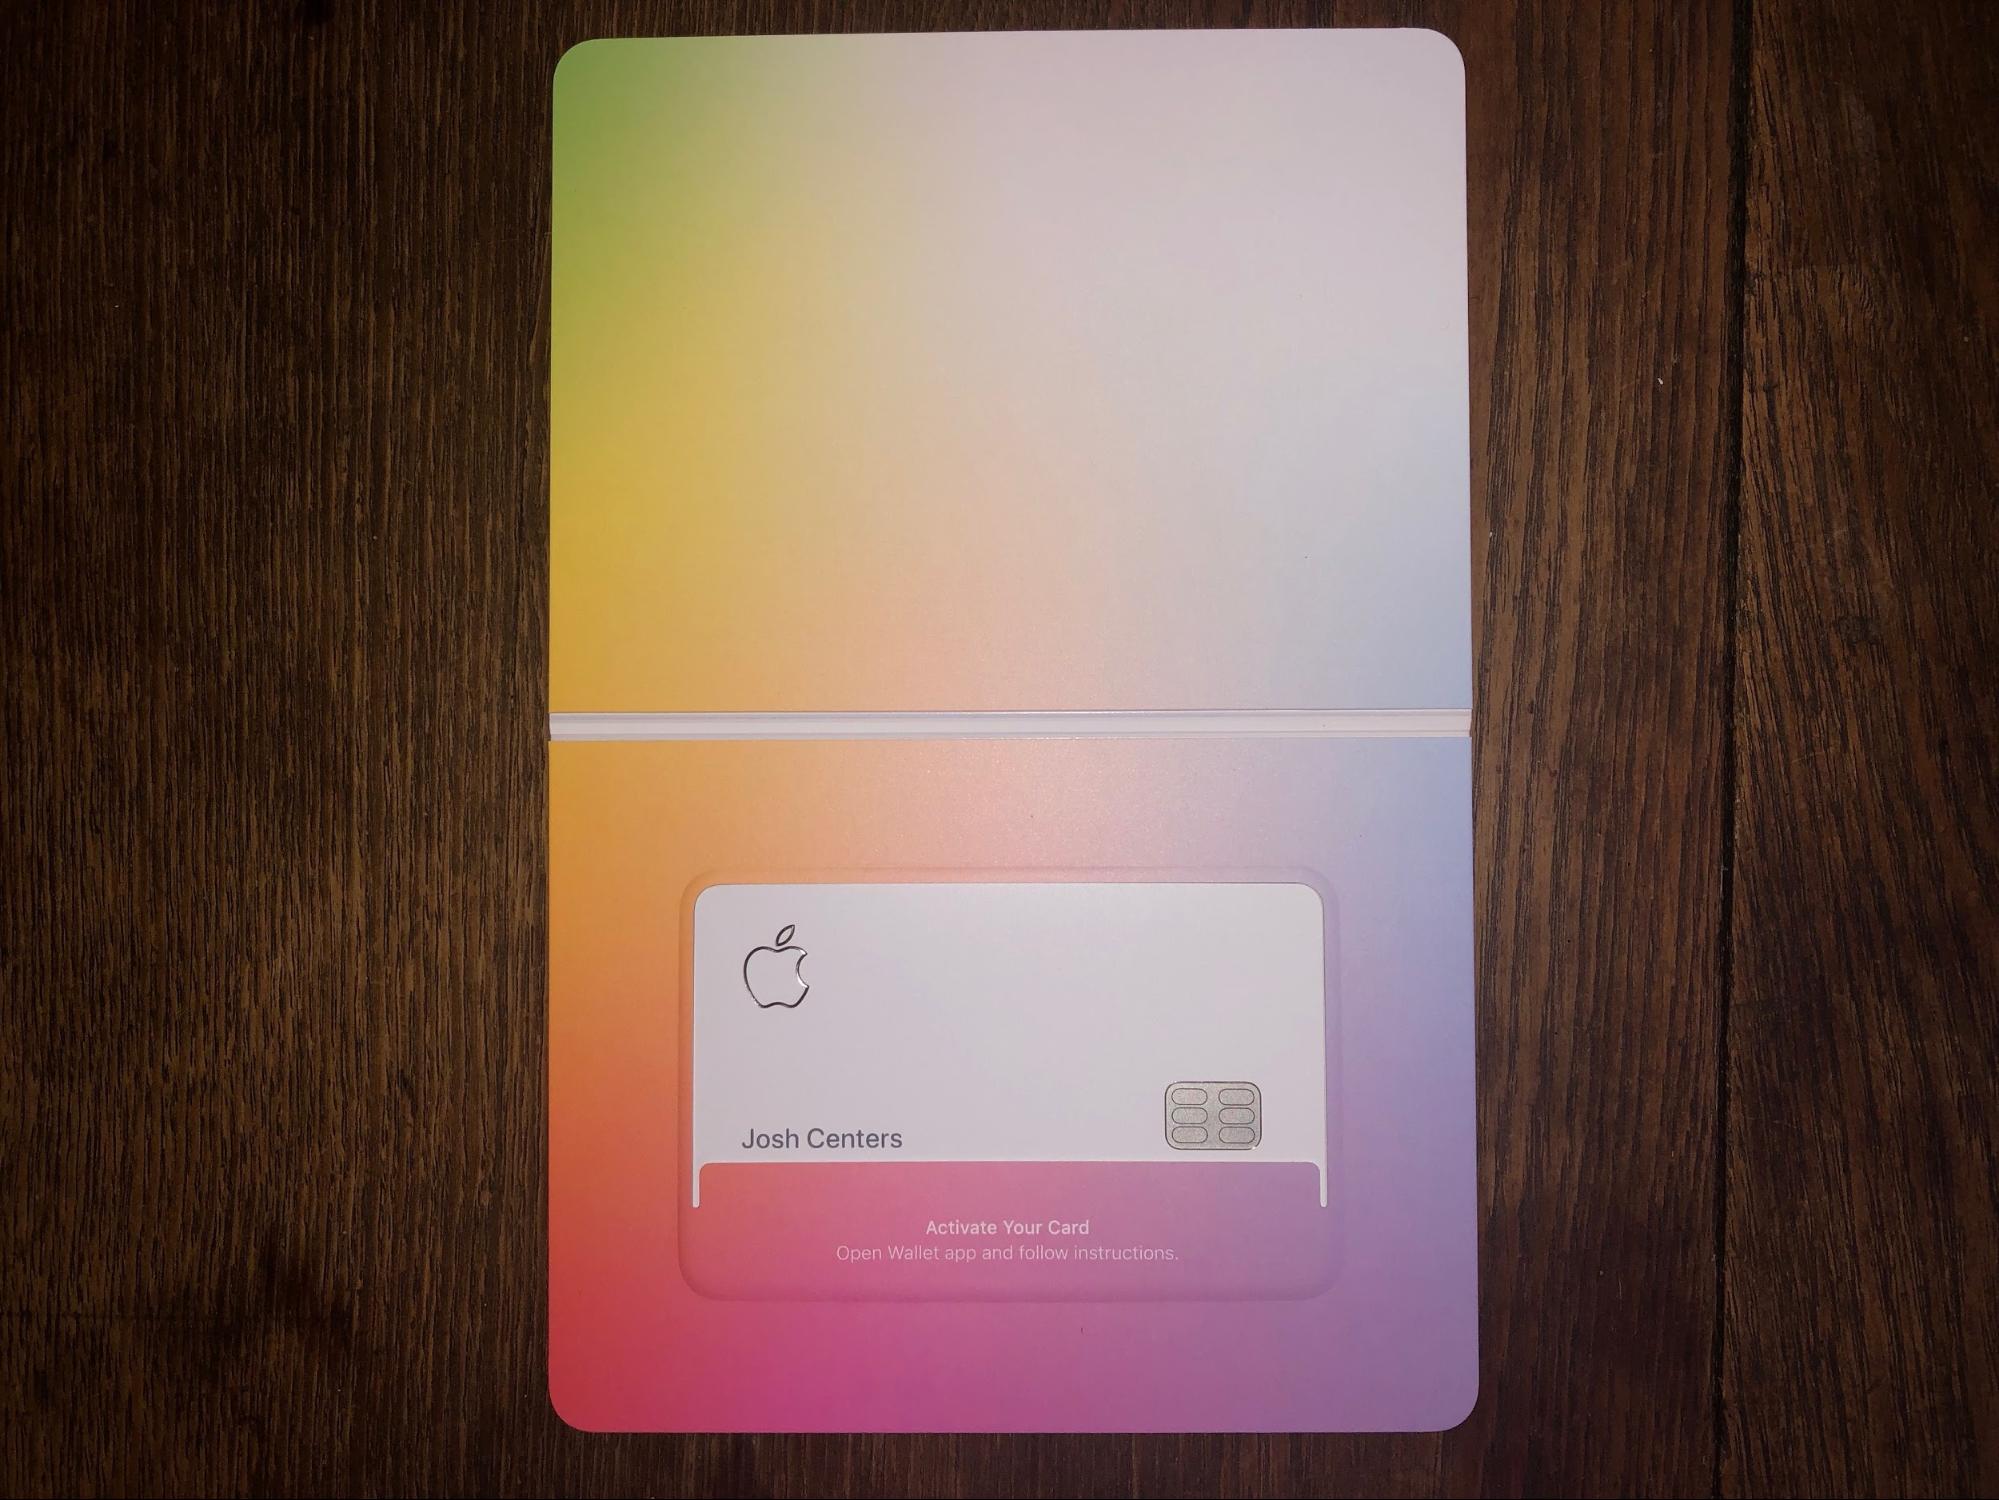
The shiny titanium card is lovely, but Apple advises you to keep it away from other credit cards, leather, and denim. Perhaps your best option for storing the physical Apple Card is to put it in a nice frame on the wall and stick with Apple Pay. Or maybe Apple will introduce a $30 Apple Card case.
Apple Card’s main draw is its daily cash-back rewards, which are as follows:
- 3% back on purchases made directly from Apple, including the Apple Store, the App Store, iCloud storage, and iTunes
- 2% back on Apple Pay purchases made from non-Apple retailers
- 1% back on all other purchases, including those made with the physical Apple Card
Additionally, Apple has announced that all Uber services, including Uber ride-sharing and Uber Eats, qualify for the 3% reward. Apple said it “will continue to add more popular merchants and apps in the coming months.”
To further maximize the benefits of your new Apple Card, check out “How to Get the Most from Your Apple Card Benefits” (14 August 2019).
Opt-Out of Arbitration
One last tip: You have 90 days from the time you open your Apple Card account to opt out of Goldman Sachs’s arbitration clause, which prevents you from participating in a class-action lawsuit against Apple and Goldman Sachs regarding the Apple Card. It says:
Credit is being extended to you and you are being provided access to and use of your Account on the basis of the inclusion of the following arbitration provision. By accepting this Agreement or using your Account, unless you reject arbitration as provided below, you acknowledge that YOU ARE GIVING UP THE RIGHT TO LITIGATE CLAIMS (AS DEFINED BELOW) AND THE RIGHT TO INITIATE OR PARTICIPATE IN A CLASS ACTION. You hereby knowingly and voluntarily WAIVE THE RIGHT TO BE HEARD IN COURT OR HAVE A JURY TRIAL on all Claims subject to this Agreement. You further acknowledge that you have read this arbitration provision carefully, agree to its terms, and are entering into this Agreement voluntarily and not in reliance on any promises or representations whatsoever except those contained in this Agreement.
Thankfully, it’s super easy to opt out:
- Open the Wallet app.
- Tap your Apple Card.
- Tap the ••• button in the upper-right corner.
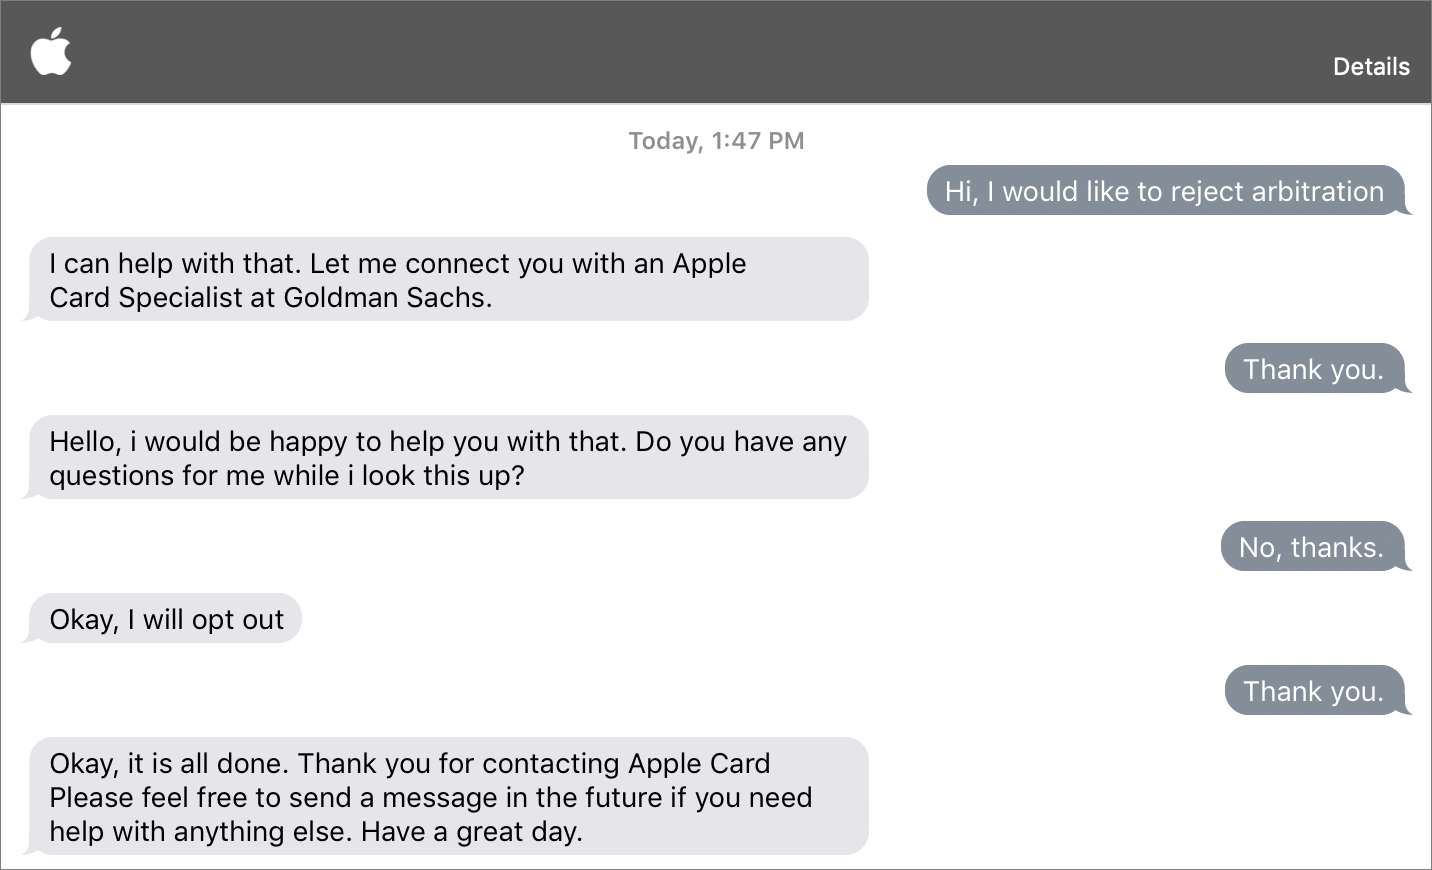
- Tap Message.
- Send a message like “Hi, I would like to reject arbitration.”
The Apple representative will put you in touch with someone from Goldman Sachs in the same message thread. It’s a painless process that takes only a few minutes and lets you retain your legal rights.
Survey Results
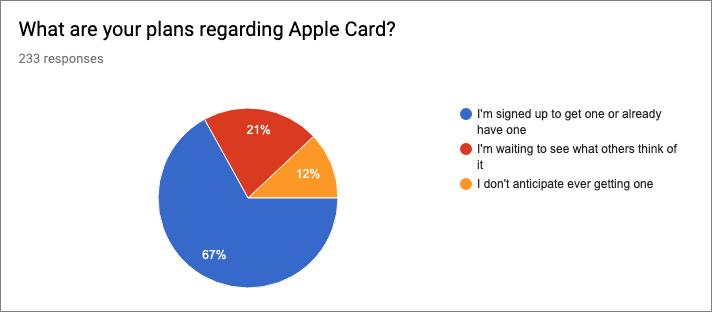
It looks as though TidBITS readers are generally bullish about the Apple Card. In our recent survey (see “How to Get the Most from Your Apple Card Benefits,” 14 August 2019), 67% of respondents said they already had it from the early access program or were signed up to get, and another 21% were waiting to see what others thought. Only 12% of respondents said they had no plans to sign up for the Apple Card.
Thoughts on Sharing Vacation Photos
Along with navigation (see “Real-World Observations about Mapping Apps,” 19 August 2019), one of the top vacation uses of an iPhone is for taking photos—as the saying goes, the best camera is the one in your pocket. In a typical week, I might take a couple of photos, but over the two weeks while Tonya and I were traveling in Switzerland, I snapped over 1000. Switzerland is unreasonably scenic, so it was nearly impossible to resist yet another postcard-perfect shot of a gorgeous Alpine valley. Despite that compulsion, now and then I’d try to take a step back and think about why I was taking a photo. They fall into a few categories, and tied up in each is how I might share any given photo:
- “Remember when…”: Some photos are meant to be documentation that could serve to jog our memories in the distant future—“Oh, that’s right, that was the day I did the via ferrata in Mürren and met Ruth from Scotland and Andreas from the Netherlands.” These don’t need much sharing.

- “Thinking of you”: Other shots are meant for sharing instantly. My uncle is a gourmet cook with a lot of Le Creuset cookware, so when we stumbled on a colorful window display in a Le Creuset outlet in Lucerne, we had to take a picture to send to him.

- “Aren’t we cute?”: Selfies are awkward for us to take. Our problem is both generational and cultural, but we seldom think of taking them, and when we do, we have trouble arranging our faces into that perfect “Look how much fun we’re having!” expression. But the benefit, as I’m slowly learning, is that the photos are much more interesting to friends and relatives if you’re in them. Although we didn’t take that many, we shared all the selfies that came out well.

Not actually a selfie, since I wasn’t using a super-long selfie stick. Ruth from Glasgow took this one of me while we were climbing. - “That’s a great shot”: There’s something deep inside me that wants to record—to own in some fundamental way—what I’m seeing by taking a photo. The more beautiful the scenery, the more I want that picture for posterity. The bulk of my photos fall into this category, but the mere number of them detracts from their impact, particularly when sharing them. It’s not that once you’ve seen one stunning Alpine lake, you’ve seen them all, but it’s easier to appreciate each shot in isolation.


Immediate Sharing with Family
We have a private Slack group for our immediate family members, and one of the best uses of it has been for sharing vacation photos during a trip. Every day, when we were done hiking or exploring, we’d post a couple of photos—generally scenery and selfies—to the #general channel that everyone in the family can see. If we had taken photos specifically for our son Tristan, such as of the architecture at the Ecole Polytechnique Fédérale de Lausanne, we’d post those separately in the private channel we share with him.

This approach worked tremendously well, since it didn’t require us to spend much time fussing with photos during the trip, and we could give a sentence or two of travelogue to explain each one. Since it was just family, we didn’t have to think about how the photos might be received by the public, which made things easier. Even selecting the photos for this article was a bit stressful, since I wanted them to be as nice as possible while simultaneously illustrating the point I was trying to make.
That’s relevant because sharing to Facebook (or its wholly owned subsidiary Instagram) or Twitter is a completely different act. I’ve never been comfortable with large-scale sharing via social media, and I have an ever-deepening revulsion for these companies and their services based on how they manipulate their users for profit and are abused by state actors to influence society at large (see “Fed Up with Facebook? Move Your Family to Slack,” 12 February 2019).
Your opinions may vary, and while Slack may not be the ideal solution for your family, I’d still encourage you to figure out a way to share vacation photos easily with the people with whom you’re most close. A Messages conversation or even plain old email would work, although we’ve found on past trips that email takes more effort to compose and can result in long conversations you don’t want to have while on vacation.
Full-Scale Sharing with Your Traveling Companions
If you’re with your spouse, family members, or friends on your trip, you’ll probably want to share photos with them as well. Tonya tended not to take a photo if I was already doing so, but she did capture some nice ones of me that I wanted, and she also wanted to be able to see my photos on her devices. Alas, despite Apple’s purported support for families, the company has never acknowledged that many families want to share a single photo collection. (Yes, there’s the automatically created shared Family album if you use Family Sharing, but it’s just a shared album and doesn’t meet the desire of wanting to share all photos.)
Despite that ongoing limitation in Apple’s photo solutions, the Sharing Suggestions in Photos in iOS 12 are pretty neat. If you’ve identified the people in your photos using the People feature, Photos automatically suggests that you share photos from the event with those people (see “Inside iOS 12: Photos Encourages More Engagement,” 25 September 2018). In our case, it suggested that I share my photos with Tonya every day, and that she share hers with me. Because we often had only slow hotel Wi-Fi, it was more of a batch process, where the photos didn’t show up right away but would be there at a later date. (The Sharing Suggestions disappear after some time, so I can’t show a screenshot of us starting the process.)

My understanding is that Google Photos allows you to share all your photos with a partner, which is arguably a better system. We’re sufficiently invested in Apple’s ecosystem that we’ve never seriously investigated using Google Photos, but if you’re looking for complete library sharing with your spouse or partner, it’s worth a look. As with YouTube or any other Google service, make sure you’re comfortable with the fact that you’re giving Google a lot more personal data.
Curated Sharing with Friends
Although we also messaged an occasional photo to a particular friend a few times during the trip, we mostly held off on sharing with friends until we got home. Since then, lots of people have asked us about the trip, of course, and we wanted to show them what we’d seen.
But wow, talk about work! About 825 photos survived my initial purges of duplicate or fuzzy photos, and it took me hours to scan through them and select about 100 for sharing. Some of that time was spent doing quick editing—mostly clicking the Auto Enhance button in Photos and deciding if I preferred the new version to the original by pressing the M key while in Edit mode.
No Thanks for the Memories
There is an easier way out: use what Photos creates for you in Memories, which includes an automatically selected collection of photos and an automatically generated video. If you like what Photos has done, you can add the Memory to your favorites so it sticks around; otherwise it will disappear at some point. And you can share both the video and the individual photos in the Memory.
But I found Memories annoyingly inflexible for sharing. If the algorithm failed to pick up a photo you wanted to include, too bad. It may seem like you can delete photos, but doing so deletes them from your library completely, not just from the Memory (in other words, it’s not like an album). The automatic video may not even include all the photos in the Memory, but at least it’s possible to add and remove photos in the Memory from the movie, at least in iOS. (Play the movie, and then tap the screen while it’s playing to reveal and tap Edit.)
You can export and share the movie, and that may be both the easiest option and the one Apple wants you to do. Personally, I prefer still images that I can flip through in many cases, so I wanted to share the photos themselves instead. And then we’re back to not being able to add or delete photos from the Memory.
Choose between Shared Albums and iCloud Photo Links
My solution was to create an album of the photos I wanted to share. (Hint: In the Image menu in the Mac version of Photos is an Add to lastAlbum command with a keyboard shortcut of Command-Control-A. That makes scanning through photos and adding them to an album much easier.) Once I’d had an album, I could turn it into a Memory to get the automatically generated video, and more to the point, I could use that collection as a starting point for sharing.
Photos has two ways of sharing in iOS: shared albums and iCloud Photo Links, but in the Mac version of Photos, you can only create shared albums. In both cases, you can get a Web URL to the entire collection of images and share it with anyone such that they can see the images in a Web browser. So what’s the difference?
As far as I can tell, since Apple doesn’t seem to document iCloud Photo Links in relation to iOS, just in the context of iCloud.com, an iCloud Photo Link results in the photos being shared via iCloud on the Web for 30 days. Anyone with the link can see their thumbnails, switch to showing one image at a time, and scroll through with the arrow keys. There’s an optional thumbnail browser at the bottom of the screen when viewing a single image, but no slideshow mode.

But what sets an iCloud Photo Link collection apart from a shared album is that Download button. Click it and you’re given the option of downloading all the photos, either as files or by importing directly into your iCloud Photos. This is a great option for sending photos to someone who you know uses iCloud Photos and will want the images in their Photos library, and it also works for someone who might want to download the originals but doesn’t use Apple devices. (I used it for sharing photos after the fact with my via ferrata climbing companions.) At least on my Mac, the download comes in as a HEIF image (with a confusing .HEIC filename extension, sigh) along with a QuickTime movie if the image was a Live Photo. I would guess that downloads would be JPEGs on other platforms.
In contrast, when you create a shared album, you have slightly different options. (First, turn them on if necessary in Settings > YourName > iCloud > Photos in iOS and in System Preferences > iCloud > Photos > Options on the Mac.) You can share a shared album explicitly with people who have iCloud accounts, at which point the shared album appears in Photos, or with anyone via a link, if you turn on the Public Website switch for the album.
These are quite different use cases. When you share an album with someone who has an iCloud account, they can not only see the images in Photos itself, they can like or comment on each photo, and if you enable the option, they can also add photos to the album. If they want to retain the photos locally for posterity, they can simply drag them from the shared album to another album.

However, when you select the Public Website option for a shared album, they can view the album’s photos on a Web page in an attractive grid format. Clicking a photo displays it on its own, and it’s also possible to make it full-screen, download the image, or display all the photos as a slideshow. Sadly, it’s not possible for the viewer to like or comment on a photo, although it’s easy to see why Apple limited such behavior to iCloud users given that the URL could get out and be seen by anyone on the Internet. Of course, if that happened, it would be easy to turn off the shared album.

I ended up sharing an iCloud Photo Link with the friend who put us up for a few days at the start of the trip, since she wanted to see all the photos and download some of the scenic ones for her own vacation planning. The other benefit was the 30-day limit for the link, so she didn’t have to think about or remove the shared album from Photos manually.
For the rest of our friends, I created a shared album and shared it with Tonya in case she wanted to add any photos, but sent everyone else the link to the public Web page.
Which of these sharing methods will work best for your situation depends on what capabilities you want to provide to those viewing the shared photos. And, of course, there are other alternatives if you want to step further outside Apple’s Photos ecosystem. If you’ve found a particularly good solution for some form of photo-sharing that Photos doesn’t support, share your experiences in the comments.


