#1501: How to deal with low cloud storage space, StopTheMadness fixes unfriendly Web sites, clean tech and more from CES 2020
What would you do if you were to run out of space on iCloud, at Google, or in Dropbox? Adam Engst provides a detailed guide on how to deal with such a situation before you lose email and files stop syncing, without paying for more storage. Have you been frustrated by Web sites that block standard Mac keyboard shortcuts, hijack scroll behavior and contextual menus, and prevent copy and paste? Josh Centers reviews the StopTheMadness app, which can restore all of those features and more in all your favorite browsers. Jeff Porten continues his coverage of CES 2020 with a look at some of the more ambitious technologies demoed at the show. Notable Mac app releases this week include Pixelmator Pro 1.5.5, Bookends, Fantastical 3.0.4, OmniFocus 3.5, and Merlin Project 6.1.
Tired of Web Sites Blocking Standard Browser Controls? StopTheMadness!
Have you been frustrated by Web sites that prevent you from copying text and images, add advertisements to copied text, add tracking junk to URLs, keep you from pasting in passwords, and block the Control-click contextual menu? Developer Jeff Johnson has created a browser extension called StopTheMadness that puts an end to these and other annoying practices.
StopTheMadness is available for an $8.99 purchase in the Mac App Store, and it supports the latest versions of most popular browsers: Safari, Chrome, Firefox, Brave, and Microsoft Edge. The price tag might seem steep, but if you’re being bothered by the behaviors that StopTheMadness prevents, it’s a small price to pay to restore your control.
The Increasingly Annoying Web
Need an example of the behaviors that I’m talking about? Johnson has a test page that invites you to select text, Command-click a link, paste into a text field, drag an image off the page, and try to open a contextual menu anywhere. None of these actions work unless you have StopTheMadness enabled.
For a minor real-world example that we’ve mentioned in the past, try accessing Safari’s Picture in Picture feature on YouTube. As you might recall from “TipBITS: Watch YouTube Videos in Picture in Picture” (19 July 2019), you normally have to Control-click a video twice in Safari to see the contextual menu option to enter Picture in Picture. With StopTheMadness enabled, a single click brings up the macOS contextual menu, as you’d expect.
Other sites are more obnoxious yet. Udemy, which sells online video courses, prevents users from right-clicking on its videos entirely. Since you’re typically paying for those videos, losing access to browser-level video controls that might improve the viewing experience is especially annoying.

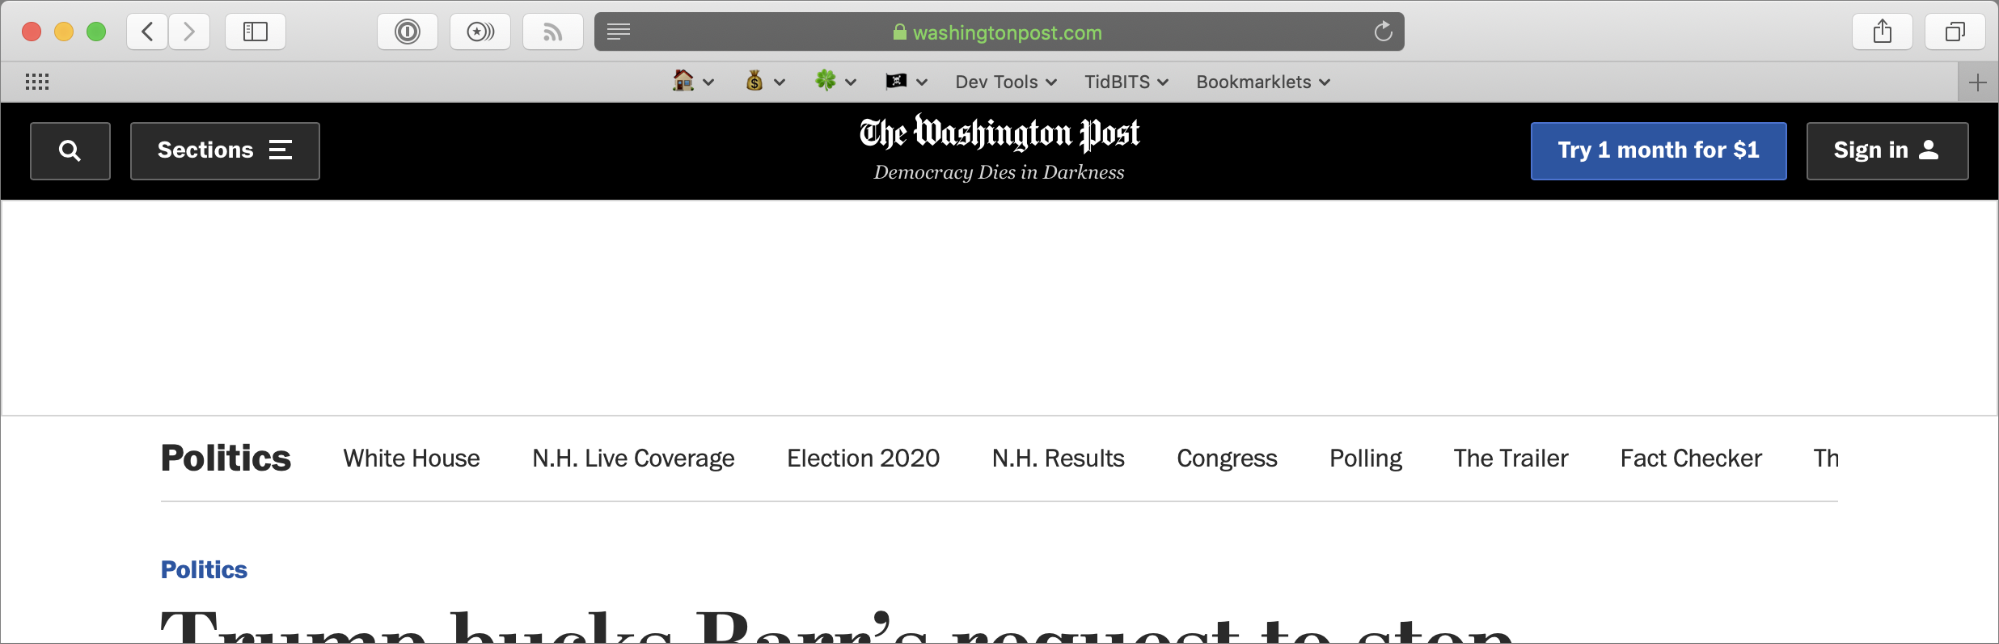
Another recent annoying trend is newspaper Web sites preventing you from reading them in private mode. Presumably, this is to keep people from working around the free article limits, but it’s an overreach. Here’s the same Washington Post article without and with StopTheMadness.

Neither my bank nor my utility companies hate me enough to prevent pasting passwords or auto-filling them with 1Password, but it’s a common complaint I saw in my research.
Sites restrict these browser-level controls through JavaScript, so you could disable JavaScript entirely or just for a single page. However, that’s becoming increasingly untenable as the Web becomes ever more reliant on JavaScript. StopTheMadness curtails these obnoxious restrictions without breaking other functionality.
StopTheMadness also improves your browsing privacy by blocking many common tracking schemes. Unfortunately, it can’t do anything to fix the Yale School of Art Web site (which is so inexplicably horrific that it must be intentional), nor does it block ads.
Set Up StopTheMadness
The StopTheMadness app doesn’t require much configuration. Open the app and choose Install to see options for installing the extension in various browsers. StopTheMadness guides you through each installation. Although It installs its extension for Safari automatically, you’ll have to open Safari’s preferences to enable it.
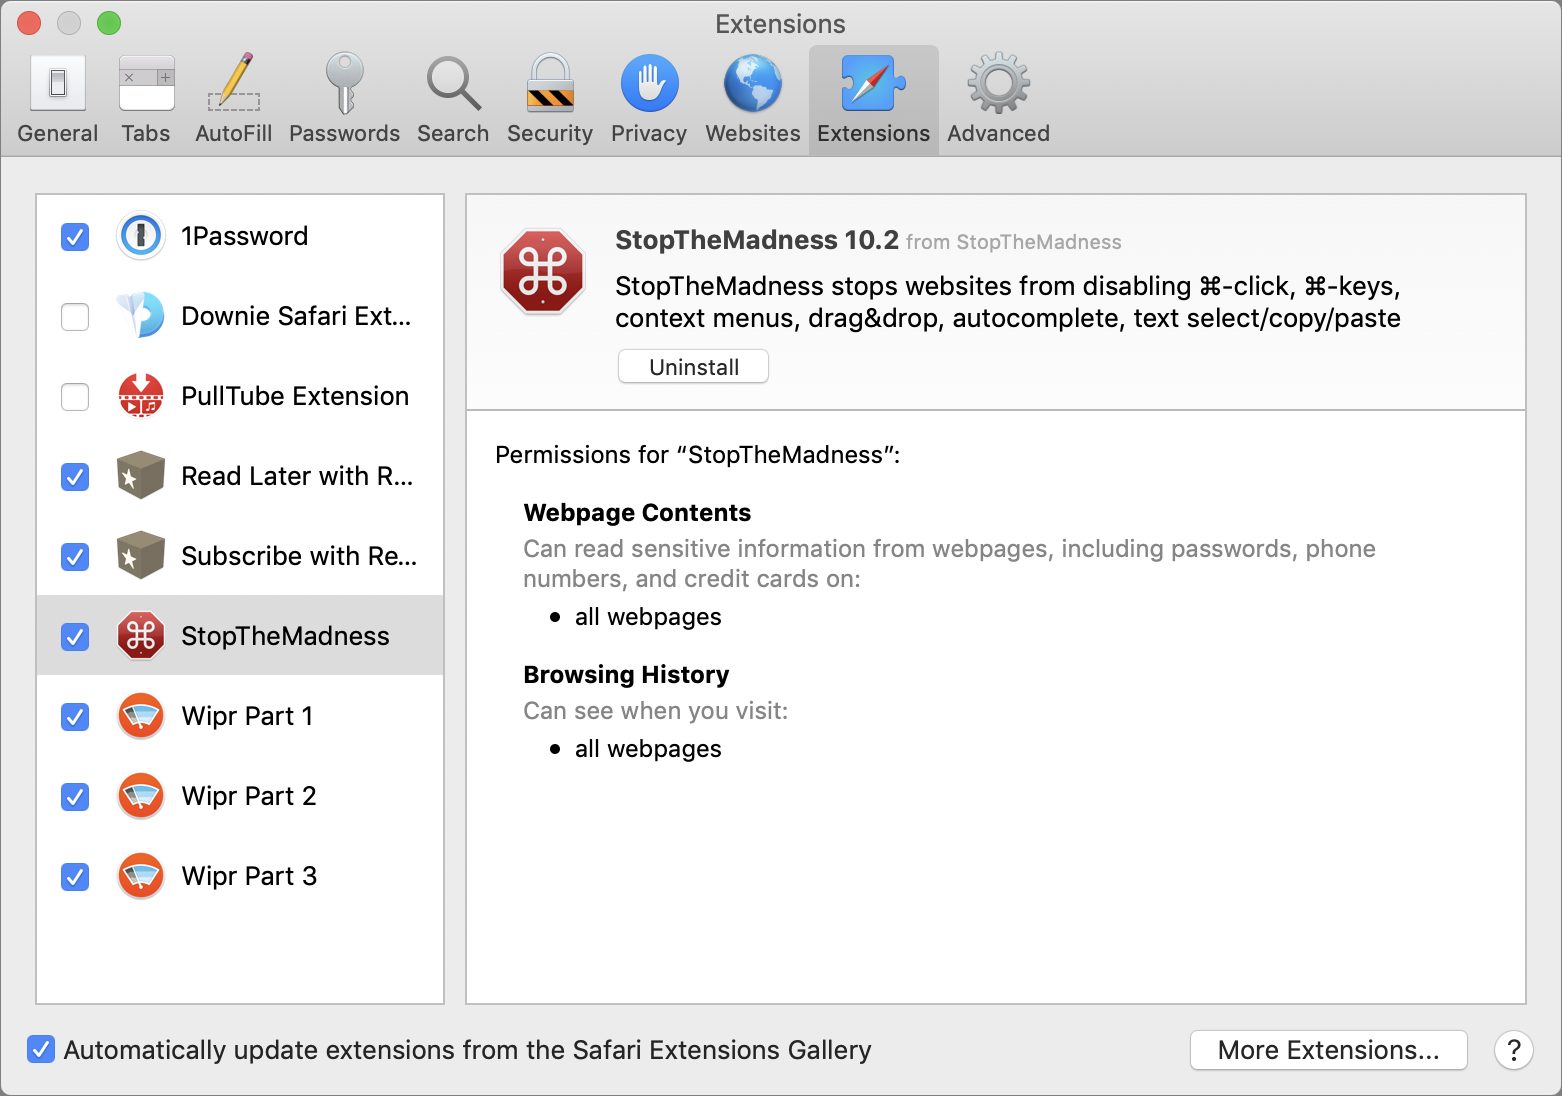
StopTheMadness enables a standard set of Recommended Protections by default. It also provides a Use With Caution set that it doesn’t enable by default because they can cause problems.
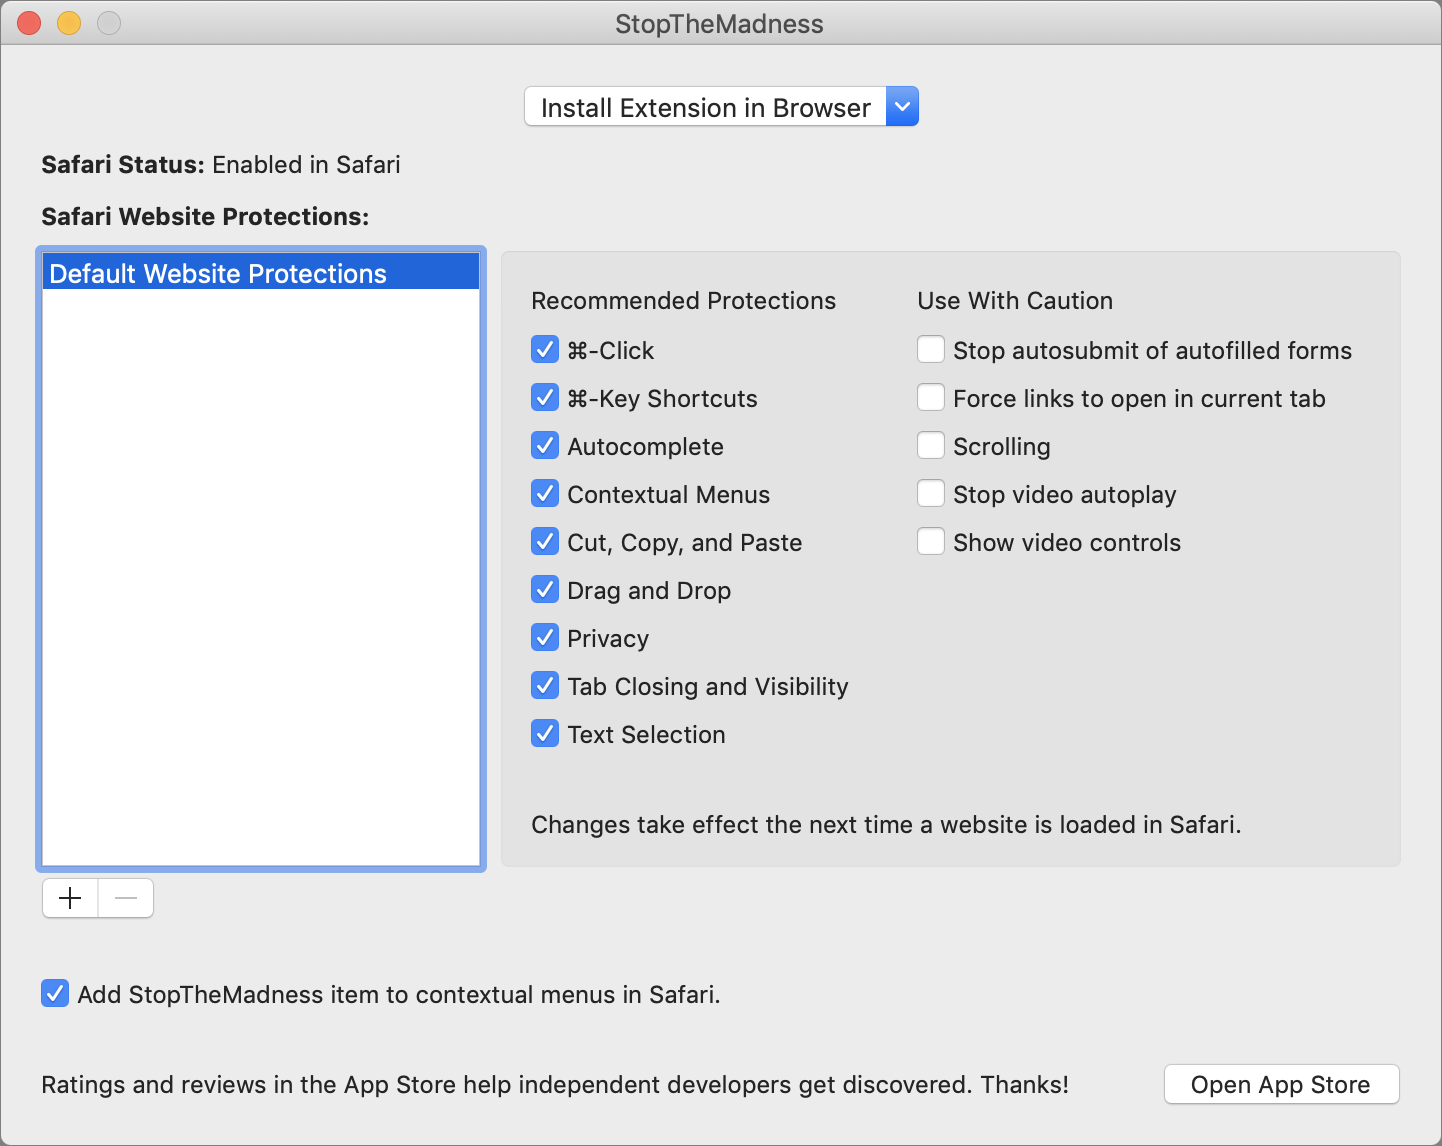
You can customize StopTheMadness for individual Web sites, and there are a few for which you’ll probably want to do that.
Stop the StopTheMadness Madness
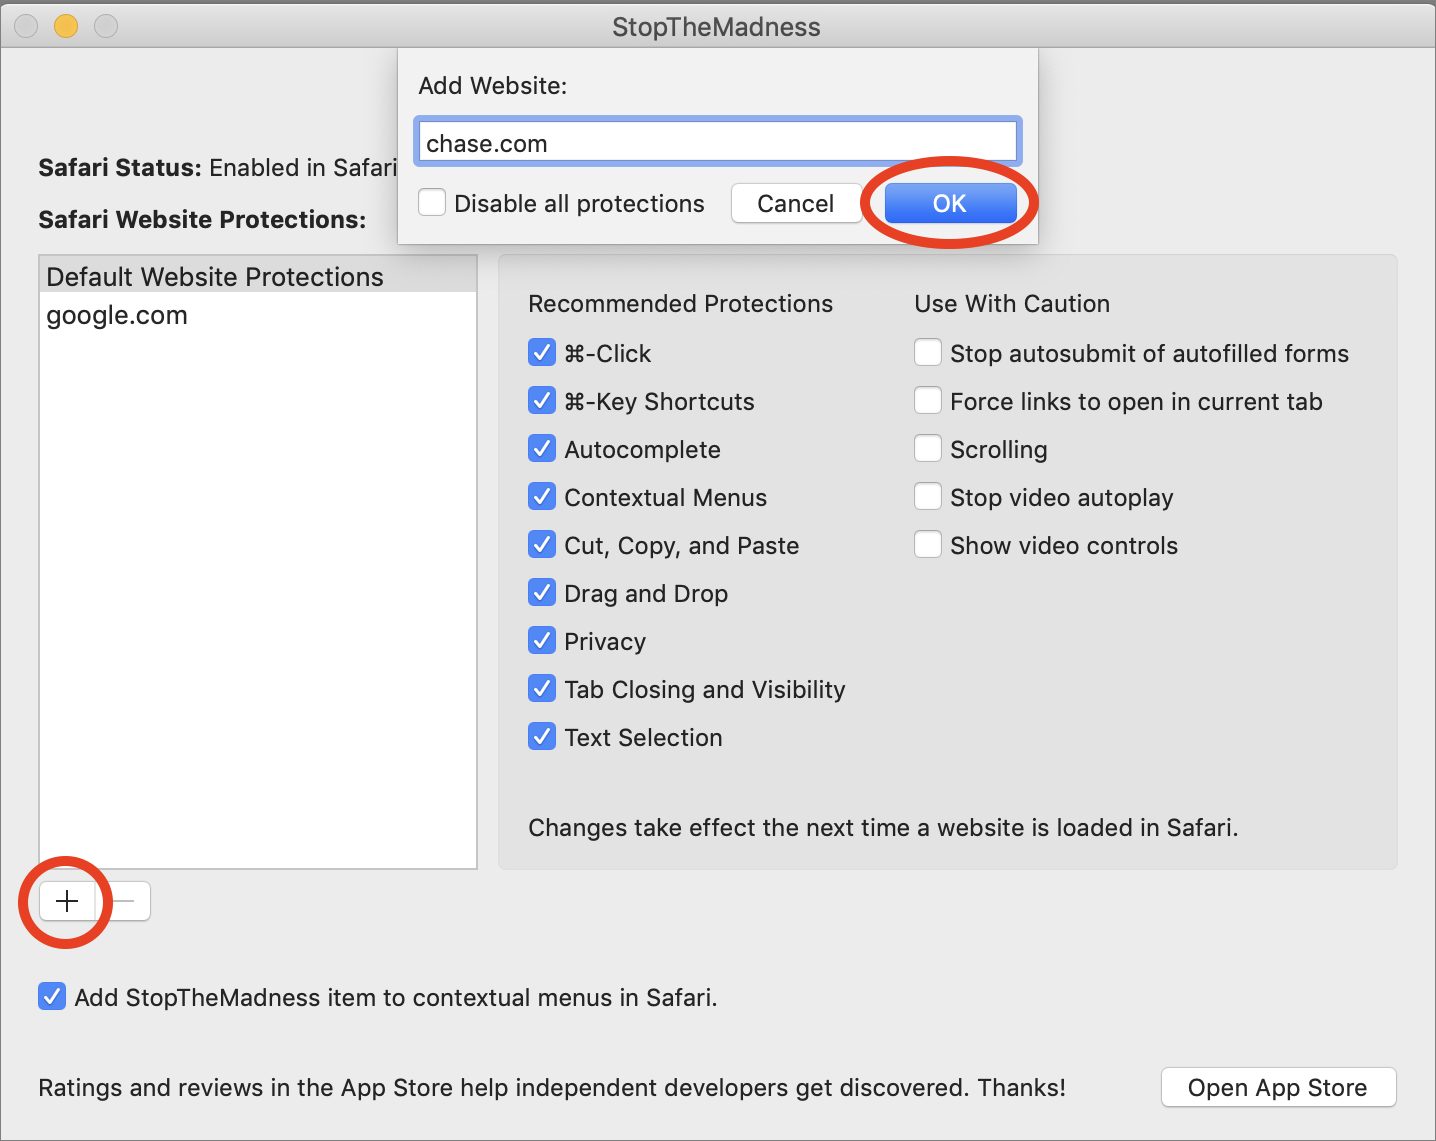
When I first tried StopTheMadness, it caused some, er, madness, because it disabled the custom contextual menu in Google Docs, which is crucial for identifying autocorrect warnings. Thankfully, it’s easy to carve out exceptions for individual Web sites.
In StopTheMadness settings, click the + to add a Web site. Enter the domain like google.com. The Mac app shows a checkbox that lets you automatically disable all protections, but I prefer to uncheck just the protections that are causing trouble. Click OK to add the exception. Then you can select the settings you want for that particular site.
Note that the StopTheMadness app only works for configuring the Safari extension. That’s necessary because Safari no longer relies on its own extensions, but instead on macOS’s app extensions, which requires an accompanying app.
For other browsers, configuration happens in the browser, and while it looks much like the StopTheMadness app, the interface varies a bit based on what the browser can do. Here’s how to configure StopTheMadness in Firefox:
- Choose Firefox > Preferences.
- Click Extensions & Themes in the lower-left corner.
- Click StopThe Madness in the extension list.
- Click Preferences.

In Brave and Chrome, the interface is similar, but you get to it in a slightly different way:
- Choose Window > Extensions.
- Click Details under StopTheMadness.
- Click Extension Options.
And in Microsoft Edge, there’s yet another path to StopTheMadness’s options:
- Click the browser (•••) menu in the upper-right corner of the window.
- Under StopTheMadness, click Details.
- Click Extension Options.
Have you run across an annoying Web site that you want me to test with StopTheMadness? Post the link in the comments, along with what the site does wrong, and I’ll check to see if StopTheMadness fixes it.
How to Deal with Running Out of iCloud, Google, and Dropbox Space
We think of “the cloud” as an amorphous space without limits. That may be true in the aggregate, but each of our personal cloud storage accounts has limits, and in comparison to the terabyte-sized drives in our Macs, our cloud accounts are often quite small. Nevertheless, you can usually go for years without bumping into their limits. I certainly did.
But when you do run out of space, it can be a major problem, since files may stop syncing, email could get rejected, and all sorts of other havoc could ensue. I recently hit this problem with iCloud, Dropbox, and Google.

Here’s how to deal with such a situation.
Find Out How Much You’re Using
First off, how much cloud storage space do you have, and how much are you using? These numbers aren’t hard to determine, and here’s where to look.
Apple
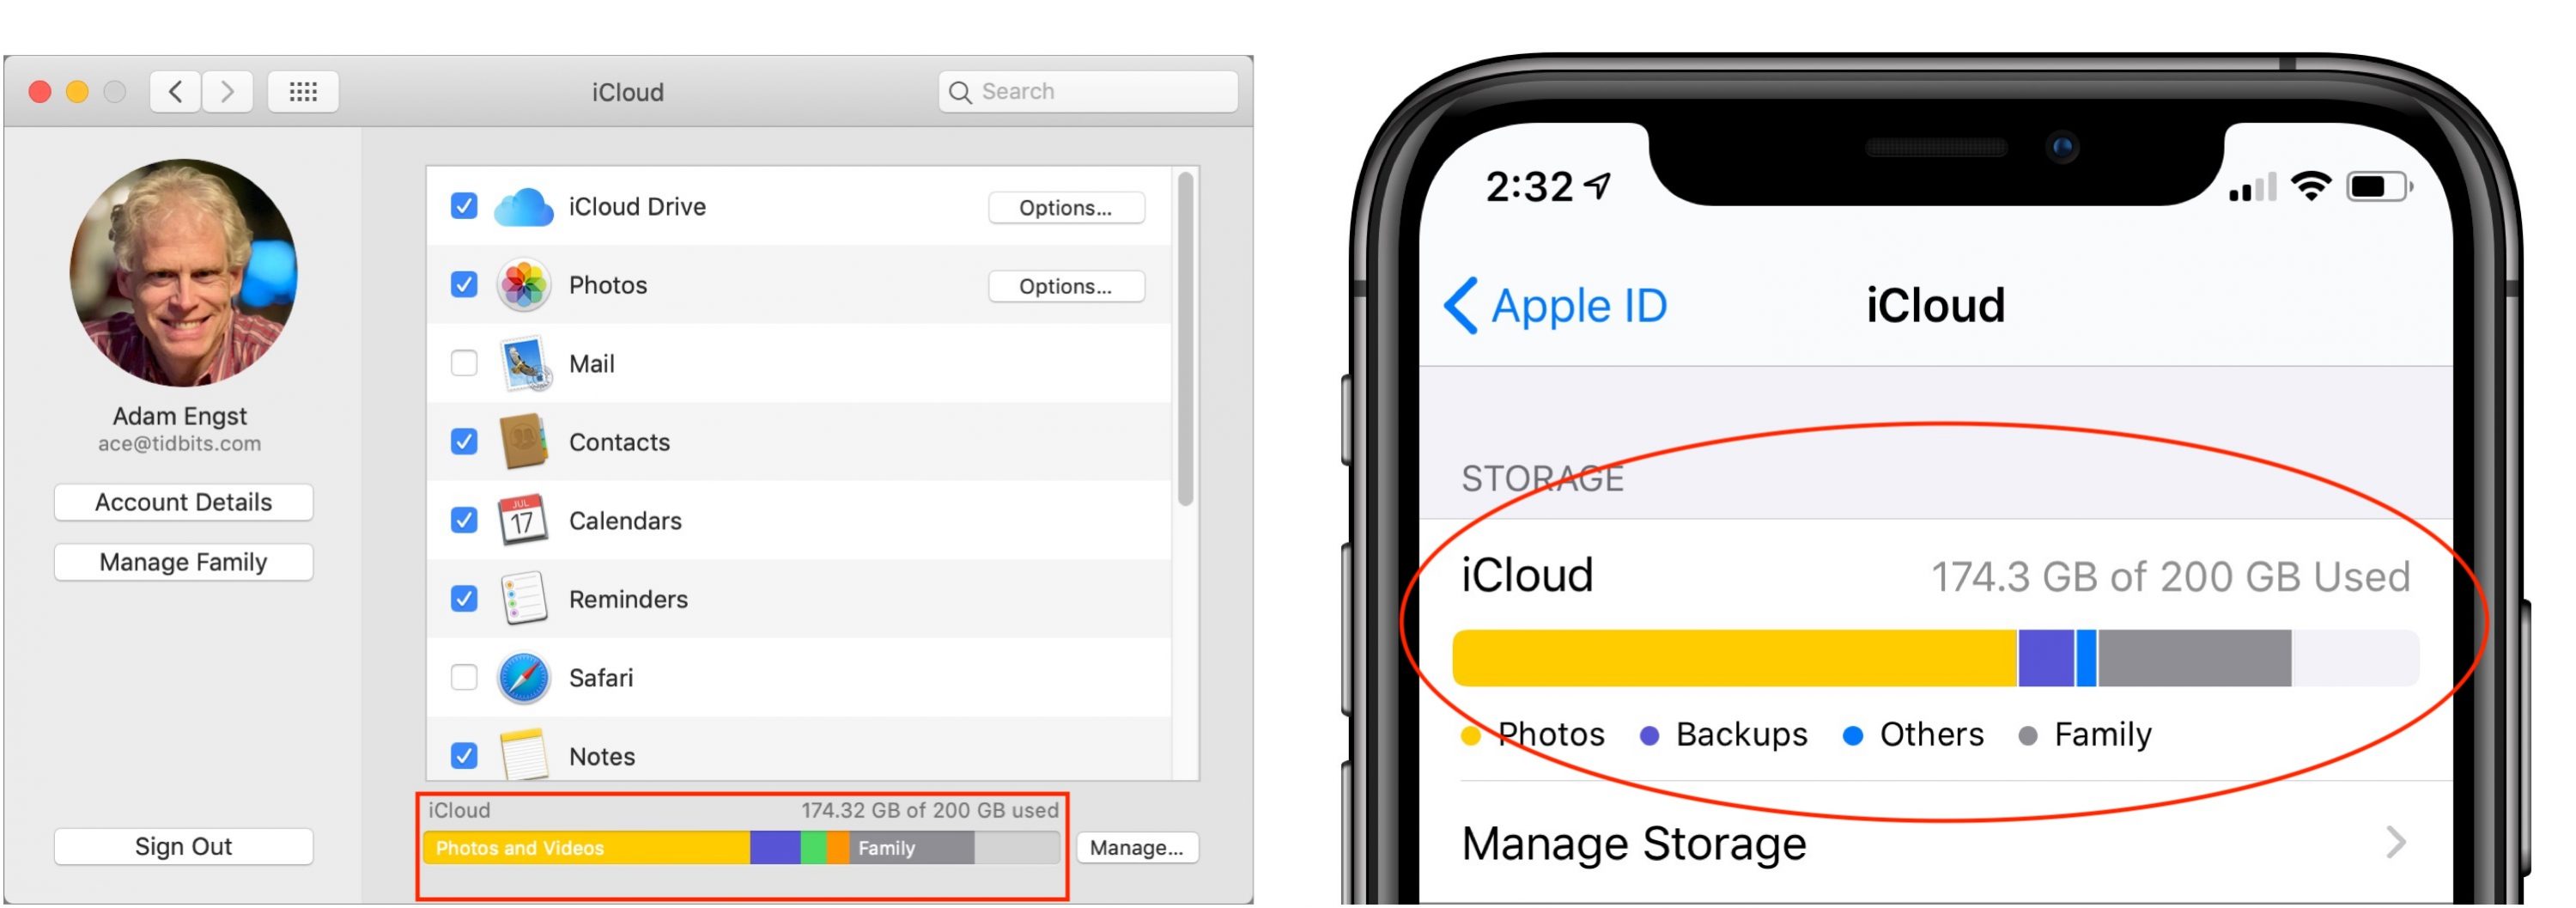
You can determine your iCloud limit and usage on either a Mac or an iOS device. In macOS 10.14 Mojave, look at the graph at the bottom of System Preferences > iCloud. In 10.15 Catalina, the graph is in System Preferences > Apple ID > iCloud. In iOS, you’ll find a similar graph at Settings > Your Name > iCloud.
Dropbox
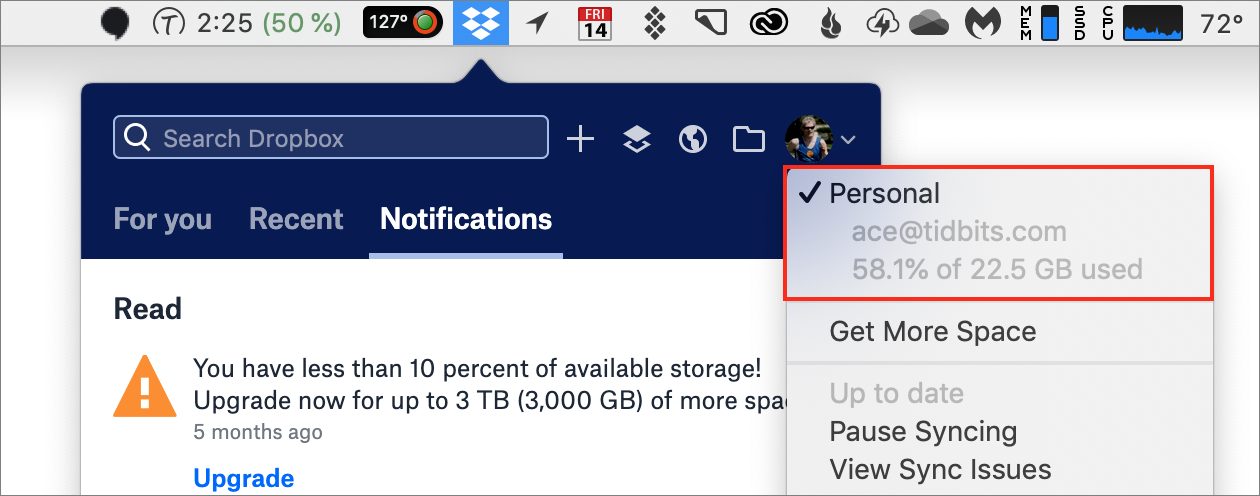
For Dropbox, you could look on the service’s Web site, but it’s easiest to click the Dropbox icon in your menu bar and then click your avatar in the upper-right corner. You can see that I solved my Dropbox problem a few months back.
In Google Drive, look at the bottom of the left-hand sidebar. You can also find that number at the bottom-left corner of the Gmail Web interface. I was at 35.95 GB of 36 GB before I did some cleaning, and I can clear more space quickly if necessary.

Buy More Space
There is an easy solution to running out of space, of course, which is to buy more storage. Apple, Dropbox, and Google all charge $9.99 per month for 2 TB of space. Apple and Google are considerate enough to provide less expensive plans as well. You can buy 50 GB of iCloud storage for $0.99 per month, or 200 GB for $2.99 per month. If you need more space from Google, it will charge you $1.99 per month for 100 GB or $2.99 per month for 200 GB.
Unsurprisingly, given that it doesn’t have other lines of business, Dropbox is the pushiest about encouraging you to upgrade. It provides only 2 GB for free, although many people have more from recommending the service to friends in the past. Apple is the next stingiest, with only 5 GB of free iCloud storage, after which you’ll need to buy more. Google offers 15 GB for free, but that still may not last long, between Gmail, Google Drive, Google Photos, and more.
(I’ve never seriously used Microsoft OneDrive, so I can’t comment on how well it compares to the others functionally. It provides either 5 GB for free for anyone or 1 TB per user for free with an Office 365 subscription. You can expand that in 200 GB chunks for $2 per 200 GB, up to 2 TB total.)
Buying more space is unsatisfying, however, particularly if you’re on the edge of your free allotment and don’t want to deal with another monthly bill. Dropbox is annoying in a slightly different way—you might be offended at having to pay for 2 TB when you’ll never use more than 20 GB.
Happily, if you’re anything like me, there are a number of ways you can reduce the amount of storage that you’re using, and thus either delay or eliminate the need to ante up for more space. They vary a bit by service, so let’s touch on each in turn.
Remove Unnecessary iCloud Device Backups
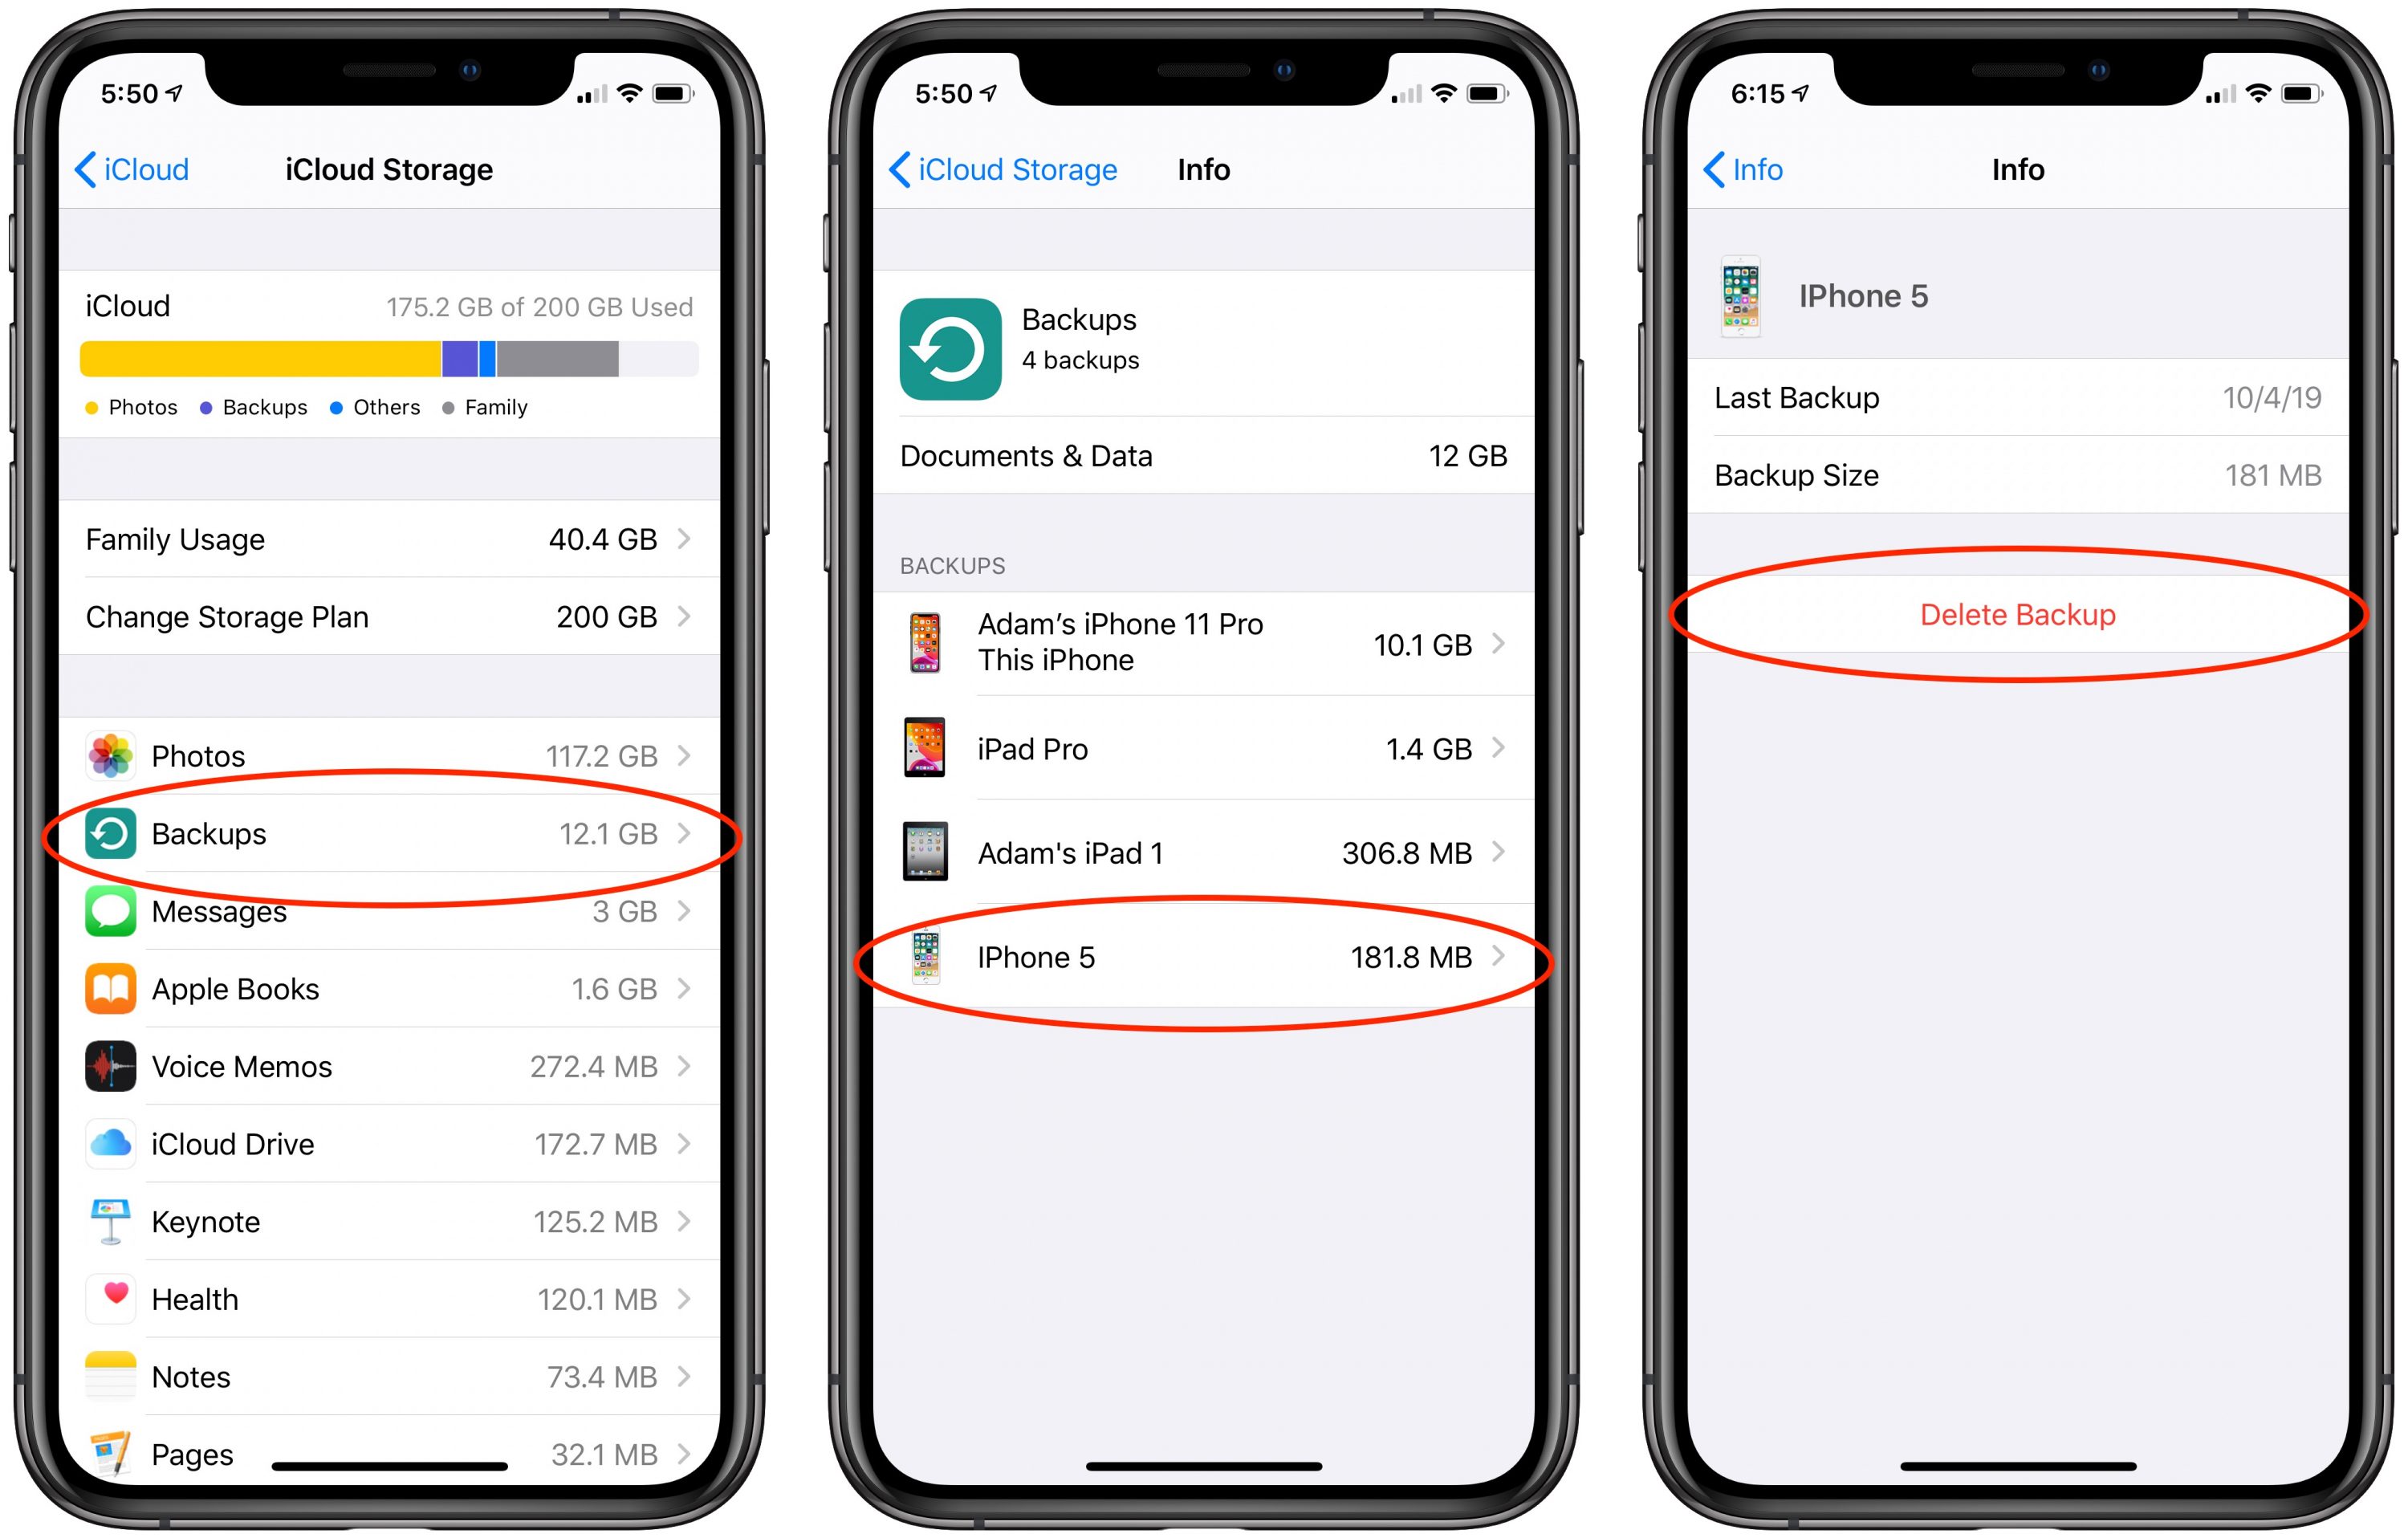
With iCloud, there’s often an easy way you can recover multiple gigabytes of storage quickly. If you back up your iPhone and iPad to iCloud, those backups count against your overall storage space. And count they do—the backup of my iPhone 11 Pro consumes 10.1 GB.
It’s likely, however, that you’re storing backups for older devices unnecessarily. Navigate to Settings > Your Name > iCloud > Manage Storage > Backups to see what you have. When Tonya and I did that, we discovered that we both had backups for our previous iPhones still in iCloud. At over 5 GB each, deleting those (tap one and then tap Delete Backup) cleared a bunch of space quickly.
(The fact that we’re sharing 200 GB for our family account meant both that Tristan and we would all have been impacted if we’d run out of space, and that all of us could help by clearing useless backups.)
Scan for and Clear Out Bloated iOS Apps
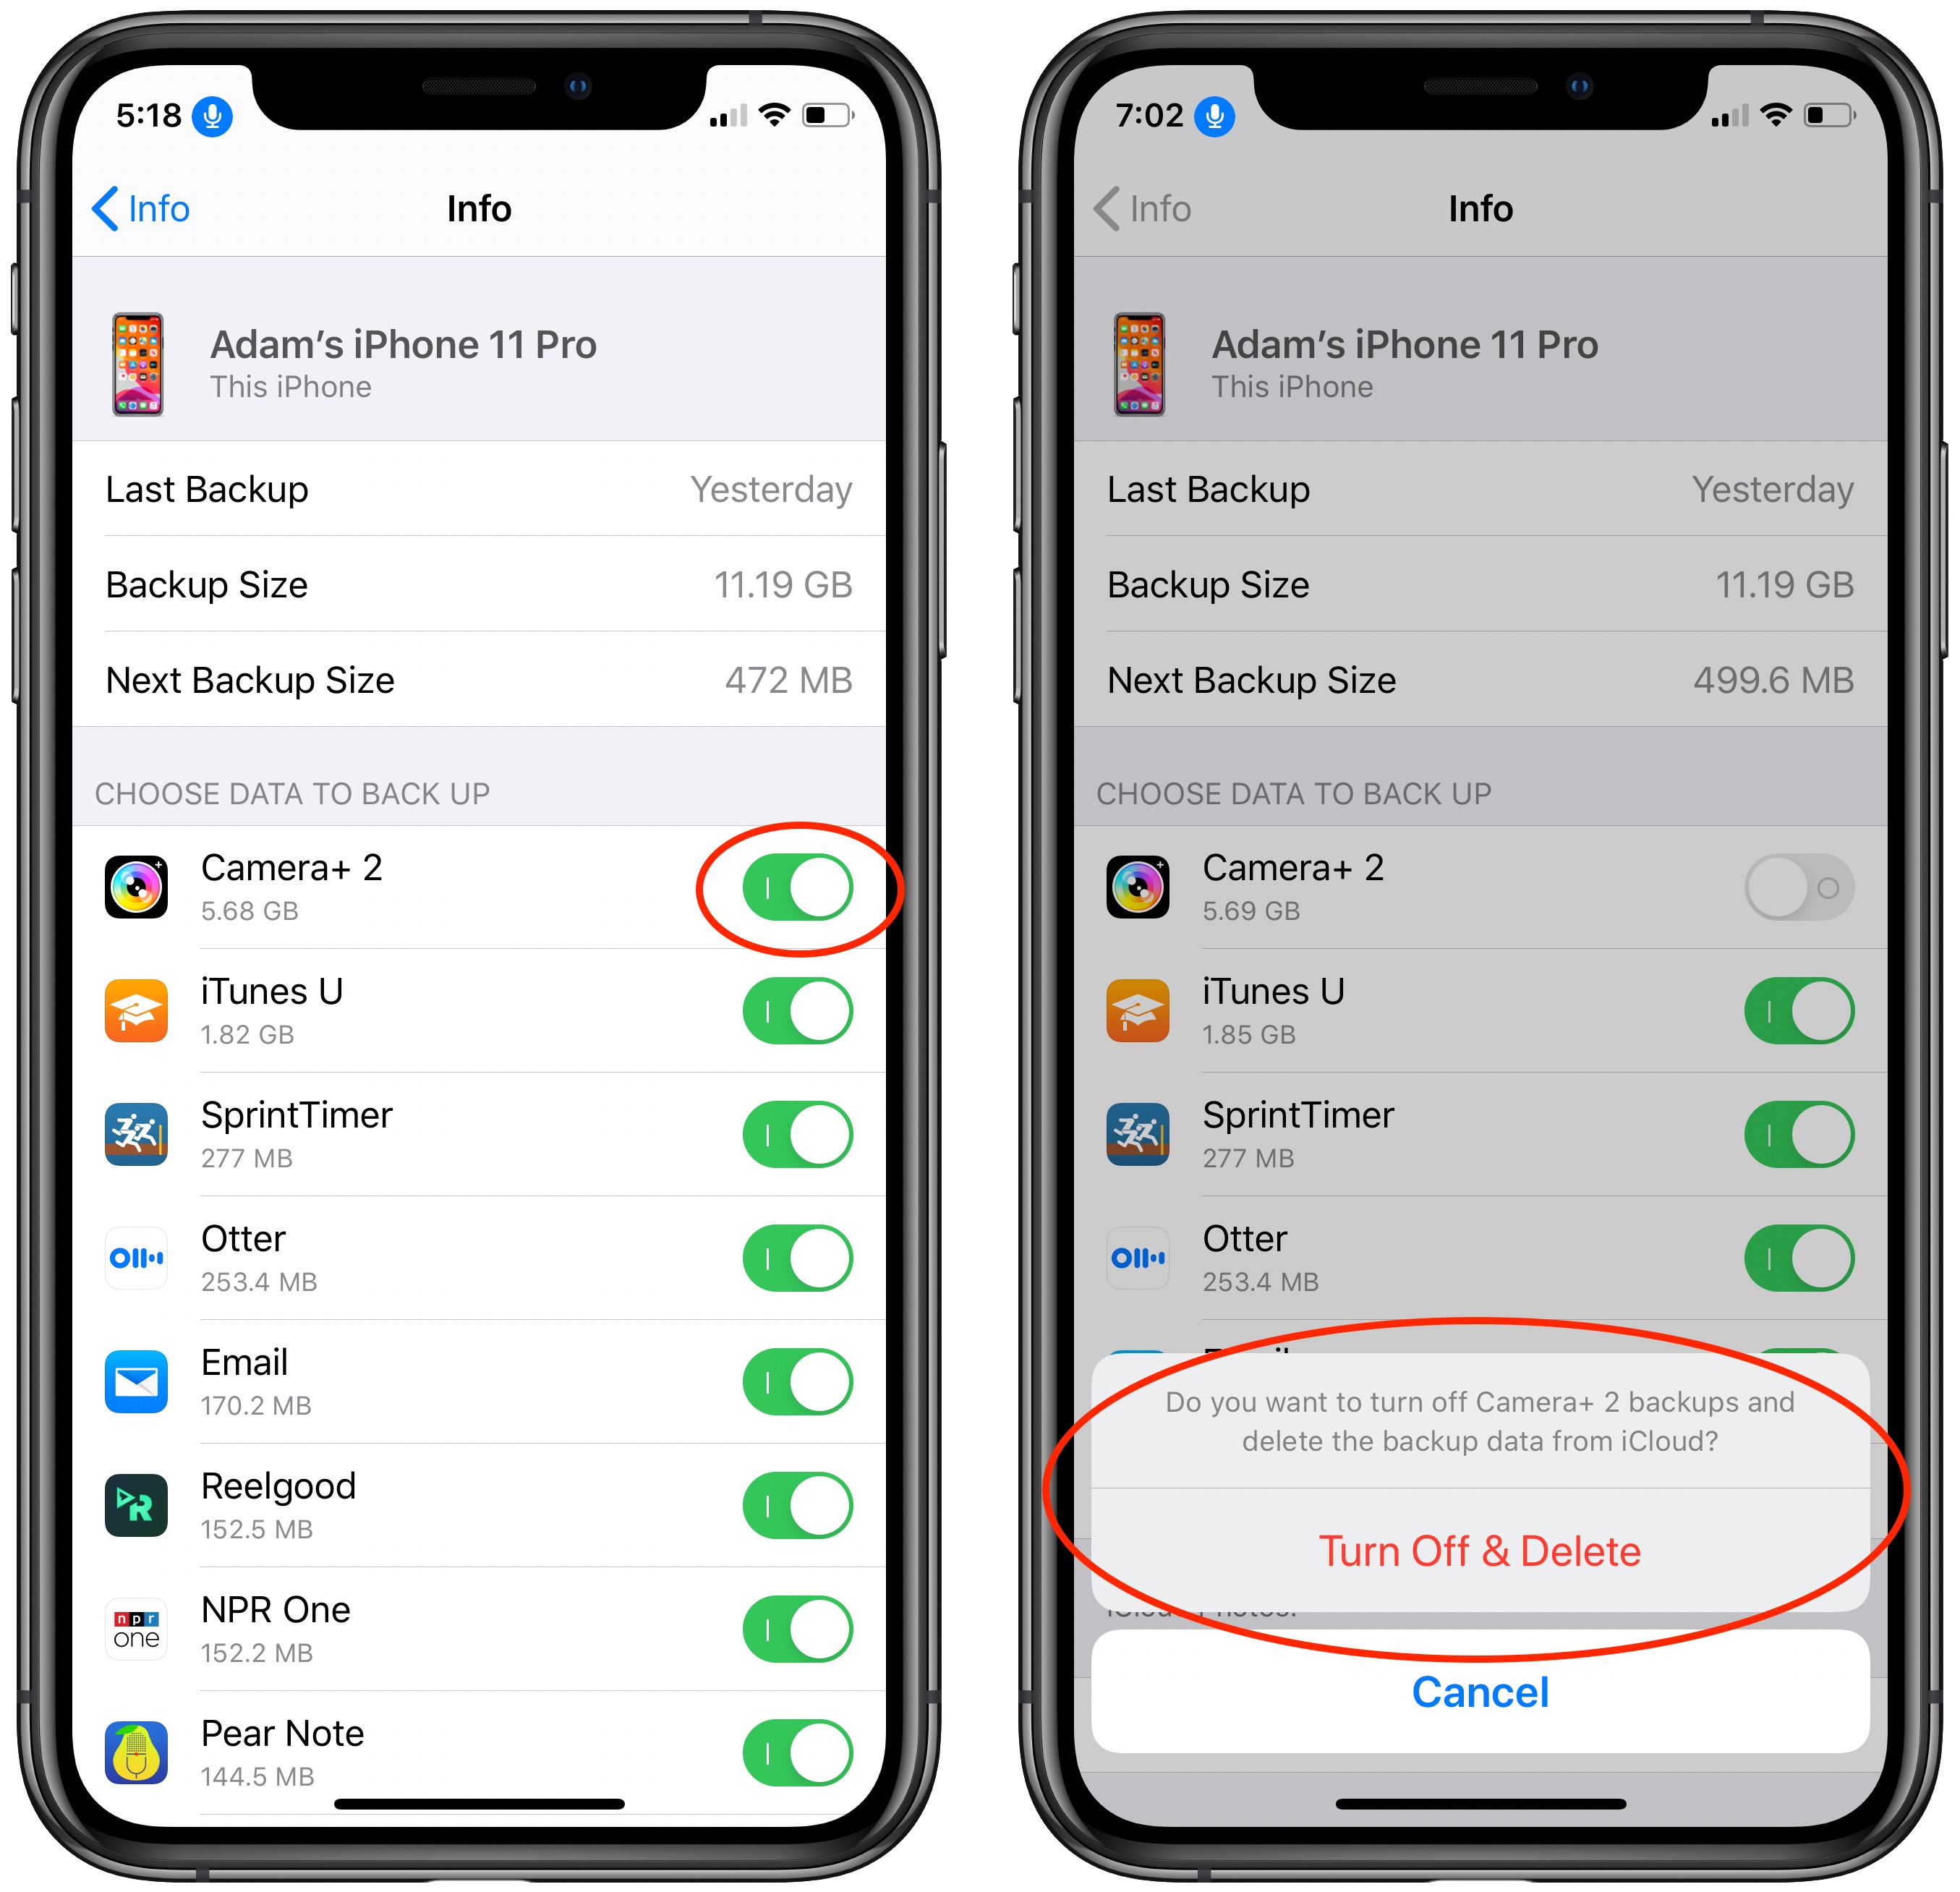
While you’re in the iCloud Storage screen (the leftmost screenshot above), look at the other apps at the top of the list. If you use iCloud Photos, the Photos app will likely be using far and above the most storage, but there isn’t much you can do about that, apart from deleting unnecessary screenshots, duplicate photos, and accidental videos of your feet in Photos. You may be able to automate some of that work, but there will likely be plenty of manual effort as well.
However, some other apps may be using space unnecessarily. When I got Apple’s warning and checked the iCloud Storage screen, the Camera+ 2 app was one of the top offenders. That’s because I used it to take nearly 2000 burst photos of cross country races. I had gone through each burst, picked the best shot, and saved it to Photos for editing and sharing. But I hadn’t deleted all the lesser images, and they were consuming over 11 GB of iCloud space: 5.69 GB in iCloud itself and another 5.69 GB in my iCloud backup. Oops.
Similarly, Apple Books was eating 1.6 GB of space, but when I went to see what was actually in there, I realized I had 40 or 50 old Take Control books still stored. I have all those elsewhere, so deleting them cleared another 600 MB of space.
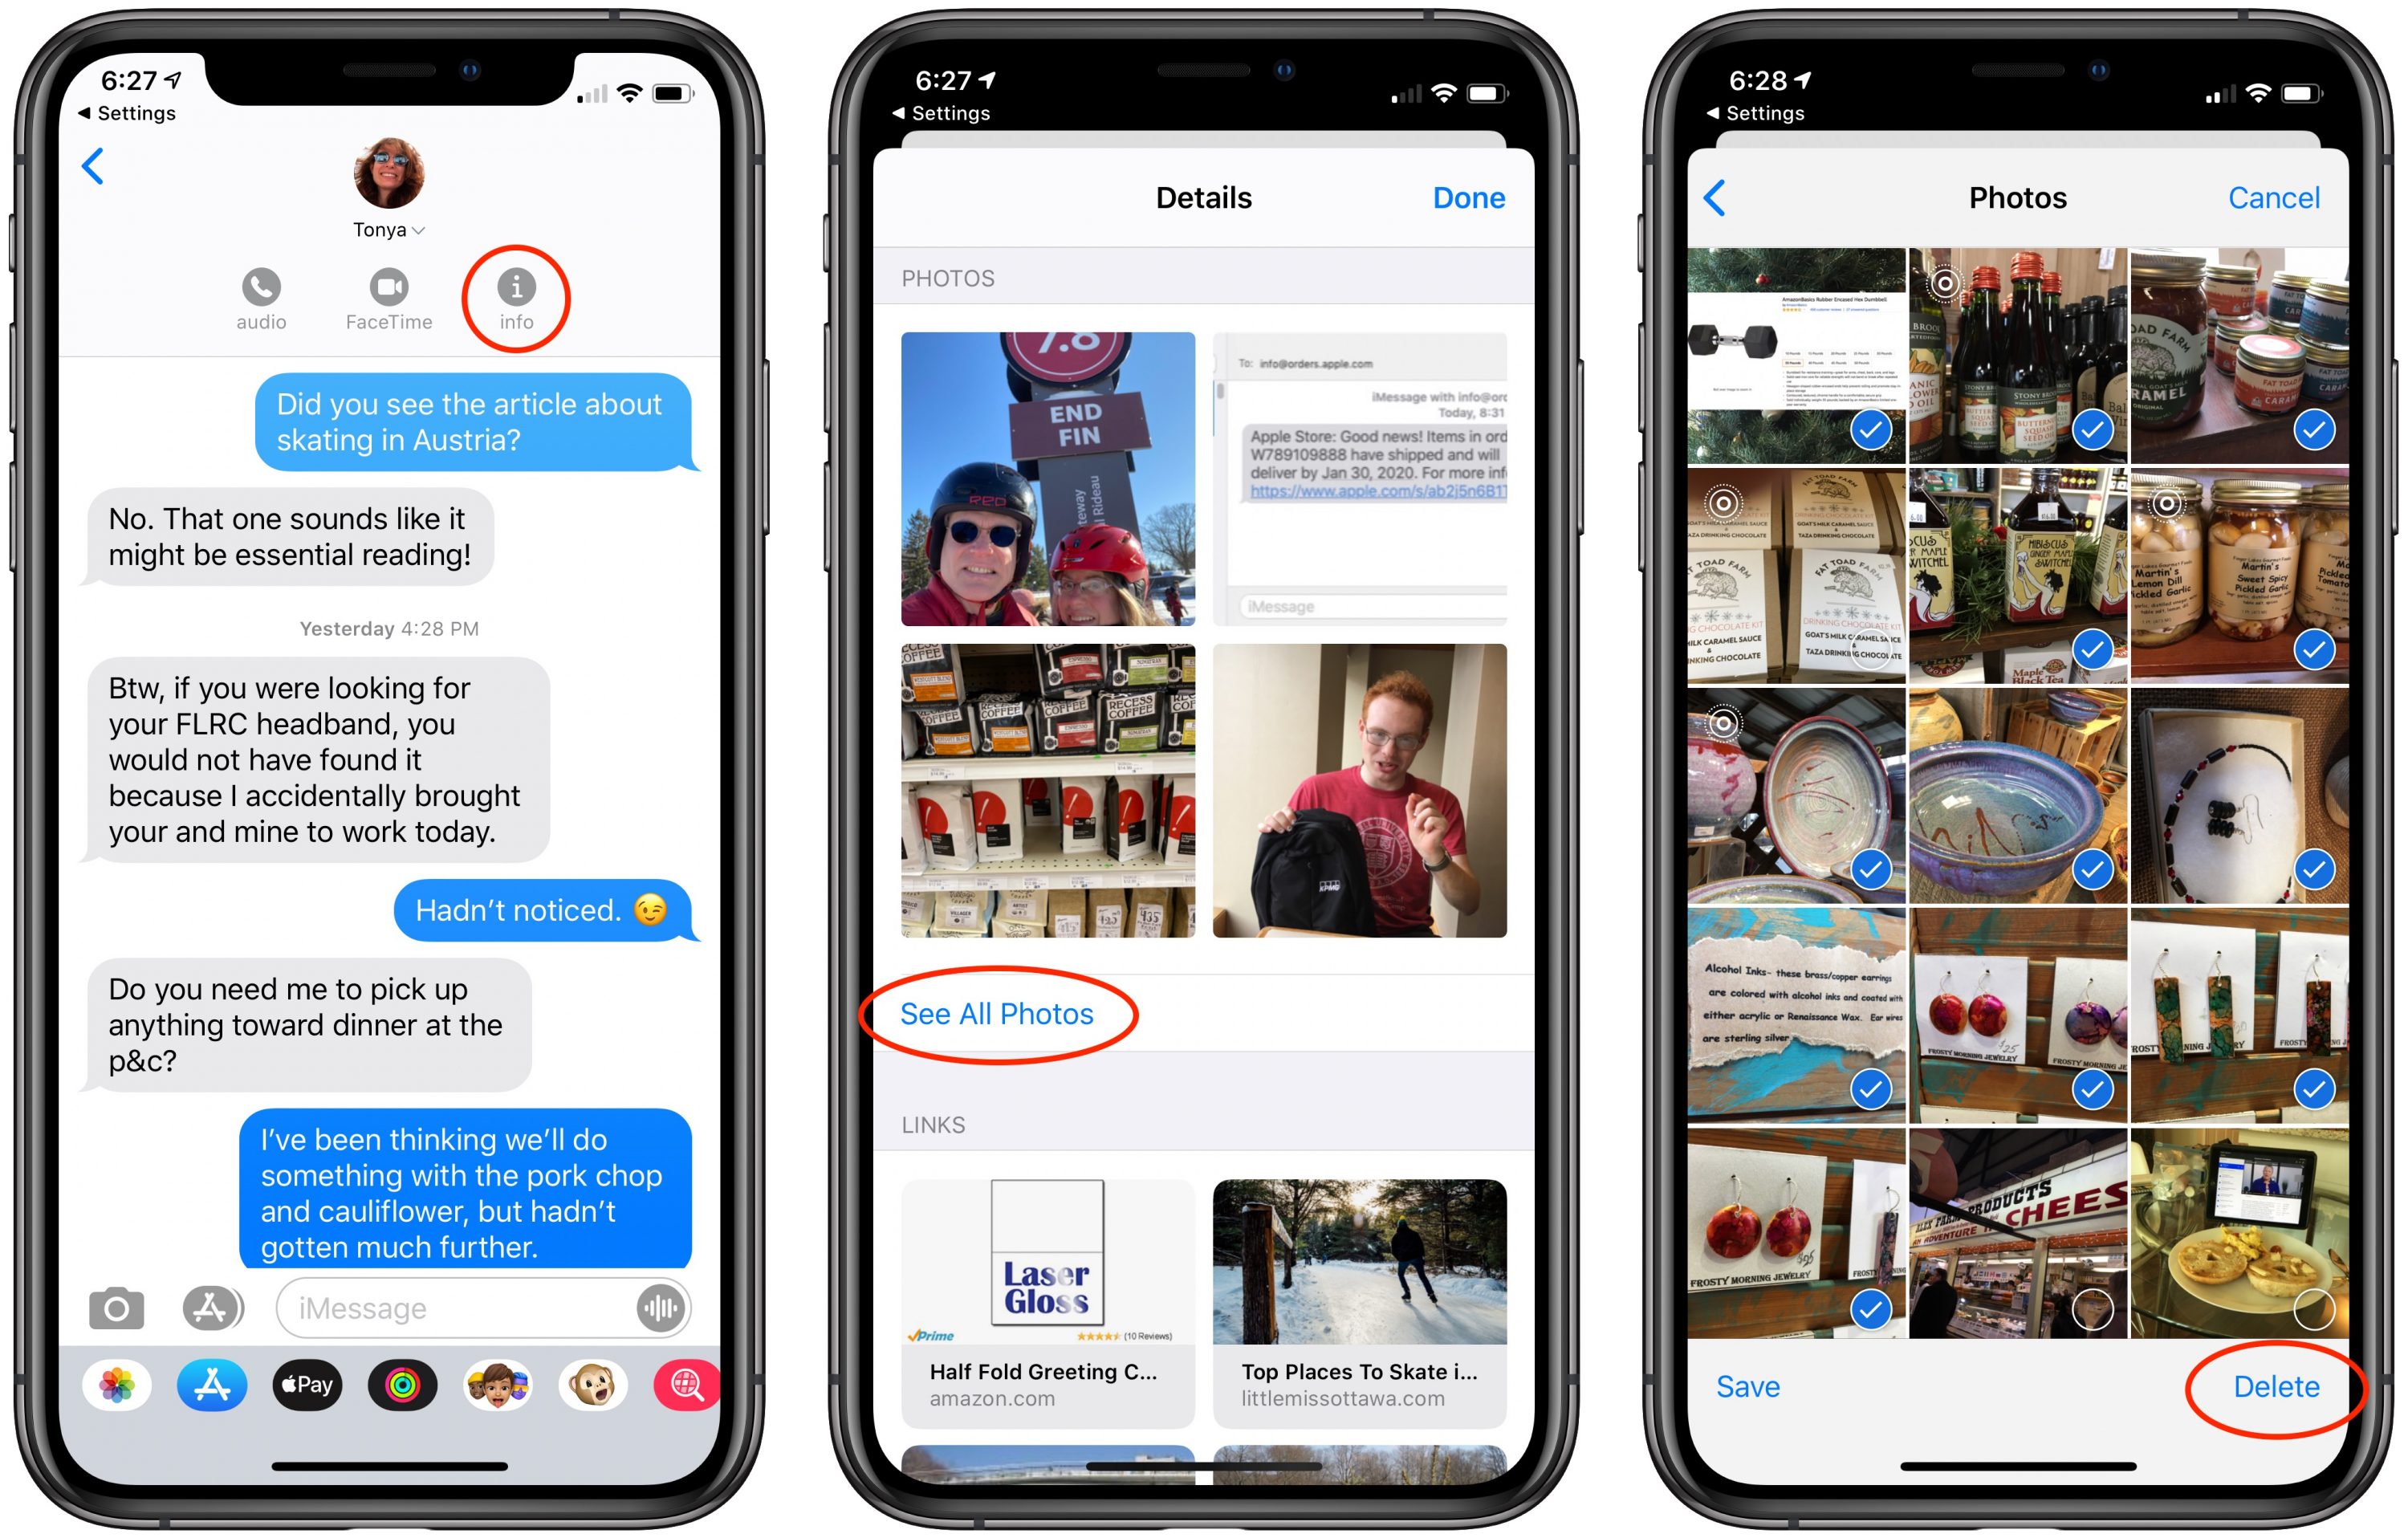
Finally, pay attention to Messages. If you regularly trade photos and videos in chat conversations, it could be another place you can save significant space. In the iCloud Storage screen, tap Messages > Top Conversations to see which of your conversations are the largest. Tap one to switch to Messages, tap the person’s avatar at the top of the conversation, tap the Info button, scroll down to see the photos, and tap Show All Photos. Tap Select, tap photos you have no desire to keep, and then tap Delete at the bottom-right of the screen.
Also, enabling Messages in iCloud can save a little space because iCloud has to store only one copy of each message, rather than a copy for each device you back up. Turn it on by enabling the Messages switch in Settings > Your Name > iCloud.
Stop Backing Up Bloated iOS Apps
There is one other way you can save space in your iCloud backups—avoid backing up apps that contain large quantities of unnecessary data. In my case, Camera+ 2 is likely to have a lot of data in it regularly, so it might make sense to exclude it from my iCloud backups, especially since I usually process my photos quickly after a race, so they would be vulnerable to being lost for only a day or two.
To see if you have any apps that are consuming a lot of space in your backups, navigate back to Settings > Your Name > iCloud > Manage Storage > Backups, and tap the name of the device you’re on. Along with telling you when your last backup was, how big it was, and how big the next one will be, that screen (eventually; it’s not quick) tells you which apps are consuming the most space in your backup. Tap the toggle switch next to an app to stop backing it up and delete its data from your backup.
Delete Old Email
Both iCloud and Gmail count your email against your storage space, which means that if you run out of space, they’ll reject incoming messages. That would be bad, so you don’t want to get to that point.
For most people, email probably isn’t as significant a consumer of storage space as files, but if you’re an email packrat like me, you could be wasting gigabytes of space on unnecessary messages. How you deal with these varies by service.
iCloud
When it comes to clearing email, iCloud is no different from any other IMAP-based email provider. I’ll assume you’re using Apple’s Mail; the general principles, if not the specific steps, may work for other email clients.
If you want to archive messages locally before deleting them from iCloud, you can do that in one of two ways.
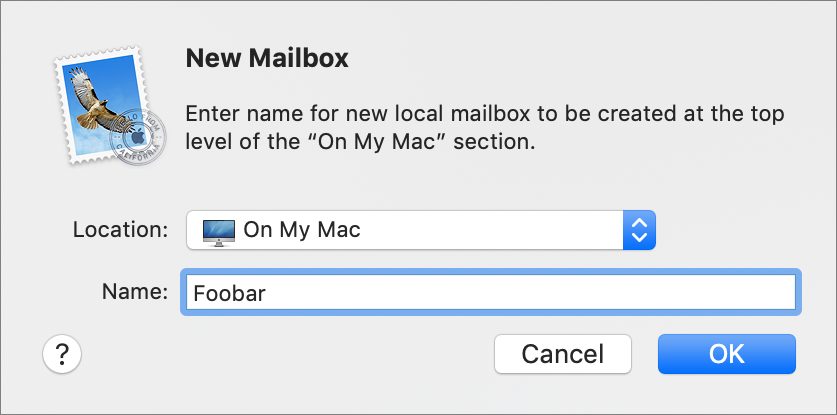
- Choose Mailbox > New Mailbox, choose On My Mac from the Location pop-up menu, and name your mailbox. Then select the messages you want to save and choose your newly created mailbox from the Move To button’s menu in Mail’s toolbar.
- If you want to archive an entire mailbox, first drag it from the iCloud account section of the sidebar in Mail to the On My Mac section to copy it there. It may take a while to copy.
To delete individual messages, you can just select them and delete them however you normally do that (I press the Delete key). However, if you’re looking for the most bang for your bump, choose View > Sort by > Size first to put the largest messages at the top so you can delete those first.
Of course, deleting messages normally just moves them to the Trash mailbox; to reclaim the space they occupy on iCloud, choose Mailbox > Erase Deleted Items > AccountName. Once you do that, the messages are gone for good.
If you want to remove an entire mailbox and its contents, select it in the sidebar and choose Mailbox > Delete Mailbox. That deletes all of its messages immediately and can’t be undone.
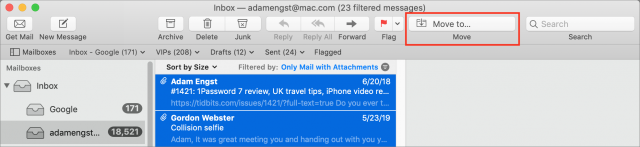
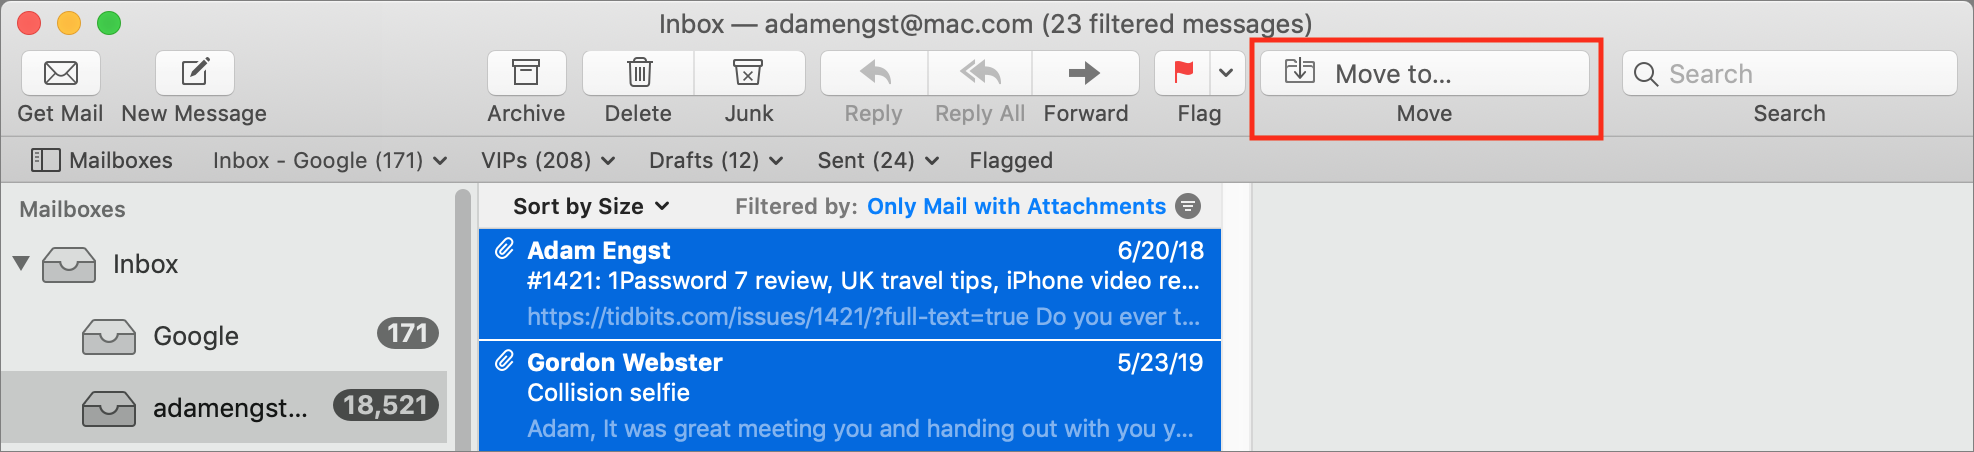
One note: Mail has a Message > Remove Attachments command that, as you’d expect, removes attachments from selected messages. Since attachments are often the point of the messages I receive, that command makes me uncomfortable, but if you don’t value attachments much, or just want to remove some egregiously large attachments from certain messages, it could help you save space quickly. I recommend using it after sorting by size and filtering by messages with attachments, as you can see in the screenshot above.
Gmail
Because Gmail’s IMAP support was tacked on to give users the option of using email clients like Apple’s Mail, it’s best to work in Gmail’s native Web interface when clearing space. But first, what if you want a local archive of a collection of messages before you delete them?
I had some Gmail labels (which Mail maps to mailboxes) that I no longer needed, but that I was didn’t want to delete permanently. I never know when I might want something buried in the archeological depths of my email, so I made local copies of those messages before removing them. I tried several techniques before deciding that the most straightforward approach was also the best.
First, since I don’t really use Mail much, I had to enable the On My Mac section of the Mail sidebar by choosing Mailbox > New Mailbox, choosing On My Mac from the Location pop-up menu, and then naming the mailbox (which I wasn’t planning to use; I deleted it later).
Then I dragged the mailbox I wanted to download locally from its position in the Gmail mailbox hierarchy to the On My Mac section. That copies the entire mailbox locally—it doesn’t change the Gmail version at all. Depending on the size of the mailbox (most of my mailboxes had as many as 30,000 messages, and my largest one contained nearly 325,000 messages), it could take many minutes or even hours. And remember, a watched copy never completes—let it run while you do other things or even overnight.
Once you’re certain that the entire mailbox has copied locally—I recommend spot-checking messages from the top, middle, and bottom of the mailbox—it’s time to delete the messages within Gmail. As I noted, do this in Gmail’s Web interface; anything else is prone to confusion and error. Follow these steps:
- Either click a label or perform a search to select the messages you want to delete. If you’re searching, be very, very careful that you’re not accidentally finding good messages too. Remember that you can add
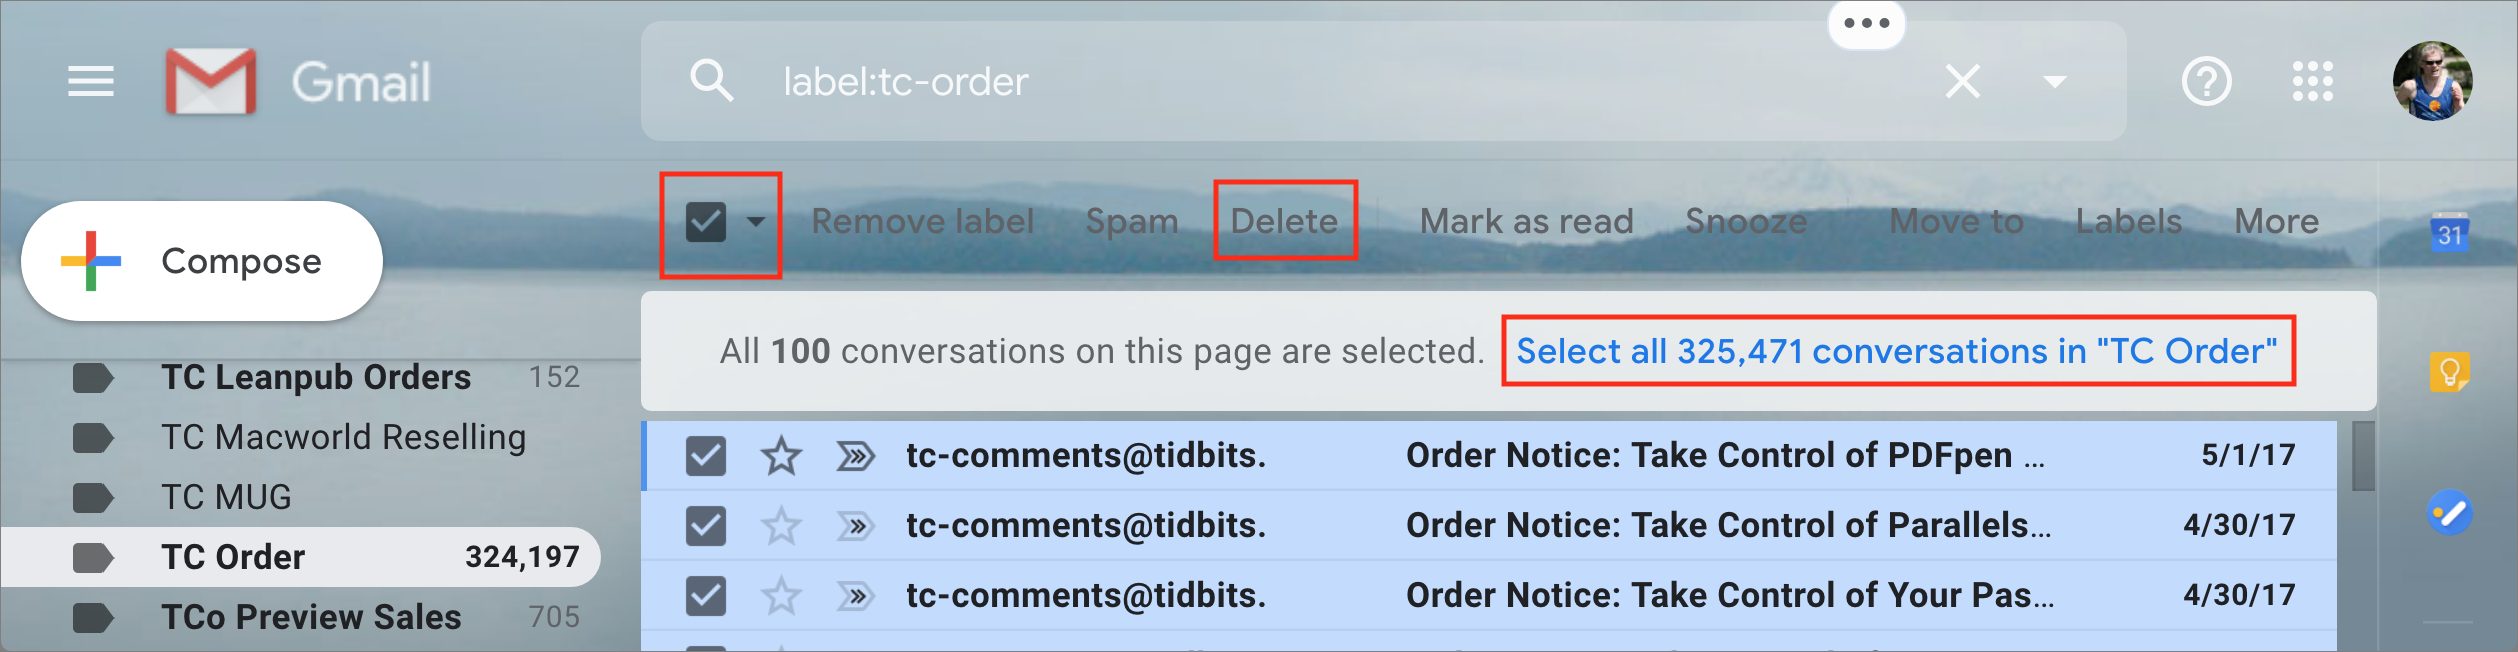
-searchtermto a search to exclude messages that contain “searchterm” as well. - Click the checkbox at the top of the checkbox column. That selects all the messages showing on that screen. In most cases, there will be many more screens; Gmail can only display 100 messages per screen.
- In the banner at the top, click “Select all X conversations in ‘LabelName.’” Gmail changes the banner to indicate that all the conversations are selected.

- Click Delete in the toolbar to move all those messages to Trash (or, in Gmail terms, to apply the Trash label to those messages). If you’re working with tens of thousands of messages, this may take several minutes. And if, like me, you have hundreds of thousands of messages to trash, Gmail may be able to work with only 5,000 or 10,000 or so at a time, requiring you to repeat the selection and trashing process many times.
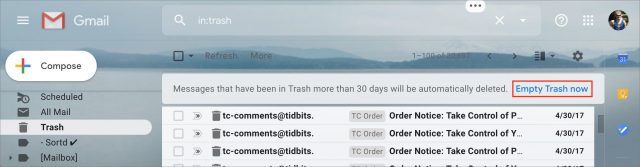
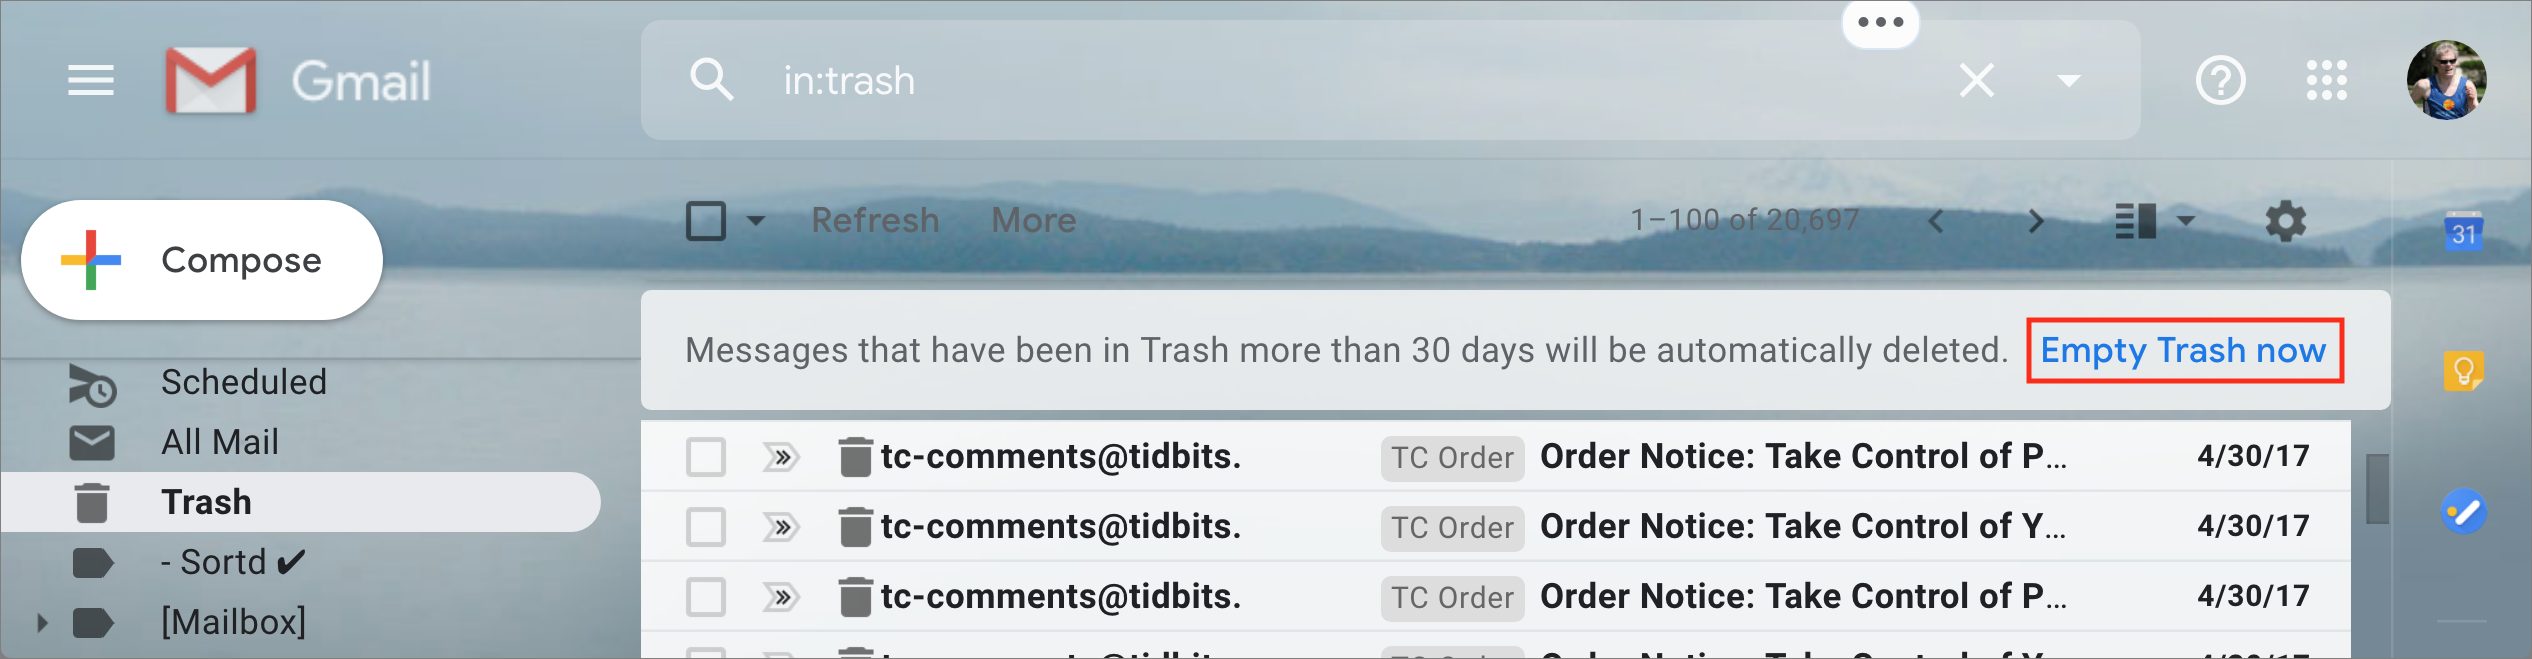
- Click Trash in the label list sidebar. You may need to click More at the bottom of the sidebar to see it.
- The banner at the top tells you that messages in Trash for more than 30 days will be deleted automatically. If you aren’t hurting for space immediately, you could let the automatic countdown delete these messages for good. If you need the space back right away, click Empty Trash Now.
- A dialog appears, telling you how many messages will be deleted. In my experience, Gmail often fails to delete all of them at once, so if the dialog disappears and messages remain in Trash, just click Empty Trash Now as many times as is necessary to clear everything.
A search that you might find useful in Step 1 is has:attachment larger:10m. As you might expect, it finds messages with attachments that are larger than 10 MB. You can change that number to any other size you want.
Remember that you can open multiple browser windows for Gmail, which makes it easy to do the slow-motion delete/trash dance repetitively throughout the day while still being able to read and reply to new messages.
It can take some time—perhaps even a day or two—for Gmail’s space measurements at the bottom of the screen to update. I have to assume that Gmail is an insanely complex system behind the scenes, with data potentially distributed between data centers and backed up in various ways, so it doesn’t surprise me that there isn’t a tight connection between your actions and the space measurements. Avoid running completely out of space if you possibly can!
Remove Yourself from Shared Dropbox Folders
Folders that are shared with you by other people count against your Dropbox storage limits. That may not seem fair, but keep it in mind, since you may be able to recover significant amounts of storage by removing yourself from large shared folders.
To do that, look for folders in your Dropbox folder that have three little people on their icons. That indicates the folder is shared, although it doesn’t tell you whether or not you’re the owner.

To determine who the owner is, Control-click a shared Dropbox folder and choose Share from the contextual menu. Then, in the window that appears, look at the right side. If you’re not the owner, click the pop-up menu to the right of your name and click Remove My Access.

You will, of course, lose access to that shared folder immediately, and you can’t get it back without asking the owner to share with you again, so make sure you’ve made a local copy of any necessary data beforehand.
Google is much friendlier in this situation—anything in the Shared With Me category in the Google Drive sidebar does not count against your storage limit.
Scan for Large Files
Since Dropbox, Google Drive, and iCloud Drive all store standard files, one useful way to clear space is to evaluate their contents with a utility that reveals particularly large files and folders. Numerous apps can do this for any drive or folder, including the free GrandPerspective and OmniDiskSweeper. I’m partial to GrandPerspective’s graphical view, but OmniDiskSweeper’s textual approach is equally effective. If neither of them floats your boat, Josh Centers says he’s a big fan of the $9.99 DaisyDisk.

In either case, you’d want to scan the folders that correspond to your Dropbox folder, the Google Drive folder (assuming you’re using Google’s Backup and Sync app), and iCloud Drive. Then look for files that are especially large and either delete them outright or simply move them to another folder on your Mac.
There’s no magic here, and you should be careful when actually deleting files, but it’s common to discover that you’re wasting a significant amount of space on files that don’t matter.
CES 2020: Clean Air and Clean Water, Plus Robots and Holograms
In general, CES shows the cutting edge of gadgetry, both those products (or at least product categories) that we’ll all have to have in five years, cheek-by-jowl alongside those products or ideas that will never see the light of day. Eureka Park, the portion of the show for startups, is where CES metaphorically looks on and says, “Whoa, man, what were you thinking when you came up with that?” Here’s where most companies won’t exist five years from now—and might only exist in a business incubator now—but also where I see the wildest thinking and most inventive solutions of the show.
Coolfinity Intermittent-Power Refrigerator
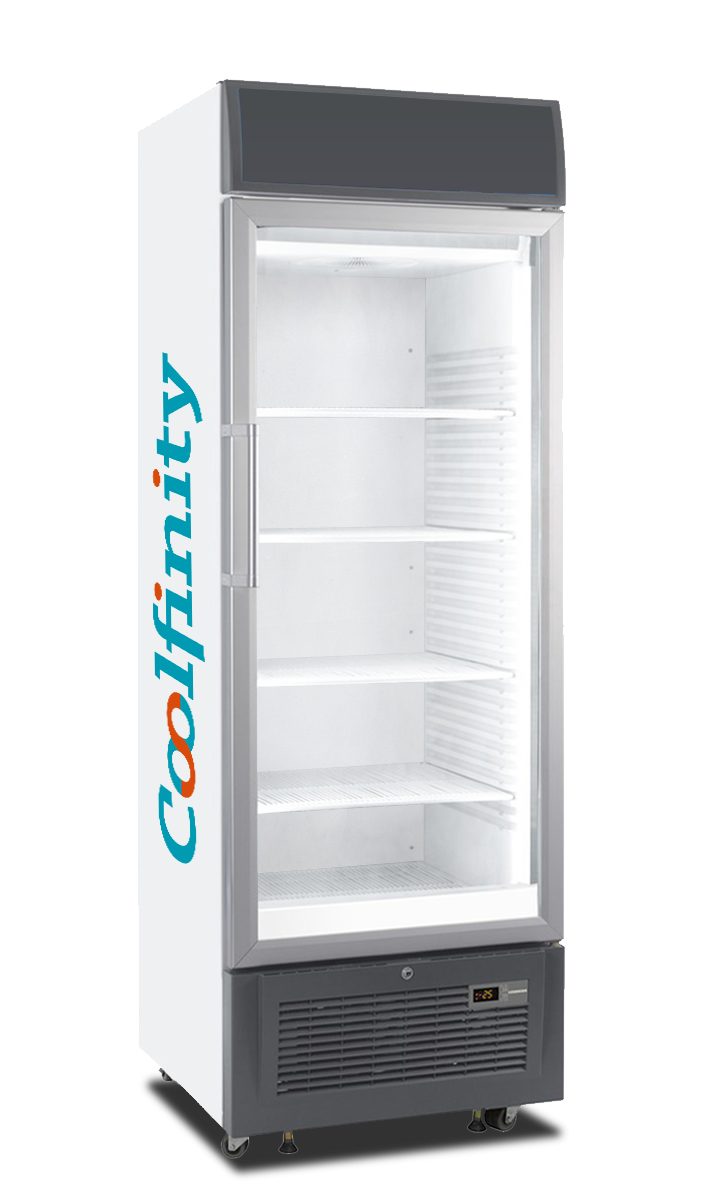
Refrigeration is one of those technologies that it’s hard to imagine what it’s like to live without, but that’s the situation worldwide for anyone living with an unreliable power supply. That doesn’t only affect the luxury of a cold beverage on a hot day—it can be lifesaving to have cold beverages when heatstroke is dangerously likely, and it’s always lifesaving to have reliable refrigeration for medicines that must be kept cold. And of course, if food is scarce, it has to be preserved for as long as possible. Coolfinity has a solution: two models of refrigerator—one for consumables and another for medications—that need only 6 hours of power every 24 hours to keep things cold. If the power cuts out, an “ice battery” cools the interior as it discharges, and that plus insulation creates a 48-hour window during which the fridge’s contents stay cool. Coolfinity’s literature talks about getting its product into less-developed regions but doesn’t answer a key question: could this technology cut home refrigeration energy costs from the 13.1% they currently average? I would think so because you could put it on a timer—but their literature doesn’t say. And in any case, the company isn’t currently offering individual sales. Still, if you’re interested in this for home use, or maybe want to be kept apprised of ways of supporting Coolfinity’s campaigns in other countries, the company has an email newsletter.
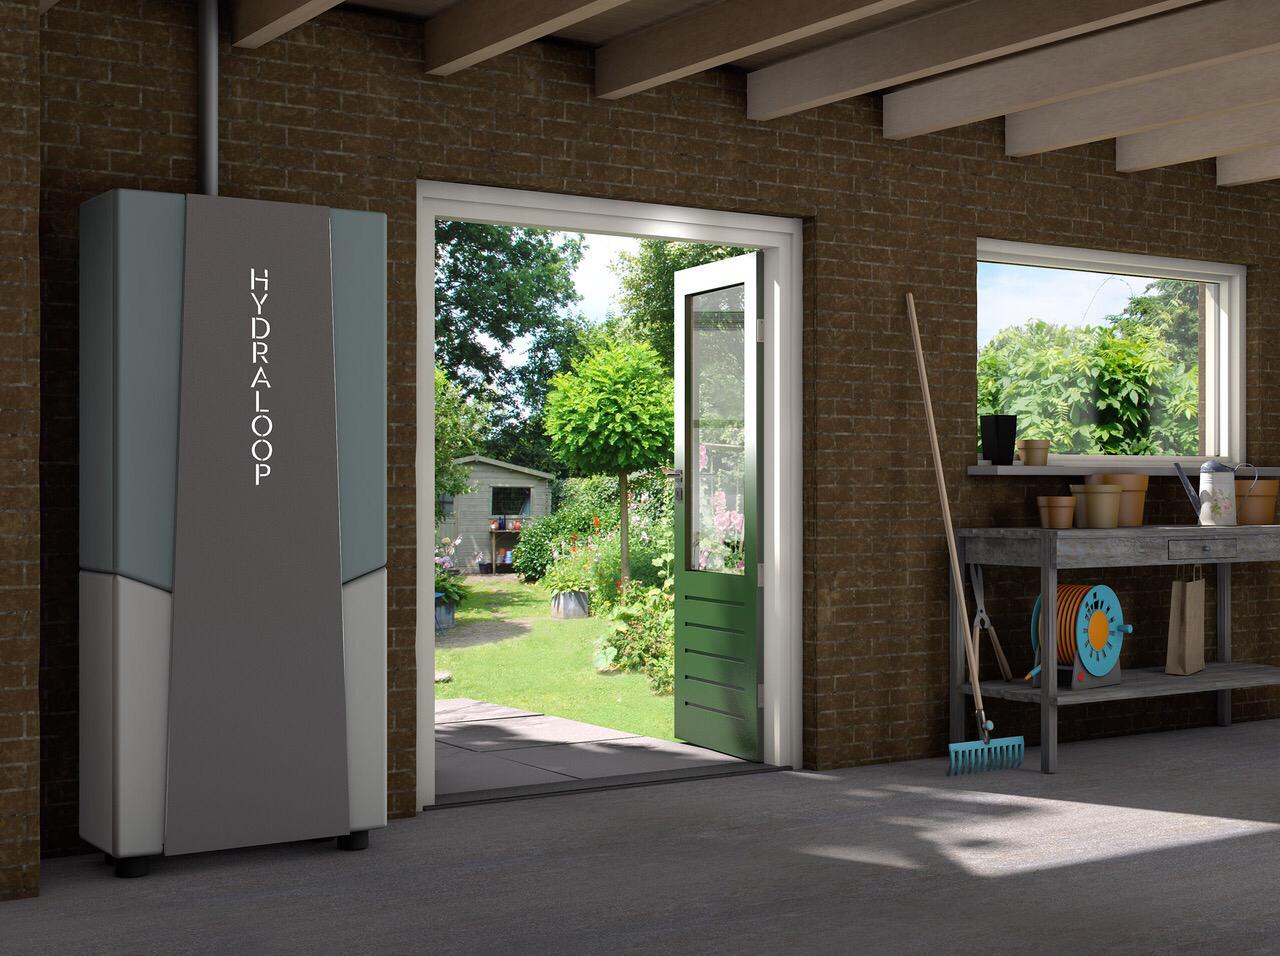
Hydraloop Water Recycling System
Make a short list of infrastructure needs that are more important than electricity, and clean water is in the top three. That’s a problem in many parts of the world, including the United States, where freshwater sources are overtaxed and droughts are frequent. (Secondarily a problem because our landscaping standards are inherited from French kings from 400 years ago.) Hydraloop has a fix for this: use your water twice. Hydraloop’s products are the size of a refrigerator with about half the depth, and each stores and treats up to 80 gallons of water. It connects to your household plumbing to take in water from the bath and shower—and optionally a washing machine—treat it back to cleanliness, and then redirect the output for home use (in the washing machine or toilets), as garden irrigation, or into a swimming pool—Hydraloop offers a separate model for each of these three use cases. When you have enough recycled water in the tank, it will be used preferentially to incoming freshwater, but new water is always drawn as needed when the tank is dry. An app tells you when you can run a load of laundry on just recycled water and when you can spend an extra ten minutes in the shower because you’ll be using that much water anyway later in the day. Hydraloop models will ship in the US in the second half of 2020 and start at $4000; some of the listed intakes and outputs require extra pumps, and there are additional costs for shipping and installation.
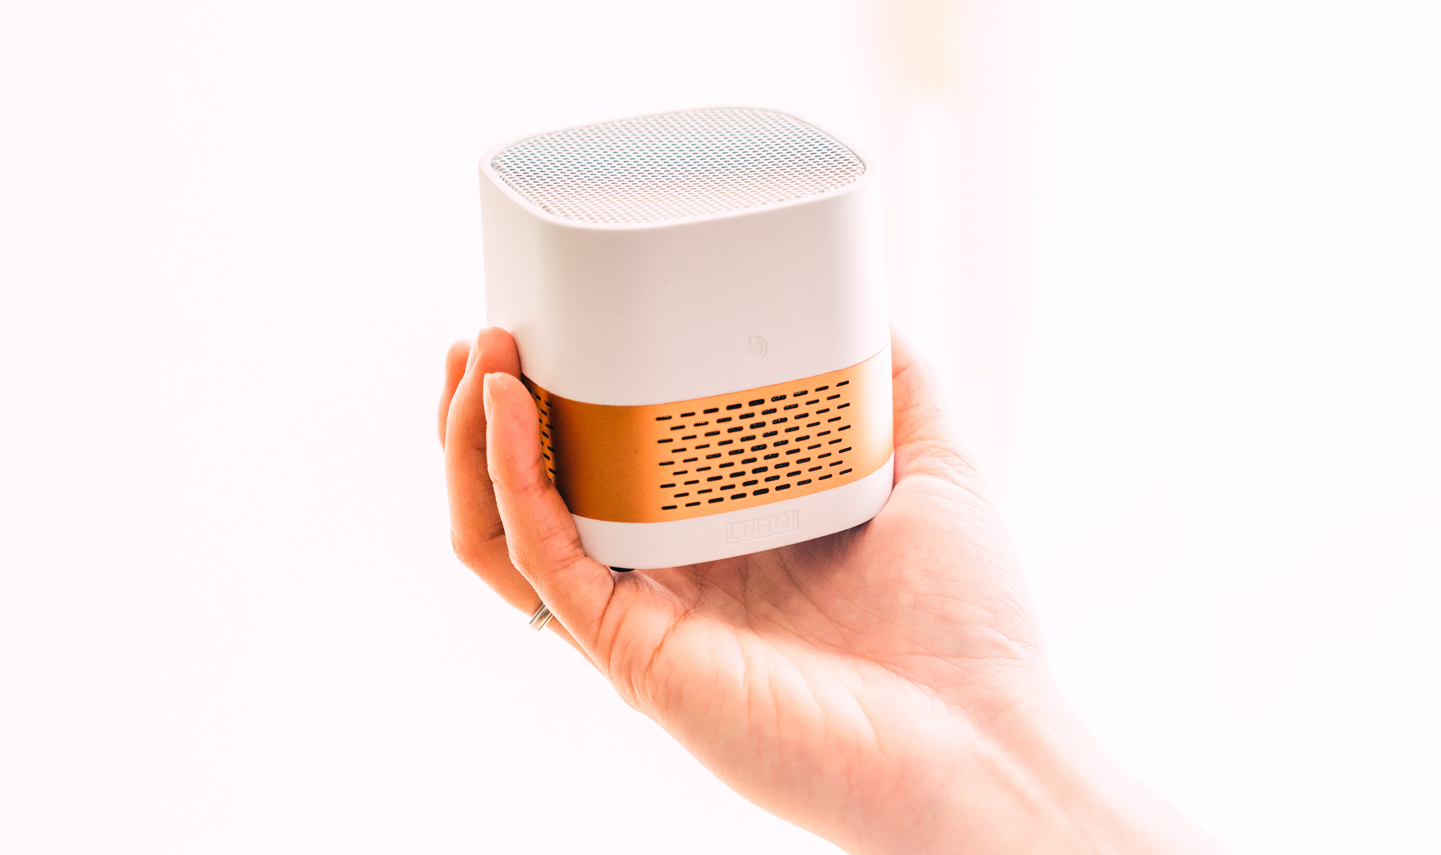
Luft Cube Air Purifier
If you need your air cleaned more than your water, Luft Cube might be up your alley. It grabbed my attention because it’s palm-sized, whereas many air purifiers at CES are the size of desk fans or larger. The premise behind the Luft Cube is that you can toss it into a bag and set it up in an office, home, or car near any USB-C power source. A fan draws air past a UV LED light and through an antibacterial mesh, then radiates the cleaned air outward. In a room of 177 square feet, the maximum space the company recommends for coverage, the entire room will be recirculated in about 3 hours. Luft Cube is available in various colors and for pre-order on Indiegogo for $109 with shipping planned in March 2020.
Odd.Bot Robot Weed Eater
Some people need their crops cleaned of weeds. Usually, this requires herbicides, bulky tractors that burn fossil fuels, or extensive manual labor. Odd.Bot introduces a fourth method: robot weed eaters. Their Weed Whacker—a term I was surprised to find is not trademarked—rolls along on three legs and can identify weeds both between crop rows and in between specific plants. When it finds one, a projecting scoop grabs it out of the ground and casts it aside. The engineer demoing the robot was rightly proud of two AI advances Odd.Bot had made: its ability to distinguish weeds from crops and its reliability rolling along on uneven farm terrain. The Weed Whacker is not yet available, but when it ships, it’ll be a service you purchase per use, not a product you’ll buy. Odd.Bot is a Dutch company, so if you’re not in the Netherlands, you may want to get on the company’s mailing list to express interest; the Weed Whacker is small enough that I don’t see why a future version couldn’t be used in a decently sized home garden. You may also see its cousin on a beach, as the company is developing a second model designed to clean up trash and detritus that washes ashore.
NanoAR Glass Projection System
I’m a fan of meaningless CES buzzwords and was greatly amused by NanoAR’s invention of “photonic projection,” a state you can duplicate by turning on a flashlight. But what the company meant is pretty cool—it’s not the projection of the photons it’s touting but rather the screen they’re caught by, which is, to all appearances, just a pane of glass. Some kind of glass treatment catches an image projected onto it from a projector hidden on the floor. The result is a clear image that almost hovers in mid-air (if you don’t notice the edges of the glass), just transparent enough to see whatever is physically behind the glass.

Smoodi Automatic Smoothie Maker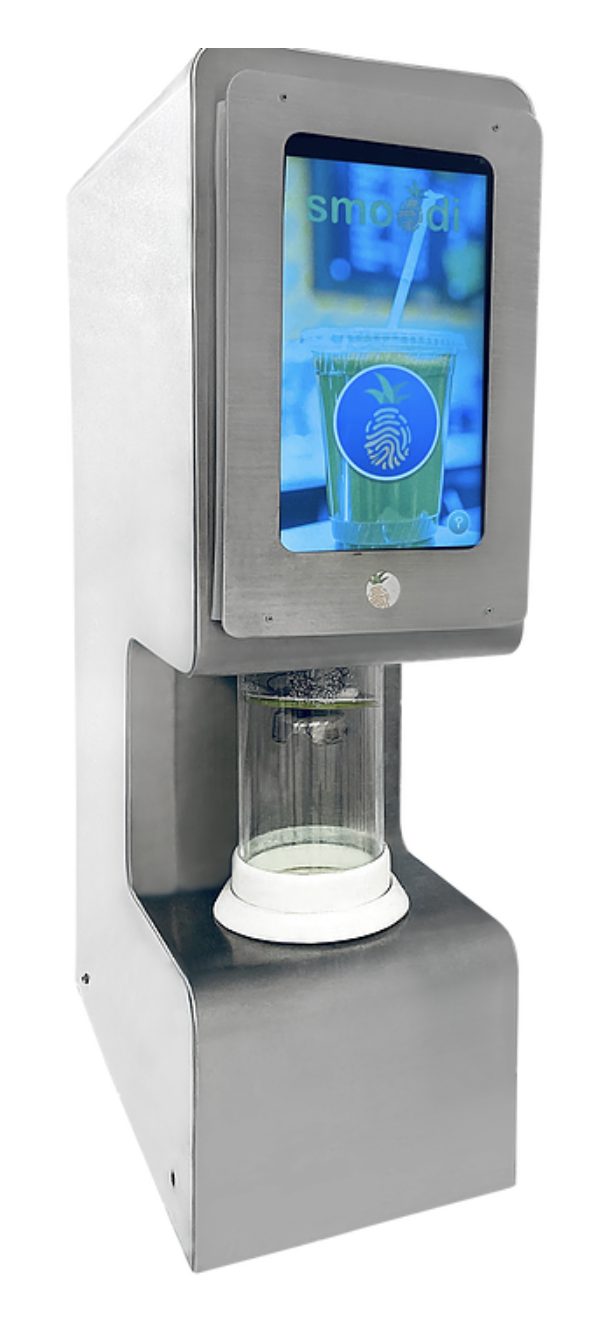
My local convenience store has a machine that will make you a soda in up to 165 flavors—or once you consider mix-and-match possibilities using the app, 4.4 million flavors. If you wish you had a similar option for healthier beverages, you may want a Smoodi. Smoodi machines are designed for stores and corporate kitchens, and they let you pick from one of three flavors of fruits, berries, and veggies (unhelpfully named “Tropical Vibes,” “Green Energizer,” and “Brain Boost”); add in a selection of toppings and additives such as cocoa, flax, or coconut; and watch it mix up a smoothie and then clean up after itself. To me, this sounds as appetizing as gargling a Chia Pet, since chia is one of the toppings—but to each their own, and I’d probably like the just-berries option. No prices are listed—you tell Smoodi how many smoothies you think you’ll sell or give out to employees per day, and the company will quote you a price.
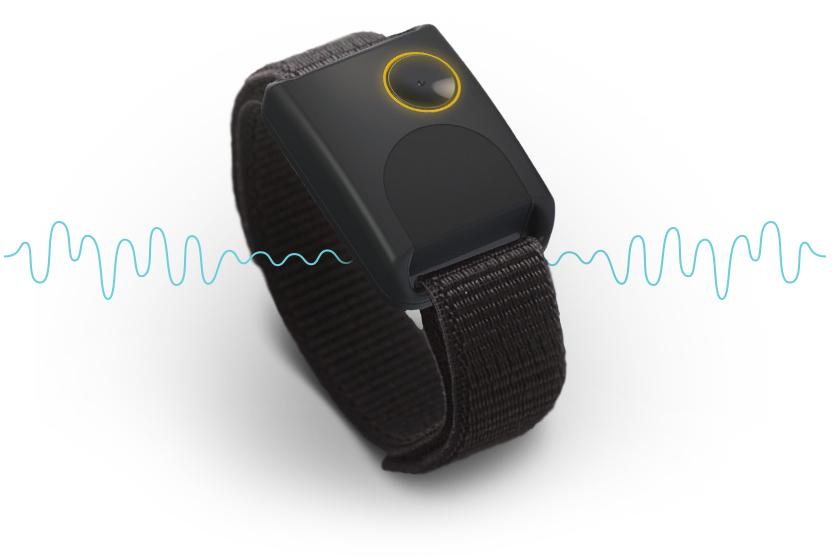
DreamOn Sleep Wristband
The DreamOn Band is a clever idea, but I still can’t figure out why it exists. The premise is that the human brain has certain electrical rhythms associated with falling asleep faster and sleeping deeper once you get there. The company’s claim is that, when provided with tactile and sound pulses from a wristband that mimics these rhythms, your brain will fall into pace with them and start your forty winks without drugs or other sleep aids. I’m not qualified to vet the medical claim, but a booth representative said the magic words that improve my confidence, “We’ve published peer-reviewed studies.” You control it with an iPhone app, but that leads to my fundamental question: why is this a $149 product instead of an Apple Watch app? I don’t see the DreamOn Band doing anything that an Apple Watch (or many other smartwatches) can’t. It’s currently out of stock; new orders will ship in 10–12 weeks.
Incus Hearing Assistant
After spending the day looking at assistive hearing technologies that could get lost in one’s ear, I was negatively surprised by the Incus, a $150 microphone/speaker that looks like a mouse that fell off a 2004 iMac (the white thing at the bottom left of the photo below) and that was depicted as being worn by an elderly woman using a chest strap the size of a seat belt. But I thought the pendant version that the company also had on display was pretty—or at least, something my grandmother would have worn—and perhaps worthy of coverage, so I asked how much it cost. “Uh… that’s $15,000. Not for sale.”