#1511: Recovering from a dead SSD, preventing tabbed windows in the Finder, iOS Mail security exploits, affordable standing desks
Adam Engst was thrown for a loop recently when his iMac’s SSD died suddenly. This week, he shares lessons learned from the process of figuring out how to become functional again, which is easier said than done, even with good backups. If you’re stuck with tabbed windows in the Finder but would prefer folders to appear in their own windows, Adam also points out which two settings control that behavior. Some serious security vulnerabilities in Mail in iOS have come to light, but Glenn Fleishman explains why you probably don’t have to worry about them. Finally, if you’re working from home and want a standing desk, Julio Ojeda-Zapata suggests two affordable options. Notable Mac app releases this week include Transmit 5.6.4 4/21/20, Default Folder X 5.4.5, Fantastical 3.0.11.
TipBITS: Stop Getting Finder Windows in Tabs
When Apple introduced support for tabbed Finder windows in OS X 10.9 Mavericks back in 2013, I enabled the feature on my 13-inch MacBook Air to see how it worked. It seemed like it might be a useful way to deal with the MacBook Air’s small screen size, given that I’m accustomed to working on a pair of large screens (currently a 27-inch Retina iMac with a 27-inch Thunderbolt Display, although back then it was probably a Mac Pro with a pair of 24-inch Dell monitors).
Much as I like tabs in Web browsers, however, tabbed Finder windows just irritate me. (That’s just me—if you like them, more power to you.) I’m happy to work in a single window in the Finder most of the time, and if I need to move or copy something, I prefer to use multiple windows so I can see the source and destination at the same time. Whenever I double-clicked a drive or Command-double-clicked a folder to get a new Finder window but instead had it open as a tab in the existing window, I’d curse quietly and drag it out to a new window.
You’re undoubtedly thinking, “And he put up with this for nearly seven years?” Embarrassing, I know. That’s mostly because I don’t use the MacBook Air that often—it’s mostly a travel machine—and when I do, I don’t spend much time manipulating files in the Finder. So realistically, while the tabbed windows annoyed me, they did so only a few times per year.
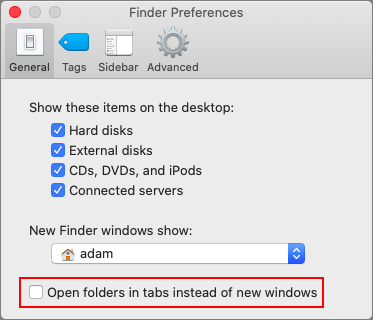
In my defense, I quickly disabled the “Open folders in tabs instead of new windows” checkbox in Finder > Preferences that would seem to control tabbed windows. Alas, it made no difference. Had this been my everyday Mac, I would have dealt with it sooner, but as it was, I never got around to figuring it out.
Until now. The SSD in my 27-inch iMac died last week (an ordeal documented in “Six Lessons Learned from Dealing with an iMac’s Dead SSD,” 27 April 2020). While I waited for an external SSD to arrive, I used the MacBook Air in Target Disk Mode to boot the iMac so I could work on my big screens. The tabbed Finder windows drove me batty within the first day, so I started trying to figure out how to disable that feature for good.
The solution turned out to be surprising, at least to me. Apparently, at some point in the distant past when tabbed windows were considered new and shiny, I had also enabled a feature in System Preferences > Dock that preferred tabs to new windows when opening documents. It’s unclear why this setting lives in the Dock preferences, and I can’t imagine why a folder in the Finder would be treated like a document, but there it is.
The “Prefer tabs when opening new documents” pop-up menu was set to Always on my system, and changing it either to In Full Screen Only or Manually resolved the problem with Finder windows opening in tabs.

There you have it. I don’t know how many people may have ended up in this situation, but if you’re suffering with tabbed Finder windows, tweak those two settings and you’ll once again be working in windows instead of tabs.
iOS Mail Exploits Serious but Unlikely to Affect Normal Users
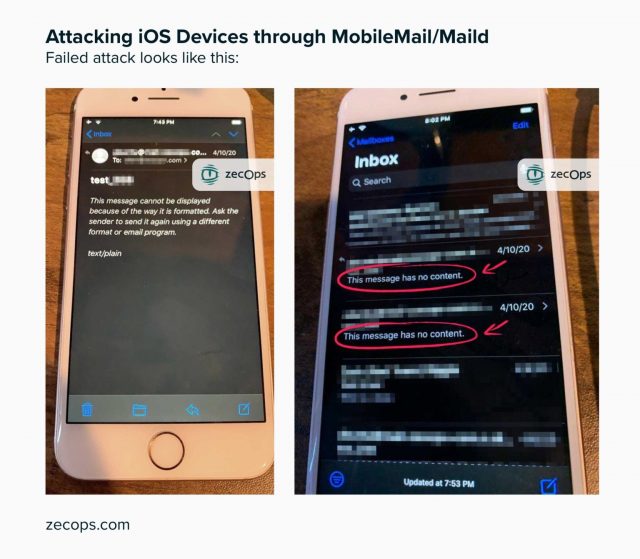
The security firm ZecOps has announced that some of its customers were hit with a pair of previously undiscovered exploits for Mail in iOS that caused the app to crash, revealing a mechanism that could be used as part of a sequence of “zero-day” attacks. In iOS 13, the vulnerabilities can be exploited merely by receiving an email message; in iOS 12, the user would have to view a malicious email message (but not open an attachment or tap a link) to trigger an exploit. ZecOps said it found the vulnerabilities as far back as it tested, which was to iOS 6, and it tracked real-world attacks back to January 2018.
However, although Apple has confirmed the vulnerabilities in Mail, they can’t be used on their own to steal information or take over devices. Any real-world attack would require additional unknown, undisclosed, high-value exploits. ZecOps did not disclose the information necessary to determine if and how its customers’ devices were compromised. Our conclusion is that the risk to average iPhone users is very low, especially with Apple already testing a fix in the latest beta version of iOS.
The two vulnerabilities are quite simple in nature. Mail fails to handle messages correctly when they use large amounts of memory. A very large attachment can cause the problem, as can a properly crafted message using Rich Text Format (RTF), multi-part attachments, or other not-yet-disclosed methods that force iOS to churn through memory. ZecOps believes attackers can delete messages after deploying them.
Apple said it has patched the flaws in the current iOS 13.4.5 beta and the next production release of iOS 13. It also affects iPadOS 13. Look for a release soon. (And no, we don’t know why it’s 13.4.5 instead of 13.4.2, as would seem logical.)
The vast majority of users don’t need to make any changes in their behavior, because the exploits have to be paired with other code to carry out malicious activities, like data exfiltration. Since a payload that can break out of Mail and perform other actions is required, the exploits are useful only to government actors or major criminal rings. Attacks would have to be extremely targeted. ZecOps listed a variety of suspected targets it had identified, which included people who work at an American Fortune 500 company, a European journalist, and a Japanese cellular carrier executive.
ZecOps has not yet released enough information on the attacks it observed in the wild to allow other security researchers to validate the company’s claim. The company said it would release proofs of concept to demonstrate how the exploits worked in practice.
ZecOps said it disclosed the vulnerabilities before the typical 90-day window had passed after reporting to a vendor because it believes these exploits pose an imminent threat. The firm said it had seen the exploits used in the wild, and that Apple’s release of a 13.4.5 beta with the fixes could provide enough information for bad actors to exploit the flaws before they were patched in a production release.
These exploits merely crack open the shell of iOS to allow other code to operate. By themselves, they don’t allow execution of arbitrary code. However, zero-day exploits of all operating systems are in constant circulation among criminals, government security agencies, and murky-hat individuals who discover and sell them.
Two Affordable Standing Desks for Temporary Telecommuters
Motorized standing desks are increasingly popular in offices because they let computer users alternate between sitting and standing positions at the touch of a button.
But vanishingly few people outfit their home offices with such bulky, pricey furniture. So what should you do if you’re missing your standing desk or are just looking to get out of your uncomfortable chair?
Affordable, space-saving alternatives for the home exist. I’ve covered a number of these in TidBITS in the past (see “Cheaper Alternatives to Expensive Standing Desks,” 8 April 2016). Today, I’ll tell you about two products that largely replicate the benefits of office-style standing desks but take up less room and are easier on the pocketbook.
Readydesk Allstand
For those working within a limited budget and space constraints, consider a wooden mini-desk, which is a table-top frame with slots for height-adjustable shelves.
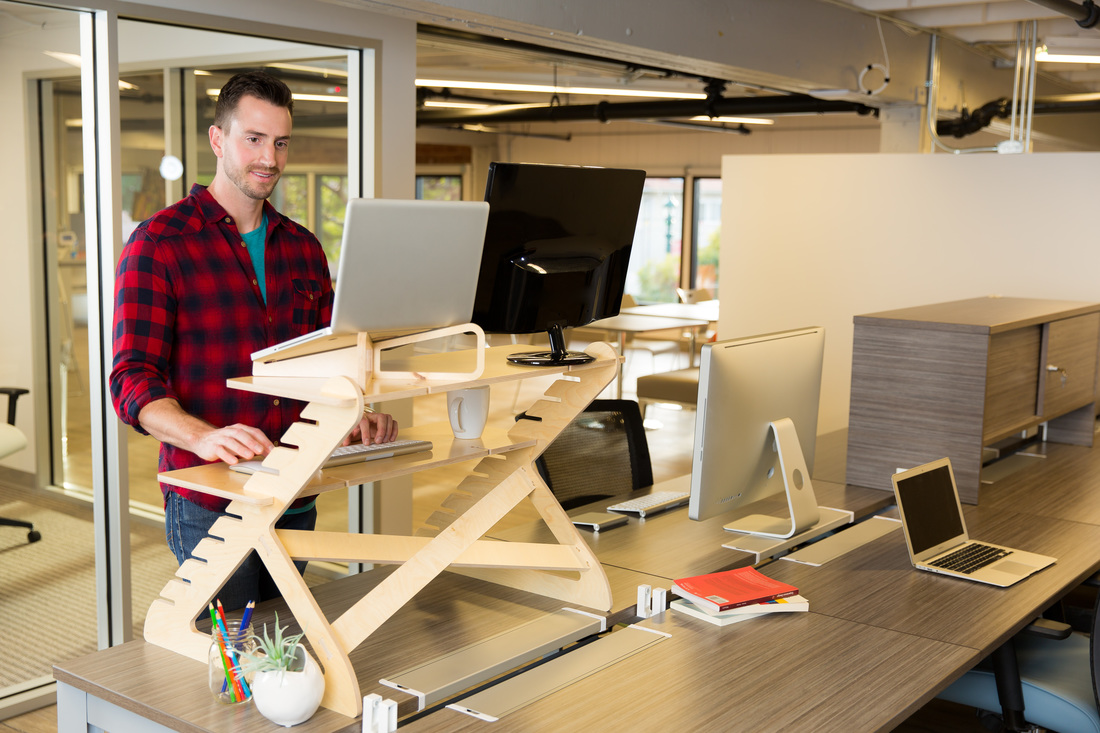
I reviewed one of these for TidBITS a few years ago in the previously linked article. The Readydesk sits atop a desk or table and provides a pair of spacious shelves for an iMac or desktop displays (upper shelf) and input devices (lower shelf). Though not without shortcomings (like the requirement that you wear flannel while working at it), the Readydesk is reasonably priced at $149.
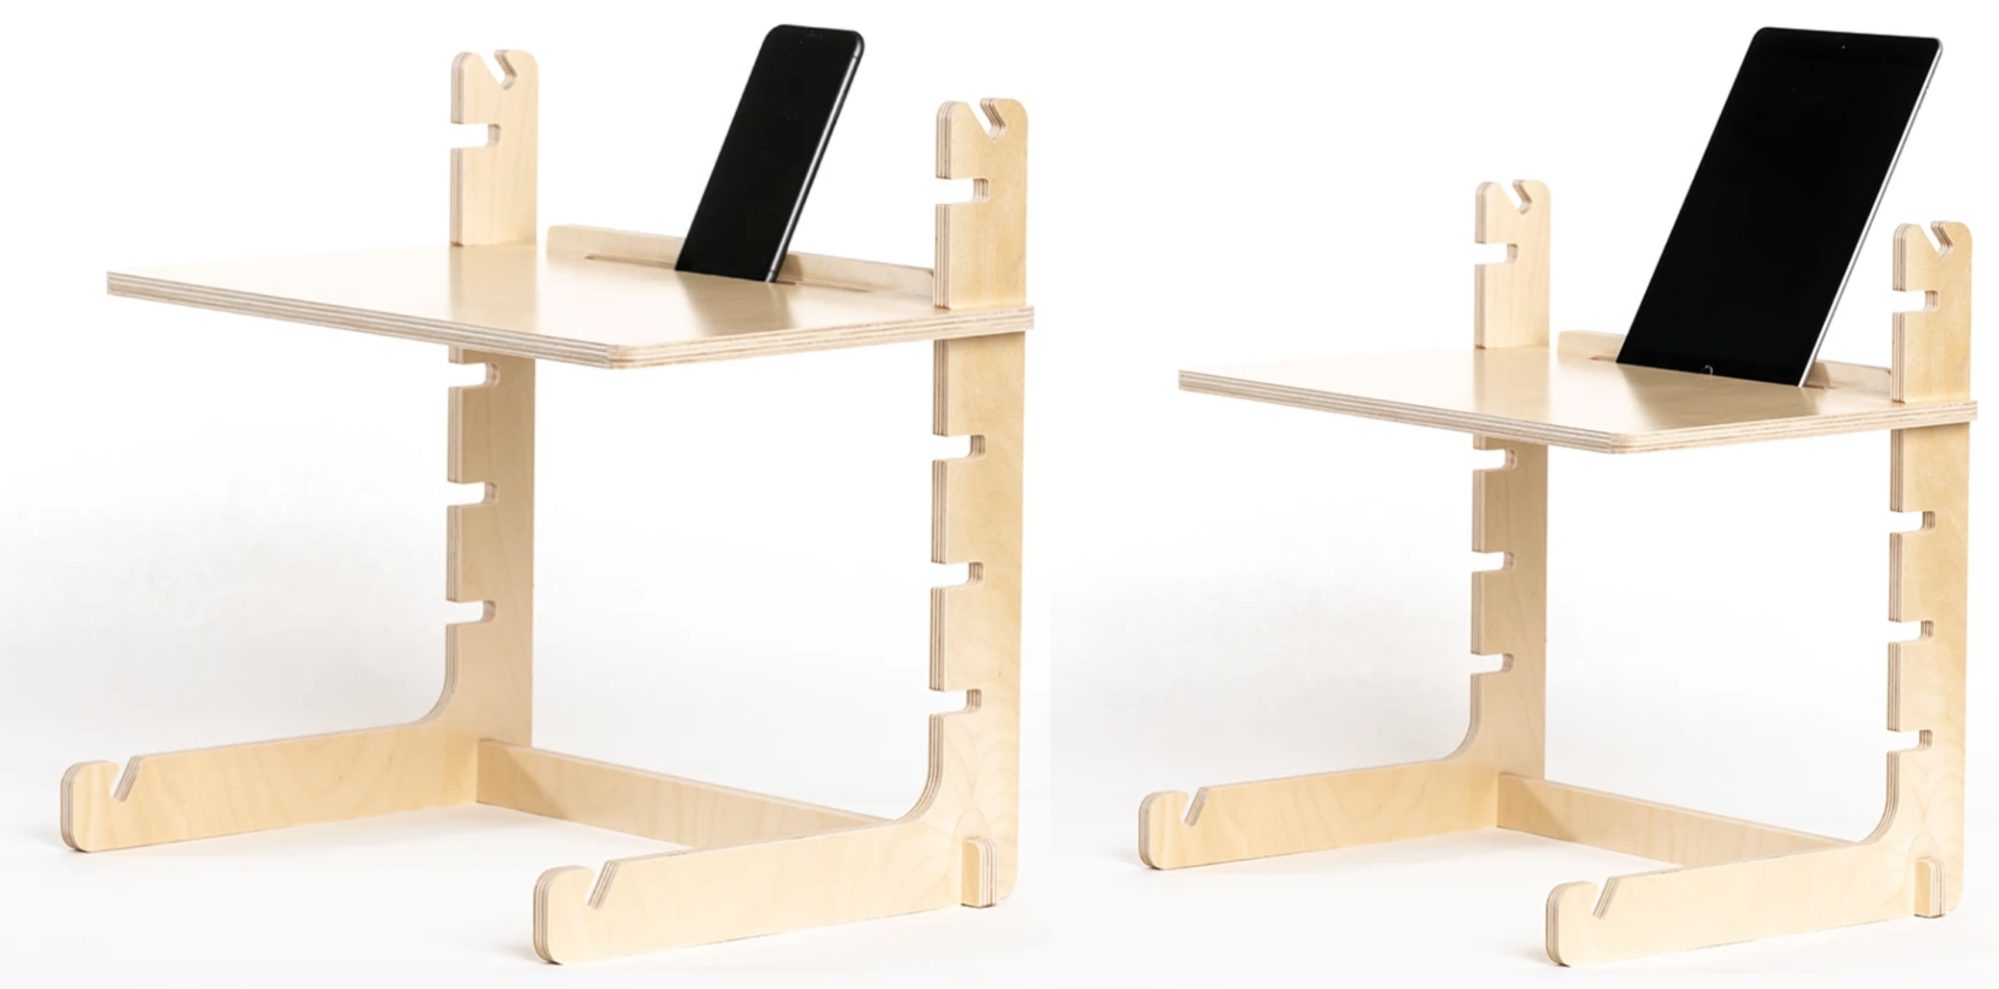
Readydesk’s Allstand, a smaller, simpler version, provides a single shelf and a more compact profile that makes it easier to move around your home. At $49.99, it’s even more affordable.
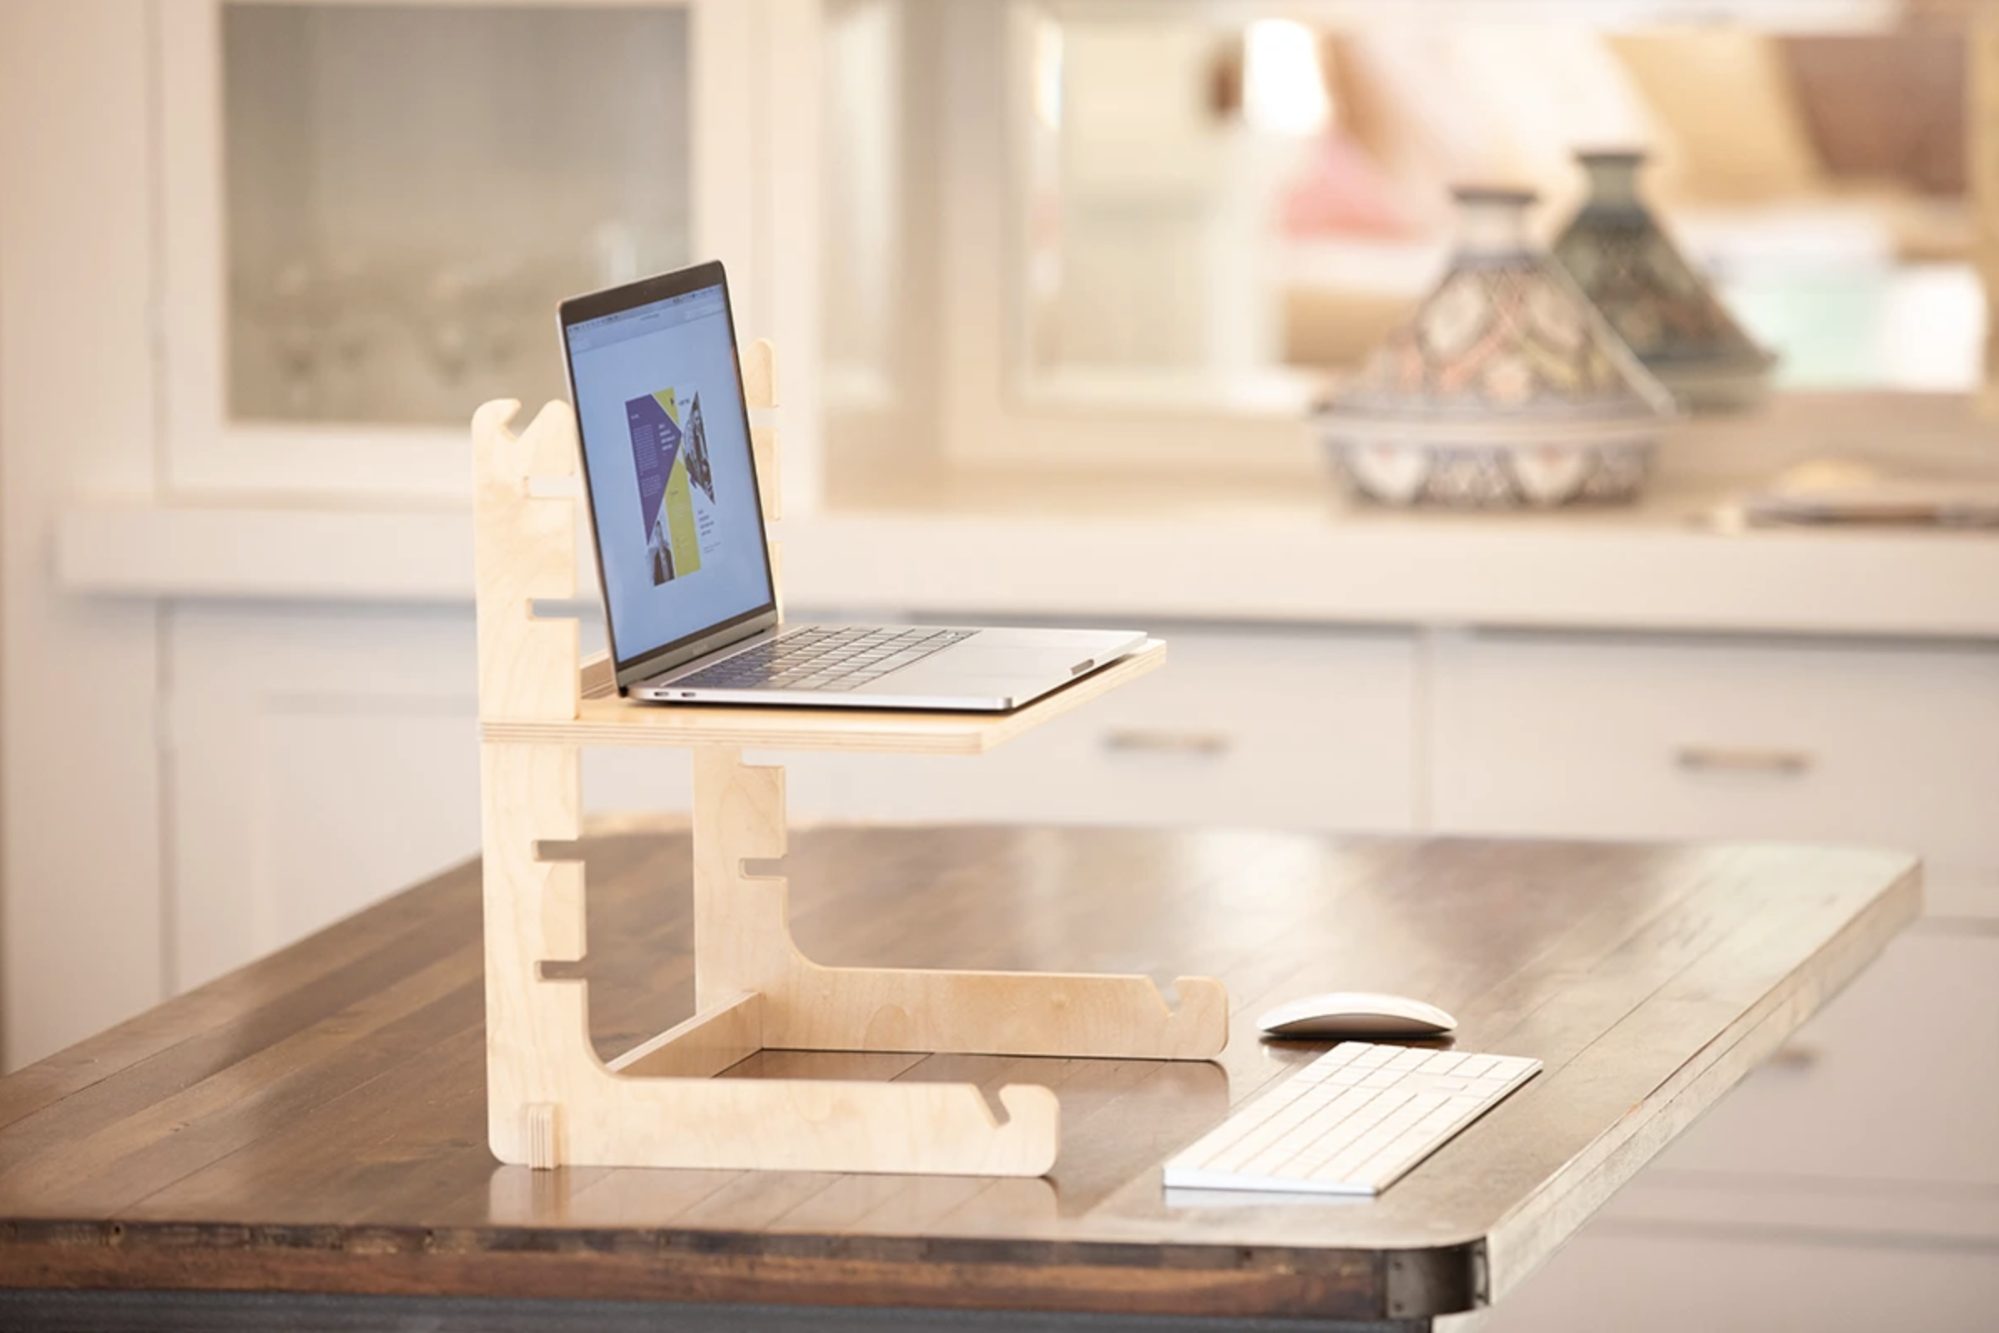
The Allstand’s interlocking components assemble quickly. Two L-shaped uprights lock into place at the bottom with a crossbeam. The L parts offer seven sets of notches into which the shelf can slide at varying heights and angles. A small, elongated part snaps to the back of the top of the shelf to serve as a backstop.

The Allstand has two distinct modes:
- Desk mode positions the shelf horizontally for use as a working surface. Five sets of notches let you adjust the shelf height.
- Easel mode puts the shelf at an angle for use with an iPad, book, or sketchpad. Two sets of notches—one high, one low—enable this.
These modes open up a number of possibilities. Let’s say you want to work on your laptop. In desk mode, the Allstand’s shelf is roomy enough for a 13-inch MacBook Air or Pro, but not quite large enough for a 16-inch MacBook Pro. Likewise, you can work on an iPad in a keyboard case (such as Apple’s latest entry, see “Magic Keyboard for iPad Pro Arrives Early,” 15 April 2020). Regardless of the device, insufficient extra space exists for a standalone keyboard, mouse, or trackpad.
Thanks to those five horizontal slot sets, you can work while standing or sitting. Whichever you choose, try to position the shelf so the laptop’s screen is as close to level with your eyes as possible. The surface on which the Allstand sits should be at a height that lets you use standalone input devices with your elbows at a roughly 90º angle and your forearms parallel to the surface.

Those using iOS devices on the Allstand have another option. You can position an iPad in portrait orientation in a shallow slot at the back of the shelf. The iPad mini or any iPhone also fits in landscape orientation. Thanks to iPadOS 13.4’s newly acquired support for input devices (see “The iPad Gets Full Trackpad and Mouse Support,” 28 March 2020), you can then separate the iPad (on the shelf) from input devices like Apple’s Magic Trackpad 2 and Magic Keyboard 2 (on the supporting surface).
Of course, an iPad with a Smart Keyboard would also fit on the shelf, but as with laptops, such a setup suffers from the poor ergonomics forced by having the keyboard close to the screen—there’s simply no way to avoid having to look down while still being able to reach the keyboard easily.
The Allstand’s easel mode gives you two additional positions. Place the shelf in the lower of the two angled slot sets, and you can work directly on the iPad—sketch with an Apple Pencil, for instance—or indirectly, using a keyboard and trackpad on the table in front of you.
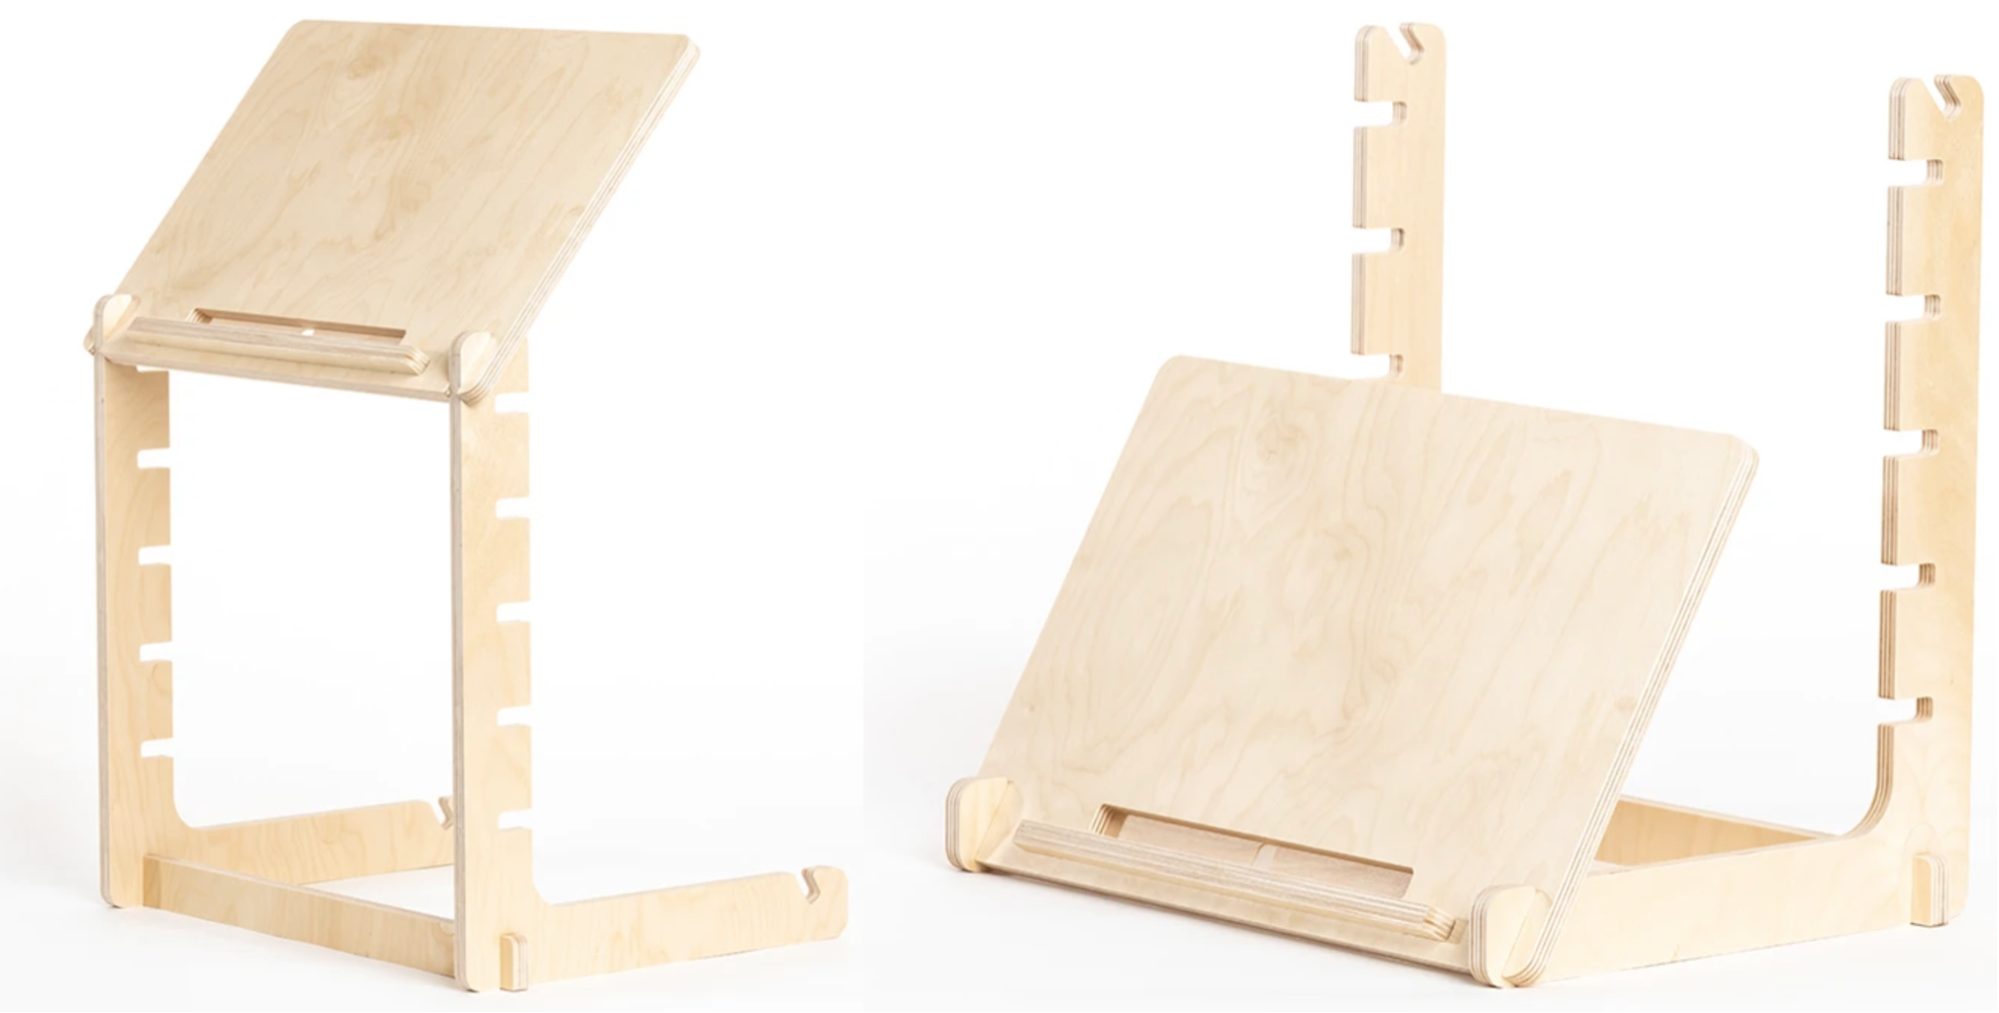
With the shelf in the top angled slot set, you create an elevated viewing platform for an iPad (or another item, such as a cookbook). This approach doesn’t lend itself as well to productivity since there is no convenient place for input devices, but it’s handy to interact with an iPad via finger taps or voice commands while you’re standing up.
Ergotron WorkFit-TS Compact Desk Converter
I’ve written about a rugged class of desk converters from the likes of Vari (formerly VariDesk) and Ergotron. Such contraptions sit atop a table or a desk and largely replicate the functionality of a full standing desk.
The converters I have reviewed for TidBITS (see “Ergotron WorkFit-TX Sit-Stand Desk Converter Works Well but Is Costly,” 27 November 2018, and “Ergotron Lets Mac Users Stand and Deliver,” 5 December 2014) work well but tend to be bulky and expensive.
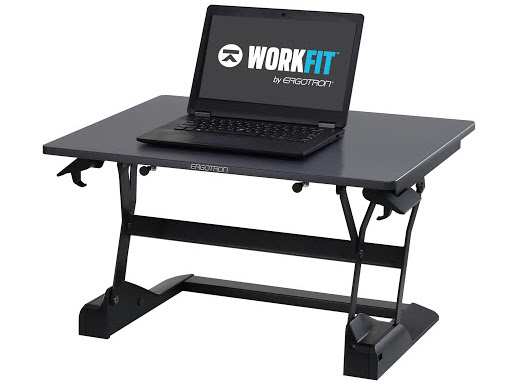
Ergotron recently tried to target consumers with a lower-cost line of converters—seemingly with poor results since the company’s Web site now lists these products as discontinued. It turns out that Ergotron’s best converter for consumers is one of its business products. The WorkFit-TS Compact Desk Converter shares key attributes with other converters:
- Mechanical levers on the left and right for raising and lowering the contraption to work in a standing or sitting position
- A flat surface big and sturdy enough to accommodate bulky, heavy gear such as an iMac or a couple of smaller displays
- A separate, tray-like surface for a keyboard and pointing device

Happily, the WorkFit-TS takes up a lot less space, and, at $299, it’s priced more appropriately for home users. You can readily remove the lower tray if you just want to use the main surface, which has room for an iMac or desktop display along with your input devices, or you can use the deck as a laptop platform.
The WorkFit-TS isn’t perfect. The input-device tray is cramped, and you can’t adjust its height like the tray on the WorkFit-TX. And, though smaller than other converters, the WorkFit-TS still weighs 38.5 pounds (17.5 kg), making it challenging to move around.
The Upshot
The lightweight, compact Allstand is handy when I want my workspace to migrate around the house with me as I work on a MacBook or an iPad, or take my productivity onto the porch now that the Minnesota winter is on the wane.
Meanwhile, I’ve set up the roomier WorkFit-TS in my home office with a MacBook and an iPad side by side for Sidecar-powered sessions. I’ve also experimented with a laptop hooked up to a desktop display—there’s plenty of space for both, assuming the monitor is on the smaller side.
Whether you’re looking for something that can move around the house with you or anchor your home office, the Allstand and the WorkFit-TS make working at a standing desk a reality for legions of temporary telecommuters, without breaking the bank.
Six Lessons Learned from Dealing with an iMac’s Dead SSD
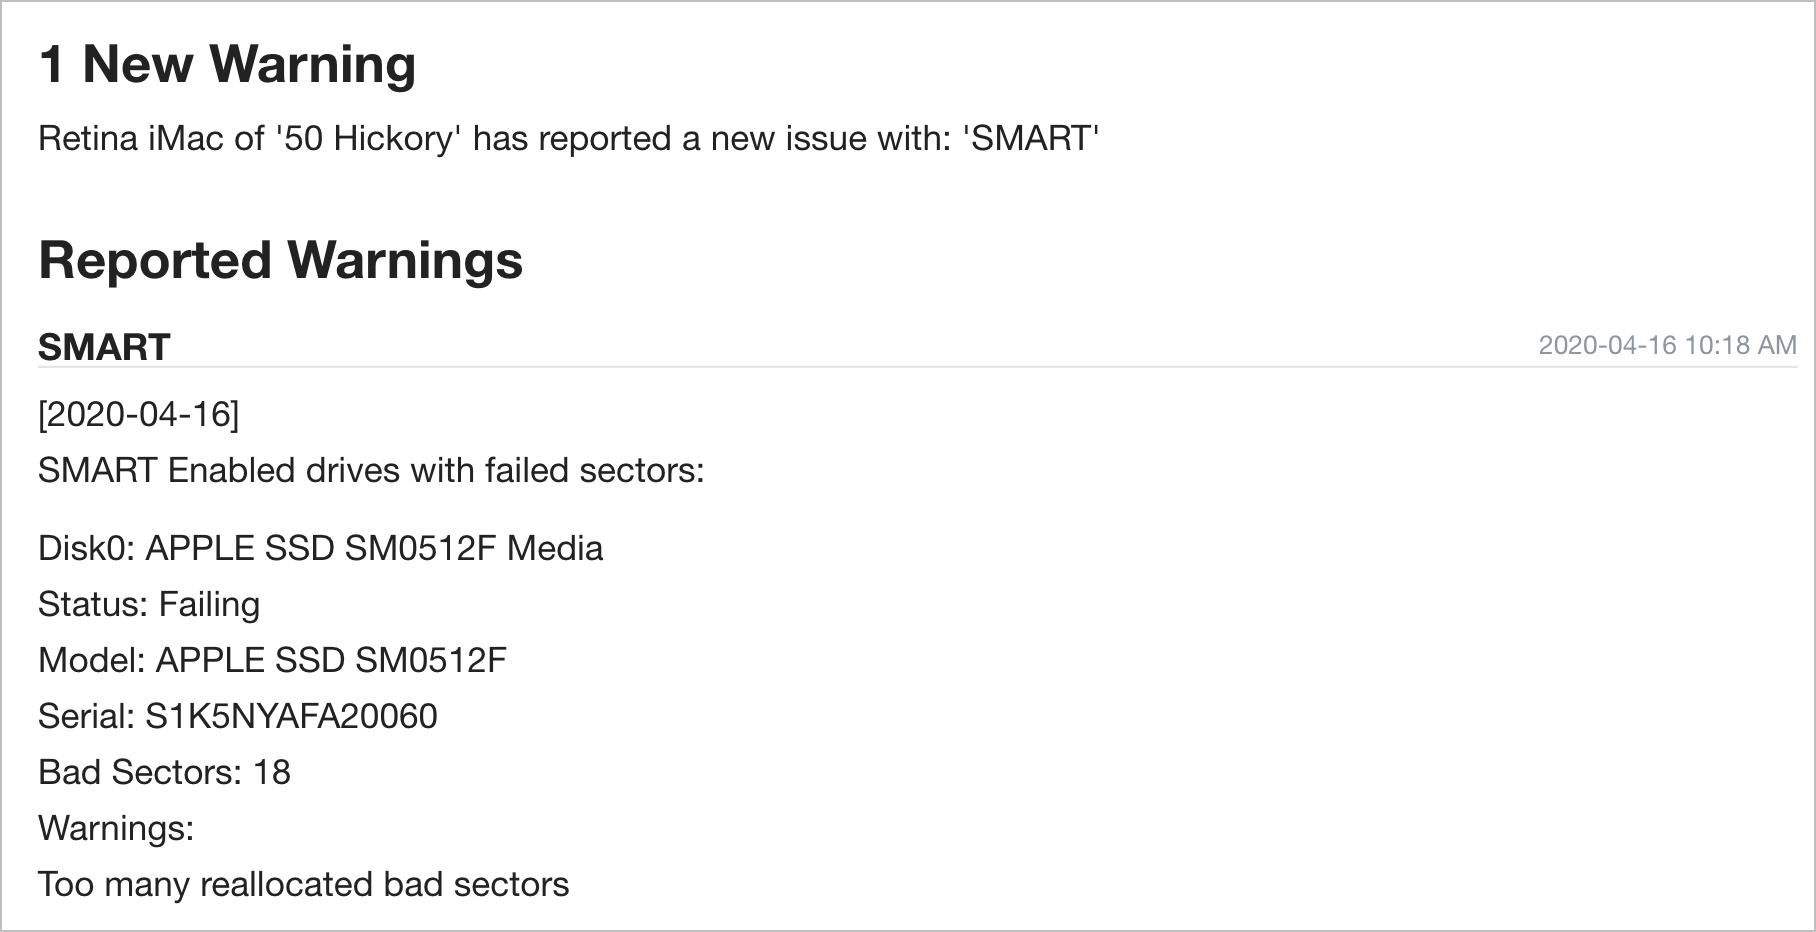
There it was, Wednesday evening, and I was working hard to finish something for the day. Then I received an email from Watchman Monitoring, an essential tool used by sysadmins and consultants to keep track of Macs under their care, telling me about disk errors on my 2014 27-inch iMac’s SSD.
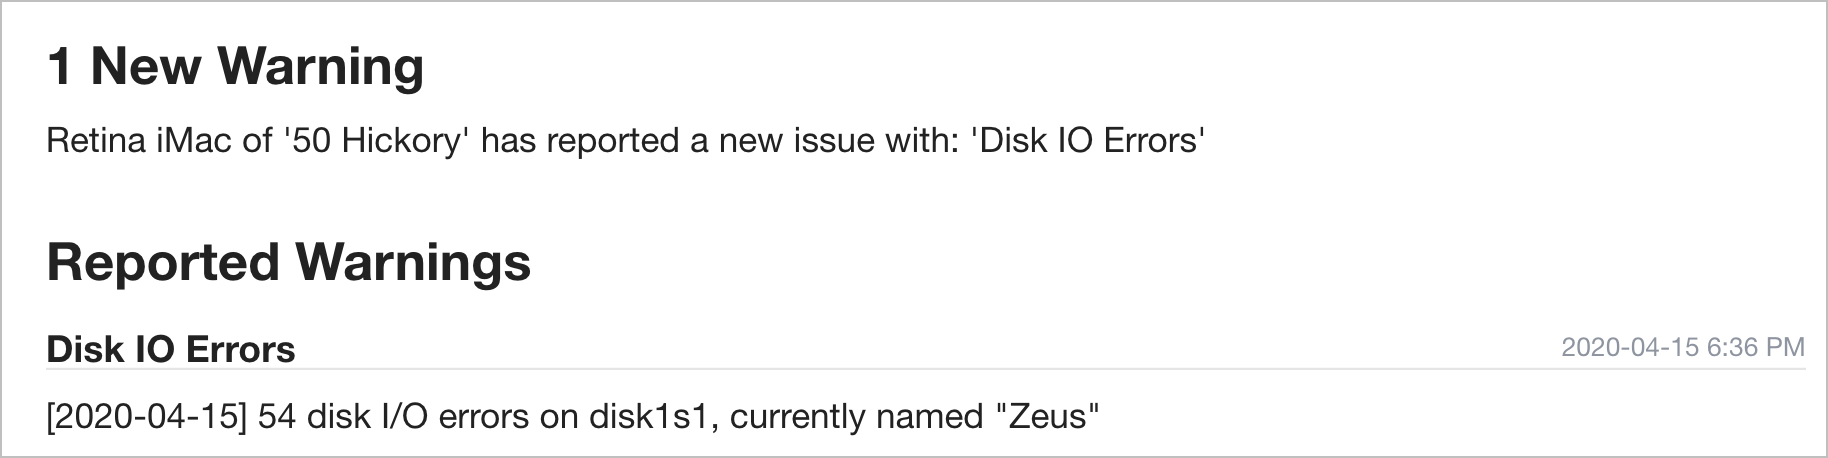
That was concerning, so I finished what I was doing, restarted in macOS Recovery by rebooting while holding down Command-R, launched Disk Utility, started First Aid, went to make dinner, and promptly forgot about it. The next morning, however, I checked the iMac and discovered that First Aid had failed with an error -69842. Another try (which took longer than it should have) failed with the same error. I could find no indication of what that error meant, but Apple’s support documentation was pretty clear about the next step being a reformat and restore. At some point in that process, I booted the iMac successfully again, just long enough for Watchman Monitoring to send an even more ominous warning.
I wasn’t terribly perturbed by all this, since I knew I had both a bootable duplicate from the night before and a Time Machine backup that had been working until I quit for the day, both on an external hard disk, not to mention Backblaze Internet backups. Plus, I could work on my 2012 13-inch MacBook Air during the lengthy restore process. This is the first time I’ve had to reformat an SSD, and I didn’t know if reformatting would map out bad sectors as it does with hard disks, but it seemed worth a try.
But I started to get more worried when Disk Utility threw an error while trying to erase the boot volume (the iMac was running macOS 10.14 Mojave, so it didn’t have 10.15 Catalina’s bifurcated drive structure).
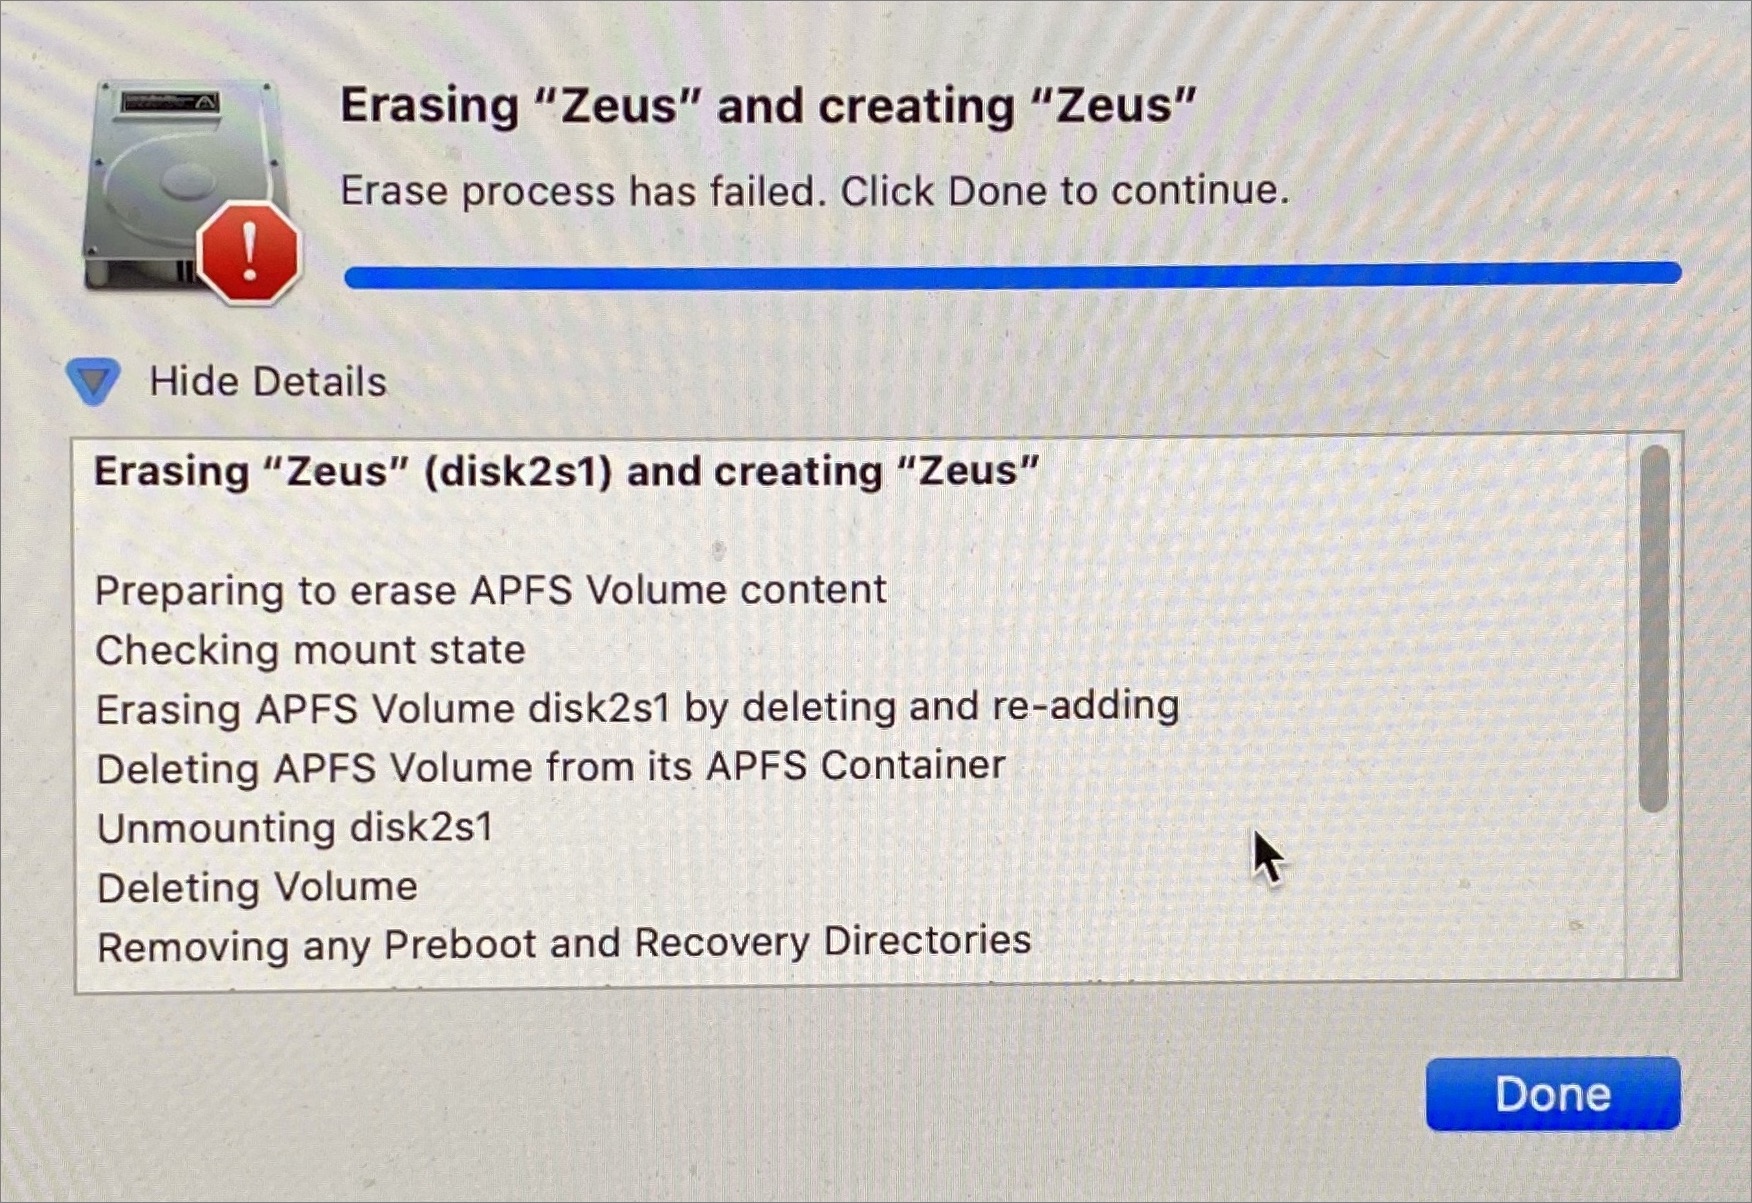
However, when I set the View pop-up menu in Disk Utility to Show All Devices and then erased the actual drive, it succeeded. While still in macOS Recovery, I quit Disk Utility and started to restore from my Time Machine backup. I knew this was going to take a lot of time, and the initial 4-hour estimate kept going up until it was at about 10 hours. After dinner, I checked on it, and it was 61.6% done, which seemed slow, and when I checked several hours later, it was still at 61.6%. Not good.
After I forcibly restarted the Mac, it wouldn’t even boot into macOS Recovery, instead loading Internet Recovery. That was the first suggestion that the SSD was dead, and indeed, once I could look at the setup with Disk Utility again, it was missing entirely and hasn’t shown up since. It’s an ex-parrot.
Because I’m paranoid that way, I booted from my bootable duplicate (which worked, thankfully), and then set it to update yet another bootable duplicate backup I have on yet another hard disk. Then I went to bed—it’s always best to tackle major problems when rested.
The next morning, I pondered my short-, medium-, and long-term options.
The “I need to get my work done” Short-Term Solution
Although I can get my work done on the MacBook Air, its 13-inch screen running at 1440-by-900 pixels is limiting, especially because I’m accustomed to working on the 27-inch iMac next to a 27-inch Thunderbolt Display. My normal desktop is 5120 by 1440 pixels. Plus, while I don’t mind working on a laptop for short periods, the ergonomics of laptop use are horrible, and it’s bad for my body to put in my normal work hours on a laptop.
The obvious solution was to run my iMac from my bootable duplicate. But this proved problematic. The 2014 iMac supports USB 3.0 and Thunderbolt 2, and my Thunderbolt Display adds a FireWire 800 port. The theoretical speeds (in gigabits per second and converted to the common megabytes per seconds for storage devices) on those are:
- Thunderbolt 2: 20 Gbps, which works out to 2500 MBps
- USB 3.0: 5 Gbps, or 625 MBps
- FireWire 800: 800 Mbps, or 100 MBps
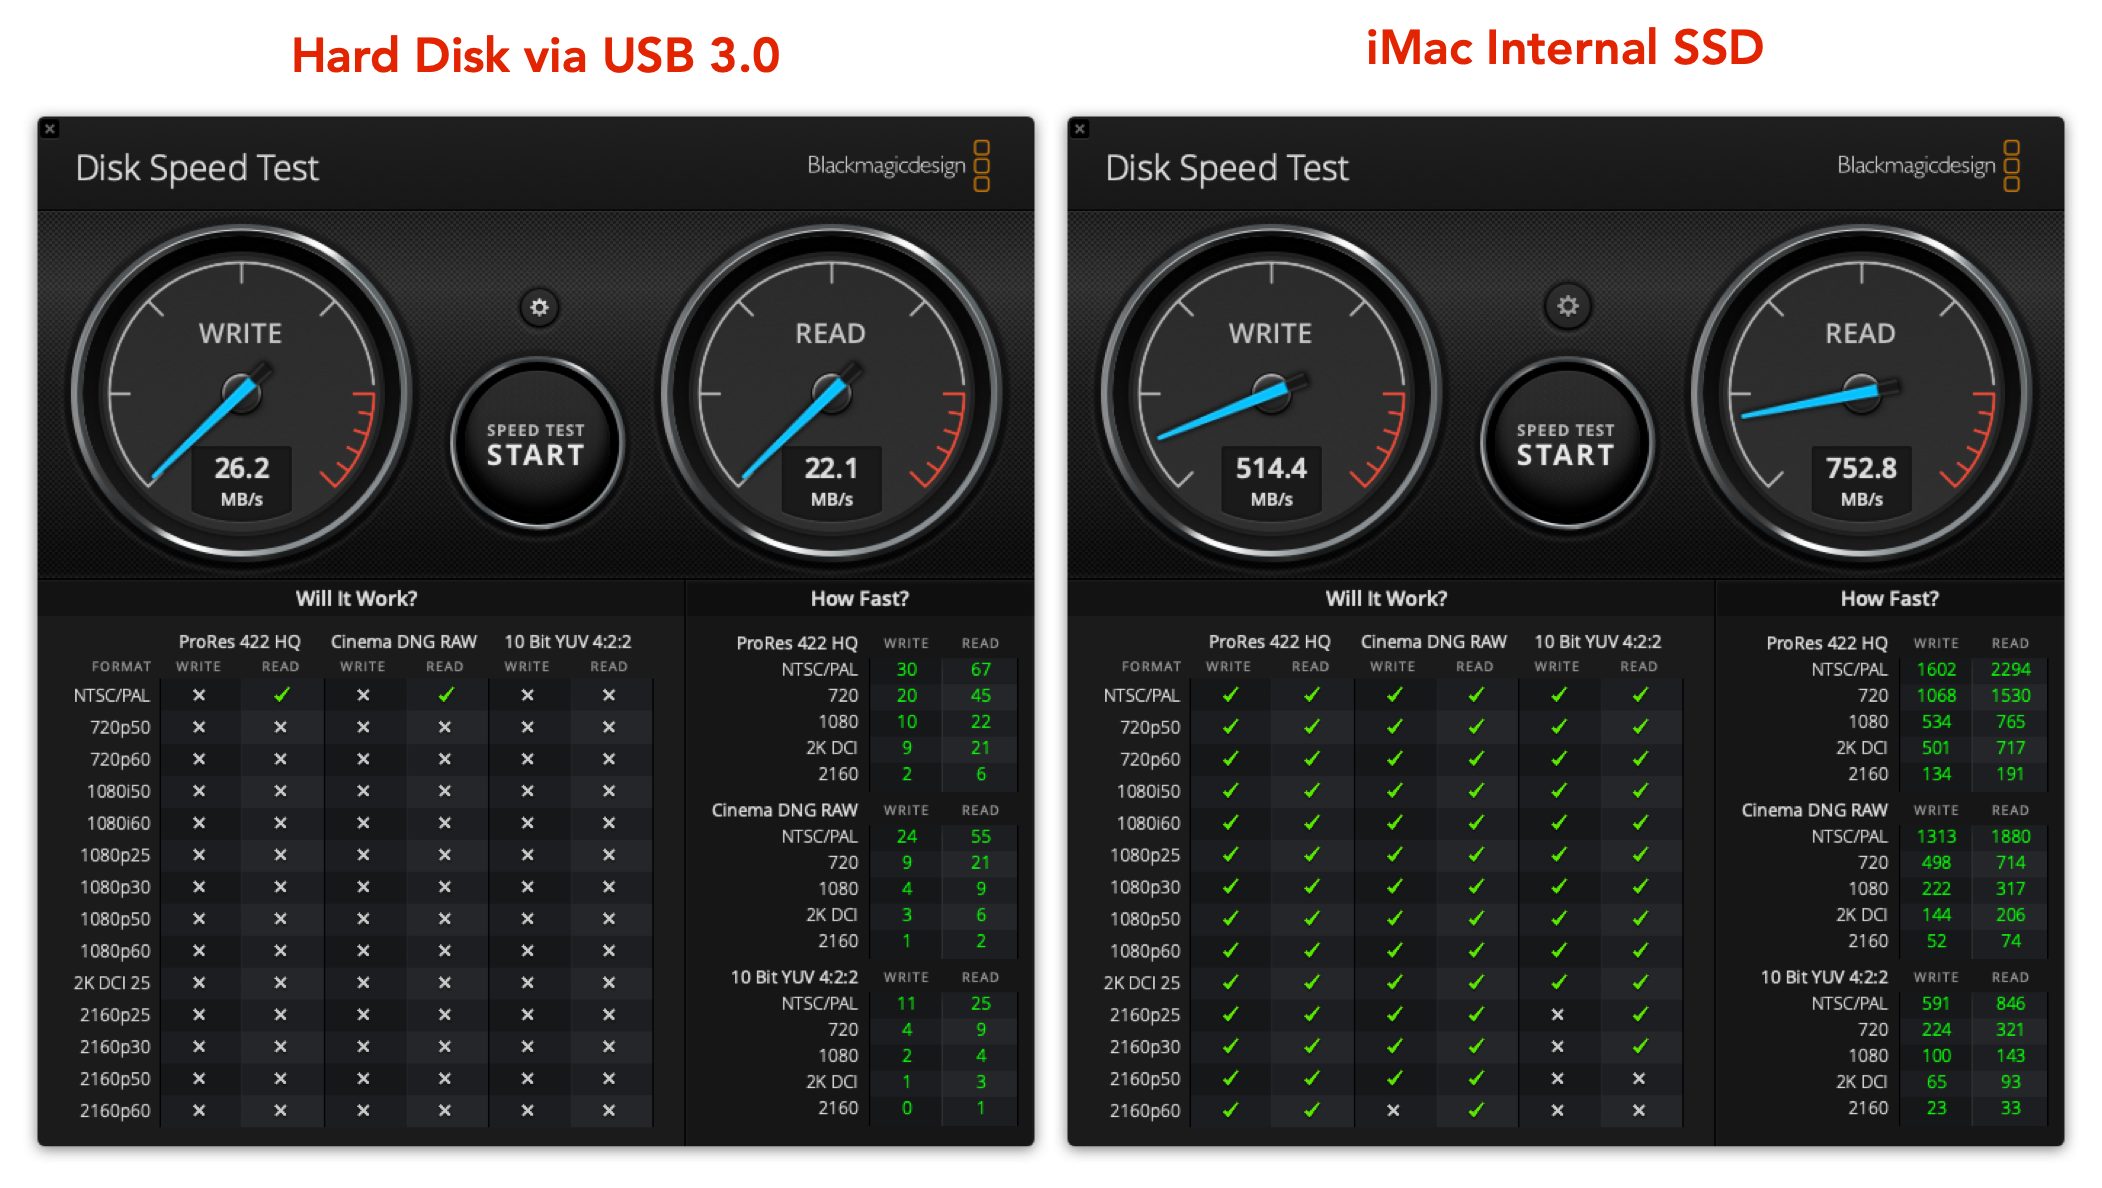
My backup drive is a 2.5-inch Seagate 2 TB FireCuda Gaming drive in an OWC Mercury Elite Pro mini external enclosure. The drive supposedly has 128 MB of cache memory, but it’s only 5400 rpm, and while its speed has never been a noticeable problem while making backups, it’s painful beyond belief to use as a boot drive. USB 3.0 might theoretically be capable of 625 MBps, but when I tested the drive in Blackmagic Speed Test, it averaged just 20–25 MBps for both read and write speeds. Ouch. I didn’t think of switching to FireWire at the time, but interestingly, it was slightly better at 25–30 MBps for the same drive. That leads me to:
Lesson #1: A bootable duplicate should be fast enough to use as your boot drive, or it’s essentially a read-only backup like Time Machine.
For comparison, the internal SSD on Tonya’s identical 2014 27-inch iMac laid down read speeds of about 750 MBps and write speeds of about 500 MBps. You can see why the hard disk was unacceptable, given that it was 20 to 30 times slower.
The solution I ended up implementing eliminated the performance problem. I restarted my MacBook Air in Target Disk Mode by holding down the T key at startup, and then I connected it to the iMac using Thunderbolt 2 and booted from it. Startup was slow but acceptable, and once the iMac was running, performance wasn’t noticeably different than normal. Keep in mind that I do very little that stresses the drive. Blackmagic Speed Test showed read and write speeds of about 120 MBps, or 5 to 6 times faster than the hard disk. Interestingly, these numbers were quite a bit below what I got when I eliminated Thunderbolt 2 from the equation and tested the MacBook Air’s SSD on its own. So Thunderbolt 2 must be slower than the MacBook Air’s internal bus.

Although this approach got me up and running, it suffered from a few other problems. Most annoyingly, iCloud and quite a few apps tie their credentials to the internal hardware of the Mac, so switching from it being a standalone MacBook Air to being a boot drive for an iMac caused iCloud and those apps to ask for authentication every time I wanted to move between machines. For reasons I never figured out, even my extensions in Brave disappeared each time I swapped Mac brains underneath the same storage device. Plus, that MacBook Air has been kernel panicking in sleep for some time, something I had previously chalked up to a dodgy Catalina install but that I now realize is related to failing hardware, perhaps with a thermal trigger, since it only happens when the case is closed. I now came up with:
Lesson #2: Target Disk Mode is useful only for occasional troubleshooting and emergency use, not as an everyday driver.
(I had briefly considered replacing my MacBook Air with a new model, which I’ve been planning to do soon anyway, and using it to boot the iMac. But the awkwardness of Target Disk Mode made that unattractive. Worse, a test using Tonya’s 2016 MacBook Pro failed—I could put it into Target Disk Mode, but the iMac never saw it over USB. It might have worked over Thunderbolt, but I didn’t have a Thunderbolt 2 to Thunderbolt 3 adapter.)
Regardless, booting from the MacBook Air in Target Disk Mode meant that I could work effectively on my big screens, and I could even access files and apps that existed only on my bootable duplicate. (My iMac’s SSD was 500 GB, whereas the MacBook Air is only 250 GB, so the two have similar setups in key ways, but they aren’t identical.)
The “I can’t work like this indefinitely” Medium-Term Solution
Between the split personality problem every time I connected or disconnected the MacBook Air, the slightly inadequate setup, and the kernel panics, I needed a better solution for the next few weeks or months.
Once again, there was an obvious solution—replace the internal SSD in the iMac with a new one—and once again, I didn’t take it. It was the cheapest and cleanest solution, but it also came with the most downtime and the most risk. I’m probably capable of cutting the screen off a 27-inch iMac—yes, you have to cut through the adhesive that holds it on—replacing the SSD, and reattaching the screen, but there’s always a chance of making a fatal (to the iMac) mistake. Worse, in the (extremely useful) TidBITS Talk conversation on the topics, my buddy Ron Risley told a story about how he used OWC’s Hard Drive Upgrade Kit to replace the drive in a 27-inch Retina Mac only to have the re-adhered screen fall off.
(I may still go down this path since I’ve now taken over another 2014 27-inch iMac that TidBITS bought for Josh Centers and replaced just a few months ago. He had been having trouble with it—specifically with its Fusion Drive—for some time, so I might open up that iMac and replace its Fusion Drive with an SSD to see if that resolves its problems. If so, I’d know how to do it for my iMac, and then I’d have two restored iMacs!)
There is a local repair shop that’s open and would probably do the work. Still, between not having any experience with them, not wanting to leave the house during New York’s stay-at-home order, the potential for several days of downtime, and the risk that they’d mess something up, I decided against that option too. (Having Apple repair the iMac isn’t an option, since Apple retail stores are closed, and none are within an hour drive anyway. There is an Apple Authorized Service Provider in Ithaca, but they’re doing repairs only for essential businesses, and we haven’t been impressed with them in the past anyway.)
I also eliminated the second-most-obvious solution, which I’ll discuss shortly, and decided instead to buy an external SSD to boot the iMac. Since the MacBook Air’s performance in Target Disk Mode over Thunderbolt 2 was acceptable and still below what USB 3.0 should be able to do, I figured that an external SSD would be as good or better. I could also get a 1 TB model that would relieve the space pressure I had been feeling and would let me move my Photos library back to the SSD from its hard disk exile.
The main question here was how much to spend.
- The cheapest option was to buy a bare SSD and use a toaster case I have around, but it’s sufficiently old that I worried that its controller might not be able to handle the SSD or that its performance might be lousy. It looked like I could get a bare 1 TB SSD for about $100–$150 after tax.
- The “just-right” option was to buy a SATA III SSD in a USB 3.1 Gen 2 case. That variant of USB can theoretically do 10 Gbps, or 1250 MBps, but the SATA III drive interface runs only at 6 Gbps and can provide about 600 MBps of throughput. Prices were around $200 after tax.
- The most expensive option was to buy a PCIe SSD in a Thunderbolt 3 case, which would run $300–$400. I’m a little fuzzy on the details here, but PCIe SSDs rely on a communications interface called NVMe, and the upshot is significantly better performance. With a 40 Gbps Thunderbolt 3 interface, an NVMe SSD can do as much as 2400 MBps read and 1800 MBps write. I’d be limited to half that due to having only Thunderbolt 2, but the bigger problem is that it seems that Apple’s Thunderbolt 2 to Thunderbolt 3 adapter (which costs another $49) doesn’t work with bus-powered Thunderbolt 3 devices. Augh!
Lesson #3: When you keep a Mac as long as possible, you can run into connectivity or performance issues when buying new peripherals. Plan ahead with a full collection of adapters.
As you might guess, I went for the “just-right” option and chose the popular Samsung T5 external SSD. It’s tiny, has a single USB-C port that supports USB 3.1 Gen 2, comes with the necessary cable to attach it to my iMac’s USB-A ports, and costs $200 after tax. I ordered it directly from Samsung to avoid Amazon shipping delays and got it two days later.
The Long Term Solution
Remember the second-most-obvious solution above? That was to slap a new 27-inch iMac on my Apple Card and move on. I’ve been starting to think about replacing my iMac anyway, and while it was tempting to use this hardware failure as an excuse, Apple hasn’t updated the iMac in over a year, which suggests that now is not the best time to buy.
Regardless, at some point before the end of the year, I’ll probably replace the iMac, either with a new 27-inch iMac because I love its 5K Retina screen, or with a Mac mini coupled with a new class of curved 49-inch screens running at 5120-by-1440 pixels from the likes of Dell, Philips, and Samsung. These so-called QHD monitors aren’t as high quality as would be ideal, having a pixel density of only 109 ppi versus the 218 ppi of the iMac’s 5K display and the LG UltraFine 5K Display, but they’re priced similarly to the LG screen for a lot more real estate. Oh, the anticipation!
Restoring Isn’t Always as Easy as It Should Be
I thought I was home free once the Samsung T5 arrived, but more obstacles remained. As I started down the path of restoring my data to the Samsung T5, I found myself in a weird set of interlocking Catch-22s caused by not having kept my hardware and software up with the times. Although my MacBook Air has been running Catalina fine since it was released, I hadn’t yet upgraded the iMac from Mojave.
Why was this a problem? I had reformatted the Samsung T5 from ExFAT to APFS, which is appropriate for Mojave when running on an SSD. I know that the macOS installer creates a Recovery partition during the installation process, but what about when restoring with SuperDuper? I was worried that SuperDuper would have no way to know it should create a Recovery partition when moving an HFS+ drive to an APFS drive.
(That was a guess. When moving 360 GB around, you don’t want to guess wrong and have to waste another day repeating the copy. However, I subsequently talked with Dave Nanian of Shirt Pocket, and he set me straight by pointing me to this blog post from 2017. SuperDuper will back up the Recovery partition whether the source drive is HFS+ or APFS, and whether the backup drive is HFS+ or APFS. When restoring to APFS, SuperDuper does the right thing as well, creating and restoring to the Recovery partition. When restoring to an HFS+ drive, SuperDuper can restore to an existing Recovery partition if one exists, but if not, you have to reinstall macOS so Apple’s installer can create it properly for you. Since I had formatted the Samsung T5 as APFS, all would have been fine. Live and learn!)
Not realizing that SuperDuper would have worked, I decided I needed to reinstall macOS, which is often a good idea anyway. I initially tried to reinstall Mojave, which was what I had been running, but that proved problematic. I had a copy of the Mojave installer available, but when I booted using the MacBook Air in Target Disk Mode, it was running Catalina, and wouldn’t let me install Mojave because it was too old. When I booted using the version of Mojave on the bootable duplicate hard disk, I was told that the Mojave installer was damaged. (I have no reason to believe that’s true, but I couldn’t really argue with it. It could have been related to the expired certificate problem—see “Redownload Archived macOS Installers to Address Expired Certificates,” 28 October 2019). So much for my local installer.

Lesson #4: Check your archived installers periodically; don’t assume they’ll necessarily work.
Back to macOS Recovery. However, because the Recovery partition on the internal SSD was no longer available, booting with Command-R held down put me in Internet Recovery, which could take up to 10–20 minutes. After that wait, using the Reinstall macOS option presented me with 10.10 Yosemite, which was the version of macOS that came with the iMac. For time reasons alone, I didn’t want to install Yosemite and then have to upgrade, and I wasn’t entirely sure how I could upgrade to Mojave anyway, since Software Update would try to give me Catalina.
Eventually, I used Command-Option-R to boot into Internet Recovery and get the latest version of macOS for my iMac, which was indeed Catalina. I had been planning to upgrade to Catalina after the release of 10.15.4 anyway and had been putting it off, so being forced into the upgrade didn’t bother me too much. I had been thinking I’d do it separately from the switch to the Samsung T5 to reduce the number of variables if I encountered any problems, but that wasn’t in the cards.
Lesson #5: You can put off macOS upgrades for a while, but something will ultimately force you to upgrade. It’s better to be ready for that eventuality than to pretend that it can be avoided forever.
(What may not be clear from my retelling of the story above is just how maddening this process was, since booting from the MacBook Air brought with it cabling swaps and authentication resets, booting from the hard disk’s bootable duplicate took nearly 6 minutes, and booting from Internet Recovery could take 10–20 minutes. I probably spent several hours just rebooting the iMac repeatedly in an effort to get to the point where I could reinstall macOS.)
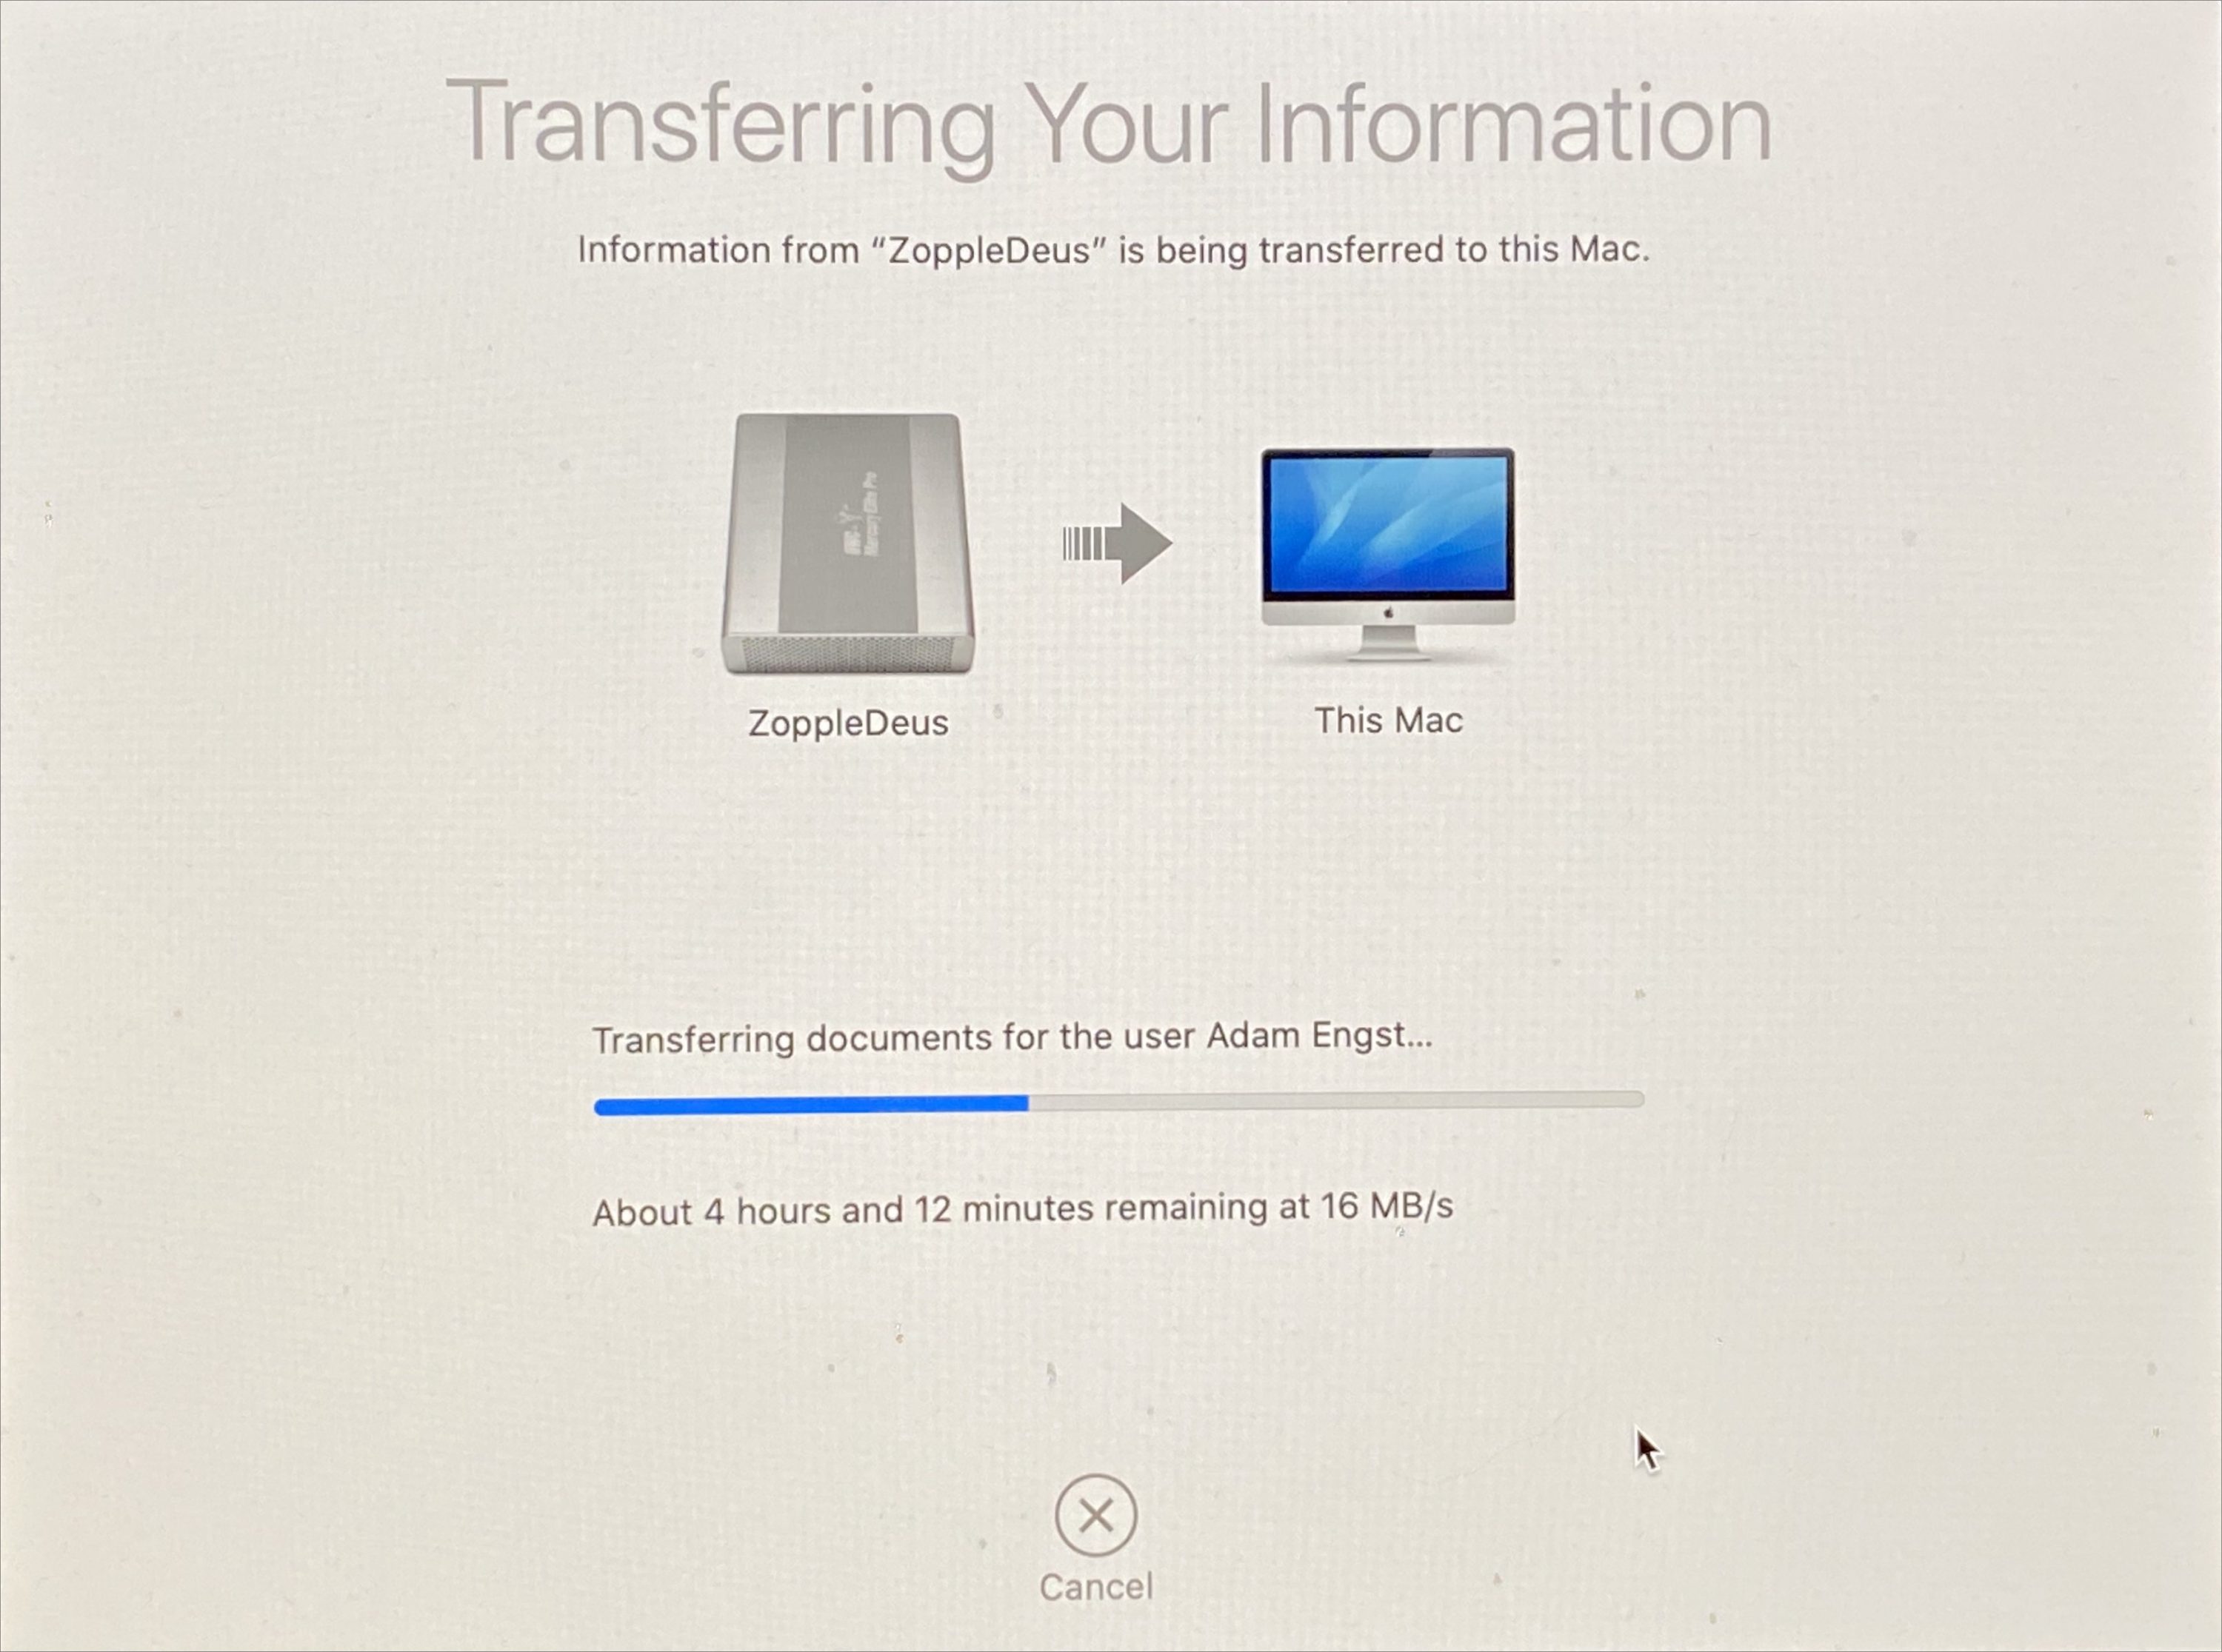
In the end, installing Catalina worked as it should, and I was able to restore the entire contents of my bootable duplicate using Setup Assistant. It took hours, although how many I don’t know since I wasn’t watching. One question I was unable to answer, but which I’d be curious to test, was whether it would be significantly faster or slower to restore from Time Machine rather than the bootable duplicate.
After installation, the first few boots were pretty rough because I have quite a few apps that launch at startup. Until I went into Keychain Access, selected my “adam” keychain, and chose File > Make Keychain “adam” Default, I was deluged with dialogs requesting my keychain password. Eventually, though, I managed to log in to every app and get things working again.
Lesson #6: Reinstalling macOS and restoring from a backup may not leave your Mac in an entirely functional state. Be prepared for additional work after restoring.
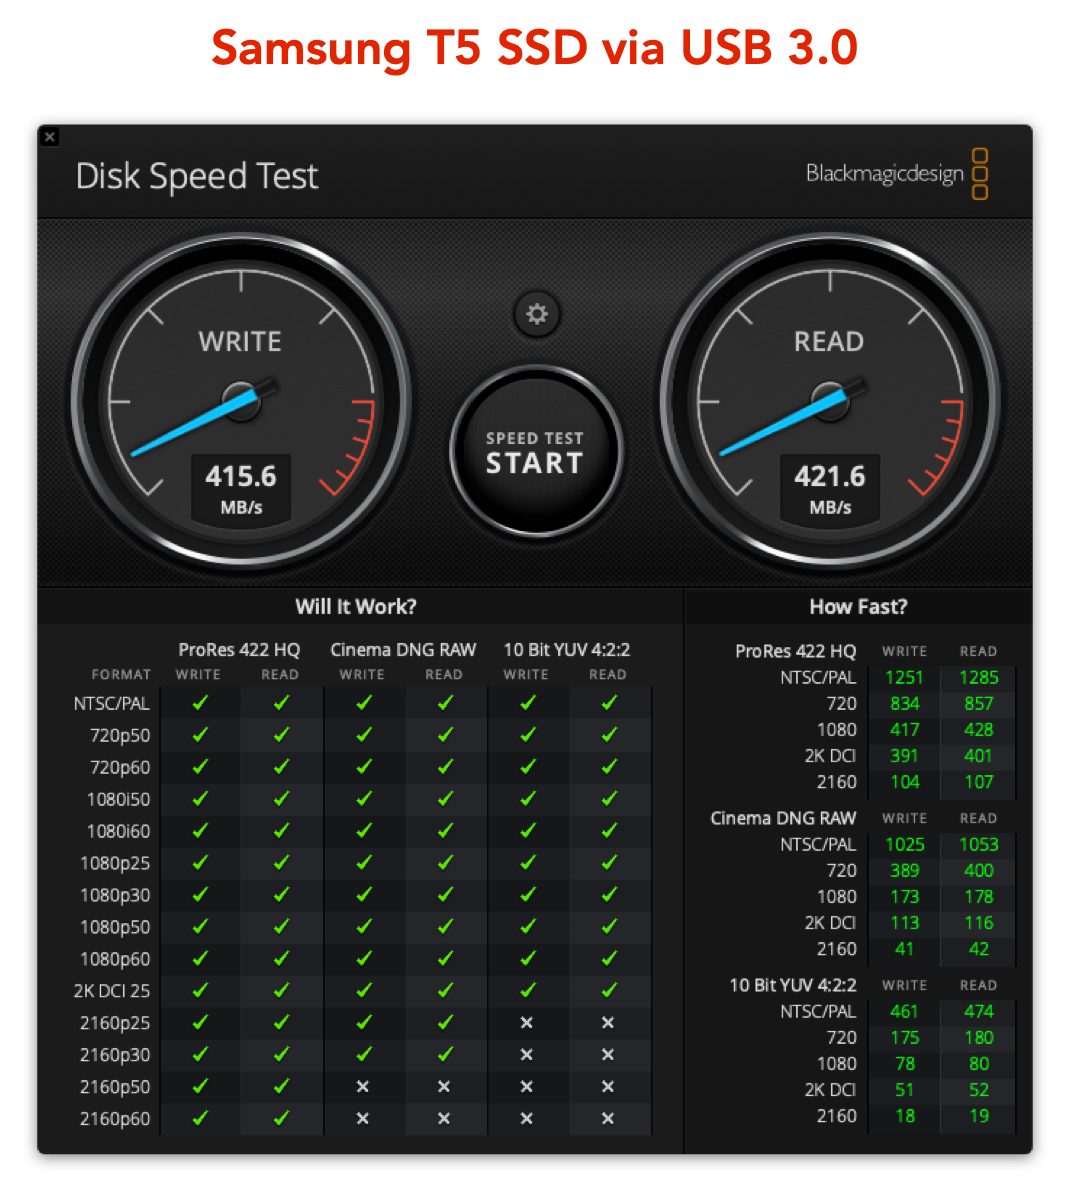 I’ve had only a few days with the Samsung T5 as my boot drive, and while most things seem to be working normally, things aren’t exactly as they were. Starting up and shutting down both take longer than seems reasonable (2–3 minutes for startup). Even booting into macOS Recovery is slower than it should be, taking about 8 minutes. What’s particularly odd about that is that the Samsung T5 has excellent performance over USB 3.0, even better than the MacBook Air over Thunderbolt 2. It’s showing over 400 MBps for both read and write speeds. My best guess right now is that the Mac is still looking for and receiving errors from the internal SSD at startup and shutdown, such that it takes a while for those errors to time out.
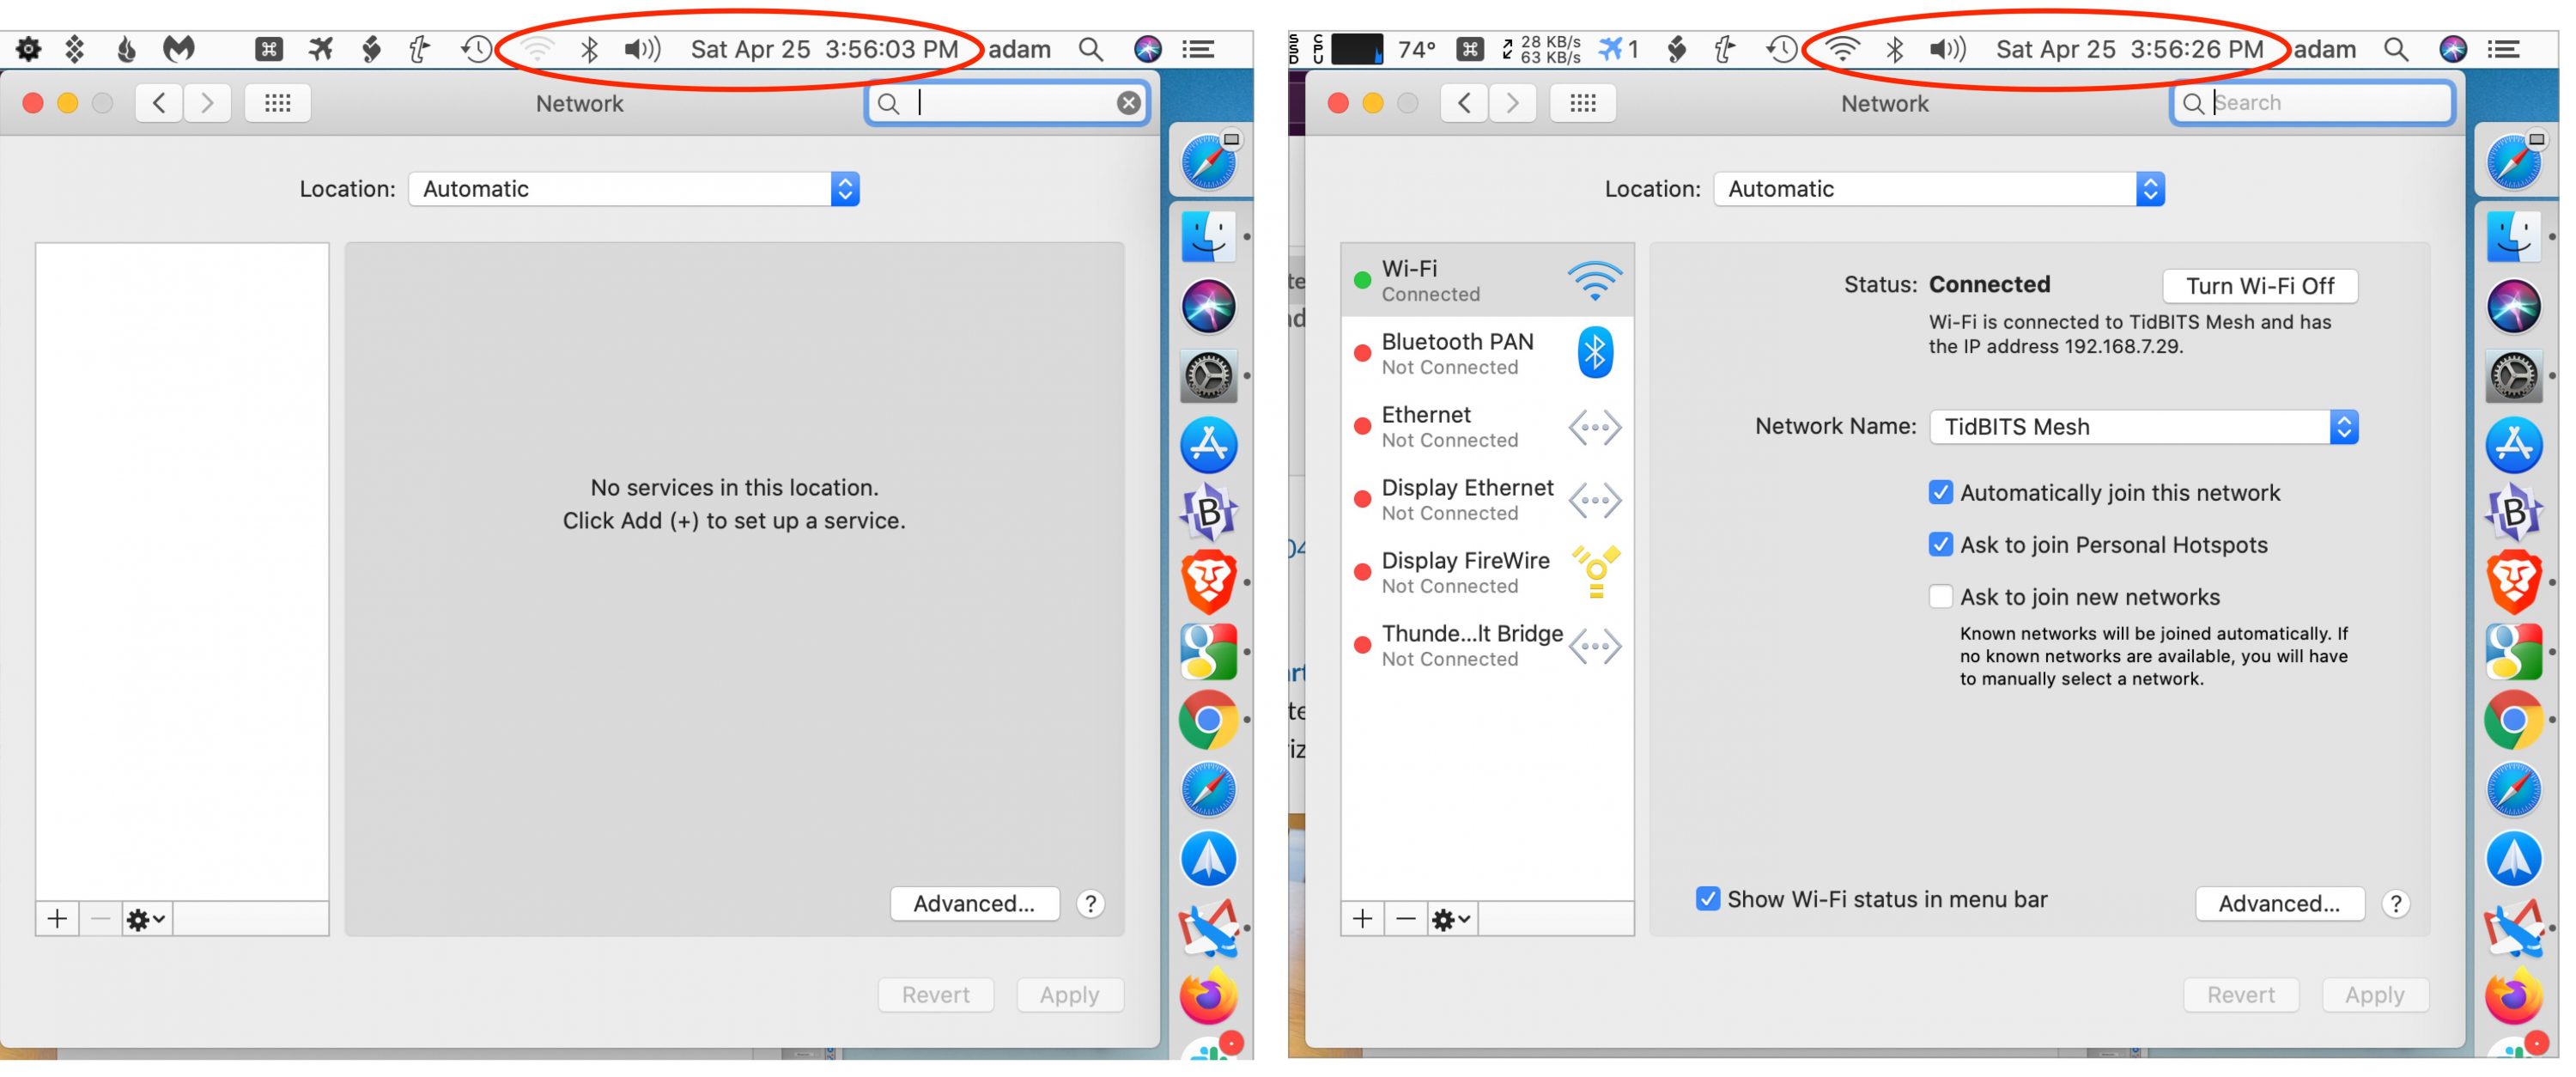
Even stranger, for reasons I still don’t understand, when I restart and log in, Wi-Fi is unavailable for over 2 minutes. And I mean unavailable—clicking the Wi-Fi icon in the menu bar doesn’t give a menu, and no networking services appear in the left sidebar of System Preferences > Networking. Between 2 and 3 minutes after boot, Wi-Fi wakes up, and all is normal. This also happened a few times while booting from the MacBook Air in Target Disk Mode, and I haven’t yet had time to ponder all the variables to figure out what might be going wrong. Freaky stuff.
Happily, I appear to have dodged a virtual memory problem that has plagued some people booting from external SSDs. In some of these scenarios, macOS fails to create virtual memory swap files, seemingly because of an inability to mount the APFS swap volume. There’s a workaround involving complicated scripting, but if I ran into this, I’d start by reformatting the drive and reinstalling macOS from scratch, since I believe the macOS installer would set things up correctly.
I suspect that this saga isn’t yet over, and if I learn any more lessons in the School of Hard Tech Knocks, I’ll be sure to share them. In the meantime, I hope following along with my thinking helps your future troubleshooting and recovery efforts.