#1516: Security fix for all Apple OSes, macOS 10.15.5 battery health management, Logitech Combo Touch, MFi hearing aid integration
With last week’s macOS 10.15.5 update, Apple introduced a battery health management feature to extend the lifespan of batteries in recent MacBooks, but it comes at the cost of everyday runtime. We thought that would be all the operating system news for the week, but just before we closed this issue, Apple updated all of its operating systems to address a kernel vulnerability. Thinking about a new iPad Pro and Magic Keyboard? As an alternative, consider the Logitech Combo Touch trackpad keyboard case, which works with recent Touch ID iPads—Josh Centers has a review. Finally, Klaus Wirtz joins us from Germany to offer some rare insight into how MFi hearing aids work with iOS. Notable Mac app releases this week include Safari 13.1.1, Security Update 2020-003 (Mojave and High Sierra), Agenda 10.0.1, OmniFocus 3.8, FileMaker Pro 19, and Airfoil 5.9.
Kernel Vulnerability Causes Apple to Update All Operating Systems
If you’ve ever wondered if all of Apple’s operating systems—macOS, iOS, iPadOS, watchOS, and tvOS—are really based on the same code, today’s updates should show just how true that is.
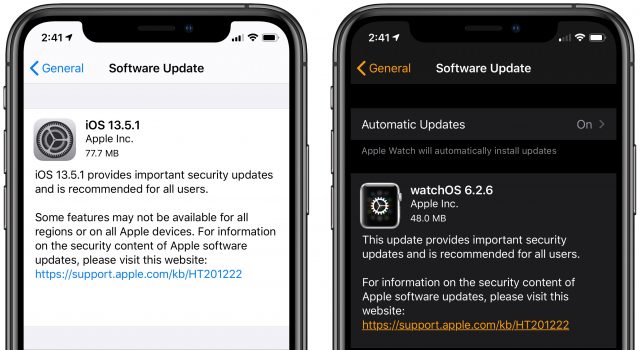
Apple just pushed out macOS Catalina Supplemental Update (1.2 GB), iOS 13.5.1 (77.7 MB) and iPadOS 13.5.1 (284.8 MB), watchOS 6.2.6 (48 MB), and tvOS 13.4.6, along with what we presume is an updated version of Security Update 2020-03 for High Sierra. The only change listed for each of these releases is along the lines of “This update provides important security updates and is recommended for all users.” The security note pages linked above all say, “A memory consumption issue was addressed with improved memory handling,” and note that the fix addresses CVE-2020-9859. Details of that vulnerability are still being held; perhaps they’ll reveal more than “An application may be able to execute arbitrary code with kernel privileges.”
We suspect this vulnerability is an ugly one. Anything that could give apps the capability to execute code with kernel privileges is concerning—it could do anything it wanted on the device from installing a keylogger to surreptitiously recording the user to erasing all local storage. It’s also possible that the vulnerability is fairly easily exploited, which would put hundreds of millions of Apple users at risk.
9to5Mac suggests that these releases are to address the vulnerability used in a new jailbreak for devices running iOS 13.5, given that Apple credits jailbreak maker unc0ver in the security notes. It’s unclear why unc0ver would have reported the vulnerability it relied on for its jailbreak; perhaps the vulnerability was simply too dangerous given that it affects all of Apple’s operating systems.
Oddly, Security Update 2020-03 for macOS 10.14 Mojave was not mentioned in the macOS security notes. It seems strange that the bug could affect High Sierra and Catalina, but not the intervening Mojave. Perhaps a Mojave update is still coming, or maybe a fix that Apple put in place in Mojave was somehow reverted.
While it’s inconvenient for Apple to update all of its operating systems at once, the company deserves kudos for dropping everything during a particularly stressful time to fix this bug.
We tend to recommend a conservative approach to updates, but given the likely severity of the vulnerability and its applicability to all of Apple’s operating systems, we suggest that updating as soon as you can is the safest course of action. If you need a refresher on how to do that:
- macOS: System Preferences > Software Update
- iOS and iPadOS: Settings > General > Software Update
- watchOS: Watch app > General > Software Update
- tvOS: Settings > System > Software Updates > Update Software
macOS 10.15.5 Update Adds Battery Health Management
Apple has released macOS 10.15.5 Catalina, adding battery health management for recent Mac laptops, eliminating the bouncing tiles in Group FaceTime, providing controls for fine-tuning the color calibration of the Pro Display XDR, and fixing a variety of bugs. It’s a 2.98 GB download via Software Update; the combo update clocks in at 4.8 GB.
Battery Health Management
I always feel irrationally disappointed when batteries in my electronics start to show significantly reduced charge life. It makes scientific sense that batteries age chemically, but intuitively, it’s hard to accept that charging today doesn’t have the same effect as charging several years ago.
Apple designed macOS 10.15.5’s new battery health management capabilities to reduce the rate at which batteries chemically age. It works by monitoring your battery’s temperature history and charging patterns to adjust the maximum level to which it will charge the battery.
Unfortunately, prolonging the overall lifespan of the battery comes with a tradeoff—a reduction in the amount of time your Mac will run on battery before needing to be plugged in. Since you may—either generally or at specific times—wish to maximize runtime, you can disable battery health management in System Preferences > Energy Saver. Click the Battery Health button, deselect Battery Health Management, and click Turn Off when prompted.
Finally, Apple notes that the limited maximum capacity may cause your battery status menu to indicate that you need to replace your battery.
The Battery Health button doesn’t appear in Energy Saver for my 2012 MacBook Air, which threw me initially but was explained by nbeadman on TidBITS Talk. He pointed out that, in a Six Colors post from 16 April 2020, Jason Snell noted that this feature was limited to Mac laptops with Thunderbolt 3 ports. That equates to all MacBook Pro models released since late 2016 and the Retina-capable MacBook Air models released since 2018. There’s no connection between Thunderbolt 3 and this feature—Apple is merely using the common denominator of Thunderbolt 3 support as a way of specifying which models are new enough to have the necessary internal hardware support.
Other New Features
The 10.15.5 update offers two additional new features:
- As with iOS 13.5 and iPadOS 13.5 (see “Apple Tailors iOS 13.5 and iPadOS 13.5 to a COVID-19 World,” 20 May 2020), Apple has added an option to Group FaceTime (in FaceTime > Preferences > Settings) to prevent video tiles from changing size when a person on the call speaks. That will make Group FaceTime easier to stomach, though the experience still leaves much to be desired (see “Videoconferencing Options in the Age of Pandemic,” 2 April 2020).

- If you have a Pro Display XDR, 10.15.5 reportedly adds controls to fine-tune the built-in calibration by adjusting the white point and luminance to your own display calibration target. For a monitor that costs $6000, you should be able to tweak individual pixels.
Bug Fixes
The list of bugs fixed in 10.15.5 includes some that have been annoying. In particular, the update:
- Fixes a bug that could prevent Reminders from sending notifications for recurring reminders
- Addresses a bug that could prevent password entry on the login screen
- Fixes a bug that caused System Preferences to show a notification badge even after installing an update (this was just discussed on TidBITS Talk)
- Resolves a bug that prevented the built-in camera from being detected when trying to use it after using a video conferencing app
- Addresses a bug with Macs with the T2 security chip that may prevent internal speakers from appearing as a sound output device in Sound preferences
- Fixes a stability problem with uploading and downloading media files from iCloud Photos while your Mac is asleep
- Resolves a stability bug when transferring large amounts of data to RAID volumes
- Fixes a bug that prevented the Reduce Motion Accessibility preference from reducing the speed of animations in a FaceTime group call
Sadly, no mention was made of the problems that some Mail users have had with data loss after upgrading to Catalina. We’ll have to wait for Michael Tsai’s users to weigh in with the results of their testing (scroll to the bottom of the comments).
And as expected, macOS 10.15.5 comes with fixes for 45 security vulnerabilities.
Should You Update? Should You Upgrade?
I wish I could change our general recommendations, but until we know more about the Mail bugs, I can’t. So, if you’re already running Catalina, either because you’ve upgraded or purchased a new Mac, let this update settle for a few days to see if it causes any troubles. It’s better to let others discover such problems and report back. Then install the update—the new features and bug fixes are all welcome.
We’re particularly intrigued to see how the battery health management feature works, but that’s going to be a long-term play. It will be difficult to assess how much it helps because no one outside Apple likely has a sufficient test suite of Macs to run for months.
Whether to upgrade from 10.14 Mojave (or earlier) is another question. We’re probably within one or two more bug fix updates for Catalina before Apple moves on to the next major version of macOS.
Assuming, that is, that Apple sticks to its usual schedule during these uncertain times and with engineers working from home. It’s conceivable that Apple could delay the next version of macOS for as much as a year. Alternatively, the company could move on to a newly named version to escape the somewhat cursed Catalina moniker but focus on cleaning up the problems in Catalina. (When it comes to new names, I’m voting for “Avalon,” which is the only city on Catalina Island and part of Arthurian legend.)
Regardless, if you haven’t yet upgraded to Catalina, my recommendation now is that you should wait until the end of June, after Apple’s Worldwide Developers Conference, which starts on 22 June 2020. The news that comes out of WWDC should provide some updated guidance.
Logitech Combo Touch: Love at First Type
Apple’s sudden announcement of trackpad support in iPadOS and the Magic Keyboard for the Face ID models of the iPad Pro came as a surprise (see “Hell Freezes Over: Apple’s New iPad Pro Supports Trackpads,” 18 March 2020). New hardware is always tempting, but I still have a Touch ID-based 10.5-inch iPad Pro and don’t have much reason to upgrade, so I decided to try the Logitech Combo Touch keyboard case, which is also equipped with a trackpad.
There aren’t many products that I try and instantly say, “Wow, this is awesome! I can’t wait to tell TidBITS readers about it.” But the Combo Touch, which comes in models appropriate for the seventh-generation iPad, third-generation iPad Air, and 10.5-inch iPad Pro, is one of those products. It’s sold out on the Logitech site, but Apple has some in stock.
Logitech Combo Touch versus the Magic Keyboard
Strangely, the Combo Touch isn’t available for the 11-inch or 12.9-inch iPad Pro. A little birdie told me that Apple discouraged Logitech from supporting those models so as not to compete with the Magic Keyboard. After just a few hours with the Combo Touch, I see why Apple might have been worried about the competition, and I think a lot of iPad Pro users will be envious of those of us who can use the Combo Touch.
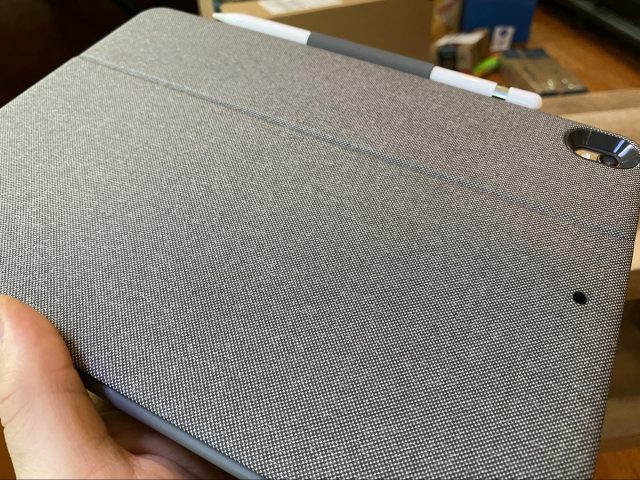
Let’s start with the price. The Magic Keyboard is either $299 or $349, while the Combo Touch costs only $149.95. Despite being half the cost, the Combo Touch doesn’t feel at all cheap. The case is covered in a fabric material that feels nice and sturdy.
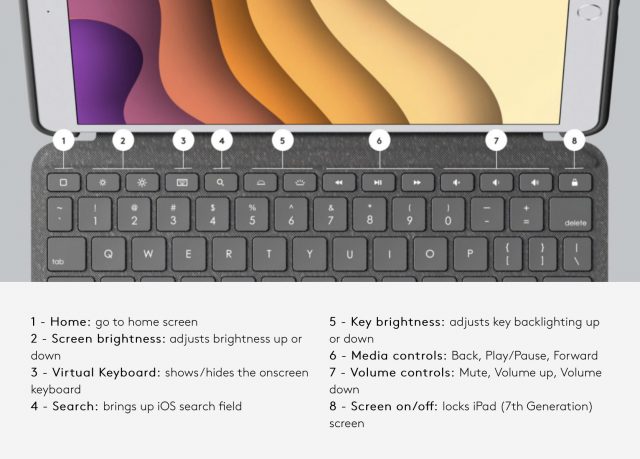
Another win for the Combo Touch is that it includes function keys for Home, brightness, the onscreen keyboard, Spotlight search, keyboard brightness, media controls, volume, and locking the screen.
In terms of flexibility, the Combo Touch beats the Magic Keyboard. While the Magic Keyboard forces you to use the iPad in landscape orientation, the Combo Touch lets you switch between landscape and portrait orientation without removing the iPad from the case.
An Overview of the Combo Touch
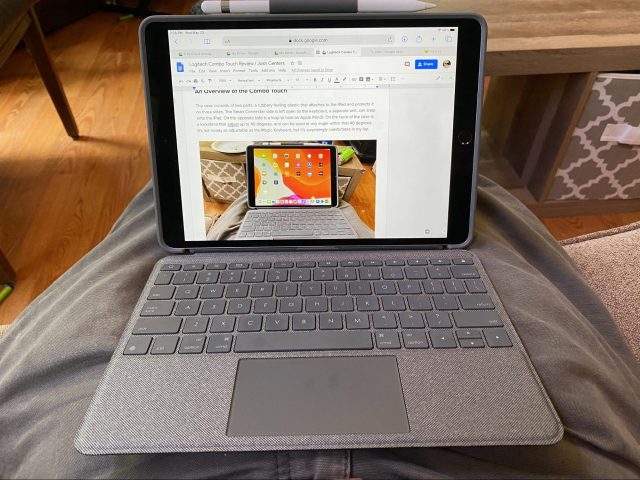
The Combo Touch consists of two parts: a back cover and the keyboard. The rubbery plastic cover fits around the iPad and protects the back and three edges. The edge with the Smart Connector side remains open, so the keyboard, a separate unit, can snap onto the iPad. On the opposite side is a loop to hold an Apple Pencil.
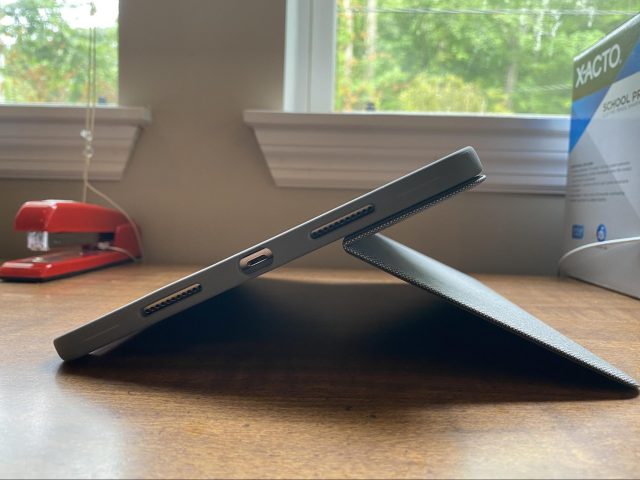
A kickstand on the back of the case adjusts up to 40 degrees and can be used at any angle within that 40 degrees. The Combo Touch is not nearly as adjustable as the Magic Keyboard, but it’s still surprisingly comfortable in my lap.
You can also bend the kickstand the other way to prop the iPad up like an easel.
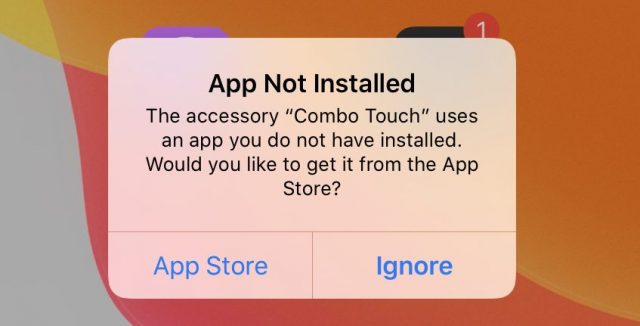
The keys are backlit, which makes the Combo Touch easier to use in a dim room. A Logitech Control app lets you set five levels of brightness, and you can turn off the backlight entirely if you wish. iPadOS prompted me to install the app, which was something I hadn’t seen before with a hardware companion app.
Some may be sad that the Combo Touch lacks an Escape key. Instead, you’ll find a Home key where Esc would normally be. I like the Home key because it enables me to keep my fingers on the keyboard and away from the screen. If you need an Escape key, which isn’t generally used in iOS, you can redefine another key, like Caps Lock. Do this in Settings > General > Keyboard > Hardware Keyboard > Modifier Keys.
As far as the feel of typing on the keyboard goes, it’s fine but nothing special. The chiclet keys are neither spongy or especially clicky, and the keycaps feel just a bit rubbery. The keys don’t wiggle and feel solid when you press them.
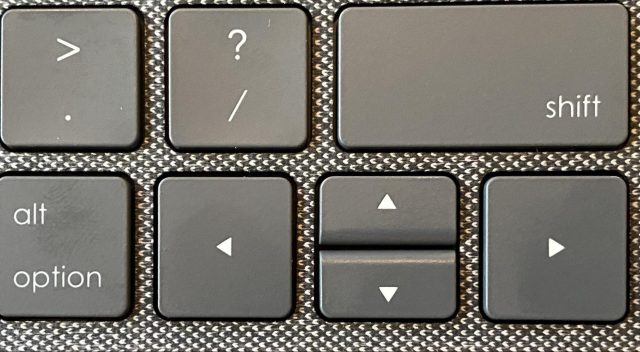
The Combo Touch is necessarily a small keyboard, which entails a few sacrifices. I’m not crazy about the arrangement of the arrow keys, which follow Apple’s old and much-maligned butterfly keyboard convention of half-size keys for the Up and Down arrows and full-size keys for Left and Right. The backtick, bracket, and backslash keys are also narrow, which is less of a problem.
But the keyboard isn’t what makes the Combo Touch interesting.
Let’s Talk Trackpad
I’ve heard little good about the Brydge Pro+ trackpad case from Brydge, which made me a bit nervous about the Logitech Combo Touch, but there was no need to worry. The Combo Touch’s trackpad is a bit small, as is the one on the Magic Keyboard, but it’s plenty responsive, and all the expected gestures work. I measured it at 3.8 inches (9.5 cm) wide and 2.1 inches (5.4 cm) high.
Unlike Jason Snell’s poor experience with the Brydge Pro+, using the Combo Touch trackpad is as smooth and precise as the Magic Trackpad 2 on my iMac. Swipe with two fingers to scroll up and down a Web page, swipe up with four fingers to bring up the app switcher, or swipe left or right with four fingers to switch apps. It’s a trackpad that lives up to Apple’s high standards.
The Combo Touch’s trackpad might be a bit small, but it’s just big enough for four-finger gestures with my average-sized hands. If you have Jack Reacher hands, it might be a bit too cramped for you, but if you think the MacBook Pro trackpads are too big, you’ll probably love it.
The trackpad functionality does a lot to make the iPad feel like a “real” computer. I’m typing this review while leaning back on the couch, and I hardly have to reach for the screen at all. But when I want to reach out and touch something or scribble with the pencil, I can.
What’s funny is, despite my total lack of drawing skills and handwriting that would make a doctor wince, I find myself using the Apple Pencil a lot more with the Combo Touch. Not for drawing or writing but as a pointing stick to tap onscreen elements so I don’t have to reach for the screen. Using the Apple Pencil this way feels just as intuitive as using the trackpad. The Combo Touch makes the whole iPad package really sing, letting me effortlessly mix keyboard, trackpad, touch, and pencil input.
Minor Annoyances
When I sat down to write with my new Combo Touch, I was frustrated by its inability to type an apostrophe. Bizarrely, the double-quote, which is on the same key, worked fine. At least that indicated that it wasn’t a hardware issue.
After a bit of research, I learned that this problem has afflicted previous Logitech keyboards as well. The fix is to go to Settings > General > Keyboard > Hardware Keyboard (which appears only if a hardware keyboard is attached) and change English (US) from Automatic to U.S. or your preferred language. Of course, if you are outside the United States or use a different language, those options will be a little different. That fixed it.
With that solved, my only real complaint is that the keyboard’s Smart Connector magnetic connection isn’t as strong as I’d like. Pick up the whole assembly by the iPad, and the keyboard will fall off. Needless to say, I recommend closing everything up before moving it to avoid potential drops to the floor.
I also find that the pencil loop can get in the way when using the iPad in portrait orientation, and I worry about the loop’s long-term durability. But I’m just happy to have a case that keeps the round Apple Pencil from rolling away.
So Good It’ll Make You Want an iPad Air
I heartily recommend the Logitech Combo Touch. It will breathe new life into your iPad, and it’s so good that it makes Apple’s current iPad Air significantly more attractive in comparison with the iPad Pro.
My wife recently decided to replace her nearly decade-old MacBook Pro with an iPad. After just a few minutes with the Combo Touch, she declared that she preferred the Combo Touch and wanted an iPad Air instead of a much more expensive iPad Pro and Magic Keyboard combination. That saved us about $450. If Apple’s plan was to discourage Logitech from making an iPad Pro keyboard in order to sell more Magic Keyboards, it may have backfired.
So now I have not just one, but two Logitech Combo Touch keyboards in the house.
Exploring Hearing Aid Integration in iOS
Last year I got my first hearing devices. For some time, I had noticed that I turned up the TV much louder than my wife did, and I had problems following discussions with larger groups of people. After having my hearing tested, I got a prescription for two hearing devices, which I took to a hearing system specialist. I learned that besides normal hearing aids, there are “Made for iPhone” (MFi) hearing devices that are directly recognized and controlled by iOS. An Apple support document lists manufacturers and products that have earned the MFi label. Of course, as an Apple user, I had to get an MFi pair. After trying several different devices, I finally settled for a pair of Pure 312 3Nx by Signia. In this article, I describe my experience in setting up and using these devices.
A couple of things before I start:
- I assume that the behavior of “Made for iPhone” hearing aids is at least somewhat similar across manufacturers and devices. There are plenty of other devices that don’t conform to Apple’s standards; I cannot say much about these.
- I haven’t tested or used many devices from different manufacturers, so I cannot provide product comparisons or even recommendations.
- I am German and live in Germany, so I don’t know anything about the hearing aid scene in the US or other countries.
- Although I changed the operating language of my iPhone from German to English before I started taking the screenshots for this article, some German words wouldn’t translate. I’ll explain them as we go along.
Introducing Your Hearing Devices to Your iPhone
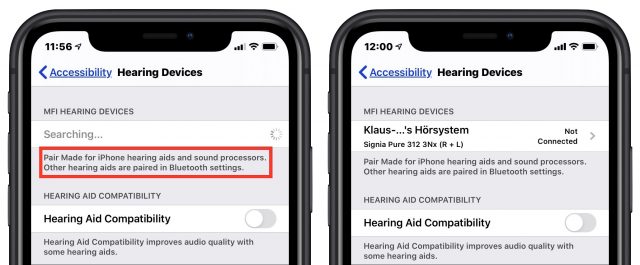
You connect MFi hearing aids with your iPhone in Settings > Accessibility > Hearing > Hearing Devices. Obviously, there is a Bluetooth pairing going on here. But hearing devices don’t have a button that puts them into pairing mode; instead, you have to open and close the battery case on each device to restart them. (You pair non-MFi hearing aids in Settings > Bluetooth like any other Bluetooth-enabled devices.)
If all goes well, iOS recognizes your hearing aids and gives them a name. You see the name of my device in the next screenshot. “Hörsystem” means “Hearing Device”; I don’t know why iOS inserted an ellipsis in place of my last name, and no, I couldn’t find any way to change this name.
Next, you’ll have to agree to a standard Bluetooth pairing request.
The status of your device then changes to Connected, and tapping it opens a new page containing controls for your device, most of which need no explanation.
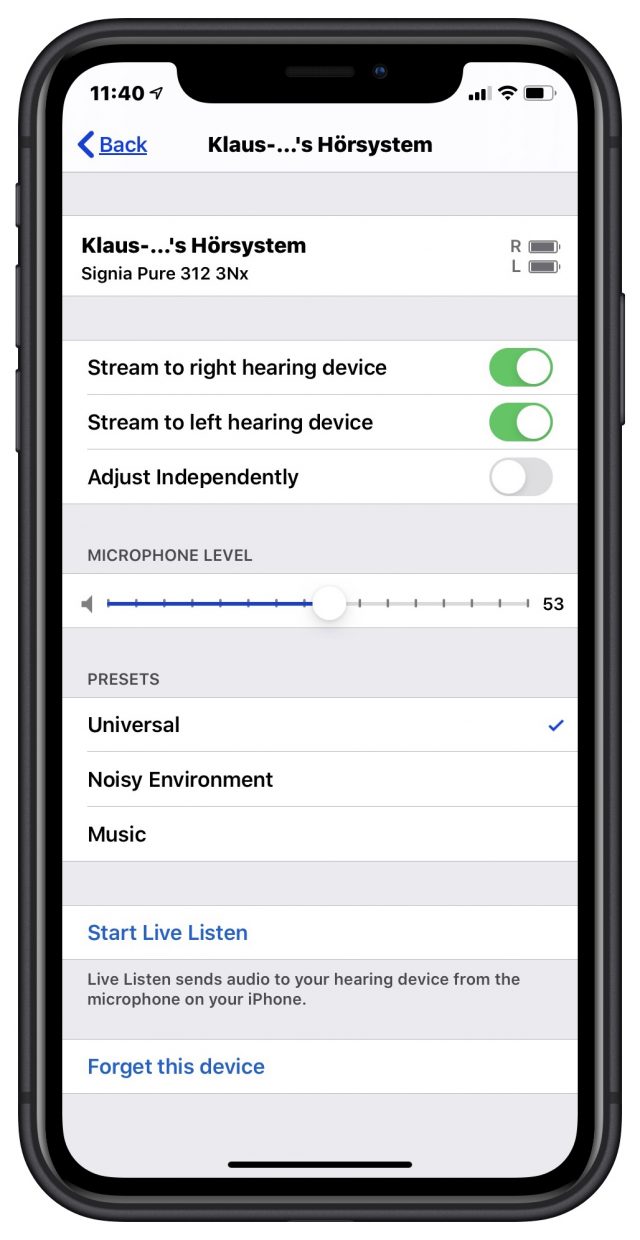
Listed under the Presets heading are the programs for different hearing situations that are present in your hearing device. (The hearing specialist configured and downloaded these to my hearing aids, and when I was annoyed by wind noises while riding my bike, she updated the programs accordingly. Work with your hearing specialist to create and modify these.) You can switch between them by tapping one. Most of the time, I use the Universal preset. The Noisy Environment preset works well for restaurant visits or meetings with larger groups of friends or colleagues. I hardly ever use the Music preset; I prefer earphones for listening to music.
Below the presets is Start Live Listen. This iOS feature, which also works with AirPods, uses the microphone on your iPhone to send audio to your hearing aids, which could be helpful in certain environments where your iPhone can be placed closer to the source of sound than your hearing aids’ microphones. That’s the theory anyway—I don’t notice any change at all when I enable it.
If you want to start over, just tap Forget This Device at the bottom.
From this point on, your iPhone knows your hearing aids. If you switch them off, your iPhone will notice and disable the hearing aid functions. When you later switch them on again, your iPhone will reconnect to them automatically, so you don’t have to repeat the pairing procedure.
Most manufacturers have their own iOS (and Android) apps that duplicate some of the above controls and add more functions. Since these apps are manufacturer-specific, I’m not covering them here.
Next, let’s look at how you perform some common tasks that involve your hearing aids.
Making Phone Calls
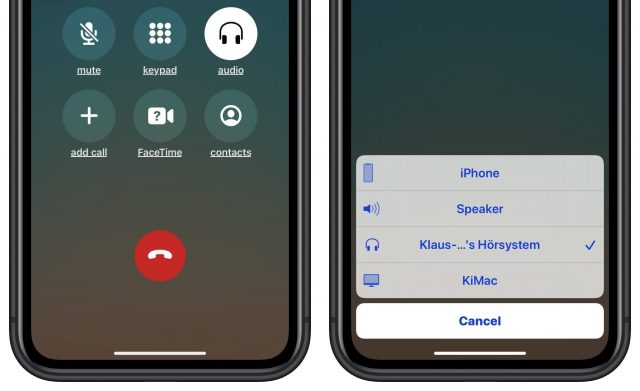
When you make or receive phone calls, the iPhone automatically sends the incoming voice to your hearing aids. In most cases, this is what you want. If you want to route the audio to your iPhone’s speaker, a HomePod, or somewhere else, you can tap the Audio button in the call controls to bring up a sheet listing the available destinations.
Listening to Music
Music you play is treated in a similar fashion. By default, the iPhone sends it to your hearing aids, but you can choose to send it to another destination. However, this time it is not an Audio button that shows up but an AirPlay ![]() button located at the bottom of the music player.
button located at the bottom of the music player.
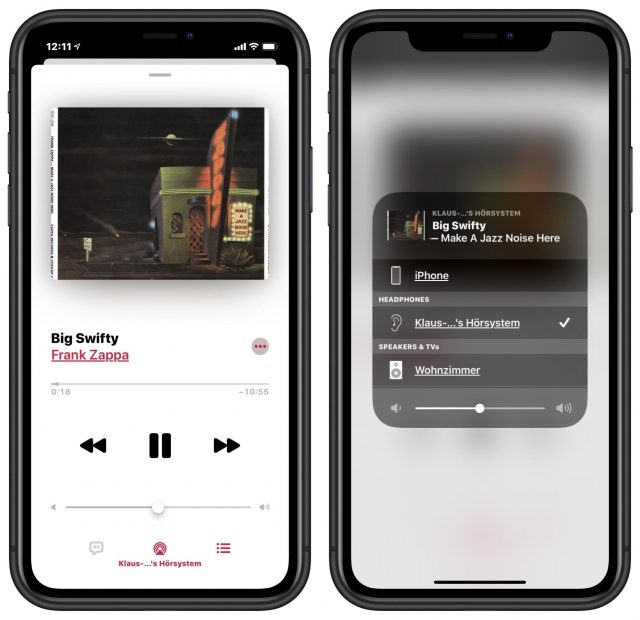
Strictly speaking, the only AirPlay destination in this sheet is Wohnzimmer, which is our AirPlay-capable living room stereo (Wohnzimmer = living room). But it surely makes sense to group all audio outputs in one place regardless of the protocol used to reach each one.
Spoken Directions While Navigating

In the car, my wife and I often use Apple Maps to guide us. (Our car is too old to provide CarPlay or even built-in GPS navigation; its tech tops out at a cassette player.) The first time we started navigation when I was wearing my new hearing devices, my wife noticed instantly that she didn’t hear any directions. As you might guess, the iPhone sends audio from Maps to the hearing aids by default.
Looking at the iPhone screen, we did not see a way to reroute the spoken directions to the iPhone speaker, since it’s helpful for the passenger to be able to hear the spoken directions too. It would be even more of a problem if my wife was driving but only I was hearing the directions. Being somewhat in a hurry at the time, however, we left it at that. Later I looked at the Apple Maps interface again, but I still couldn’t figure out how to route the audio. On my next visit to the hearing system specialist, I asked the friendly people there, but they didn’t know either. A Google search finally gave me the answer. Would you have known?
You can pull up the sheet from the bottom of the navigation screen to reveal more buttons. One of them is an Audio button that, when tapped, brings up a sheet where you can switch the voice output to the iPhone speaker.
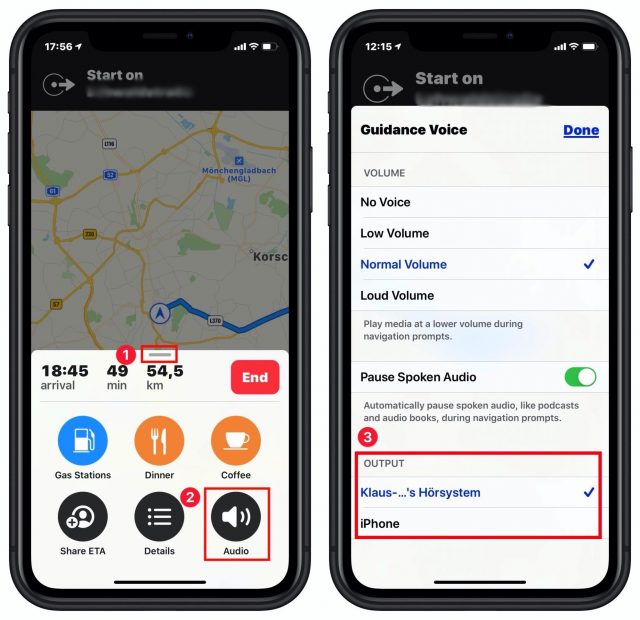
This, in my opinion, is a bad case of hidden functions. How is the average user who doesn’t read manuals to know that he can pull this sheet up? At the very least, a hint that there is a hidden part should be present in the visible part of the sheet, perhaps a small arrow.
Listening to Voice Memos
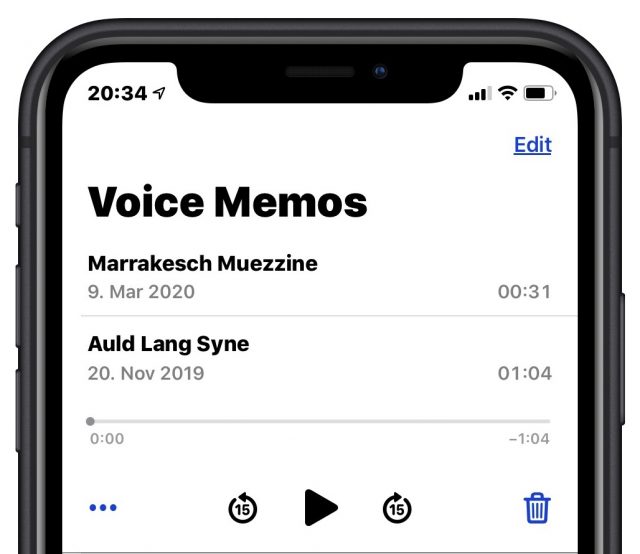
Another awkward situation arose when I went to the biweekly rehearsal of my small choir wearing my new hearing devices. We wanted to record one song we had rehearsed to play it back immediately as a way of checking our progress. I recorded the song with the Voice Memos app and started to play it. I heard the song, but my colleagues just looked at me expectantly. You recognize the pattern: the song played back to my hearing devices, not to the iPhone speaker. I looked at the Voice Memos interface to switch the audio output.
This time, there is no way to control where the audio is played—no Audio button, no AirPlay button, no sheet you can pull up to reveal hidden controls. The Ellipsis button presents a sheet that contains many useful functions but no way to change the audio destination. In the end, I emailed the song file to my colleagues after the end of the rehearsal. Only much later did I figure out several ways to send a voice memo to the iPhone speaker or another destination—read on!
Changing Audio Routing Defaults
It’s obvious by now that the default behavior of the iOS hearing aid integration is to send all audio to your hearing devices. There should be a way to change this, and there is.
 Back in Settings > Accessibility > Hearing > Hearing Devices, the screen where you connected your hearing aids contains more controls, one of which is labeled Audio Routing.
Tapping Audio Routing > Media Audio shows three choices. (Call Audio offers the same choices.)
The default here is Automatic. Changing it to Never Hearing Devices sends all audio to the iPhone speaker. So this would have been one (clumsy) solution to the Voice Memos problem: switch to Never Hearing Devices, play the memo, and then switch back to Automatic.
Always Hearing Devices is, in my testing, poorly labeled; it should be Always Hearing Devices (When Present). Here’s why: If your hearing devices are connected to the iPhone, this option sends audio to them; if they are not connected, sounds play through the iPhone’s speaker. The question remains: what does Automatic do? In my testing, it’s the same as Always Hearing Devices (When Present). Apple’s support document has this to say:
Audio Routing
Choose the default device for audio playback.
Well, that’s helpful. If you know what Automatic does, please leave a comment.
Shortcuts (and a Second Solution for Voice Memos)
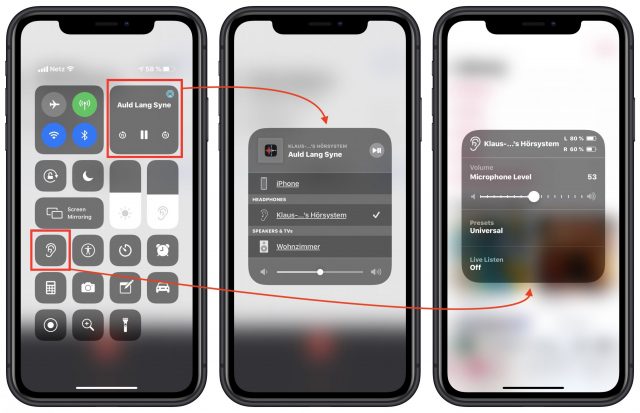
There are a couple of shortcuts that help with common hearing aid functions. Control Center contains two relevant controls. The Audio “card” (as Apple calls it) in the upper right contains an AirPlay button that gives access to all available audio destinations, exactly like the AirPlay button in the music player.
Tapping the AirPlay button in the Audio card presents a second solution to the Voice Memos problem above—it displays a list of possible audio destinations. Like the first solution, this change of audio output is permanent; if you want to switch back to your hearing aids, you’ll have to do so manually.
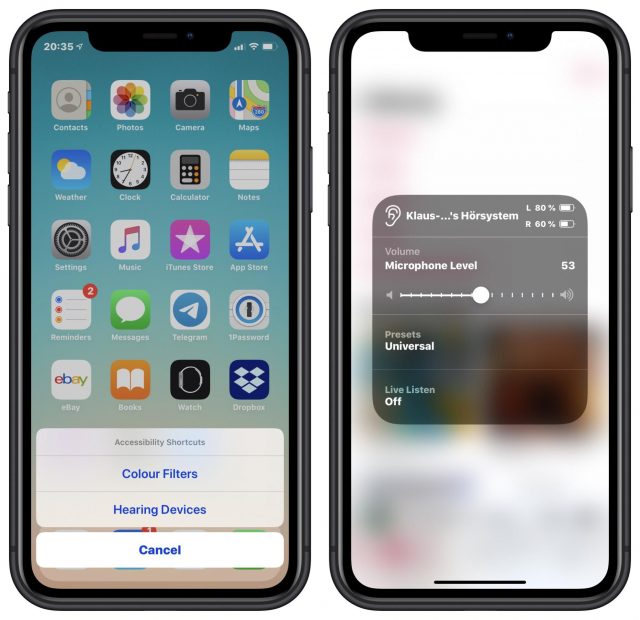
Then there is the Hearing control (the one with the ear icon above). If you don’t see it in Control Center, you’ll have to activate it in Settings > Control Center > Customize Controls. It gives you access to some important functions like volume, presets, and Live Listen.
Another option is a so-called Accessibility shortcut, which can also provide quick access to the Hearing controls. On an iPhone X or later, you invoke it by triple-clicking the side button; on other iPhones, you triple-click the Home Button. You configure the Accessibility shortcut in Settings > Accessibility > Accessibility Shortcut; one choice there is MFi Hearing Devices. Triple-clicking the button then shows your Hearing controls, or, if you have configured more than one Accessibility shortcut, a list of choices. Tapping Hearing Devices then brings up the same Hearing options as before.
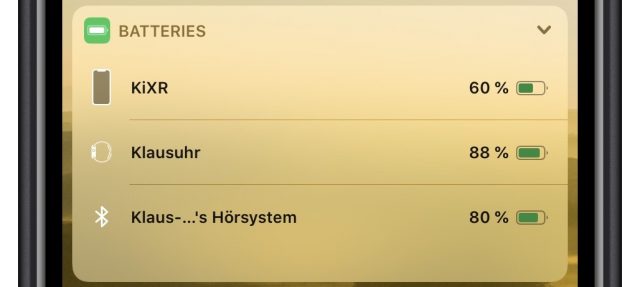
Finally, iOS provides one additional shortcut that helps you keep track of the battery level in your hearing aids. On the iPhone’s Lock or Home screen, swiping from left to right reveals a configurable set of widgets. The Batteries widget shows not just the battery levels of your iPhone, Apple Watch, or AirPods, but also those of your hearing aids. If it doesn’t appear, scroll to the bottom and tap Edit to activate it, much like adding the Hearing controls to Control Center.
Using Your Hearing Aids with More Than One Apple Device
Connecting hearing aids to multiple devices seems to be tricky and troublesome according to some comments in TidBITS Talk. Generally speaking, if you want to pair your hearing aids with another Bluetooth device, you have to put both devices into pairing mode; since the hearing aids lack a button for that, you have to take them out, open and close the battery cases to restart them, and then put them back in. It’s fussy and not particularly comfortable.
However, if we restrict the discussion to Apple devices, we find a relevant Apple support document that’s surprisingly clear:
If you pair your hearing devices with more than one device (both iPhone and iPad, for example), the connection for your hearing devices automatically switches from one to the other when you do something that generates audio on the other device, or when you receive a phone call on iPhone.
Changes you make to hearing device settings on one device are automatically sent to your other devices.
- Sign in with your Apple ID on all the devices.
- Connect all the devices to the same Wi-Fi network.
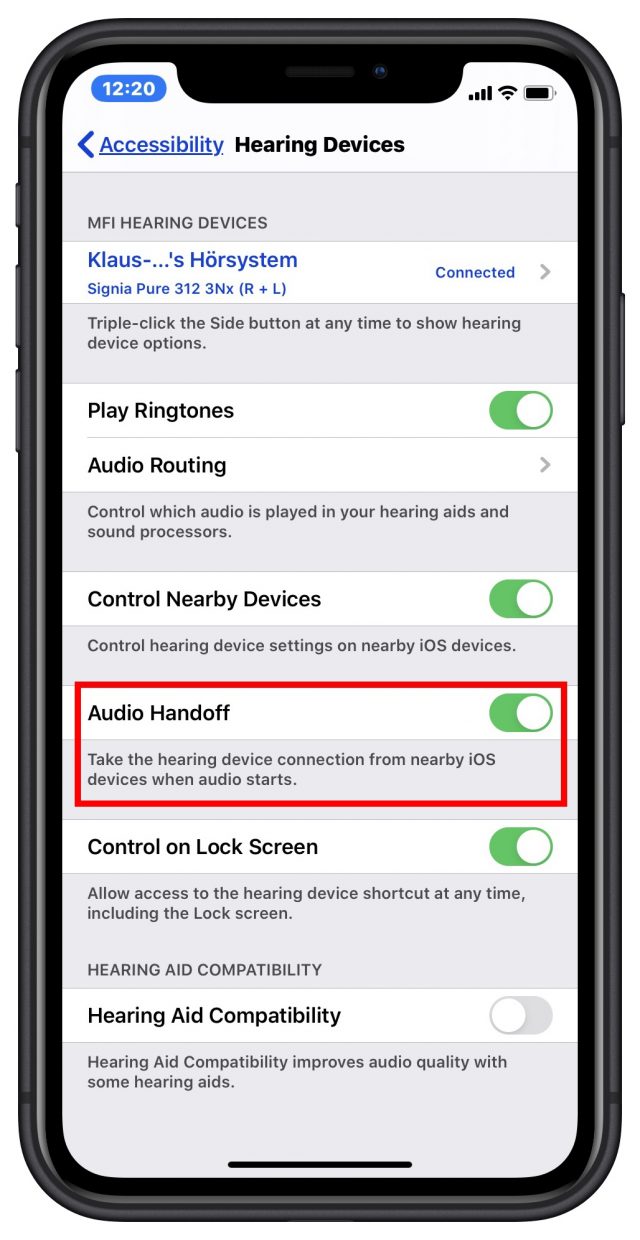
Furthermore, Audio Handoff must be on; enable it in Settings > Accessibility > Hearing > Hearing Devices.
I tested this with my iPhone and iPad; the results were mixed.
- When I signed in with the same Apple ID and connected to the same Wi-Fi network, the hearing aid settings from my iPhone were indeed magically transported to my iPad. So the second device knows about my hearing aid without having ever seen it or paired with it directly. That’s great.
- My first tests revolved around receiving phone calls while music was playing from another device to my hearing aids. I started by playing music on the iPad, which was correctly sent to my hearing devices. I then had someone call me on the iPhone. Immediately, the music on the iPad was silenced, and the iPhone sent the ringtone (and the caller’s voice) to the hearing aids. In some tests, the iPad stopped the music during the call, restored the connection to my hearing devices after the call had ended, and resumed playing. In other cases, the iPad stopped the music, and nothing happened at the end of the call.
- My second series of tests involved playing music on one device and then starting music on the second device. Automatic switching of the hearing aids did not work reliably for me, no matter what I tried. What did work was the following series of steps:
- Music plays on device A through the hearing aids.
- Stop the music on A and, using the AirPlay button, move the audio destination away from the hearing aids to another destination.
- On device B, start the music. After a delay, it should automatically play through the hearing aids.
The goal of automatically distributing the hearing aid settings to all participating Apple devices is a good one and seems to work. However, the switch from one audio-generating device to a second one sometimes works for me and sometimes doesn’t. But my tests were far from exhaustive. Your comments are welcome!
It (Mostly) Just Works
Overall, I’m quite content with how Apple integrates support for hearing aids into iOS. Setup is straightforward, and the way all audio is sent to the hearing aids makes sense in most cases.
There are a few situations where it doesn’t, and although Apple could do a better job of making the interface more discoverable, there are ways of redirecting audio from the hearing aids to other audio destinations. A uniform symbol (like the AirPlay button) that leads to a consistently laid-out screen would be helpful, as would a Siri command to “Play audio on my hearing aids.” Only a few apps, like Voice Memos, fail to provide any in-app way of redirecting audio—we can hope Apple will address this in an update.
Although Apple has put some effort into making one set of hearing aids work with multiple iOS devices, the automatic switching works well only with phone calls. With music and other audio, the switching is haphazard at best, and there’s plenty of room for improvement there.
Klaus Wirtz is a TidBITS reader since the 1990s. He was a member of the German TidBITS translation team from 2003 to 2006. Lately, he has become a bit hard of hearing.



 Agen Schmitz
11
comments

