#1565: Cardhop 2.0, block Facebook photo location tracking, M1 Mac external drive limitation, fix apps broken by iOS 14.5
In this special Memorial Day issue of TidBITS, Adam Engst looks at what’s new in Cardhop 2.0, not the least of which is that it’s now free, with advanced features bundled into a subscription with Fantastical. Josh Centers explains how Facebook surreptitiously uses your photos to track your location and how you can prevent it such antisocial behavior. The Mac community has discovered that M1-based Macs can’t boot from an external drive if the internal drive is dead. Glenn Fleishman explains why Apple made this change and why it probably isn’t a big deal. Finally, Adam takes you on a winding journey to extract data from an old iOS app that won’t launch in iOS 14.5 and ends up finding multiple solutions to what could be a relatively common problem. Notable Mac app releases this week include Security Update 2021-003 Catalina and 2021-004 Mojave and Safari 14.1.1.
Cardhop 2.0 Bundled with Fantastical in Flexibits Premium
Calendars and contacts go together like macaroni and cheese. Many events involve people, and if you’re going to have a phone call with someone or meet at their office, it’s handy to have their contact information associated with the event. That’s why we had combined packages like Now Up-to-Date & Contact, Claris Organizer, and Palm Desktop in the past. Apple now gives us Calendar and Contacts, and those who want more power, flexibility, and better interfaces can instead choose BusyMac’s BusyCal and BusyContacts or—my current favorites—Fantastical and Cardhop from Flexibits. The company has now released Cardhop 2.0 for the Mac, iPhone, and iPad.
I’ve written about Cardhop for both macOS and iOS (see “Cardhop Puts Contacts Front and Center,” 18 October 2017, and “Cardhop Rethinks How You Use Contacts in iOS,” 4 April 2019). The basics remain the same in Cardhop 2.0—notably, it still lives in the menu bar on the Mac. Flexibits remains steadfast in its belief in Cardhop’s contact-first approach—find a contact and then choose how you want to communicate with them. Unfortunately, much as I like Cardhop for standard contact lookups and editing on the Mac, I never use it to initiate communications with contacts, nor do I use it at all on the iPhone. In both cases, I think of the medium first—email, text message, phone—and then pull up the contact in the appropriate app. It’s how my brain works. Plus, I often rely on past content to inform what I’m saying.
While Cardhop 2.0 has some new features, most notable is the fact that Flexibits has moved to a freemium model that provides Cardhop 1.0’s basic features for free. Access to the new Cardhop 2.0 features requires a subscription, just as last year’s upgrade to Fantastical 3.0 provided basic calendaring for free but required a subscription for the new and advanced features.
However, rather than create yet another subscription, Flexibits has bundled Cardhop with Fantastical—for all of Apple’s operating systems—in a single Flexibits Premium subscription. Happily, the price remains the same despite the addition of Cardhop to the mix: $3.33 per month paid annually ($39.96). A family plan for up to five users costs $5.42 per month paid annually ($64.99). Month-by-month options are available, but I can’t see any reason to use those other than to extend the 14-day free trial.
New Cardhop 2.0 Features
I may not have a contact-first approach to communications, but I still appreciate Cardhop’s other features. In particular, the parser is great for looking up or adding contacts, or adding information to an existing contact. I’m a keyboard guy, so I enjoy typing at my apps. It even has solid printing capabilities, with support for lists, labels, and envelopes, and I like how it’s instantly accessible with a global hotkey.
New features in Cardhop 2.0 include:
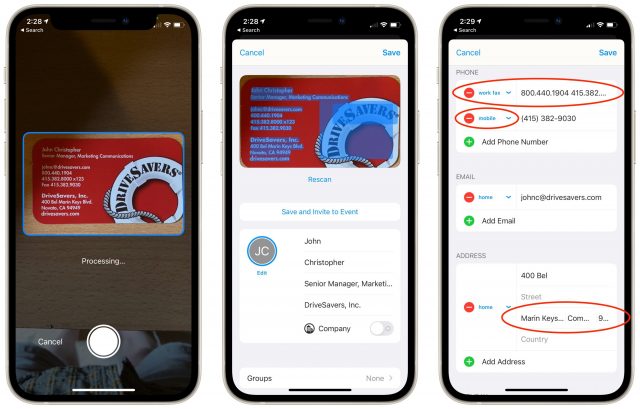
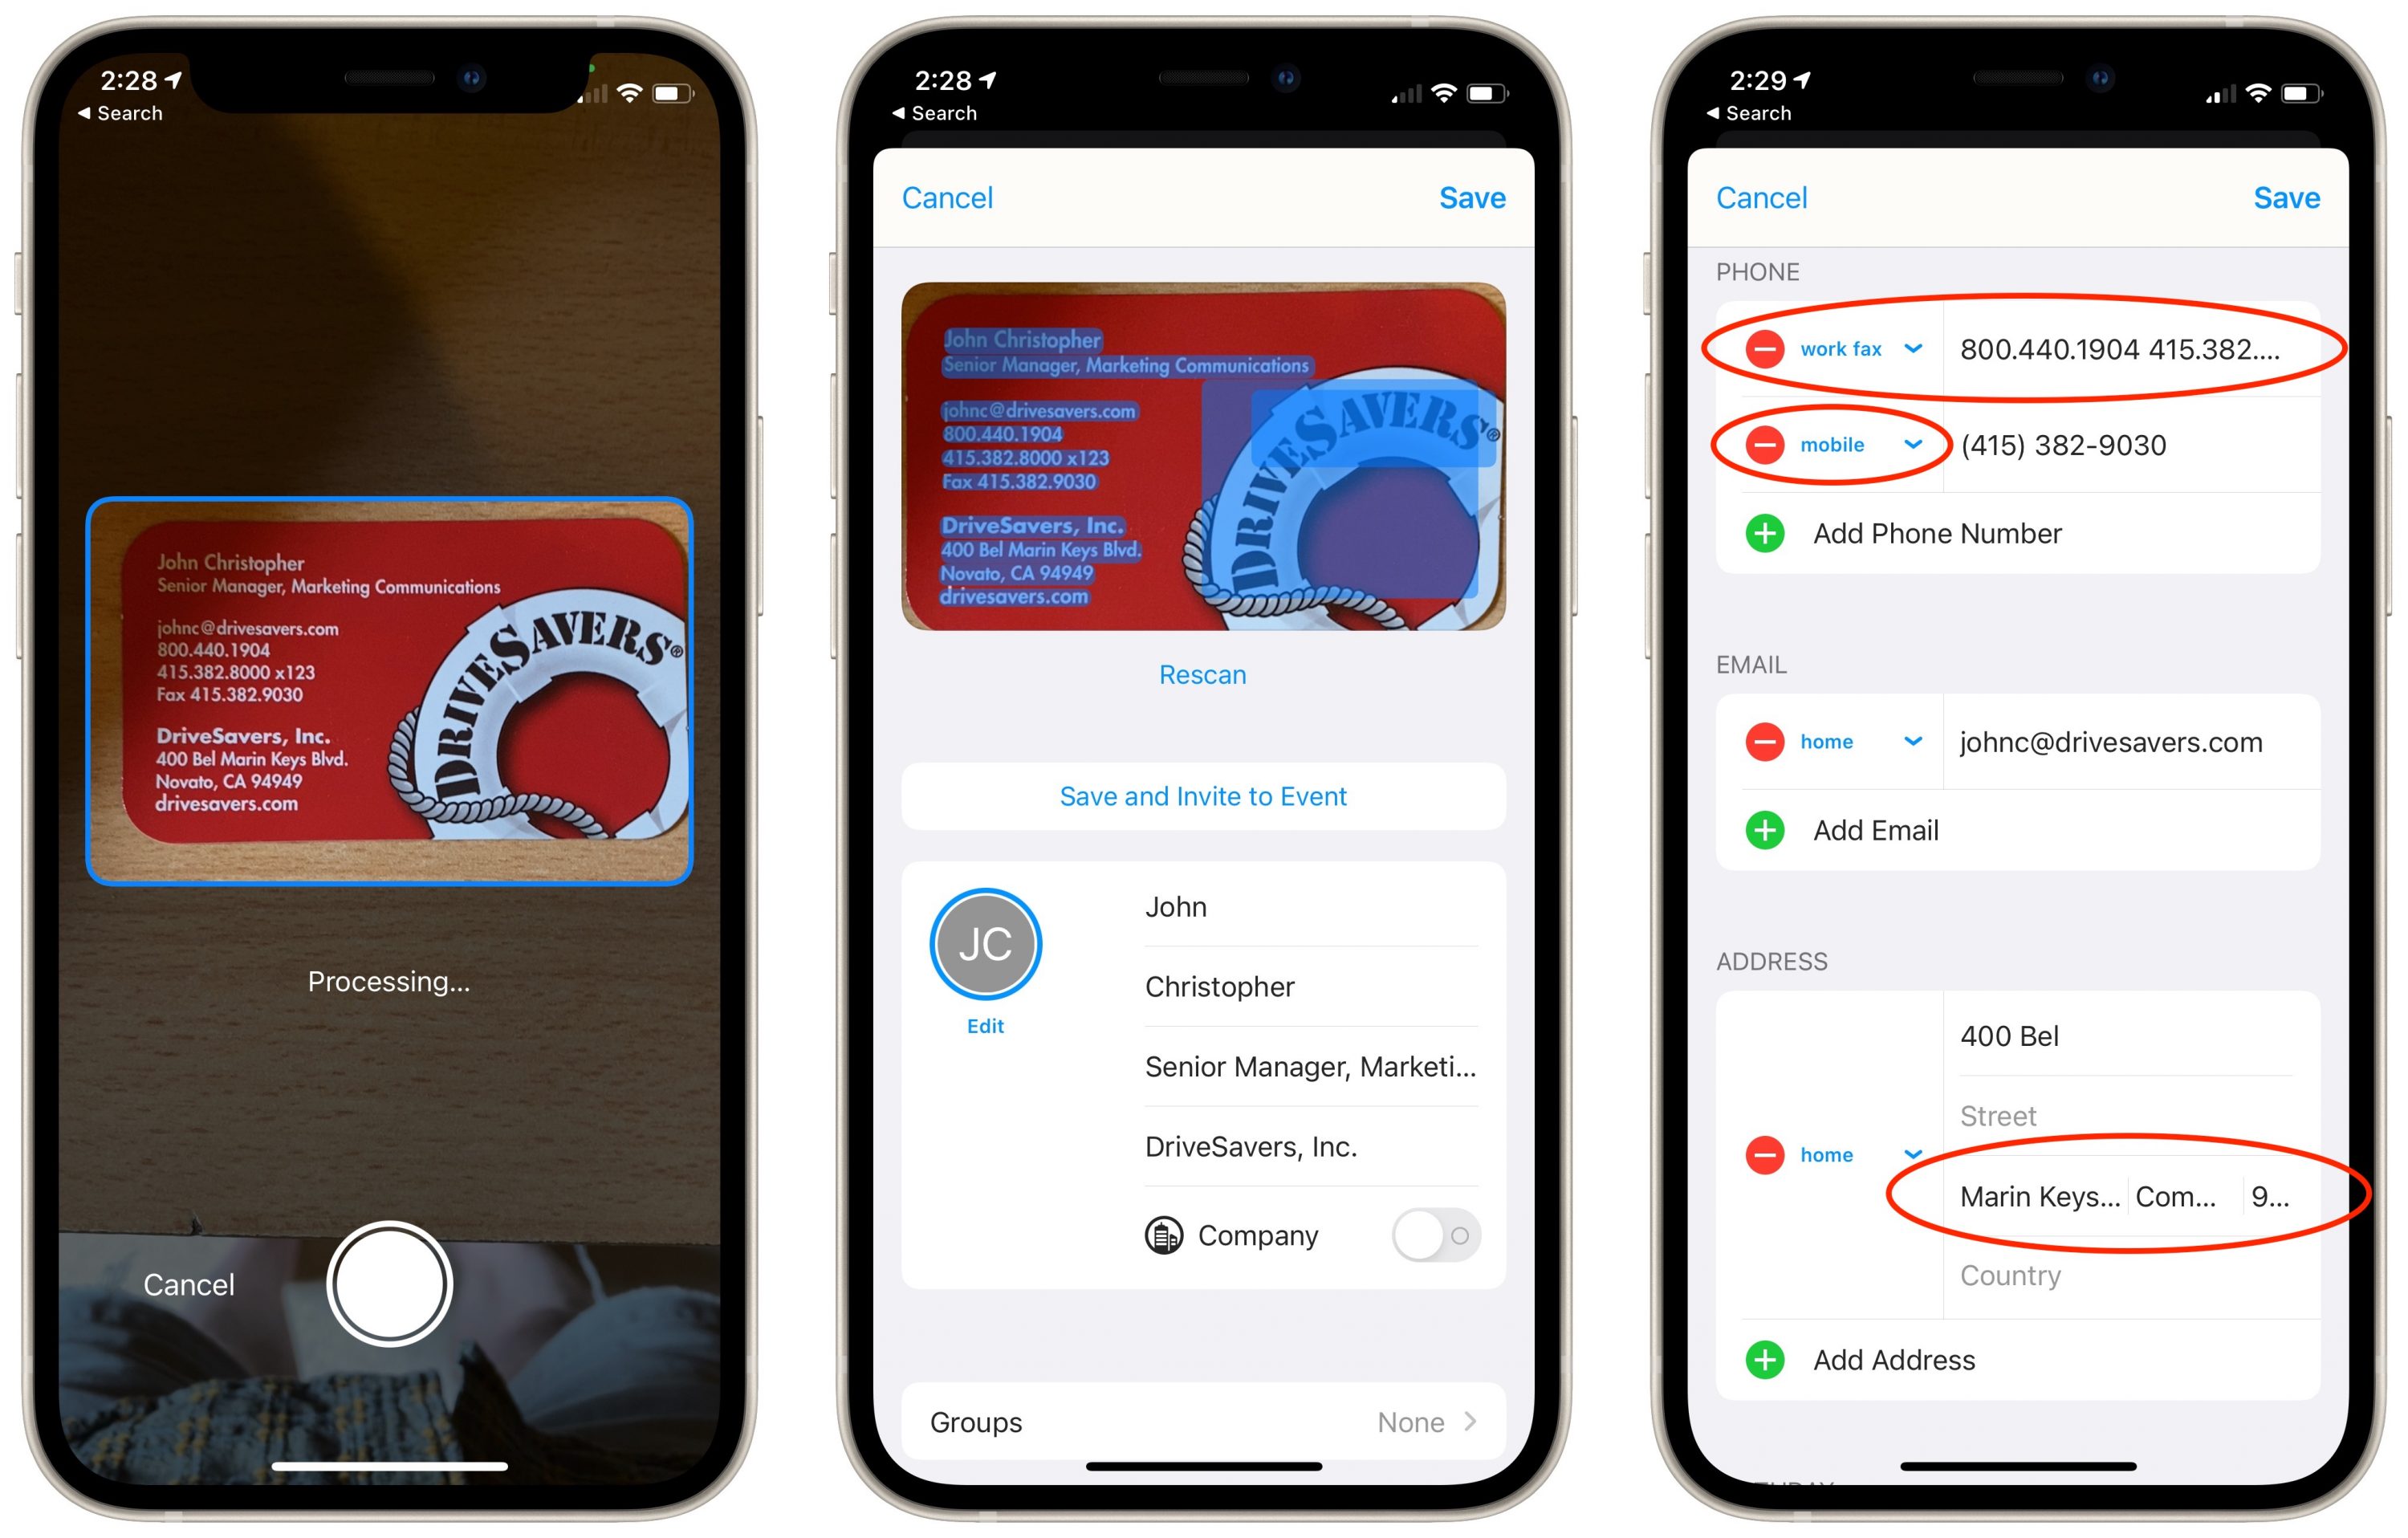
- Business card scanning: This feature, which is only in the iPhone and iPad apps, does a decent job of importing data from business card scans. It was a huge win over typing information in my testing, but corrections were often required. As you can see in this scan of my buddy John Christopher’s card (he’s no longer at DriveSavers), Cardhop got a lot of information right, but combined two phone numbers, mislabeled the fax number, and stumbled badly on the street address. Other apps offer this feature, but it’s welcome in Cardhop.
- Widgets: Even if you don’t think in a contact-first way generally, you may appreciate Cardhop’s widgets. In iOS 14 and macOS 11 Big Sur, you can configure small, medium, or large widgets that encapsulate a person and an action. Some actions might be more easily accessed via Siri, but if you prefer looking and tapping, a widget for your most contacted people could be welcome.

- Relationships: In contact cards, you can add relationships, like mother, spouse, child, and so on. Those relationships can either be just static text or can link to other contact cards. The main use I’ve found for them is in printing holiday card labels for couples where I want to include both names (which Cardhop can’t do currently, but which Flexibits is investigating). Cardhop can now display a family tree of sorts for such relationships, though it can be a bit confusing, given that Jennifer is my sister, not Tonya’s. Although such a family tree doesn’t seem all that useful for individual contacts, if you link Cardhop to a corporate directory (Google or Office 365) with org chart details, that data could help you see where someone sits in the organization, who their supervisors and direct reports are, and so on.

- Invite to meetings: For those who like the contact-first approach, you can now use Cardhop to, for instance, “invite Contact Name to lunch on Thursday at 12:30” to create an event in Fantastical. It’s totally fine, but no easier than typing “lunch with Contact Name Thursday at 12:30” directly in Fantastical.
- Image attachments: You can now attach images directly to contact cards. I’d have to work to think of an example where this would be useful—a real estate agent attaching a picture of a client’s house, perhaps. Note that the slightly awkward process requires going through a pop-up menu and Open file dialog (Mac) or photo picker (iOS), so you’re unlikely to want to attach more than a couple of images.


After a few days of using Cardhop 2.0, I can’t say that it has changed my usage patterns at all. But it’s still a good contact manager, and the fact that it’s either free or bundled with Fantastical in the Flexibits Premium subscription (which I already have) makes using it an easy decision. If you’re looking for an alternative to Contacts, give it a try.
How to Keep Facebook from Snooping on Your Photos’ Locations
Even many people who are troubled by Facebook’s privacy abuses feel they can’t avoid using Facebook’s iPhone app to stay in touch with their family, friends, and communities. If that’s you, first make certain you’ve turned off Allow Apps to Request to Track in Settings > Privacy > Tracking (see “Apple Releases iOS 14.5, iPadOS 14.5, macOS 11.3, watchOS 7.4, and tvOS 14.5,” 26 April 2021). Also, be sure to set Settings > Privacy > Location Services > Facebook to Never to keep Facebook from tracking your location. Facebook can’t track your location anymore, right? Well, not quite.
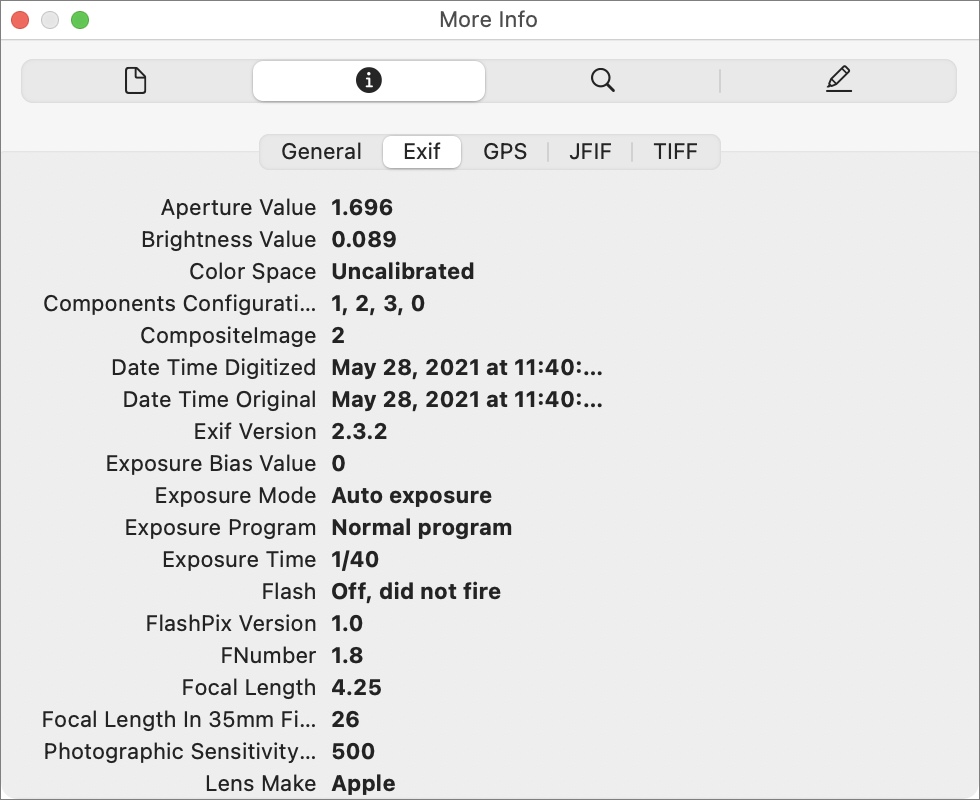
Zak Doffman, writing for Forbes, discovered that Facebook extracts location data from any photos you upload. It does this by snagging the EXIF data embedded in any photo you take with your iPhone, which includes location, date and time, and camera settings. In normal usage, the Photos app uses that location data to display a map of where you took all your photos.
Facebook extracts your photos’ location data in a particularly sneaky way, stripping it out between when you upload the photo and when it’s published on Facebook. That might lead you to believe your privacy is being protected. If you download a photo from Facebook, you won’t find any interesting EXIF information, but Facebook silently adds it all to its own data trove. Facebook confirmed that practice to Doffman.
Instagram, which is owned by Facebook, engages in the same behavior, and it’s probably safe to assume any Facebook-owned app does so as well. We wouldn’t trust any other ad-supported services that accept photos either.
If you’re curious about what sort of data is embedded in your photos, you can easily view it on your Mac. To maintain your privacy when sharing photos, we recommend stripping the location data when exporting from Photos on your Mac, iPhone, or iPad, and we’ve made an iOS shortcut to share photos without metadata. Finally, just to be safe, you can block an app’s access to your photo library in iOS so it can’t possibly exfiltrate data.
View EXIF Data on Your Mac
Before you learn how to strip EXIF data, it’s helpful to see for yourself what’s there. That requires a third-party app on iOS, but Photos, Preview, and even the Finder on the Mac can show you that information just by selecting a photo and pressing Command-I. You’ll see the most detailed EXIF data in Preview. Be sure to click the “i” tab, and you can see more EXIF data by clicking General, Exif, and GPS.
Strip EXIF Location Data from Photos on Your Mac
Photos can strip EXIF location data automatically when you drag a photo from Photos into the Finder to export it. This is controlled by a setting in Photos > Preferences called “Include location information for published items.” As long as that’s unchecked, Photos will remove the location data during the export process.

If you instead use File > Export > Export X Photos, there’s a Location Information checkbox that controls whether or not Photos will export GPS location data along with the photos.
Strip EXIF Data from Photos on Your iPhone or iPad
You need an app to view all the EXIF metadata on an iPhone or iPad, but you can strip location metadata from photos for free. Open a photo in Photos, and tap the photo to reveal the share icon. Tap the share icon and then tap Options at the top. Turn off Location and tap Done. You can then share or copy your photo to send it out into the world without location data.

But it’s easy to forget to do that every time you want to share a photo. If you want a technique that is guaranteed to strip the data each time, I’ve created a shortcut to share photos without location data. Install and open the shortcut, select your photos, and tap Add in the upper-right corner. You can then choose the destination from the share sheet. If you share photos frequently, you could invoke the shortcut via Siri or even customize it to share automatically to your preferred app.
Some apps like Twitter don’t play nicely with the share sheet. For them, I copy the image from the share sheet and paste it into the app.
Protecting Access to Your Photos in iOS
 In its ongoing push to ensure that apps can access only data that the user intends them to access, Apple introduced a privacy feature in iOS 14 that lets you control which photos any given app can access. It’s fiddly to select only a subset of photos that you may want to share, and if you’re sharing directly from Photos or the shortcut, apps don’t need access to your photos anyway.
To cut off access to photos, go to Settings > Privacy > Photos > App Name and select None. That way, Facebook and other nosy apps can’t access your photo library at all.
Stripping Location Metadata Should Be the Default
WWDC is only days away, and we’d like to see Apple add better control of location metadata to iOS 15 and iPadOS 15. Photos for Mac can already strip this data on export, and iOS and iPadOS can do it on a per-photo basis. Facebook’s behavior shows that this is not enough.
Apple’s next step should be to add two switches at the top of Settings > Privacy > Photos. The first would globally prevent all apps with access to photos from reading EXIF data, and the second would automatically strip location metadata on export, just like in Photos for the Mac. Apps could request permission to override either setting, and the user could grant such permission on a per-app or per-export basis.
An M1 Mac Can’t Boot from an External Drive If Its Internal Drive Is Dead
Bombich Software recently updated Carbon Copy Cloner to version 6, and its founder, Mike Bombich, posted a blog entry explaining some of the intricacies involved with updating cloning software for Big Sur and M1-based Macs. One heading may have surprised those who haven’t read all the technical details about M1 changes: “An Apple Silicon Mac won’t boot if the internal storage has failed.”
That might seem bizarre. A core aspect of dealing with system failures on Macs is that you could maintain an external bootable drive, perhaps a bootable duplicate of your startup volume, that lets you use your Mac even if an internal drive was corrupted or failed entirely.
In “The Role of Bootable Duplicates in a Modern Backup Strategy” (23 February 2021), Adam Engst presciently explained why bootable clones might be a thing of the past. Now Mike Bombich has confirmed with Apple that external bootable drives won’t always work!
It’s true, but it’s not as terrible as it sounds. Let me first explain why you should be aware of it but not worry, and then explain the more technical details for those interested in the innards of macOS.
You’re Unlikely To Have a Dead Internal SSD and a Live Mac
The fresh information here is that an M1-based Mac relies on its internal SSD to allow external drives to boot. If the internal SSD has failed or been entirely erased—it contains several hidden volumes—you can no longer boot from an otherwise valid volume on an external drive. Why would Apple do this? To increase security. And, maybe, to reduce its tech support costs.
Relying on details stored only on the internal SSD to control startup from external drives is a way to make it harder for nefarious parties to hijack a Mac’s data. This approach is a shift from Intel-based Macs, which relied instead on firmware (software stored in programmable memory chips that can be updated). However, firmware updates can sometimes fail, causing temporary problems with a Mac or even “bricking” it. There may also be attack vectors related to firmware-based startup control that Apple hasn’t disclosed.
On an Intel-based Mac, you can set a firmware password that prevents booting from anything but a “designated startup disk.” Apple didn’t include that feature with M1-based Macs because the company changed the startup and recovery processes to require knowing a password associated with the selected startup volume. An Apple support document notes: “a Mac with Apple silicon also won’t require (or support) a firmware password—all critical changes are already gated by user authorization.” If you don’t have a valid account and password, you can’t change the startup volume or perform most other recovery features.
We don’t know to what degree problems with firmware updates or undocumented attack vectors contributed to Apple’s switch. Perhaps it was just a simple architecture change, given the reliability of SSDs and the ease of updating them to shift aspects of security from programmable memory chips to SSD storage? You might intuit that Apple could have had high ongoing costs of technical support related to firmware update failures and knew of exploits that compromise data on a Mac’s internal drive by starting up from an external drive. Maybe the cost of diagnosis and repair for Macs disabled or bricked due to firmware failures was high enough to be a consideration, too. But we don’t know.
However, here are the reasons we’re not too concerned about this change:
- A large majority of people don’t possess a bootable external drive compatible with M1-based Macs and would never create a bootable backup. (We cognoscenti may love booting from external drives, but it’s not a mainstream thing to do.)
- Modern SSDs are extremely reliable. The vast majority of people with Apple silicon Macs will never experience a failure of their internal SSD. Thus, they will never encounter a situation where they can’t boot from an external drive due to an internal drive failure. Look no further than iPhones and iPads for evidence of this fact.
- Should the internal boot volume become corrupted, or the firmware in the Secure Enclave develop issues, Apple provides a range of recovery options, including recoveryOS with macOS Recovery (a separate bootable partition), fallback recoveryOS (another partition), and revive/restore via Apple Configurator via another Mac, as I explain in the next section.
Put another way, the only time you would encounter this problem is if you had set up a bootable external drive and your M1 Mac’s internal drive became so damaged (at a hardware level, likely) that you would need an entire motherboard replacement.
What’s going on at a relatively low level of macOS that makes this possible—even necessary? The nitty-gritty follows.
Apple Silicon Puts Security Policies on the SSD
I learned about this limitation while researching my book Take Control of Your M-Series Mac, during which I dug into the Apple Platform Security guide, which was published in February 2021 (and updated this month). Plus, I had read Howard Oakley’s article “M1 Macs radically change boot and recovery,” which interpreted some of the obscure aspects of new boot policy for M1-based Macs. Howard and I apparently alerted Mike Bombich to this in a Twitter thread—it’s such a new idea, even he took some convincing!
As Howard notes in his article, Apple introduced the notion of the 1 True Recovery (1TR) partition with M1-based Macs. This additional partition, separate from a Big Sur startup volume group, holds the code and data that controls boot-time behavior. On Intel-based Macs, firmware serves this role.
One way 1TR differs from the firmware on Intel-based Macs is that the 1TR partition stores your decisions about startup security policies, the directives you set in the Startup Security Utility available in recoveryOS. You can set a separate policy for each external volume you allow to boot your Mac, but that policy is stored only on the internal drive in the 1TR partition. This technique prevents manipulation and trickery if you opt to vary from the highest level of security available, which is the default mode.
This reliance on 1TR is also why setting up an external bootable volume on an M1-based Mac sends you through a two-step process the first time you boot from it. After you select a volume on the external drive in the Startup Disk preference pane or through the recoveryOS startup process, your Mac restarts and makes you authenticate again. From then on, you can restart directly from that external volume. Because it only happens the first time, people often think it’s an error rather than an intentional process. Here’s what’s happening.
The first step in recoveryOS invokes user authentication to validate the new security policy that will allow that volume to start up the Mac, which it then writes to the 1TR partition. But because the policy hasn’t yet been read from the 1TR partition (which is necessary to know that it’s valid), a second restart happens so that 1TR can read that policy during the boot process and validate that the external volume can be used as the system startup volume.
You can encounter trouble if you erase the internal SSD. If you erase all the partitions, including 1TR, you won’t be able to boot from an external drive. However, if you haven’t erased all the partitions, you can reinstall macOS in one of two ways:
- Use recoveryOS: Shut down your Mac. Then press the power button for 10 seconds and release it only after the startup options window appears. Click Options, authenticate, and reinstall macOS. If that fails…
- Use fallback recoveryOS: Apple added a second recovery partition to macOS for M1-based Macs in case something happens to the main recoveryOS partition. Fallback recoveryOS should start up automatically when the main recoveryOS fails. But you can also trigger it manually: Shut down your Mac. Instead of pressing and holding the power button, press the power button twice in succession, holding it down the second time for 10 seconds until the startup options window appears. With fallback recoveryOS, volume policies aren’t loaded. However, it does let you reinstall macOS, and it silently repairs the main recoveryOS. After reinstalling macOS, you can restart and get back to normal. (In fact, if the main recoveryOS has failed, Apple promotes the fallback recoveryOS to become the main recoveryOS and installs a new fallback recoveryOS in its place. If your head is spinning, join the club.)
If recoveryOS can’t be used, you have to use the revive or restore firmware processes, which require the free Apple Configurator app, a particular cable depending on which M1-based Mac you have, and a second Mac. Apple describes the process in extreme depth. The firmware involved here is the Secure Enclave Process’s operating system (sepOS), which manages what Apple calls the Secure Boot process, involving elements described above. (You’ve probably never heard of sepOS before, but it’s a thing.)
If the revive or restore process fails, that’s likely an indication of a significant hardware failure. Your Mac will need to be serviced, and Apple might replace either the motherboard or the entire computer.
Extracting Data from an Old iOS App Broken by iOS 14.5
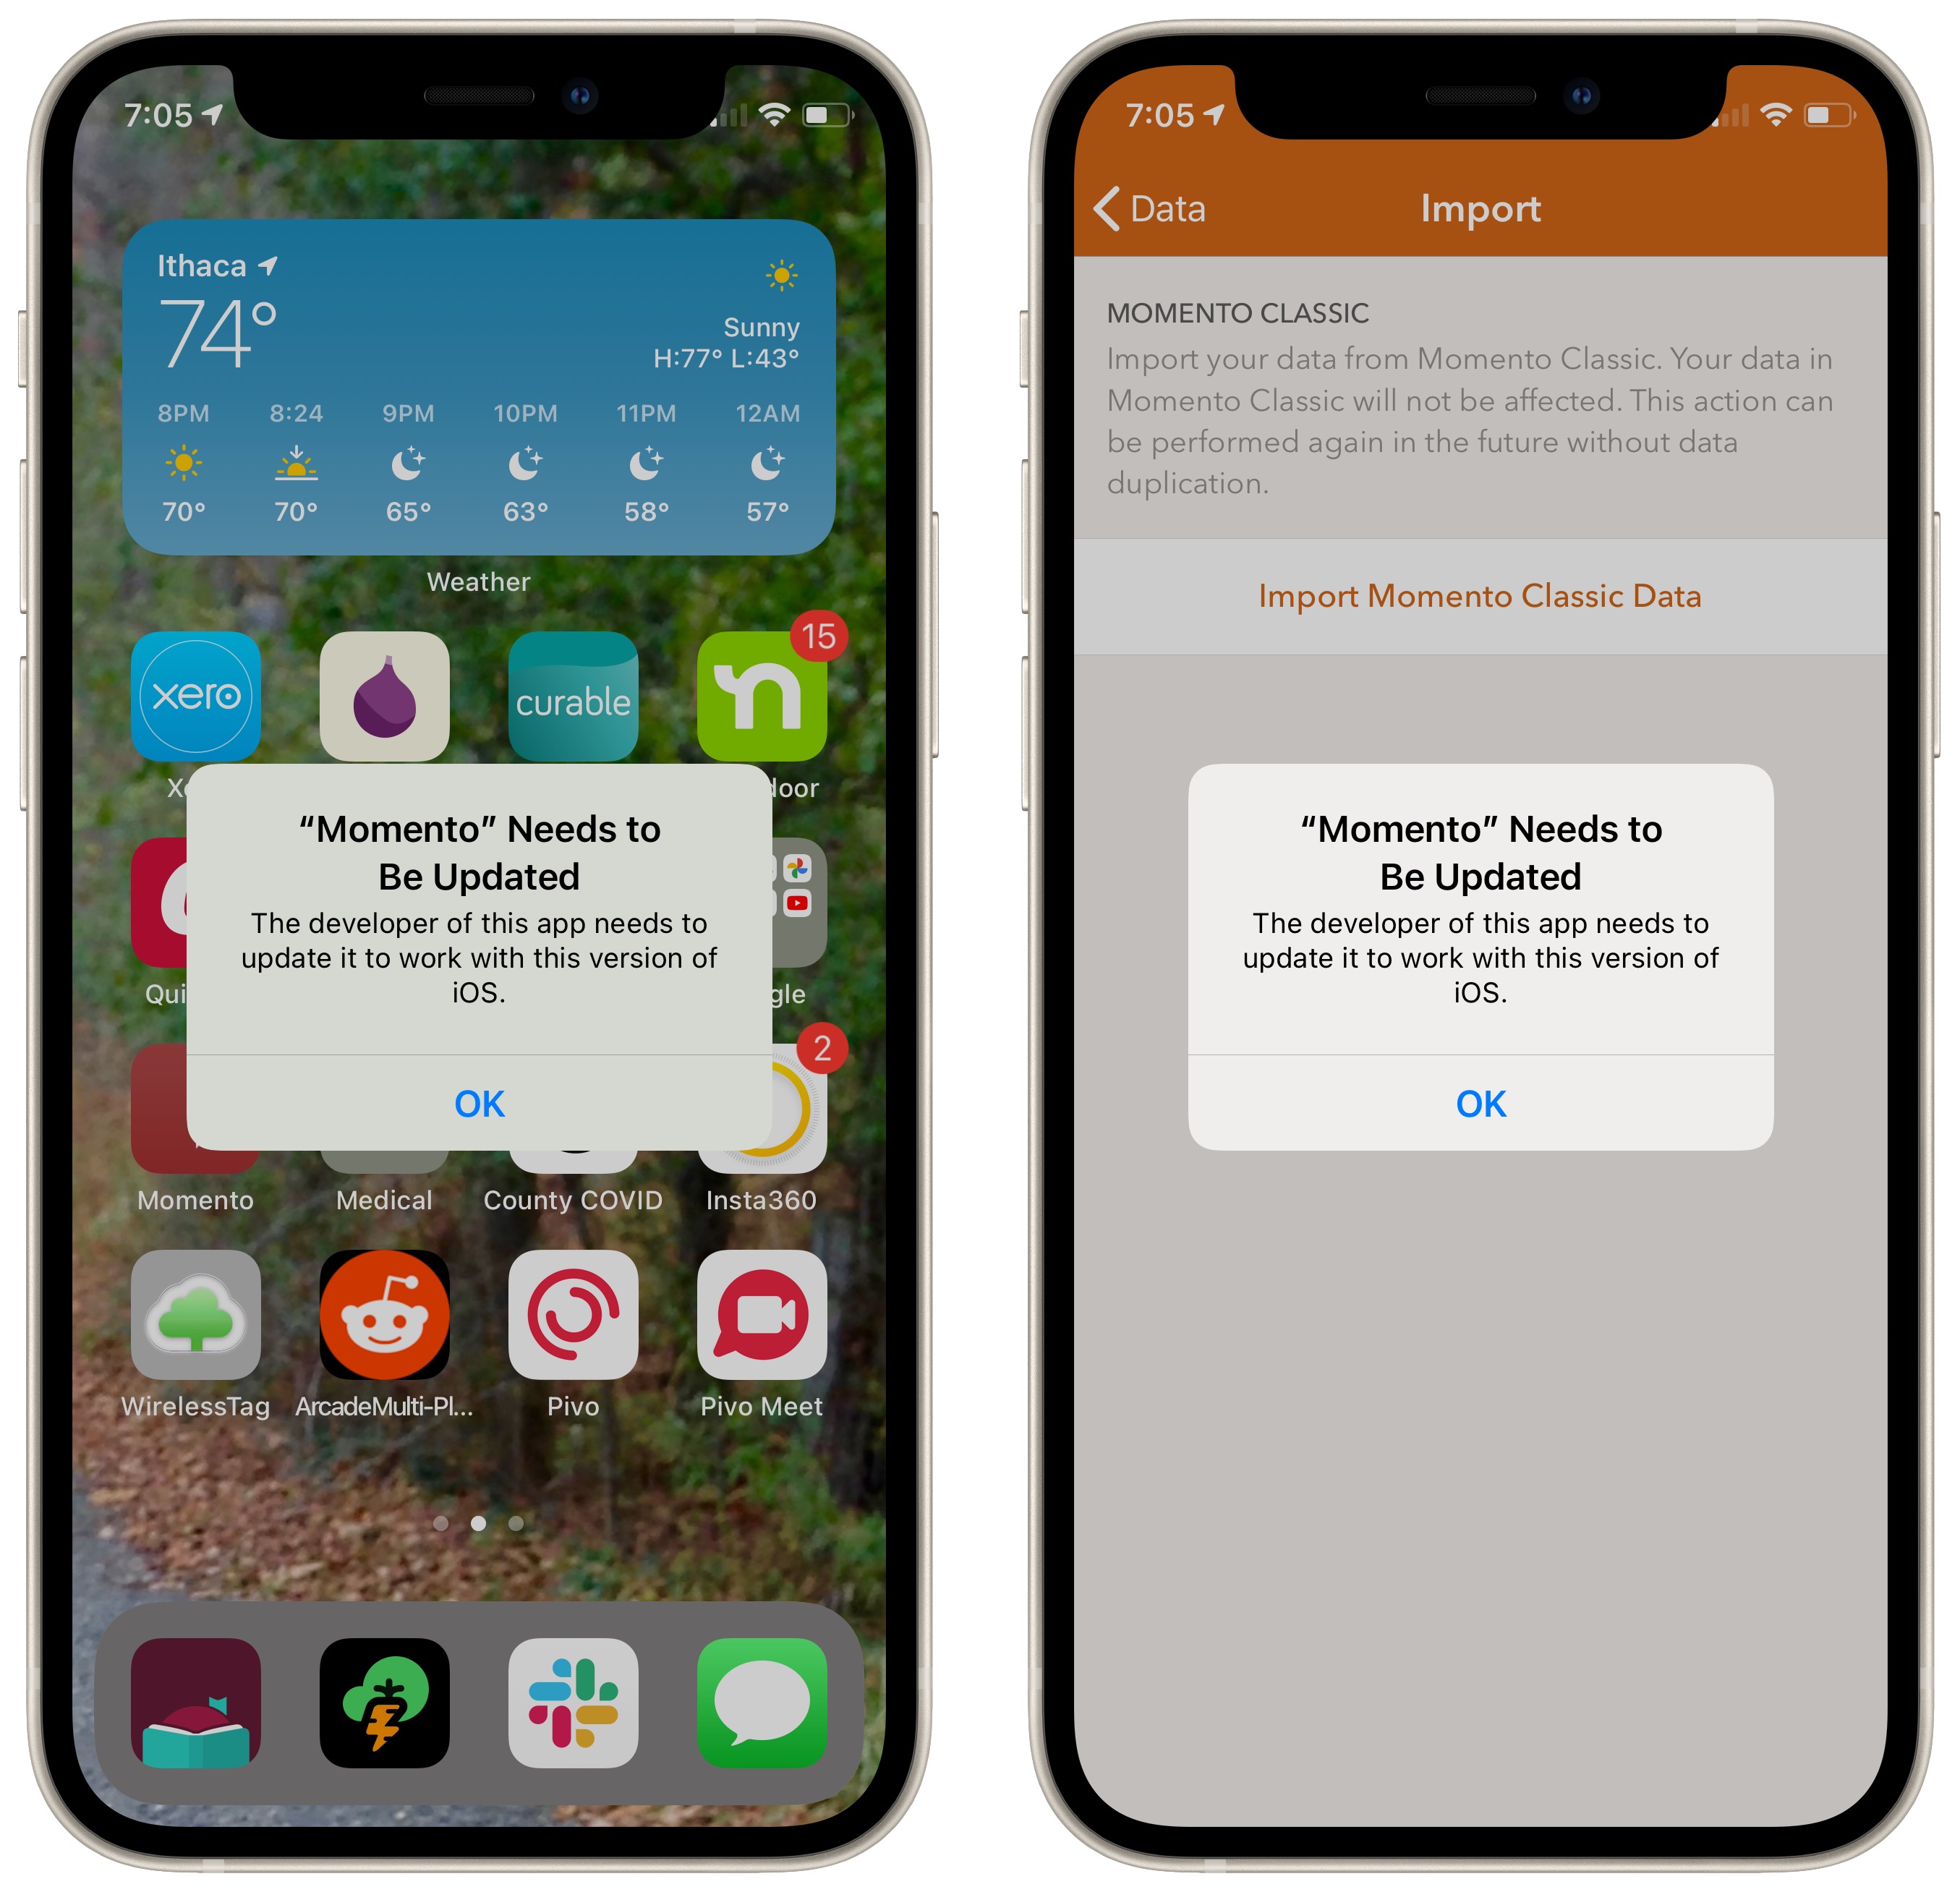
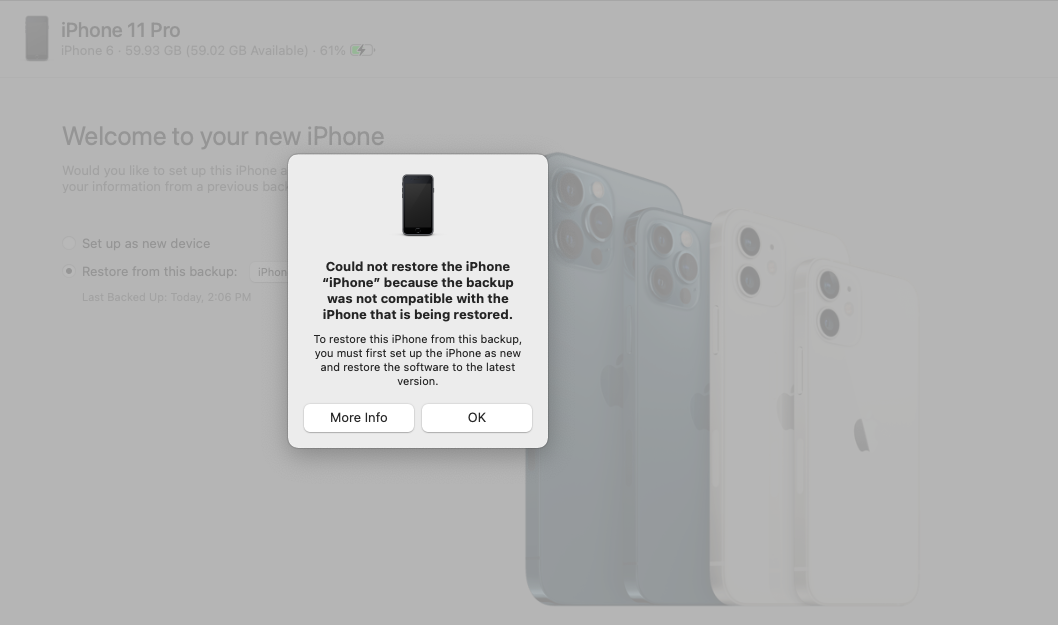
So this is embarrassing. Back in 2013, I was looking for an app I could use for diary-like journal entries, and I settled on Momento. I used it for a while, and at some point, it prompted me to upgrade to a new paid version. I didn’t want any of the new features, so I dismissed the upgrade notice. The app didn’t nag me to upgrade again that I remember, so I kept using it with no problems, apparently for years. Until, that is, Apple released iOS 14.5, which somehow prevented Momento—now called Momento Classic—from launching. Uh oh. (This problem isn’t limited to Momento. Several other apps have displayed similar alerts since upgrading to iOS 14.5.)
I wasn’t opposed to paying for the current version of Momento in principle, though the app’s current approach is a freemium model that would have required a $16.49-per-year subscription to get the features I used in Momento Classic. However, the question of whether the subscription was worthwhile wasn’t really at issue. When I downloaded the current version of Momento and tried to import data from Momento Classic, I got the same error dialog as when I tried to launch Momento Classic under iOS 14.5. Presumably, the new version needs to communicate directly with the old version to import data.
Email to Momento’s developers generated a Zendesk auto-reply but no ideas for how to transfer the data. I wasn’t particularly bothered by losing the data, but all things being equal, I’d prefer to keep it. So after waiting three weeks, I decided to see what I could do on my own. (Momento support finally replied to my initial message, suggesting only that if I had a separate backup of the Momento Classic data, which I don’t, I could potentially work with that on an iPhone running an older version of iOS.)
Restore to an Older iPhone
My first thought was to see if I could restore the Momento data from a backup of my iPhone 11 Pro to an old iPhone 6s that was still running iOS 12 and could thus run Momento Classic. I erased the old iPhone and set it up again, first trying to restore from an iCloud backup and then from a local backup made in the Finder. In both cases, the iPhone insisted on upgrading itself to iOS 14.5.1. I blocked it both times since I assumed the upgrade would render Momento Classic inoperable again, but then my only choice was to erase and start over.
I was able to restore a 2014 backup made when I had an iPhone 5, and that even had some of the Momento data I was looking for, but of course, nothing since 2014. So I could theoretically get Momento Classic working again, but not with the current data.
For giggles, I tried restoring an iPhone 11 Pro backup from iOS 14.5.1 onto an old iPhone 6 running iOS 12.4. That failed too, unsurprisingly, but the fact that it didn’t work is worth keeping in mind. An old iPhone that can’t run the current version of iOS isn’t worth much as a backup device since you would be limited to the data on it as of the last time you had used it, however many years before.
Extract Data from the iPhone Backup
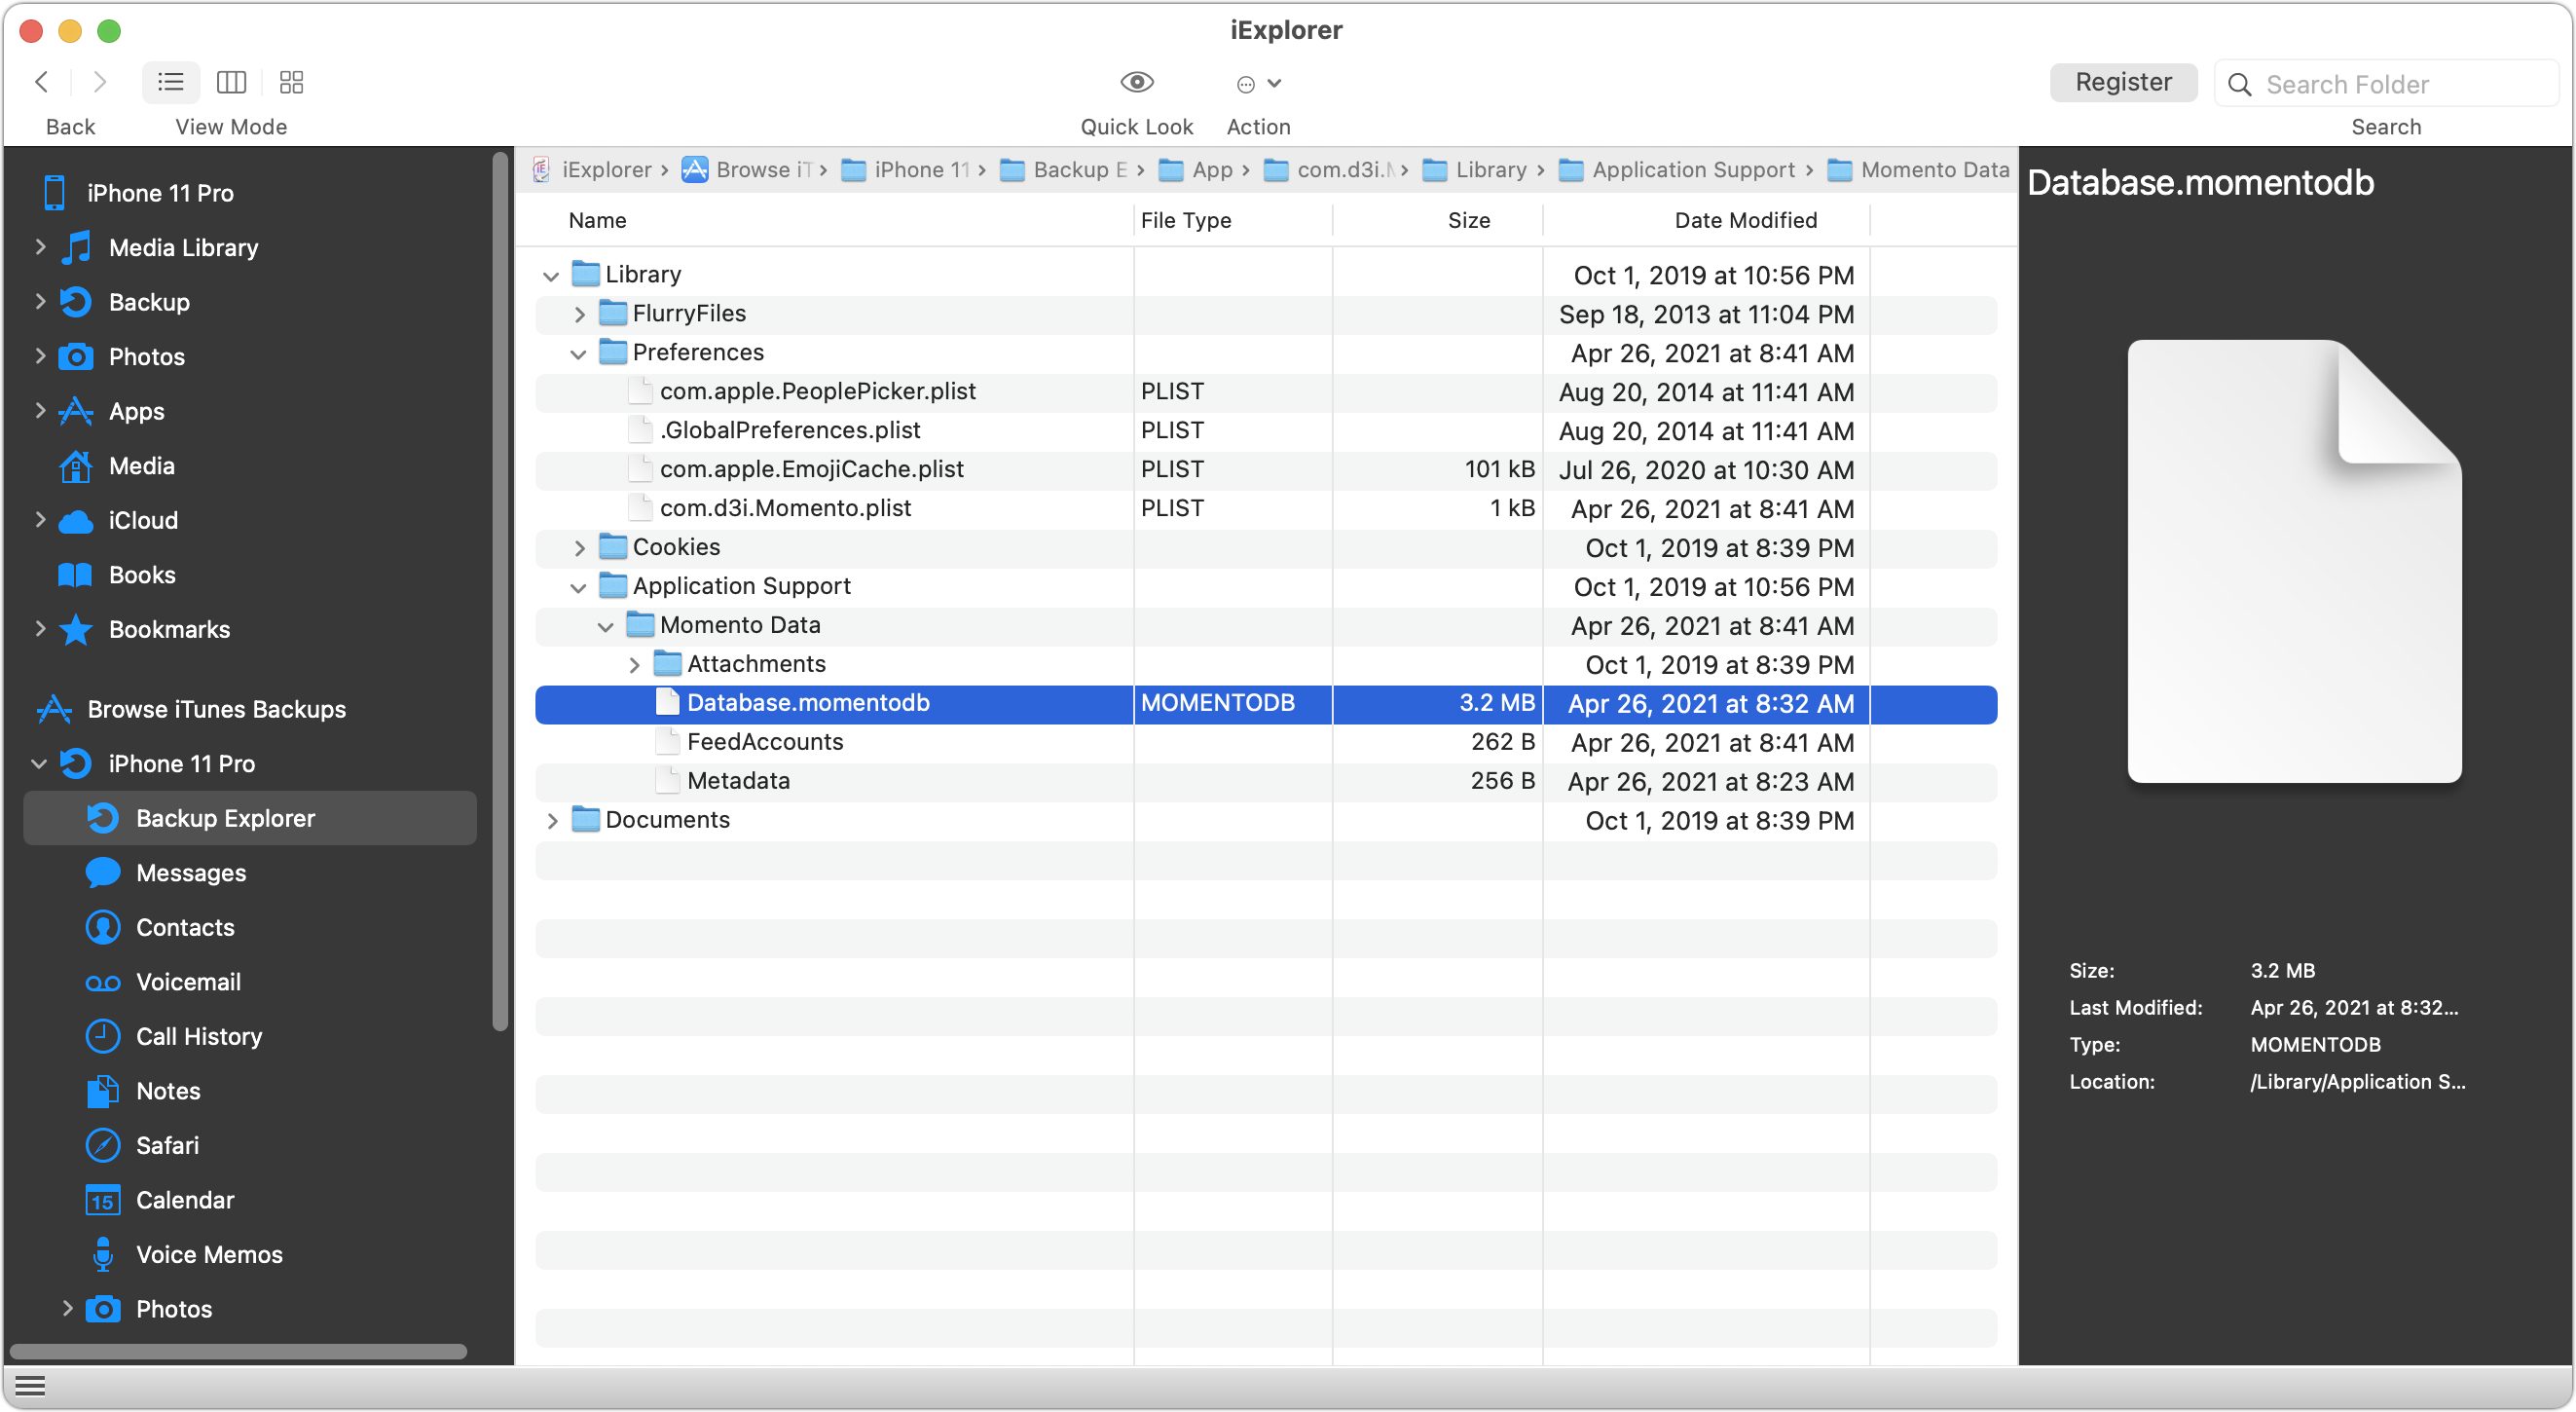
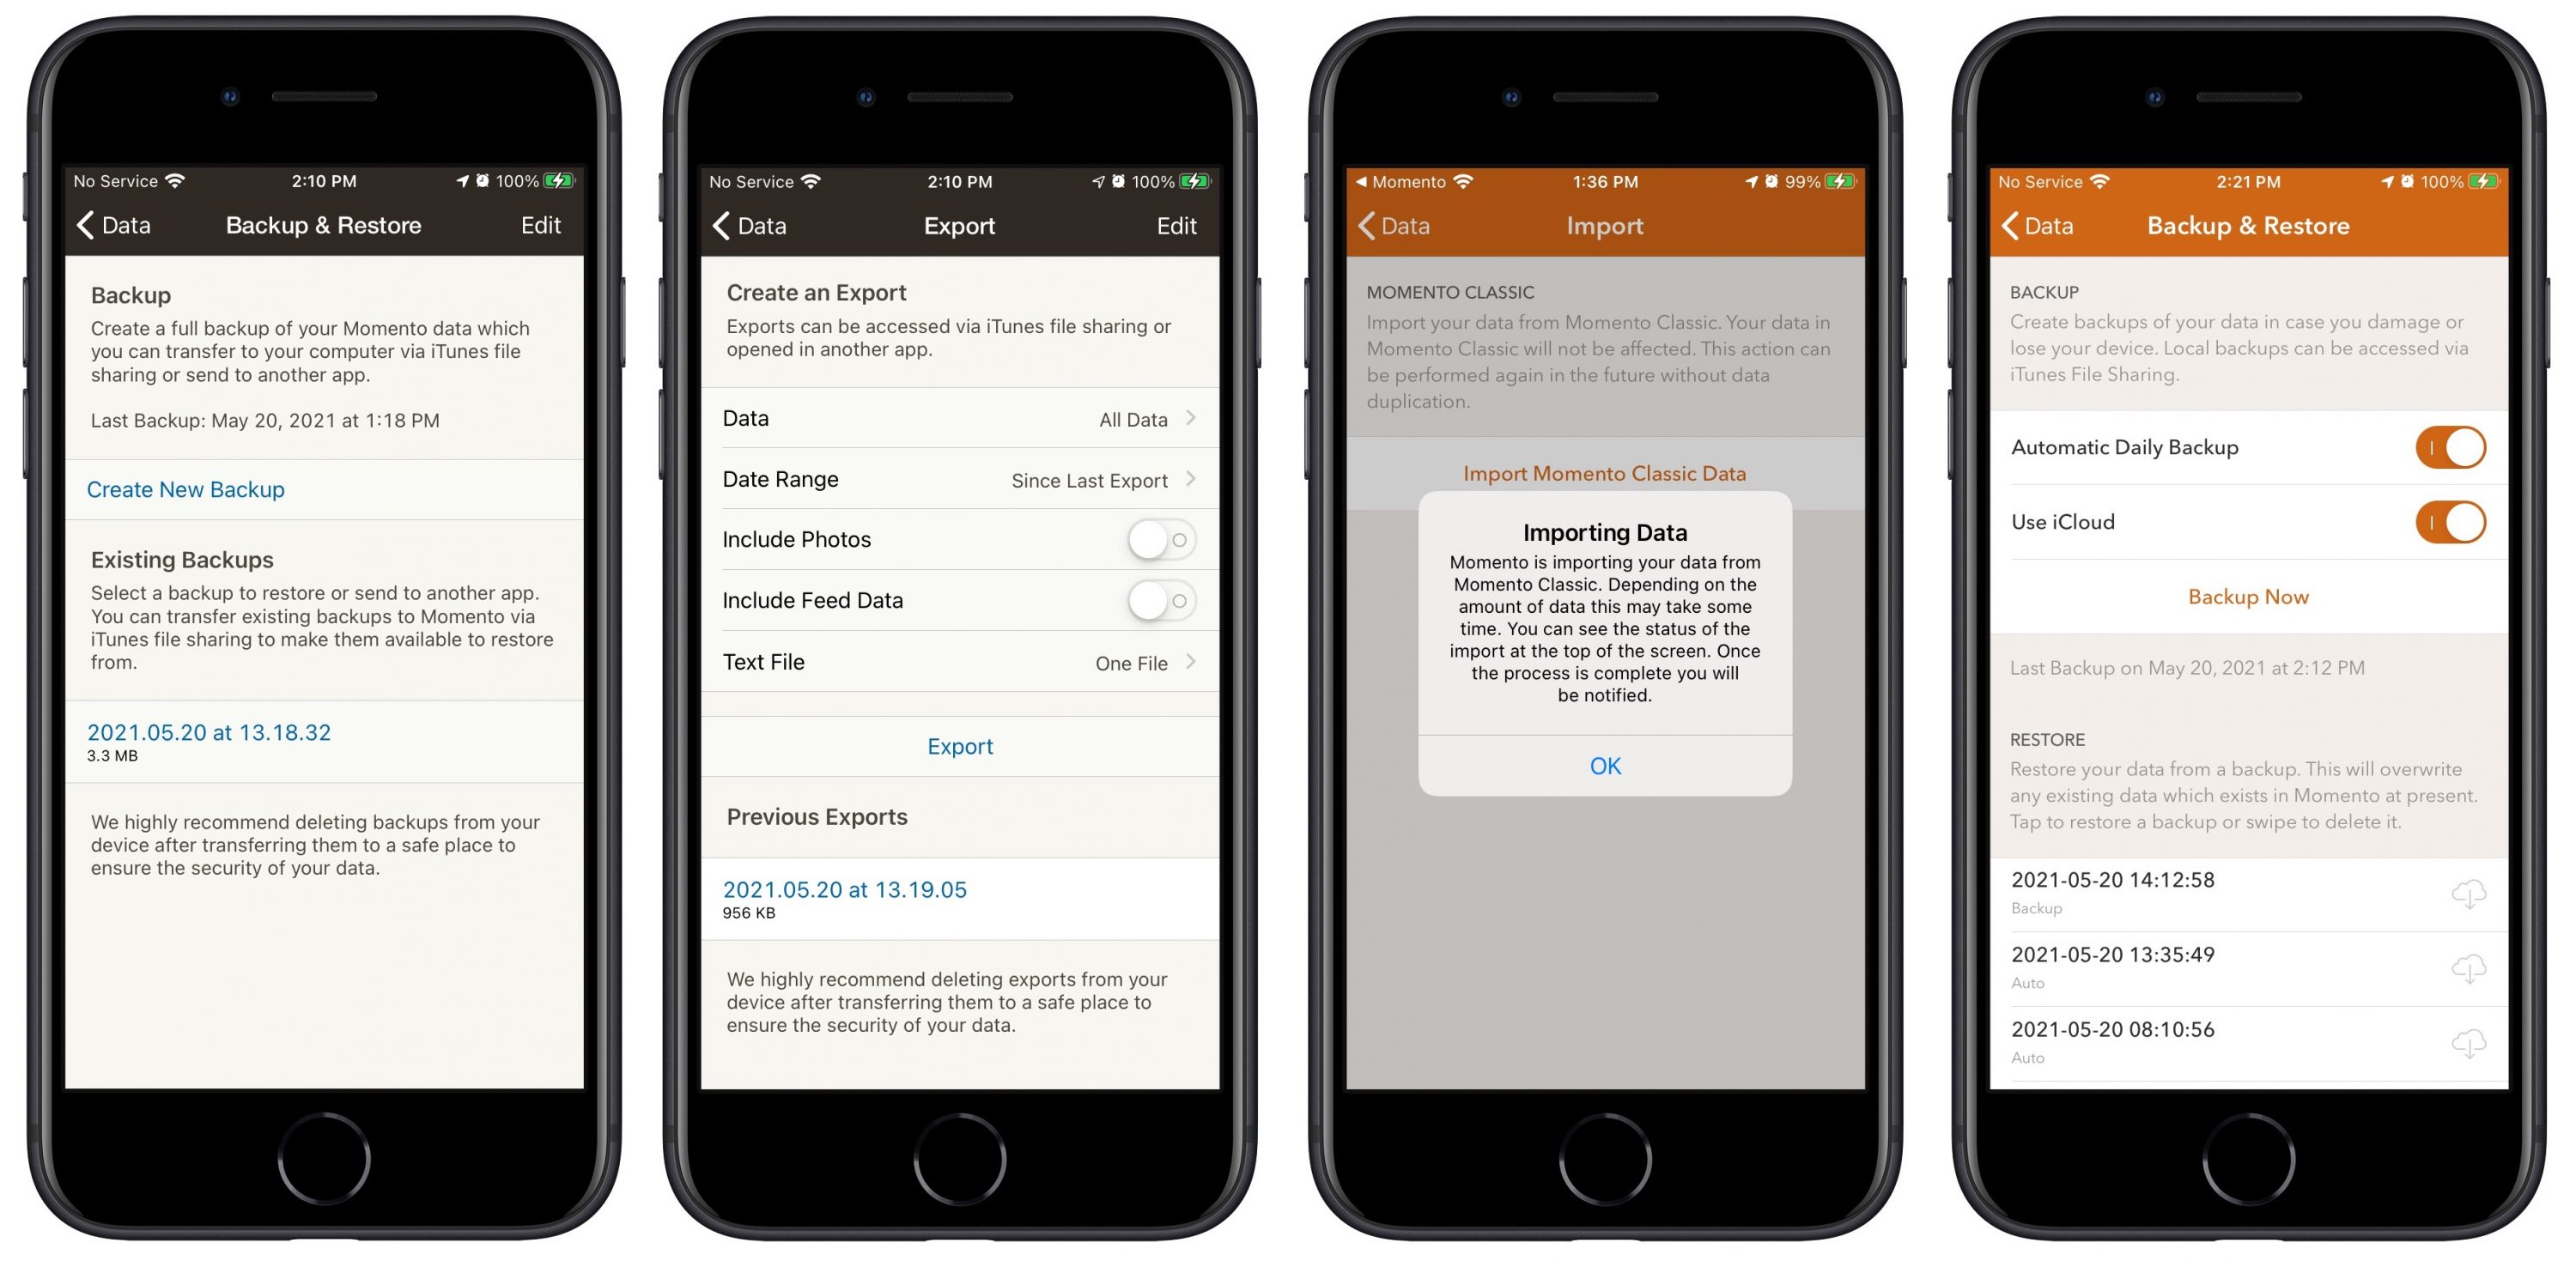
Working with the backups got me thinking that perhaps I could extract the data from a recent backup of my iPhone 11 Pro. I normally back up only to iCloud, but I had made a local (unencrypted) backup on my Mac while trying to see if I could restore that without upgrading to iOS 14.5.1. That backup would be up-to-date, at least, and getting the data out turned out to be surprisingly easy.
I downloaded the demo version of iExplorer, launched it, opened its Backup Explorer view, and did a search on “momento.” That revealed Documents and Library folders, and a few seconds later, I had discovered /Library/Application Support/Momento Data/Database.momentodb, with a recent modification date. I dragged the file to the Desktop and had my data back. Eureka! (I later tested iPhone Backup Extractor, and it too was perfectly capable of extracting that file; I assume iMazing and AnyTrans would have been similarly useful.)
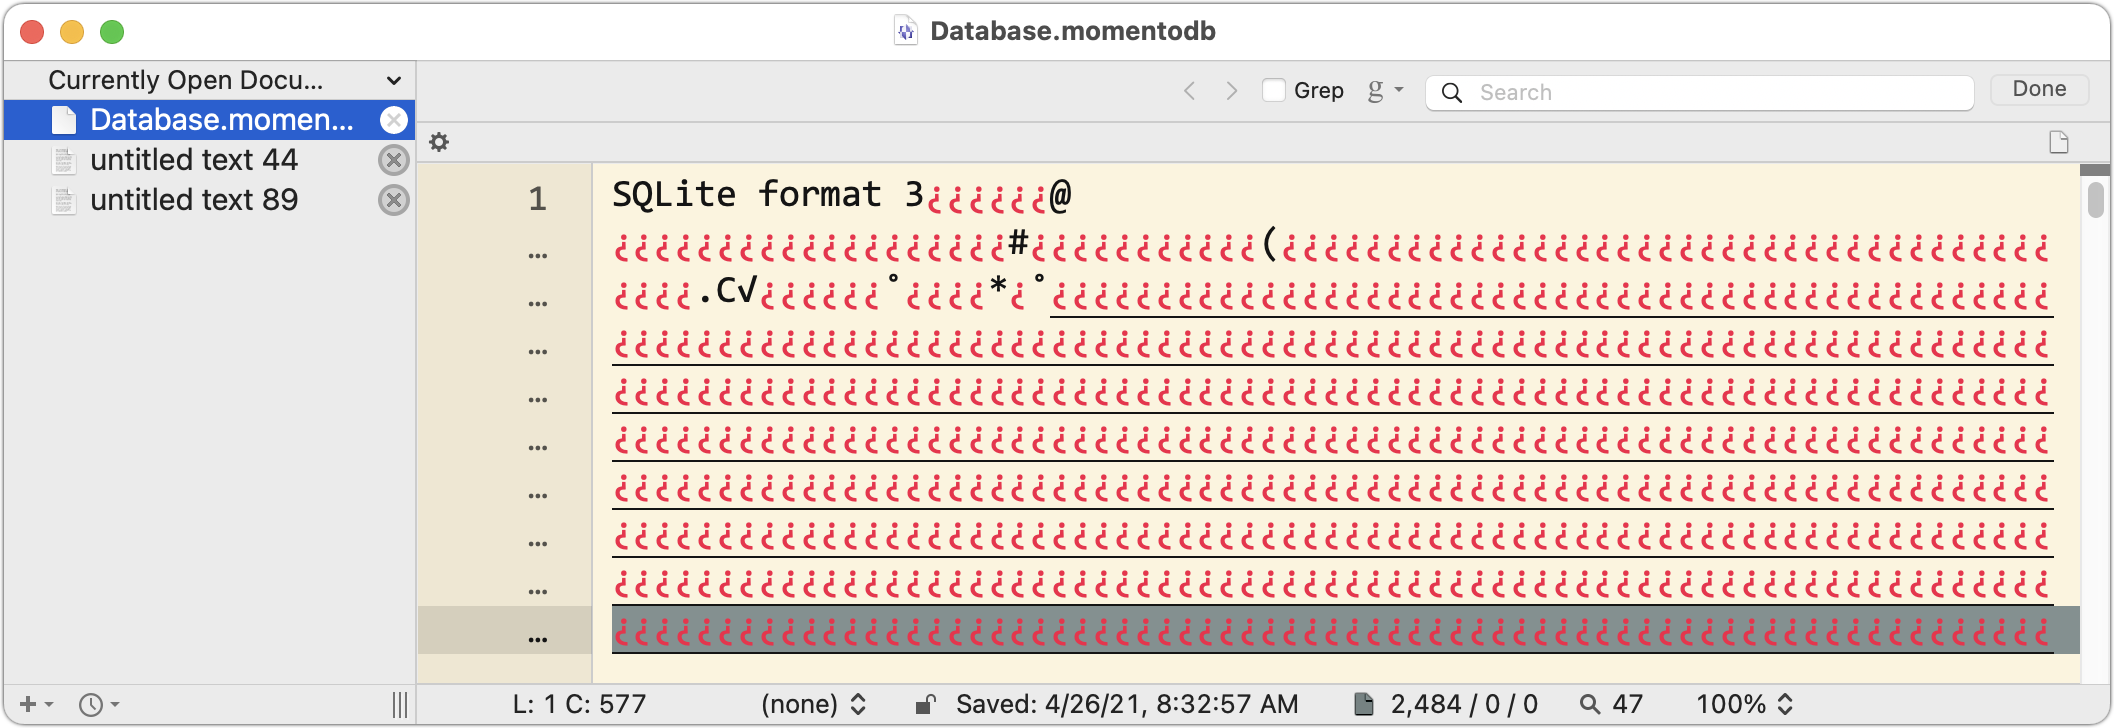
The next question was what format Momento used for its database. I dropped the file on BBEdit, which is happy to display nearly anything, and got my answer instantly: SQLite 3. I also scrolled down in the file and confirmed that it did indeed hold my text. So at the very least, I could write some grep searches to clean up the file to get my text back.
But could I do better? I’m no database expert, but I’ve had to fiddle with MySQL databases for the old TidBITS Publishing System and our current WordPress content management system, so I knew there were good Mac apps for working with databases. I opened Setapp and searched on “sqlite” to see what it had. A cornucopia of riches!
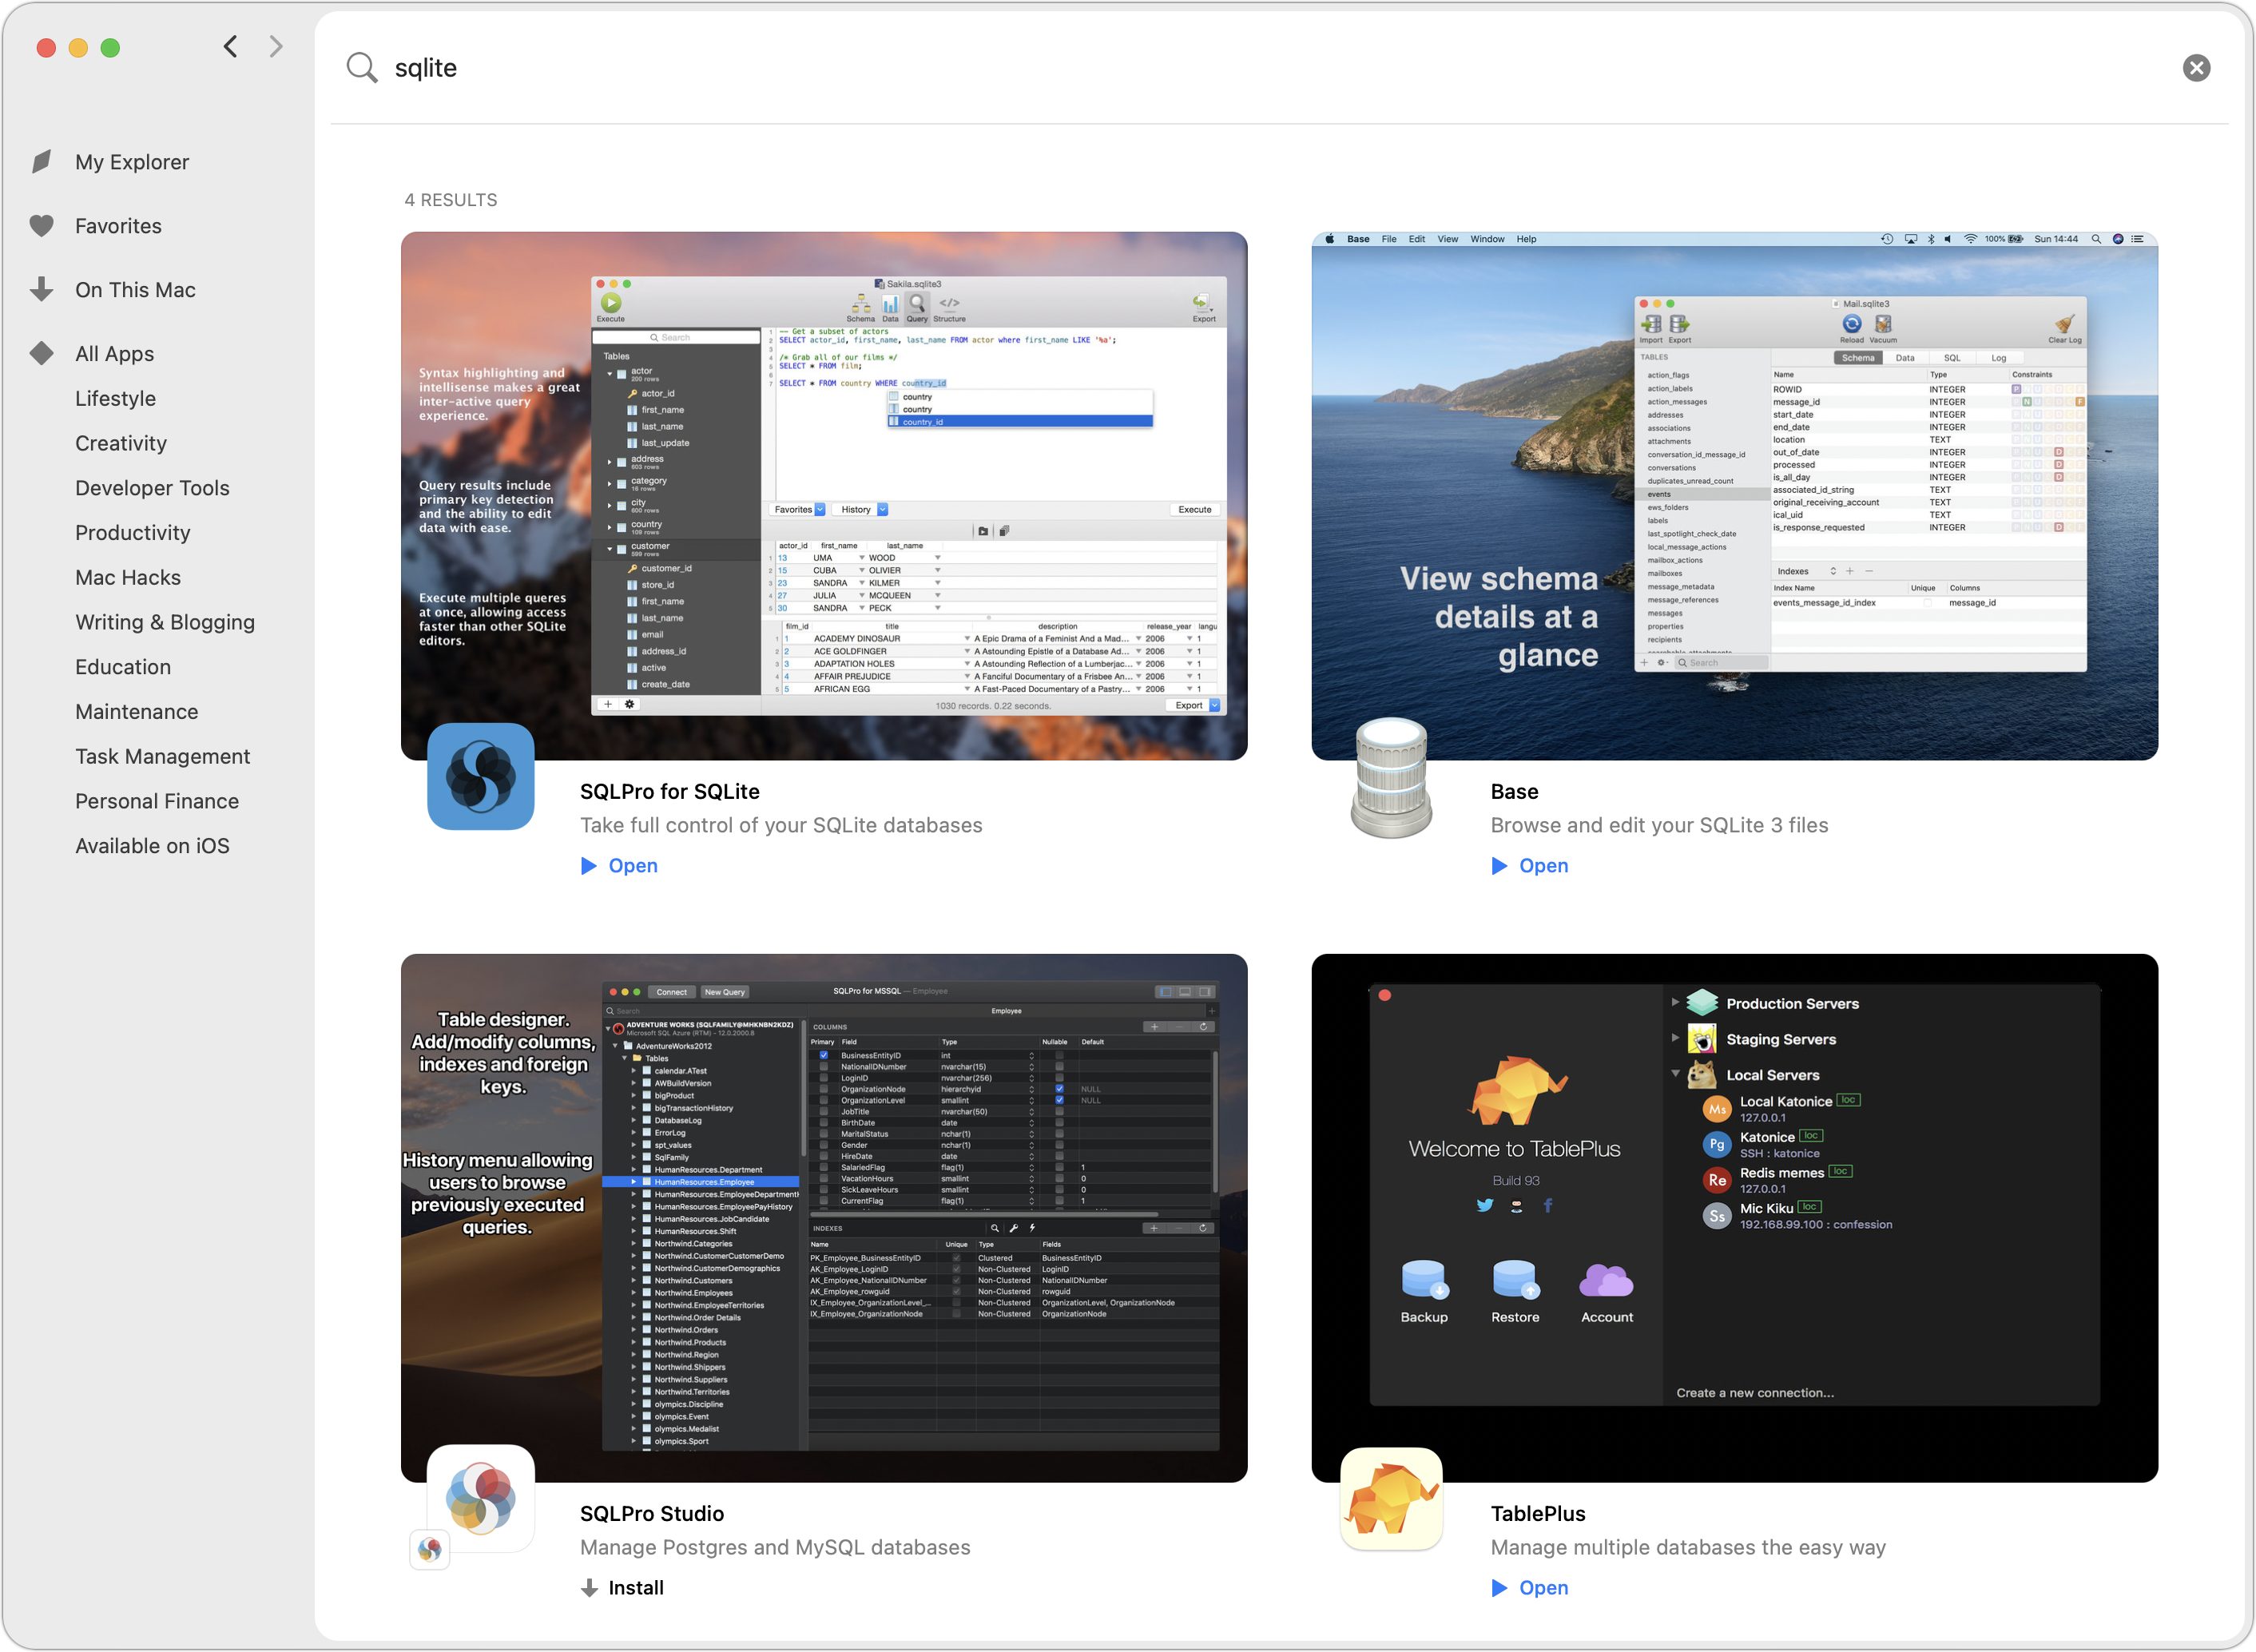
I picked Base at random, launched it, opened my database, and after a few minutes of poking around, found my data. A quick trip to File > Export, and I had my data back in a delimited text file. (I later confirmed that at least SQLPro for SQLite provided the same capabilities for opening and exporting the Momento database file.)
So at long last, I had my data back, if not in its pretty Momento interface.
Could I Inject Data into a Backup?
The fact that I was so easily able to extract data from a local unencrypted iPhone backup got me thinking. Since I now had my data outside of Momento Classic, perhaps there was a way to get it back in, either to Momento Classic or the new version of Momento. For this to work, I’d need to modify data in an unencrypted backup on my Mac and then restore that backup to an iPhone.
To make a long story short, I struck out, despite my extreme cleverness in finding the necessary inscrutably named file in the local iPhone backup and replacing it with an identically named version of the extracted SQLite database. For one test, I modified the database slightly; for another, I replaced the 2014 version with the 2021 version. With the modified version of a database injected into the new version of Momento, it launched fresh, with no entries at all. Replacing the 2014 database with the 2021 version seemingly corrupted the backup because the restore included only a single third-party app, not the large collection that should have been there.
I guess I’m not surprised that injecting data into a backup and restoring doesn’t work because it feels like it could be a security vulnerability. After I published this article, the developer of iPhone Backup Extractor said that it could have recalculated the necessary checksums after updating the data in the backup. However, that didn’t prove to be necessary.
A Happy Reversal of Fortune
Remember how I had assiduously prevented the iPhone 6s from upgrading from iOS 12 to iOS 14.5.1? I did that because Momento Classic stopped working in iOS 14.5. However, I had also pulled an iPhone 7 running iOS 14.0 out of the closet while figuring out what I had available for testing. It didn’t contain the latest version of Momento Classic’s data, but the app still launched. As part of the testing to see if I could inject data into a backup, I brought the iPhone 7 into play, figuring that I could restore a modified iPhone 11 Pro backup to it. As before, I was stymied by the need to upgrade to iOS 14.5.1, but this time I let it upgrade itself. The injection test failed, but you can imagine my surprise when Momento Classic launched, even if it had no data in it. Wait, what?
Apparently, whatever prevented Momento Classic from launching in iOS 14.5 was also related to running on an iPhone 11 Pro. Trying it on an iPhone 7 changed the underlying elements such that it could launch.
I erased the iPhone 7 again—I can’t tell you how many times I did this—and restored it from the previous night’s iCloud backup from my iPhone 11 Pro. Once it was operational, I checked Momento Classic again, and again it worked, letting me create a separate backup and export the data as a text file as well. Next, I opened the new version of Momento and imported the data from the old version. And finally, I made a backup from the new version on the iPhone 7 and was able to restore it into the version I have on the iPhone 11 Pro. Success!
All’s well that ends well, but you know how I say that upgrading isn’t really optional, even if you can put it off temporarily? (If not, go read “Why You Should Upgrade (On Your Own Terms),” 4 September 2015.) This experience is yet another reason why you can’t fall too far behind with upgrades. I made one decision not to upgrade long ago and then failed to think about it again. It’s possible that Momento warned me subsequently, though I have no memory of that happening; regardless, I knew I was using an ancient app and have no one to blame but myself for what happened.
A Late-Breaking Better Solution and Clue
After I published this article (but before it appeared in a TidBITS issue, after which we don’t make changes), Steve Nicolai left a comment saying that he had solved a similar issue with an old app refusing to launch under iOS 14.5 by offloading and reloading it. Initially, I read that as deleting and reinstalling. In a test with Momento Classic on my iPhone 11 Pro, I confirmed that he was correct, but deleting the app erased its data too. Data loss aside, this was a significant step forward, since it brought a previously inaccessible app back to life in situ.
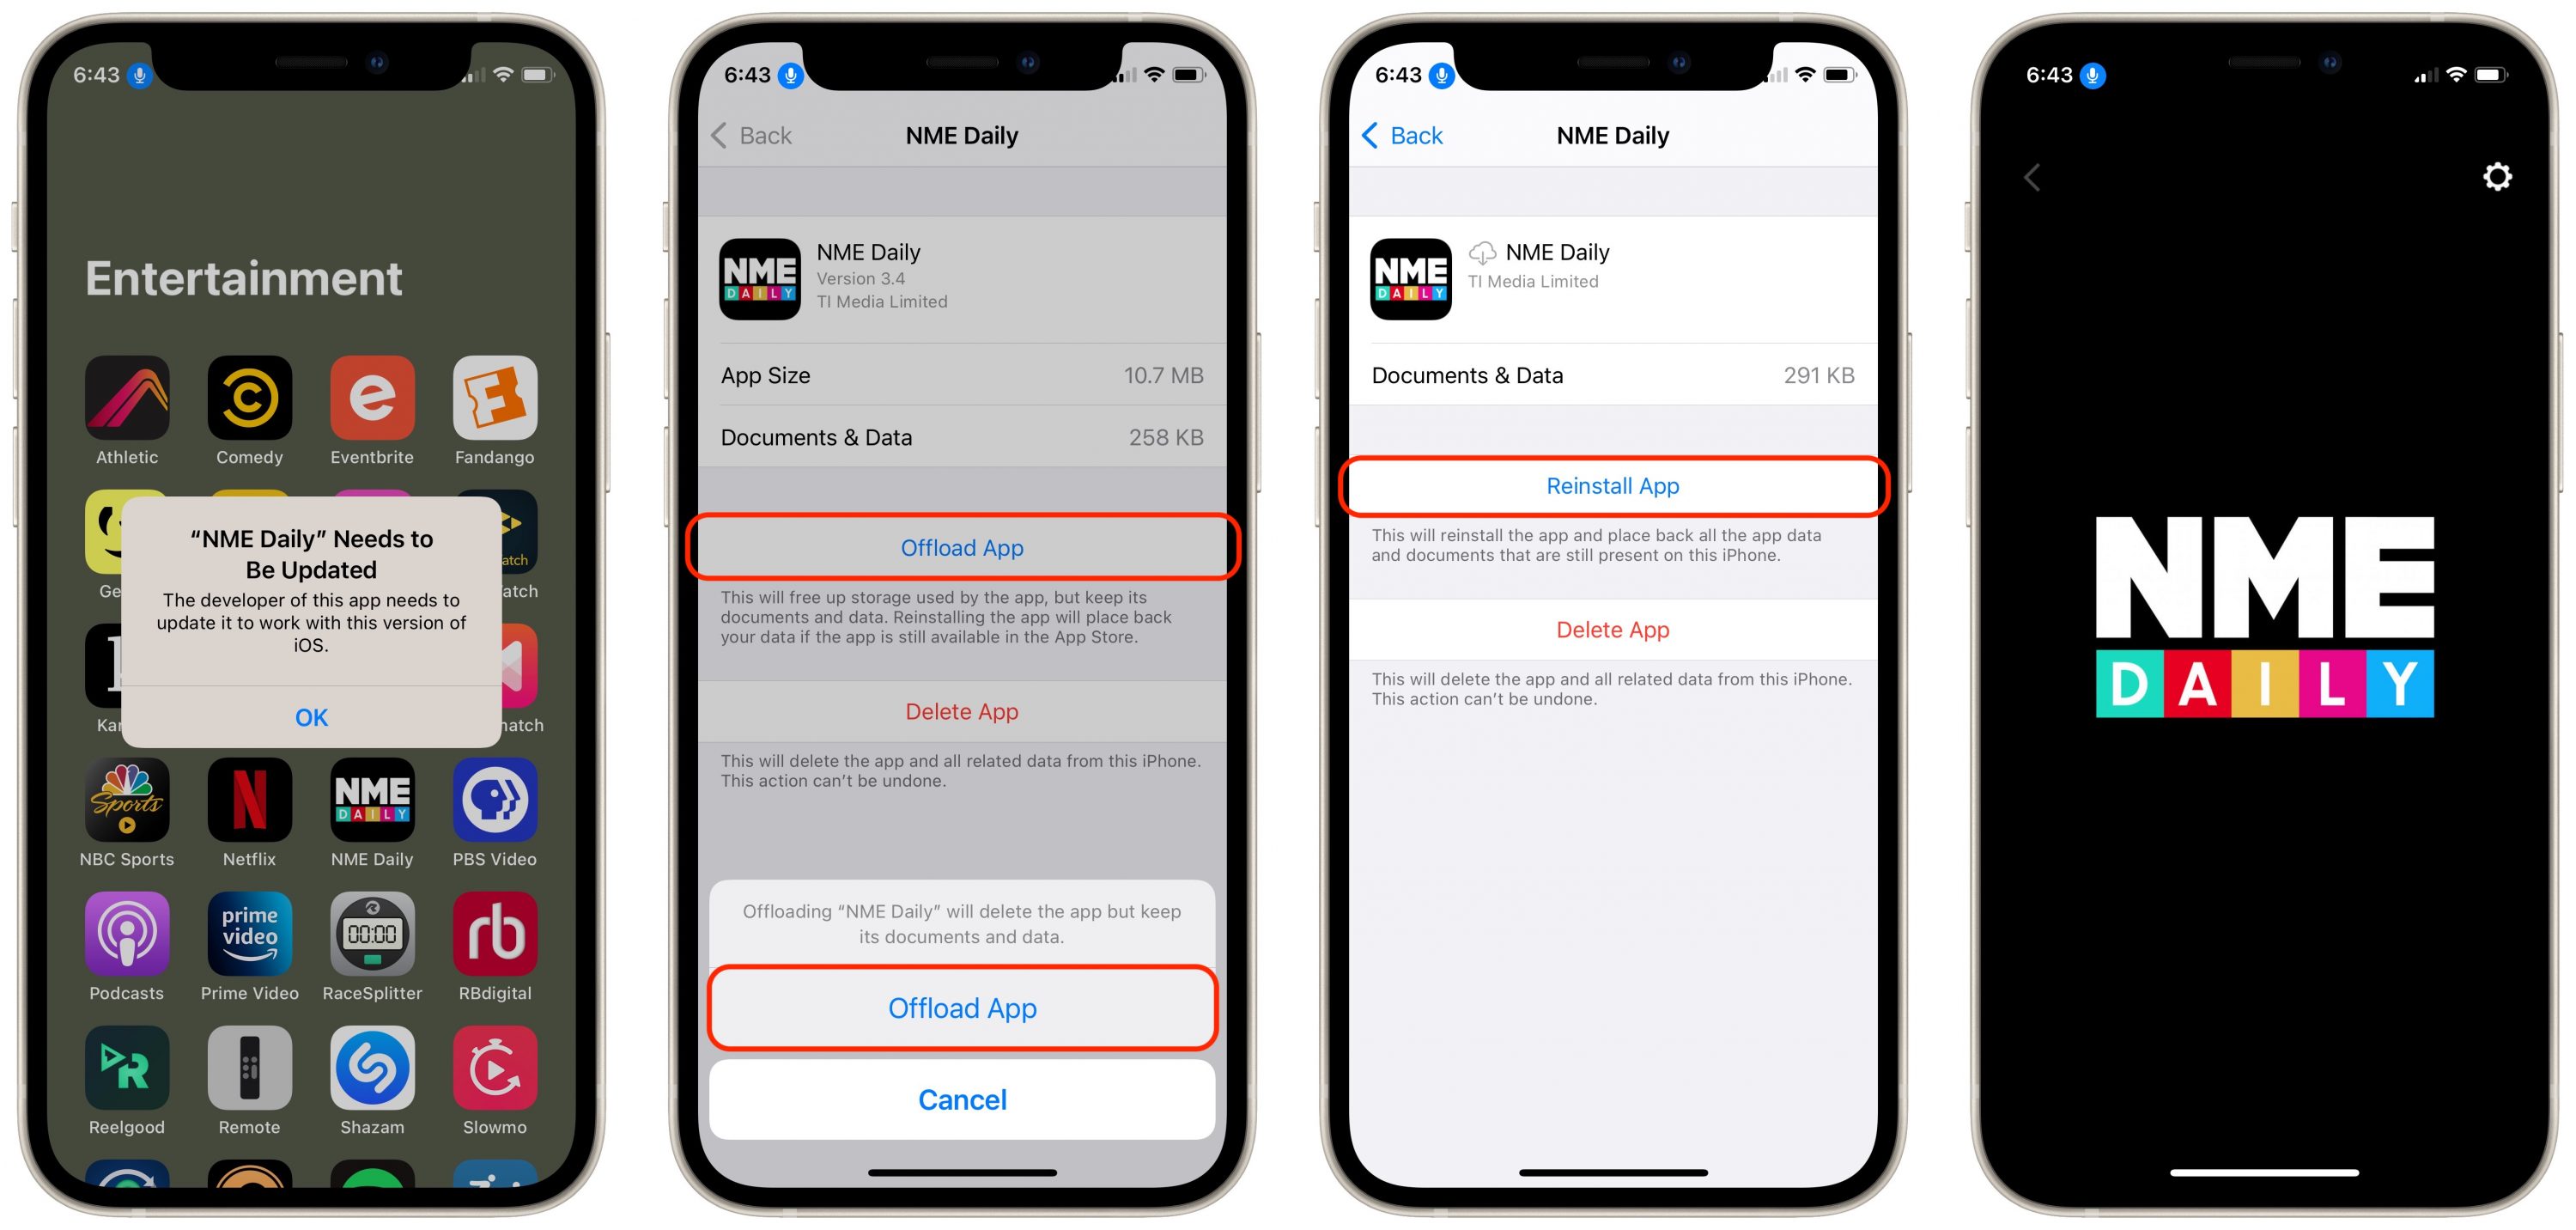
Then Steve set me straight. He was referring to the process of offloading an app to save space, which you do in Settings > General > iPhone Storage. Tap the magnifying glass icon at the top to search for the app you want, tap Offload App, tap Offload App again in the prompt, and once it has been removed from your iPhone, tap Reinstall App. When I did that with the NME Digital app, it came back to life!
This process didn’t work with several other apps in this situation because they were no longer available for download in the App Store. None were important to me, so I just deleted them. Had they contained useful data, I might have tried to extract it. I don’t know why only some older apps remain in the App Store—it’s likely up to the developer.
Steve’s insight explains why Momento Classic and these other apps that stopped working in iOS 14.5 were able to launch on the iPhone 7 after I restored it from the iPhone 11 Pro’s backup. iOS’s backup and restore process doesn’t include the apps themselves; instead, it downloads fresh—and functional—copies from the App Store. (That strategy makes a ton of sense since Apple can maintain one copy of an app in the App Store rather than backing up millions of copies installed on iPhones around the world.)
The fact that merely reloading an app allows it to launch suggests that the actual problem was some sort of expired certificate, not corruption or incompatibility with iOS 14.5. When you try to launch an app with an expired certificate, iOS 14.5 says it needs to be updated by the developer because that process would provide it with a new certificate. My guess is that the App Store itself automatically applies a new certificate to old apps when they are redownloaded, which explains why reloading or restoring from backup both bring affected apps back to life.
Regardless, now you know what to do to revitalize at least some old apps that suddenly stop working in iOS 14.5.