#1568: M1 Macs for the desktop, RAW Power 3 image editor, Ellume COVID-19 Home Test, Apple products and pacemakers
Health has become increasingly high-tech. Adam Engst recently had a COVID-19 scare but was able to set his mind at ease with the iPhone-enabled Ellume COVID-19 Home Test. And for those with pacemakers and other implanted medical devices, Apple just updated its guidance relating to interference from magnets in Apple products. Given that four Mac models share the same M1 processor, which should you choose for your desktop? Julio Ojeda-Zapata surveys the options and offers tips to help you pick the perfect Mac. Jeff Carlson wraps up the issue with a detailed look at RAW Power 3, a capable RAW image editor for shutterbugs. Notable Mac app releases this week include Lightroom Classic 10.3, Microsoft Office for Mac 16.50, Little Snitch 5.2.1, Timing 2021.4, BBEdit 13.5.7, Zoom 5.7, Tinderbox 9.0, ScreenFlow 10.0, SoundSource 5.3.4, PDFpen and PDFpenPro 13.1, and Final Cut Pro 10.5.3, Compressor 4.5.3, and Motion 5.5.2.
Apple Updates Advice Regarding Magnetic Interference with Implanted Medical Devices
Earlier this year, we reported on concerns that the MagSafe charging technology in the iPhone 12 models could interfere with pacemakers, defibrillators, and similar medical devices (see “Keep the iPhone 12 and Other Magnet-Bearing Consumer Electronics Away from Implanted Medical Devices,” 25 January 2021). At the time, Apple said:
Though all iPhone 12 models contain more magnets than prior iPhone models, they’re not expected to pose a greater risk of magnetic interference to medical devices than prior iPhone models.
Although that text remains intact on the “Important safety information for iPhone” page, Apple has now revised the support document that previously reiterated that advice. In “About potential magnetic interference with medical devices,” Apple continues to acknowledge the possibility of magnetic interference and provides a list of Apple products whose magnets are strong enough to be of concern, including the iPhone 12 and MagSafe accessories, along with some you might not expect, like the Pro Display XDR. It’s a long list, but the key thing to remember is that close contact is what you’re trying to avoid. Apple recommends keeping these products at least 6 inches (15 cm) away from such medical devices or more than 12 inches (30 cm) away if using wireless charging.
What prompted the change? It may have been aimed at heading off criticism. 9to5Mac noted that the American Heart Association reported on a recent study that showed interference between an iPhone 12 Pro Max held close to implantable cardiac devices.
Play it safe. If you have an implanted medical device, keep Apple’s magnet-enhanced products well away. That applies to all sorts of other products that also have magnets—Apple’s not doing anything unusual here. Though the company does love its magnets!
Ellume COVID-19 Home Test Goes High Tech
In retrospect, I had been feeling unreasonably chilly all day, and my evening run with friends was a struggle. I attributed my sluggishness and muscle pain to the previous day’s speed workout, but shortly after finishing, I started to ache all over and shiver uncontrollably. Our traditional pizza and cider weren’t going to happen, so we made our apologies, and Tonya drove me home. After a shower, I went straight to bed, where my fever spiked and I slept poorly. By morning, the fever had receded and I felt drained but otherwise reasonable.
I’m fully vaccinated against the coronavirus (as are 64% of adults in Tompkins County) and haven’t interacted with unvaccinated people indoors recently, if at all. Nevertheless, it was impossible to ignore the possibility—however low—that I had suffered a breakthrough case of COVID-19. Some research revealed that several rapid antigen tests for COVID-19 are now available, and an MIT Technology Review comparison pushed me toward the Ellume test, available in the US for about $40 at CVS drugstores and online from CVS.com.

Now, I know you might expect TidBITS to cover computer viruses and anti-malware apps, but coronaviruses and COVID-19 tests? What struck me about the Ellume test was just how high-tech it was, and the company did a good job of employing that technology to make the somewhat complicated process more straightforward. Plus, the results went straight to my iPhone—no need to squint at a faint colored line to see if I was pregnant sick. (The competing BinaxNOW Self Test doesn’t appear to provide as much guidance and relies on the colored line approach.)
 It was a fascinating experience. Downloading the app felt a little unnecessary at first, but given all the parts and pieces of the kit, I appreciated how it walked me through the process. In fact, it forces you to watch a video that explains the entire process, emphasizing that you should not try to perform the test while watching. The step-by-step instructions come next and are wonderfully clear and concise, with additional tips and warnings sprinkled throughout.
In essence, you put some liquid in a custom dropper, use a custom nasal swab to swab the inside of both nostrils (uncomfortable but not painful), and then screw the swab into the dropper. Next comes the Analyzer, which you pair to your iPhone using Bluetooth by holding down a button on one end. Then you carefully squeeze five drops from the dropper—which has internally mixed with the swab—into a hole on the other side of the Analyzer. Let the app work for 15 minutes without interruption for your result.
My test was negative, thank goodness, and two days later, I felt fine.
Pros of the Ellume test include:
- Relatively low cost at about $40
- Wide US availability through CVS and online ordering (BinaxNOW is also available at Walgreens)
- Claimed accuracy rates over 90% for both positive and negative samples, and for symptomatic and asymptomatic individuals
- Analyzer checks for other proteins as a verification that you swabbed sufficiently
- Results come back in 15 minutes; the entire process takes about 45 minutes
- Only one test required (BinaxNOW requires two, 36 hours apart, for maximum accuracy)
- The emailed test result may be useful as proof of a negative test (BinaxNOW essentially works on the honor system)
There are cons as well:
- Nearly twice as expensive as the BinaxNOW test, which is about $25
- Heavy on materials and packaging for a single-use test (the Analyzer refuses to work even a second time)
- Requires downloading an app and providing some personal information
- Precision required in the testing process
- Numerous requirements for test accuracy (temperature range, no direct sunlight, no other tests taking place nearby, and more)
- Closing the app during the process ruins the test and requires a new kit

Given that breakthrough infections are happening, particularly with the Delta variant, I think there will be a role for at-home rapid testing for some time yet. It’s not that breakthrough infections are likely, but we’ve spent so much time worrying about COVID-19 for the past 15 months that any viral infection with similar symptoms will immediately cause concern. Given that the gold-standard PCR tests take a day or two to return results (and may require self-quarantining in the meantime), I plan to keep an Ellume test handy, just for peace of mind.
Besides, I already have the app installed.
More generally, I could see a bright future for in-home test kits. Ellume has developed a single-use flu test that sounds similar to the COVID-19 Home Test. The flu isn’t as contagious or dangerous as COVID-19, but the virus—often abetted by opportunistic secondary infections—can be deadly. Even when it’s not, it can lay out a healthy person for weeks and require months of recovery. The last time I had it, I felt terrible for two weeks and couldn’t kick the cough and fatigue for almost a month. TidBITS contributor Glenn Fleishman had a four-month recovery after contracting the nasty 2017–2018 flu season variant. Being able to identify a flu infection quickly without having to get to a doctor might be welcome for short-term planning and for requesting a Tamiflu prescription.
Ideally, such test kits wouldn’t be single-use. Security Editor Rich Mogull, who is also a paramedic, told me that the problem with multiple-use tests is contamination, both from previous tests and exposure to the environment. To prevent that, every piece of the Ellume kit came packaged in a separate mylar wrapper, and the instructions say not to open them until you’re ready to perform the test. When you’re done, there’s nothing to do with the plastic parts but recycle or trash them. It’s hard to know which is better, given the plastic industry’s decades-long campaign to convince us that recycling is economically feasible, something that has apparently never been true. It’s just offensive, though I suppose less so than many other modern products (I saw the plastic parts of a microwave dinner for the first time recently—insane).
I’ll bet plenty of people would pay for a home testing device that could detect multiple diseases. Some quick searching shows that these sort of things do exist, but they’re like the minicomputers of yesteryear in size and price. Even this “compact multiparametric immunoanalyzer” weighs 88 pounds (40 kg) and costs almost $15,000 refurbished.
I’m as far as it gets from an expert in this field, but Ellume has shown infectious disease testing can be brought to the home, and my money is on the tech world making this possible within my lifetime. And if I’m wrong, I’ll be dead and won’t care.
Consumer Desktop Mac Buying Guide: Which Is Right For You?
Most Mac users buy laptops, but Apple hasn’t neglected those who prefer desktop Macs. Its recently released M1-based iMac has a brand-new design in an array of lively colors, a thin profile, better performance than its Intel precursor, enhanced webcam image quality, and more (see “Apple Releases New M1-Based 24-inch iMac in Spring Colors,” 20 April 2021).
If you are in the market for a desktop Mac, as I am, you might find the M1-based iMac to be tempting. I’ve been using an Apple review unit for a few weeks, and I’m smitten—even though it has a physical flaw that I’ll explain in a bit.
Before dropping $1299 or more for one of these Macs, however, you should consider all your desktop Mac choices, as I have been. I’m focused on consumer-level options for those with limited budgets, so you’ll see no further mention in this article of the Mac Pro with its Pro Display XDR for a combined minimum of $10,998, or even the 27-inch iMac with 5K Retina display ($1799 and up).
But the Mac mini, retrofitted late last year with the same M1 chip now found in the iMac and other newer Macs with Apple silicon, is worth a look (see “Apple M1 Chip Powers New MacBook Air, MacBook Pro, and Mac mini,” 10 November 2020). The Mac mini starts at $699, not including a display, keyboard, or pointing device.
Then there is the M1-based MacBook Air, starting at $999. Yes, it’s a laptop, but many users plug it into a display, attach external input devices, and get busy in desktop mode at least part of the time. The M1-based 13-inch MacBook Pro starts at $1299, but I don’t see it as a good deal if you’re on a budget for reasons I’ll explain a bit later.
I’m guessing you are at least superficially familiar with all of these Mac options, but I hope to dig into details and nuances you may not have considered. I had not made my buying decision as I typed these words, so writing this article has been a helpful exercise.
Modular Mac
My last Mac was the space gray Mac mini, announced in 2018, with an eighth-generation Intel i5 processor, 8 GB of memory, and 256 GB of storage for $799. It served me nicely until last year, when I received $460 for it from Phobio, Apple’s hardware trade-in partner.
I had intended to replace the Intel-based Mac mini with its M1 equivalent for $699, but the new iMac put my buying plans on pause. I might still end up going with the Mac mini, however. It has some benefits: choosing your own display, easy swapping in the future, and access to legacy ports.

You get to choose your own display. Separating the Mac from its screen opens up a world of options. If you are on a tight budget, you can get a decent-enough display for a few hundred dollars for a combined cash outlay under $1000, which is substantially less than the cost of an entry-level iMac. Better yet, you might already have a display to press into service, so the Mac would be your only significant expense.
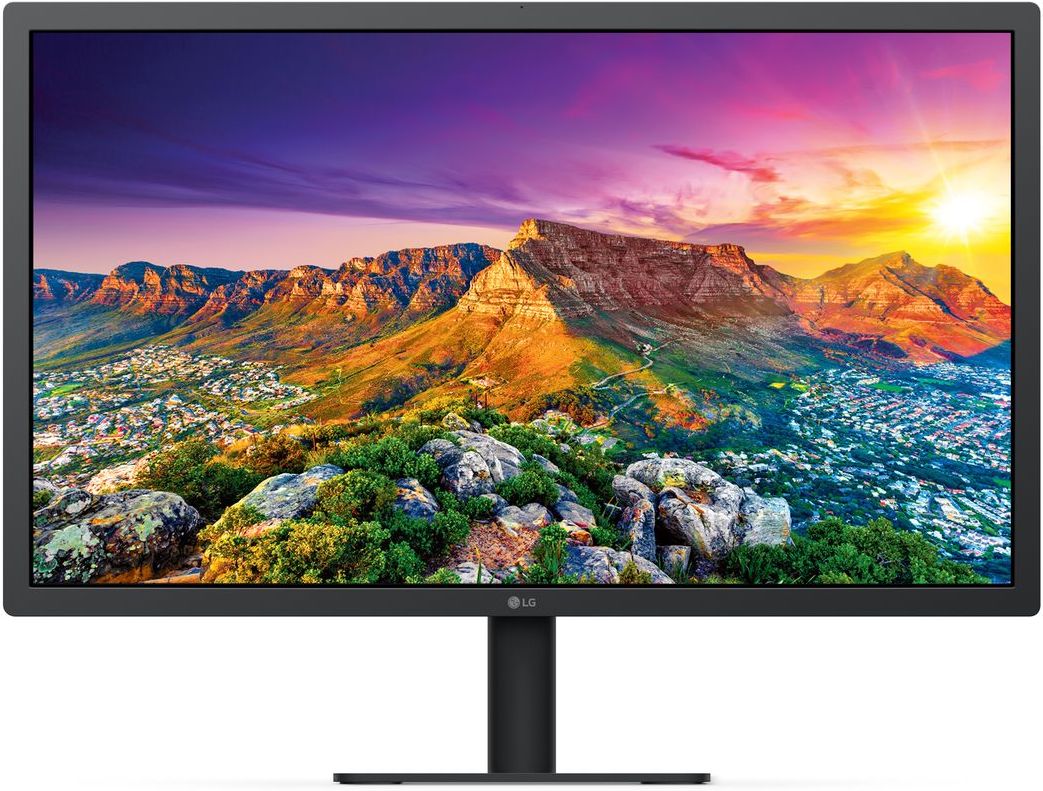
I like my midrange display, the $699 UltraFine 4K Display, made by LG with Apple’s input and sold via Apple’s online and physical stores (see “Apple Debuts LG’s All-New 23.7-inch UltraFine Display,” 20 May 2019). The 23.7-inch display connects to a Mac via a Thunderbolt 3 port and doubles as a hub with a second Thunderbolt port and three USB-C ports.
TidBITS managing editor Josh Centers bought a different LG display, the 27UK850-W 27-inch (see “LG 27UK850-W: An Acceptable 27-inch Display for the Mac,” 18 December 2020). It doesn’t do Thunderbolt 3 but does have a USB-C port for linking to a Mac. The display’s price varies, often topping $600, so keep an eye out for deals; Josh paid $380.

If you want to use your Mac mini with two displays, things get a little complicated. The Mac mini supports only a single Thunderbolt display, but you can connect a second display via its HDMI port. That may require the use of an adapter.
Of course, you also need to add external input devices—the Mac mini doesn’t come with any. Choices abound; you can’t go wrong with Apple’s Magic Keyboard and Magic Trackpad, which I’ve been using for years. I dislike the Magic Mouse, though, so I use Logitech’s MX Master 3.
One great thing about the Mac mini is how easy it is to transport if, for instance, you have to take it to an Apple Store’s Genius Bar—detach it from its display and go. Any sort of transport is more of a chore with the iMac, thanks to its integrated display.
The Mac mini is easy to swap out. After decades of using all-in-one Macs, ranging from the Mac Classic and the Color Classic to every flavor of iMac, my switch to a Mac mini was jarring but logical. If I bought a nice-enough display, I reasoned, it would last me through at least two or three Mac generations. I’d just exchange one Mac mini for another as a sort of brain transplant, thereby saving money.
The Mac mini has legacy ports. Most M1-based Macs offer limited port options, forcing users to invest in dongles or docks. The Mac mini is the exception with two USB-A ports, an HDMI port, and an Ethernet port, along with the standard two Thunderbolt ports.
Clamshell Mac
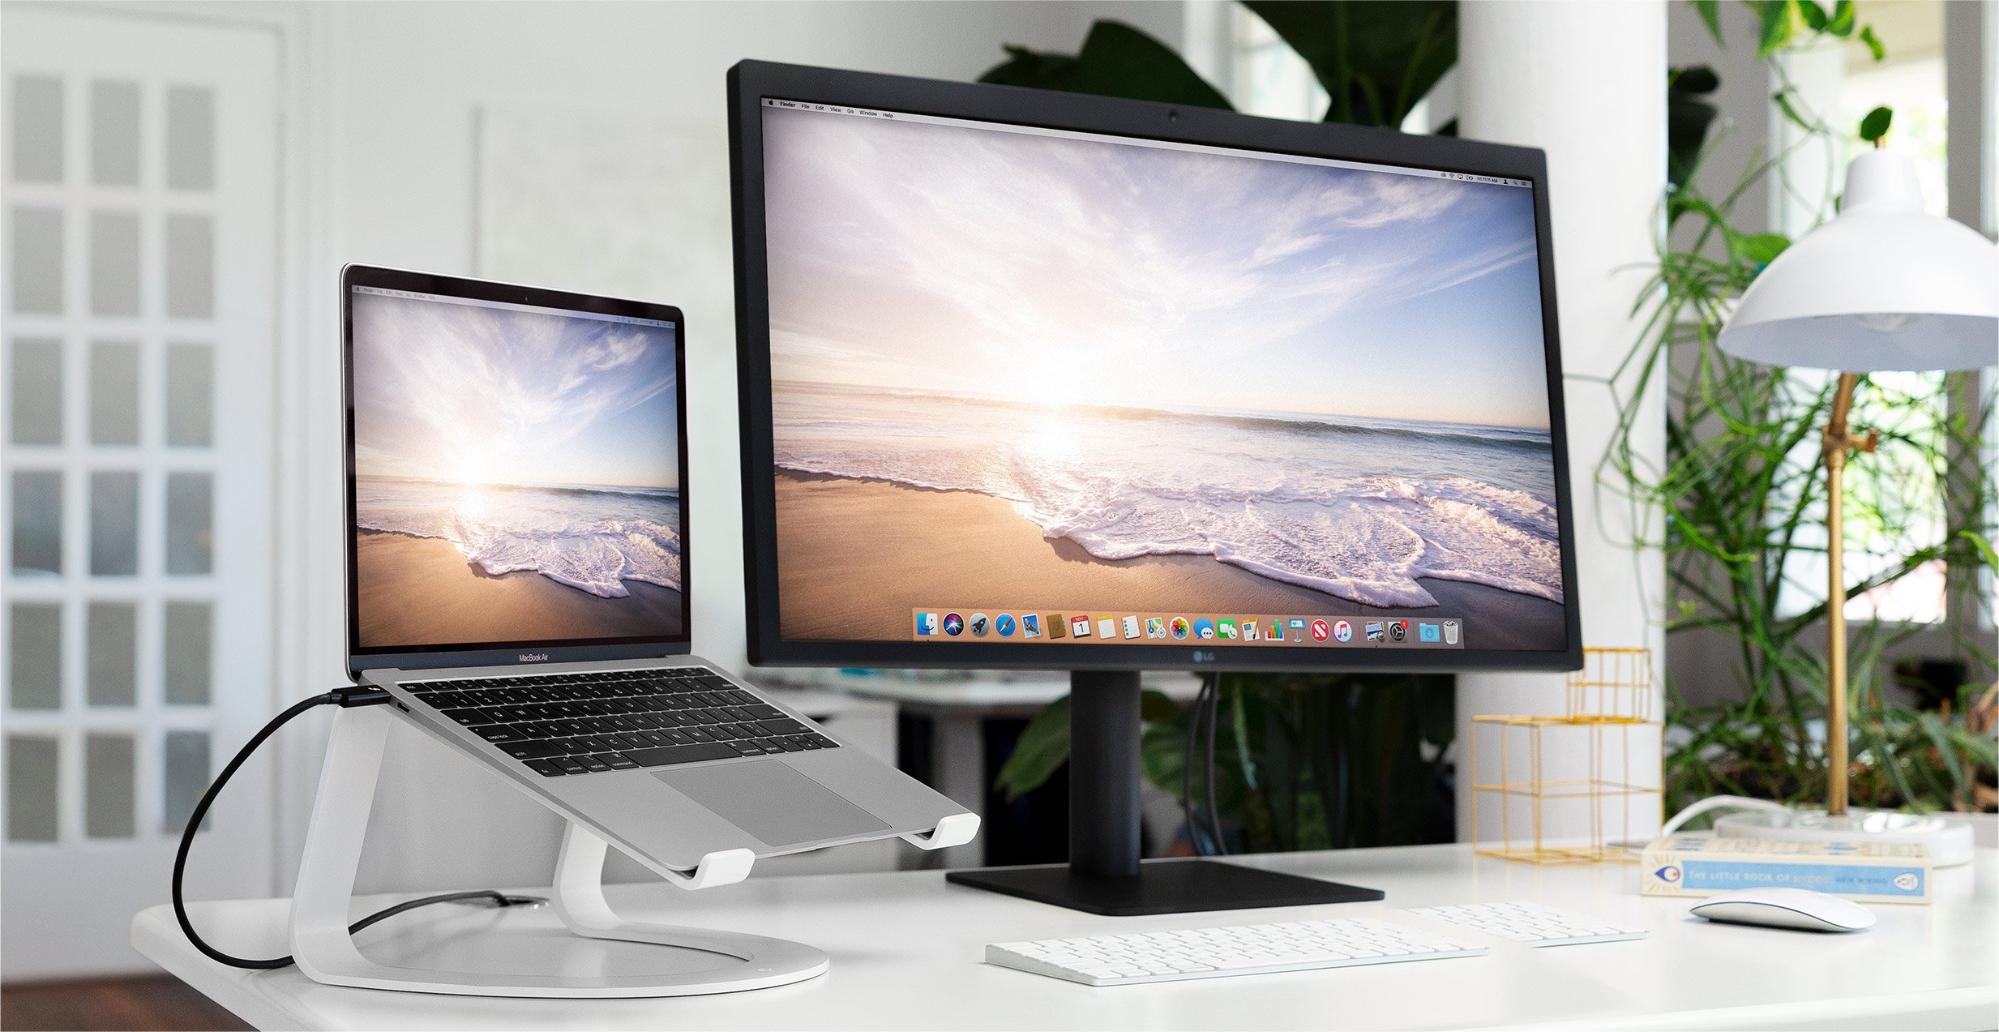
I’ve never owned a Mac laptop, but whenever Apple sends me one for review, I plug it into my LG UltraFine display. Sometimes I keep the laptop open and perch it on Twelve South’s Curve stand for use as a secondary display. At other times, I’ll keep the laptop closed in “clamshell” mode.
Such an arrangement can have huge ergonomic benefits. Many laptop owners experience neck strain by continually hunching over their laptop screens. I often run into Mac laptop users who do not seem to grasp the health implications of such an arrangement. I am happy to educate them.
The other obvious benefit of connecting a MacBook to a desktop display is more screen space to work, especially if you position the laptop alongside as a secondary screen.
A laptop-with-display arrangement is also helpful in an office or home where a workspace is shared. Imagine Mom, Dad, and the kids moving about the house with their laptops, which is fine most of the time. But if a household member wants better ergonomics and increased screen real estate for a serious work session, they can jack into a communal display.
Pairing a Mac laptop with an external display doesn’t have to be expensive. Begin with a $999 MacBook Air and add a decent monitor to keep the combined outlay under about $1400, or roughly the cost of a mid-range iMac.
Want two external screens? The M1-based MacBook Air, unlike its Intel-based predecessor, does not have native support for dual displays—but there are workarounds. Companies such as Kensington offer hardware and software to get around this issue. If you have an iPad, that can be one of your external screens via Apple’s Sidecar feature (see “Catalina’s Sidecar Turns an iPad into a Second Mac Monitor,” 21 October 2019), or third-party options such as Luna Display or Duet Display (see “Luna Display Turns an iPad into a Responsive Mac Screen,” 7 December 2018 and “Attach an iPad to Your MacBook as a Second Display with Mountie,” 22 February 2019).
Need legacy ports? The MacBook Air has only two Thunderbolt ports along with an audio jack, but you can get more ports with an external display (the LG model that Josh bought includes two HDMI ports and two USB-A ports along with its headphone jack and a single USB-C port) or a Thunderbolt 3 dock (I favor Elgato’s model with two Thunderbolt ports, three USB-A ports, a Gigabit Ethernet port, and a DisplayPort, along with headphone and microphone ports).
The 13-inch MacBook Pro is another laptop option, but I’d suggest avoiding it unless you’re enamored with its Touch Bar (not many people are). Its screen is only marginally brighter than the MacBook Air’s. It has minimally better performance thanks to a fan that the MacBook Air lacks but would rarely need in everyday use. It’s bulkier and heavier than the MacBook Air. And of course, it’s more expensive.
Some might be reluctant to buy an M1-based MacBook Air or MacBook Pro because of their dated designs (all but identical to their Intel-based predecessors), but it may be a while before redesigned consumer MacBooks arrive. Pro-level laptops with fresh looks are rumored to be first up—perhaps later this year—with consumer models possibly due by the end of the year or in 2022. If I were in the market for a consumer laptop, I would wait it out, but I realize not everyone has that luxury.
Pretty Mac
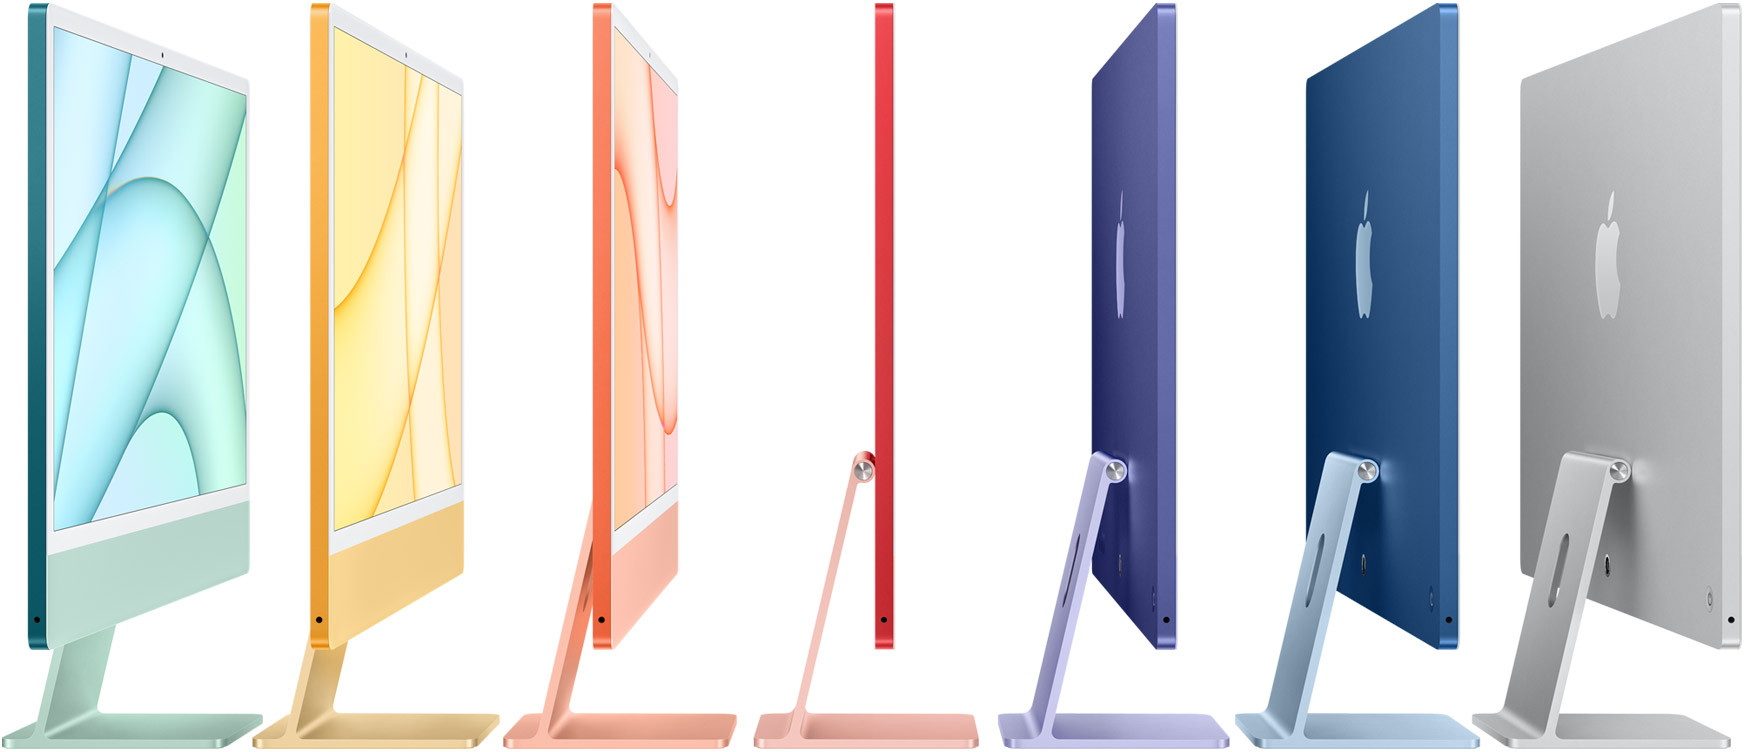
Apple’s original iMacs back in the 1990s are famous partly for introducing bright colors to enliven what until then had been a mostly beige personal computer era. Now, after a long interregnum with many generations of iMacs in subdued white, silver, and gray shadings, colors are back with the 24-inch iMac.
The color is one reason I love my loaner iMac, with its dark blue on the back and a lighter blue shade on the front “chin” beneath the display. I’m even more taken with the purple model because it makes me think of Minnesota’s Prince. Apple also sells the iMac in green, yellow, orange, pink, and silver. (Only blue, green, pink, and silver are available with the entry-level configuration, but higher-end configurations get the full rainbow.)

Yes, the colors are cool, but there are more practical reasons to consider going with the M1-based iMac over an alternative.
Convenience. You get everything you need in a self-contained package that maximizes desk space and minimizes cable clutter. That has been the case since the original iMacs, but the new models push the envelope with a body that is so thin that it looks a bit like an iPad mounted on a stand (it’s thinner than the original iPhone). It achieves its thinness partly due to the space-saving nature of the M1 internals and the external power supply with an optional Ethernet jack.
At under 10 pounds (4.5 kg), the iMac is lightweight enough to move around easily. It may be more awkward than a Mac mini or a MacBook Air, but it’s undoubtedly easier to move than any other Mac with an integrated display.
Better webcam. Ever since I switched from an iMac to the Mac mini, I have struggled with videoconferencing, which is unfortunate since the pandemic made it so important. It’s clunky to balance an external webcam atop my display, which lacks an internal camera, and I don’t like the cable clutter. Even worse, the various third-party webcams I’ve tried have had difficulty providing consistent image quality in my unevenly illuminated home office, forcing me to tinker with software utilities that never fully solved my problem. You may have faced similar issues; webcams can be finicky beasts.
Improved video quality is one of the big reasons I am considering buying a 24-inch iMac. I was blown away by the image quality during my first video chats on my loaner unit. It’s the first iMac webcam with a 1080p resolution. It has a larger sensor for improved low-light performance, along with computational image enhancement. Apple has worked wonders here. If I were to nitpick, I’d wonder why Apple did not go full 4K, but I don’t know if I’d really notice that resolution.
External display support. TidBITS publisher Adam Engst recently encouraged me to try dual-display computing via an iMac paired with an external monitor. Such a setup isn’t new (iMacs have supported the feature for years), but it has been a revelation for me, and I may not be able to go back to a single screen again.
Setup is super easy; just connect the iMac and the display with a Thunderbolt 3 cable. My LG UltraFine and 24-inch iMac loaner have worked flawlessly together. I’m limited to one external display with the M1-based iMac, but older iMacs natively support up to two displays. (Realistically, it can be hard to work on three displays because the edges end up quite far away.)
So, if you already have an external display you like, buying an iMac and placing it alongside your monitor will introduce you to the wonders of dual-display productivity.
Legacy port scarcity is almost as much a problem with the 24-inch iMac as it is with the MacBook Air. The entry-level iMac has only two Thunderbolt ports (along with a headphone jack), and higher-end configurations add two USB-C ports. The Ethernet port is in the external power brick, but only with the higher-end configs; the brick with the entry-level iMac lacks the port unless you pay extra for it. It’s obvious why Apple left out the Ethernet port and other legacy ports: the iMac is too thin to accommodate them.
Again, an external display could add legacy ports that are absent on the iMac, so that’s another reason to consider a secondary display. Or get a Thunderbolt 3 dock.
Touch ID support. The Touch ID sensor found on recent Apple laptops is helpful for unlocking (and locking) the Mac and for password autofill; Apple Pay transactions; and purchases on Apple’s iTunes, App Store, and Books storefronts. It’s also handy for fast user switching.
However, Touch ID hasn’t been an option for desktop Mac users so far. Now Apple has brought Touch ID to the desktop with its Touch ID Magic Keyboard, although there’s a catch: it’s available only with purchases of the M1-based 24-inch iMac. Apple bundles it with the higher-end configurations and offers it as an option with the entry-level model. But it will work with any M1-based Mac and should eventually be available as a standalone purchase.
The Touch ID Magic Keyboard, which is color-matched with the iMac, puts its touch sensor on the upper right corner and has worked as expected.
One thing to keep in mind if you’re excited about unlocking your Mac automatically—an Apple Watch provides the same capability, so you may not need Touch ID.
Sound quality. The speakers built into the 24-inch iMac are the best ever for an iMac, and they sound great. This saves you the hassle of procuring external speakers. Sound from the M1-based Mac mini, MacBook Air, and 13-inch MacBook Pro isn’t as good, so you might end up wanting a HomePod mini or other external speakers.
There is one possible problem with the 24-inch iMac. When I first unpacked my iMac and put it on my standing desk, I was puzzled that it seemed a bit askew. I attributed this to my uneven floor and imperfections in my office wall, which have tended to throw me in the past. I tucked a few Post-Its under one side of the iMac stand and put it out of my mind.
It turns out my sample is one with a well-documented physical flaw: its screen is a bit crooked in how it attaches to its base. Reports I’ve seen on the degree of skew vary from one millimeter to several millimeters. In my case, it’s off by about a millimeter, enough to drive me nuts—now that I’ve seen it, I can’t unsee it. Nevertheless, my iMac has functioned flawlessly in every other way, so I would not urge you to forgo a purchase. But you should check your iMac with a ruler upon unpacking it and insist on an exchange or your money back if it is not level. (Apple has a 14-day, no-questions-asked refund policy.)
This is why ultra-cautious Apple users wait a while before spending money on any brand-new hardware design. Apple’s overall track record is good, but imperfections like this occasionally crop up, and it can be worth waiting to see if others report any issues before ordering. We’ll have to see if Apple acknowledges the problem and establishes a repair program to address it.
Which Mac?
Shopping for a desktop Mac got more interesting—and complicated—with the arrival of the M1-based 24-inch iMac. But Apple made one aspect of the decision simple: all the Macs use the same M1 processor, so they are nearly identical in performance. So your choice of Mac will be based on other factors.
- Do you fancy a modular approach to computing with a compact desktop Mac that is easy to swap out for a newer model and combine with a display or displays exactly to your liking and within your budget? The Mac mini may be for you.
- Do you like the idea of desktop computing for improved comfort and productivity with an external display and input devices, perhaps in a shared environment, but require the option to unplug for computing on the go? The MacBook Air might be exactly what you need.
- Do you crave some color in your Mac life, perhaps with fond memories of Bondi blue, along with the tidiness that comes with an all-in-one machine that sports a better webcam and the option to plug in a second monitor? Apple’s 24-inch iMac could be just the ticket.
I’m not in the market for a laptop because I prefer to use an iPad for my mobile computing, so I’m vacillating between a Mac mini and a 24-inch iMac. It’s a tough call. The Mac mini approach is less expensive but would have only a single display unless I wanted to spend more on a second screen. The iMac is a more considerable investment, but I’d get two displays and Touch ID along with the brand-new design. But if I get an iMac, its screen had better be level.
Stay tuned—I’ll share what I end up deciding in the comments below.
Editing RAW and ProRAW Photos Using RAW Power 3
When I decided to jump from point-and-shoot digital cameras to something more capable, I was faced with a new choice: should I capture images in RAW or JPEG format? Until that point, all my cameras shot JPEG, the imaging standard that can deliver great-looking but heavily compressed photos. RAW was better, I was told, because it encapsulates the raw data captured by the sensor without additional in-camera processing. Plus, since professionals used it (and of course I wanted to be more like the pros), I dove from the high board into deeper photographic waters. (To be clear, RAW is not an acronym; it’s written in uppercase by convention seemingly only to be parallel to JPEG, TIFF, PNG, and other image formats that are acronyms.)
RAW photos can be better—dramatically better, in some cases—than JPEG photos, but it takes some work and know-how to get them there. RAW Power, an app for macOS, iOS, and iPadOS from Gentlemen Coders, is adept at taking advantage of the options that RAW brings to photo editing. It’s also one of the few tools that properly handles the ProRAW format in the iPhone 12 Pro and iPhone 12 Pro Max, more so than even Apple’s own Photos app.
First, a disclaimer: RAW Power developer Nik Bhatt has been a guest on, and an early sponsor of, my podcast PhotoActive. He also contributed an article to TidBITS: “The Ins and Outs of Non-destructive Editing in Photos for Mac and iOS” (14 June 2019).
A JPEG, HEIF, and RAW Primer
To talk about RAW Power requires a quick explanation of RAW formats and how they differ from most of the images your typical point-and-shoot camera captures. JPEG (short for Joint Photographic Experts Group, the organization that developed it) is a file format and compression scheme designed to create good images that are small in size. That was especially important in the past when memory cards were measured in megabytes (MB), compared to today’s multi-gigabyte (GB) cards.
JPEG accomplishes its size reduction by throwing data away, a process known as lossy compression. Its algorithm determines areas of similar colors that won’t be perceived by typical human vision and blends them using fewer colors. The image data is processed in-camera, so the only photo saved is the compressed version. In most cases, because the algorithm works well, we don’t notice the compression or the smaller bit depth, which is why JPEG has remained the dominant digital photo standard for years.
Since iOS 11, the iPhone captures photos in a newer format called HEIF (High Efficiency Image Format), which also applies lossy compression. For the sake of simplicity, I’m lumping JPEG and HEIF into the same group: images processed in-camera and compressed. HEIF images aren’t as compatible as JPEG among the galaxy of image editing software, which is why there’s an option to make the iPhone’s Camera app save images as JPEG (Settings > Camera > Formats > Most Compatible). That said, I leave the option set to High Efficiency and don’t run into compatibility issues in my everyday editing apps in part because iOS usually converts HEIF images to JPEG when you export.
A RAW file, by comparison, contains only the data recorded by the image sensor. A RAW photo isn’t even an image—it’s just the ones and zeros describing the light levels for each pixel on the sensor. A RAW file is much larger than a JPEG; a single image captured with my Fujifilm X-T3 camera is around 56 MB, while the same image recorded as a JPEG is about 12 MB. (The medium-format Fujifilm GFX 100S produces 102-million-pixel RAW images that can be 200 MB each!)
There’s an in-between possibility, too—Apple ProRAW, which combines the dynamic range of RAW images with the computational photography features Apple applies when processing HEIF or JPEG images. They too are larger in size, around 25 MB each.
On the iPhone and iPad, you can shoot RAW images, but only in some third-party apps, such as Halide, Adobe Lightroom, and Manual. Starting with iOS 14.3 on the iPhone 12 Pro and iPhone 12 Pro Max, the Camera app can also optionally shoot in Apple ProRAW format.
It’s in that size difference that RAW images can be better than JPEG images: there’s much more data to work with when editing them.
And with RAW images, you will need to edit.
Editing RAW Images
When you edit a JPEG photo, you’re manipulating the brightness and colors of the pixels. Allow me an oversimplification: increasing the exposure of a dark image can shift black pixels to gray, make dark blue pixels lighter blue, and so on. The editing software uses its tools to change the appearance of those pixels (using smarter algorithms than my example).
In comparison, a RAW file, technically, doesn’t contain any pixels—it includes information about which colors the pixels should be once the image is processed. Much like photographic film that must be run through chemicals to reveal areas exposed to light, the image in a RAW file doesn’t appear until the software “develops” the file by reading the data and assigning colors to each pixel based on the information.
That sounds like a superficial difference because a JPEG and a RAW file both show up as images to us; we never see the RAW file in its native form. When we open it in the Photos app, for instance, we see the photo as colored pixels, but that’s because Photos interprets the RAW data and creates an image to view.
Why is all this important? A RAW file includes more information than just “these pixels are black and these other pixels are blue.” When camera manufacturers create a new camera model, they tailor its raw format to take advantage of, or compensate for, characteristics of the camera or sensor. For example, if they’re using a sensor that exhibits more noise at high ISO settings, the RAW file can include data that an editing app can use to minimize or remove that noise.
So, shooting in RAW provides not only more image data to work with, but also the capability to target some adjustments better than if the image was saved as a JPEG.
It can also lead to lags in even being able to edit those RAW images. Even though each company uses its own format overall—CR2 for Canon, RAF for Fujifilm, NEF for Nikon, and so on—the files generated by each camera model are unique. If you owned a Fujifilm X-E3, for instance, and replaced it with the Fujifilm X-E4, the Photos app can currently edit the X-E3 RAW files but not the X-E4 files, because Apple hasn’t added support for that model to its operating systems.
Particularly unhelpful is the fact that the manufacturers don’t publish the RAW file specifications; developers must reverse engineer each model’s format to support it. As a response, Adobe created the DNG RAW format, which is more open but not adopted by the camera companies. However, Apple’s RAW and ProRAW formats save photos as DNG files.
Editing in RAW Power
Most image editing apps can work with RAW photos, but they take a broad approach in general. For example, the controls for adjusting tone and color take advantage of the expanded dynamic range in a RAW file, but they’re still the same controls, like Exposure and Sharpening, that work with all images.
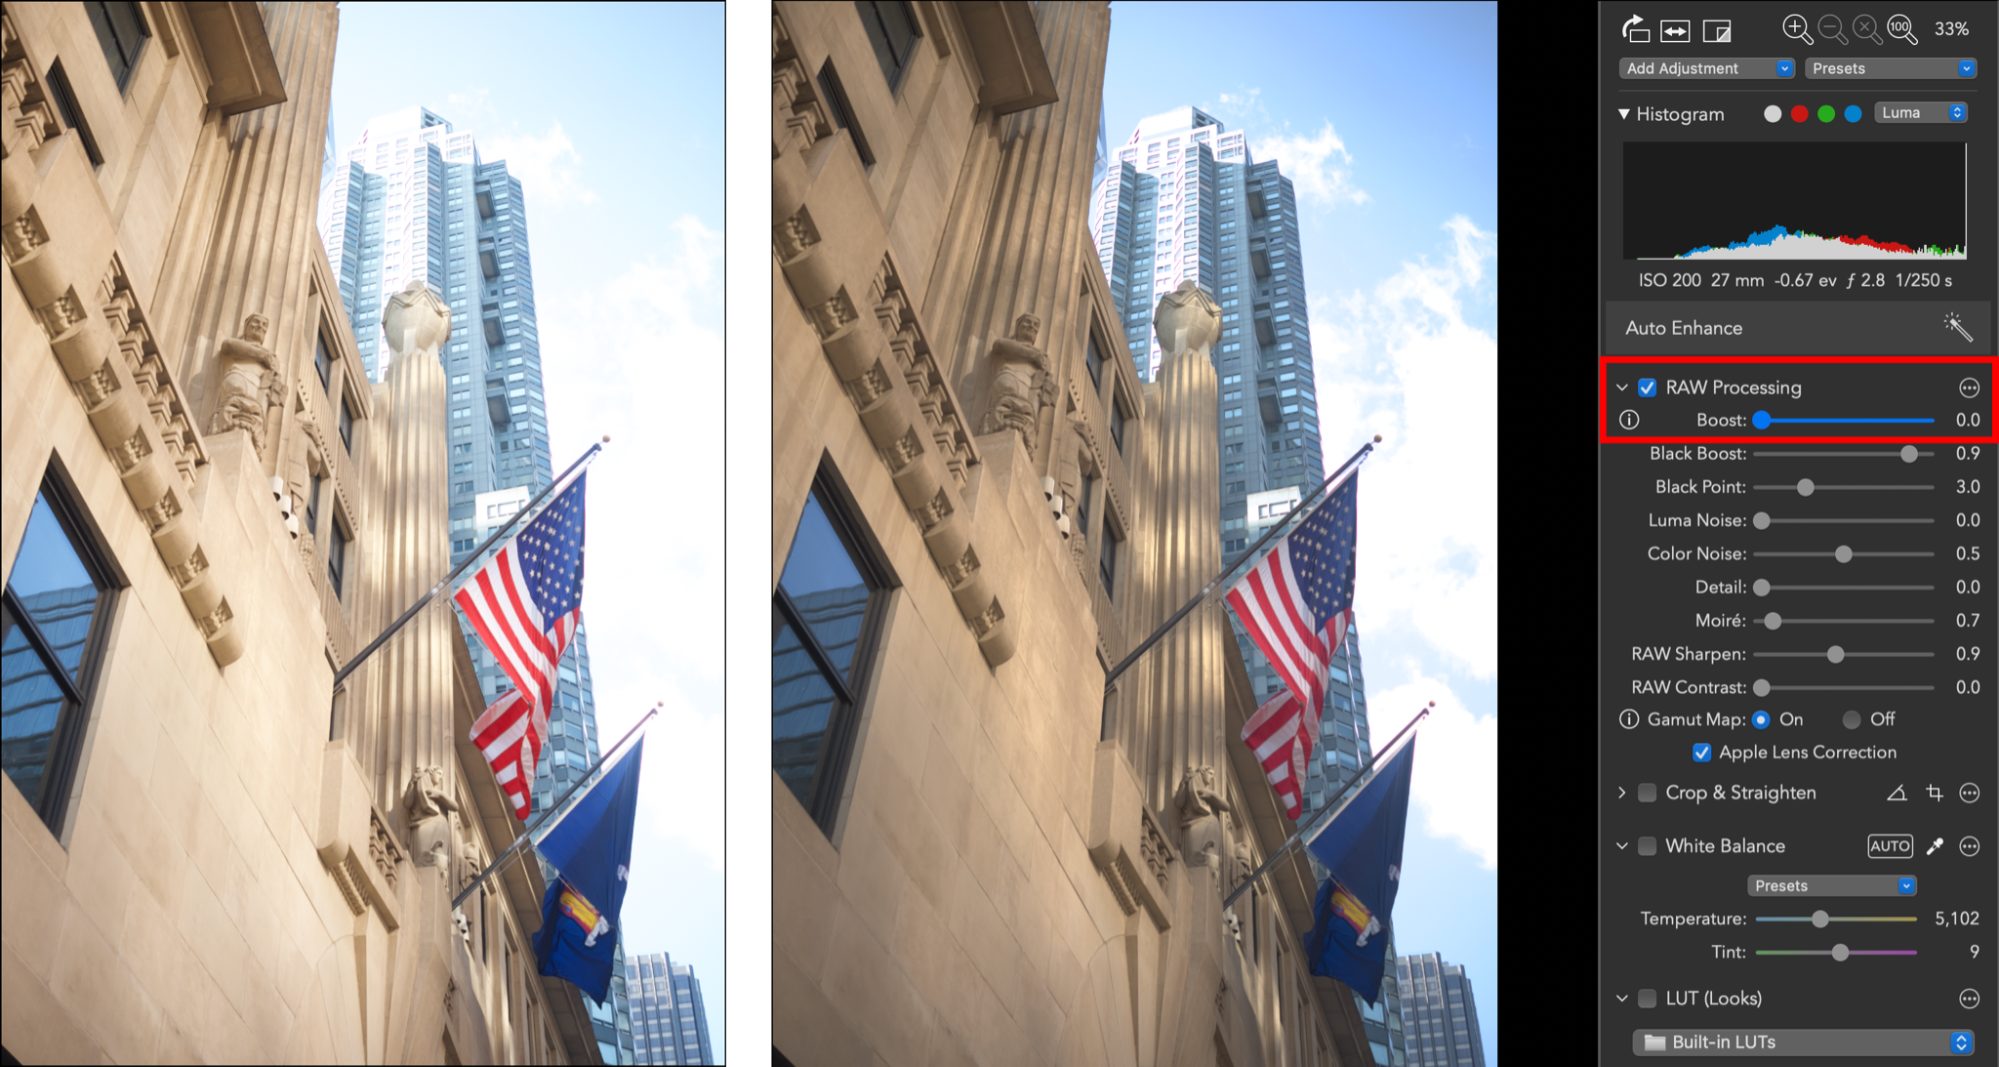
RAW Power adds image editing nuance by including additional controls that target specific RAW settings as part of the RAW decoding process. When you’re editing a RAW image, a set of RAW Processing controls appears. For example, if an image is overexposed, reducing the Boost slider turns down the exposure and recovers some detail. In the following image, it has added texture and variety to the dappled sunlight on the building and given the clouds more definition.
Or, let’s look at a photo that includes a lot of digital noise. This image of an old truck was shot in a dark barn, so I compensated by increasing the ISO to 12,800, which creates noise. (Higher ISO settings boost the power of the sensor’s light sensitivity, so some pixels record the wrong colors.) At 300% zoom, you can see that the photo is grainy from the noise, but take a look at the RAW Processing controls at right: the Luma Noise and Color Noise sliders already have settings, based on what RAW Power has read in the RAW file.

If I reduce the two sliders to 0.0, you get a better idea of what the sensor recorded—it’s an explosion of rainbow colors!

The default Color Noise setting has eliminated that kaleidoscope, but I can increase the Luma Noise slider to minimize a lot of the other noise.

The side effect of noise compensation is that images tend to gain a soft or pastel appearance. This is where it’s important to point out RAW Power’s helpful tooltips, which appear when you hover the pointer over a control. Doing so reveals that the Detail slider “Brings back grain removed by noise reduction,” which wasn’t my first assumption based on the tool’s name. Increasing the Detail amount adds definition (and some noise), but between it and Luma Noise, I can find a good compromise that makes the image look more natural. Granted, this photo is an extreme example of dealing with noise shot with an older camera (a Canon EOS M); more recent cameras do a better job with noise, but you’ll still benefit from these adjustments.

Other RAW Processing controls affect sharpening, contrast, and black levels based on the RAW-specific information in the image file. Practically speaking, they give you more refinement over those adjustments, independent of the Sharpen, Contrast, and Levels or Curves tools, respectively. The Gamut Map option prevents saturated colors from clipping (going to 100% saturation, such as when something bright red appears unnaturally intense).
Apple ProRAW and RAW Power
This brings us to Apple’s ProRAW format. What’s unique about ProRAW is that it incorporates Apple’s computational photography technology into RAW shooting. When you take a normal photo using an iPhone, it captures several exposures within milliseconds and blends them together to create an overall pleasing composition; bright areas that would otherwise be overexposed are balanced with dark areas that retain detail. It helps overcome the difficulties faced by small sensors.
But in that case, there’s no single “source” image that represents what the sensor recorded, in the same way a RAW file is. You end up with a processed patchwork of several shots (which, don’t get me wrong, usually looks great).
Apple ProRAW combines the digital-negative aspect of RAW shooting with computational photography in a clever way. Apple’s iOS and iPadOS devices have been able to shoot RAW photos for several years—albeit only using third-party apps—which are saved in Adobe’s DNG file format. ProRAW builds on that by adding a new feature called local tone mapping to the DNG specification. When you shoot using ProRAW, you get the expanded dynamic range and additional image information of a RAW file as a base, and then the Camera app uses its computational analysis to note changes in selected areas of the image.
(Interestingly, Apple still develops the RAW data—a process called demosaicing—so that base isn’t quite as pure as a RAW image saved by most cameras. Kirk McElhearn covers this in more detail in “Apple’s New ProRAW Photo Format Is Neither Pro nor Raw.”)
For example, the following photo was captured with an iPhone 12 Pro by enabling the RAW option in the Camera app (which activates ProRAW). It’s a challenging shot for a camera because the lens is pointed at the sun, which is still bright even in the last minutes of sunset, while the foreground is comparatively dark. The iPhone renders it beautifully, maintaining color in the sky and the orange and yellow around the sun.

But those details are there because of ProRAW’s local tone mapping. If we view just the base raw image data, the same photo looks dramatically different. In an app that doesn’t yet fully support ProRAW, here’s what you would see—again, this is the same file as the one above.

RAW Power was one of the first apps to handle ProRAW files properly, thanks to the addition of a Local Tone Map slider. Apple’s image processing attempts to balance everything as evenly as it can, which sometimes gives a flat look that you may not always want. Local Tone Map reduces the effect. In the following image, the trees in the foreground are well exposed, but I don’t want that much attention paid to them. The snow-capped mountain in the center of the frame is also faded and doesn’t stand out the way I saw it when I took the shot.

Reducing the Local Tone Map slider from 1.0 to 0.3 darkens the immediate foreground, making the trees more of a framing element for the snowy peak.

Extended RAW Camera Support
Just as important as how RAW Power edits photos is what it edits. I mentioned earlier that camera companies create new RAW file formats for every camera, and to make things annoying, they consider those formats proprietary and don’t share the specifications. If you’ve ever bought a just-released camera and discovered that the majority of photo editors can’t open its RAW files, that’s why: the developers don’t have the information they need to interpret the new formats correctly. It can take weeks or months for new cameras to be supported, a problem that has been getting worse on Apple devices in recent years.
Apple stores the RAW decoding data at the system level, and supporting new cameras has apparently not been a priority for the company. Did you buy a Fujifilm X-E4 when it was released in March? You’re still waiting for Photos to support it. GoPro cameras have never been supported. And because Photos and RAW Power (and many other apps) use Apple’s built-in RAW engine, that’s a bottleneck.
Extended RAW support in RAW Power 3.3 breaks that logjam, adding support for various new Fujifilm, GoPro, Olympus, Pentax, Panasonic, and Sony cameras. The Fujifilm variants also include support for compressed RAW images (so the files don’t occupy as much space on disk).
Apple Photos Library Integration
RAW Power doesn’t try to manage your photo library, as an app like Adobe Lightroom does. Instead, it ties into your existing Photos library. If you use iCloud Photos, that makes your photos available in the RAW Power app running on iOS and iPadOS devices.
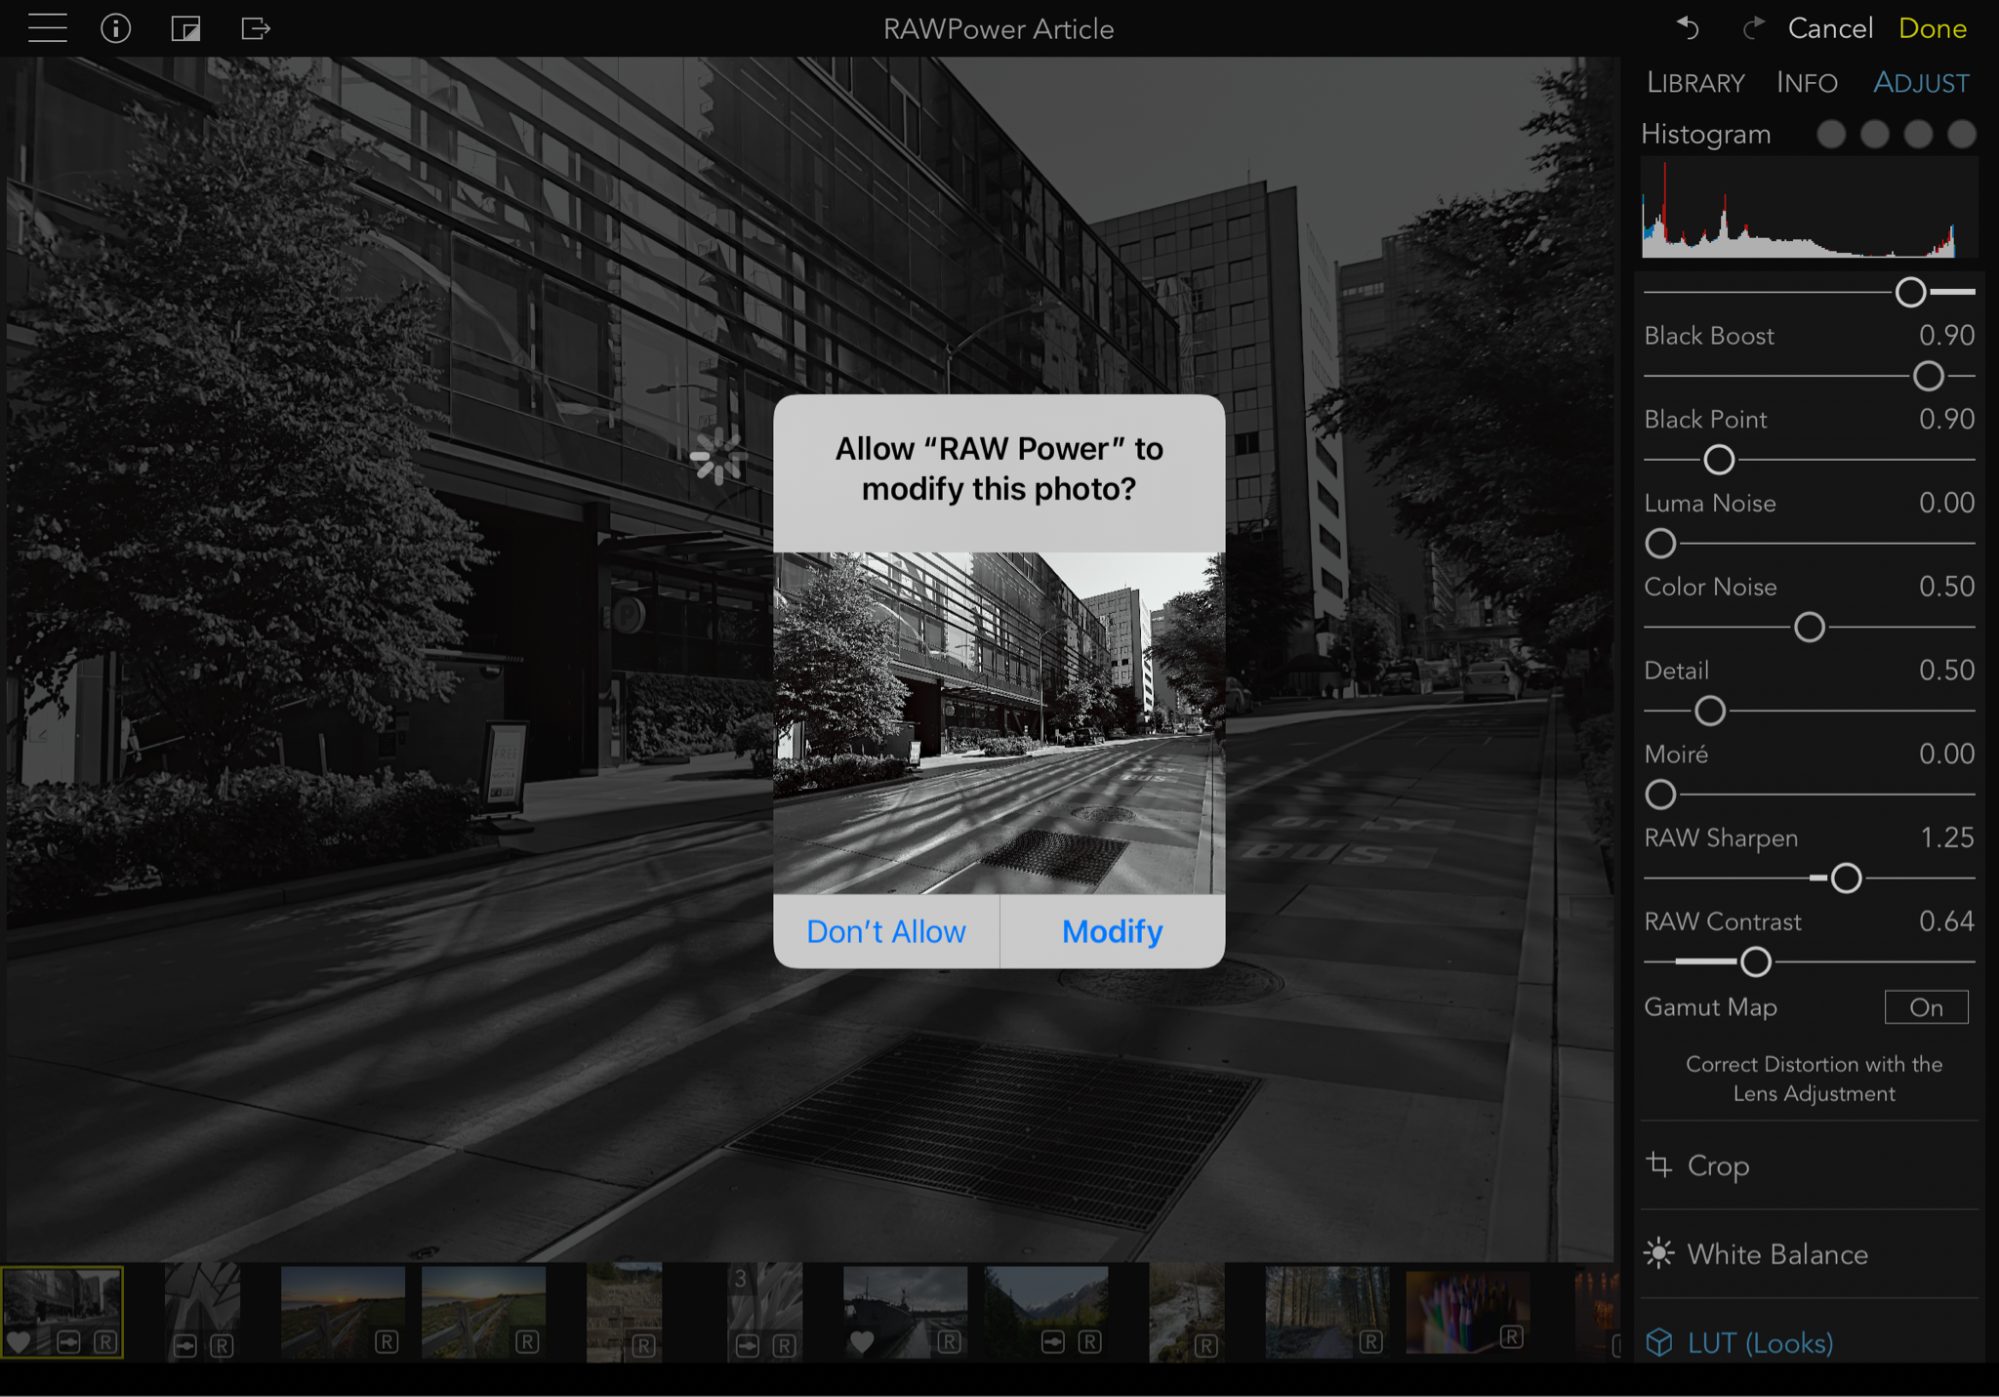
After you edit an image from your Photos library, RAW Power needs your permission to save the modified photo back to the library. You can always revert to the original in Photos if you end up not liking the edited version, but even better, if you re-edit the image in RAW Power, all the edits are saved such that you can go back to where you left off. In the past, Photos would simply save a finished edited version, which meant you had to start over from scratch if you chose to revisit the image. (Some third-party apps still work this way.)
Don’t use Photos? You can open images directly in RAW Power from the Finder in macOS and the Files app in iOS/iPadOS. RAW Power on the iPhone and iPad can also import images directly from an attached SD card, avoiding the old round-trip hassle of saving files to the Camera Roll first.
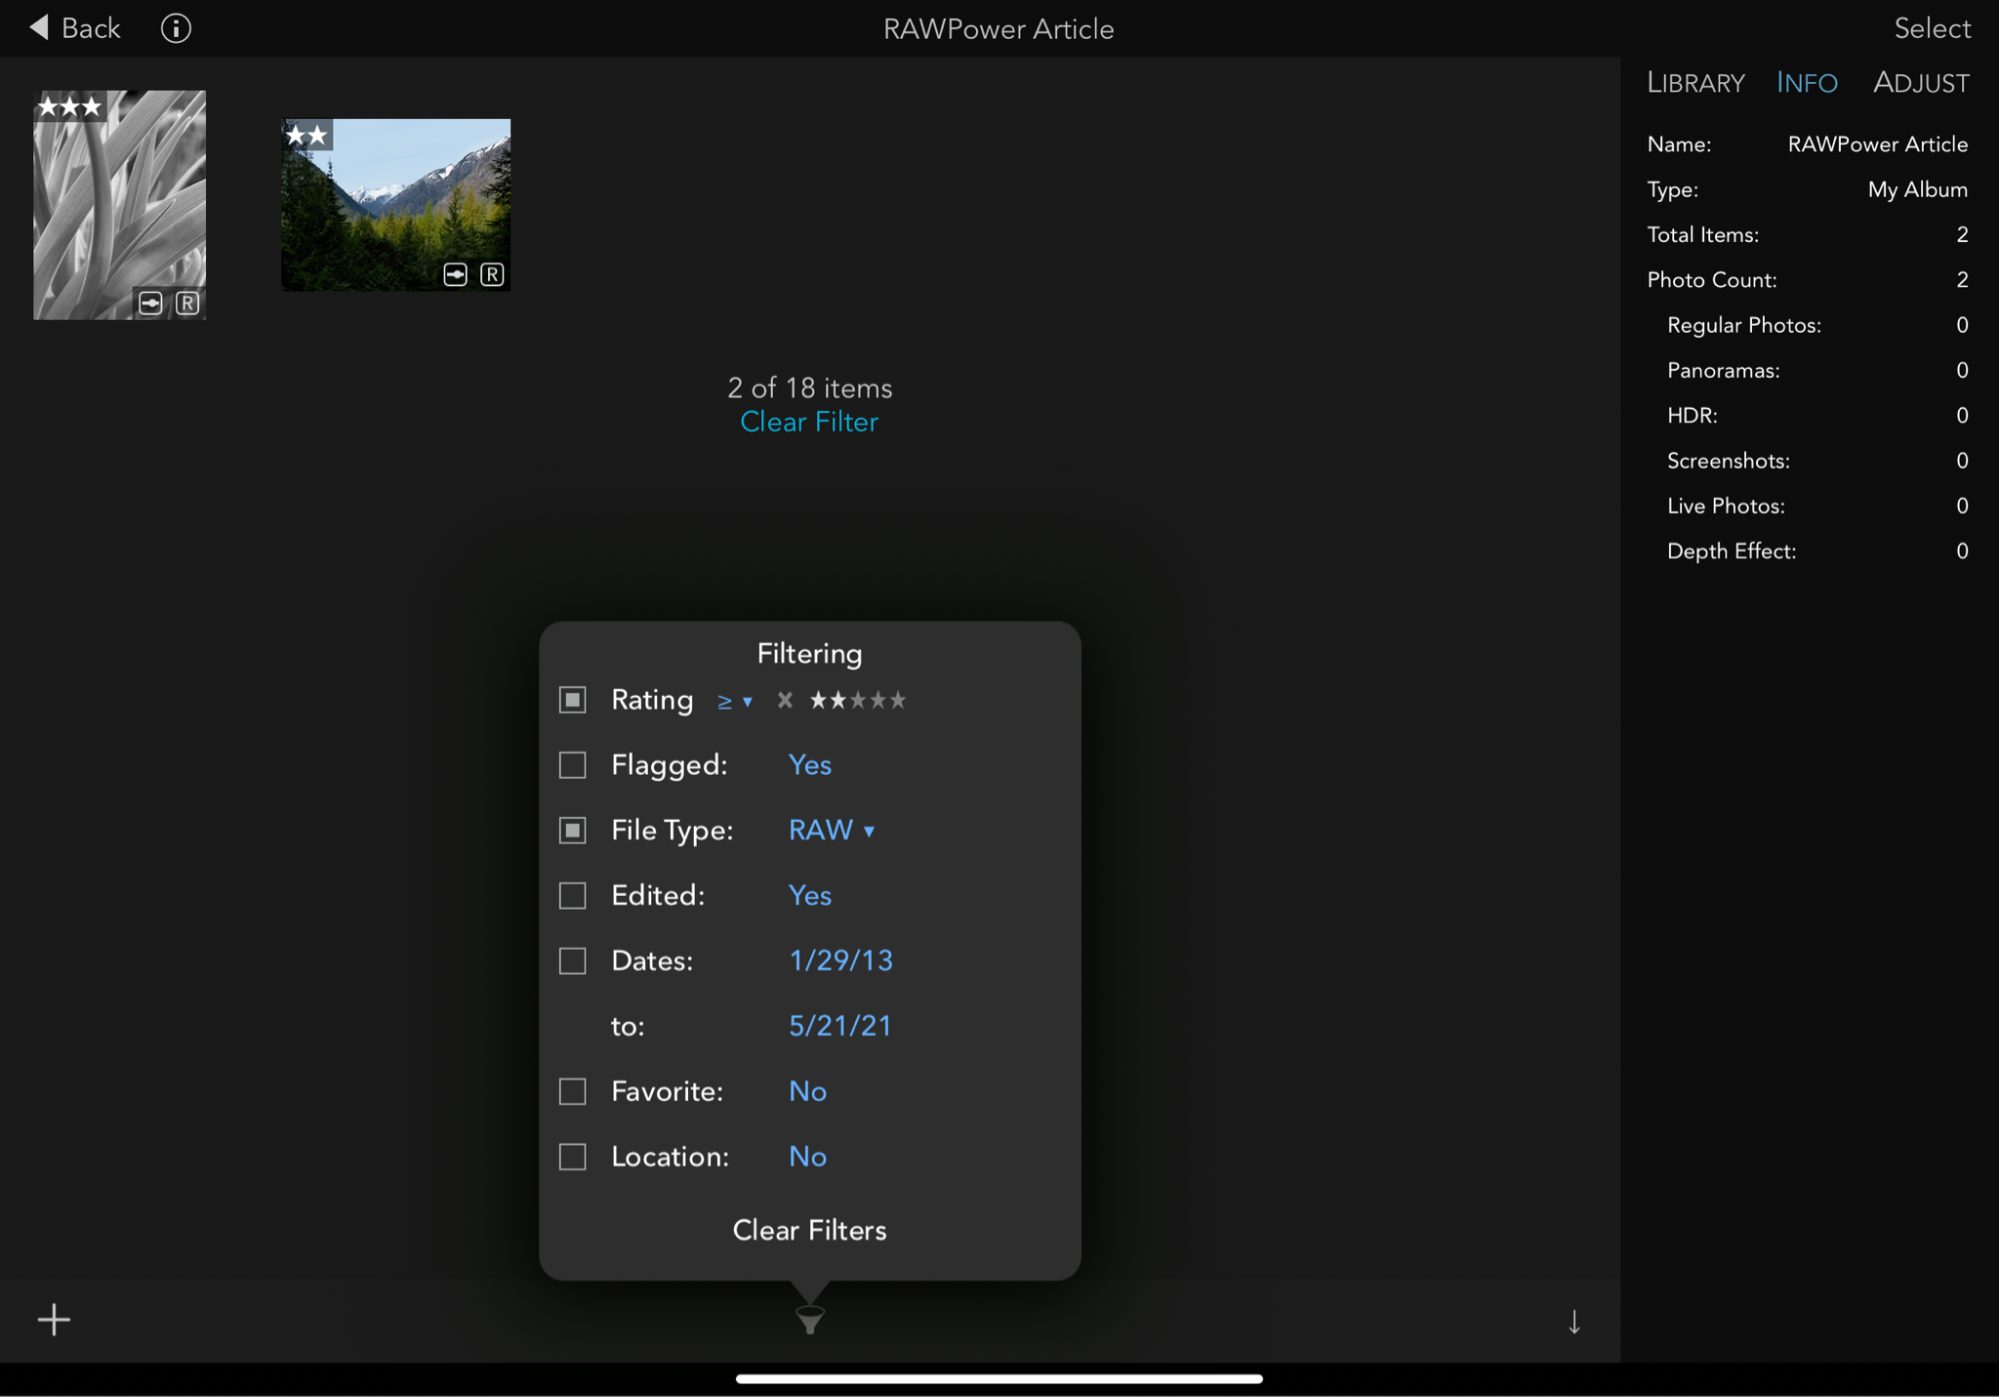
RAW Power’s integration with the Photos library is the most convenient approach, though. Also, the Photos app long ago abandoned star ratings as a way to help you surface which photos are better than others; instead, there’s now just the capability to assign a Favorite flag to images. If you prefer the flexibility of star ratings, RAW Power includes them and syncs them across devices. I’ve always found it to be helpful to be able to filter the library or an album and see, for example, all photos you’ve marked as 2 stars or higher that are RAW files.
More Power to the RAW Power
I’ve focused primarily on the RAW editing features of RAW Power, but those are just part of the entire package. It also includes tools for adjusting levels and curves, manipulating the HSL (hue, saturation, and luminance) of individual colors, black-and-white conversion, cropping, and more. There’s also a set of LUTs (lookup tables) for applying preset looks, including film simulations and exclusive looks from Lutify.me. You can also import other LUTs.
Developer Nik Bhatt actively adds features; the recent 3.3 release introduced a Lens Correction tool for correcting lens distortion and vignetting (as seen often in wide-angle lenses, for instance), which can semi-automatically apply the same adjustment to other photos shot with the same lens at approximately the same focal lengths. A new Split Toning tool adjusts the color of highlights and shadows for creative effects.
It’s also important to note that RAW Power mirrors its features across the macOS, iOS, and iPadOS versions. It’s easy to start an edit on the Mac, save it so Photos syncs the adjustments among devices, and then pick the image up later on an iPad or iPhone.
The macOS version of RAW Power, which is optimized to work on both Intel- and M1-based Macs, costs $39.99 through the Mac App Store. A free trial with a few limitations is also available. The iOS and iPadOS app is available as a free unlimited free trial mode, with some features disabled. Unlocking those costs $9.99.