#1571: iOS 14.7 update, Apple/Beats audio gear buyer’s guide, SFTP without passwords, Consumer Reports Internet survey
Apple released iOS 14.7, watchOS 7.6, HomePod Software 14.7, and tvOS 14.7 with a few small enhancements and bug fixes—we expect iPadOS 14.7 and macOS 11.5 Big Sur soon. If you’re in the market for earbuds or headphones, you’ll appreciate Julio Ojeda-Zapata’s comparison of everything available from Apple and Beats, backed up with an elaborate chart comparing the features of each. Speaking of elaborate, do you use SFTP to transfer files to your Web server or other remote machines? Glenn Fleishman provides step-by-step instructions that explain how you can increase both security and ease of use by switching from a password to private-key authentication. Finally, Consumer Reports and The Verge are teaming up to survey American Internet access. We tell you how you can participate, with the hope that the results will encourage positive change. Notable Mac app releases this week include Fantastical 3.4.2, EagleFiler 1.9.5, Logic Pro 10.6.3, and iStat Menus 6.6.
iOS 14.7 Adds Support for the MagSafe Battery Pack
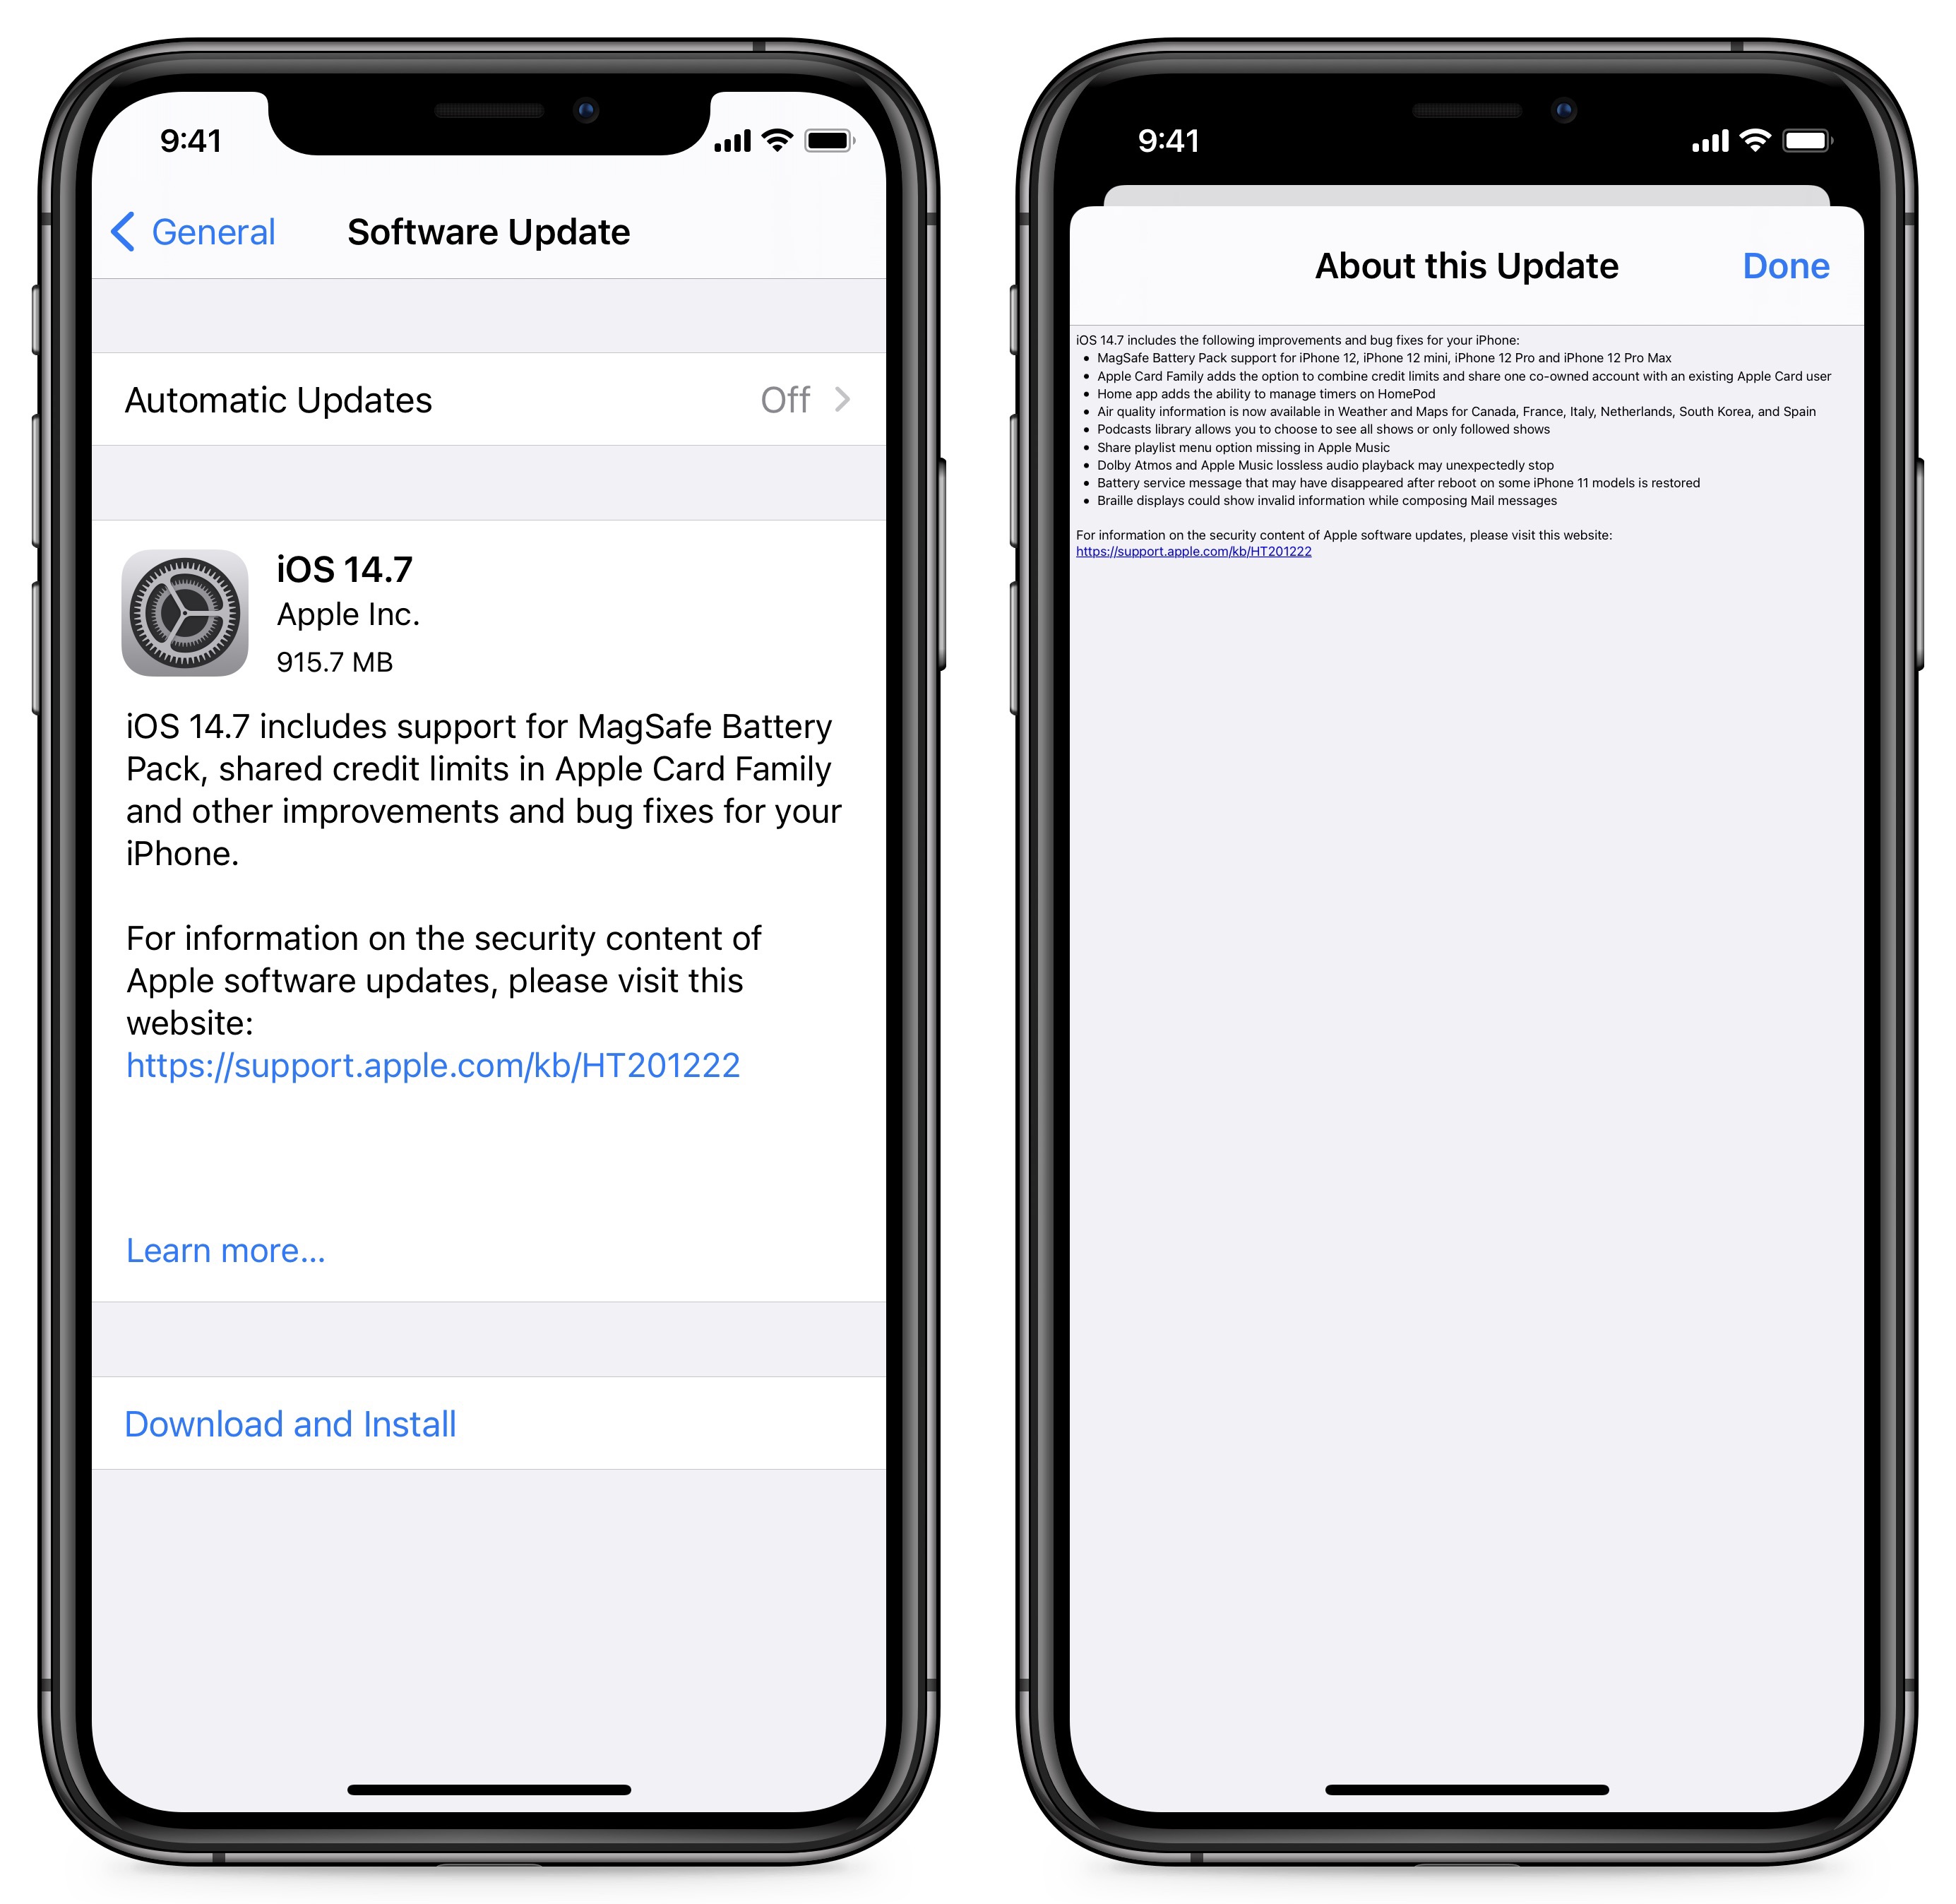
Apple has released iOS 14.7 with support for the soon-to-launch MagSafe Battery Pack, along with support for share credit limits in Apple Card Family. Apple also released watchOS 7.6, HomePod Software 14.7, and tvOS 14.7 with minor updates. It’s surprising that Apple didn’t also release iPadOS 14.7 and macOS 11.5 Big Sur. Still, given that Apple says “details available soon” for the security notes for each of today’s releases, perhaps the others are due shortly.
At the moment, our advice is to wait a week or so and then install these updates. If the security notes reveal that they address vulnerabilities that are being exploited in the wild, we recommend updating sooner, but otherwise, nothing here is earth-shaking.
iOS 14.7
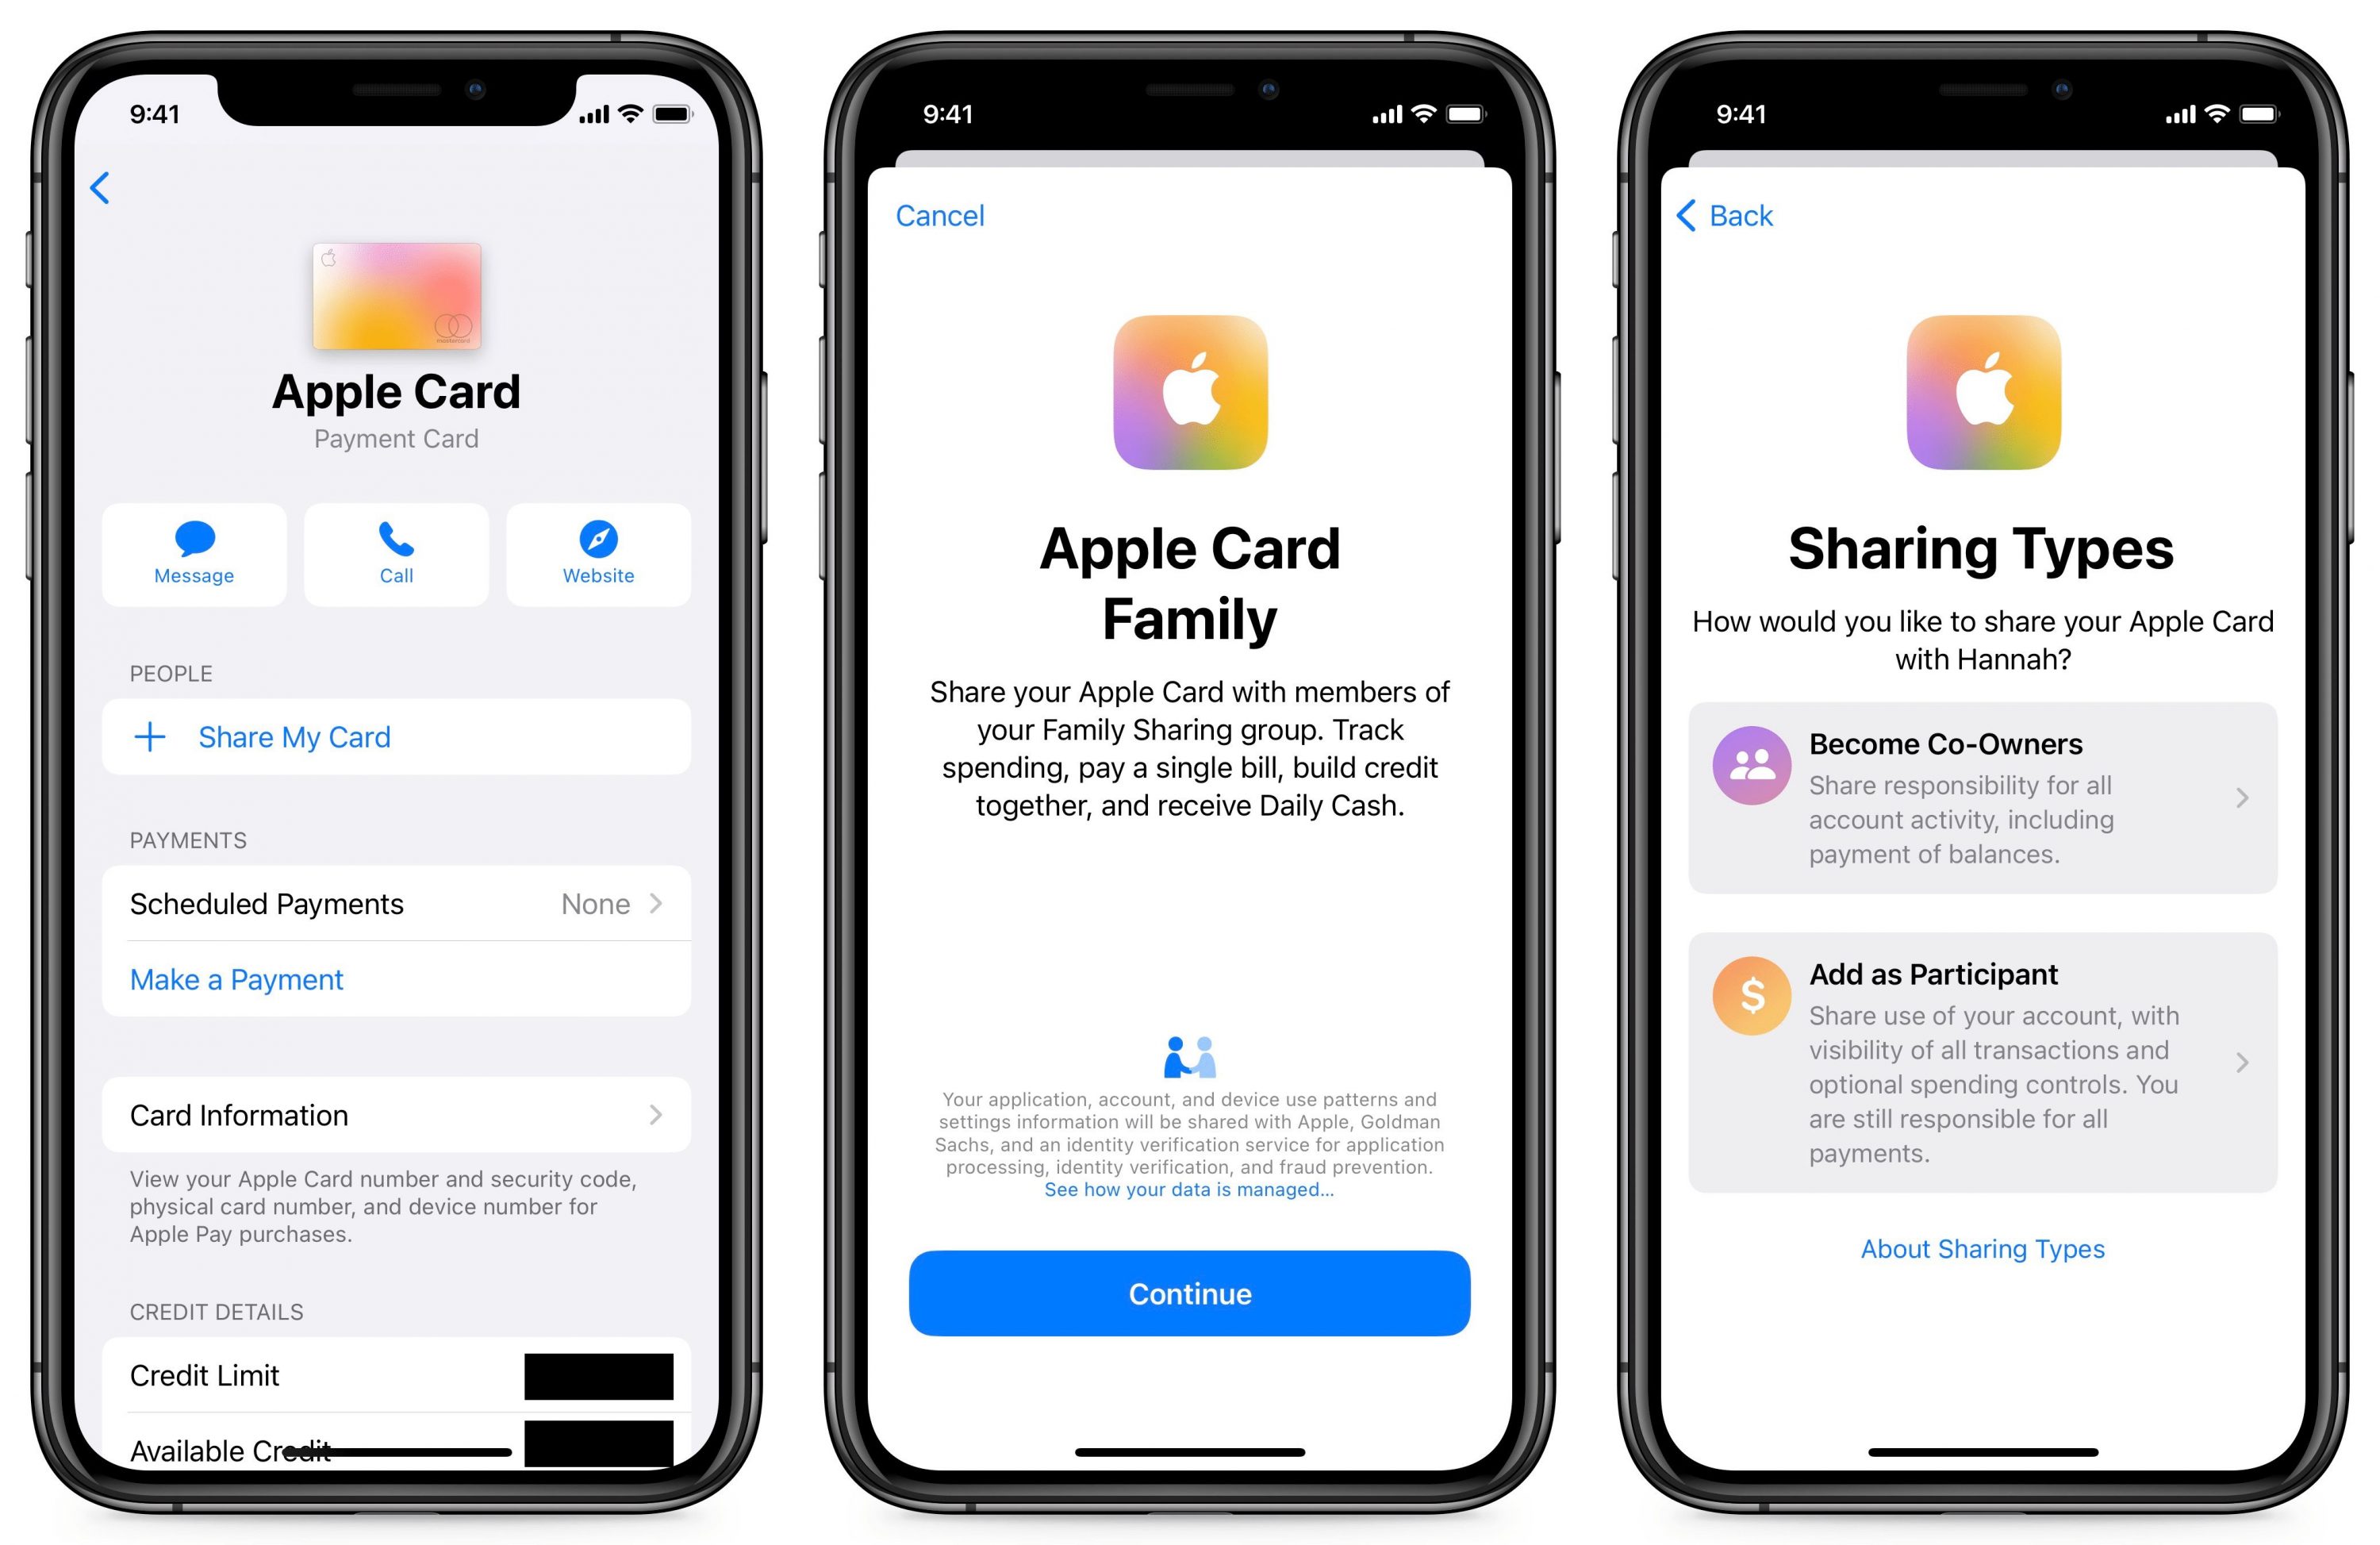
In addition to the aforementioned MagSafe Battery Pack support, iOS 14.7 now allows you to share credit limits in Apple Card Family.
If you haven’t yet configured Apple Card Family, you can set shared credit limits from the get-go. In the Wallet app, select your Apple Card. Tap the ellipsis in the upper-right corner and then Share My Card. Continue through the prompts until you get to the Sharing Types screen, where you have two options: Become Co-Owners or Add as Participant. If you choose Become Co-Owners, you’ll have to enter your income and go through a credit check to determine your new combined credit limit.
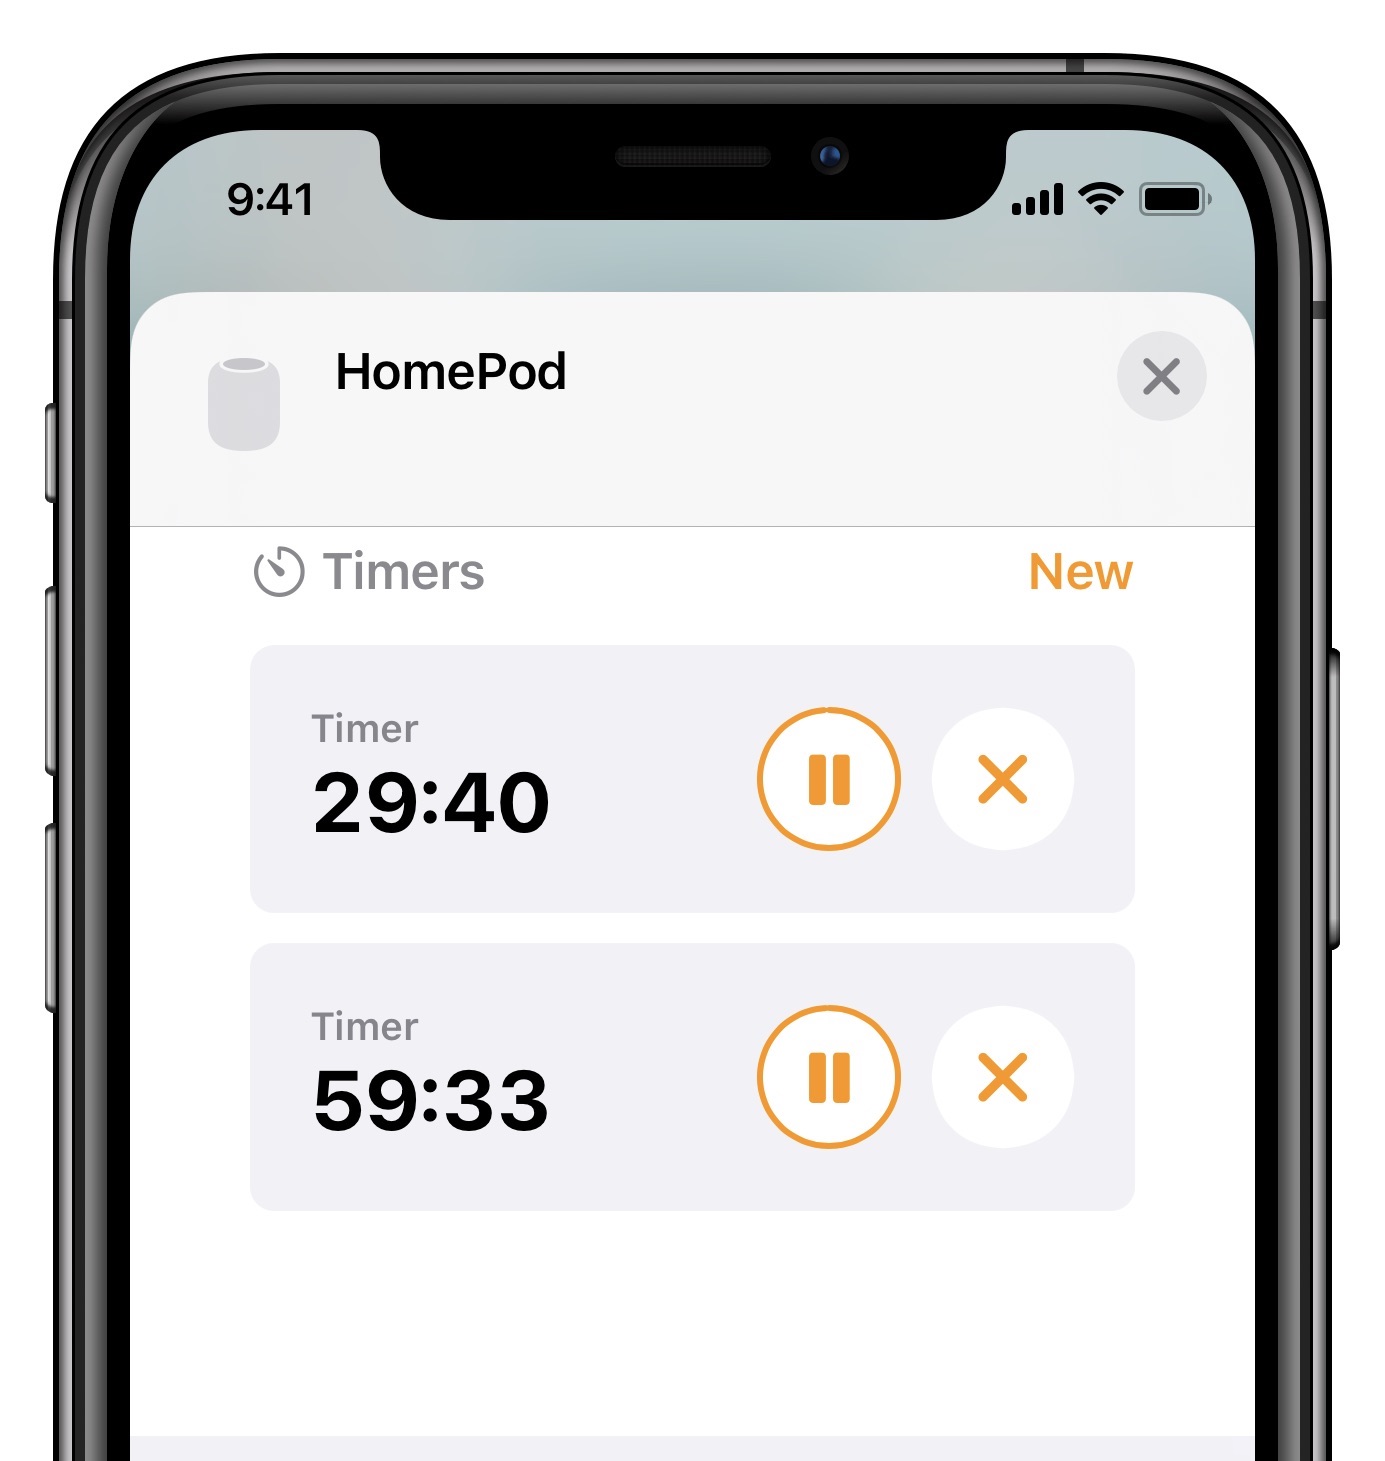
You can now also control HomePod timers in the Home app. To do so, open the Home app and press and hold the HomePod’s tile to open HomePod settings. Scroll down to Timers. There, you can control existing timers or tap New to create a new timer on the HomePod. Over at Six Colors, Dan Moren explains why he thinks Apple didn’t go nearly far enough with improving HomePod timer support.
In addition to those new features, iOS 14.7 adds:
- Weather: Air quality information is now available for Canada, France, Italy, Netherlands, South Korea, and Spain. You can see that data on the main page by scrolling down under the weather forecast.
- Podcasts: You now have the option to see all shows or only the ones you follow in the library.
iOS 14.7 also fixes a few bugs:
- Apple Music: Apple brought back the missing share playlist option.
- Audio playback: Playback of Dolby Atmos and Apple Music lossless tracks no longer stop unexpectedly.
- Battery: Apple restored the battery service message that sometimes disappeared after reboot on some iPhone 11 models.
- Mail: Braille displays should no longer show invalid information while composing messages.
Apple didn’t mention the problem with connecting to Wi-Fi networks with certain characters in their names (see “Obscure Bug Could Disable the %p%s%s%s%s%n Wi-Fi on Your iPhone or iPad,” 7 July 2021). We hope Apple fixed it and simply didn’t see fit to call it out.
You can install the iOS 14.7 update, which weighs in at 915.7 MB on an iPhone 11 Pro, in Settings > General > Software Update.
watchOS 7.6
watchOS 7.6 adds support for the ECG app and irregular heart rhythm notifications in 30 more regions. Support for these features has been trickling out to a country here and a country there, so it’s a little surprising to see 30 regions appear at once. The new ones are mostly island nations and territories, along with some European countries like Andorra, Bulgaria, Estonia, Slovenia, and Ukraine.
The watchOS 7.6 update, 188 MB on an Apple Watch Series 4, can be installed in the Watch app on your iPhone and under My Watch > General > Software Update. Have your watch on its charger and charged to at least 50%.
HomePod Software 14.7
The HomePod Software 14.7 update adds support for managing timers from the Home app on an iPhone or iPad. The update is 467.7 MB.
To install it, open the Home app, and if an Update Available button appears, tap it. Otherwise, touch and hold the HomePod tile, tap the gear icon to display the settings, and then tap Update near the top of the screen. Left to its own devices, the HomePod should update itself as well.
tvOS 14.7
Finally, Apple also quietly pushed out tvOS 14.7 with “general performance and stability improvements.” Install it on your Apple TV HD or Apple TV 4K in Settings > System > Software Updates, or just let it install on its own sometime if you’re not noticing any problems.
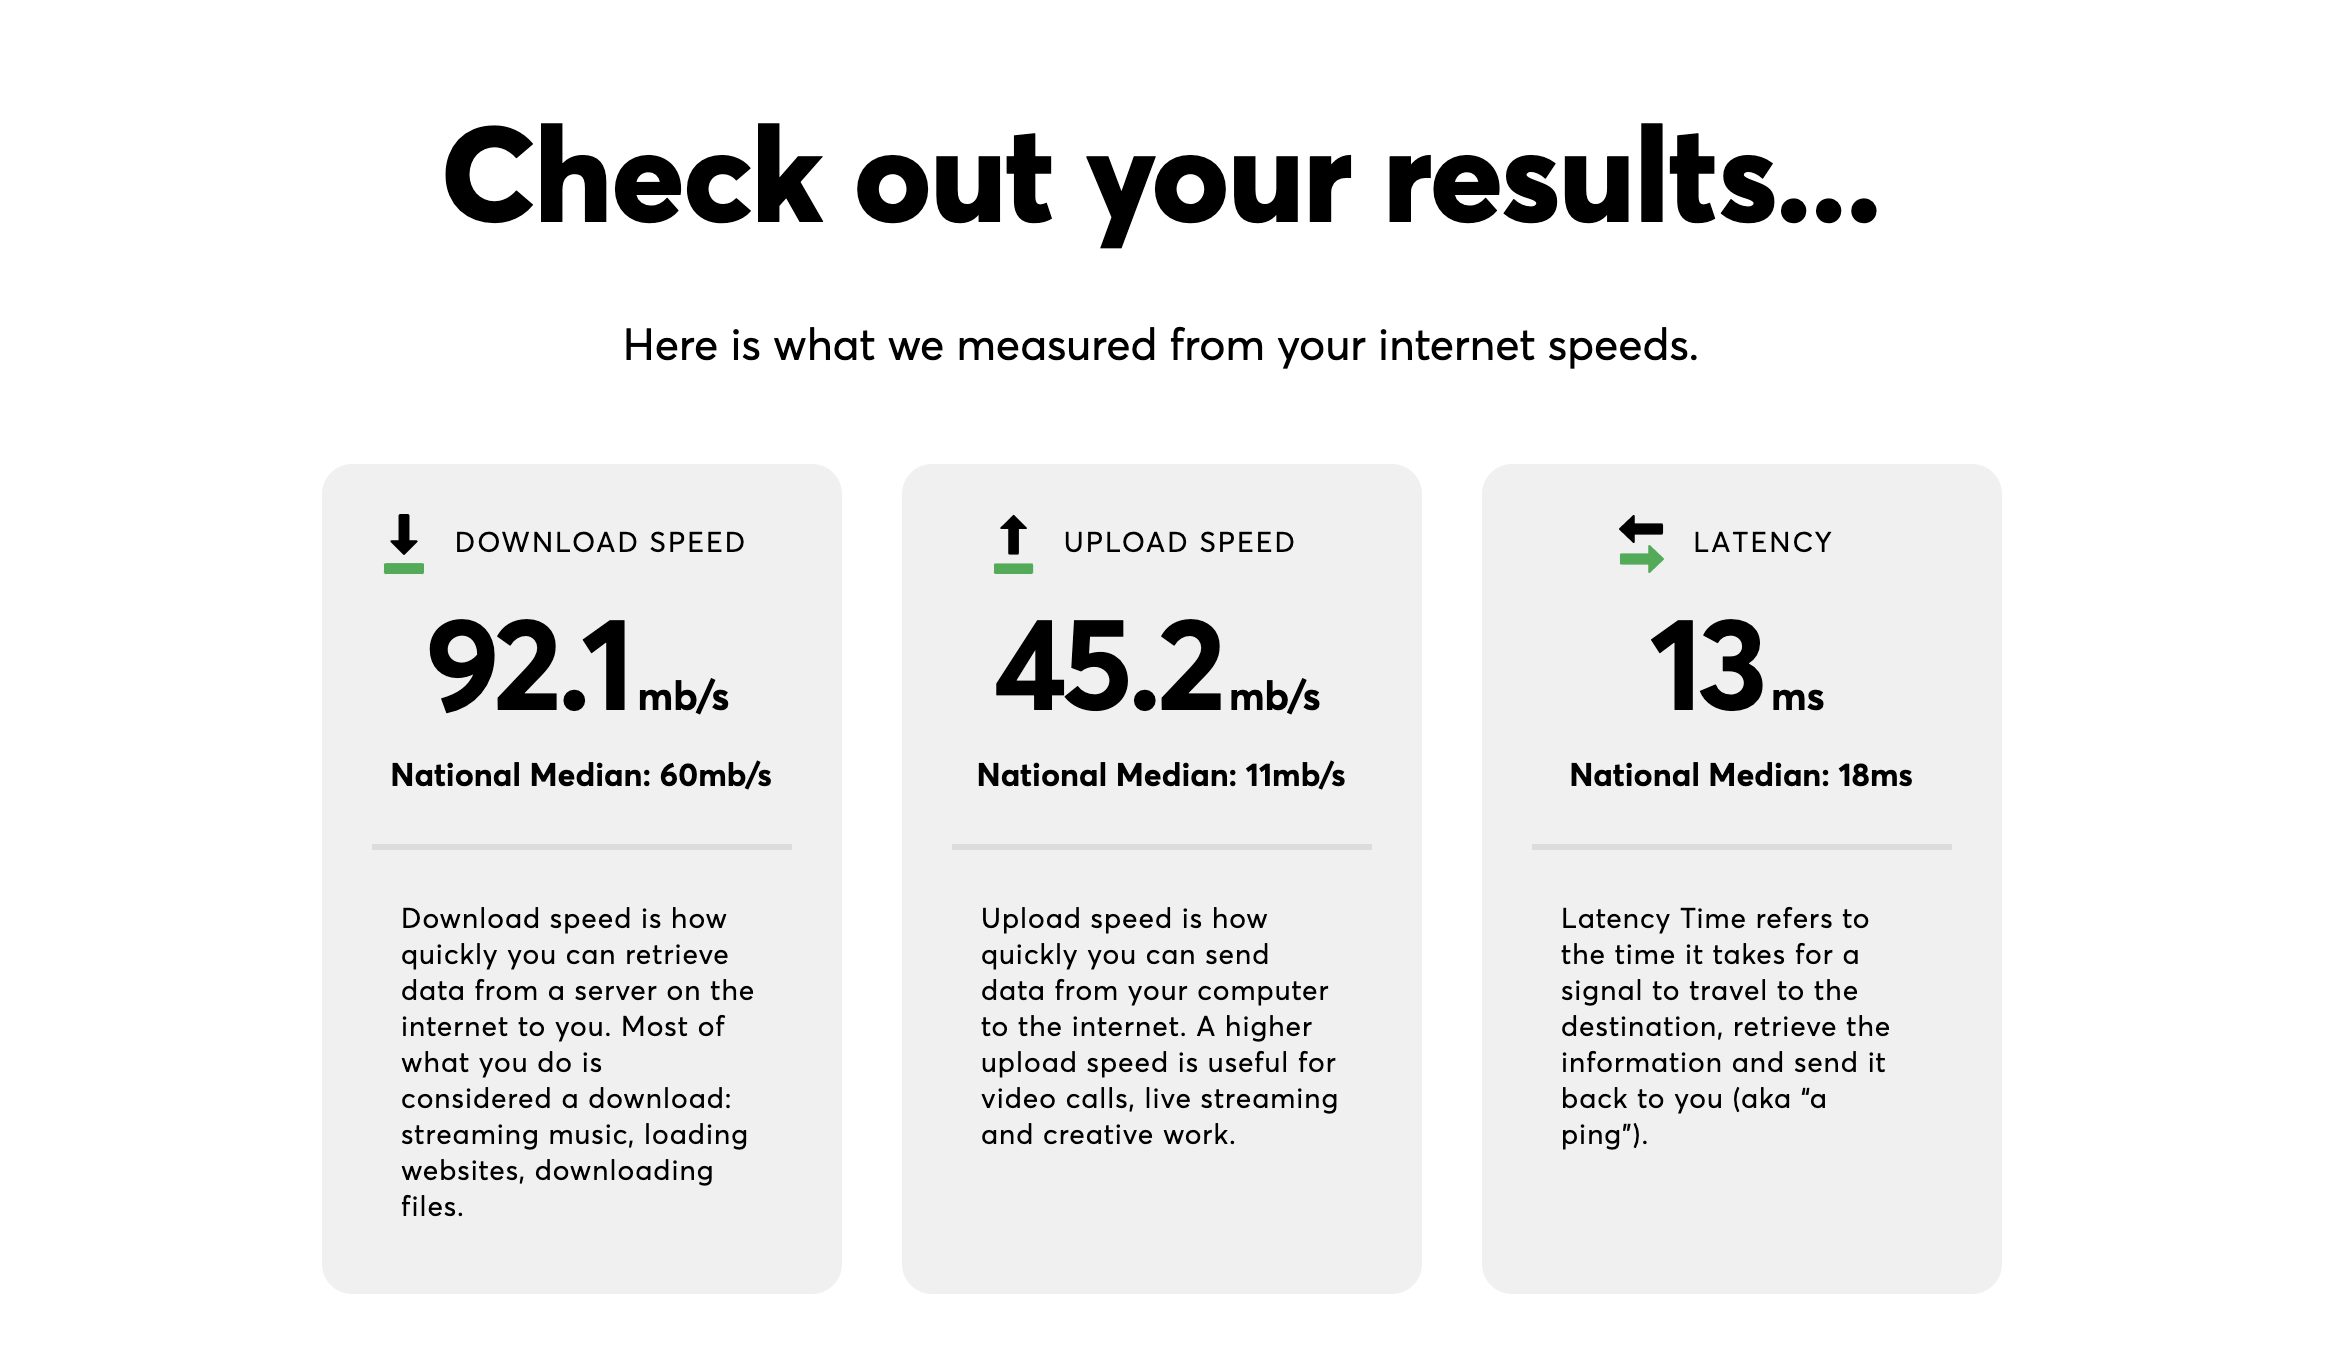
Consumer Reports and The Verge Are Surveying the US Broadband Landscape
It’s no secret that Internet access in the United States isn’t great. There aren’t many choices, especially in rural areas, and ISPs often don’t deliver what they promise. It says something that many tech reviewers trashed SpaceX’s Starlink satellite service, while many of my homesteading and off-grid friends rave about it.
To learn more about the reality of broadband service in this country, Consumer Reports and The Verge are teaming up. You can participate by performing a speed test and uploading a PDF copy of your latest bill. The entire process takes about 7 minutes.
To get started, you need a Consumer Reports login. You’re prompted to create one, but if you’re a past subscriber, you can use that existing login.

First, the site walks you through performing a speed test. The first one it took for me was unusually slow. Thankfully, it provides a chance to redo the test if it’s not representative of what you normally see, but once you’ve submitted your speed report, you cannot change it.
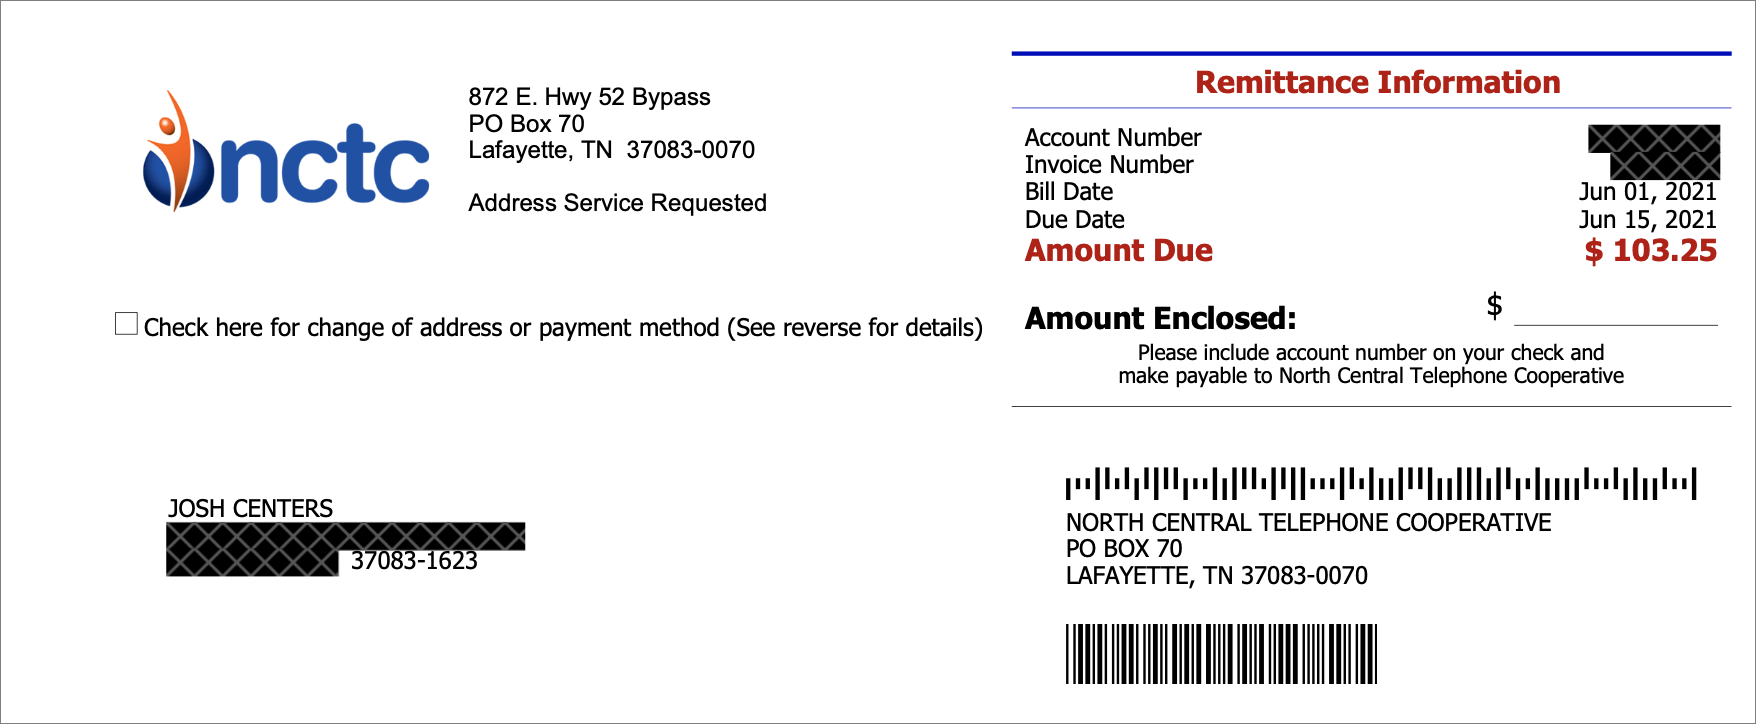
Next, the site asks you to upload a PDF copy of your bill, and it offers instructions on how to obtain that from the most common ISPs like AT&T and Comcast.
I take a bit of issue with how this is done. Consumer Reports says it doesn’t want sensitive information like your name, address, or account number, but redacting PDFs is beyond the skill level of many people. (How many political scandals have broken out over the past decade because someone didn’t properly redact a PDF?) It’s also easy to think you’ve redacted a PDF by visually obscuring sensitive information when the data underneath can still be easily extracted.
Happily, Apple added a built-in redaction tool to Preview in macOS 11 Big Sur. Choose Tools > Redact, and then any text you select will be permanently removed when you save the document.
If you’re not running Big Sur, the best tool for most Mac users is PDFpen, which is available on its own or as part of the Setapp subscription service. Open your bill in PDFpen, make sure you have the Select Text Tool enabled (Tools > Select Text Tool), select the sensitive text, and choose Format > Redact Text — Block. If the text in your bill PDF isn’t selectable as text, you can use Tools > Select Rectangle Tool instead, followed by the Redact Text command.
Once you’ve thoroughly redacted your bill, upload it when prompted. Look carefully because I missed my phone and account number in one spot on my first pass.
Finally, the site asks a series of questions. Some are relevant, like your ZIP code and satisfaction with your service, whereas others are less so, like your political affiliation. I gave the vaguest possible answers, though interestingly, the political affiliation didn’t have a “Prefer not to say” option like the race, income, and education questions.
Over 15,000 people have already submitted responses, and we’re anxious to see what conclusions Consumer Reports and The Verge draw about the true state of Internet access in this country.
Upgrade Your File Transfer Security with Encryption Keys
One of the oldest still-working protocols on the Internet is FTP (File Transfer Protocol). Designed in the net’s earliest days, FTP never concerned itself with security. Later standards addressed this limitation by adding encryption, although insecure FTP remains in widespread use.
There’s FTP over SSL/TLS, which uses a digital certificate of the same type that secures Web sites—but which is hard to configure unless you run a server and can work through the configuration details at a low level. At one point, WebDAV plus HTTPS seemed like a solution: a WebDAV-enabled Web server allows file transfer and can offer the equivalent of FTP and HTTPS as a solution. But it’s funky to set up and also often requires direct Web server configuration access. (If your Web host provides it, however, consider using it!)

For many of us, SFTP (Secure FTP) turned out to be the best solution for secure file transfer. SFTP is not actually a secure evolution of FTP but is instead part of the SSH (Secure Shell) remote access service. SSH replaced the Telnet remote login service (also unencrypted like FTP) with a more sophisticated, encrypted approach.
SFTP is often used with a password, but it can be set up to work with a pair of stored encryption keys. Making this relatively minor change improves your account security immensely: to log in to your server, someone would need to obtain a private key stored only on your computer. Nothing can be intercepted or extracted from your communications, and you can’t be fooled into revealing the key because you never enter it anywhere like you would a password.
If you have a hosting account that lets you access a Unix home directory for your account for file transfer, you should be able to set up SFTP with a private key without logging in via a terminal or command-line session at all. It’s a little easier to do in a terminal session, so I’ll show you that way too.
While some of the steps required to set up private-key access may seem daunting or technical, this is a one-time setup. Once you’re done, you won’t ever have to mess with it—or have weak security—again. (That said, if you buy a new Mac and don’t migrate your user account to it, you might have to repeat some of these steps; at best, you can just copy a file.)
Why switch from simple passwords to private-key access? Because the Internet is more scary and insecure than ever. Recently, someone broke into my hosted server and installed Bitcoin mining software. With nearly 30 years of experience managing Internet servers, you would think I had learned the necessary security lessons by now. The mistake was that I had long ago set my dad up with an account and password, and he probably reused the password years back on some other site, from which it was stolen. (There are no known hacks for the version of Linux I run or its supporting software that would allow a direct compromise. And only my dad’s account was cracked.)
As a result, I decided to disable all password-based terminal and SFTP sessions. It was an easy decision since I’m the only one who logs into the server remotely, and only a couple of family members need file transfer capability.
The steps to shift to private-key–secured connections are straightforward. I provide all the recipes you need to follow to create a paired set of encryption keys and copy the public key to the correct spot within your home directory on the server. As a bonus, if you log in via a terminal, those SSH sessions will now work password-free, too.
Step 1: Create a Set of Keys
The simplest form of key-based SSH authentication relies on public key cryptography, which creates two linked keys, one public and the other private. You must keep the private key secret, and it should typically never leave your computer. In contrast, you can freely share and even publish the public key. The public key can be used to encrypt messages that only the possessor of the linked private key can decipher, but it can also be used to verify definitively that a message (or file or app) was digitally signed by the private key’s owner.
With SSH, you generate a public/private pair. The private key stays on your Mac; you copy the corresponding public key to your account on a server. When you start an SFTP (or SSH) session, your Mac and the SSH server pass messages back and forth to prove each other’s identity to each other. That includes signing messages with their respective private keys that the other validates with the public key they possess for the other party.
This happens automatically; no management is required except when you first connect to the server, described in the next section. (When using SSH from the terminal, the ssh command-line app automatically tries the public keys first if the server accepts them.)
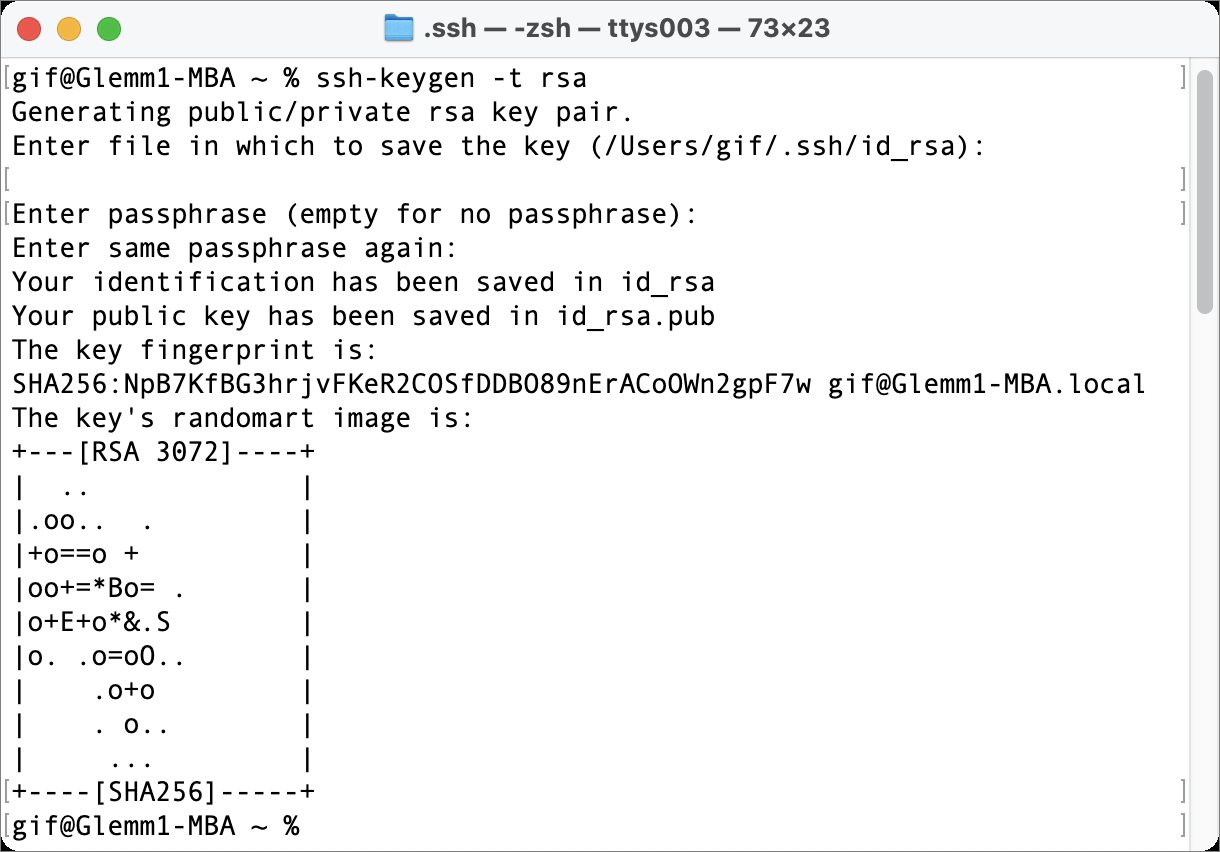
Here’s how to create the keys:
- Launch Terminal on your Mac.
- Type or copy the following exactly and press Return:
ssh-keygen -t rsa. - The
ssh-keygenprogram prompts you for a location to save the file:Enter file in which to save the key (/Users/gif/.ssh/id_rsa):. Press Return to save the file in a hidden.sshdirectory inside your home directory. (You can specify a different path and name, but that’s not necessary unless you’re creating multiple keys.) - The
ssh-keygenprogram prompts you to enter a passphrase. This isn’t needed and won’t interact well with most Mac file transfer apps. Press Return. When prompted to verify, simply press Return again.
A few lines of information appear that are only of interest to people working with others to use these keys; you can ignore them. Your keys are now generated as id_rsa (the private key) and id_rsa.pub (the public key).
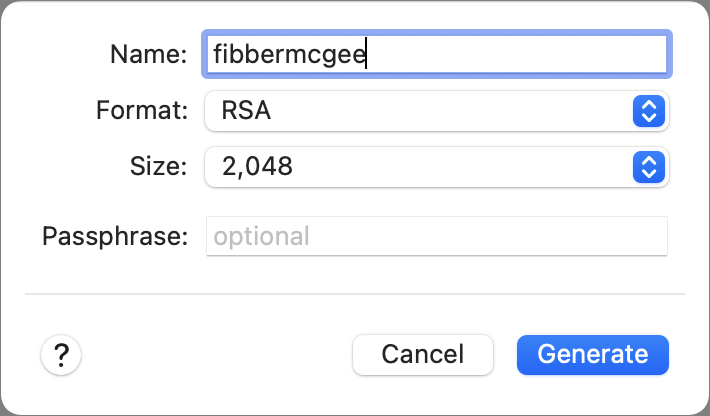
If you use Panic’s Transmit, you can skip the steps above and generate a key directly within the app:
- Launch Transmit and choose Transmit > Preferences > Keys.
- Click the + at the lower-left corner and choose Generate Key.
- Name the key. Leave the format set to RSA. You can optionally increase the Size setting from 2,048 to 4,096 or 8,192. That increases the strength of the encryption, but 2,048 is fine. Don’t enter a passphrase.
- Click Generate.

- Click Copy Public Key for use in both sets of instructions below instead of copying the text from a file stored on your Mac.
If you connect from multiple Macs, you could repeat the procedure above and then copy each Mac’s public key to the server in the next section. However, if all your Macs are under your control, it’s secure enough to use the same key pair across all of them. Simply copy the generated id_rsa and id_rsa.pub keys to each Mac: you can use a USB drive, a network connection, screen sharing, or what have you but never email private keys—email exists in too many places. You may need to create an .ssh folder in /Users/username/ on Macs where you haven’t yet interacted with SSH.
With the keys generated, you can copy them to your server account.
Step 2: Transfer Your Public Key to Your Server Account
In this next operation, you copy the public key to your server. If you have only file transfer access:
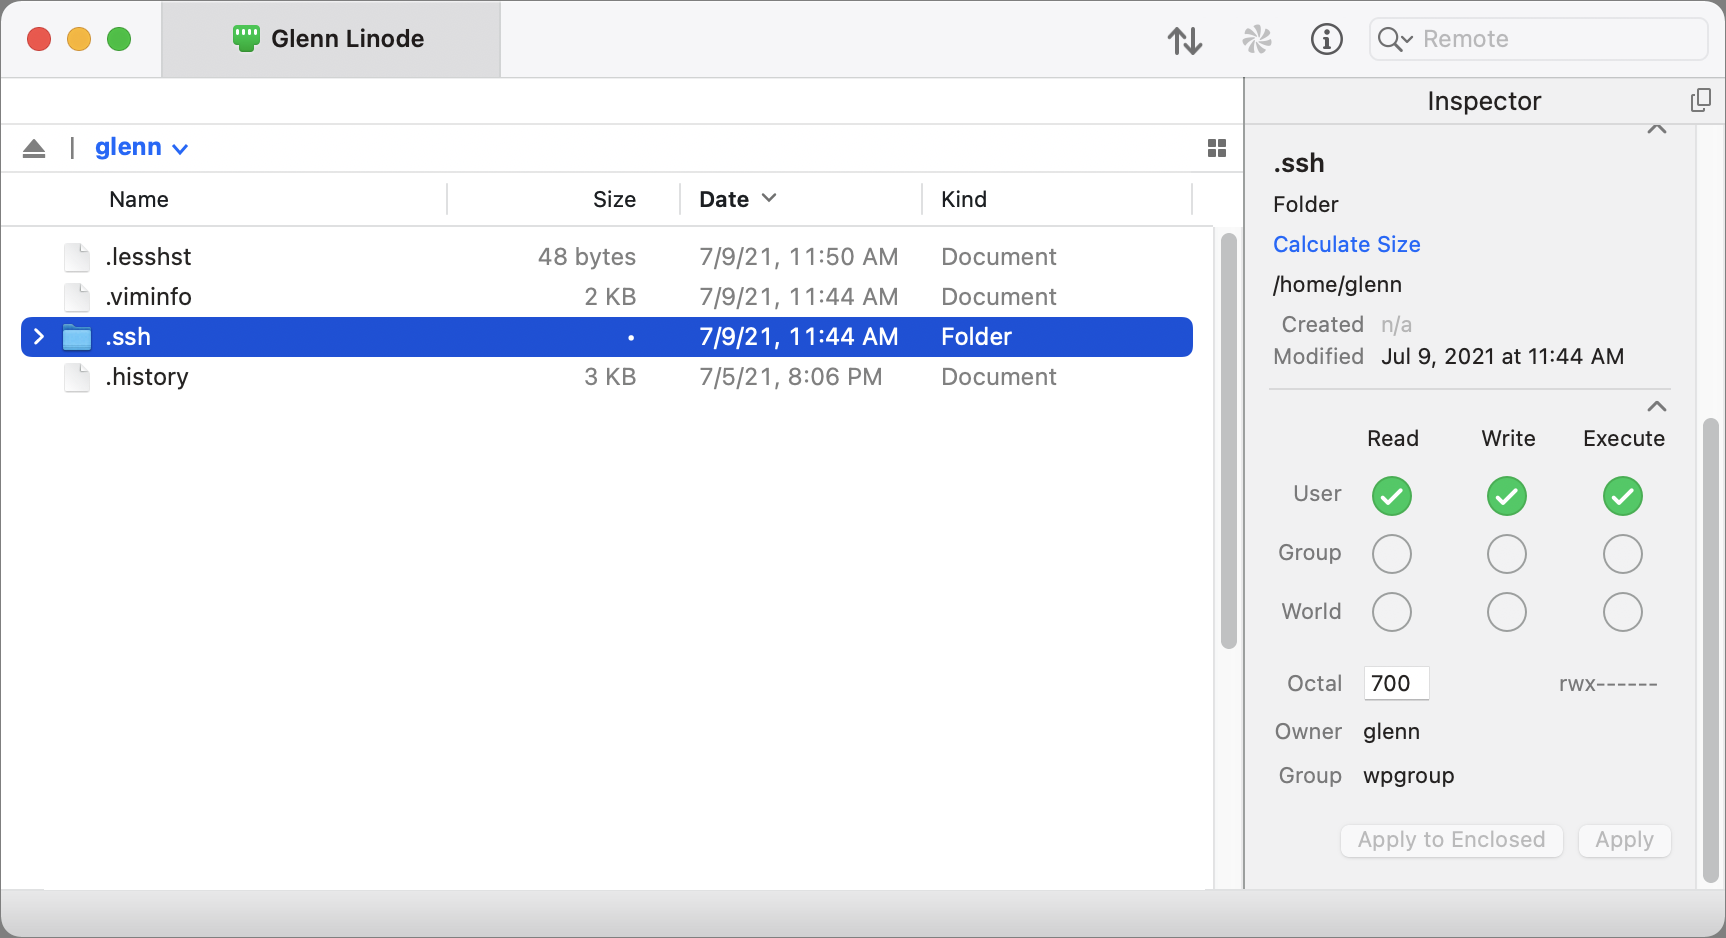
- Use your file transfer app to view your home directory on the server, which is usually a path like
/home/glennfor a shortcut like~glennf/. - In that view, create a directory named
.ssh(that’s ssh with a period before it). - Use the app to set permissions on the directory to be owned by your account and only readable, writable, and executable (required to view the contents of a folder in Unix). Group and world permissions should all be off. (If you don’t see the
.sshdirectory, check the setting in your app to show hidden directories and files; items beginning with a period are often hidden in lists.)

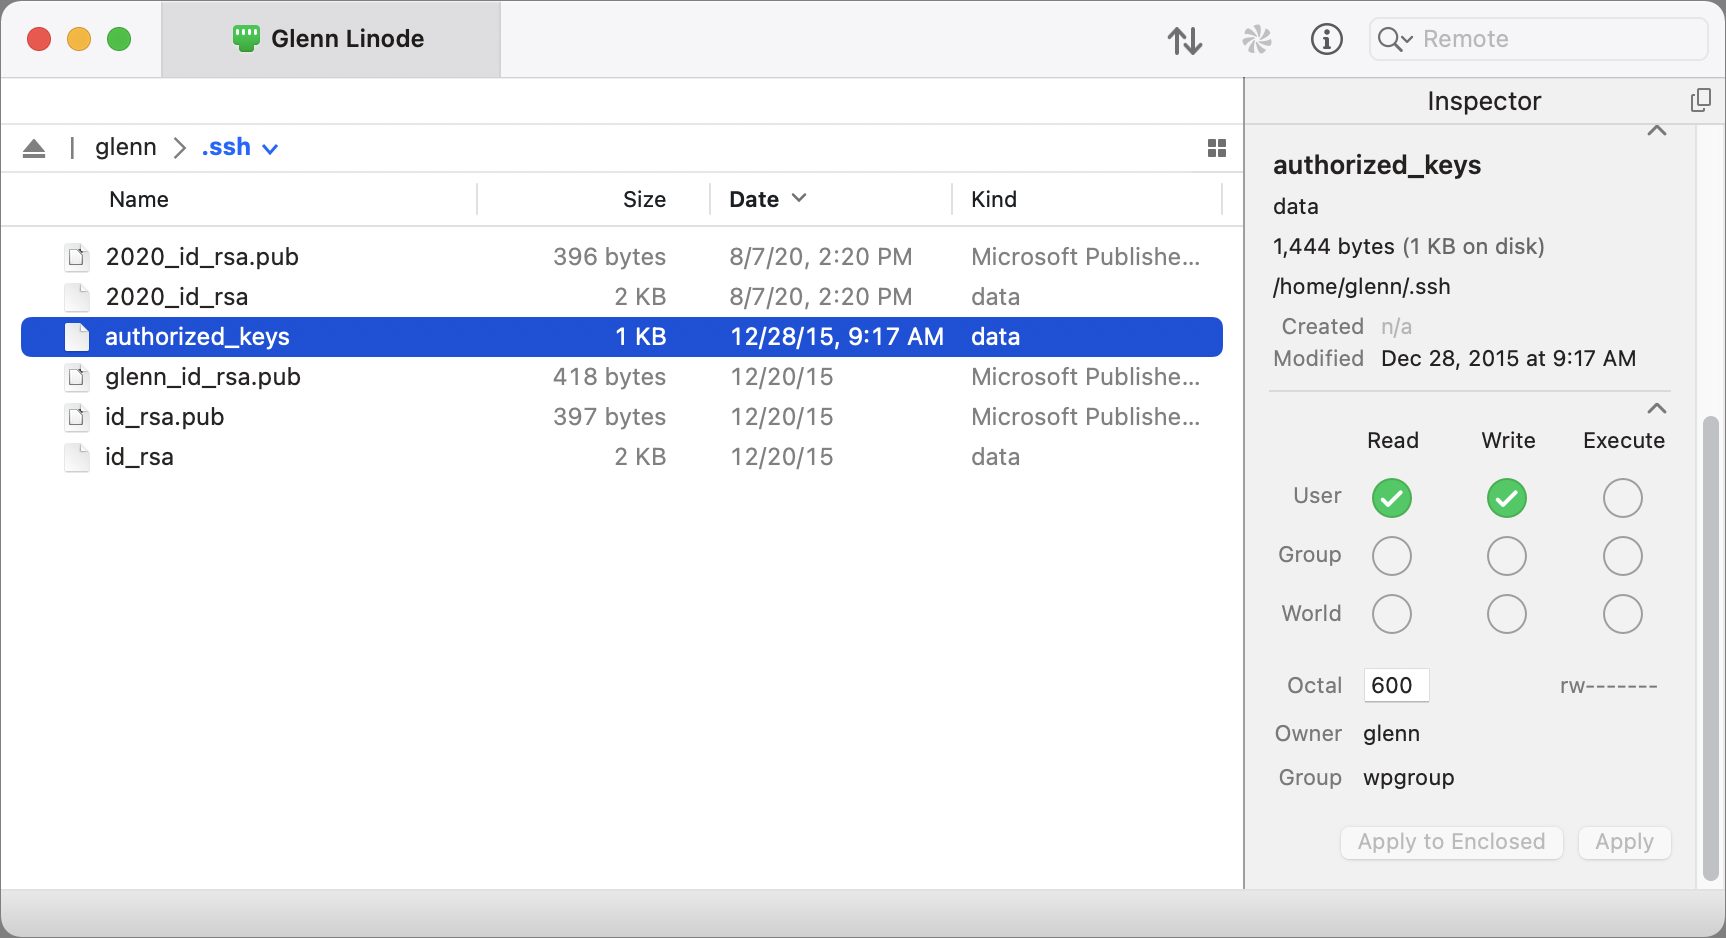
- On your Mac, open the
id_rsa.pubfile in your .ssh folder. (In the Finder, you can press Command-G and then enter~/.ssh/to navigate to that folder.) You should be able to open it in a text editor like BBEdit or even TextEdit. - Copy the contents of
id_rsa.pub(an example is below this list) and paste it into a new text file. - Name that second text file
authorized_keys(with no extension) and make sure it’s saved as plain text, not RTF or anything else. - Via your file transfer program, navigate into your account’s
.sshdirectory and uploadauthorized_keysthere. - Set the file permissions for
authorized_keysto read and write by the owner only.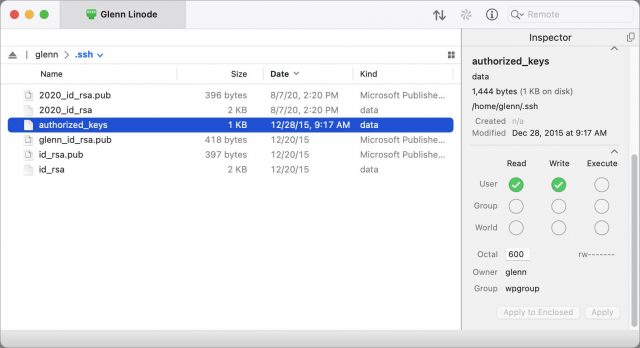
In Transmit, select the authorized_keys file and use the Inspector to set Read and Write permissions to cover just the file’s owner—you.
Here’s what a public key looks like:

If you’re comfortable with the command line, the necessary commands can be a little faster and simpler:
- Via a terminal app connected to the server, navigate to your home directory (
cd ~). - Create an
~/.ssh/directory with the correct permissions (mkdir -m 700 .ssh). - On your Mac, open
~/.ssh/id_rsa.puband copy its contents. - On the server, navigate into the
~/.ssh/directory or use your favorite command-line text editor to open or create a file calledauthorized_keys. - Paste the copied text into that file via the terminal session—since it’s text, it will transfer correctly—and save it.
- Make sure the permissions on authorized_keys are set correctly by entering
chmod 0600 authorized_keys.
That’s the entire setup! Now you have to use a file transfer program that supports SSH public key authentication. But first, a quick aside about validating that the server you connect to is the one it claims to be.
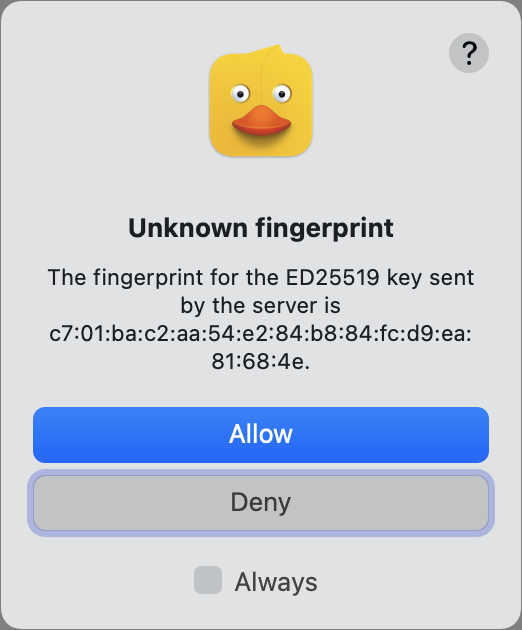
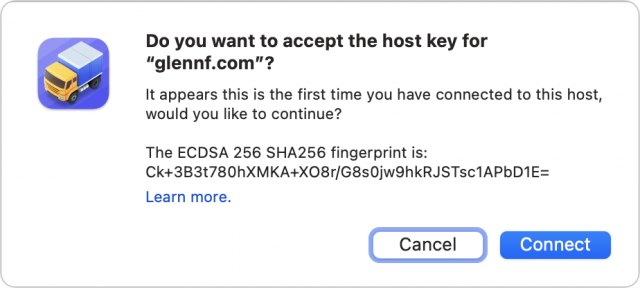
Dust for Digital Fingerprints
When you use any means to connect via SSH, including SFTP, the first time you connect to a new server, you will be asked to verify that its “fingerprint” is accurate. The fingerprint is an encrypted shorthand version (a hash) of the public key part of the server’s public/private keypair. In some apps, including Cyberduck, this abbreviated version displays as 16 sets of two-digit hexadecimal (base 16) numbers separated by colons—an outdated but still-used MD5 hash. It looks like this:
97:a9:54:4d:7c:26:c6:e8:a1:39:6a:59:c0:1e:b9:47
In other apps, such as Transmit, you’ll see what looks like a 43-character mix of text, letters, numbers, and punctuation (the SHA256 hash), another way of representing the same source public key:
/WVPYwFk8GyGE/QuvSsj8MS12ryrV2th4nDKeFvYqis
(Why 43 characters? It’s 256 bits of information, but divided into 6-bit pieces to represent values in a reduced character set—a kind of an simplified ASCII.)
The shorthand is used because the public key is quite long and you’re not trying to check slight differences between digits. You just want to know that the public key on the server you think you’re connecting with is identical to the public key offered by the server you’re connecting to!
On the first connection, your computer has no record of that key. If you agree it’s correct, it’s stored (in the ~/.ssh/known_hosts file) and matched in the future. You’ll only be warned again if it changes, which can be a sign to check that the server wasn’t compromised.
The fingerprint helps you resist man-in-the-middle (MitM) attacks. If someone can redirect your server’s domain name or somehow insert themselves on a network connection between you and the destination, they have a dilemma. They can fake the public key, but then they can’t respond correctly to your software’s handshake because they don’t possess your private key. Your file transfer software will flash alarms or at least note an error.
If the attacker instead generates their own keypair, the fingerprint won’t match, and you have to be alert to notice the error. If you don’t notice it, the MitM can present fake information or a fake file listing and try to convince you to engage in insecure behavior.
However, because the server has your public key stored, the MitM can’t access your account or files on the server: the server will always reject any connection attempt that doesn’t provide the private key that matches the stored public key.
In most cases, it’s not critical to check fingerprints because you’re not at risk of a MitM attack, and the attackers can’t extract your password or gain access to anything in the process except fooling you.
However, if you want to ensure you’re on the straight and narrow with the server:
- If your account is with a hosting service, see if they can provide their hashes (ask for MD5 and SHA256 versions) for their SSH server.
- If you have sufficient access on a hosted server or your own, you can run a command that produces the necessary hashes. It’s obscure but reasonably straightforward; read this article for the recipes.
You can now connect without typing a password!.
Step 3: Configure Your File Transfer App
Many file transfer apps support SFTP connections with SSH keys. These include two popular options: Cyberduck (macOS 10.9 or later, free but donation requested) and Panic’s Transmit (macOS 10.14 or later, $45).
In CyberDuck, here’s how to use a public/private keypair for login:
- Choose Bookmark > New Bookmark.
- Choose SFTP from the pop-up menu at the top.
- Give the bookmark a memorable nickname and enter the server name and your account username.
- From the SSH Private Key pop-up menu, choose your
id_rsakey if it’s not already selected.

- Close the bookmark entry and then double-click it in the bookmarks list to connect.
- You will likely see a fingerprint warning. Click Allow if you’ve checked this key or are comfortable proceeding. Select Always to avoid this alert each time you connect after this while the fingerprint remains unchanged.
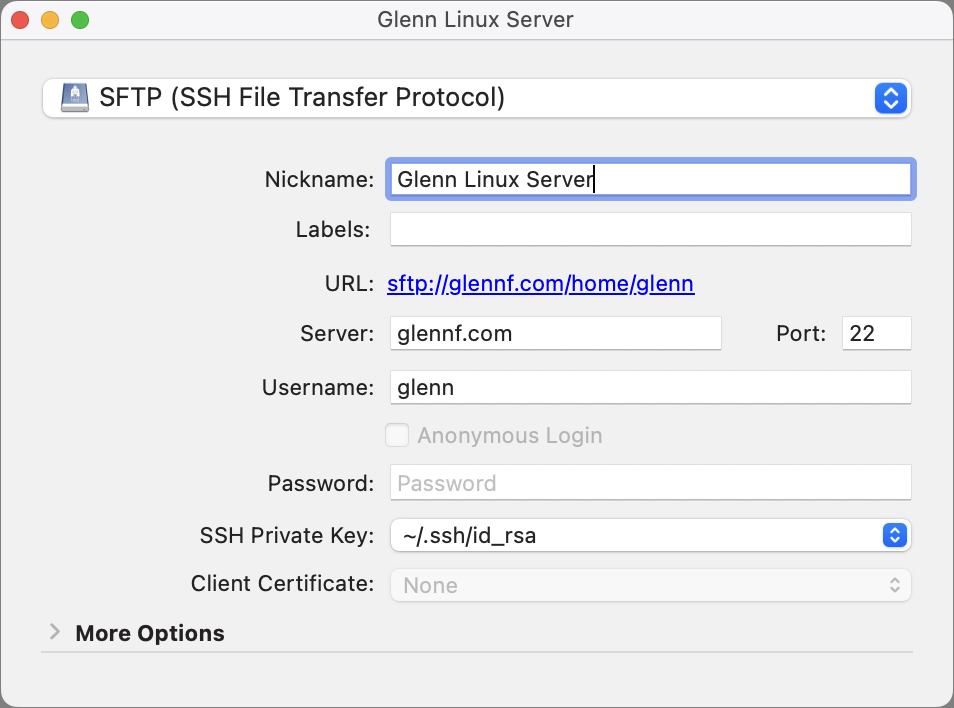
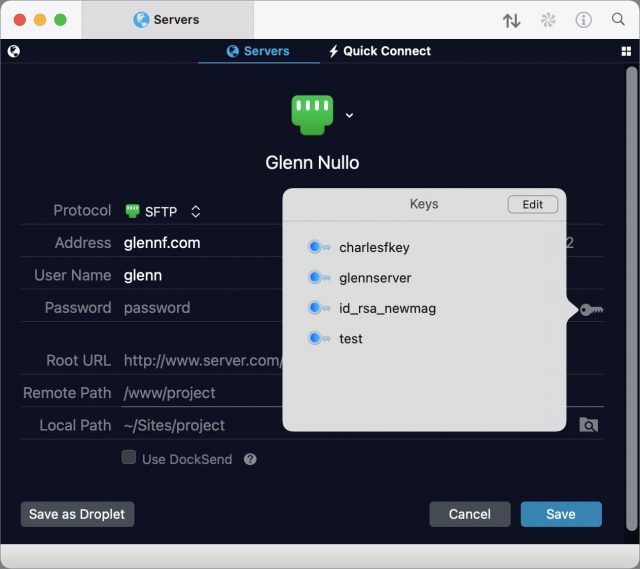
In Transmit, the process goes like this:
- While in the Servers view in any pane, choose Servers > Add New Server.
- Name the server descriptively, choose SFTP (it may already be chosen by default), and click Next.
- Enter the server name in the Address field and your account username in the User Name field.
- If you’re using a key generated within Transmit, click the key icon to the right of the Password field and select it from the list. If you’re using the default key in the
~/.ssh/directory as described earlier, you don’t need to select anything: Transmit automatically uses any keys in~/.ssh/when connecting.
- Click Save.
- Double-click the entry to connect.
- If a fingerprint prompt appears, examine it and click Connect if it matches your expectation.


That’s it! From now on, all your file transfer connections will be more secure than they would be with a password, and you won’t have to enter or manage a password.
Forward into the Future
Security is a constantly escalating battle, and passwords are increasingly targeted. Upgrading your security for SFTP (and SSH sessions if you use them) reduces a significant potential point of weakness. While SSH isn’t perfect, the use of strong encryption keys improves your security today and into the foreseeable future.
The Ultimate Guide to Choosing Apple/Beats Audio Gear
Shopping for Apple wireless earbuds or headphones seems simple enough:
- If you are on a budget, Apple’s second-generation AirPods earbuds will run you $159 (see “Apple’s Wireless AirPods Were Worth the Wait,” 20 December 2016).
- If you crave more features and have a bit more to spend, try the $249 AirPods Pro with added features such as active noise cancellation (but note that a higher price doesn’t automatically mean they’re better—see “AirPods Versus AirPods Pro: Apple’s Earbuds Go Head-to-Head,” 3 July 2020).
- If you want premium audio and have few cash constraints, the $549 AirPods Max awaits (see “Apple’s AirPods Max Headphones Are Pricey but Good,” 15 March 2021).
The decision gets more complicated, though, if you broaden your search to include earbuds and headphones from Apple subsidiary Beats by Dre. That introduces new styles, such as earbuds with ear hooks for athletes, earbuds connected with cables so they are more difficult to lose, earbuds you can jam deeply into your ear canals, and headphones of different sizes, styles, and prices to complement the AirPods Max.
It’s reasonable to include Beats audio products in such a decision because they often rely on Apple’s proprietary H1 or W1 chips that enable capabilities such as iCloud syncing, hands-free “Hey Siri” use, automatic switching among Mac and iOS devices, and more. But not every Beats product supports every such feature, which can be confusing.
I’m here to help. This article separates Apple and Beats products into categories so you can get a better sense of which would best fit your needs and lifestyle. It’s not a full feature accounting, but I’ve assembled a massively detailed companion chart so you can more readily decipher which headphones or earbuds are best for you. (If you see ways to improve the chart, let me know in the comments below.)

First, Beats Studio Buds Mini Review
Most of the products in this roundup have been on the market for months or years, so many people are at least somewhat familiar with them. However, Beats shipped the $149.99 Studio Buds earbuds just last month, so almost no one will know about them. Before we get into the comparisons, let’s take a quick look.
The Studio Buds are positioned as an alternative to the AirPods line. They cost slightly less than the AirPods but include high-end features like active noise cancellation found in the AirPods Pro.
You won’t mistake the Studio Buds for AirPods. There are no downward-pointing stalks, and the Studio Buds are available in black and red, as well as white. They’re a bit simpler to master, with a mechanical button jutting slightly outward from each bud instead of the AirPods’ trickier tap or squeeze controls.

The Studio Buds don’t match the AirPods Pro feature for feature, and this is where you need to pay attention. The Studio Buds rely on neither an H1 nor W1 chip but, reportedly, MediaTek’s TWS chip, which provides only some of the capabilities of Apple’s chips and is more friendly to Android users. Apple users won’t have problems with the Studio Buds, but they have an odd blend of feature inclusions and omissions.
Like the AirPods, the Studio Buds pair with an iPhone instantly with the usual info card that shows battery status. They offer hands-free “Hey Siri” support. You can make them beep via Find My if you lose track of them. They pop right up in Control Center, with active noise cancellation and transparency controls accessible beneath the volume slider.
On the downside, the Studio Buds won’t automatically be set up and become available on all Apple devices signed in to iCloud with the same Apple ID (which also means they can’t switch automatically from device to device). They don’t support audio sharing, nor do they have in-ear detection, so music won’t pause when you take them out of your ears or resume when you put them back in.
Overall, they’re certainly worth considering, but be aware that they have a somewhat odd mix of features.
On to the comparisons!
Best Options for High Tech Features
Unquestionably, if you crave the most features, the Apple-branded products rule the roost.
Only the AirPods Pro and AirPods Max support spatial audio with dynamic head tracking in songs and movies. Apple says that dynamic head tracking creates a more immersive experience for spatial audio by adjusting the audio dynamically as you turn your head. The feature is available now in movies that support it, and it’s coming for songs in Apple Music later this year.
Another advanced feature that’s exclusive to Apple-branded earbuds is wireless charging. The second-generation AirPods and the AirPods Pro support this feature via Qi-capable battery cases, but no Beats product does. That’s a shame since even inexpensive third-party earbuds like Aukey’s $39.99 Wireless Charging Earbuds offer wireless charging.
Best Options for Finicky Fitters
If your earbuds or headphones don’t fit properly, what can you do about it?
Most of the earbuds are bundled with several sets of silicone ear tips in a variety of sizes for an effective ear canal seal. That design also gives you the flexibility to experiment with silicone and foam tips from third parties. The exceptions are the AirPods, which don’t include tips in the box and are designed to be one-size-fits-all—although Minnesota-based Hearing Components has figured out how to put foam tips on them. Hearing Components also offers tips made with its signature Comply foam for AirPods Pro, Beats earbuds, and earbuds from many other makers. I swear by Comply tips.
The Beats Flex can be made to fit better than the other earbuds in a particular way—they are the only ones you can jam deeply into your ear canals for an extra-secure fit along with the best ear canal sealing. I like this a lot.
In the headphone category, all models let you telescope the ear cups upward or downward to correspond with the size of your head. The AirPods Max do it most elegantly, with metal arms that have just the right amount of resistance as they move up and down. They attach to the cups with a pivoting, rotating design that balances and distributes pressure for enhanced comfort.
If you have a big head, the Beats Solo Pro may not be for you. Some users have complained that their telescoping isn’t generous enough to position the cups over the ears without feeling pressure and discomfort atop the head; I can attest to this. Others, such as TidBITS managing editor Josh Centers, feel that Beats headphones clamp too tightly to the head. The AirPods Max doesn’t have any of these problems.
I can’t speak to the comfort of the Studio³ and Solo³ headphones, which I didn’t test. Also, the Solo³ came out way back in September 2016, which makes it “old,” as a Beats spokeswoman told me—perhaps partly to signal that it may not be long for this world.
Best Earbuds for Active Lifestyles
Many use AirPods while exercising, but they’re arguably not ideal for it. They’re prone to falling out since little more than ear canal friction keeps them in place.
Certain Beats earbuds are friendlier to athletes. The PowerBeats and PowerBeats Pro boast over-the-ear loops, so they remain in position more securely (see “AirPods Versus PowerBeats Pro: Same Parent, Different Paths,” 17 September 2019).

The Beats Flex earbuds tackle the problem differently. Because they fit deeply within your ear canals, they are unlikely to dislodge during workouts.
You sweat when you exercise, so earbuds should have built-in moisture protection. With one exception, all the earbuds have IPX4 protection from perspiration and water splashes. Only the Beats Flex earbuds lack such protection, rendering them less appropriate for athletes despite how well they stay in your ear canals.
None of the headphones in this roundup have moisture protection, but you shouldn’t be wearing them for exercise anyway.
In athletic situations, it can also be helpful for pairs of earbuds to be connected with a cable so they stay together and are harder to lose. The Beats Flex and PowerBeats earbuds feature this design, so you can hang them around your neck like a scarf when you aren’t using them.

As a bonus, the Beats Flex earbuds magnetically clip together on your chest to hold them in place, pausing the audio as soon as they click together. And, uniquely, their controls are on the cord, split between the left and right ends.
Best Headphones for On the Ear or Over the Ear
In the realm of headphones with round, cushioned cups for the left and the right ears, there are two design schools of thought. Should the cups be large enough to cover and encase the ears, or smaller so that they rest upon the ears?
The AirPods Max fit into the former over-ear category. Their huge cups envelop your ears but put no pressure directly on them. This makes the headphones very comfortable—assuming you don’t wear glasses, which introduces an unwanted physical element that can trigger pain after a while. Beats Studio³ headphones are also over-ear models, but they are less bulky than the AirPods Max. I can’t say much more about them because I’ve never handled them.
The older Solo³ and the newer Solo Pro headphones are on-ear variants. Some prefer the on-ear approach, but I have found the pressure on my ears to be tolerable only for an hour or two. Because I wear glasses, they become even more uncomfortable over long periods. That’s why I favor earbuds.
Best Options for Active Noise Cancellation
Active noise cancellation (ANC) has been available on headphones for a while, and the feature has more recently migrated to earbuds, along with the complementary transparency mode.
ANC filters out outside noise—particularly constant background noise—so you can focus on your audio. Because noise-canceling earbuds and headphones also block outside sounds passively, transparency mode lets you keep listening to your audio while bringing outside sounds in.
Products in this roundup that support ANC include three sets of headphones (AirPods Max, Solo Pro, and Studio³) and two sets of earbuds (AirPods Pro and Studio Buds).
Alas, they aren’t equivalent. You’ll find that the quality of the ANC and transparency mode is in rough proportion to what you pay. The pricey AirPods Max features the best ANC I have ever experienced, whereas the less-expensive Beats Solo Pro headphones and the AirPods Pro earbuds are merely pretty good.
ANC on the Studio Buds is mediocre. In my testing, I found it useful in mildly noisy environments, such as at my home office desk in my busy household, but marginal on a cacophonous city street or loud city bus. It did only an OK job of cutting out the faucet noise when I was listening to a podcast while washing the dishes. However, the Studio Buds’ ANC is still better than ANC on lower-cost third-party buds such as Aukey’s $59.99 Hybrid Active Noise Cancelation [sic] Wireless Earbuds. Again, you tend to get what you pay for.
I can’t attest to the quality of the Studio³ headphones’ noise cancellation because I didn’t test them.
The AirPods Max and Solo Pro headphones make ANC and transparency mode a breeze to use via simple push buttons. Using ANC on AirPods is not difficult, but it does require you to memorize certain tapping or squeezing actions, and it may also involve a quick dive into Settings to customize those actions. Using ANC on the Studio Buds is similar, though via a mechanical button on each earbud.
Best Options for Optimal Audio Quality
I’m far from an audiophile, so I’m not one to wax poetic about the nuances of sound emanating from various earbuds and headphones. Much of that is lost on me, but not all.
Unsurprisingly, the over-ear AirPods Max headphones sound amazing. They also cost $200 more than the next most expensive device, the Beats Studio³ (which I can’t comment on). The Solo Pro headphones sound premium, too—but their on-ear design doesn’t do as good a job of physically dampening external sounds so you can immerse yourself in whatever is playing.
Earbuds can’t compete with headphones for audio quality, and there’s variation even within the category. The PowerBeats Pro has an ardent fan base because of their audio quality, and I can see why. Expect similar quality from the PowerBeats, which are basically the PowerBeats Pro connected by a cable. Most people seem to agree that the audio from the AirPods Pro is good, but not great, and a bit better than the AirPods. The Studio Buds provide decent sound for the money.
A bit of advice: if you just want decent earbuds for calls, podcasts, casual music consumption, and watching videos on your iPad or Mac, don’t spend more than you have to. The Beats Flex has performed nicely for me in all respects, and remains the bargain in this roundup despite a mysterious autumn price hike from $49.99 to $69.99.
Best Options for Protecting Your Earbuds or Headphones
You want your earbuds or headphones to be properly protected when you are not using them. In this category, the Apple and Beats products are all over the map.
Only one set of headphones, the Beats Studio³, comes with a hard case to protect the product when not in use. The Beats Solo³ and Solo Pro have soft cases that encase the headphones, but they offer less protection from impacts than a hard case would.
The Smart Case that Apple bundles with the AirPods Max provides only partial protection. It’s made of a pliable, plasticky fabric and accommodates the headphones’ cups once you rotate them so the AirPods Max lies flat. A flap atop the Smart Case holds the cups in place. But the rest of the product remains entirely exposed. And the Smart Case looks dumb.

In the earbud realm, the AirPods, AirPods Pro, and Studio Buds include hard-shell power cases for protection and charging. The PowerBeats Pro also includes a hard case, but it doesn’t charge.
On the lower end of the line, the PowerBeats include only a soft carrying pouch, and Beats Flex users get nothing to protect their buds.
Best Options for Color Choice
You can get the AirPods or AirPods Pro in any color you want as long as it’s white. However, you can get nice covers for the AirPods or AirPods Pro case if you want something other than white on your desk or counter. And for a high price, Minnesota-based ColorWare will be happy to sell you AirPods in custom colors or color combos.
The AirPods Max is available in five two-color combinations (such as a model with a red headband and pink ear cups).
Every Beats product comes in various colors ranging from the subdued to the aggressive, with the Studio³ and the PowerBeats Pro providing the most color choices (six and five, respectively). The Studio³ options even include a couple of two-color combinations. Interestingly, colors in the Beats line don’t always repeat from one product to the next—if you want yellow, for instance, the Beats Flex is your only option.

Your Best Buds
As you can see, even within the Apple and Beats product lines, there’s a dizzying array of price points, options, and alternatives. I hope you find this article and its companion chart helpful when you’re next in the market for earbuds or headphones. I certainly did—I put this all together because I was confused by all the Apple and Beats options and wanted to make better sense of them.
Let us know what you decide on and why in the comments!