#1582: iOS 15.0.1 and iPadOS 15.0.1, Apple Watch Series 7 dates, cautionary tale about backups, using Live Text and Safari extensions
iOS 15 and iPadOS 15 shipped with a couple of annoying bugs, like Unlock with Apple Watch failing for some iPhone 13 units and erroneous “Storage Almost Full” messages. Apple has now fixed those in iOS 15.0.1 and iPadOS 15.0.1. Apple also announced when you will be able to get an Apple Watch Series 7. For those who think about backups, Glenn Fleishman shares a cautionary tale about an edge case in which he lost a file despite having three continuous archiving systems in place. Finally, if you have upgraded your iPhone and iPad, Take Control of iOS 15 and iPadOS 15 author Josh Centers has articles on two new features: leveraging Live Text to select and copy text in images and finding, installing, and using Safari extensions. Notable Mac app releases this week include Pages 11.2, Numbers 11.2, and Keynote 11.2; Audio Hijack 3.8.6, Piezo 1.7.5, and SoundSource 5.3.6; and Nisus Writer Pro 3.2.2 and Nisus Writer Express 4.2.2.
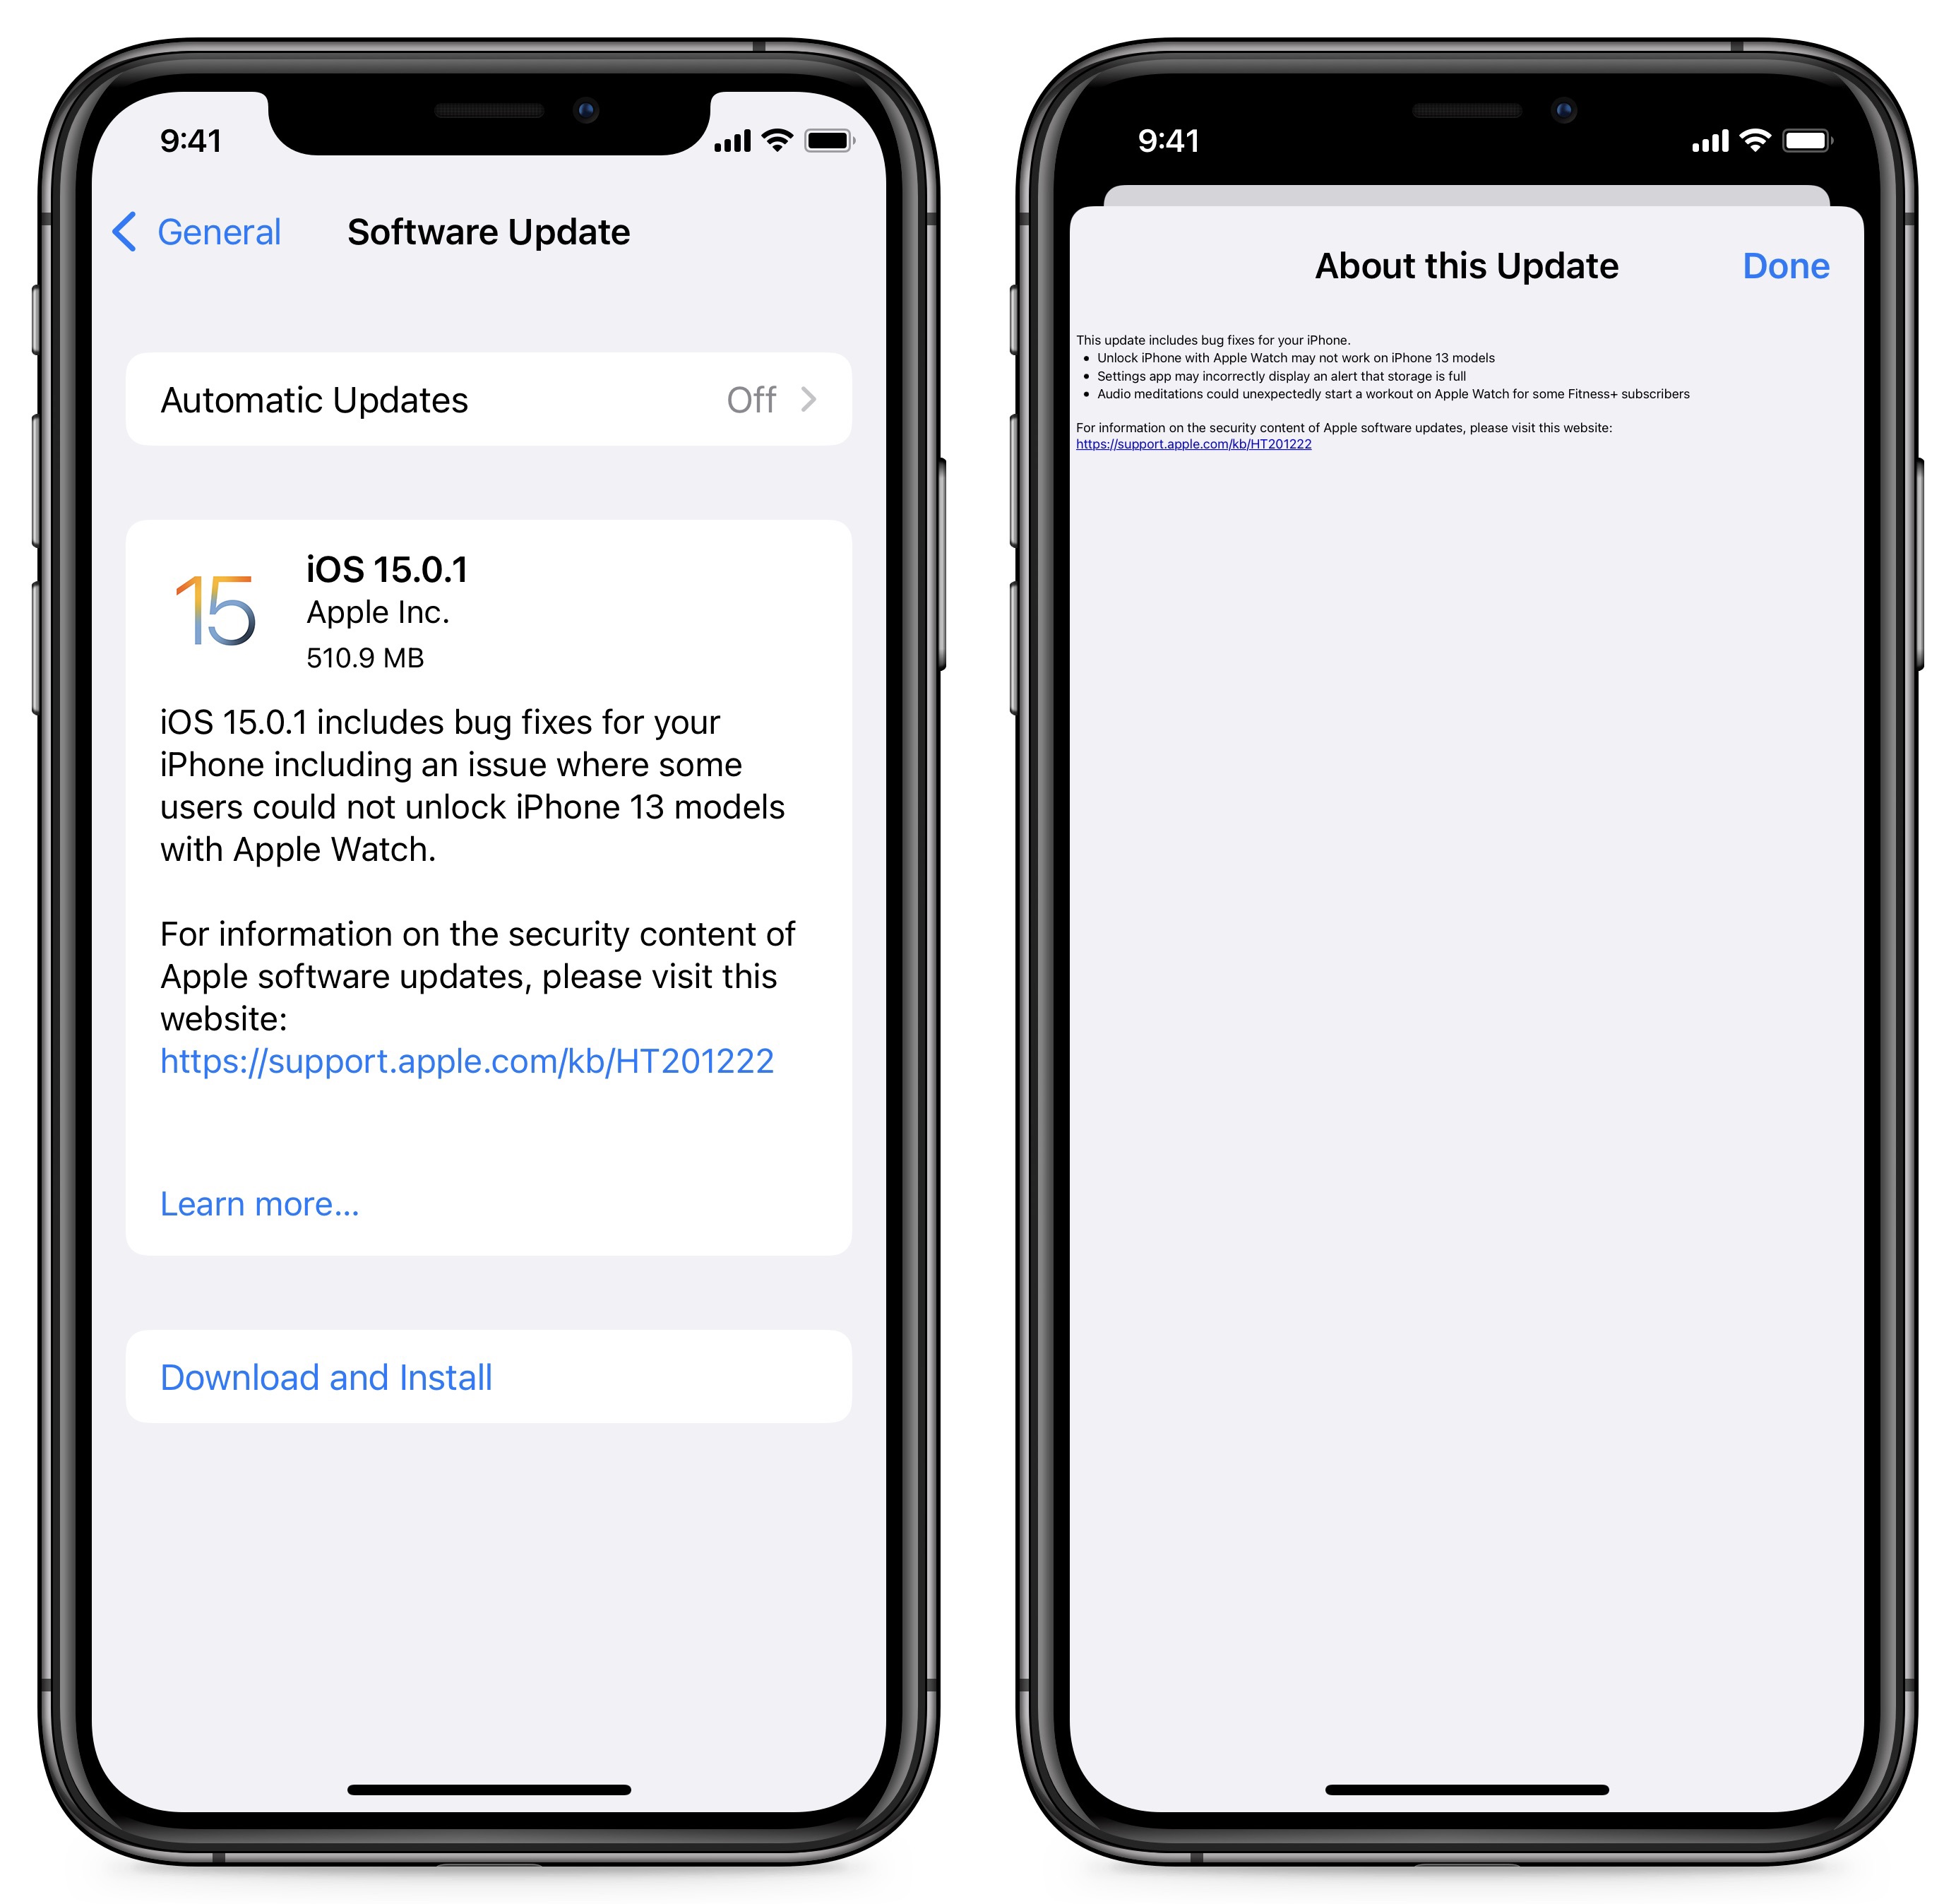
iOS 15.0.1 and iPadOS 15.0.1 Fix Unlock with Apple Watch and “Storage Almost Full” Bugs
Apple has released iOS 15.0.1 and iPadOS 15.0.1 to fix the following bugs:
- Problems with the Unlock with Apple Watch feature (see “Unlock with Apple Watch Broken for Some iPhone 13 Owners, Fix Coming Soon,” 27 September 2021)
- Erroneous “Storage Almost Full” notifications
- Audio meditations unexpectedly starting Apple Watch workouts for some Apple Fitness+ subscribers
We’ve confirmed that the Unlock with Apple Watch feature works once again, but be aware that you will probably need to enable it in Settings > Face ID & Passcode.
The updates have no published security fixes.
If you’re running iOS 15 or iPadOS 15 and have experienced these bugs, you should update right away, which you can do in Settings > General > Software Update. The iOS 15.0.1 update is 510.9 MB on an iPhone 11 Pro and 445.7 MB on an eighth-generation iPad.
Apple Watch Series 7 Release Dates Announced
Apple has announced availability dates for the Apple Watch Series 7. You can place an online order starting on 8 October 2021 at 5 AM PDT, and Apple Watch Series 7 models will be available in stores on 15 October 2021. However, Apple’s announcement says nothing about when orders placed on October 8th will arrive, which could suggest that supply constraints may delay delivery times for all but the very first orders.
The Apple Watch Series 7 starts at $399 for the 41mm aluminum model. Apple has yet to release full pricing information, but we expect the stainless steel model to start at $799 as it did for the Series 6. The new titanium Apple Watch Edition model also lacks pricing details.
Apple is making the aluminum Apple Watch Series 7 in five colors: midnight, starlight, green, blue, and (PRODUCT)RED. The stainless steel model comes in silver, graphite, and gold, while the titanium model comes in titanium and space black titanium. There are also the usual Nike and Hermès variants.

Overall, the Apple Watch Series 7 is a minor upgrade over the Series 6 (see “Apple Watch Series 7 Brings Modest Tweaks,” 14 September 2021). The most significant change is a larger and more space-efficient screen that allows for a full keyboard. The screen is also brighter and more durable.
If you own an Apple Watch Series 5 or 6, it’s probably not worth upgrading to the Series 7, assuming you’re happy with your current watch. Those who rely on a Series 4 that’s getting long in the tooth will likely appreciate the faster processor, larger screen, additional sensors, and improved battery life. However, if you’re still wearing a Series 3 or earlier, the Series 7 will be an enormous improvement to your Apple Watch experience, and it’s well worth upgrading.
How You Can Lose a File Despite Three Layers of Backup (and How To Avoid It)
I have preached the gospel of file backups for decades, from floppies through digital tape systems to today’s local and cloud-based systems for continuous archiving of even the tiniest changes to files. Color me a rainbow for how surprised I was a few days ago when I found I had permanently lost the original form of a file that a colleague had shared with me 45 days earlier. And it was my own fault.
How to Lose Data in 45 Days
Reader, I have not one, not two, but three continuous archiving systems deployed:
- Dropbox: I store nearly all my active documents in Dropbox for up-to-the-second uploads of the slightest change.
- Time Machine: Although I came late to the party after years of dubious feelings about its reliability, I eventually added Time Machine backups to my home network. I was glad I did when Time Machine helped recover from two disasters in the last year.
- Backblaze: A stalwart secure cloud-hosted backup provider, Backblaze has rescued several terabytes of data for me over the years. I count on it to keep a deep archive of both current files and those I’ve changed and deleted.
So how did I manage to lose data despite these three backup systems? My colleague shared the file with me by adding it to a shared Dropbox folder. It synced properly in Dropbox since it was copied to my computer. But then I worked on it right away, causing both Backblaze and Time Machine to back up only the version I had edited heavily, not the original.
I have Backblaze set to archive continuously, but it does take some amount of time to recognize new or changed files. As its support document notes:
We designed Backblaze to be lightweight, so it might take 2 hours to reflect new numbers and find your new files. The reason it takes 2 hours is that Backblaze runs VERY SLOWLY on purpose to try to keep the load off your CPU and disk. The result is that it can take up to 2 hours to detect any new files, or new hard drives, or if a file has changed, or a configuration has changed.
Apple schedules Time Machine to run every hour, and Time Machine also tries to keep your Mac from being overloaded. Either I’d modified the file before Time Machine copied it to a drive, or it may have backed up the original but deleted it later to recover space on the backup drive.
You see, a salient fact here is that when I needed the original version of the file, 45 days had elapsed from when my colleague first uploaded the original version. I pay Backblaze for its Extended Version History option on my office Mac, which gives me a year of depth, but given the original version wasn’t captured, that didn’t help.
Time Machine makes hourly snapshots but then prunes them as time passes. As Apple explains it:
After you connect the storage device and select it as your backup disk, Time Machine automatically makes hourly backups for the past 24 hours, daily backups for the past month, and weekly backups for all previous months.
That explanation is a little backward: Time Machine drops hourly snapshots over time on a rolling basis. It retains no more than the 24 most recent hourly backups, one per day for the previous month, and then one per week before that unless it has to start deleting the oldest versions for space reasons. There’s no easy way to know what versions it might have pruned. Regardless, the file I wanted wasn’t available in Time Machine’s backup.
But let’s circle back to Dropbox. The file was still in Dropbox; couldn’t I just pull up an older version? Dropbox maintains older versions of files, but only for 30 days. However, I was paying for Dropbox’s Extended Version History Add-On!
Or at least I thought I was. For many years, I had paid for that option—known as Packrat before the marketing folks got to it. But during the pandemic, I opted to upgrade from Dropbox Plus to Dropbox Family when my spouse needed more space than the free tier Dropbox provides plus some extra storage she’d earned through referrals years ago. The Plus and Family plans both offer 2 TB of storage, and I was consuming only a fraction of my Plus plan’s storage. Plus costs $11.99 per month ($119.98 annually), and Family is $19.99 per month ($239.88). Up to six users can join a Family plan, making the upgrade a good deal for us.
What I hadn’t noticed or brushed off when I upgraded is that the Family plan has no option for Extended Version History. Drat.
A Safer Approach
What should I have done? The same technique we’ve employed for decades at TidBITS and Take Control: use folders and file-naming conventions to create a clear version path that doesn’t depend on local or cloud-based archiving systems.
Instead of opening a file and modifying it directly, first make a copy with an incremented number in its name, and work on that version. Put the previous version in a folder labeled “Old” (nested in a folder with a name that’s more descriptive), and you’re golden. I rely on this technique to manage nearly all my other files. In collaborative situations, we also employ a “Checked Out” folder and add our initials after the incremented version number to clarify who has modified the file.
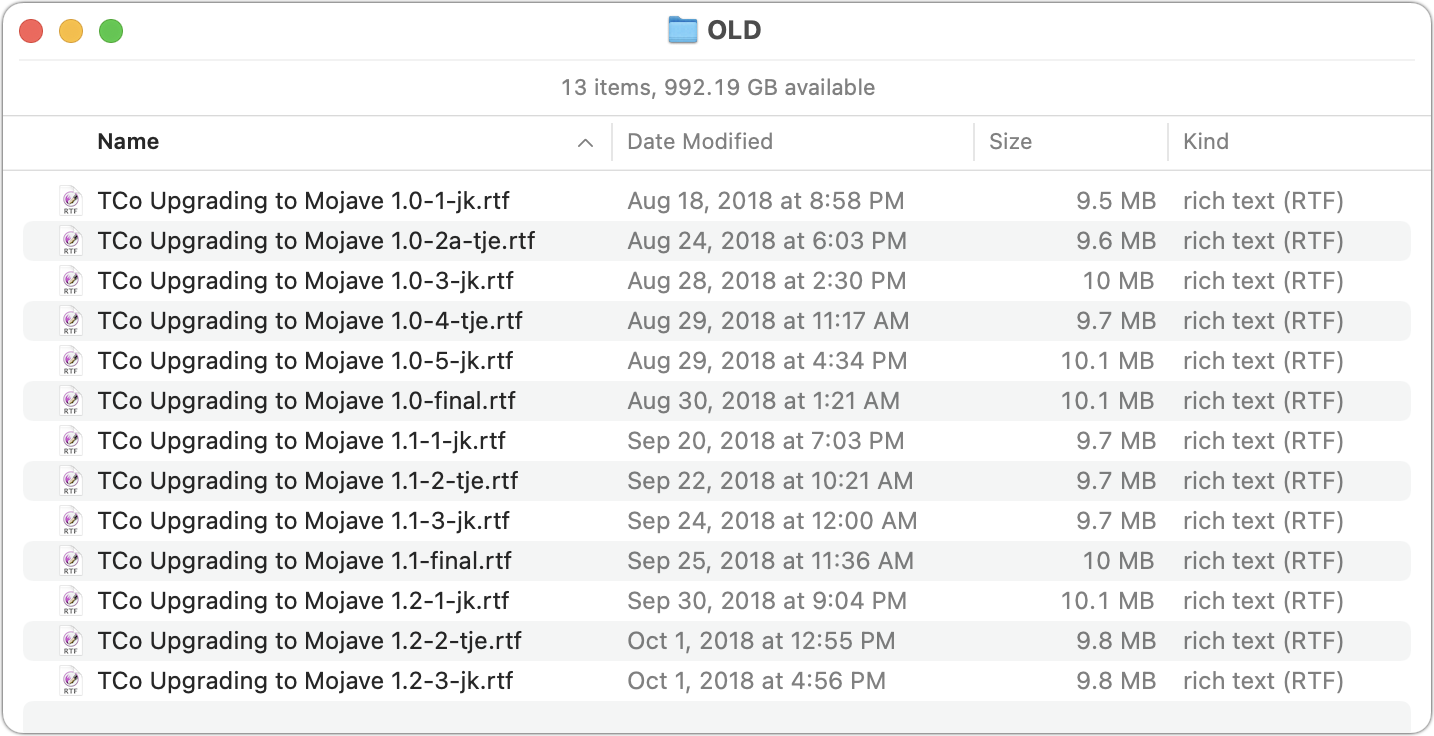
(One extra tip: despite my long history with the Mac, I had missed the fact that the Finder sorts alphabetically and numerically when punctuation is involved, meaning you don’t need to add leading zeroes. In other words, I learned only recently that a file whose name contains 1.1-9-gf will sort correctly after a similarly named file that contains 1.1-8-gf and before one that contains 1.1-10-gf. Neat, eh? TidBITS wrote about this problem—and the solution that eventually made its way into the Finder—25 years ago in “The Natural Order of Things,” 3 February 1997.)
This system gives you an extra set of supports on top of the belt, suspenders, and duct tape you already have holding up your trousers. If something goes terribly wrong, you typically have a deep well of backups and likely versions of current files. It’s hard to lose work entirely this way and nearly impossible to lose much work.
One slip-up in a life of blameless file management, and that’s where I found myself.
Fortunately, my colleague managed versioning better and was able to send me the unmodified original a few hours after I had come up empty while poring through my archiving systems. And I’ve learned a lesson: archive-based file versioning may be fine, but there’s no shame in relying on old-fashioned manual versioning to back up your backup.
Digitize Any Text with Live Text in iOS 15 and iPadOS 15
One of the coolest features in iOS 15 and iPadOS 15 is Live Text. Once you’re running these operating systems, the Camera, Photos, Notes, and Safari apps—and undoubtedly more soon—can recognize text in photos and let you select it just as you would any other text. You can then copy it and paste it into any other app. The system-wide search finds text in photos, too. (And if you can’t upgrade or haven’t yet upgraded to iOS 15 or iPadOS 15, or want similar capabilities on the Mac before macOS 12 Monterey ships, see “Work with Text in Images with TextSniper and Photos Search,” 23 August 2021. Even after Live Text is available everywhere, I suspect the developers of these and similar utilities will look for ways of going beyond what Apple provides.)
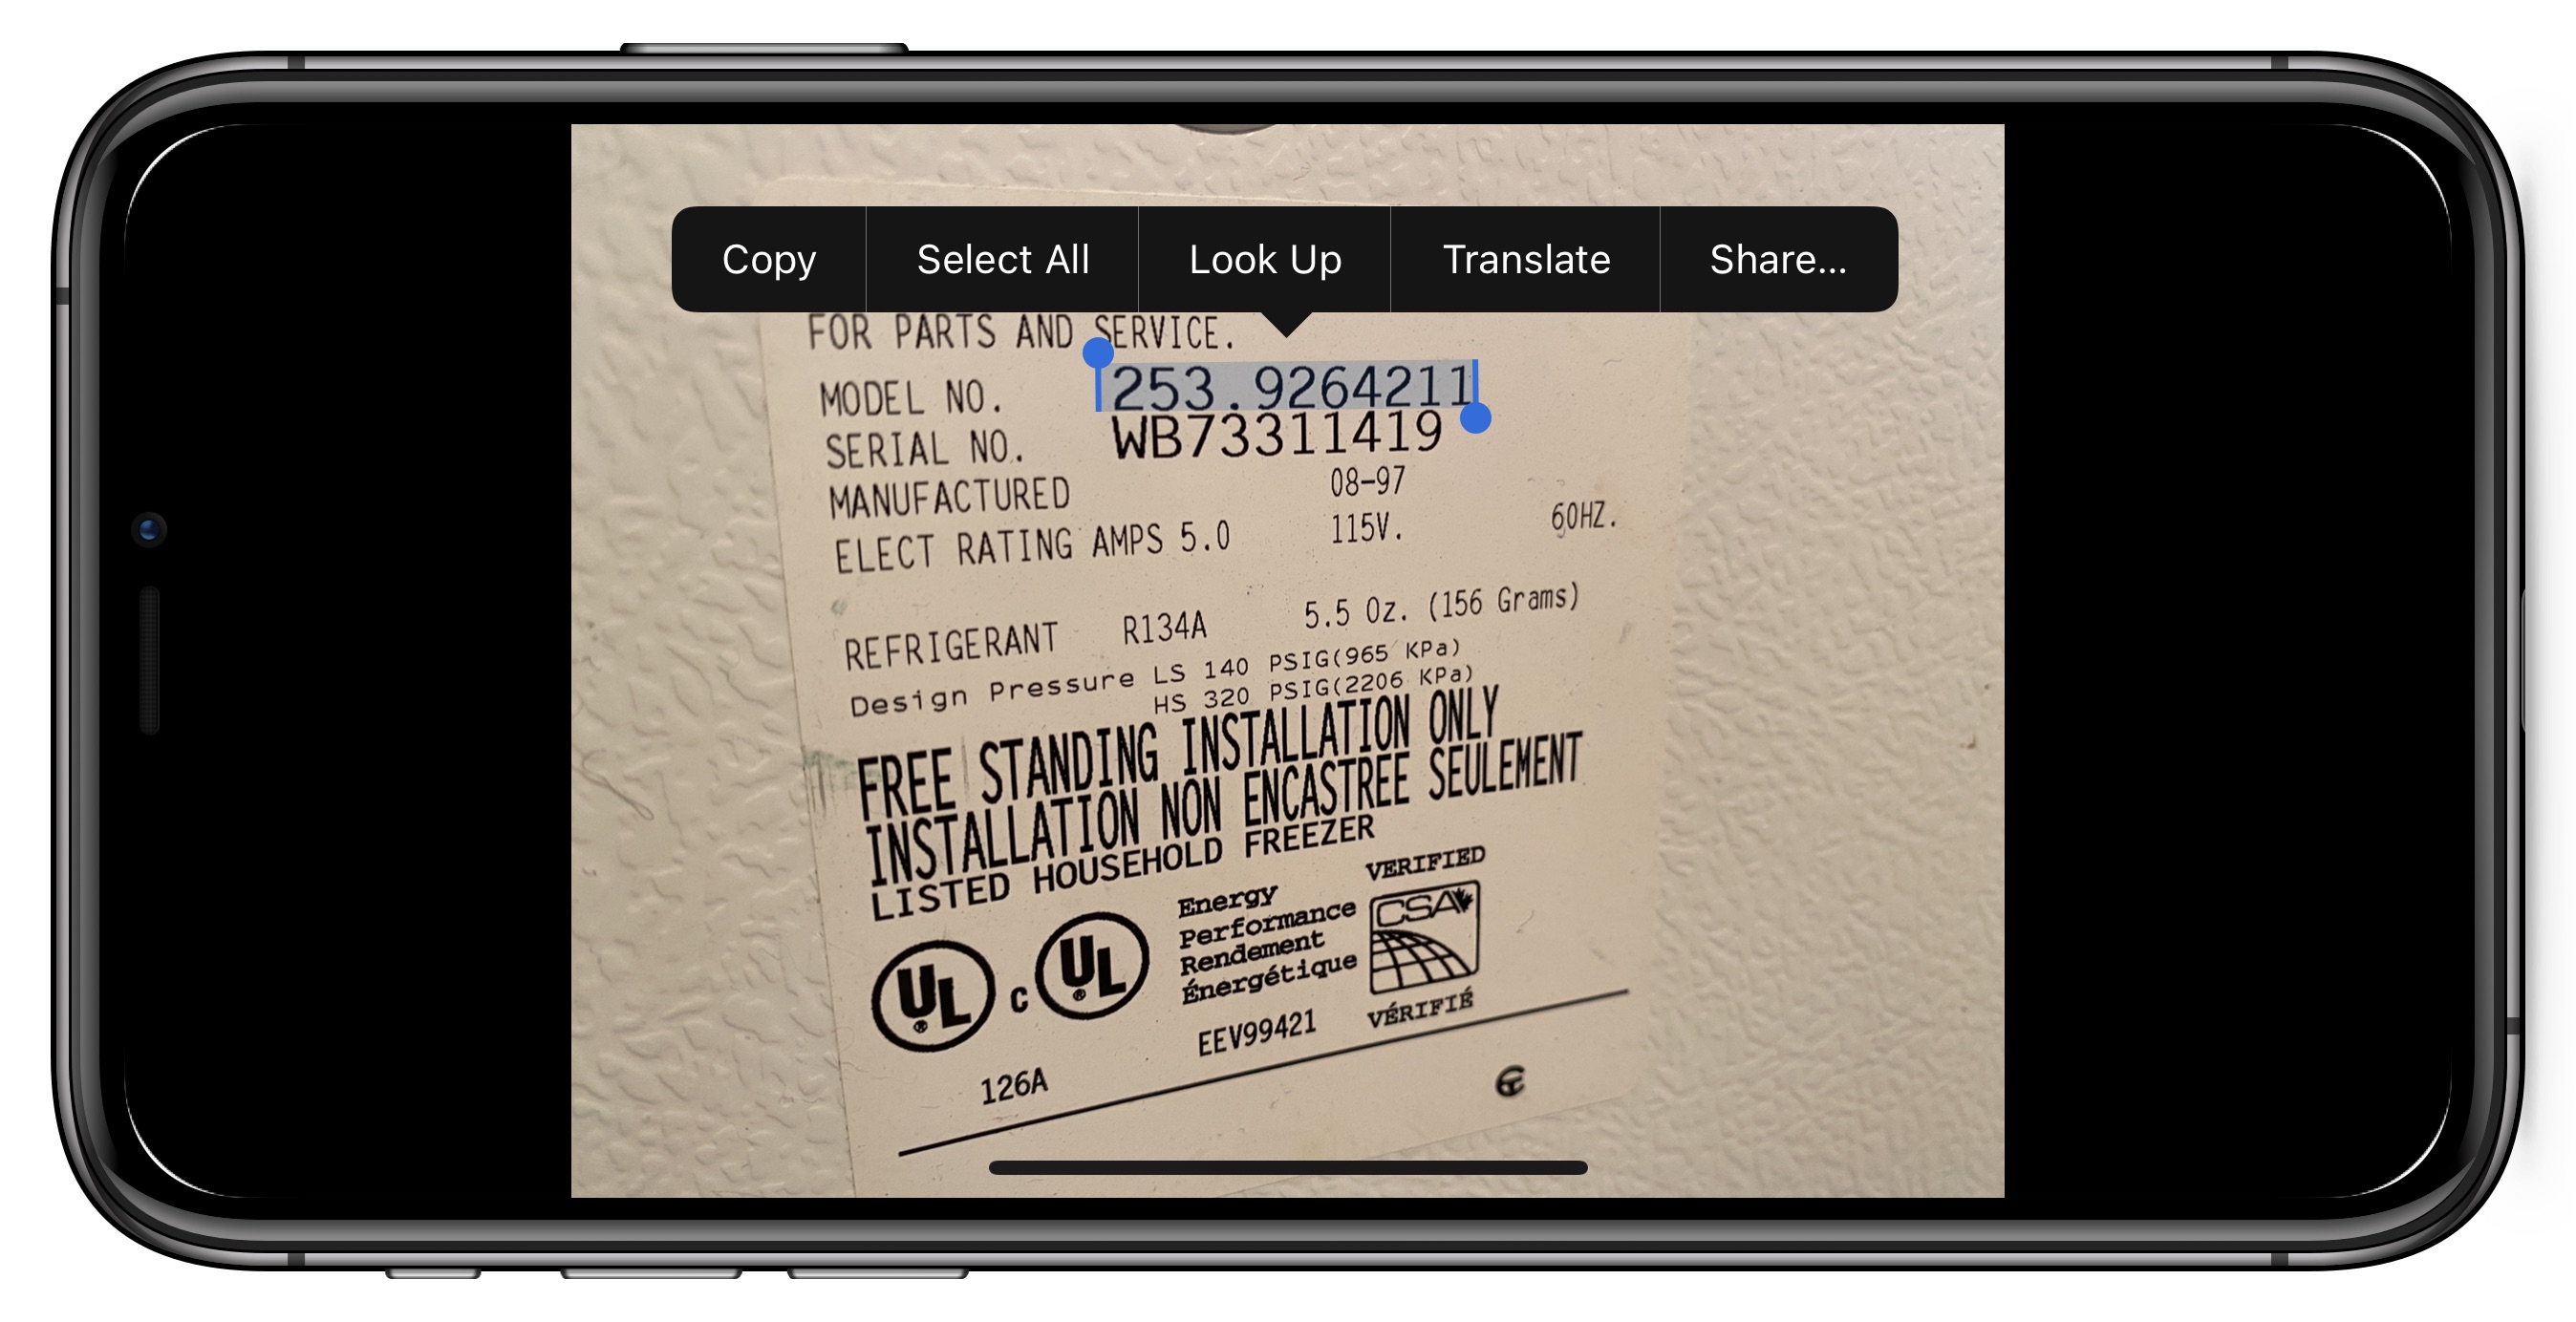
Live Text is immediately useful. Whenever I need a spare part for some appliance, I take a picture of the sticker inside it to figure out its model number. I can now directly copy the model number and paste it into a search engine without manually transcribing it. Took a photo of a business card but can’t find it? You can search for it. Read a passage in a book that you’d like to research? Take a picture and then paste the text into Notes to refer to later.
Our own Michael Cohen figured out a clever use for this feature. If you’re reading something in Libby or another app that doesn’t let you copy text, you can take a screenshot and then copy the text from a screenshot.
To use Live Text, you need an iPhone or iPad with an A12 Bionic processor or better. That means you need:
- iPhone XR, XS, XS Max, and later, including the iPhone SE (2nd generation)
- iPad Pro 12.9-inch (3rd generation) and later
- iPad Pro 11-inch
- iPad Air (3rd generation) and later
- iPad (8th generation)
- iPad mini (5th generation)
See “The Real System Requirements for Apple’s 2021 Operating Systems” (11 June 2021) for more specifics on iOS 15 and iPadOS 15’s requirements.
Most Live Text use happens in the Photos and Camera apps, Safari, and within the system-wide search. You can also use Live Text with the device’s camera to import real-world text directly into any app that accepts text input. Here’s how to use each. See my book, Take Control of iOS 15 and iPadOS 15, for more tips on new features in those operating systems.
Live Text in Photos
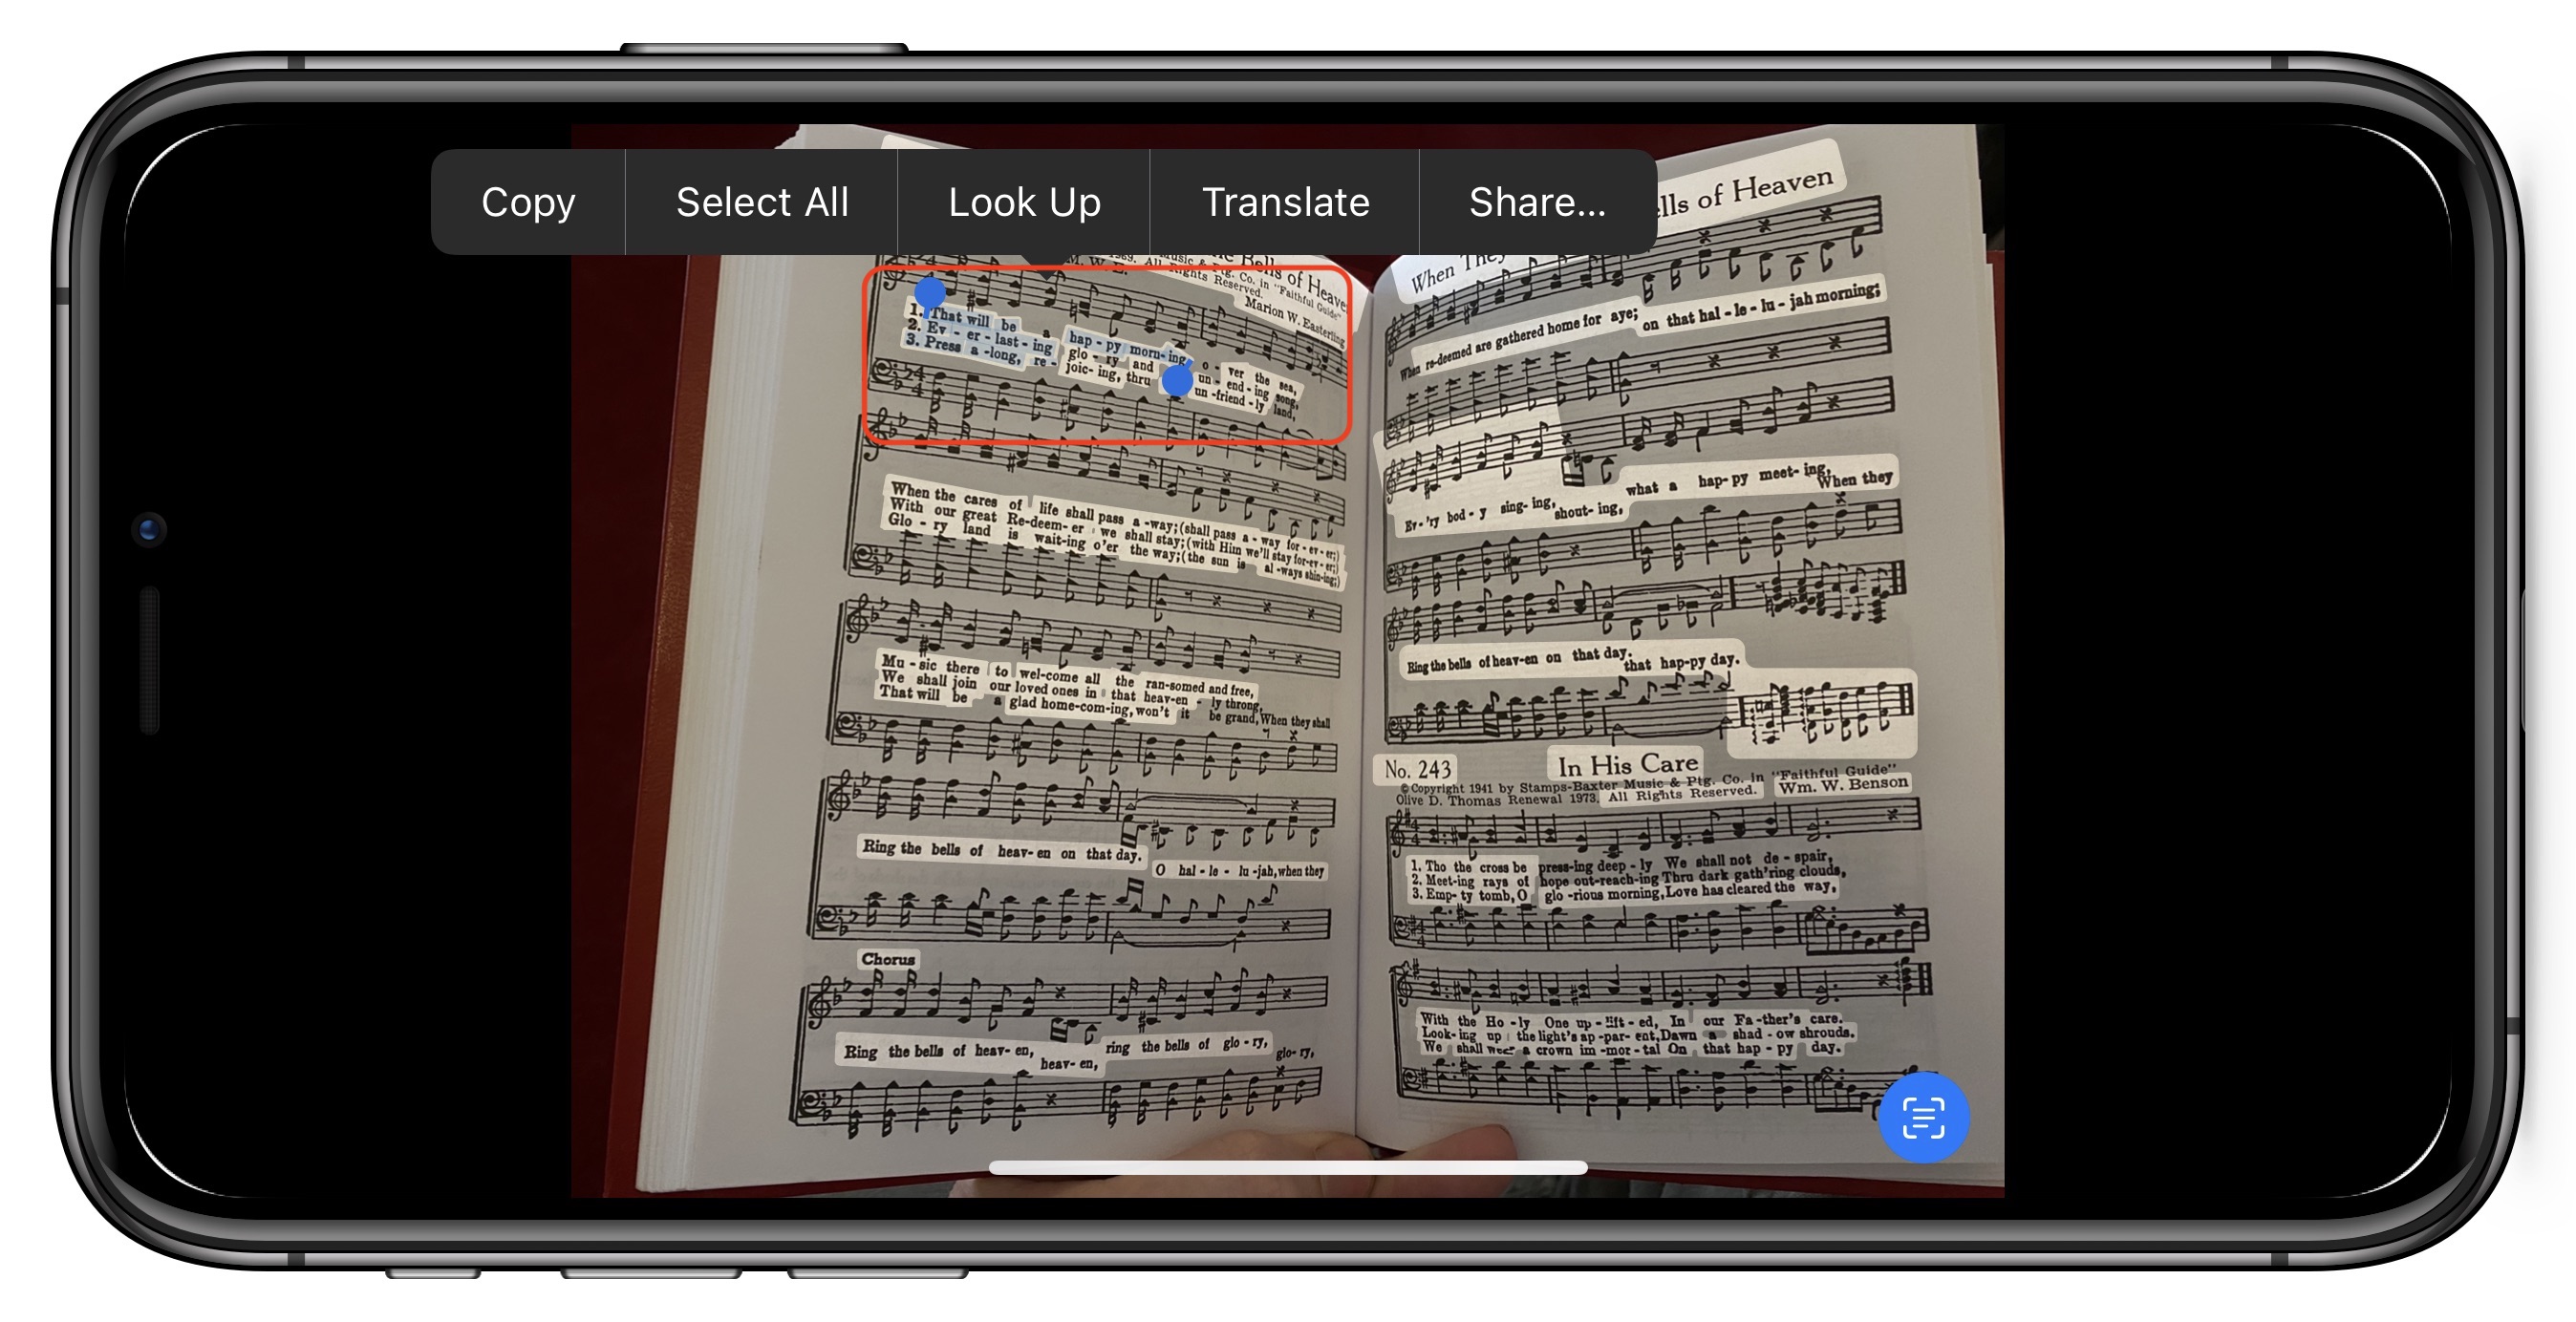
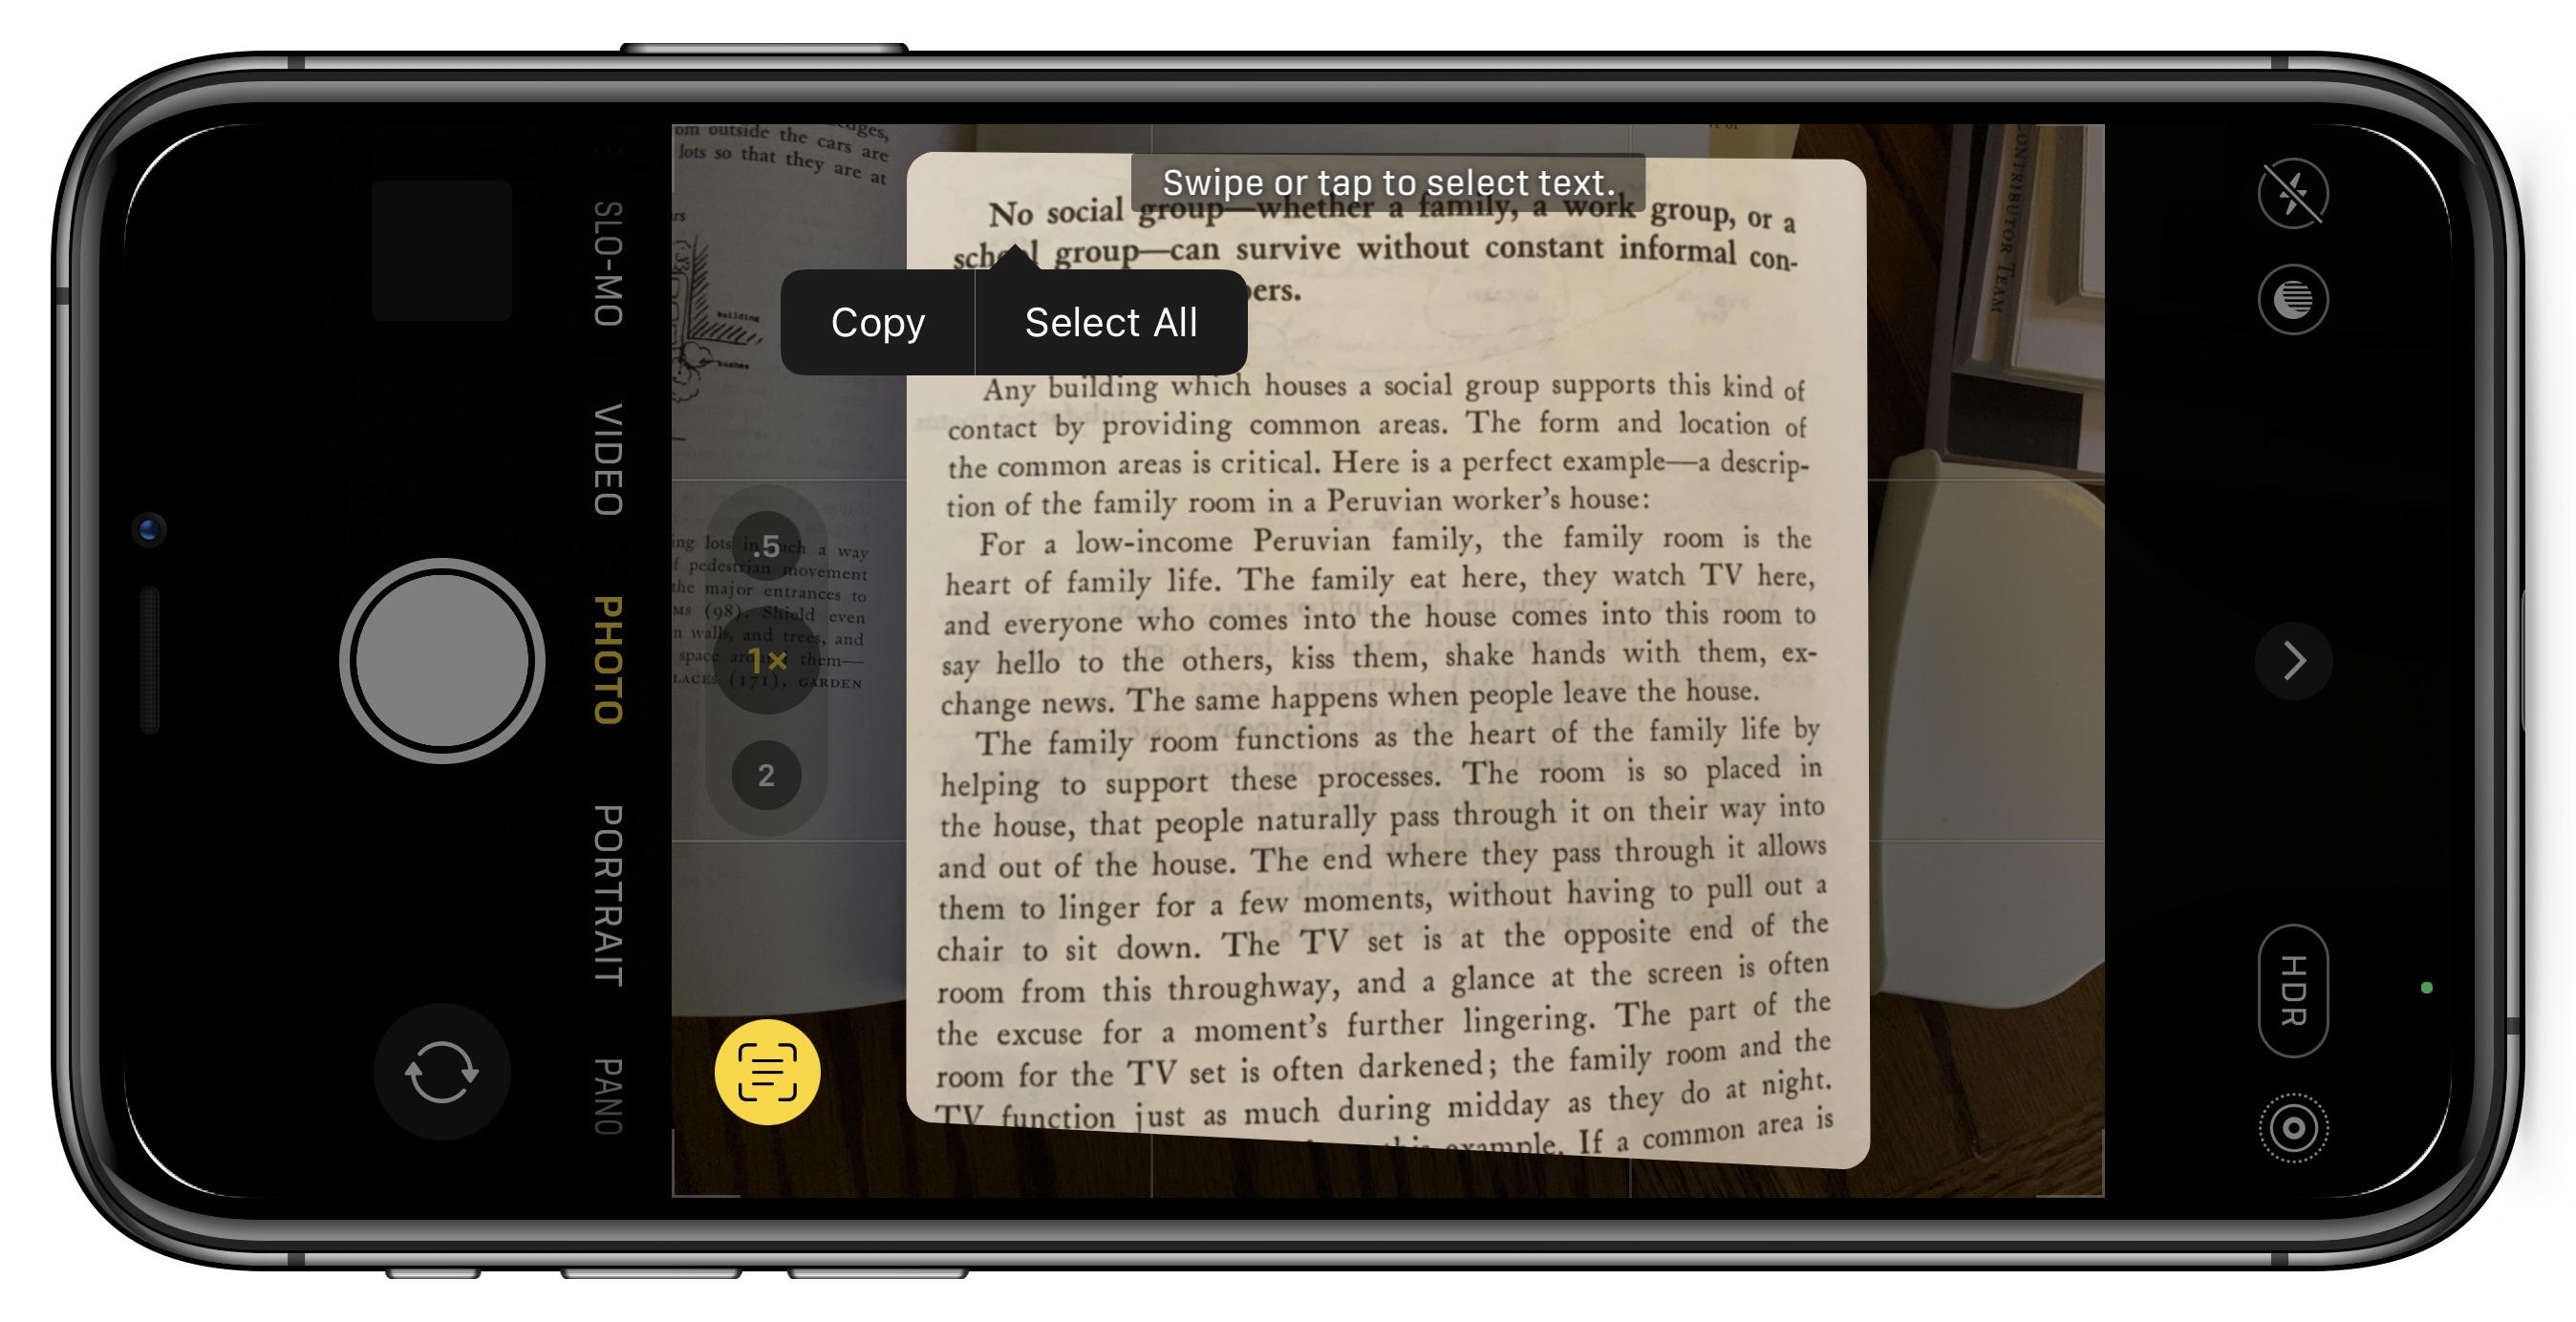
You select text in a photo like any other text: touch and hold the text until it highlights in blue. Then you can move the blue drag handles to adjust the selection. After you select text, the familiar popover appears with options to copy text, select all text, or look up a term.
If you’re having trouble, tap the Detect Text button in the lower-right corner of the photo, which darkens the image apart from the detected text, which is highlighted.

Detect Text usually works pretty well, but if the text is angled, odd things can happen, like being forced to select text you’re trying to exclude or preventing you from adjusting the text selection.
You may wonder how Live Text interacts with Live Photos that contain text since you touch and hold to animate a Live Photo, and you also touch and hold to select text. The trick is to touch and hold somewhere away from text to animate the Live Photo.
Live Text in Camera
If you don’t want to clutter up your camera roll, you can copy text directly in the Camera app. Aim your viewfinder over the text. A yellow outline appears around any text the Camera app detects.

Tap the Detect Text button to zoom in on the text, which is frozen so you can easily copy it.
I find this more awkward than snapping a photo and copying text later, so I don’t use it often.
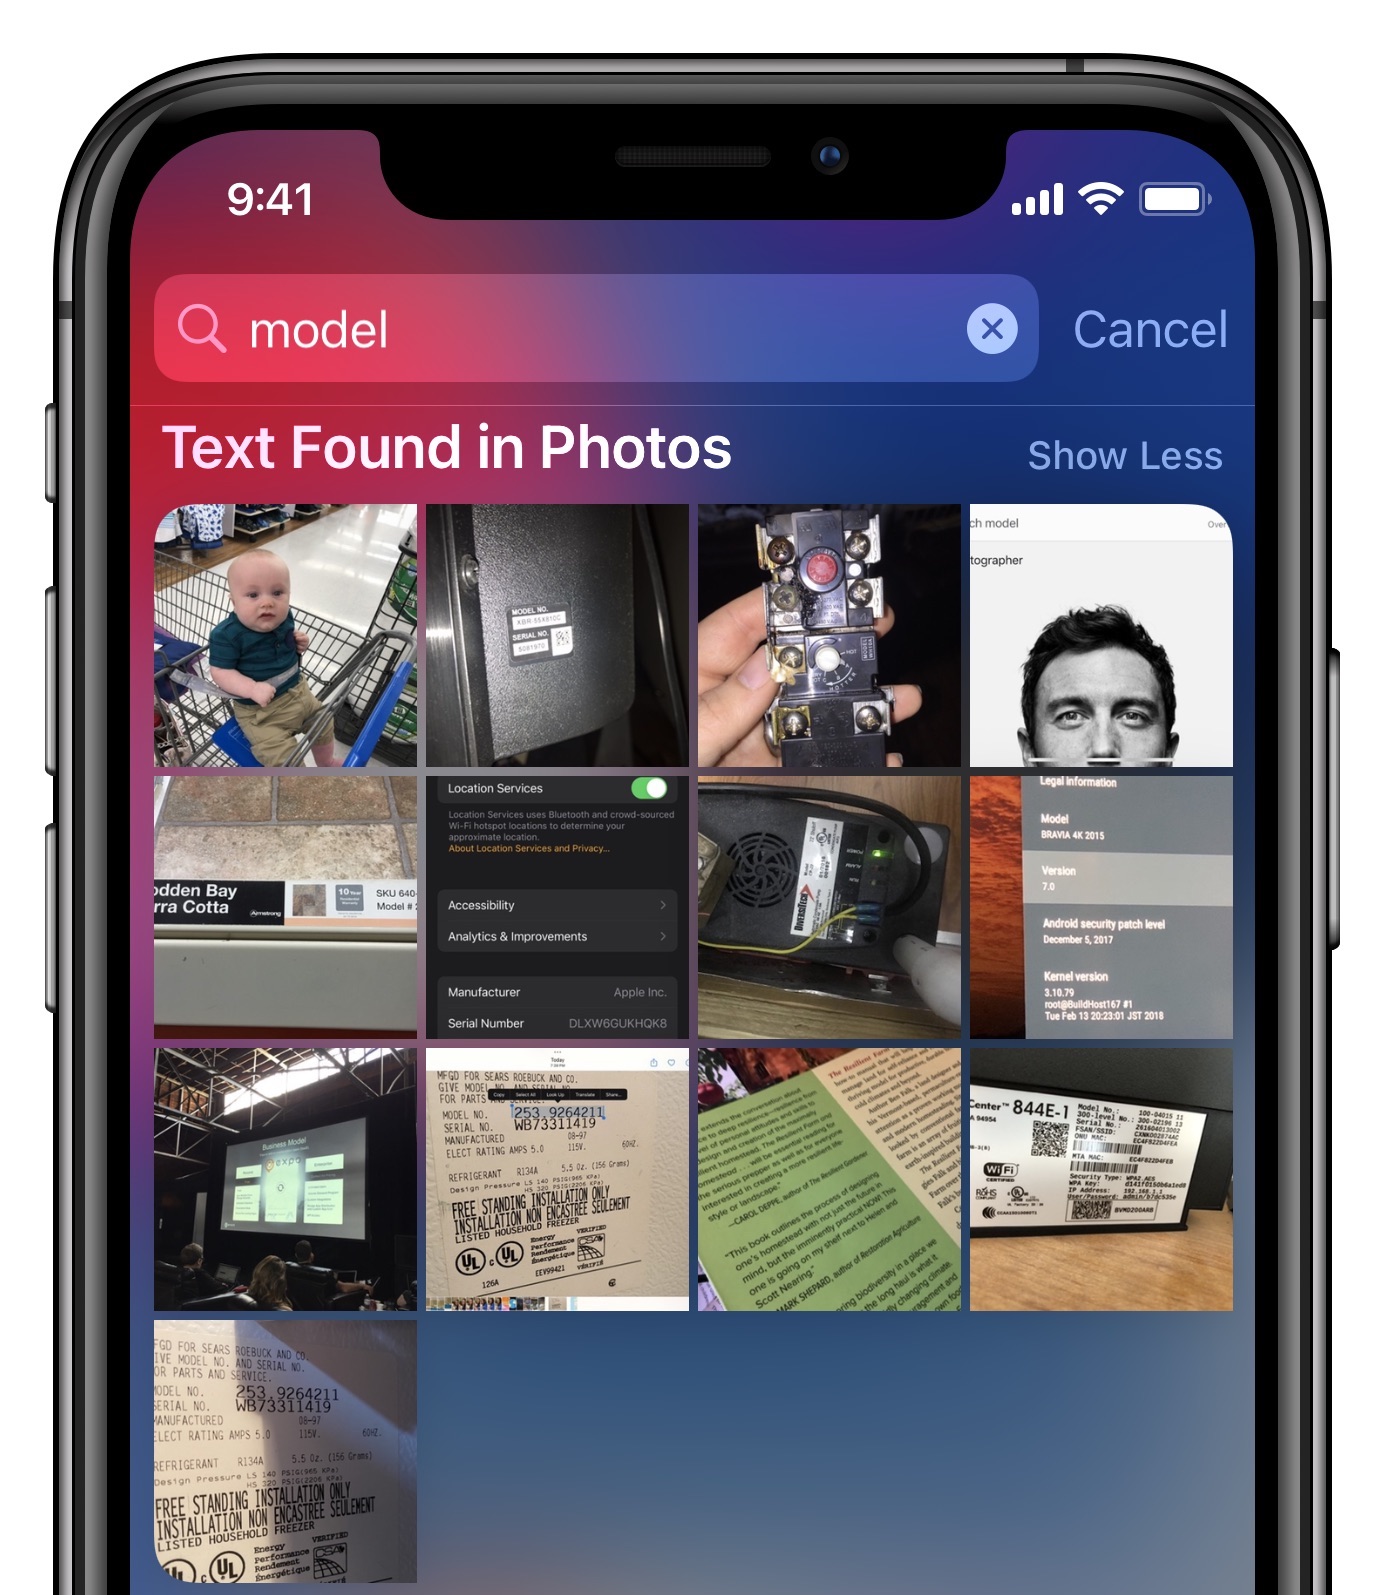
Search for Live Text
iOS 15 and iPadOS 15 index all of the text they recognize in photos so you can search for it. Bizarrely, you can’t search for Live Text in the Photos app. Instead, you have to swipe down from the middle of the Home screen to activate the system-wide search (Apple doesn’t call it Spotlight in iOS and iPadOS anymore). Scroll down to the Text Found in Photos heading.
Live Text in Safari (And Other Web Browsers)
Just as in Photos, you can touch and hold an image in Safari to select text. As you might expect, given Apple’s requirement that all Web browsers rely on WebKit in iOS and iPadOS, it also works in Brave and Firefox and likely in other browsers, too.

Also, as in Photos, if you need to touch and hold an image to invoke another action (like seeing a preview of the page the image links to), touch and hold away from any text.
Import Live Text Directly into Apps
It may take some time before we become accustomed to this capability, but you can use Live Text with the device’s camera to import real-world text directly into any app that accepts text input. Tap in a text field to reveal the popover and tap the Scan Text icon.
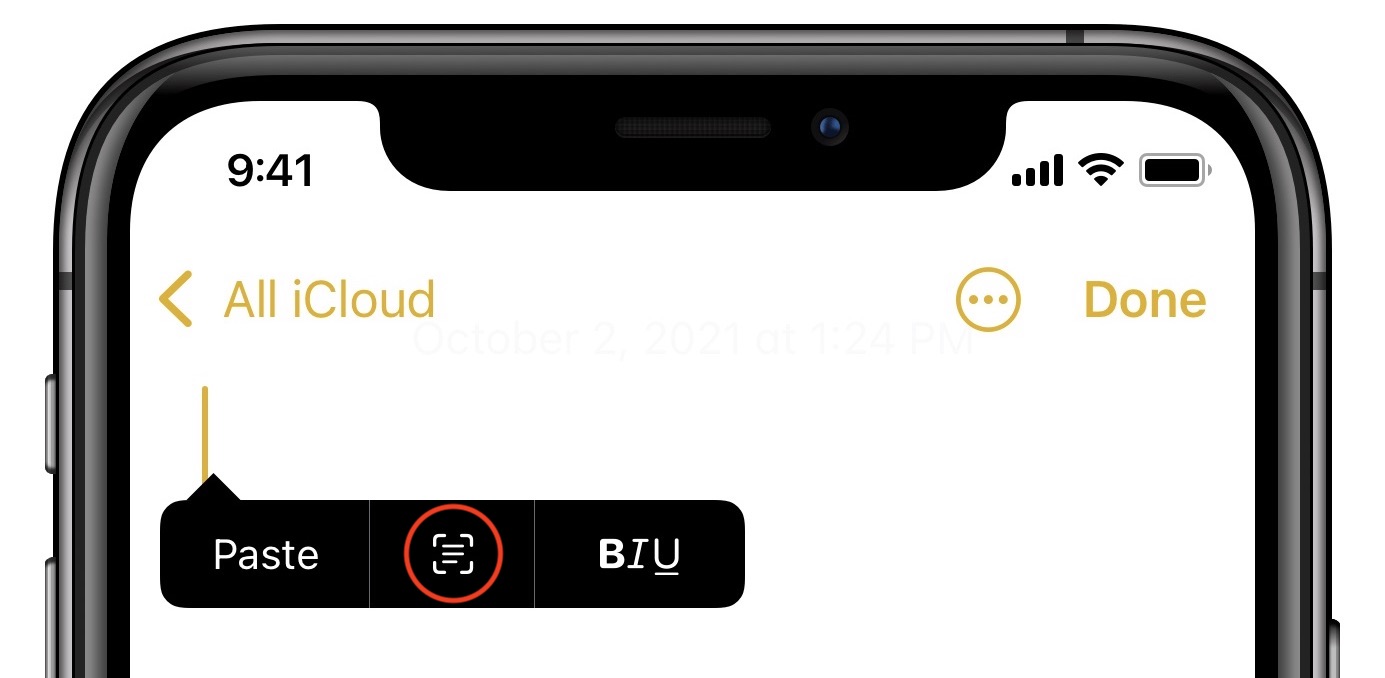
A viewfinder appears on the bottom half of the screen, with a yellow outline around the text. Detected text floods into the text field, but only as a preview. If it’s what you want, tap the “insert” button. (We have no idea why its name is lowercase.)

As you can see, text input via Live Text works pretty darn well, even if using it may take some getting used to.
VoiceOver for Live Text
Live Text is also a great feature for accessibility because it enables VoiceOver to read the text in images. Go to Settings > Accessibility > VoiceOver > VoiceOver Recognition and turn on Text Recognition to enable it.
When viewing a photo with text while VoiceOver is enabled, tap the text in the photo to have VoiceOver read it to you.
Translating Live Text
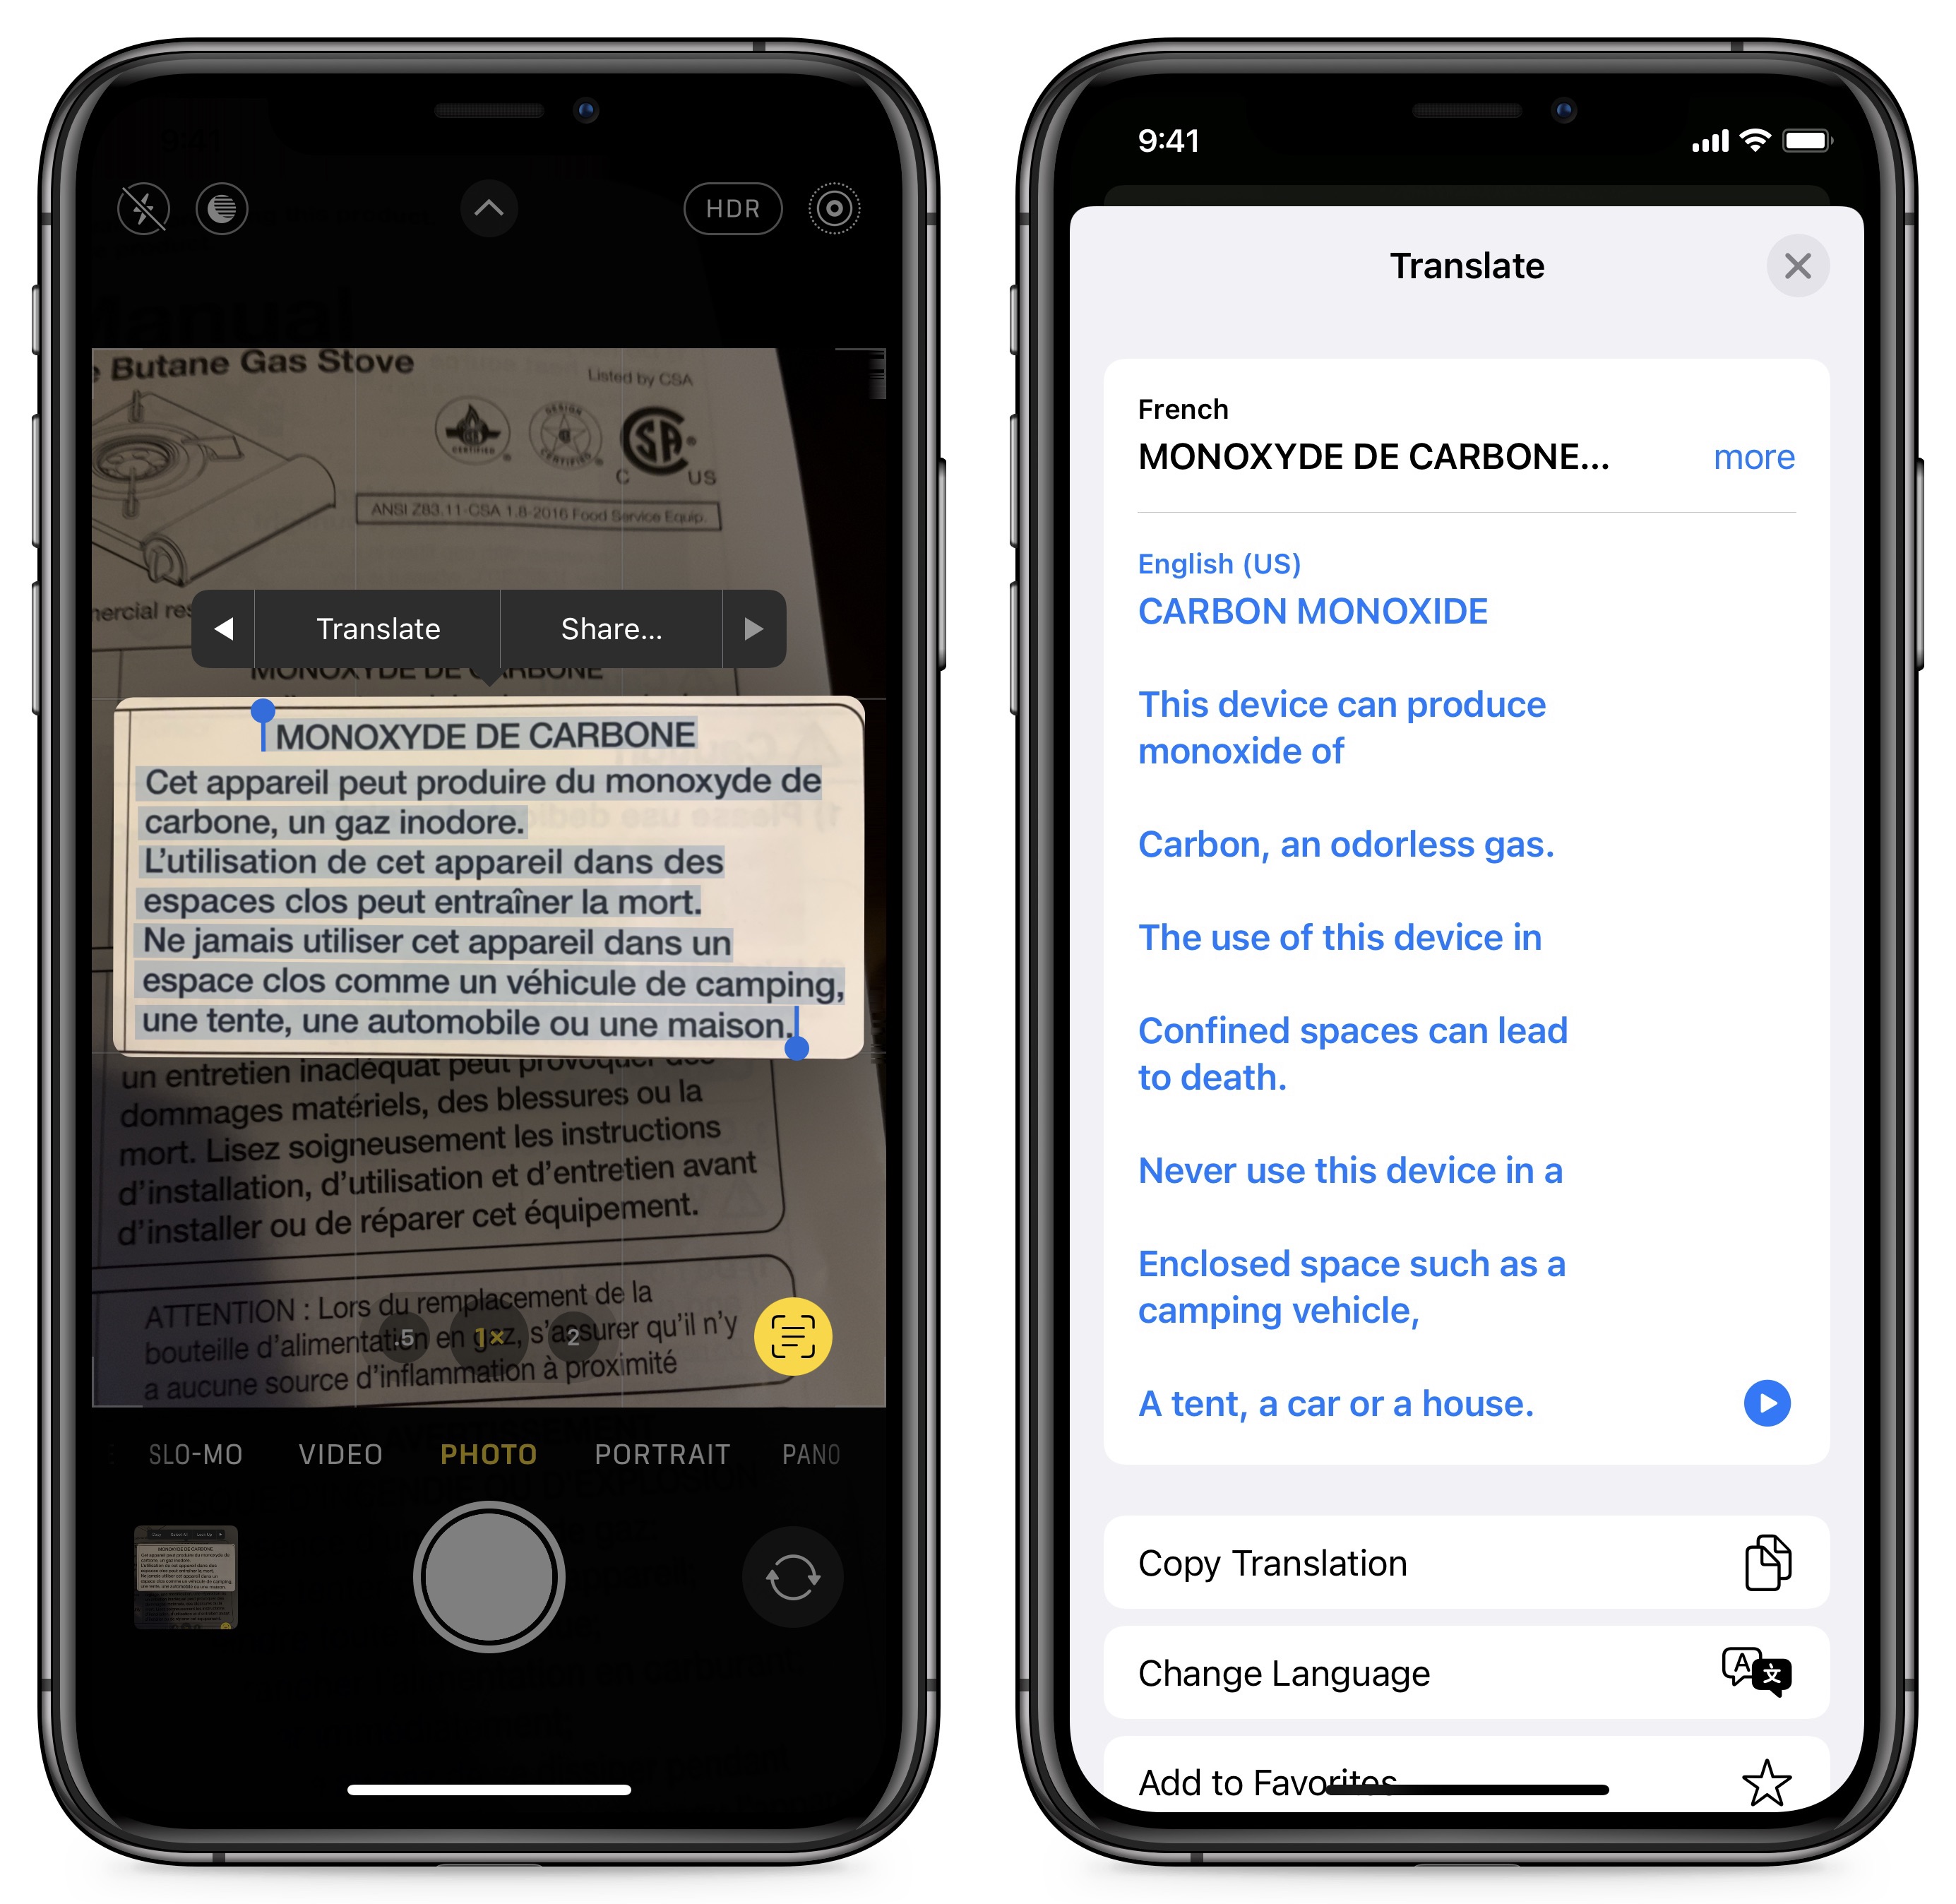
One last tip. The Translate app is now a system service, so you can translate any text you select, including text in photos or picked up by the camera. It’s one of the options in the popover that appears when you select text.
What are your favorite uses for Live Text so far? Let us know in the comments!
Using Extensions in Safari in iOS 15 and iPadOS 15
With iOS 15 and iPadOS 15, the iPhone and iPad are one step closer to matching the capabilities of full-fledged computers. Safari now supports third-party extensions on those platforms, just as it does on the Mac. Safari in iOS and iPadOS has supported content blockers for a few years, but now developers can create other extensions with more capabilities.
As with Safari extensions on the Mac, Safari extensions for iOS and iPadOS come bundled with apps obtained in the App Store. Many of your installed apps may have been updated to include a Safari extension. For example, password manager 1Password now includes a Safari extension that replicates the desktop browser extension, and Reddit app Apollo provides an extension that automatically redirects Reddit Web links to the Apollo app.
But there are now also new apps that extend Safari’s capabilities. Here’s how you can find them, along with recommendations for a few particularly useful ones. For more tips, see my book, Take Control of iOS 15 and iPadOS 15.
Finding Extensions
The App Store has a category for Safari extensions, but it’s sort of buried:
- Tap the Apps tab.
- Scroll all the way down to Top Categories.
- Tap Safari Extensions.
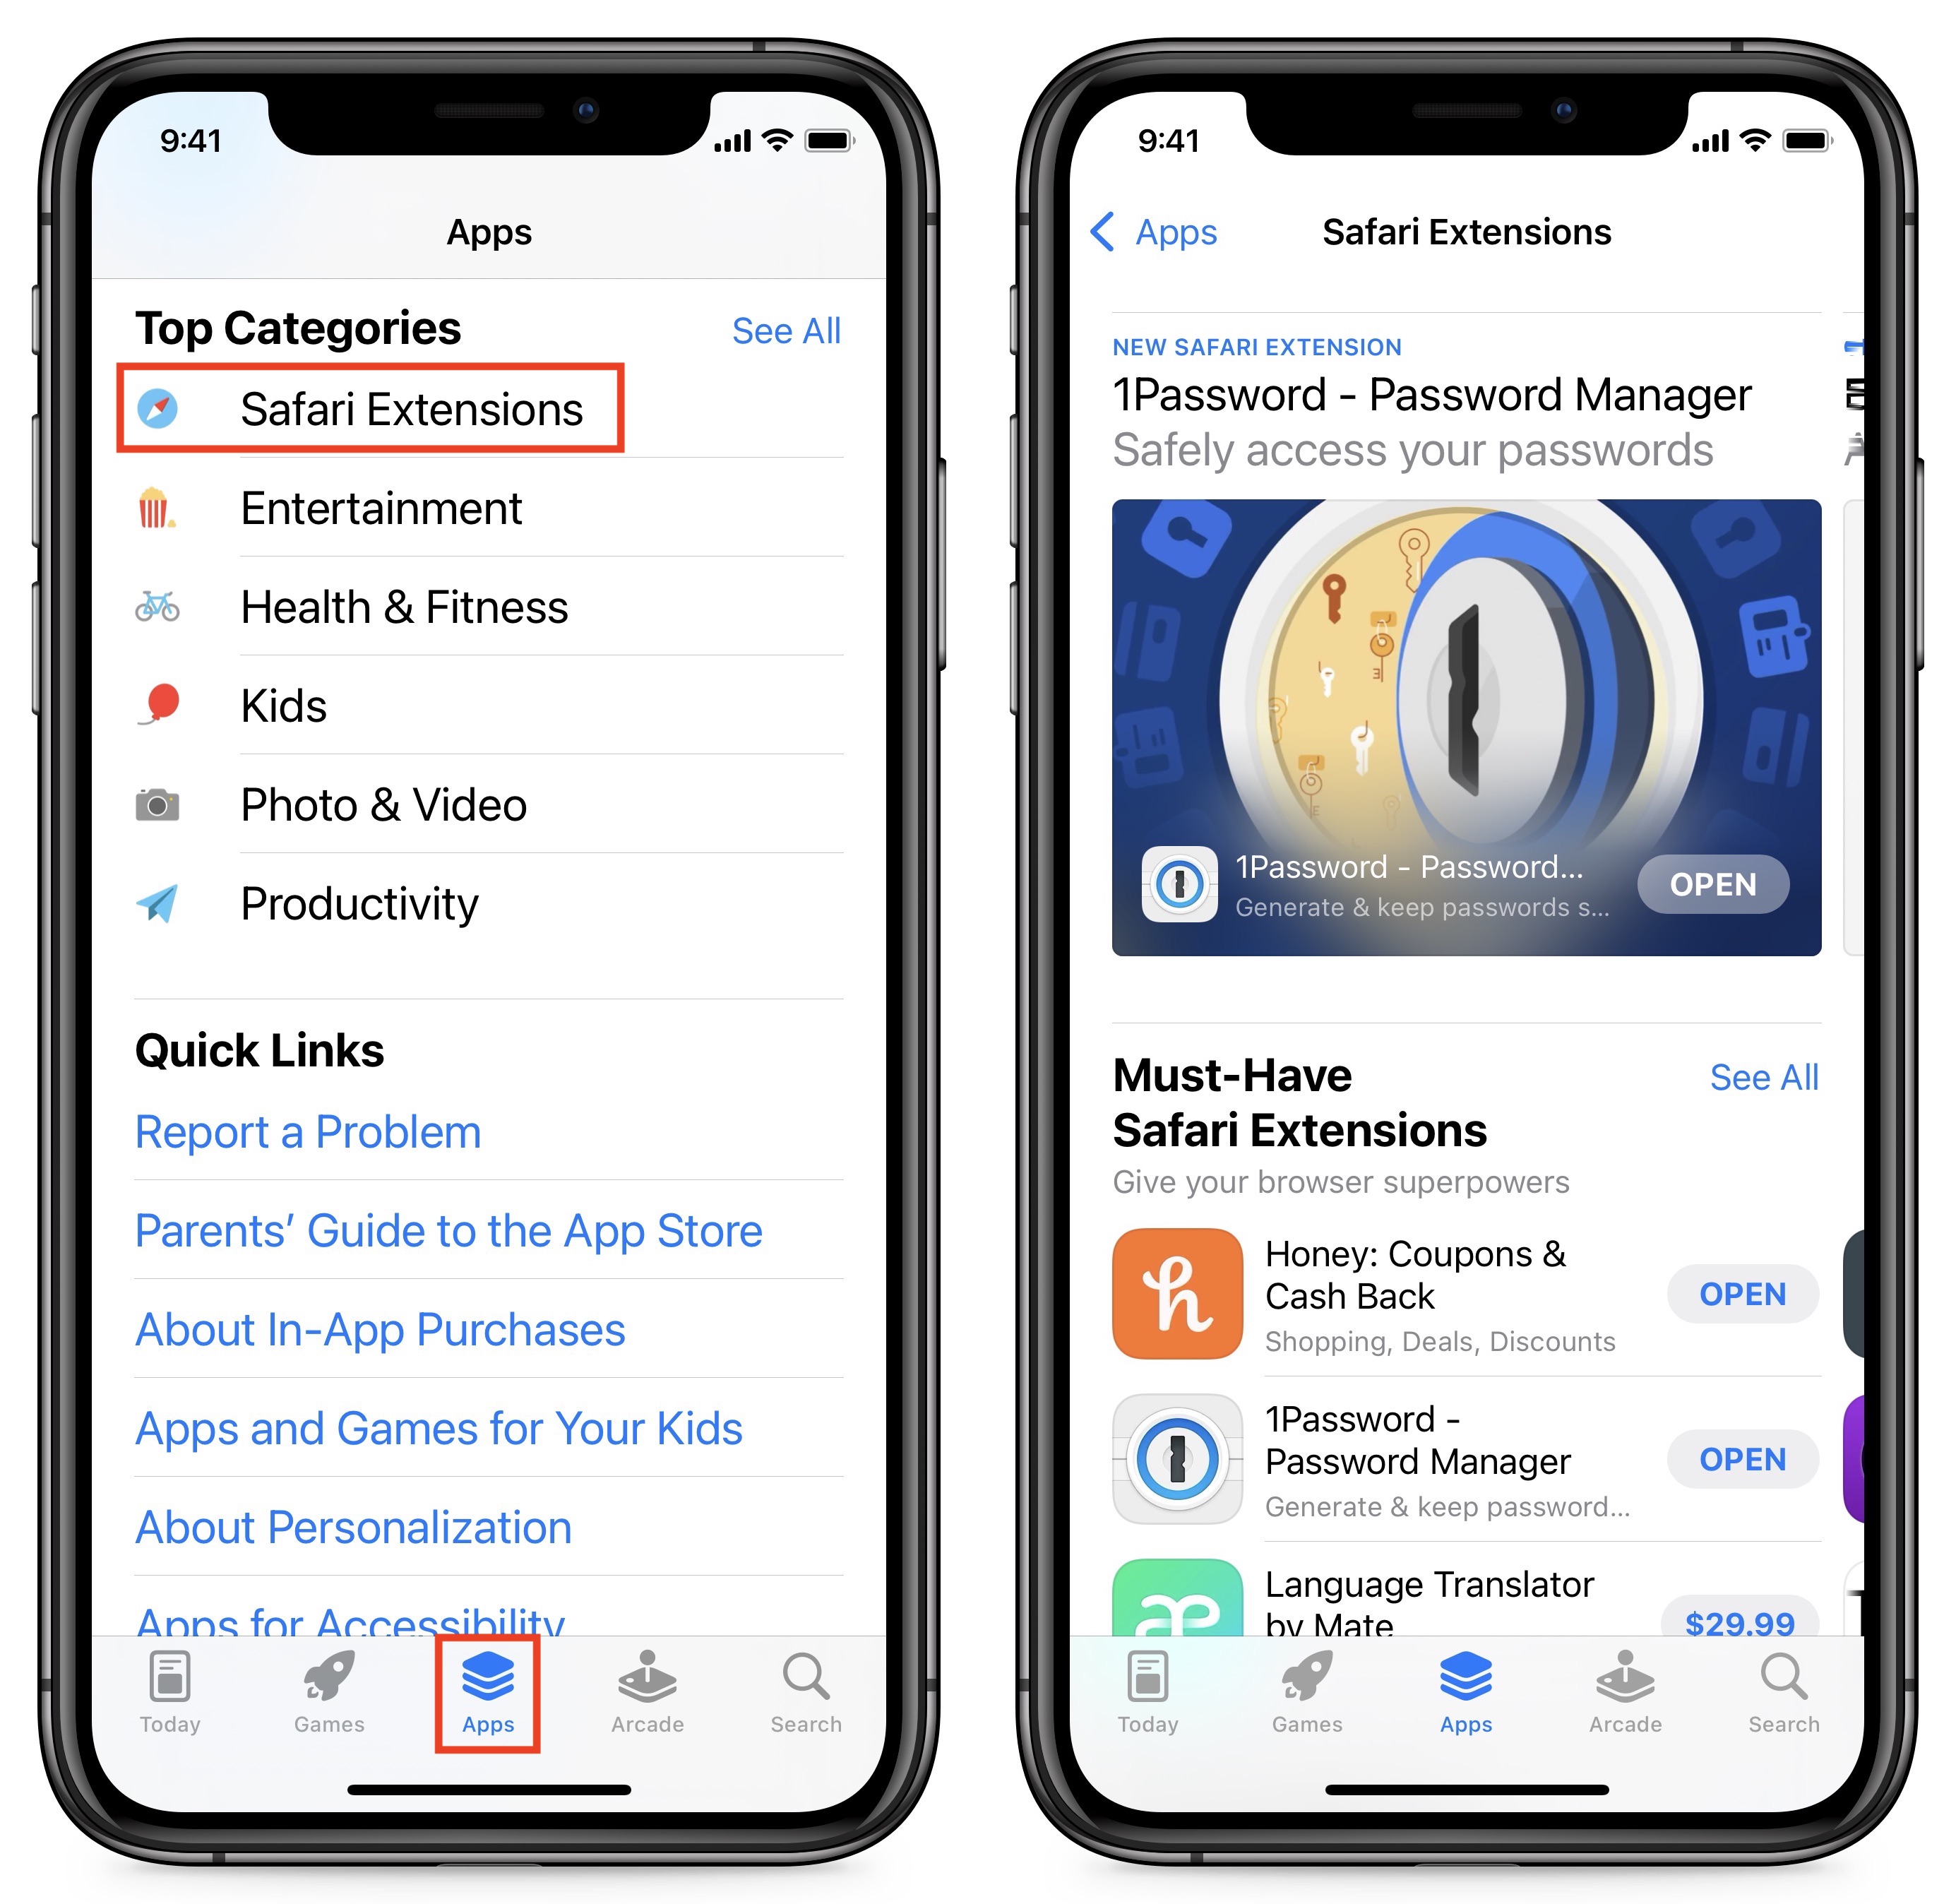
If Apple removes Safari Extensions as a “top category” at some point, you can tap See All for a list of all available categories.
Since extensions are distributed as apps, you install them just as you would any other app. Some are free, but you must buy others. As always, it’s worth scrolling through an app’s listing to view its privacy report card and see what data it wants to collect (see “Apple Unveils Stringent Disclosure and Opt-in Privacy Requirements for Apps,” 7 January 2021). There are some additional protections we’ll discuss below.
Some Extensions to Try
Here are a few extensions I’ve tried and enjoyed. None of these collect data on you:
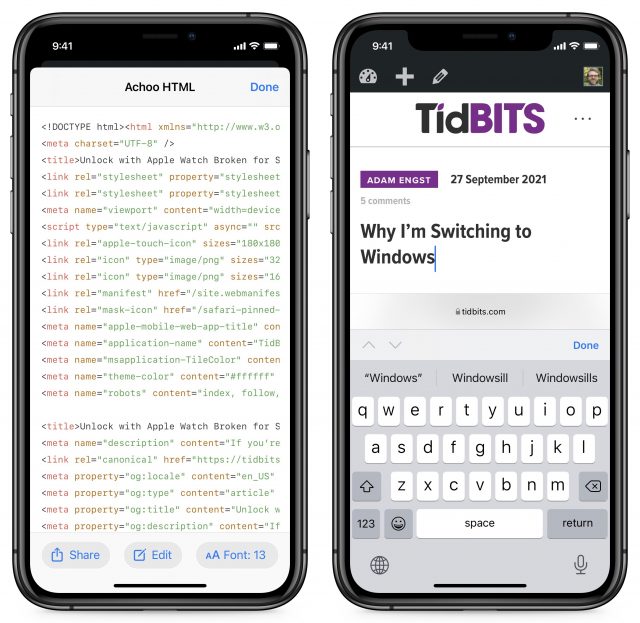
- Achoo HTML ($0.99): Every Web browser I can remember, dating back to the mid-’90s, has had a built-in HTML source viewer. Except those on the iPhone and iPad. Achoo HTML from Christian Selig, creator of the aforementioned Apollo, adds that basic functionality. It also lets you edit a local copy of Web pages (it doesn’t change what anyone else sees), making for some fun possibilities.
- PiPifier (free): I love using the picture-in-picture feature on the iPhone and iPad to shrink a video down to a thumbnail that keeps playing while I switch between apps. But some sites, like YouTube, go out of their way to block this functionality. PiPifier lets you open any video playing in Safari in picture-in-picture. It was originally implemented as a share sheet extension but is now a Safari extension.
- Noir ($2.99): There are good reasons not to use Dark Mode (see “The Dark Side of Dark Mode,” 31 May 2019), but if you have light-sensitive eyes like me, white backgrounds on absurdly bright iPhone and iPad screens in dark rooms can be painful. Noir automatically darkens Web pages when you’ve enabled Dark Mode.


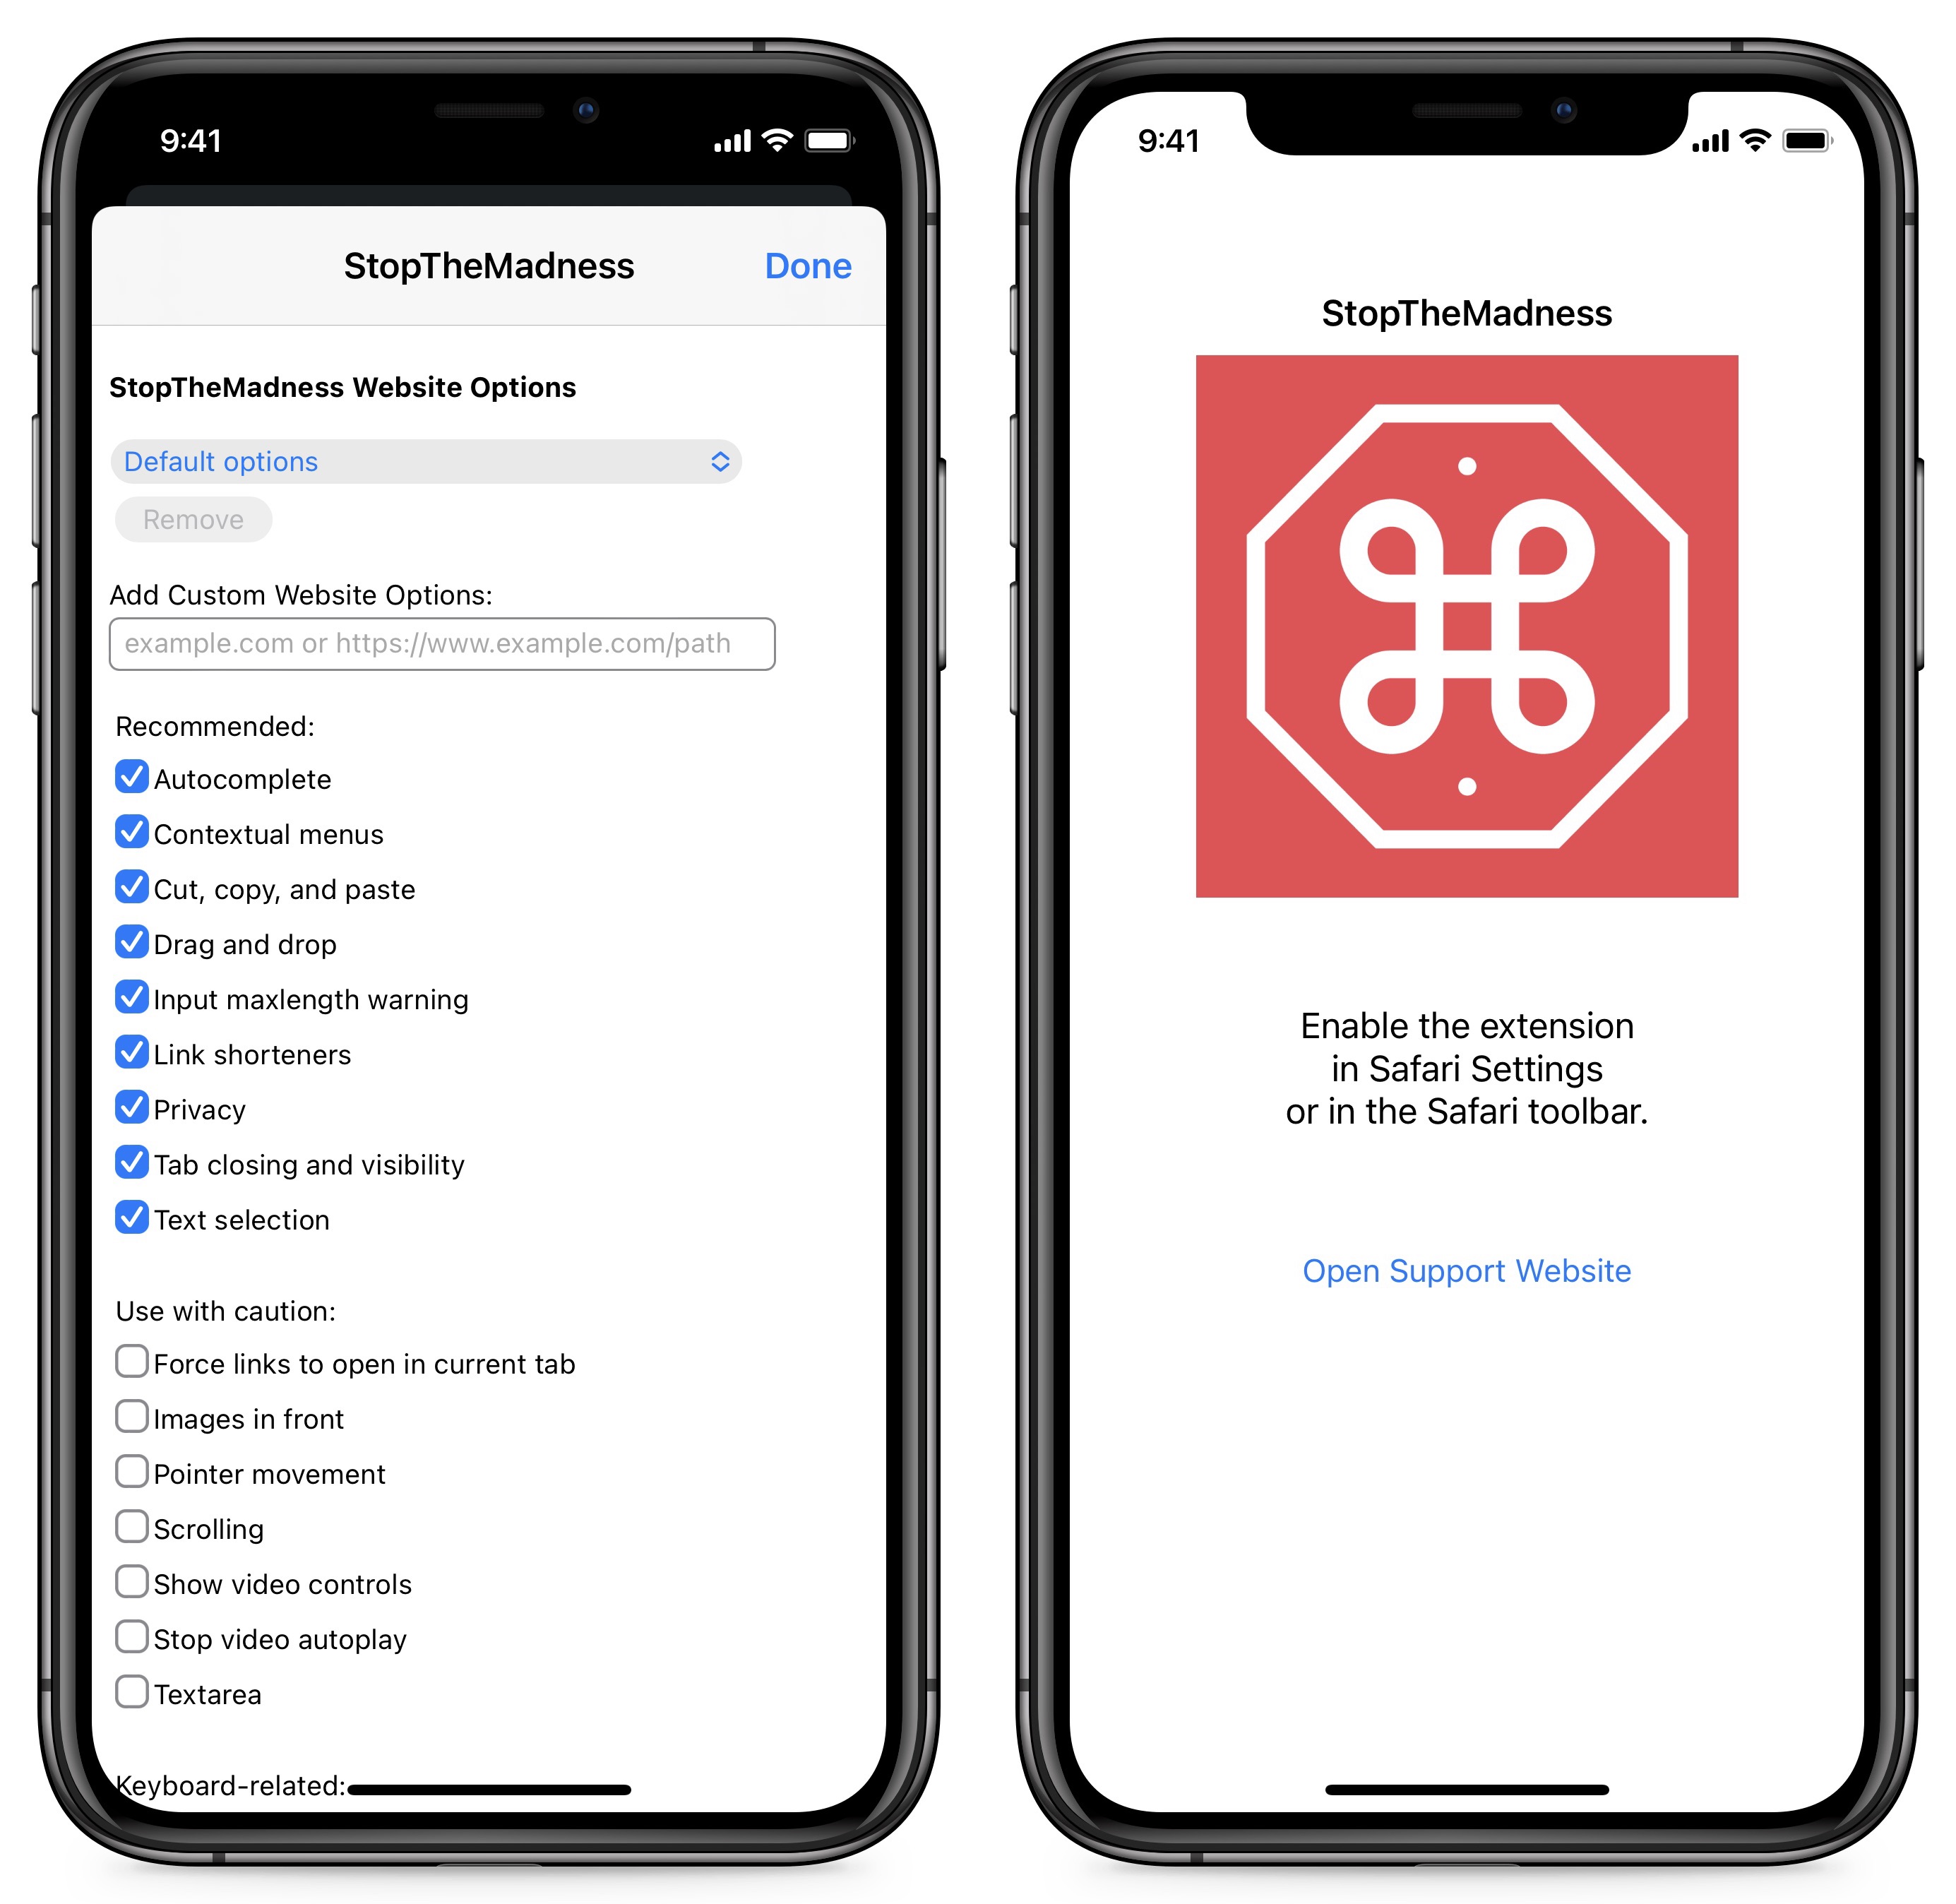
- StopTheMadness Mobile ($7.99): I have long been a fan of the desktop version (see “Tired of Web Sites Blocking Standard Browser Controls? StopTheMadness!,” 17 February 2020), and now StopTheMadness is available on the iPhone and iPad. It provides a grab bag of fixes for Web annoyances like tracking links, clickjacking, Google AMP, websites preventing you from copying text, and more. There are less-expensive extensions that implement some of these features, like Christian Selig’s Amplosion ($2.99), but StopTheMadness does it all, and developer Jeff Johnson keeps adding more capabilities.
Enabling Safari Extensions
Once you’ve installed an extension’s app, you have to enable the extension before you can use it. There are two ways to do this:
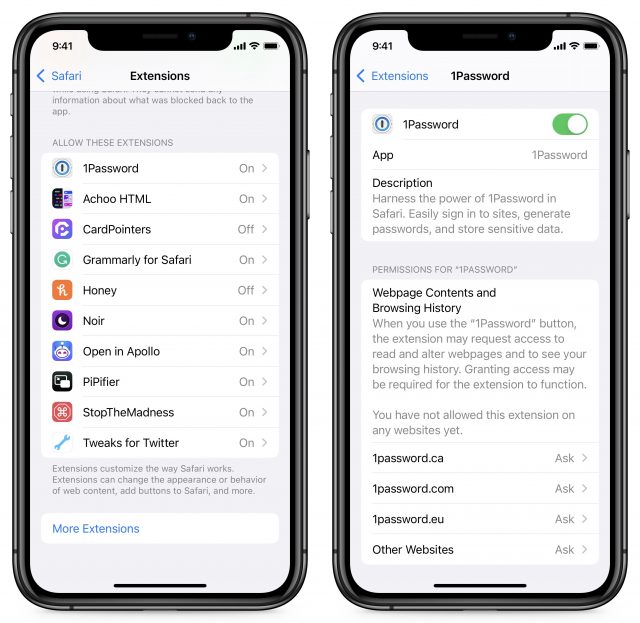
- Go to Settings > Safari > Extensions, scroll down to view extensions, tap the extension’s name, and flip the switch. While you’re on that screen, you can also adjust website permissions. By default, extensions can’t see your browsing history or other data, and you must manually approve requests for it. Unfortunately, you don’t get to fine-tune the options. You can allow the extension on all websites or just certain websites designated by the app. You can set it to ask every time, which is annoying and impractical, deny permissions entirely, or give it access to everything. The most workable solution is to allow full access to all websites, which is why you should be careful about the data collection practices of the apps you install.
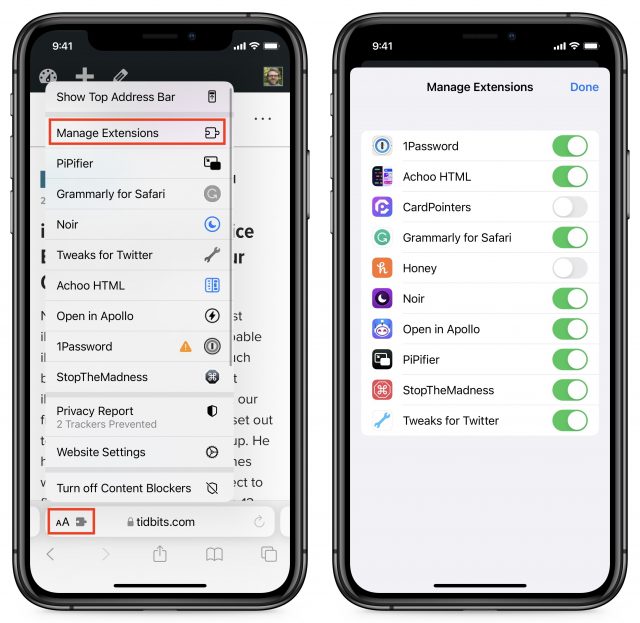
- In Safari itself, tap the icon with two “As” and a puzzle piece on the left side of the tab bar. A long press will enable or disable Reader View, but if you merely tap it, it reveals a menu. From that menu, tap Manage Extensions to bring up a screen where you can enable or disable extensions. (Sometimes, tapping the extension icon will enable Reader View instead. To get out of it, tap the icon again and tap Hide Reader View. Then tap the icon again.)
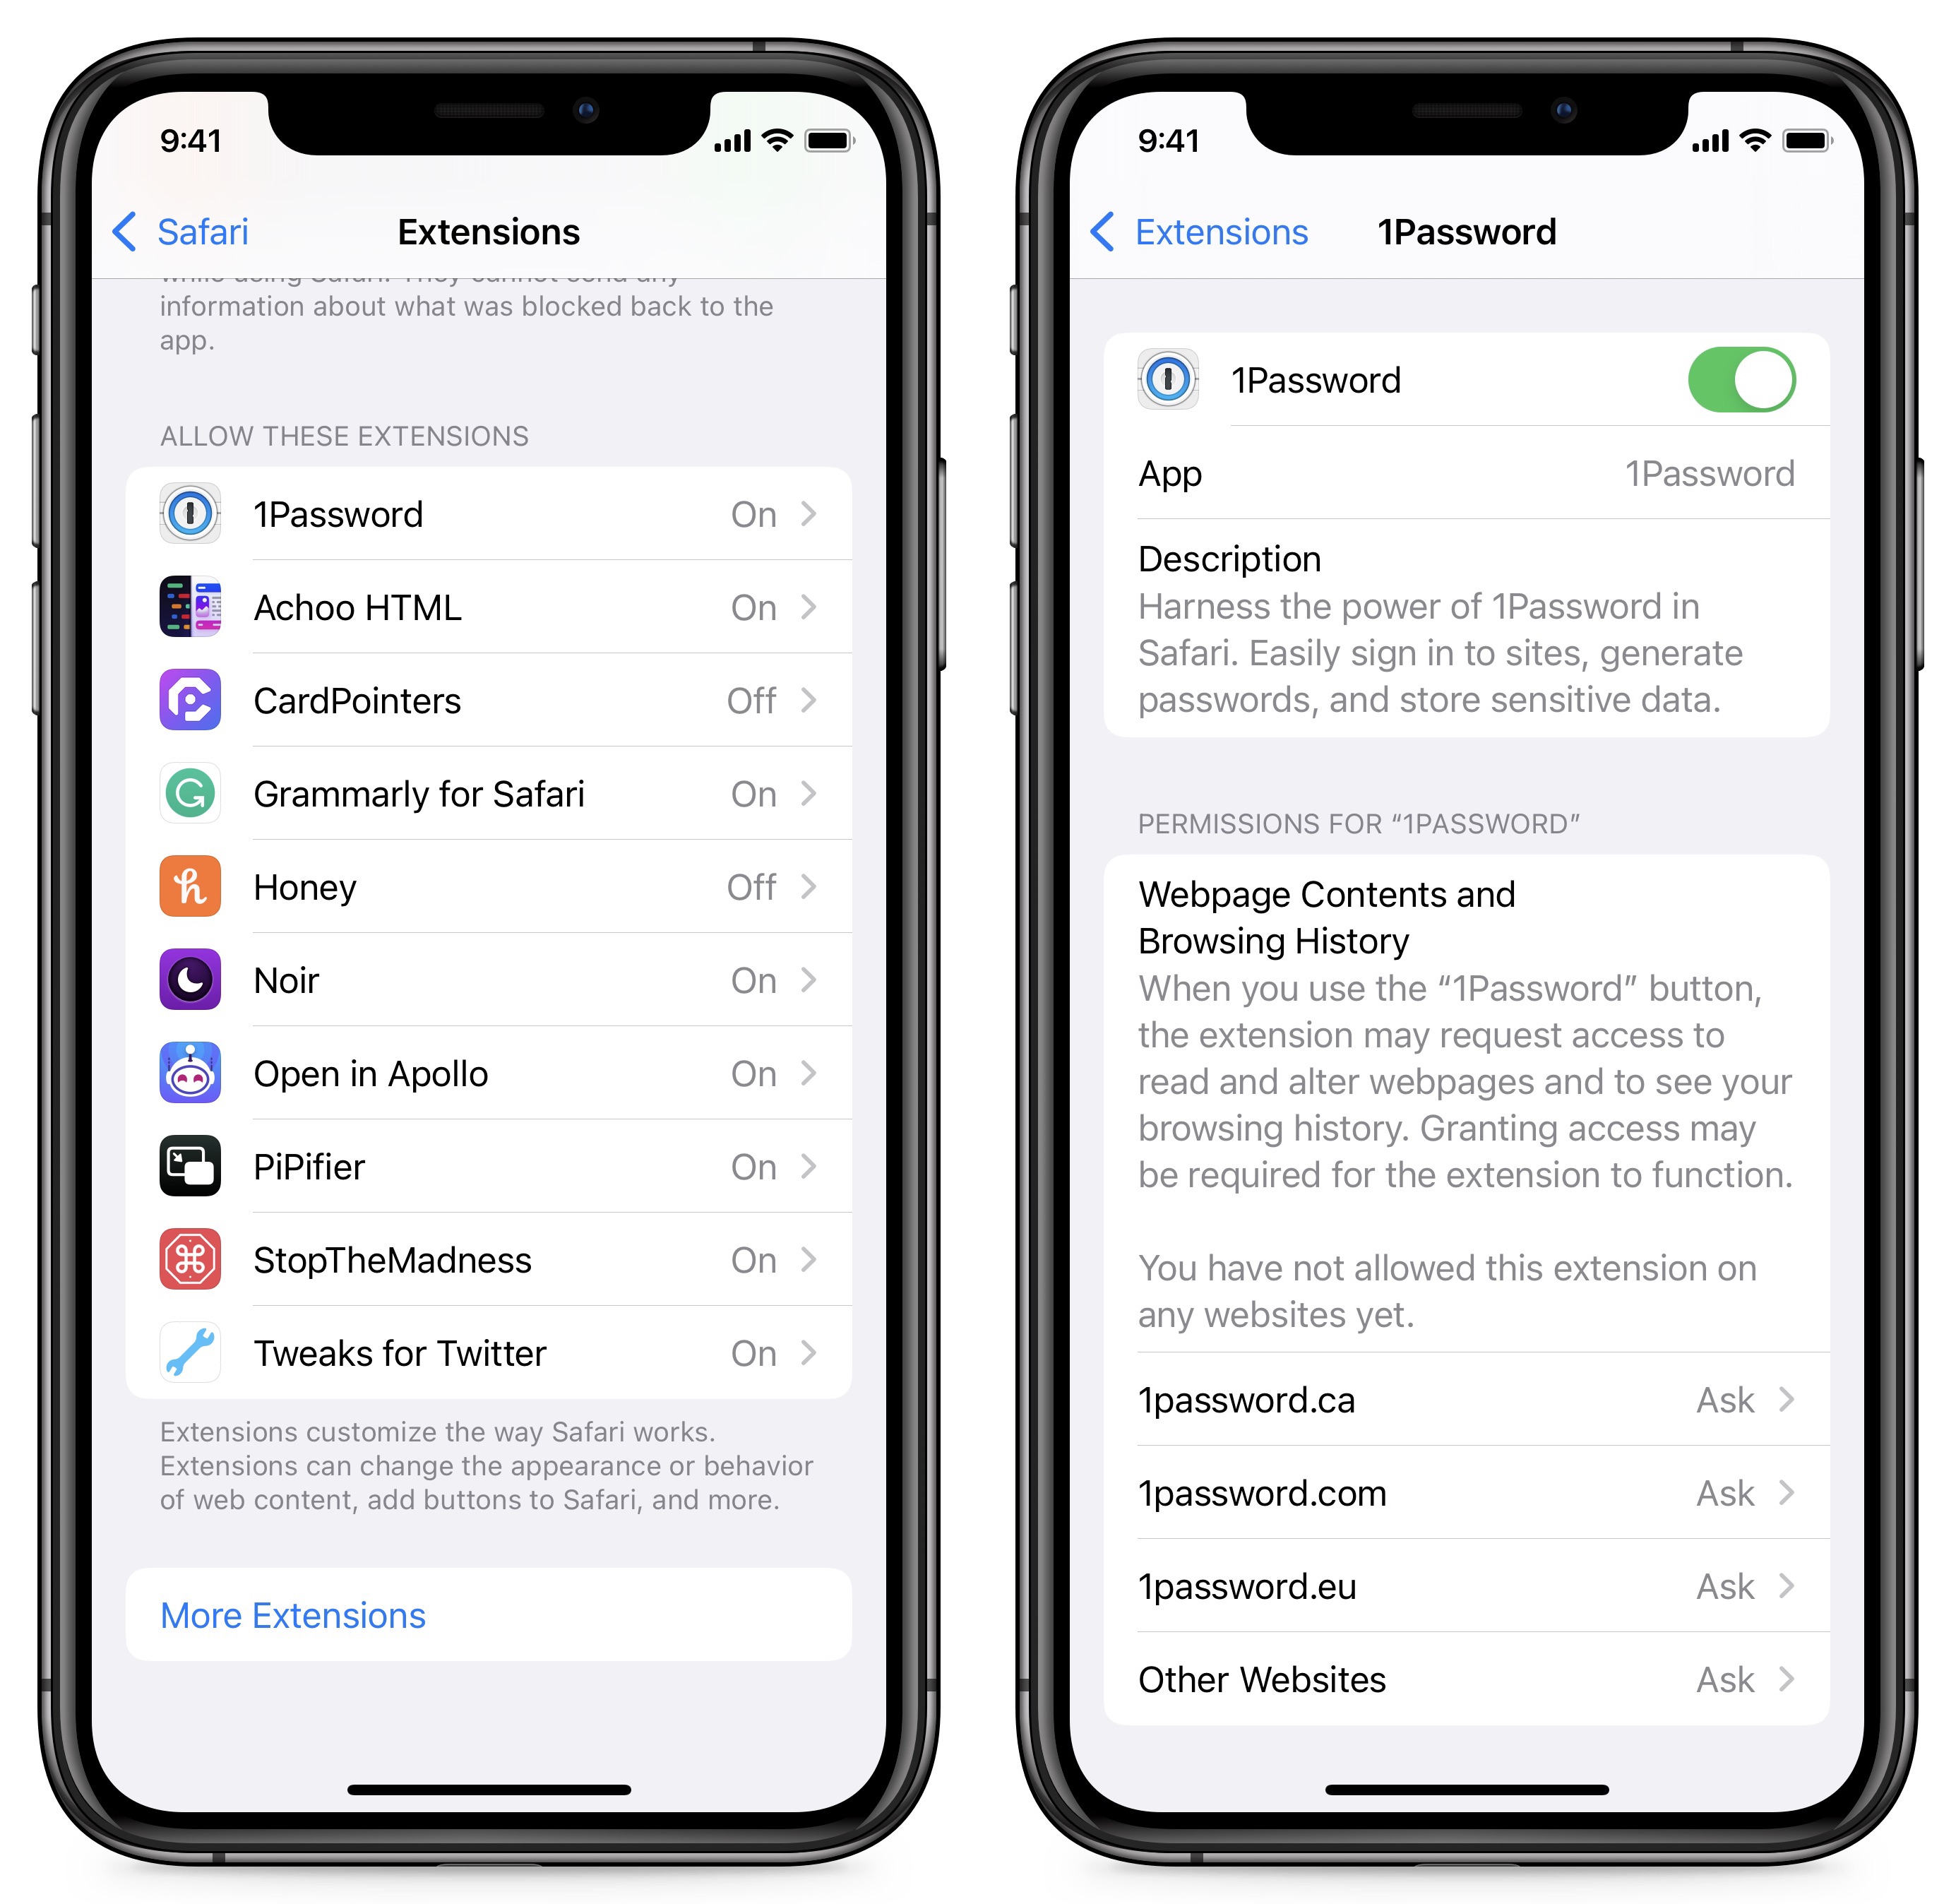

Just because an extension is enabled doesn’t mean it’s working, due to the permission requirements I mentioned above. If you tap the extension icon to show the list of your extensions, an orange triangle indicates a permissions issue (you can see it with 1Password above). Tap that entry, and you’ll be prompted to enable access on the current website either for one day or always.
Here’s where the interface gets annoying. After that prompt, you might receive more prompts asking for more permissions. Honey, an extension that’s supposed to find deals and coupon codes automatically, eventually pops up with a prompt asking for permission for nearly every website you’ve visited lately. Sometimes, even if you tap Cancel, it will prompt you again.

I’ve also run into a situation where I’ll visit some website and an extension that’s enabled but lacks permissions, like 1Password or Honey, will randomly prompt me for permissions again. For now, if an extension wants more data that I’m willing to share, I uninstall the app, or if that’s impractical, like in the case of 1Password, I disable the extension.
Using Safari Extensions
Actual usage is where things get a bit more confusing because there is no fixed way to use an extension. Some work automatically if given sufficient permissions, like Apollo and StopTheMadness. Some you must trigger manually, like Achoo HTML and PiPifier. And others depend on some other trigger. For instance, by default, Noir darkens websites only when Dark Mode is enabled on your device.
For that reason, I recommend enabling extensions one at a time and setting aside a few minutes to figure out how each one works.
The best place to begin your investigation is to tap the extension icon in Safari and tap the extension name in the menu. That will either trigger the extension or bring up its settings. Opening the extension’s app might also offer more instructions or a link to a website with instructions.
Let us know about your favorite extensions in the comments.