#1599: Avoiding blue light from screens, Bowflex C6 Bike spin cycle, Internet mapping services, Apple Buying Advice website
We have a wide-ranging issue for you this week! Josh Centers kicks things off with an announcement of a new personal site containing Apple buying advice, followed by a look at how to reduce the sleep-disrupting effects of blue light from screens—what if you need to go beyond Night Shift? Want an indoor exercise bike but experiencing Peloton sticker shock? Julio Ojeda-Zapata offers a review of the Bluetooth-connected Bowflex C6 Bike as a cheaper option with a greater variety of workout apps. Finally, Adam Engst takes you on a journey through Internet mapping services that provide an assortment of capabilities, with side trips to talk about ways of annotating maps and correcting any mistakes you find. Notable Mac app releases this week include BBEdit 14.1, Mellel 5.1, DEVONthink 3.8.2, Bookends 14.0.5, KeyCue 10.0, and GraphicConverter 11.6.
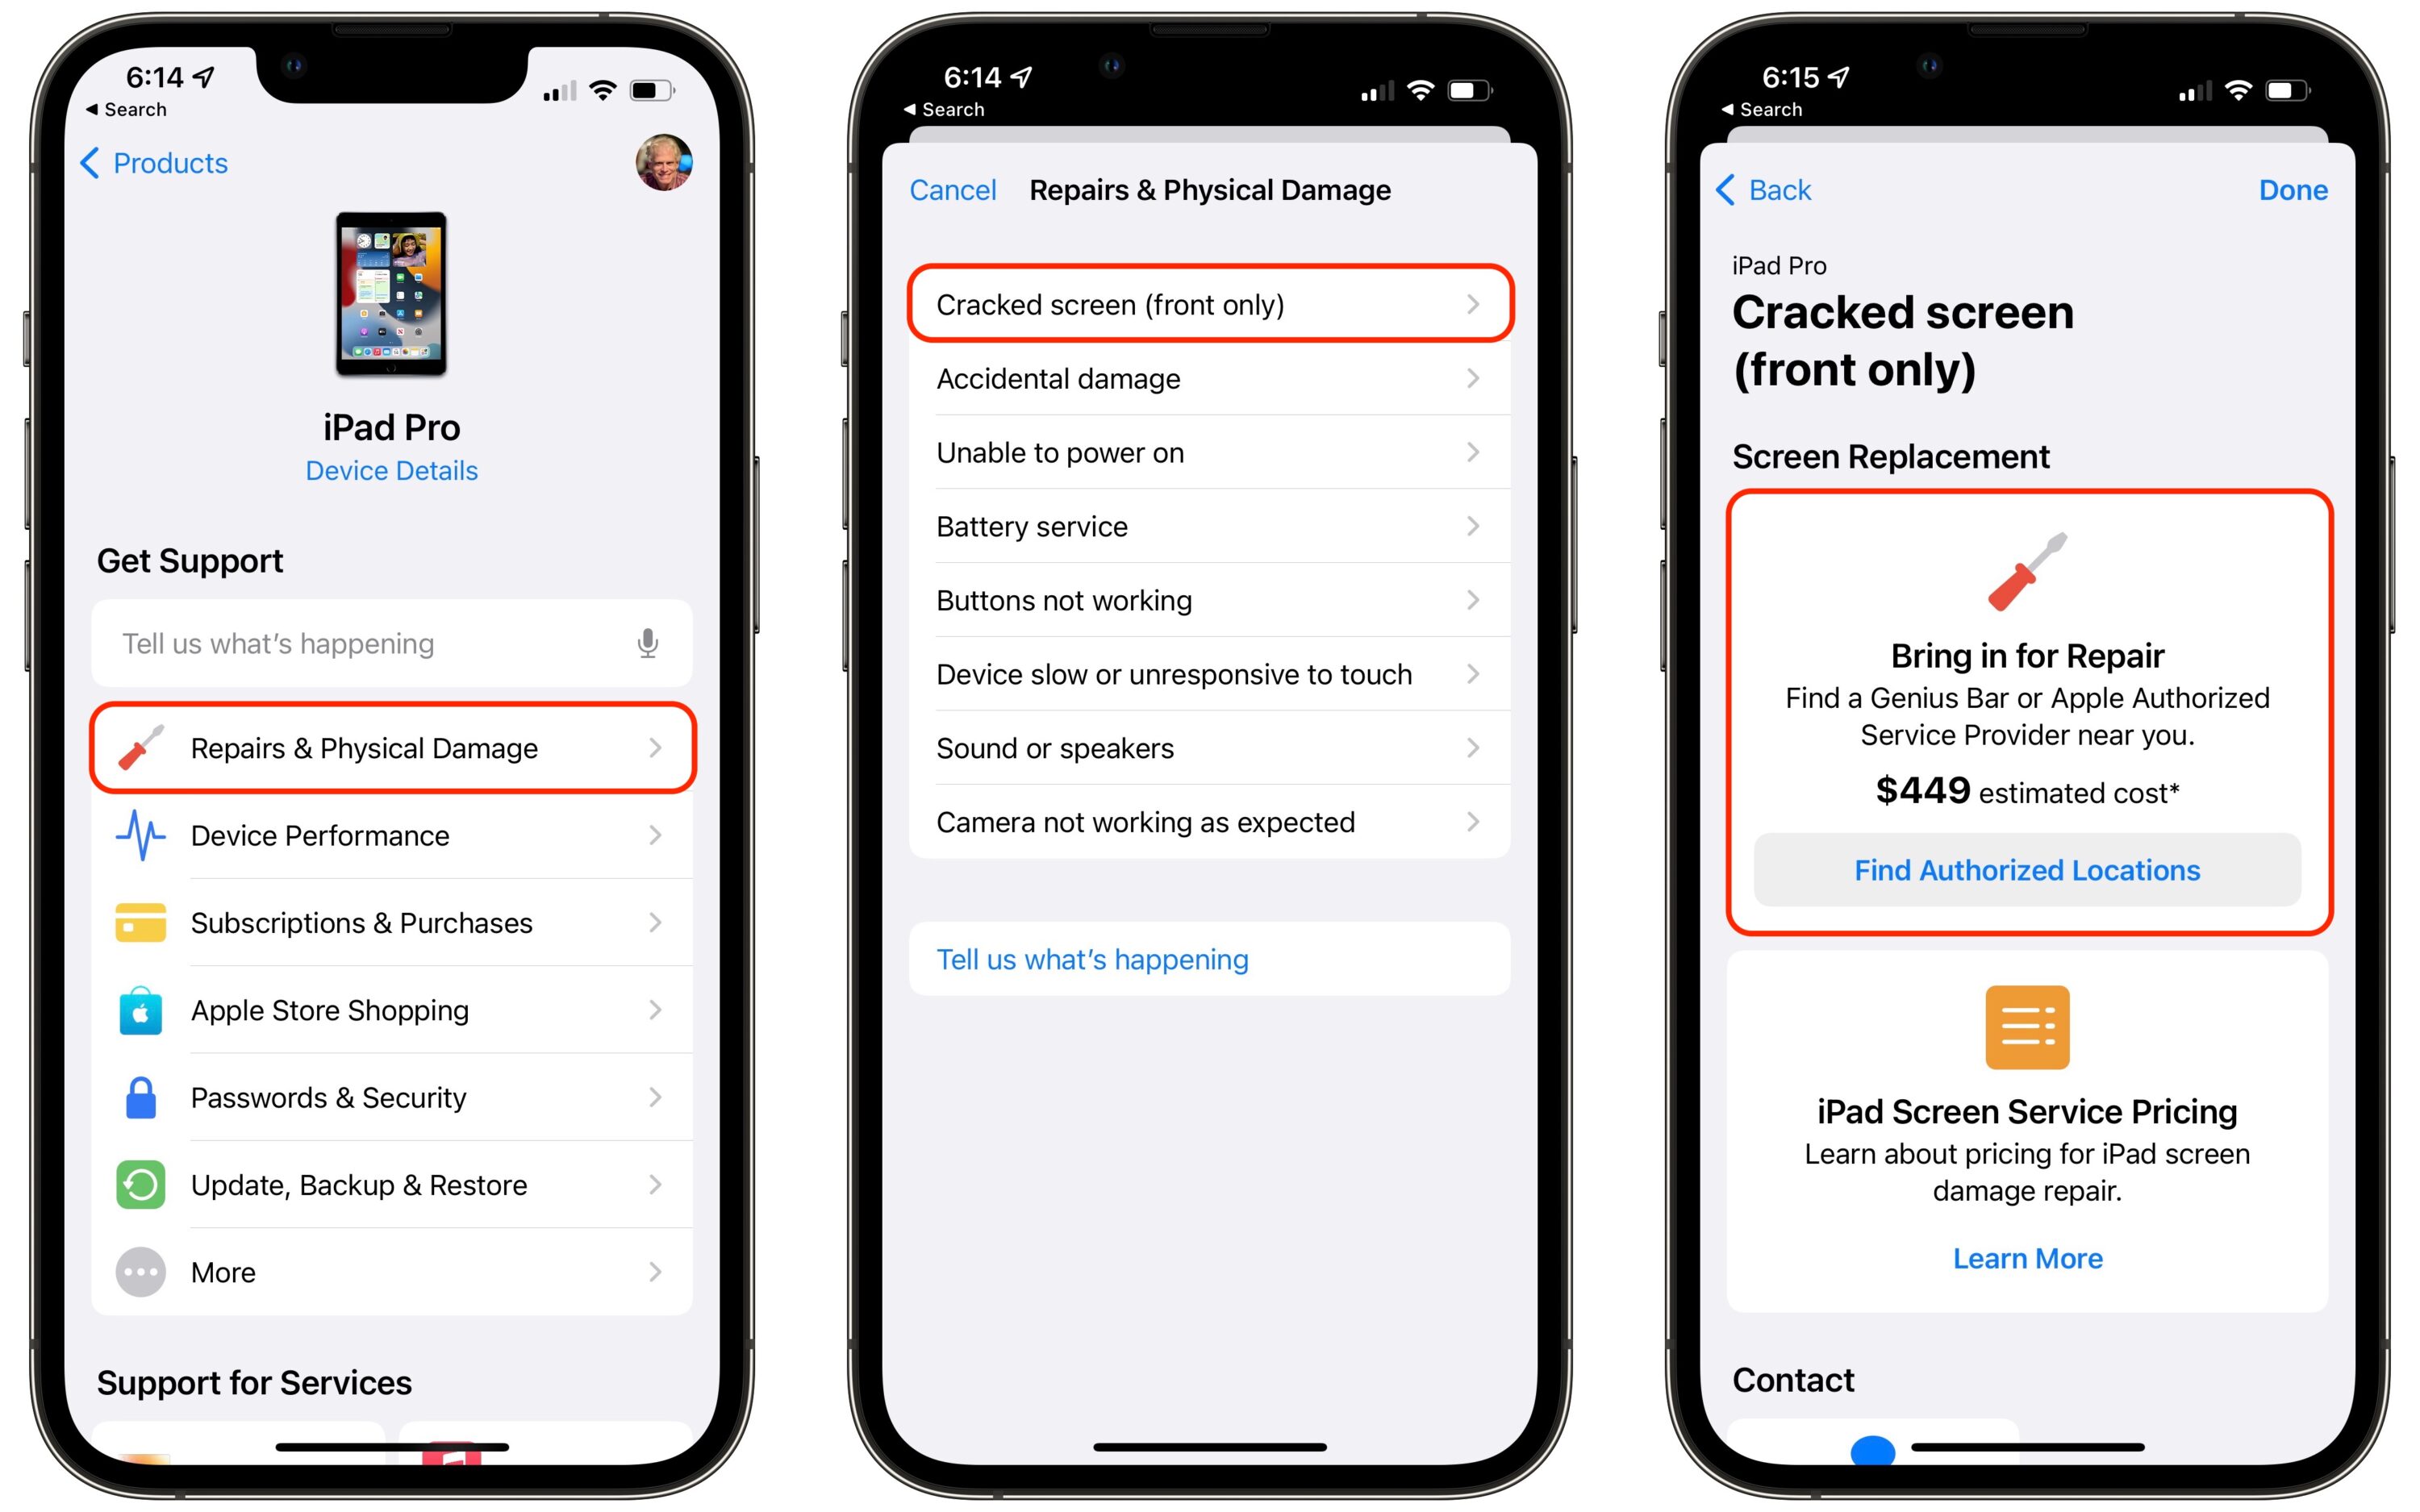
New “Apple Buying Advice” Website by Josh Centers
I recently taught an iPad class for the Naples MUG, and the organizers specifically asked me to add a few slides with my recommendations on which iPads and accessories to buy. After the class was over, I was reflecting on how many times per week I answer questions about which Apple product to buy or if it’s a good time to buy—from friends, family members, TidBITS readers, Take Control readers, and sometimes even people I haven’t seen since high school.
That gave me an idea: what if I put my recommendations on a website and sent people to that? That idea was the genesis of my new Apple Buying Advice site, which isn’t affiliated with TidBITS in any way. When my father-in-law called to ask for an iPhone recommendation while I was drafting content for the site, I knew I was onto something.

The goal of Apple Buying Advice is simple: to recommend specific Apple products for those who are overwhelmed by all the options and have only one question: “Which one do I buy?” I offer quick picks on the home page, backed by short guides for each product category that explain my rationale and offer a few alternatives. Think of it like Wirecutter but with an exclusive focus on Apple products.
You may disagree with some of my choices, but they’re exactly the same recommendations I make to friends and family, and I think they’ll please the vast majority of buyers. For example, I recommend the base model iPad but upgraded with 256 GB of storage so owners don’t suffer from a storage crunch later. I caution against buying the iPhone SE right now since reliable sources suggest that a third-generation model will debut early next month. At appropriate times, I’ll adjust my recommendations and add warnings to delay purchases if possible, such as if someone is shopping for an iPhone in August before the annual September release of new models.
If you’re an advanced Apple user, you may appreciate being able to refer friends, family, and high school classmates you barely remember to Apple Buying Advice instead of having the same conversation over and over again.
As I noted, Apple Buying Advice is not a TidBITS project but purely my own thing. However, Adam Engst was the first person outside my family with whom I shared it, and he agrees with most of my picks for the everyday user.
The site is monetized through affiliate links, largely to Amazon, and I get a small commission when you make a purchase through them. But the affiliate commissions don’t influence my recommendations. For example, I often recommend less expensive products, and I skipped affiliate links for the iPhone entirely because Apple is the most reliable source for seeing purchase options. Apart from the iPhone, I tend to send links to Amazon because most people are familiar with it and likely subscribe to Prime (at least 60% of US households). Of course, there’s no requirement that readers shop through the affiliate links if they have another preferred vendor.
The business plan is simple: I paid a whopping $47.28 for a year of hosting with Bluehost and another $12.55 for my logo from logoflow on Fiverr. If I can’t make at least $59.83 in my first year, I’ll close the site. My main source of income is and will continue to be the managing editor of TidBITS—and thank you for nearly a decade of support!
Check out Apple Buying Advice, and let me know what you think.
Protect Yourself from Blue Light with Digital Color Filters
Perhaps it’s a cliché, but I’ve made health the focus of this new year. I’m hitting the gym, tracking health with my Apple Watch, and experimenting with countering the effects of blue light exposure (for more on my health experiments, see “How I Finally Embraced the Apple Watch as a Fitness Tracker,” 7 February 2022).
The science isn’t settled, but there is a growing body of research that links blue light exposure from screens to sleep problems that may, in turn, contribute to cancer, diabetes, heart disease, and obesity. There’s a tinge of pseudoscience to some of the claims, but even Harvard Medical School points to these effects, recommending red lights and blue-light blockers at night, such as special glasses or screen filters.
Anecdotally, as someone who stares at screens all day and much of the night, I’ve been dealing with increasing eyestrain, dryness, and headaches as I get older. Apple has acknowledged this problem and provided a baked-in solution. Night Shift, introduced in iOS 9.3 and macOS 10.12.4 Sierra, gives you a free and easy way to experiment with blue light filtering. (Of course, if you need accurate color representation on your screen for graphics work, you won’t be able to use Night Shift.)
Reducing Blue Light on the Mac with Night Shift
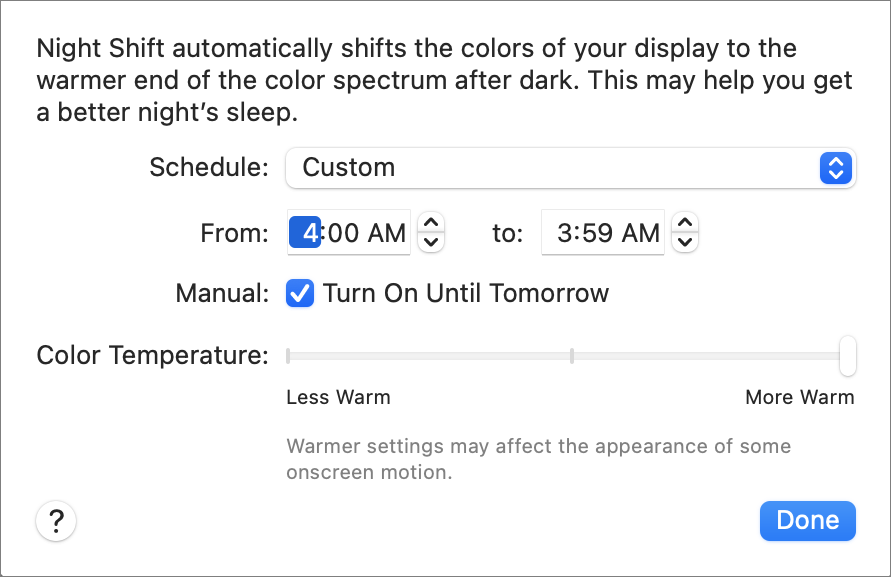
To try Night Shift on the Mac, go to System Preferences > Displays > Night Shift, and select Turn On Until Tomorrow. If you want to leave it on all the time, there’s a trick: for Schedule, choose Custom, and set the time from 4:00 AM to 3:59 AM. That way, there is only a brief minute during the wee hours in which Night Shift is off.
But Night Shift may not be all that effective. In a 2018 study, researchers at Rensselaer Polytechnic Institute had 12 young adults look at iPads between 11 PM and 1 AM. They tested four conditions across four nights: LED goggles that emitted a lot of blue light, Night Shift set to less warm, Night Shift set to more warm, and a dim light control with orange goggles. The researchers found that when Night Shift was enabled, the participants’ melatonin levels were slightly less suppressed, but there wasn’t a significant difference between settings. (Melatonin is a hormone that helps you sleep, and exposure to blue light suppresses it.)
But this was a small study, almost certainly conducted on college students whose sleep schedules and habits aren’t representative of older or younger people. And while Night Shift’s effects weren’t significant with respect to melatonin suppression, they did show a slight improvement. The researchers also noted that screen brightness was also a factor. All this got me thinking—what if Night Shift doesn’t block enough blue light?
With that last idea in mind, I looked for something stronger. Initially, I tried f.lux, the classic open-source app that Apple Sherlocked with Night Shift, but it’s tuned for gradual blue light reduction throughout the day. I wanted to eliminate blue light with the flick of a switch.
Eliminating Blue Light on the Mac
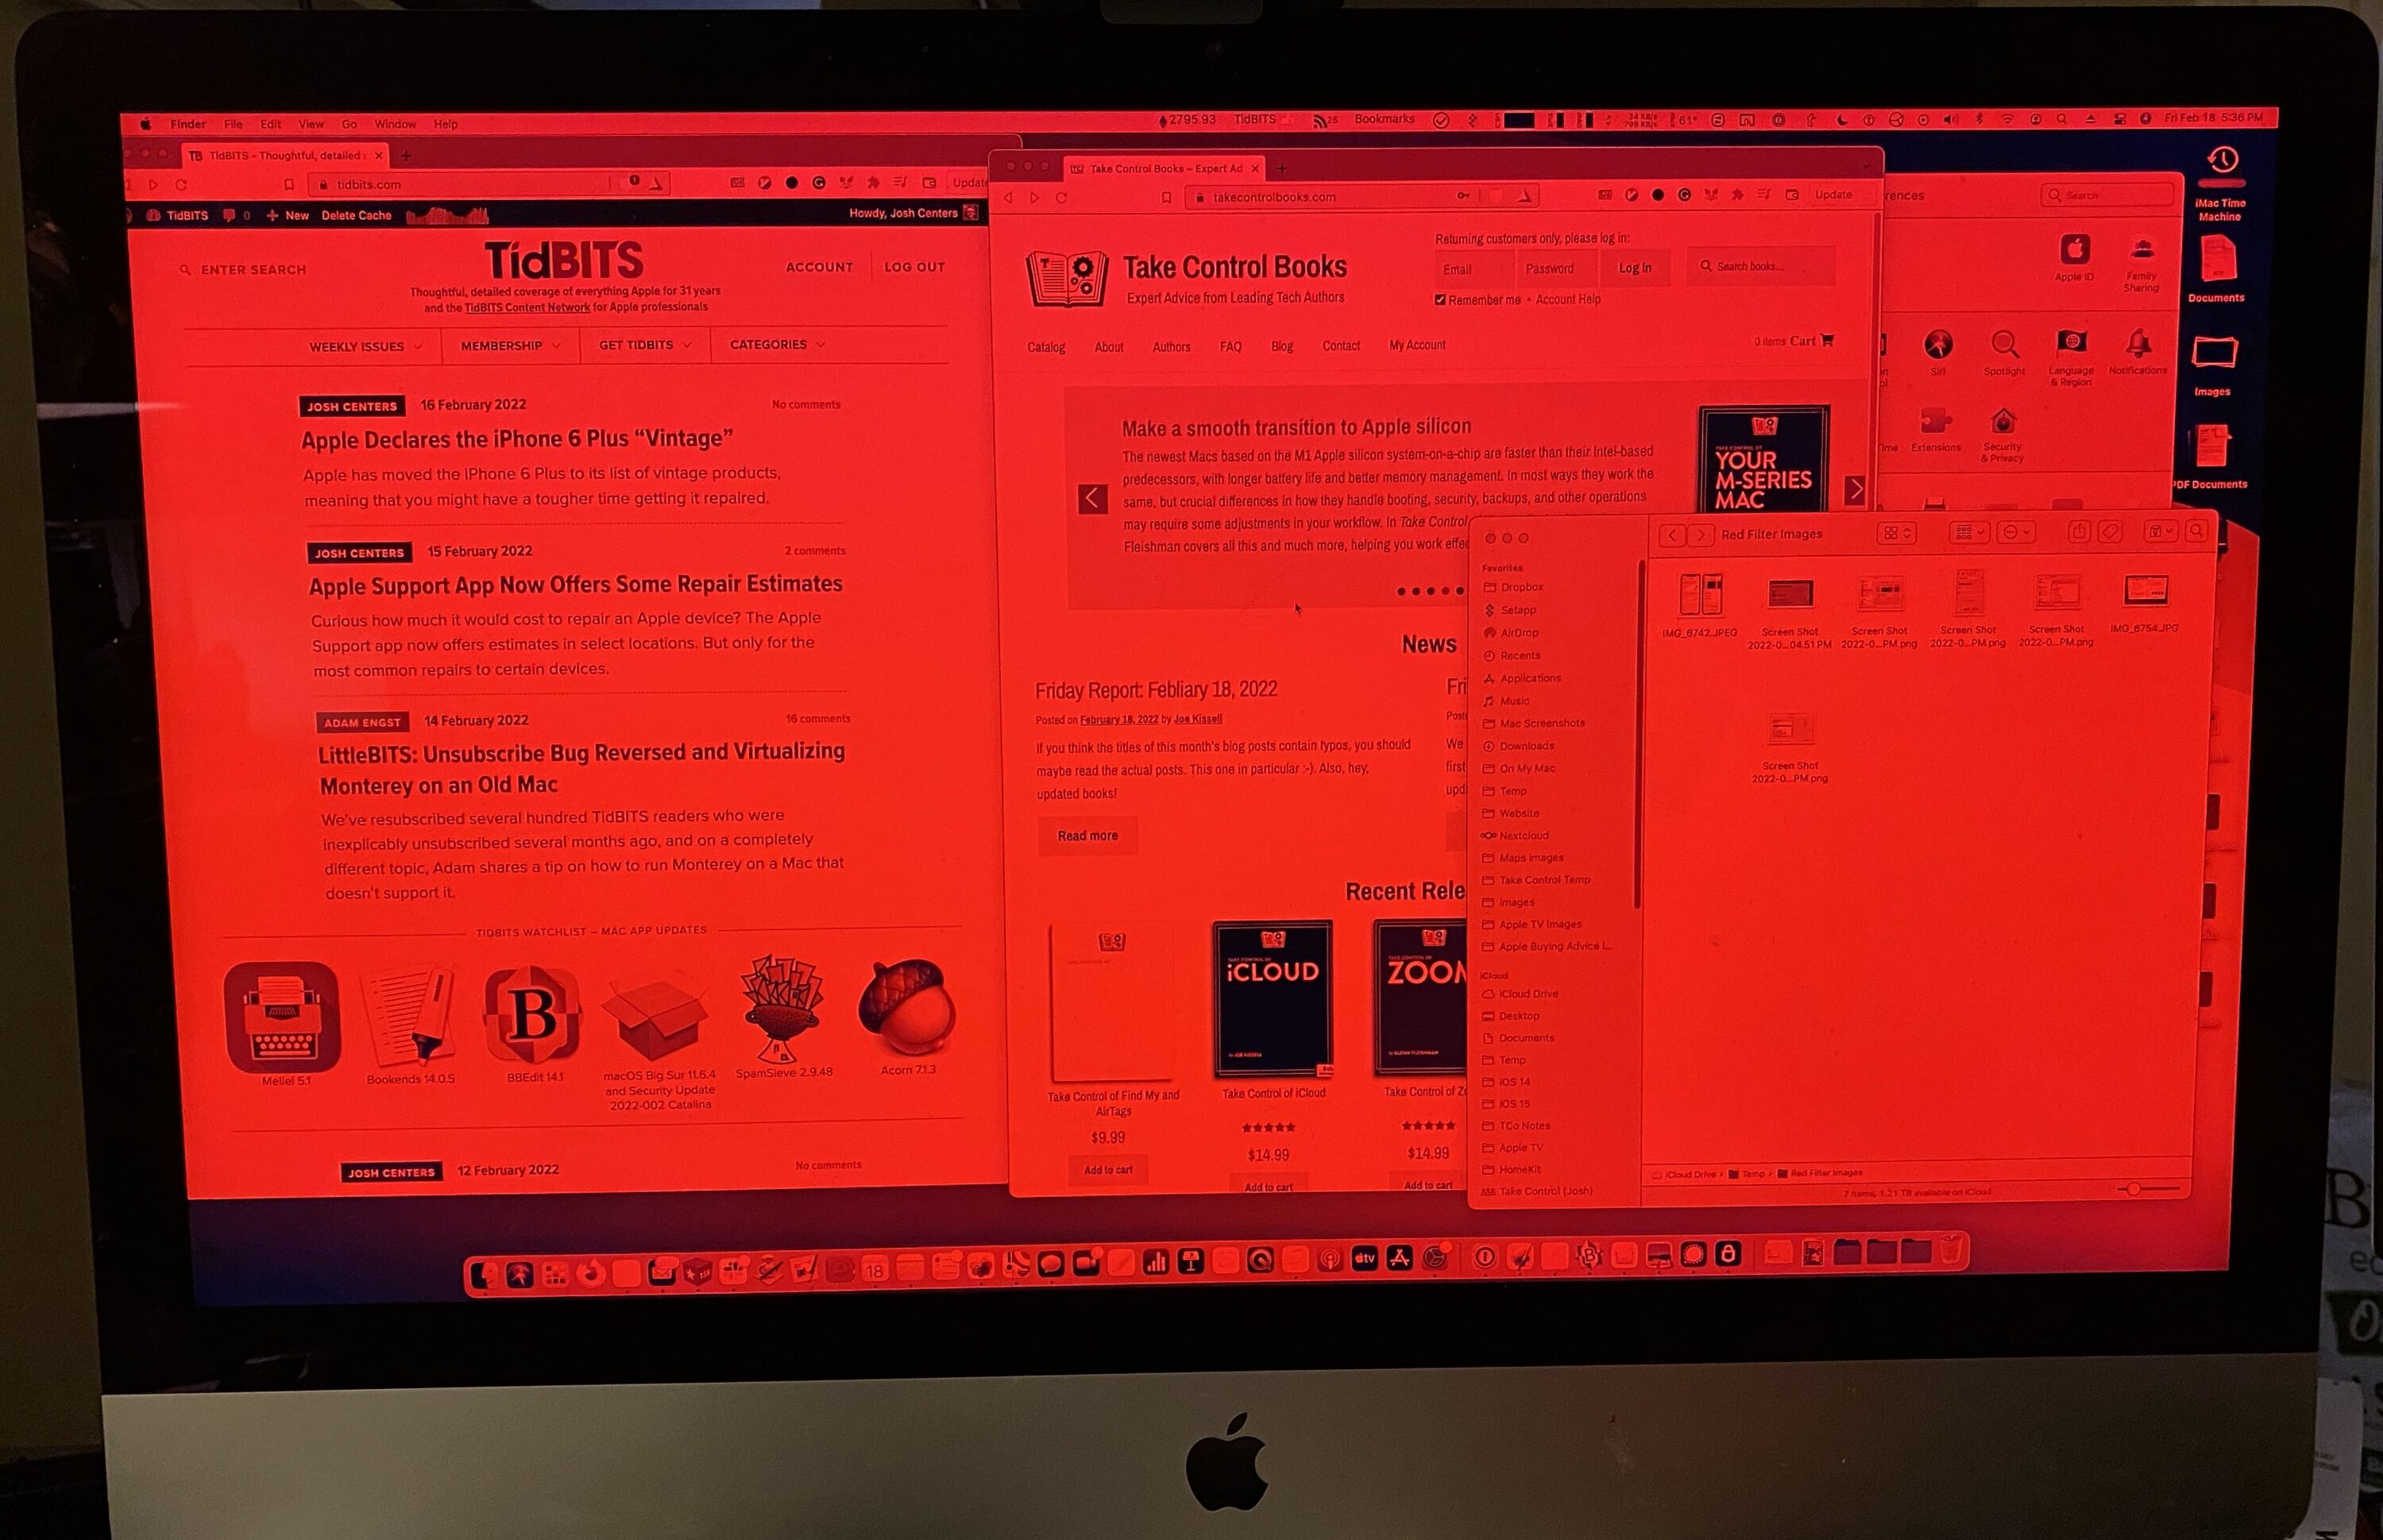
Night Shift reduces blue light but doesn’t eliminate it. To do that, you need a red filter, since red is the opposite of blue on the color wheel. Thankfully, the Mac has a built-in way to do that.
First, turn on Night Shift as described above, which removes some blue light but not all. We’re going to add a toggleable color filter on top of Night Shift to eliminate even more:
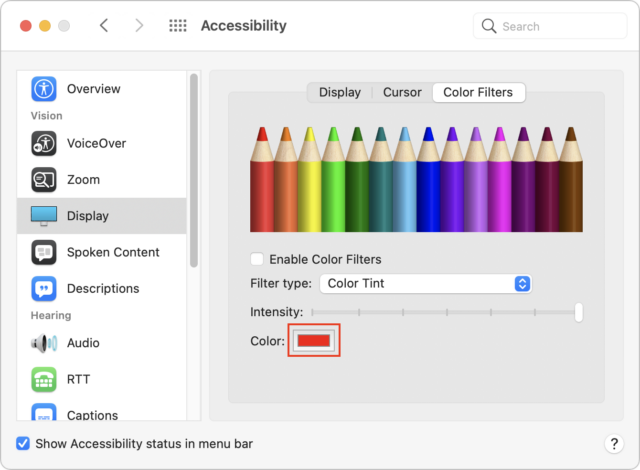
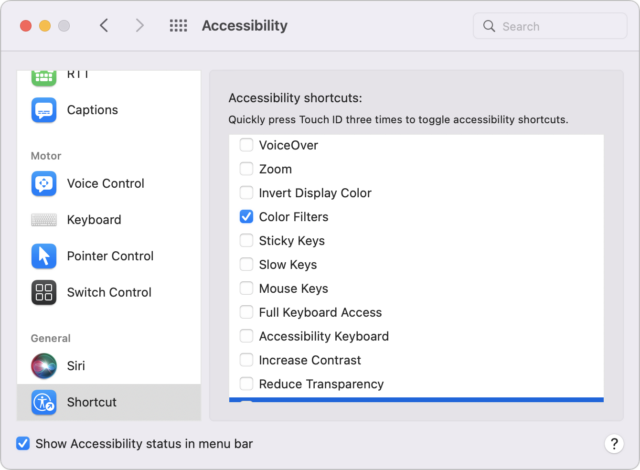
- Go to System Preferences > Accessibility > Display > Color Filters.
- For Filter Type, choose Color Tint.
- Move the Intensity slider all the way to the right.

Now we want to set the maximum shade of red:
- Click the box next to Color (highlighted above) to open the color picker.
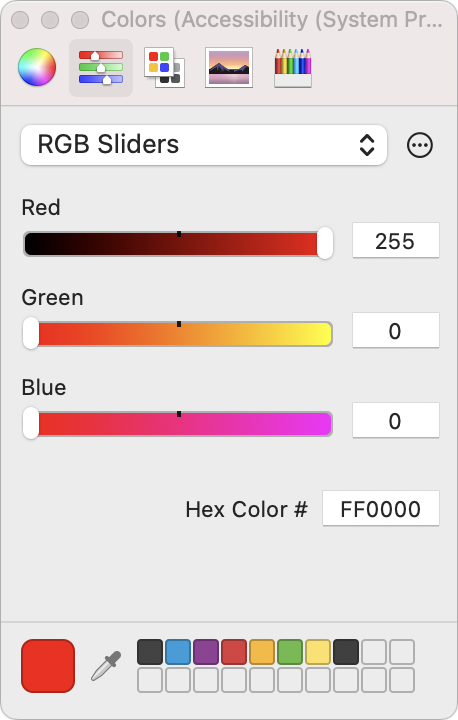
- Click the second icon in the toolbar and choose RGB Sliders from the pop-up menu. Turn red all the way up (255) and set both green and blue to zero.
That’s our initial setup. Now let’s make it easy to turn on and off:
- While in the Accessibility preference pane, select Show Accessibility Status in Menu Bar at the bottom of the pane.
- Scroll all the way to the bottom of the sidebar and select Shortcut.
- Unless you need any of the other features listed, uncheck everything except Color Filters.
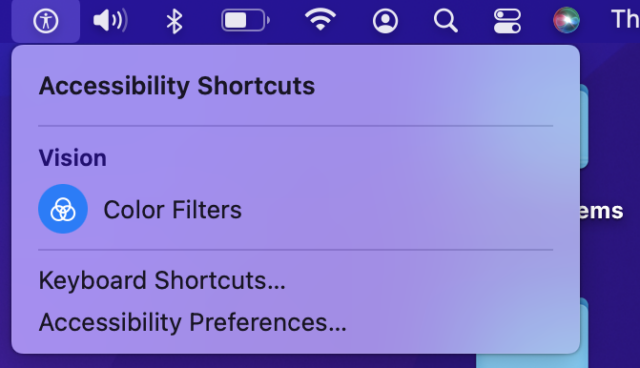
Now you have two ways to toggle the red color filter:
- Press Command-Option-F5 on your keyboard or press the Touch ID button three times. If you have more than one Accessibility shortcut enabled, it will present a (rather slow) menu that lets you turn accessibility features on and off. Otherwise, it instantly turns the screen red.
- Click the Accessibility icon in the menu bar (it looks like a little man in a wheel) and choose Color Filters.
As you can see in the photo below, this provides a rather shockingly red screen that’s appropriate for indicating your Evil Computer Hacker status or developing analog film in a darkroom.
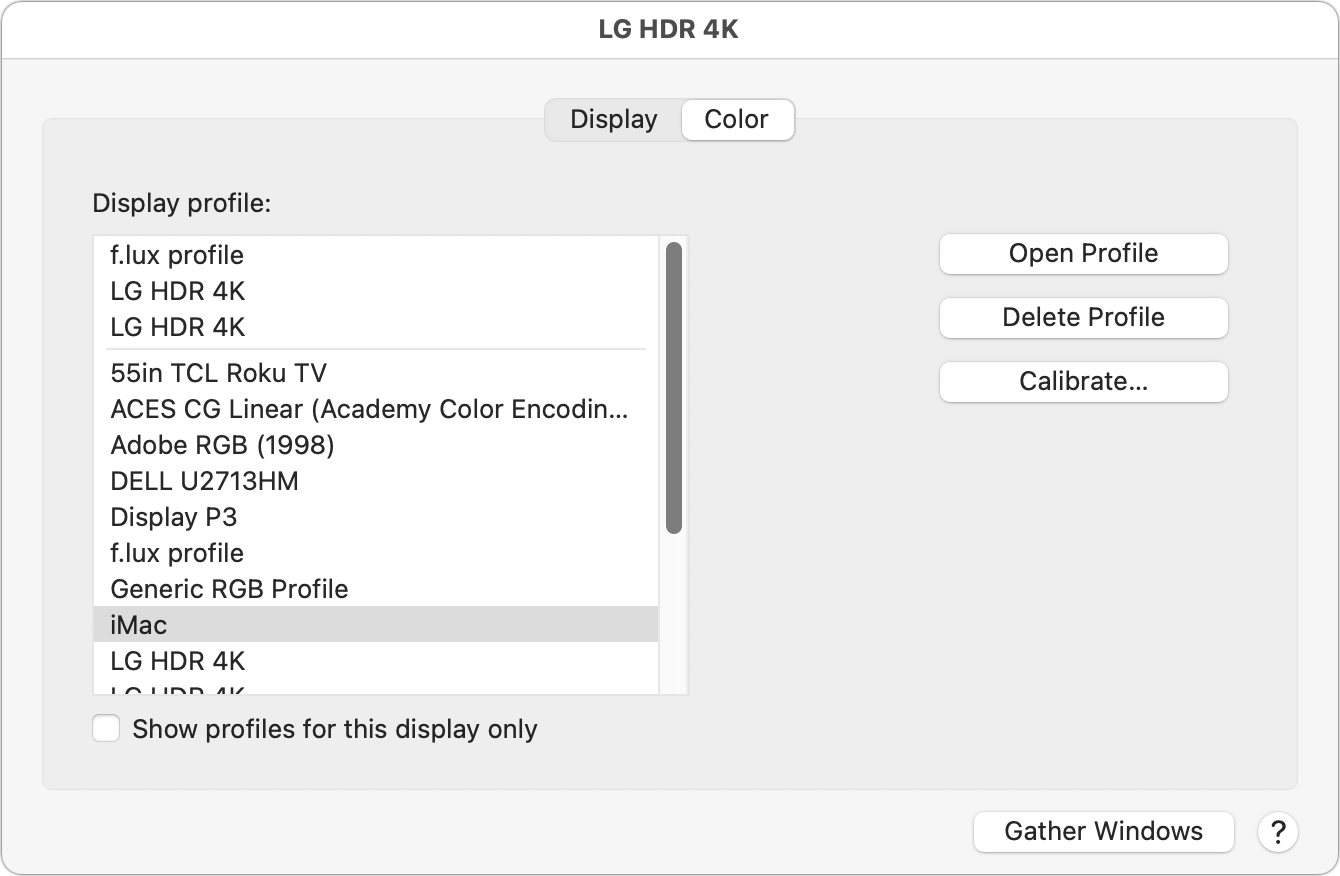
If the color filter doesn’t work on a second display, the likely culprit is a color profile. To fix that, open System Preferences > Displays. Make sure you’re looking at the display the color filter isn’t working on because macOS shows an individual settings panel for each display. Click Color, and then pick another profile like Generic RGB Profile. If you don’t see any that work, uncheck Show Profiles For This Display Only to show all available profiles.
Based on my testing, the problem seems to be that some color profiles simply won’t display certain colors. The LG monitor connected to my iMac won’t show pure red unless I set it to the same color profile as the iMac.
To make the most of this color filter, turn your screen brightness down to the lowest comfortable level since studies indicate that brightness is as disruptive to sleep as blue light.
Eliminating Blue Light in iOS and iPadOS
You can use the same techniques to set your iPhone or iPad to reduce and eliminate blue light. First, set up Night Shift to run 24 hours per day, minus one minute:
- Go to Settings > Display & Brightness.
- Tap Night Shift.
- Turn on Scheduled and set it from 4:00 AM to 3:59 AM.
- Drag the color temperature slider all the way to the right to More Warm.
Once again, to eliminate blue light, we’re going to take advantage of color filters:
- Go to Settings > Accessibility > Display & Text Size > Color Filters.
- Turn on Color Filters.
- Select Color Tint.
- Drag the Intensity and Hue sliders all the way to the right.


Your screen should be absolutely red, which isn’t always desirable. For instance, the podcast app Overcast, which has a largely orange color scheme, is practically unusable with the red color filter. However, it’s easy to make the filter togglable:
- Go to Settings > Accessibility > Accessibility Shortcut (at the bottom).
- Select Color Filters.
Now you can triple-press the side button or Home button (depending on your iPhone model) to turn the red color filter on and off.
What about brightness? Consider turning off Auto-Brightness while you’re in Settings > Accessibility > Display & Text Size and then manually adjust screen brightness to the lowest comfortable level using Control Center.
Blue Light Special vs. Red Light District
Let’s run an informal experiment. Try one of these approaches for turning your screen red while using your devices after dark. Then let me know in the comments if your eyes feel better or if you see improved sleep quality. Personally, I find the darkroom approach easier on my eyes, but I have yet to find a direct correlation to sleep quality. I’m much better off avoiding my iPhone entirely before bed and instead reading on my Kindle.
If you get tired of the red screen, simply disable the color filter settings outlined above.
Bowflex’s C6 Bike Is a Less Costly, More Versatile Peloton
When the COVID-19 pandemic hit in 2020 and going to a gym became unthinkable, I thought about buying a Peloton stationary bike as so many others sequestering themselves at home were doing at the time—but I quickly reconsidered.
Peloton’s premium spin cycles are expensive. They’ve come down in price a bit lately as the company has been battered by shifting market conditions—such as fitness buffs returning to their health clubs—but they still cost $1500 to nearly $2500.
Besides, I was and remain offended at how Peloton locks its customers into a proprietary ecosystem. If you want to take a spin class on the bike’s big, beautiful screen, it has to be a Peloton class—and you pay a monthly fee in perpetuity for that, in addition to the hardware cost.
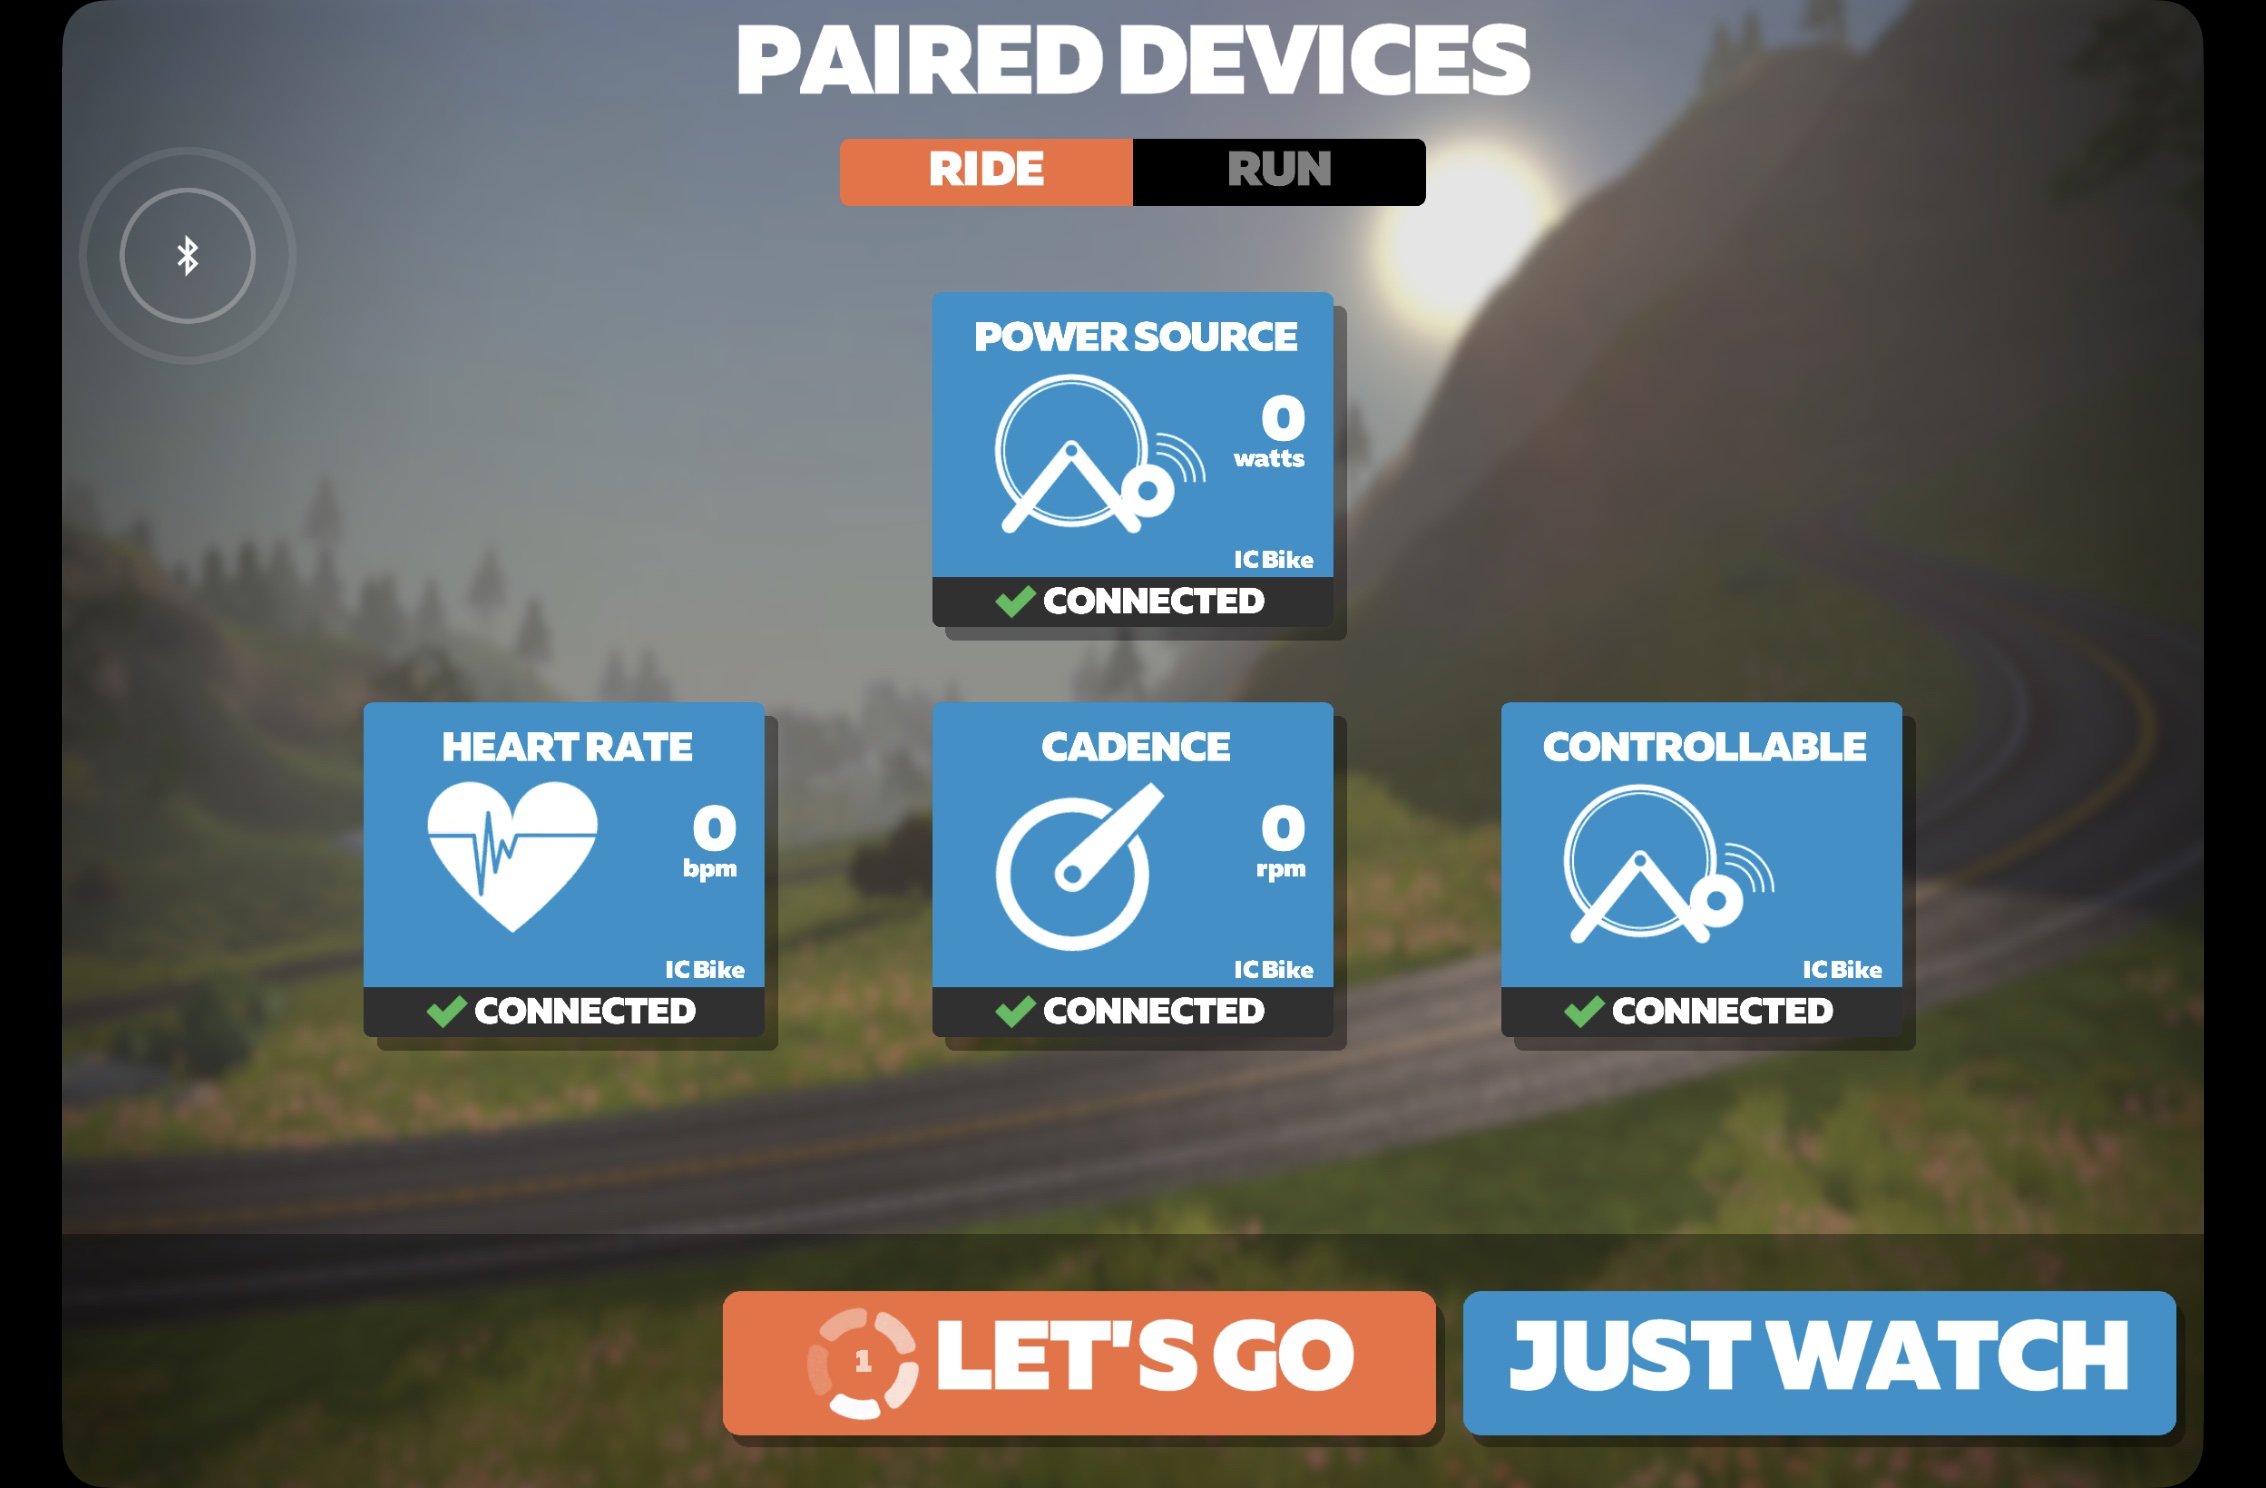
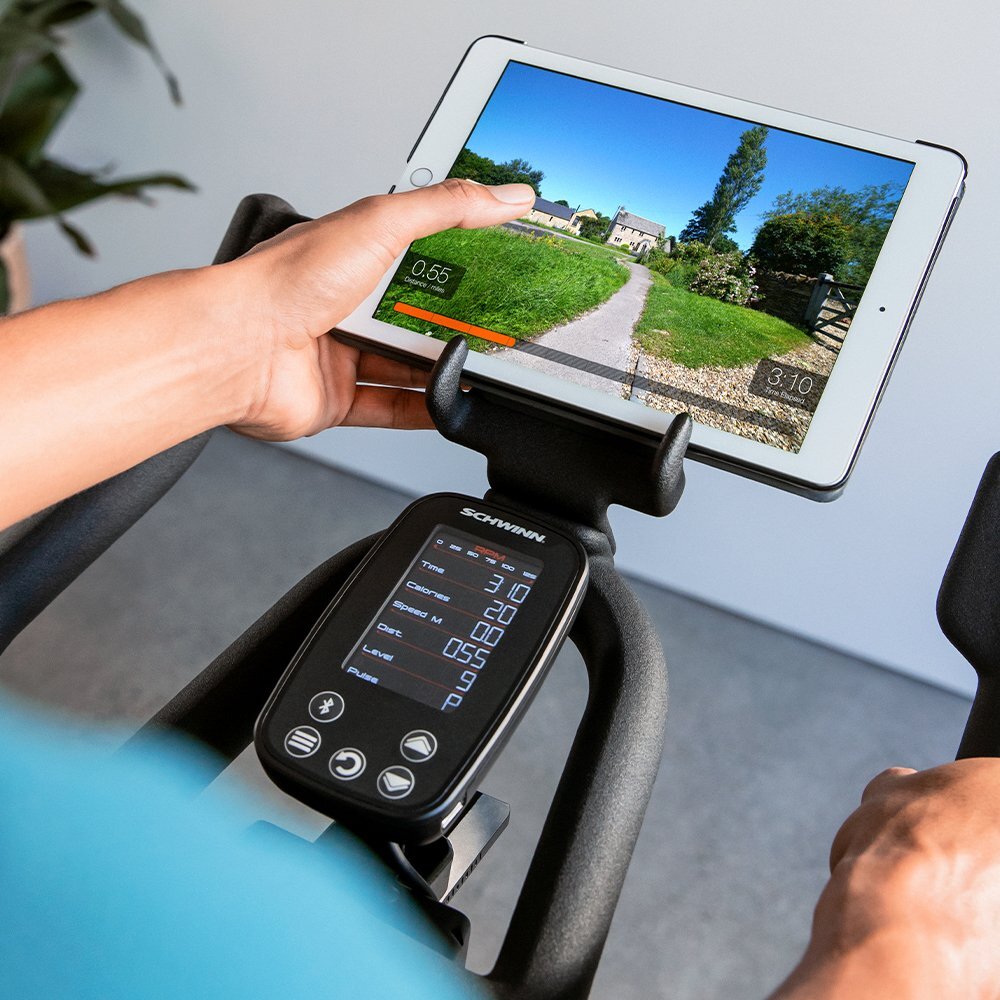
As someone who already uses a bunch of Apple-compatible exercise apps, I want a stationary bike that is flexible enough to integrate with those workouts. Moreover, I want a smart bike with no built-in screen, just a holder for an iPad or iPhone, so I can link the fitness apps to the bike via Bluetooth and then use the Apple device as the bike console while exercising.
Bowflex’s C6 Bike fits into such a role (as does its near-identical sibling, Schwinn’s IC4 Indoor Cycling Bike; the products share a parent company, Nautilus). At $799, the C6 Bike is much more affordable than a Peloton—especially if you consider that a one-year membership to Nautilus’s JRNY exercise service (a $149 value) is included in that cost.

Most important to me, the C6 Bike is a generic platform upon which I can hang a range of fitness services—including Zwift, Kinetic Fit, and even Peloton—via their apps. This does not always transpire flawlessly—there’s something to be said for integrated systems such as Peloton’s—but I prefer the freedom and variety the C6 Bike provides.
C6 Bike Hardware
The C6 Bike will be instantly familiar to spin cyclists. All the usual hardware bells and whistles are there:
- A big metal flywheel with magnetic resistance that is supposed to be dead silent but wasn’t quite
- A bright red twist knob for increasing or decreasing that resistance in fine increments
- A super-heavy bike frame that ensures you won’t wobble or tip over during frenetic workouts
- Two-sided pedals that give you the choice to use adjustable foot cages or clipless biking shoes to keep your feet in position
- Groovily curved handlebars that give you multiple ways to hold on as you pedal
- A padded phone and tablet holder bolted onto the handlebars
- The option to raise and lower the handlebars and seat (when you twist another red knob to reduce tension) and to move them forward and backward (after you flip a lever)
- Dual water bottle holders that double as hooks upon which to suspend a pair of 3-pound dumbbells (included with the bike)
The C6 Bike ships to buyers in pieces, unsurprisingly. Assembly is not rocket science, but expect some pain as you heave this beast (weighing in at 330 pounds or 150 kilograms) into position. I had to haul the C6 up to the gym area of my attic with my son’s help—and let’s just say that graphically descriptive words were uttered.
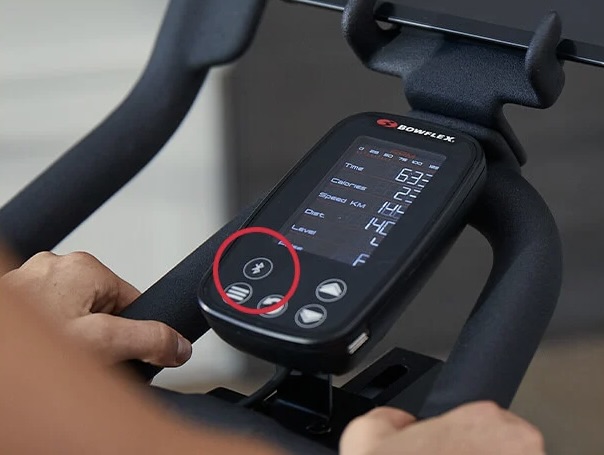
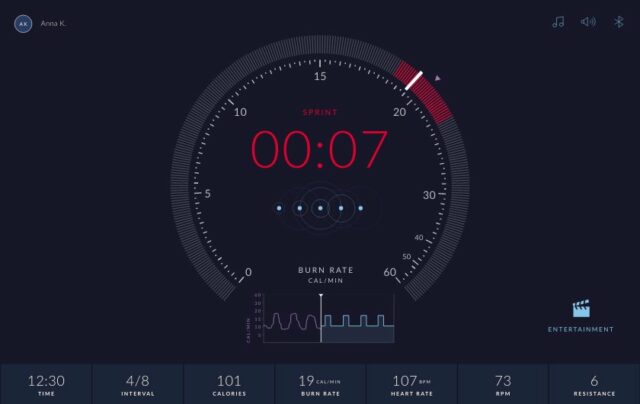
Once assembled, you plug the C6 Bike into power. That activates a basic display for those who don’t want to muck about with fitness apps and services. The console shows data such as workout duration, calories expended, speed, distance, wheel resistance level, and revolutions per minute.
If you have a heart-rate monitor, such as wrist or chest monitors sold by the likes of Wahoo, push the Bluetooth button on the bike console to set a heart icon flashing and pair the monitor with the C6 Bike. I’m told a heart-rate monitor is normally included, but my review unit didn’t come with one.
A Zwift Bike
I spent little time with the C6 Bike’s basic console because I had grander ambitions—starting with the Zwift service, my go-to for indoor cycling.
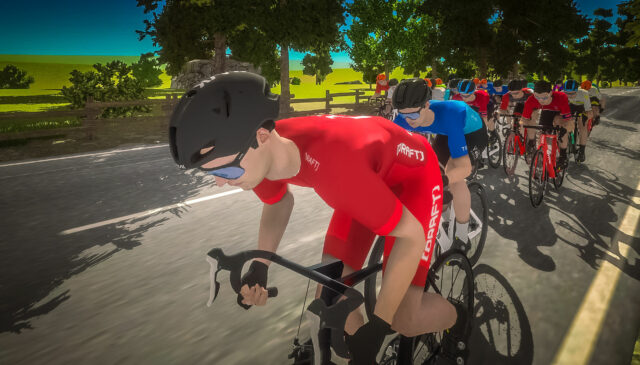
As I noted in “Zwift Transforms Stationary Bicycling into a Shared Virtual Experience” (1 July 2020), Zwift is a boon for those cycling in place within their homes because it turns dreary workouts into a game-like fitness experience.
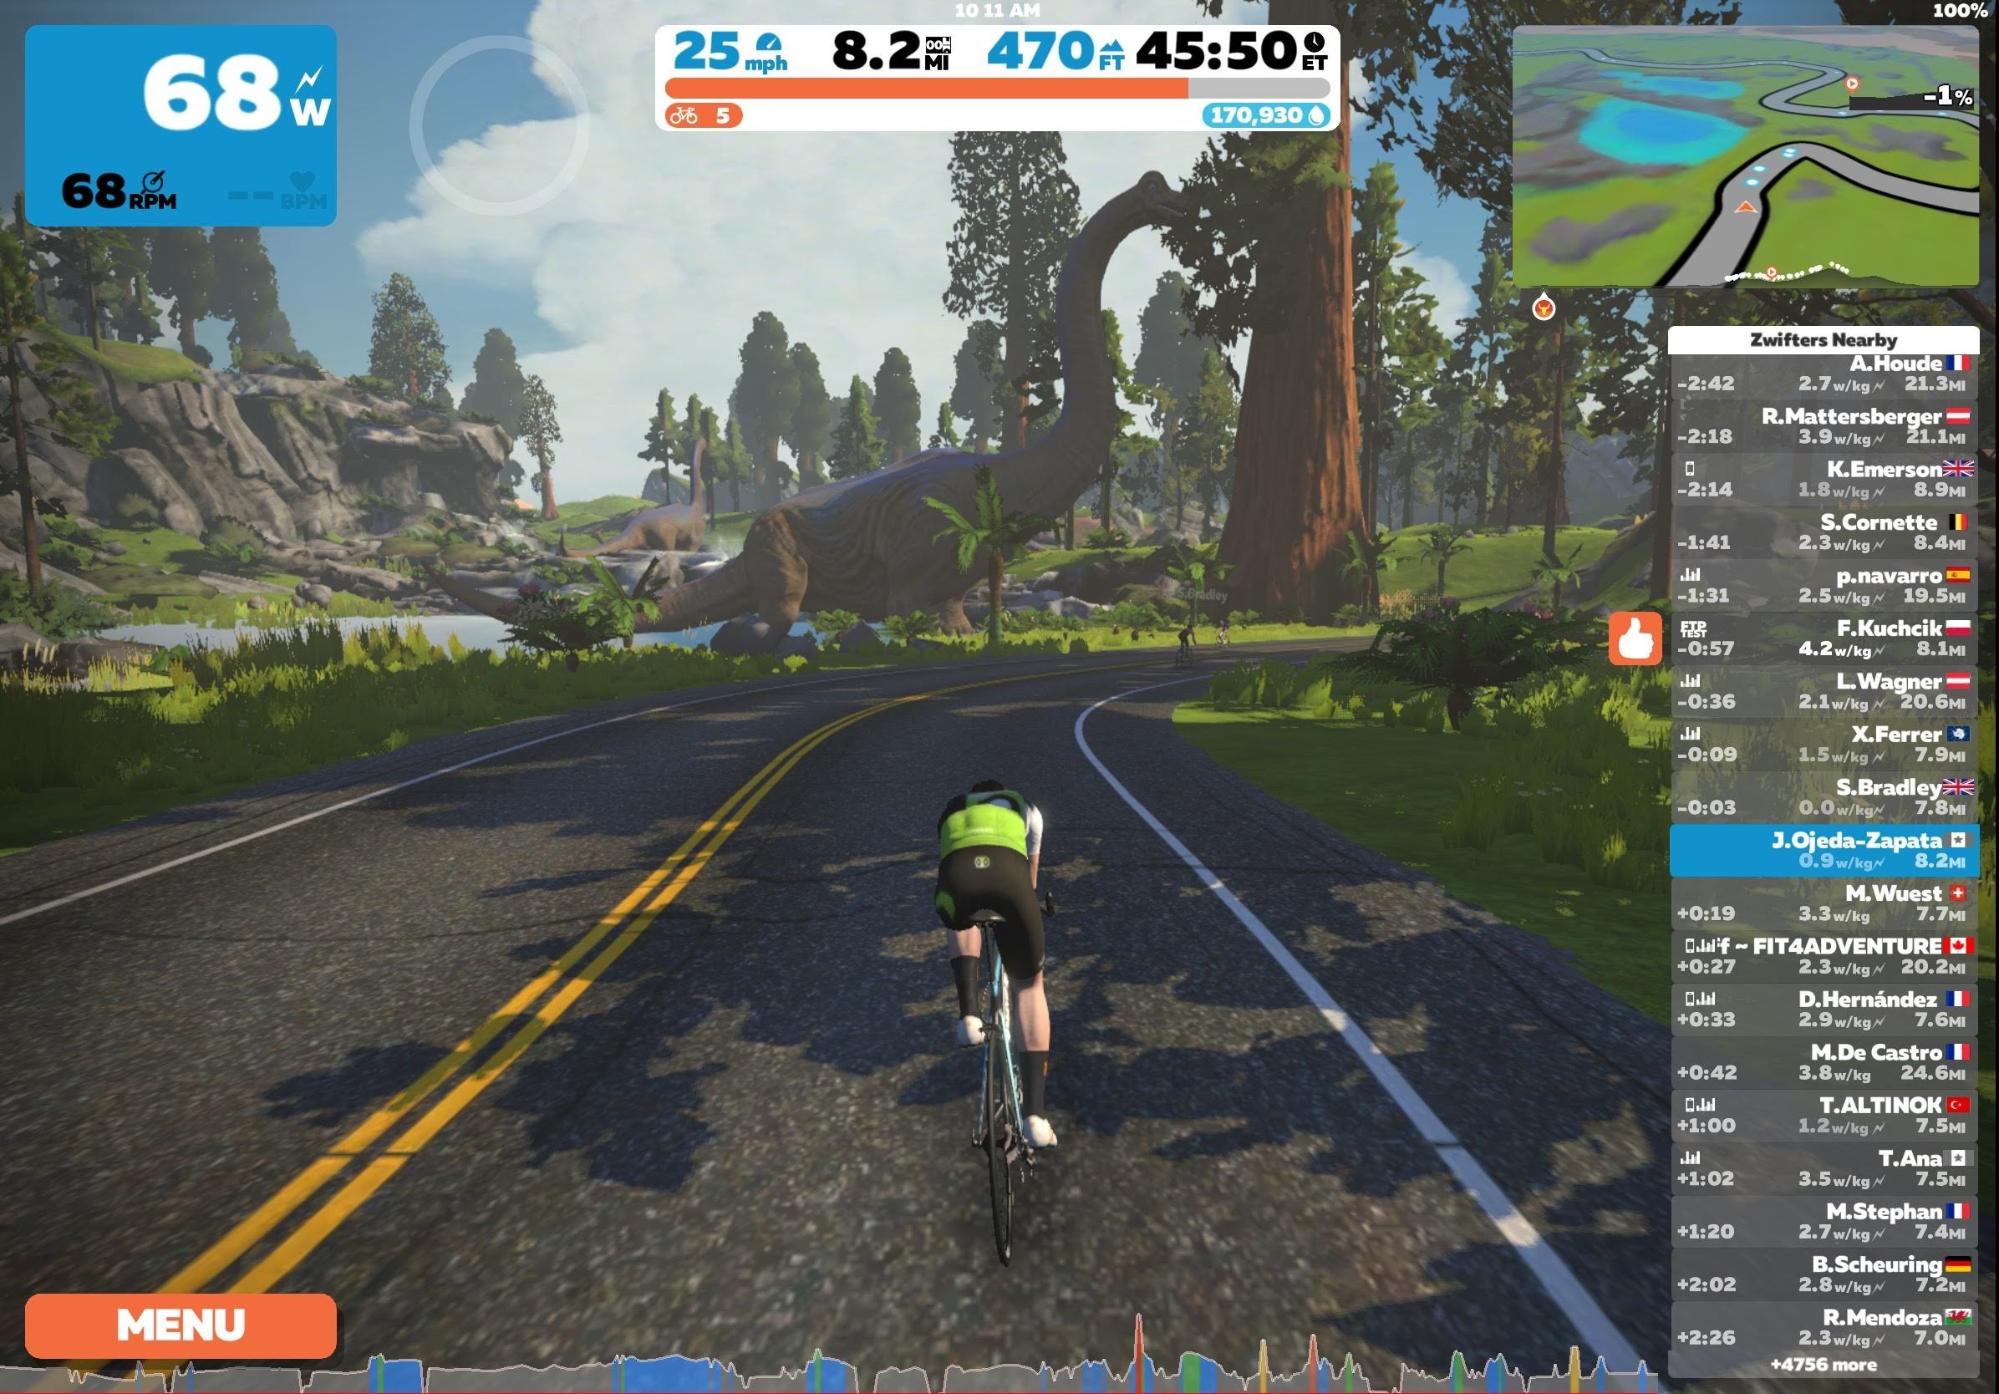
With the Zwift app running on a Mac, Apple TV, or iOS device, and a Bluetooth connection to smart bike hardware established, you can see a virtual version of yourself in exotic locales—like London, a futuristic version of New York, the fictional realm of Watopia, or the Japanese-influenced Makuri Islands. As you pedal, your avatar pedals. You can even meet virtually with your biking pals and trash talk each other on voice-chat apps while pedaling past dinosaurs and volcanoes in this cartoon-like universe.
The Zwift setups described in my earlier article consist of traditional bikes mounted on “trainers”—stands that elevate the bikes’ back wheels and hold them against heavy resistance rollers. Smart versions of such trainers connect to Apple gear via Bluetooth to enable Zwift workouts. Or, if you use a dumb trainer, you can connect sensors to your bike and person, and then link those to Zwift.
Using the C6 Bike is much less of a hassle. There’s no bike mounting, adjusting, and calibrating, as with trainers. You just launch Zwift on your Apple device, push the Bluetooth button on the C6’s panel, pause for Zwift to detect it as a data source, pick a ride, and start pedaling. Zwift purists might dislike that the C6 doesn’t look and feel like a road bike, which is what the service emulates, but I didn’t mind.
After linking to the C6 Bike, Zwift measures cadence (pedaling rate) and, supposedly, heart rate. The latter metric perplexes me since it is not connected to a heart-rate sensor attached to my wrist or chest. So how does it get data? You do have the option to use your standalone heart-rate sensor with Zwift.
You should be aware of a major limitation when using Zwift with the C6 Bike: it is not a “controllable” bike. This refers to a stationary bike or trainer that is smart enough to ratchet up physical resistance when virtually going uphill in Zwift and ease up on the tension on the downhill. Zwift controls how the ride feels, hence the term.
Here is the confusing part: Zwift detects the C6 Bike as controllable during Bluetooth pairing, which appears to be meaningless since the user derives no benefit from this designation that I can see.
Variable tension makes Zwift more realistic, so I missed it when using the C6 Bike. You can use the knob to increase or decrease resistance manually as you come upon hilly terrain in Zwift, but it’s not the same.
I had another problem when using the C6 Bike with Zwift: the bike overestimated how fast I was going and, therefore, how much territory I covered in a particular period of time. An hour-long ride that should have come in at about 12 to 15 miles, similar to my outdoor biking, was revised upwards to about 20 or 25 miles. (I’m good, but not that good.) Mathematically taking this into account on ride after ride was a hassle. And, since I upload data to Strava, an online service that documents all my cycling activity for posterity, the C6 makes me look like a cheater. As I write this, I’m unclear whether this is a Bowflex or Zwift issue; I’ll post in the comments below if and when I learn more.
A Peloton Bike
Yes, you can do Peloton rides without a Peloton bike. Just load the Peloton app on an iOS device or Apple TV, subscribe to the service for $12.99 a month—with a 30-day free trial if you’re a new user—and connect the C6 Bike to the app.
When you do so, the app tracks only cadence. It can also measure heart rate, but it prompts you to connect a separate sensor. The Apple Watch is one option for that courtesy of Peloton’s watch app, which also gives you at-a-glance metrics during a workout.
There are a few downsides to using Peloton on the C6 Bike instead of a Peloton bike. You don’t appear on Peloton leaderboards. You can’t use Peloton’s video-chat feature to communicate with other Peloton-using friends (but that’s easily replicated on an iPad with the video chat service of your choice). Worst of all, Peloton’s iOS app is missing two marquee Peloton-bike features that would make me more likely to sign up:
- Lanebreak: This new feature gamifies Peloton with what is basically Guitar Hero for cyclists, who pedal in particular rhythms instead of finger strumming to rack up points.
- Scenic Rides: Instead of an instructor on the screen, you watch scenic vistas unfurl before you as you pedal. Enjoy such tours in locations like Savannah, Hawaii, and Big Sur.
A Kinetic Bike
Kurt Kinetic is a well-known maker of bike trainers—including the $599 Kinetic Rock and Roll model that I tested (and that now appears to be sold out).
Kinetic also makes software, notably the Kinetic iOS app. It is not as cool as Zwift, but many serious cyclists regard it as a gold standard because of its specialized fitness tracking. I have no idea what “lactate threshold” is, but the app measures that.
The Kinetic app also connects to the C6 Bike and provides more data than other apps, including speed, cadence, and heart rate—but, again, where is that data coming from?
Peloton and Kinetic, Together
Digging around the Web, I discovered that some users of the C6 Bike use the Peloton and Kinetic apps in tandem—often with an iPad split screen. The Peloton app gives them the spin-class experience they crave in a data-light fashion, while the Kinetic app fills in additional metrics that nerdier riders require.
You can really get into the weeds here, so rather than try to explain it all, I’ll point you to lifestyle blogger Leslie Lambert. She has written a trio of posts that dissect how she transformed her bike, the near-identical IC4 Indoor Cycling Bike from Schwinn, into what she calls a “DIY Peloton.”
Other Bike Apps
You aren’t limited to the big names of online fitness. Here are other C6 Bike-compatible apps that stand out for me:
- Explore the World: This iOS-based Nautilus app provides what its name implies: You get to pedal along scenic routes around the world. As with Peloton’s Scenic Rides, video-recorded paths and roads unfurl before you. You get six trips such as the French Riviera and the Mojave Desert for free, and dozens more unlock for $9.99 a month or $59.99 a year.

- JRNY: Nautilus intends JRNY to be the flagship iOS app for its bike users, but I have mixed feelings. It offers spin-bike workouts like Peloton, though with a relatively limited class selection, and it integrates better with the hardware to measure things like burn rate. Other features fall flat. Video tours à la Explore the World are built into workouts, but it’s jarring to get verbal prompts from a faceless fitness instructor while riding along a Paris sidewalk. The option to play background music further muddies the experience. I don’t like it. JRNY is free for a year with a bike purchase, as noted, and $19.99 a month after that.
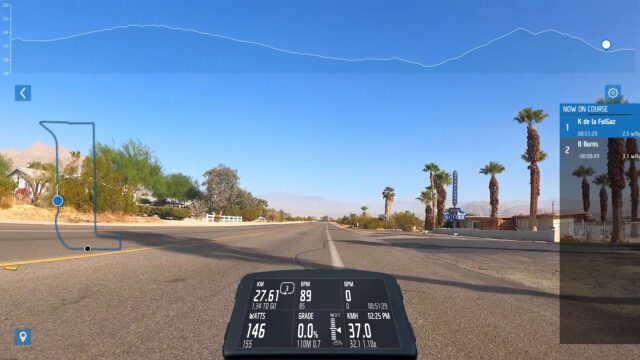
- RGT Cycling: Think of this iOS and Apple TV service as a cross between Zwift and Explore the World, with a bit of Kinetic thrown in. Rides in places worldwide are computer-generated but more lifelike than those in Zwift. The app also offers metrics-focused workouts. You can meet your friends for group rides. RGT Cycling has some functionality for free, and you get the rest for $9.99 a month.
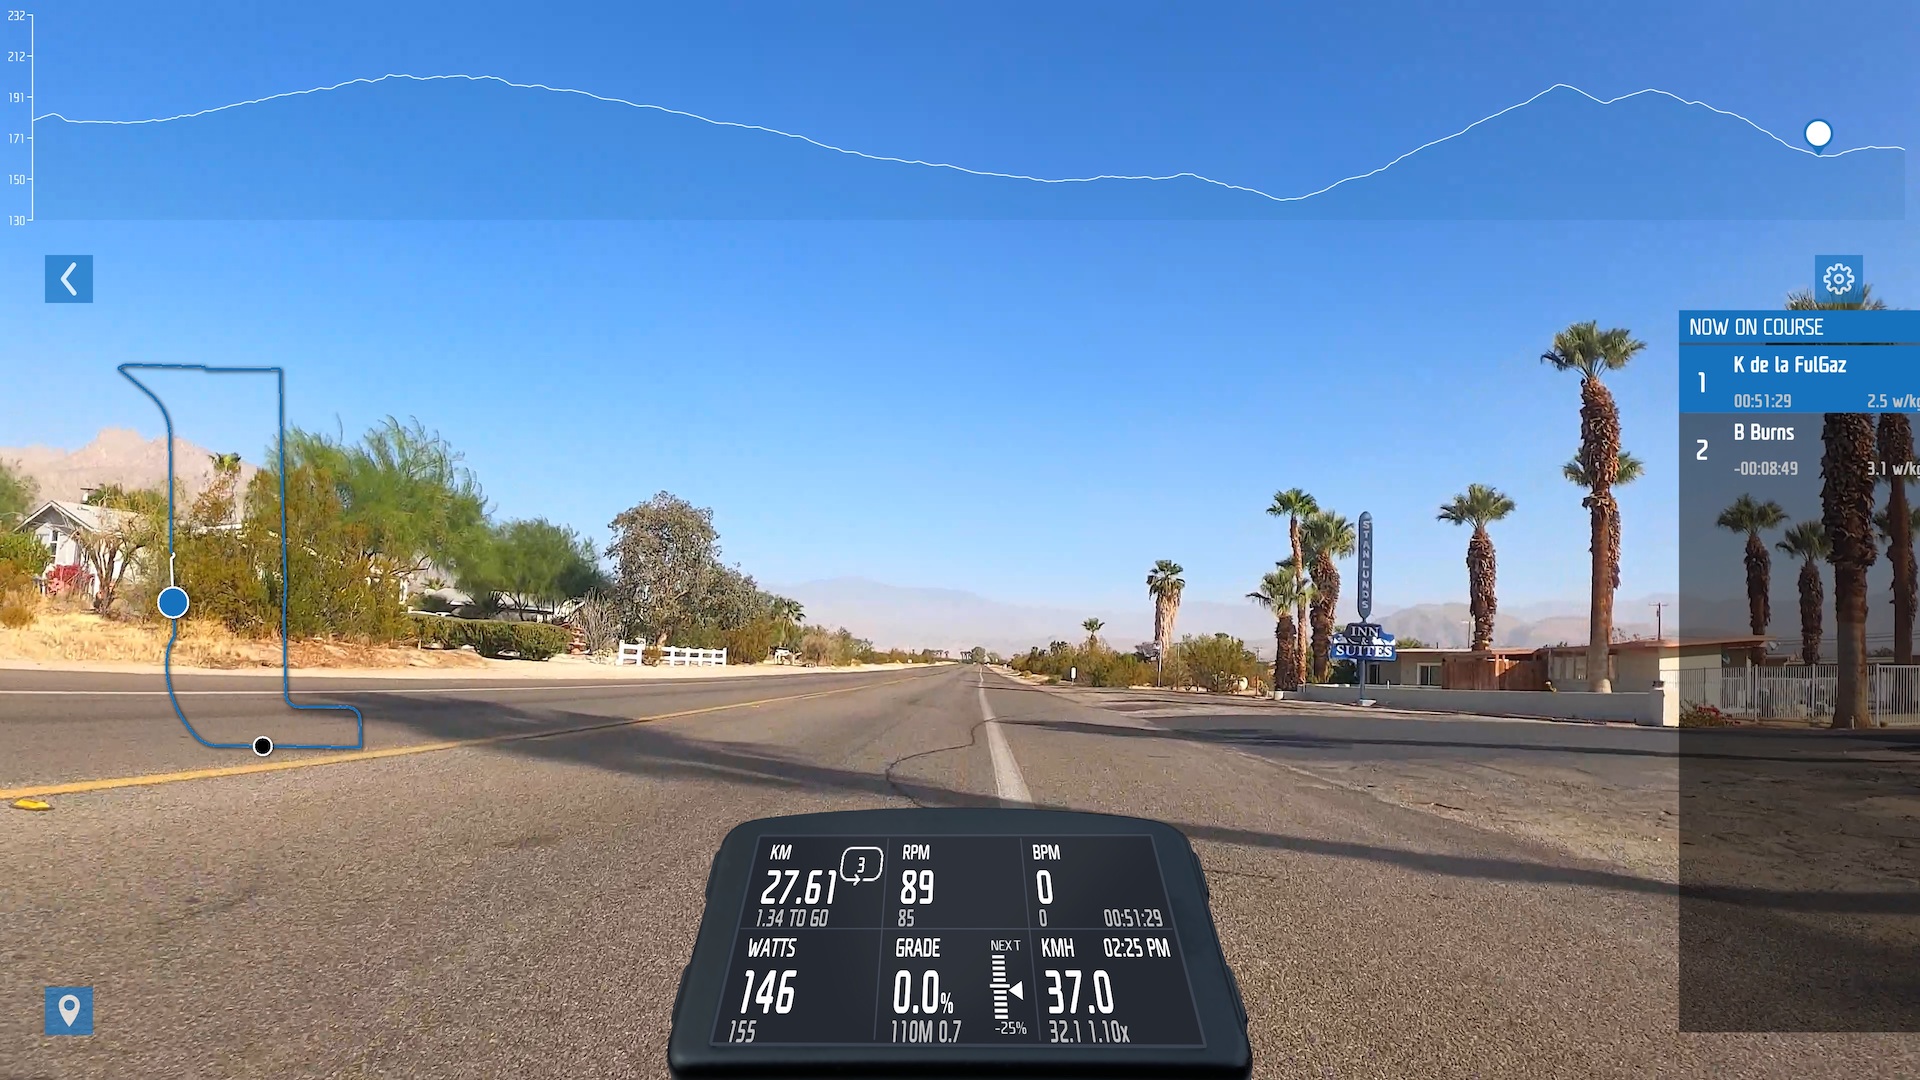
- FulGaz: This service is like Explore the World but is intended more for hardcore bikers than casual riders. The video-recorded routes were lovely as they unfurled before me but sometimes did not stop when I did (I suspect this is due to a minor incompatibility with the C6 Bike). I tested the service using iOS and Apple TV; there’s also a macOS app. Fulgaz costs $12.99 a month or $108.99 a year (the latter gives you the option to add a second person for free).


Other apps I did not test but verified as compatible with the C6 Bike include:
- Bkool Fitness: This Peloton-style spin-cycling app is compatible with the iPhone, iPad, and Apple Watch.
- Bkool Cycling: Bkool Fitness’s road bike-style sibling places you on scenic roadways and in velodromes that can be experienced as videos, 3D avatars, or maps; it supports the iPhone, iPad, and Mac.
- Kinomap: This is yet another video-based outdoor cycling (as well as running and rowing) simulator for the iPhone, iPad, and Apple Watch.
- Rouvy: This outdoor cycling simulator cleverly places computer-generated riders upon video-recorded routes; it supports the iPhone, iPad, and Apple TV.
Bowflex cites other fitness apps—such as Systm (formerly Sufferfest), TrainerRoad, and Tacx Training—as compatible with the C6 Bike.
Is the C6 Bike Right for You?
Not everyone will follow my lead in avoiding Peloton bikes. If you have an ample budget and are drawn to the rich culture with charismatic instructors that Peloton has fashioned over the years, don’t let me stop you. Peloton has lately seen financial troubles and seems to have an uncertain future, with the possibility of being acquired (Apple has been mentioned as a potential buyer, but that seems highly unlikely). But I don’t believe its bikes will be obsolete anytime soon, even though Bloomberg’s Mark Gurman has recommended that Peloton get out of hardware entirely.
What bothers me about Peloton, in addition to the steep hardware cost, is the service lock-in. With the C6 Bike, I have at my disposal a veritable buffet of available services—even Peloton, albeit in a form that’s more limited than what Peloton bike owners enjoy.
Before you buy a C6 Bike, however, ask yourself a few questions:
- Do you primarily gravitate towards spin-style exercising or road-style cycling? Assuming it’s the latter, consider whether the C6 Bike’s spin design would bother you. I am fine Zwifting on the bike, but road biking diehards might feel differently. The C6 gives you the flexibility to find workouts in either category.
- If you are a road-biking enthusiast, are you a stickler for realism? Remember that the C6 Bike isn’t controllable, so it cannot adjust pedal tension to match hillier terrain in Zwift and other services. If you want that capability at a reasonable cost, you are better off installing your road bike on a smart trainer.
- Do you just want a spin bike at a nice price, perhaps to use with Apple’s Fitness+? Sadly, Fitness+ can’t interface with the C6 Bike via Bluetooth. However, that does not matter much because you only need an Apple Watch to enjoy Fitness+ spin-bike workouts regardless of the bike you’re using. The C6 fits right in.
Bottom line: the C6 Bike has limitations, but overall, it’s a flexible and attractively priced spin bike with which you can explore a universe of workout options.
Here Be Digital Dragons: Musings on Modern Mapping
We’ve come a long way from “Here be dragons” (and be sure to read this article from The Atlantic about that phrase), but maps retain their power to inform even into the digital age. I’ve been working with mapping services a lot of late and wanted to share some of my experiences in the hope that they’ll help you boost your mapping game beyond simple navigation.
Making Maps
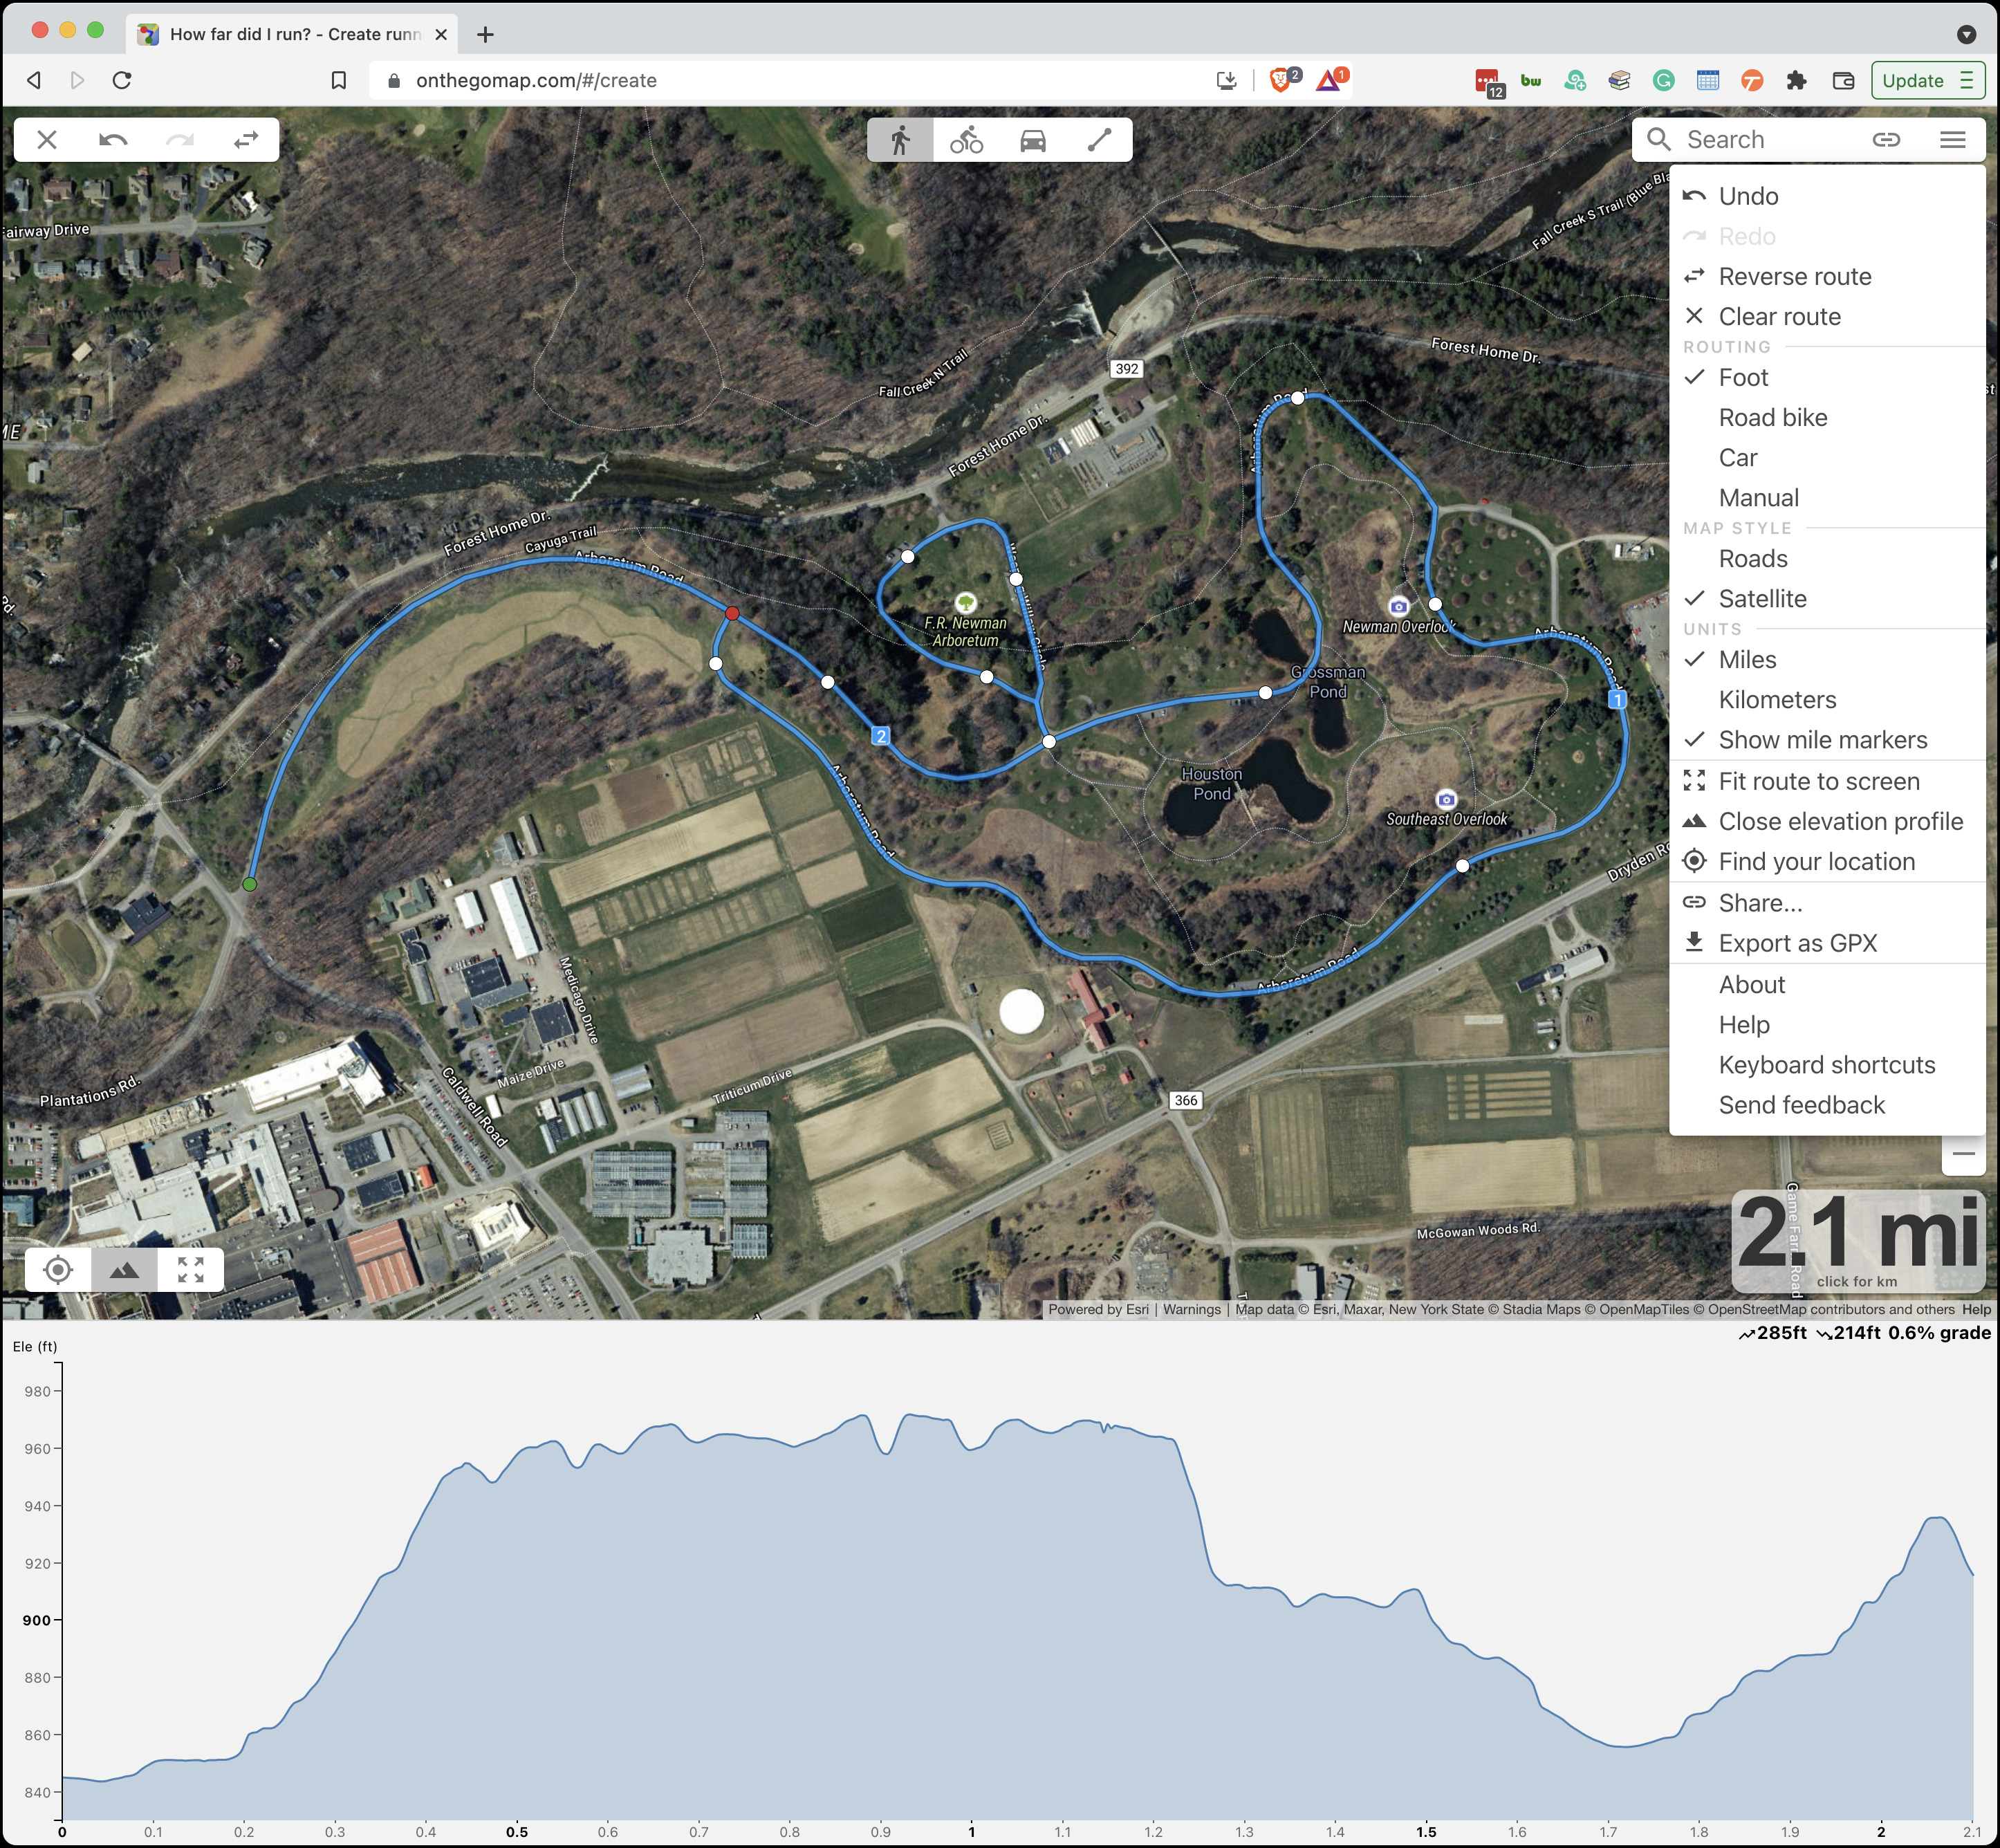
Because I’m a runner and race director, I often need to map out a running course to determine distances and share with others. Numerous services provide such features, but I’ve found On The Go Map best at providing the features I need in an easy-to-use interface. (For mapping out a biking route, where ending up with a cue sheet listing all the turns is incredibly helpful, I would switch to Ride With GPS.)
On The Go Map’s pop-up menu offers all the key features: satellite view, automatic routing options, support for Command-Z to undo inadvertent clicks, manual routing for when you don’t want to follow an obvious road or path, distance markers (and an overall distance display that can switch to kilometers with a click), an optional elevation profile, and the capability to share routes. You can even drag the points you’ve dropped to adjust them instead of having to undo and redo multiple steps.
I almost always work in the Satellite map style because I’m creating routes in familiar areas, so I find it easier to view the area from above rather than parse the text labels in the Roads map style. I rely heavily on the Foot routing option, where I can just click anywhere on a road or path to have On The Go Map draw my route there. It occasionally gets confused about walking paths and trails, especially when making connections to roads. In those cases, the workaround is to switch briefly to Manual mode, which draws straight lines between click points. Once I’m done, the Share option provides a shortened URL to the completed route.
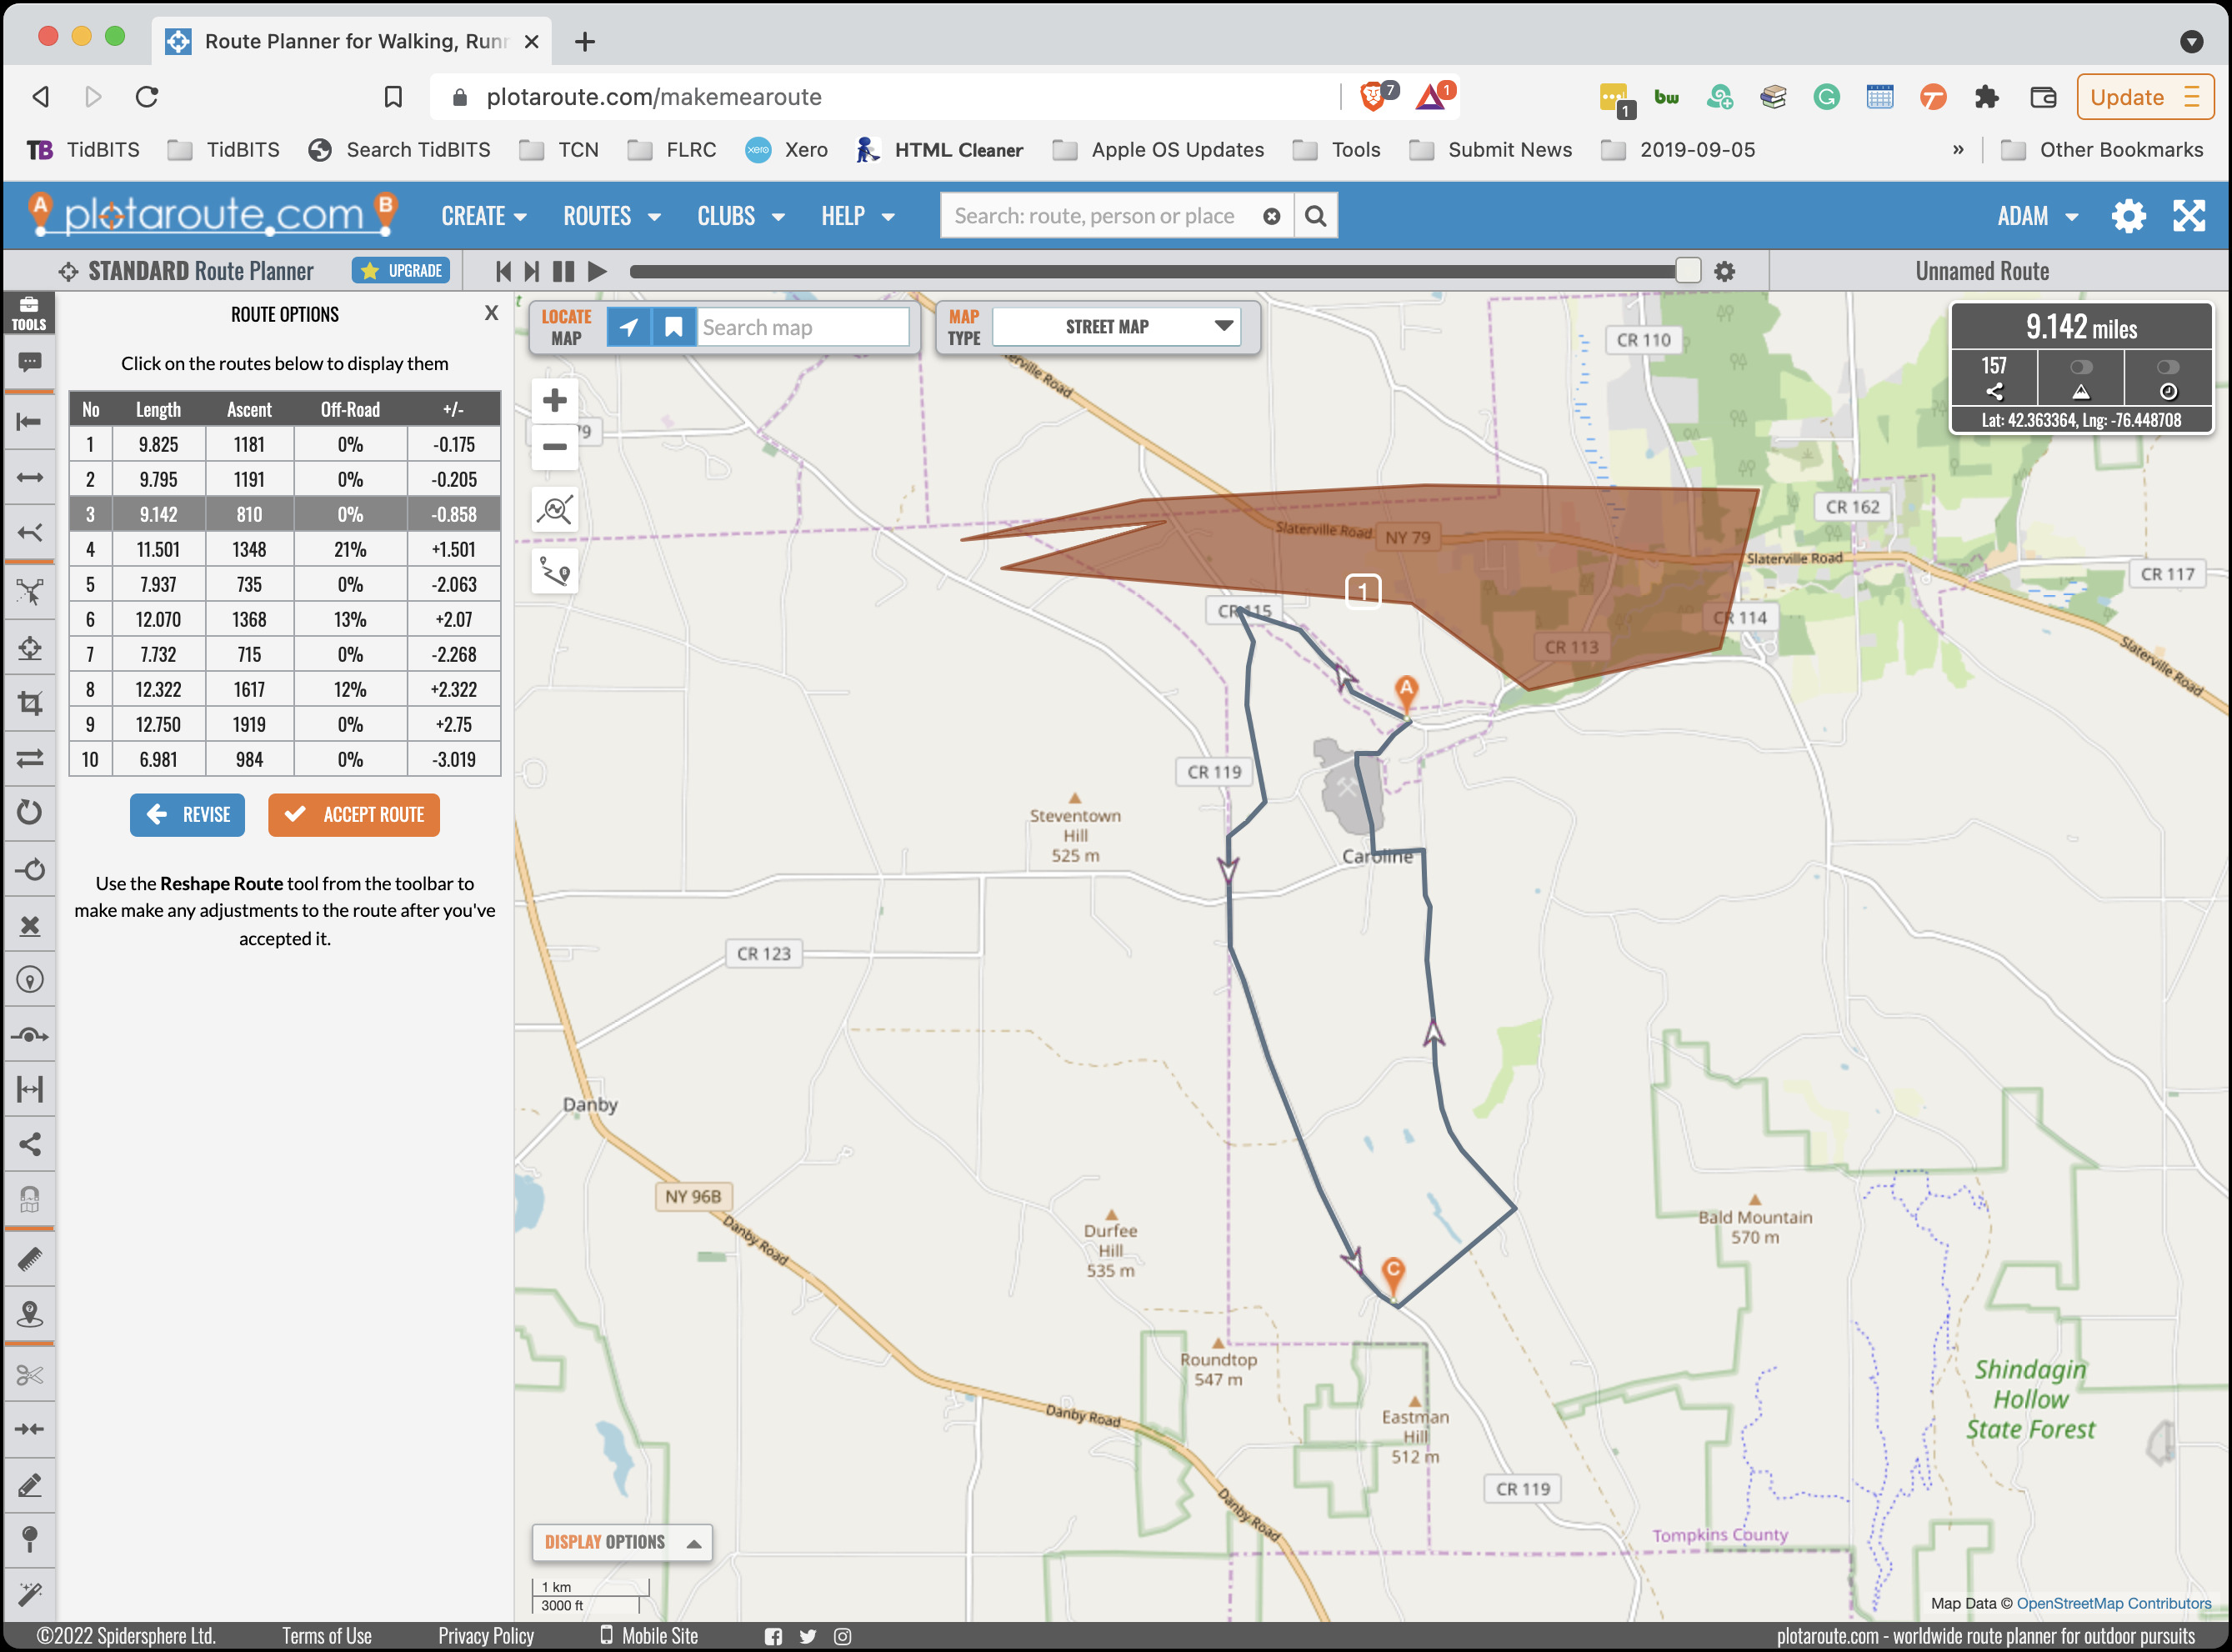
On The Go Map is all you need when you know where you want your course to go or when the number of possibilities is quite limited. But what if you are looking for a 10-mile course in an unfamiliar area? Plotaroute.com might be helpful in that case. It has all of On The Go Map’s features and more, albeit in a cluttered, difficult-to-use interface. What really sets it apart is its Make Me A Route feature, which attempts to identify routes that approximate a specified distance in a particular area. You can set a waypoint to encourage Plotaroute to go in a particular direction, and you can also block off areas that it shouldn’t include. In the screenshot below, I’ve blocked off some parts at the top of the map and put a waypoint (the C marker) down toward the bottom.
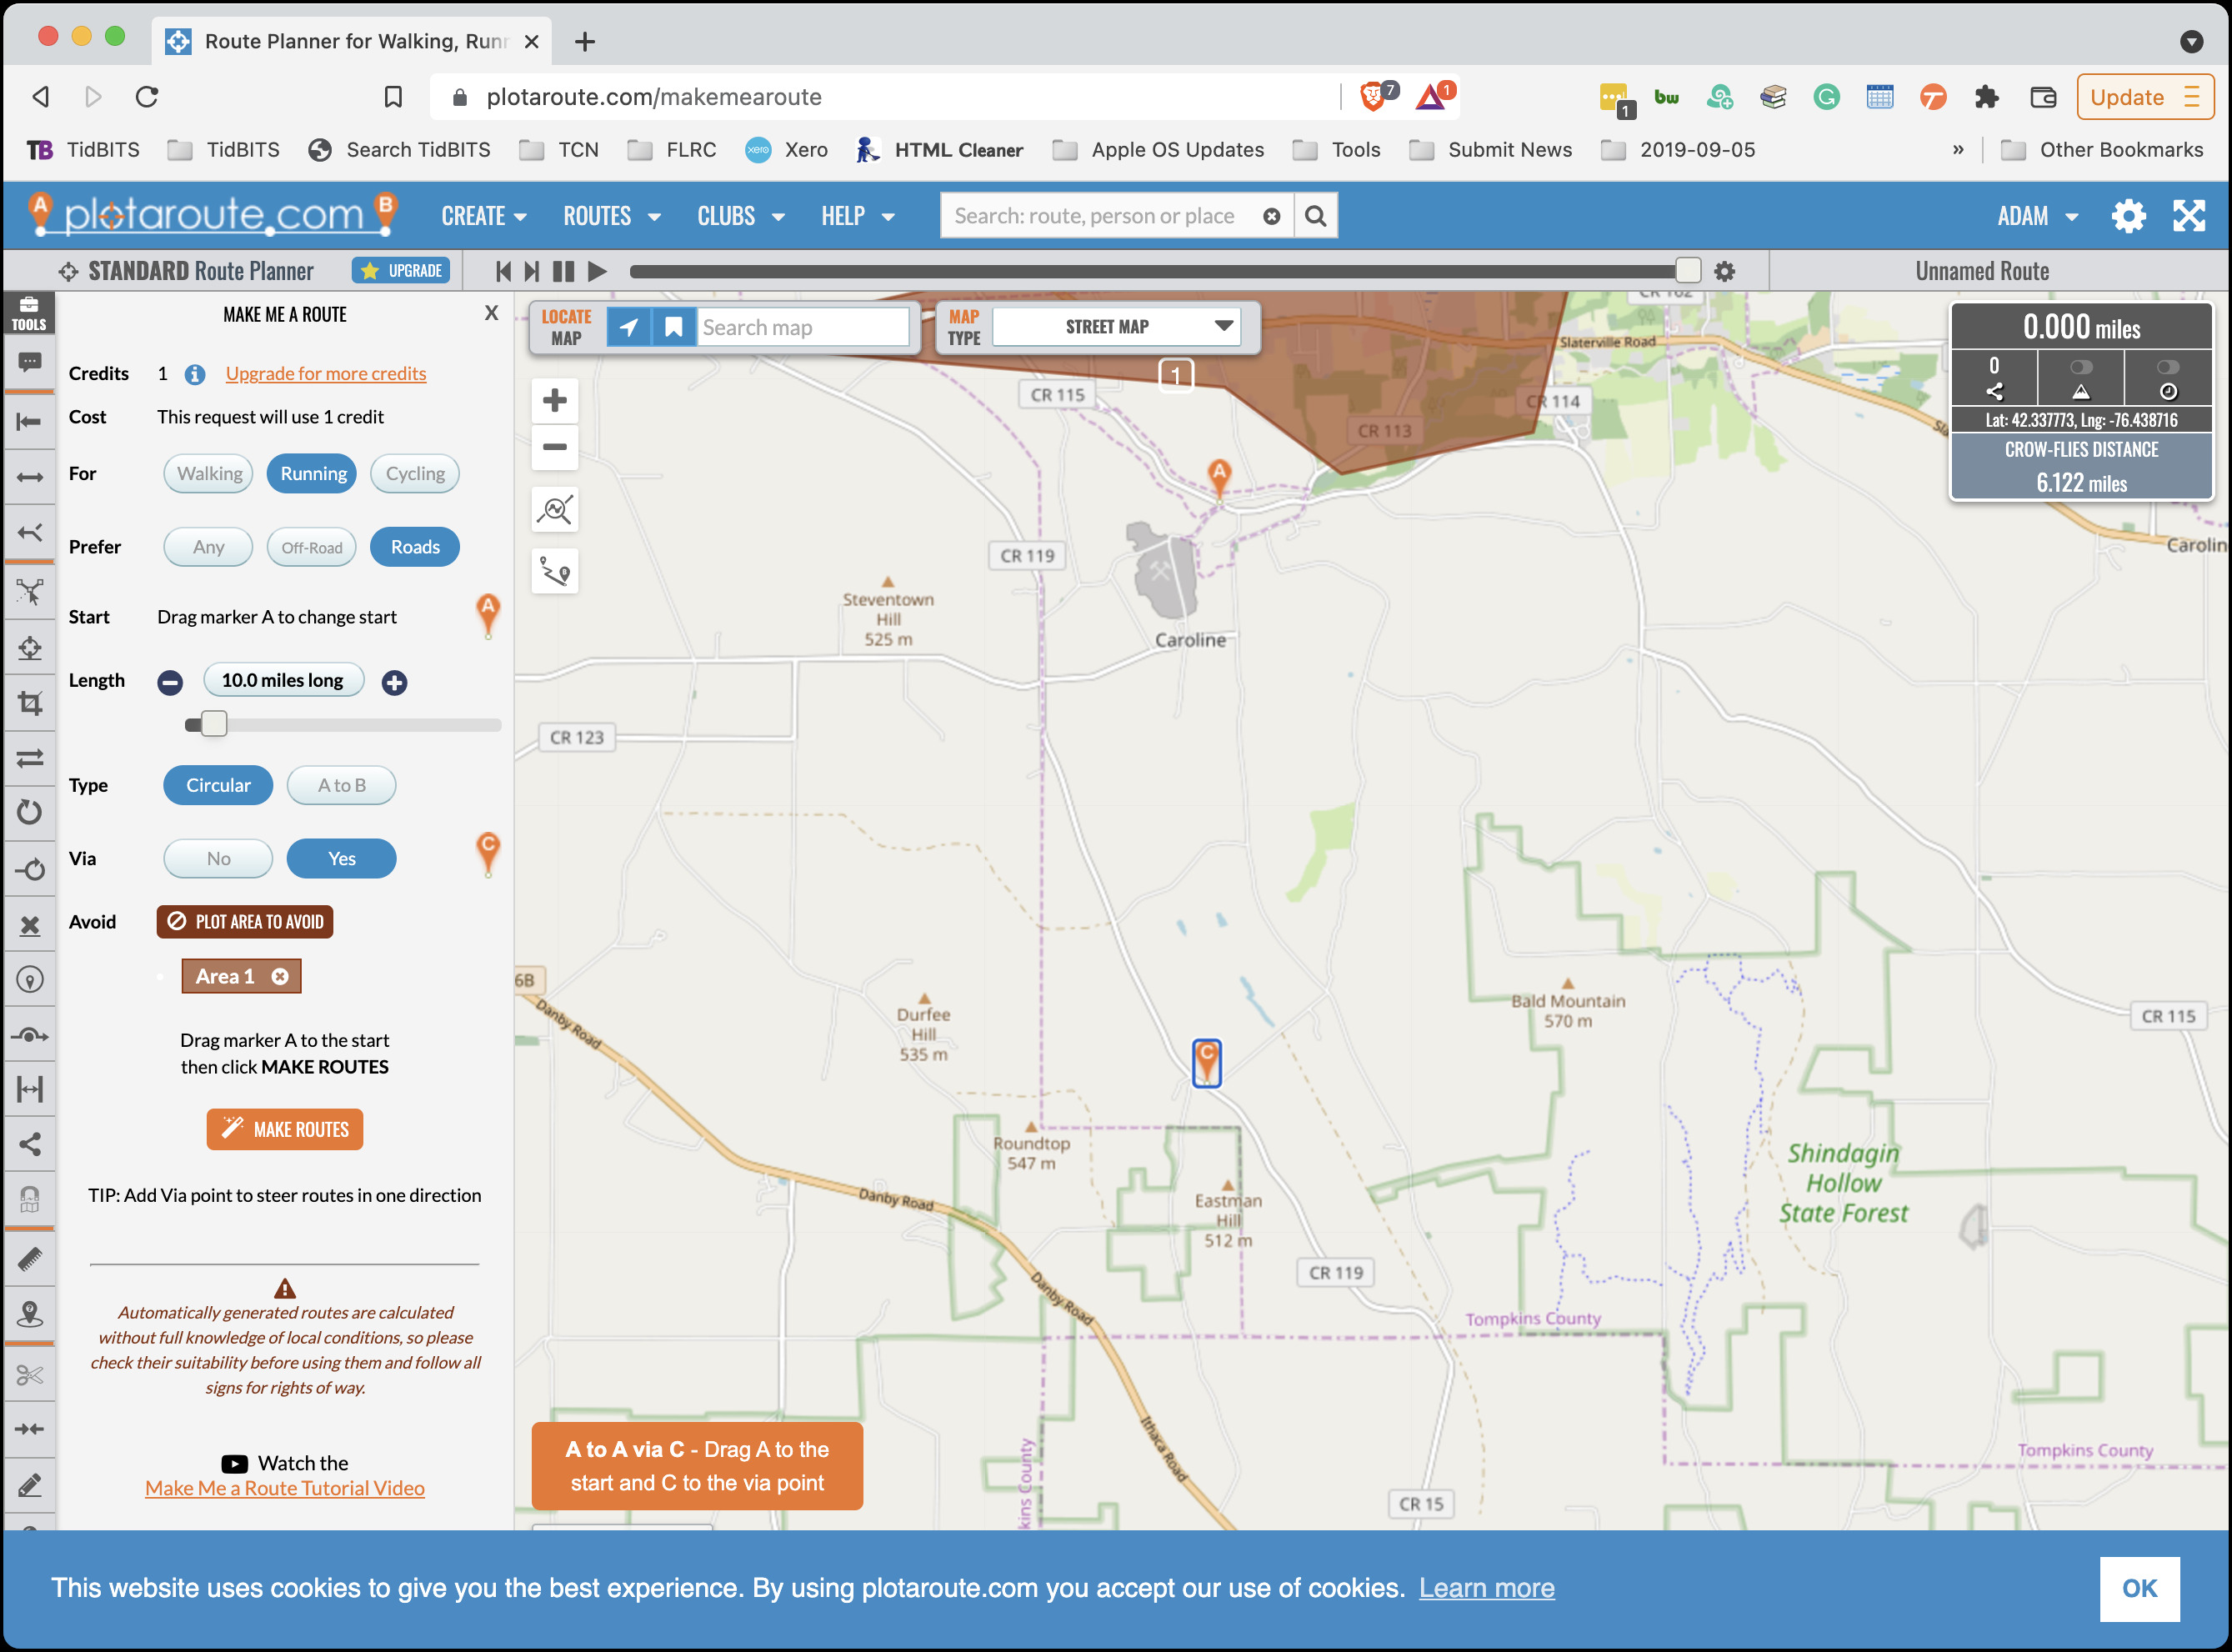
After indicating that I wanted a circular running route that should prefer roads and aim for about 10 miles, I clicked the Make Routes button and received ten suggestions. Most involved more hills than I wanted or weren’t close enough in distance, but course #3 wasn’t bad. I could see some ways to get it closer to 10 miles, but I found Plotaroute’s tools and interface for modifying courses so daunting that I took its suggestions back to On The Go Map.
Plotaroute’s Make Me A Route feature is free, like all of the service’s basic features, but you can make only two routes per day. To increase that to 20 routes per day and get a bunch of other features, you can pay $25 per year for a premium membership.
Following Maps
I want to mention another mapping service that’s unique as far as I know: RunGo. Visual maps work well for courses on well-marked roads, as shown above, but they’re less helpful for people trying to follow a trail course in the woods. Traditionally, the fallback has been to supplement a visual map with written directions like “At the intersection with the big tree, take the sharp right, run along the fence line to the road, and pick up the trail on the other side 100 meters to the west.” Particularly when running, having to stop repeatedly to refer to and interpret maps and directions is annoying.
Instead, RunGo lets you create custom routes that provide users with turn-by-turn audible directions on an iPhone, Apple Watch, or Android smartphone, just like Apple’s Maps and Google Maps. The easiest way to create a course is to import a GPX track of something you’ve completed already and then customize each important turn with descriptive text. In the example below, you can see that the trails are marked, so I was able to provide instructions like “Turn right onto Y6.” It’s painstaking work, but patience is rewarded.
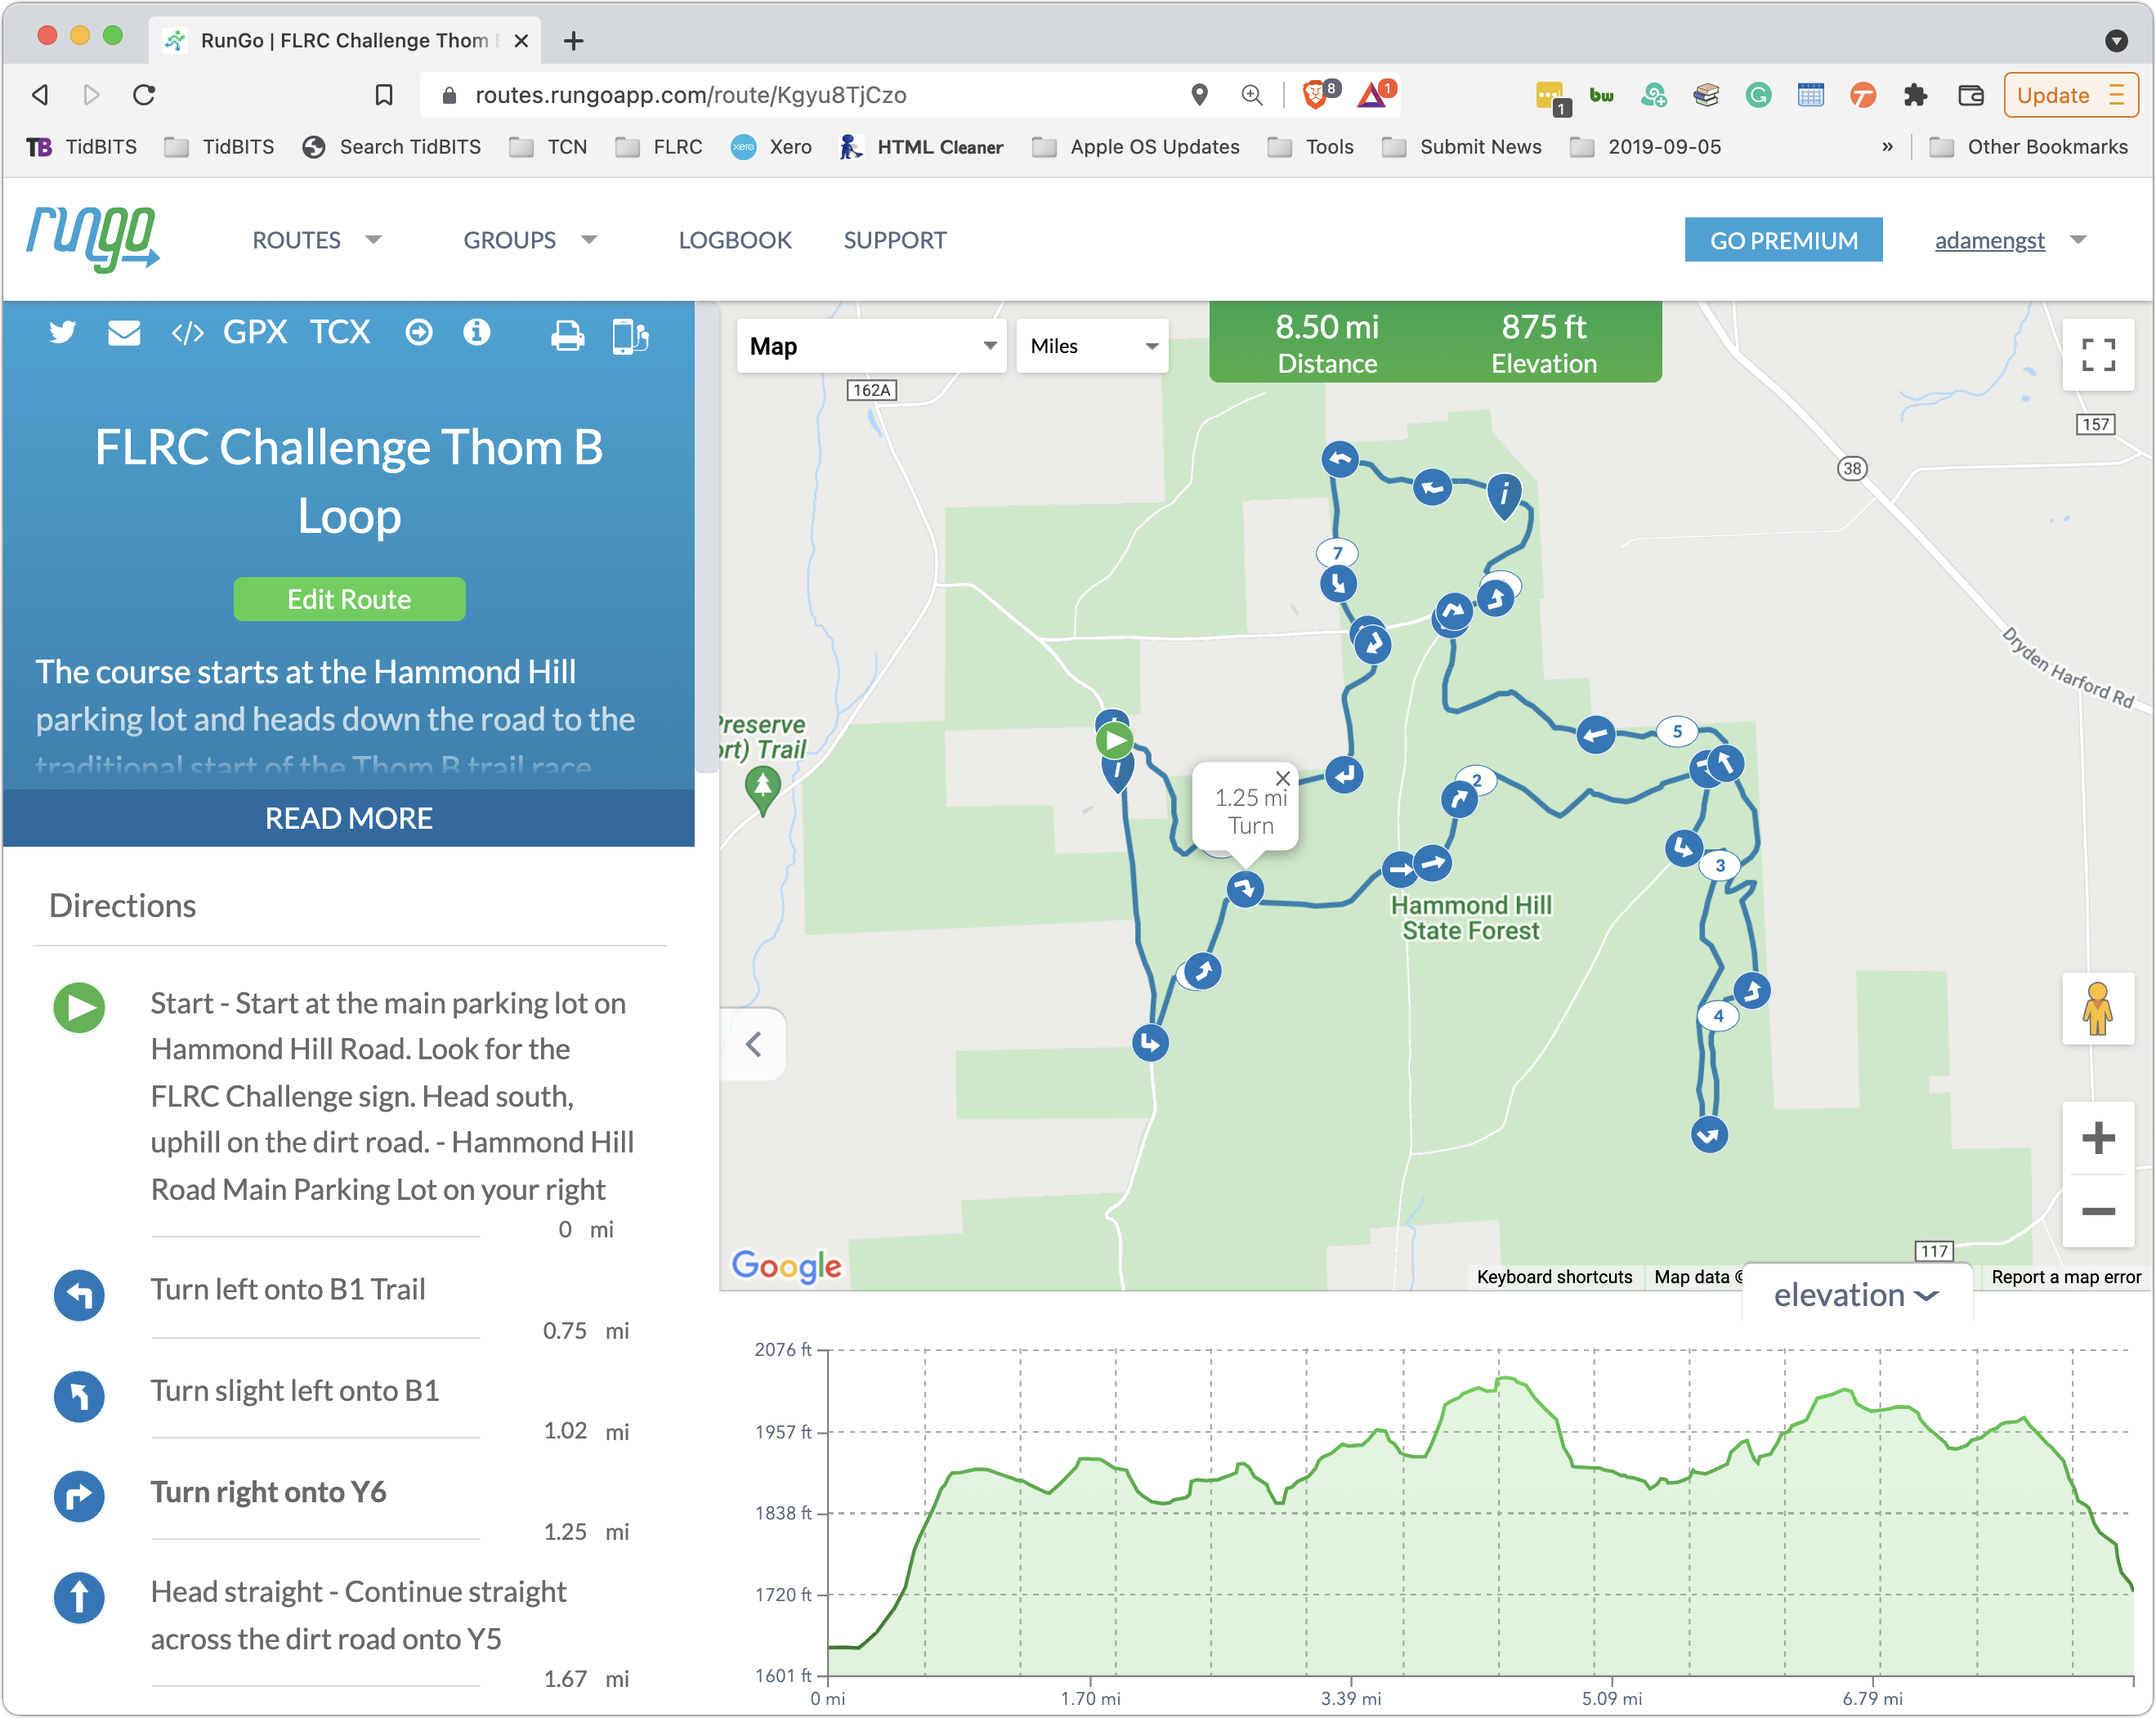
When it comes time to run a RunGo course, you load it into your iPhone or Apple Watch when you have Internet connectivity. Once a course is loaded, RunGo doesn’t require Internet access, which is necessary in the sort of natural areas that lend themselves to trail races and hikes. Start the app, start running, and every time the app detects that you’re nearing a turn using your device’s GPS, it will say something like, “In 47 seconds, turn right on Y6.”
I’ve used RunGo a number of times on my Apple Watch, and overall, it works well. My experience is that even though it theoretically knows how fast you’re moving, it often gets the distances somewhat wrong, so it will tell me to turn in 47 seconds even though I’m almost on top of the turn. That may also be related to GPS inaccuracy. The voice on the Apple Watch is easy to hear when you’re by yourself, but if you’re talking with someone else, you can miss it. (I’ve never tried it on the iPhone because I hate carrying an iPhone when running.)
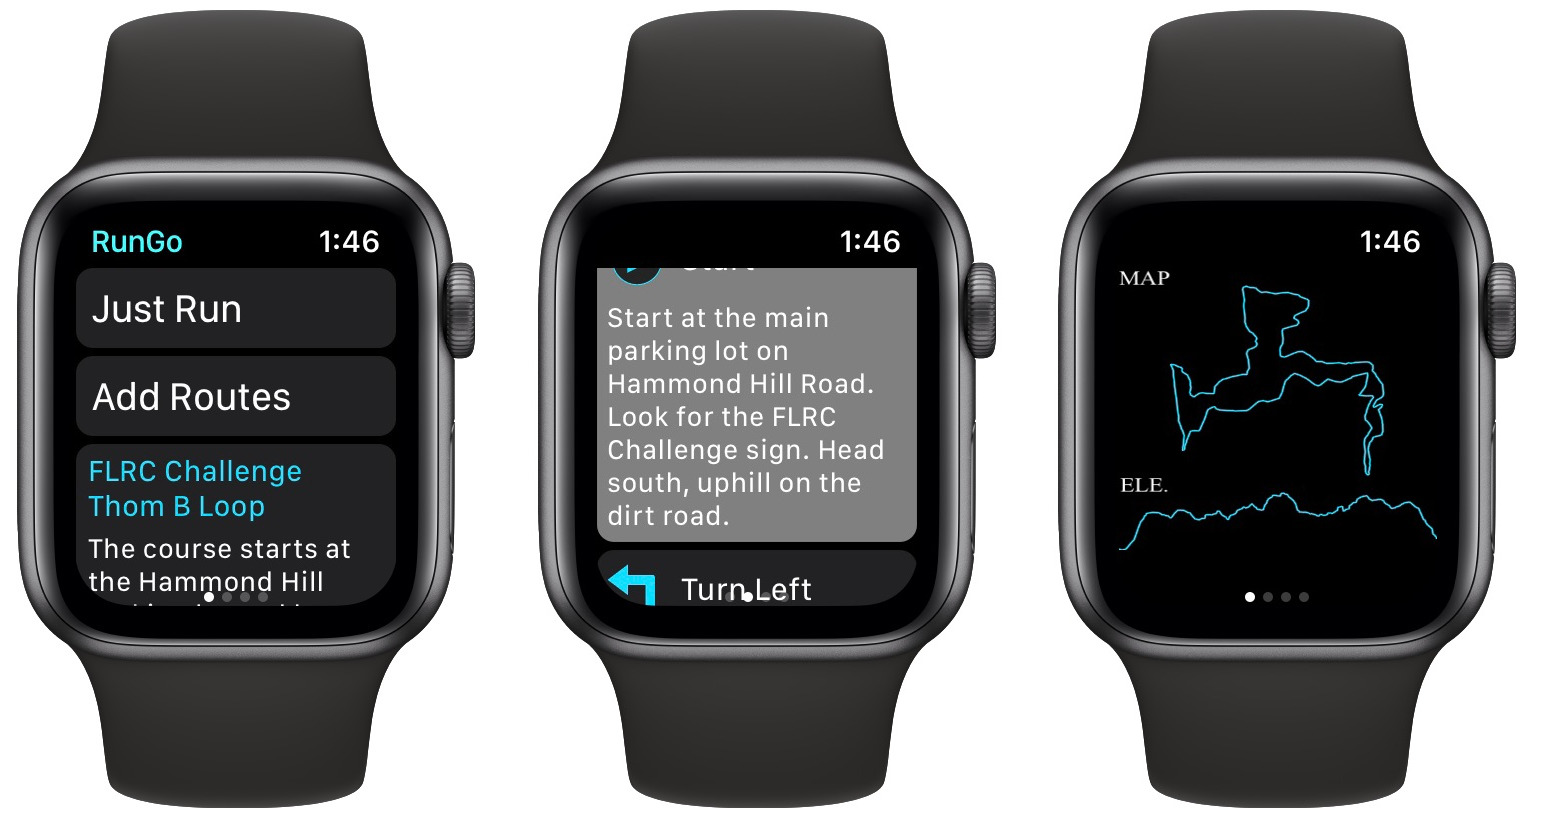
RunGo is good at informing you of turns on the specified course, and it will alert you if you stray off course, but getting back on course once you’re off is still a chore, particularly if you’re using the Apple Watch. If you use an iPhone, you could see better where you were in relation to the course.
You can use RunGo for free for creating and following routes, but a RunGo Premium subscription ($3.99 per month, $29.99 per year, or $59.99 for unlimited) lets you make more routes, provides additional route creation options, imports from Strava, supports more than one route on your Apple Watch, provides live tracking for peace of mind, and offers voice-guided interval training.
Annotating Maps
Perhaps the most common thing I do with maps is share screenshots of map locations to show someone where to go or indicate where something should happen. In such situations, I generally fall back on Apple’s Maps app on the Mac simply because it’s a standalone app that makes grabbing a screenshot easier than working through a browser.
Once I have the screenshot, I launch my trusty copy of Preview, which remains my favorite tool for quick annotations (admittedly, I know Preview really well from having written Take Control of Preview). Red circles, arrows, and boxes do a great job of calling out key spots, and it’s easy to drag the resulting PNG file into an email message or online post. I recently needed to give a presentation about a large race to interested parties on the Cornell campus, so I dropped my annotated map screenshots into a Google Slides document. That worked perfectly both for showing during the Zoom call and sharing via URL so they could examine my maps more closely later.

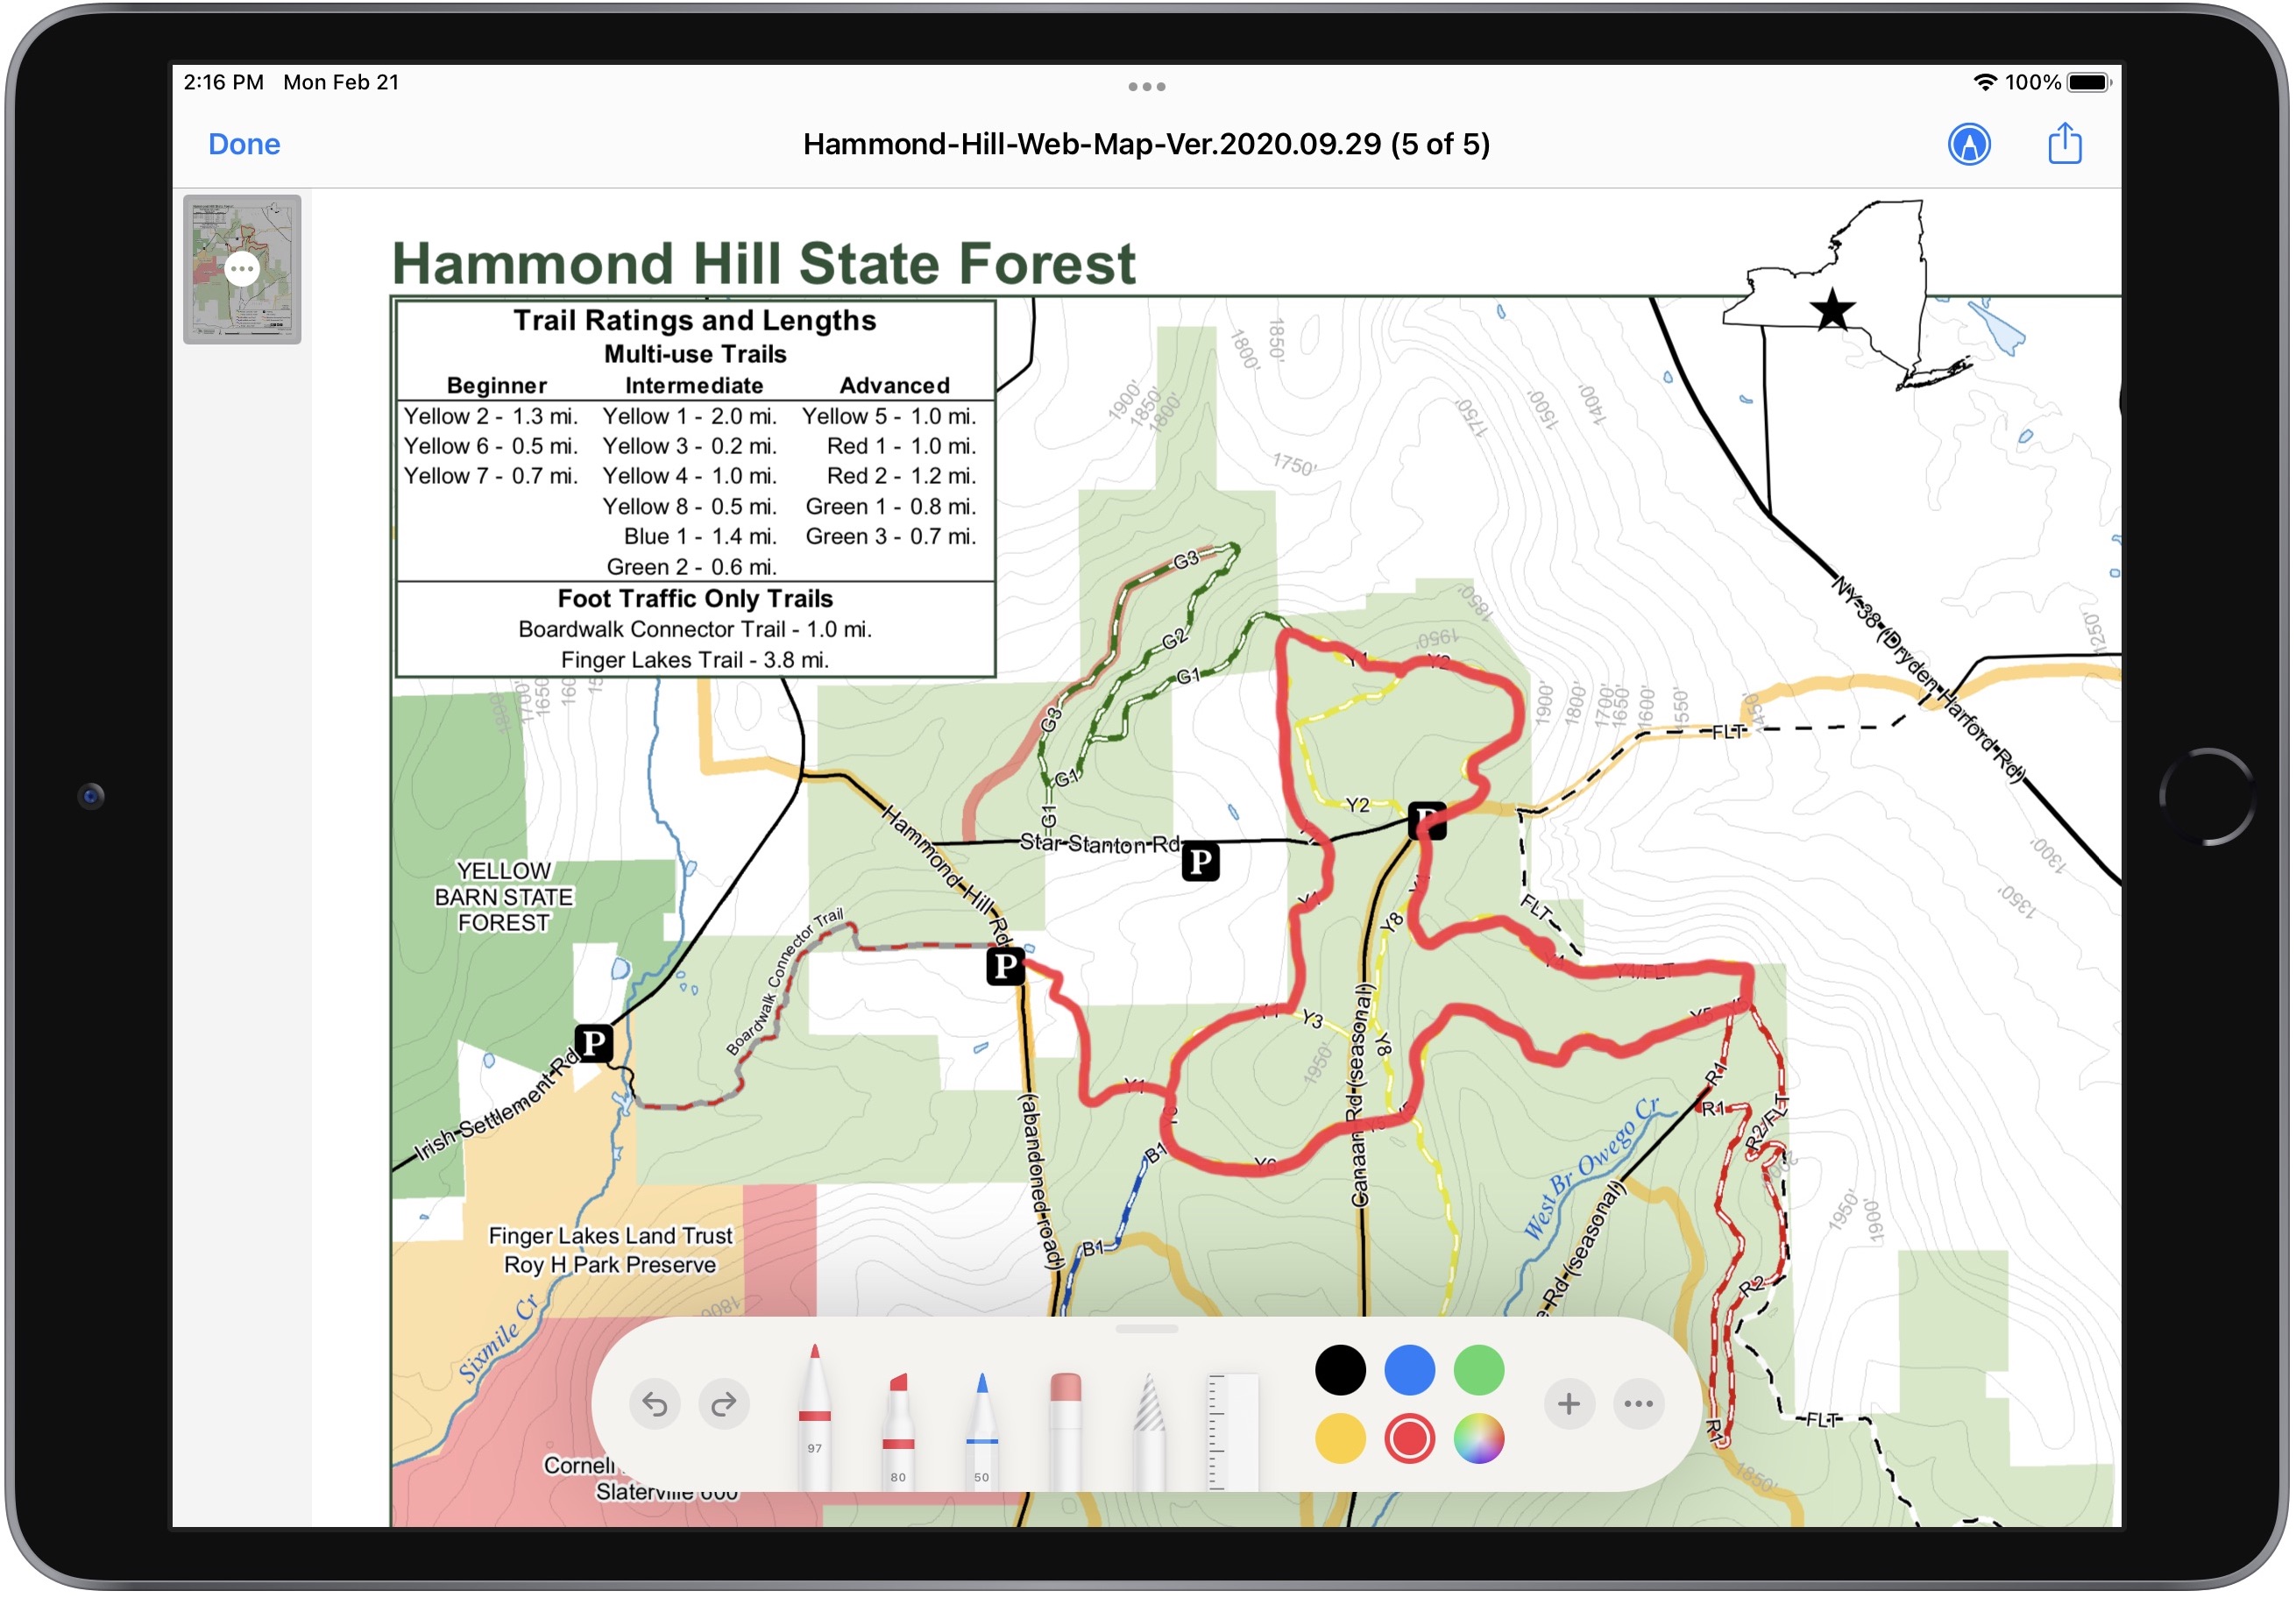
Sometimes I need to go beyond Preview’s simple annotations—it has a freehand drawing tool, but I have trouble drawing—or even tracing accurately—with a mouse or trackpad. For another race, I had to make a map showing a trail running course for a New York State Department of Environmental Conservation permit. In this case, I was starting from a PDF that showed the trails I needed, and I realized that this is what the Apple Pencil was created to do. (This may be the only productive use I’ve ever had for the Apple Pencil—I’m clearly a bad iPad user.) The process was simple: use the Share button to save the PDF from Safari to iCloud Drive in Files, open it in Files, tap the Markup button, pick the desired red color and pen tip, and then trace the course on the map with the Apple Pencil. Once saved, it was ready instantly on my Mac in iCloud Drive.
Correcting Maps
Unfortunately, it’s all too common for mapping services to rely on obsolete or incorrect data. In the On The Go Map map at the top of the article, you’ll see Plantations Rd in the lower-left corner. When I sent a map proposing a running course to my contact at Cornell, she pointed out that that road had been renamed Arboretum Rd. as part of an overall name change from “Cornell Plantations” to “Cornell Botanic Gardens.” It turns out that On The Go Map uses data from OpenStreetMap, a free and editable map of the world, so I created an account, logged in, and left a note asking for a fix.
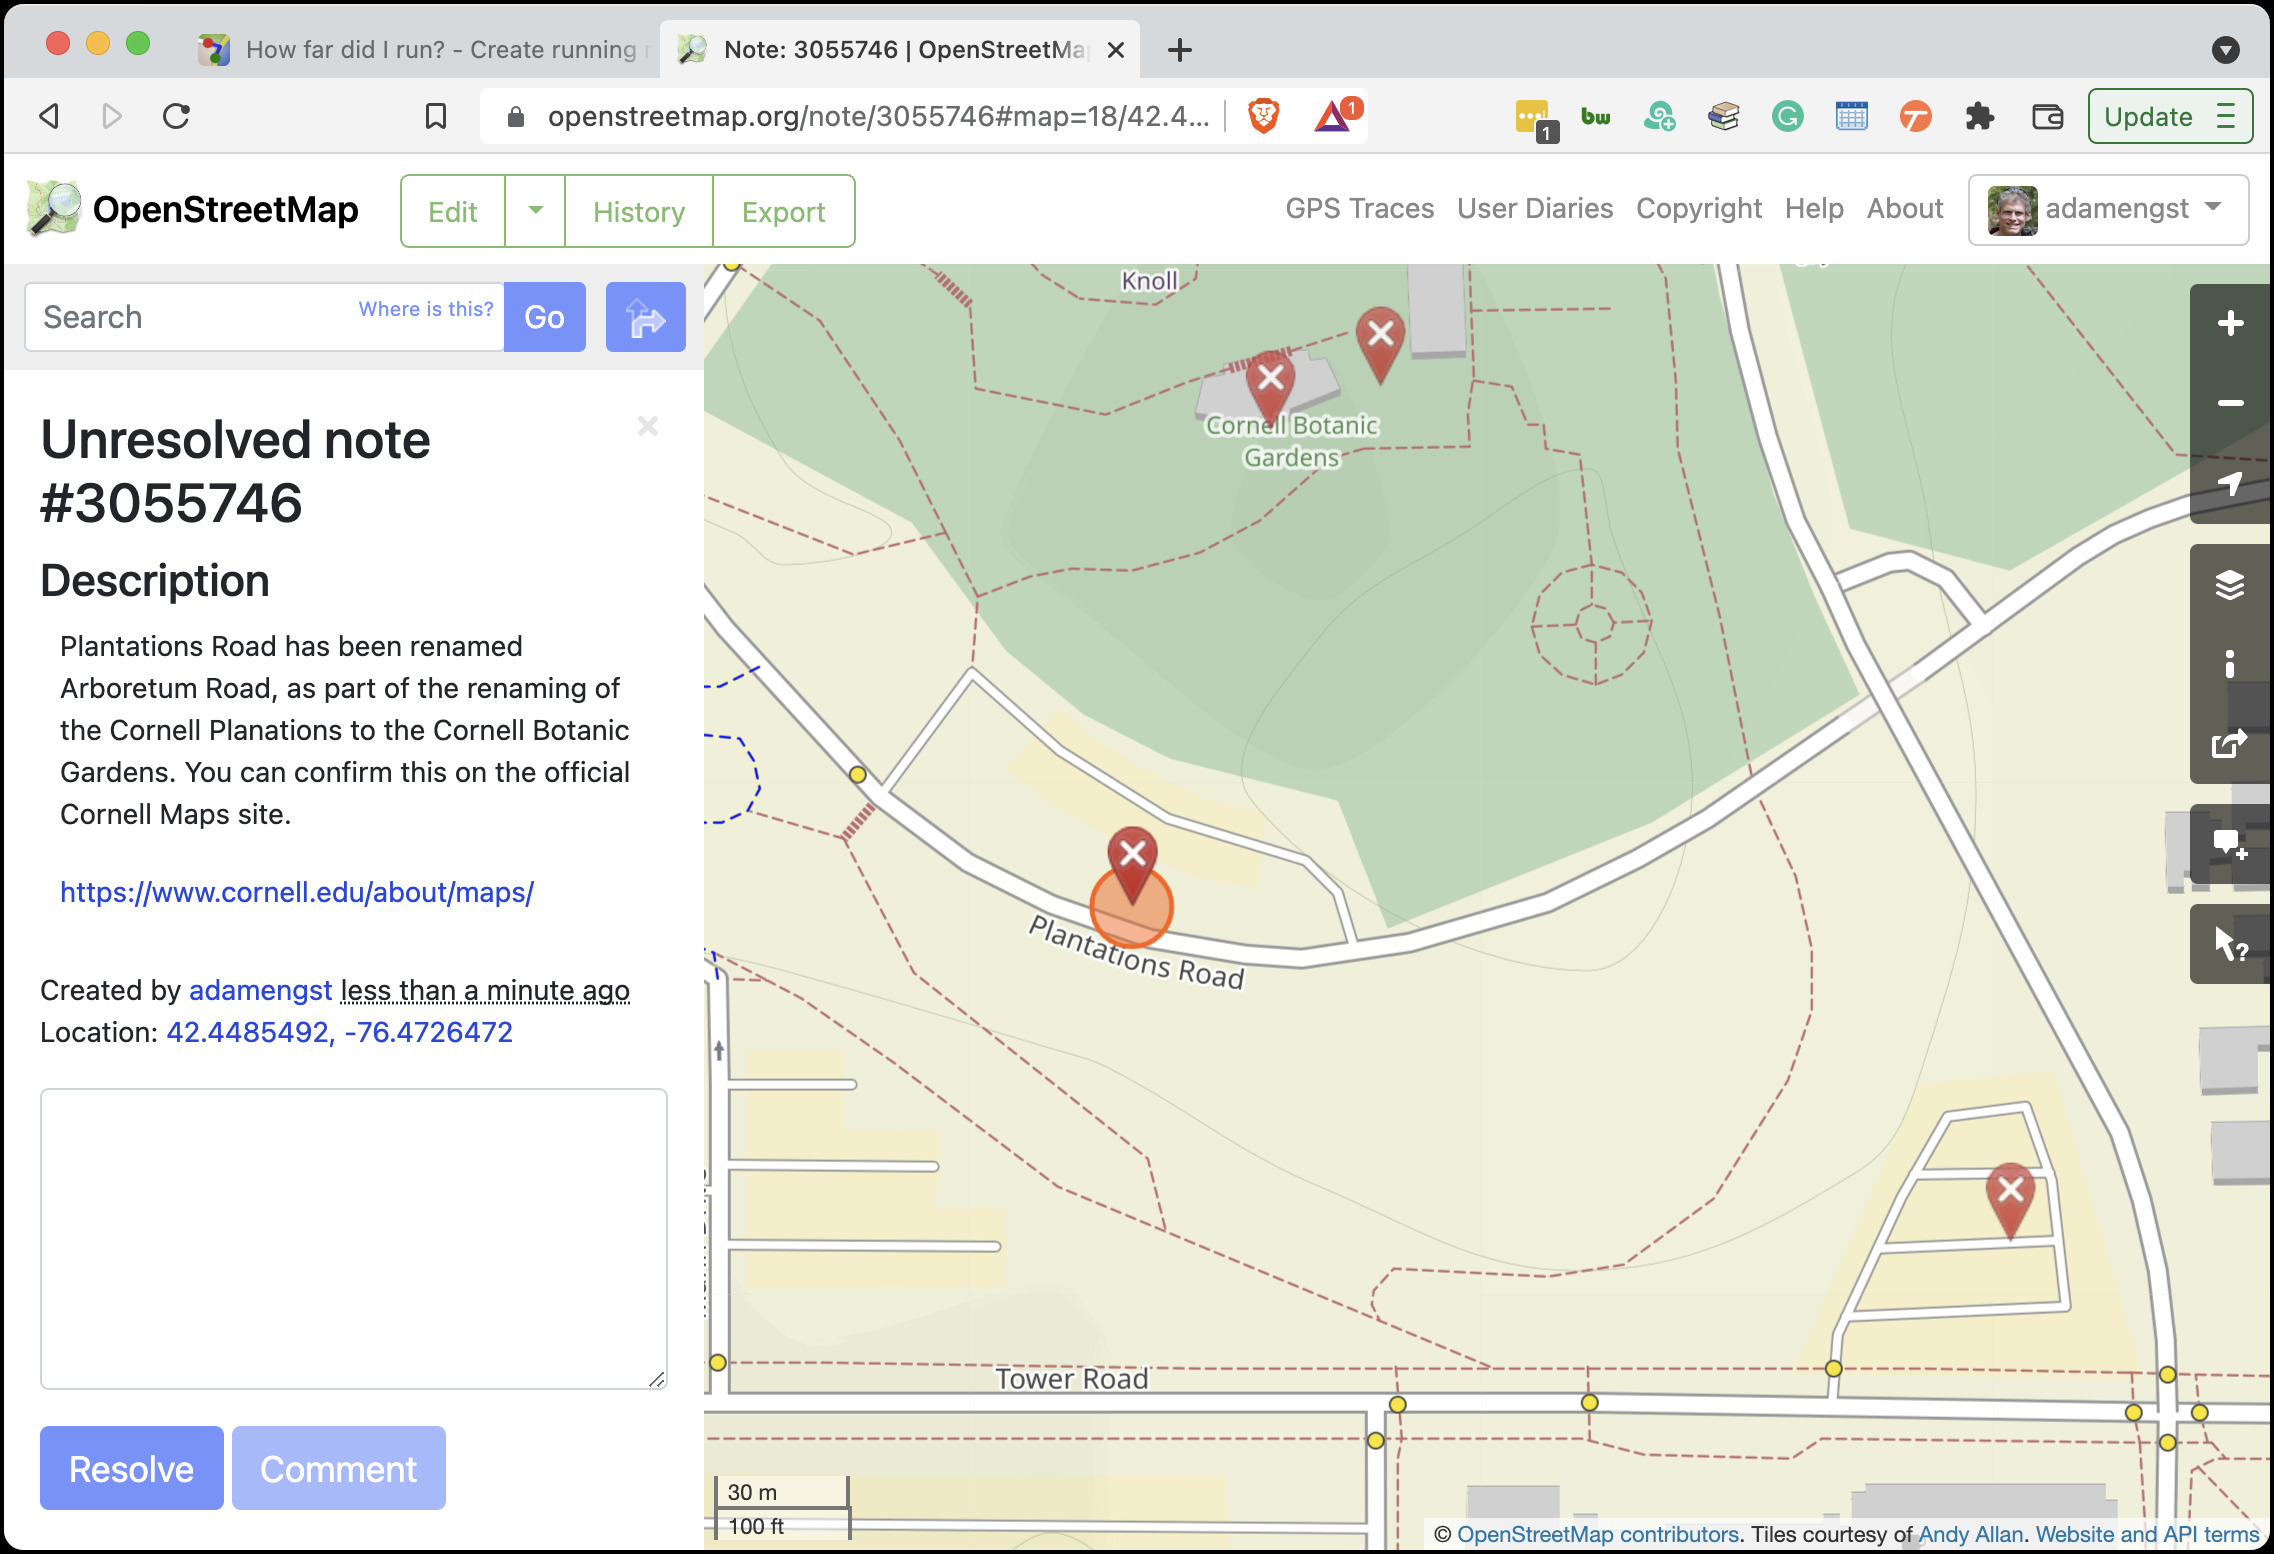
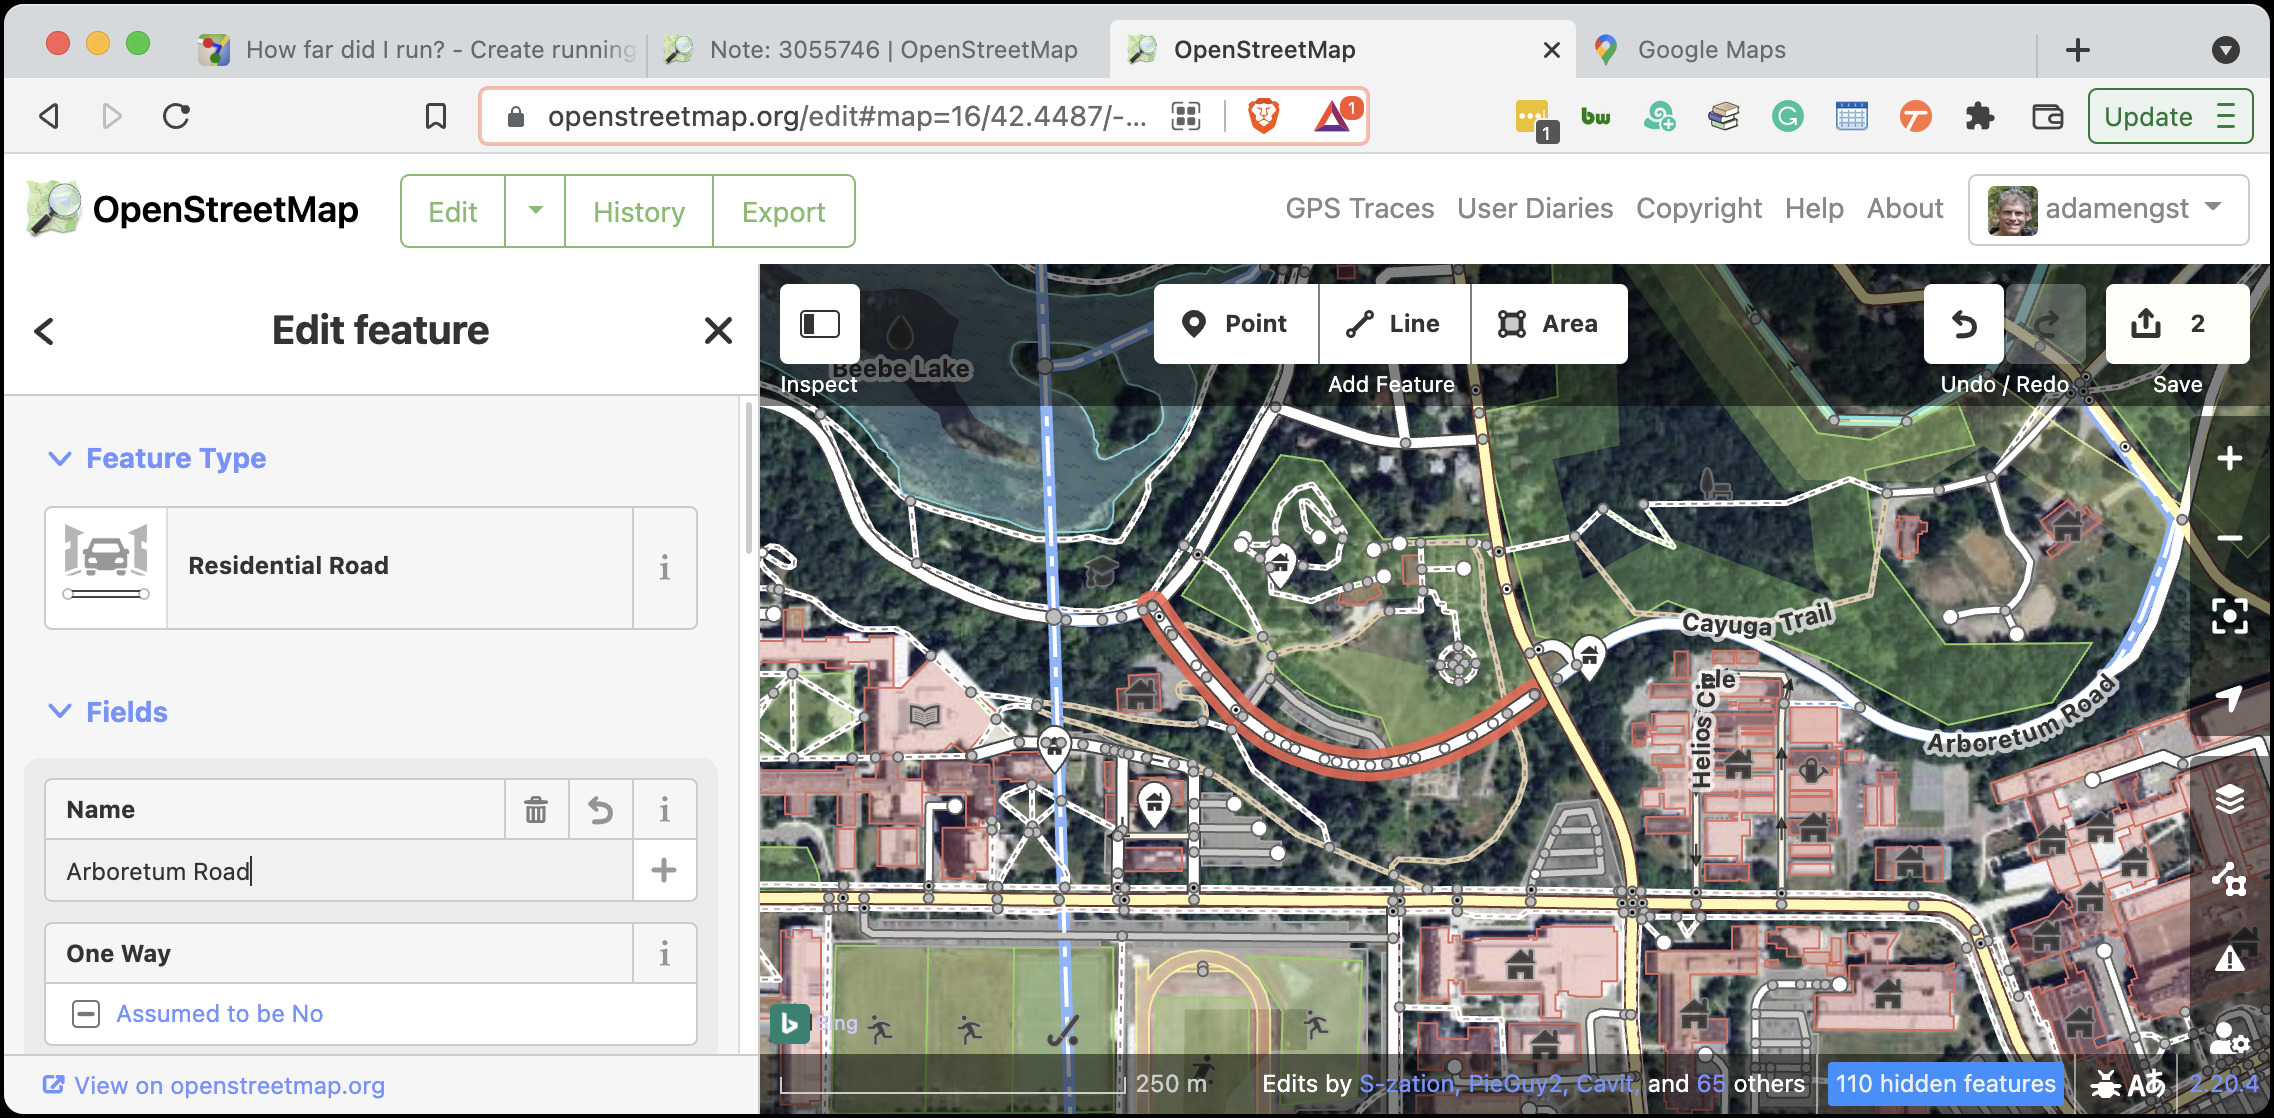
Then I got curious and looked at a few of the notes that others had left. Some seemed to be rather old, so I decided to change the name myself rather than give someone else more work to do. Editing the road name turned out to be easy—just a matter of selecting the incorrectly named road segments and renaming them. A short while later, my fixes were live! Now I have the power to make the world match my reality!
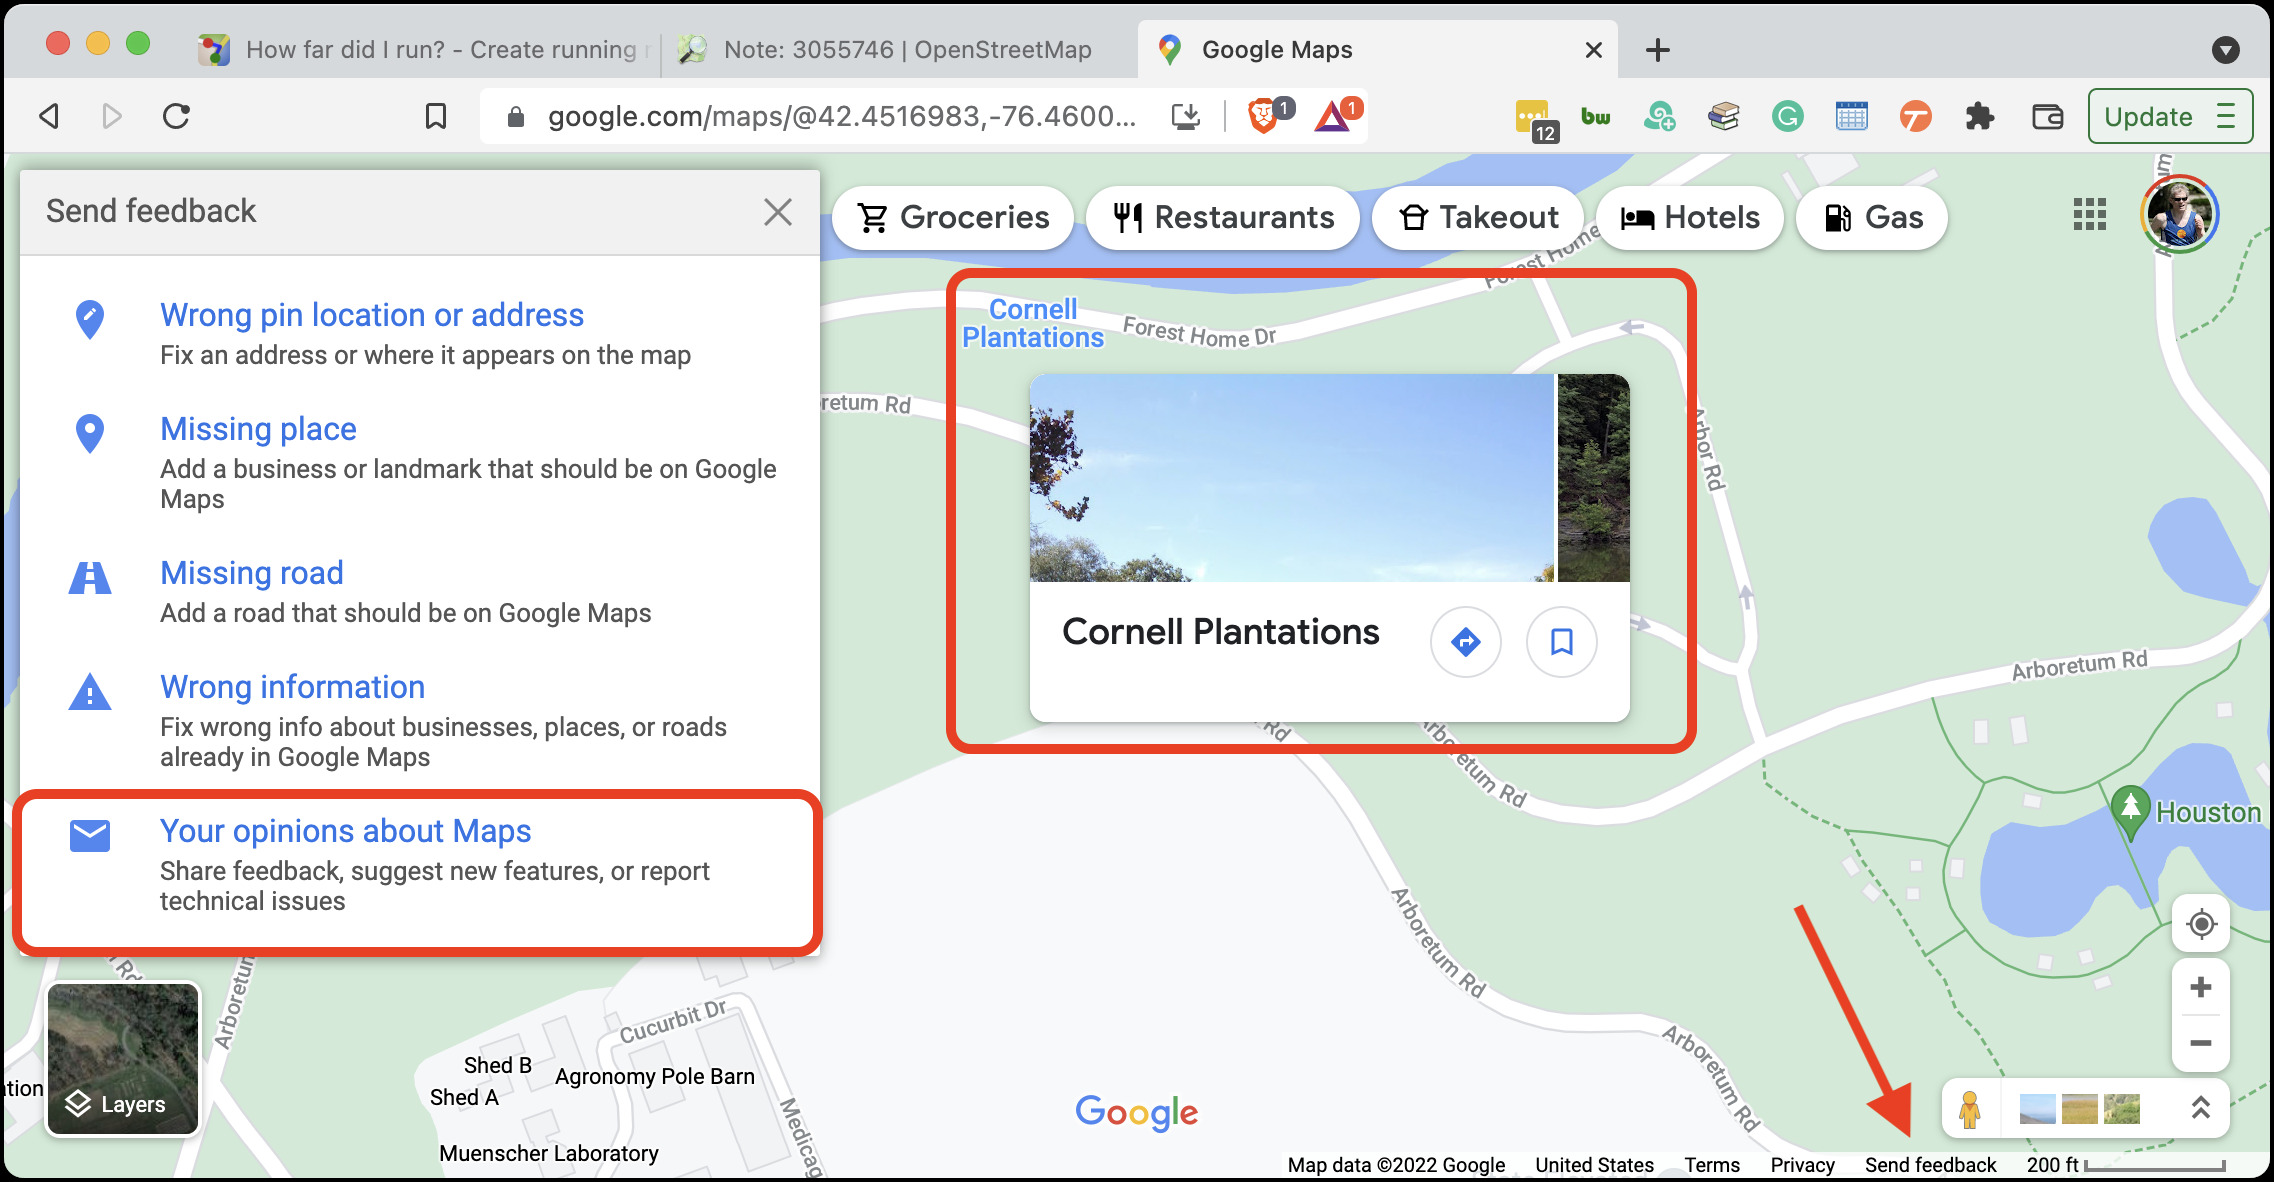
My contact had informally attributed the naming error to Google Maps, but when I looked at Google Maps itself, it had Arboretum Rd. correct. However, I noticed that Google Maps still had a label for the Cornell Plantations, so I reported that update as well, using the tiny Send Feedback link in the lower-right corner of the page. We’ll see if Google gets back to me about it.
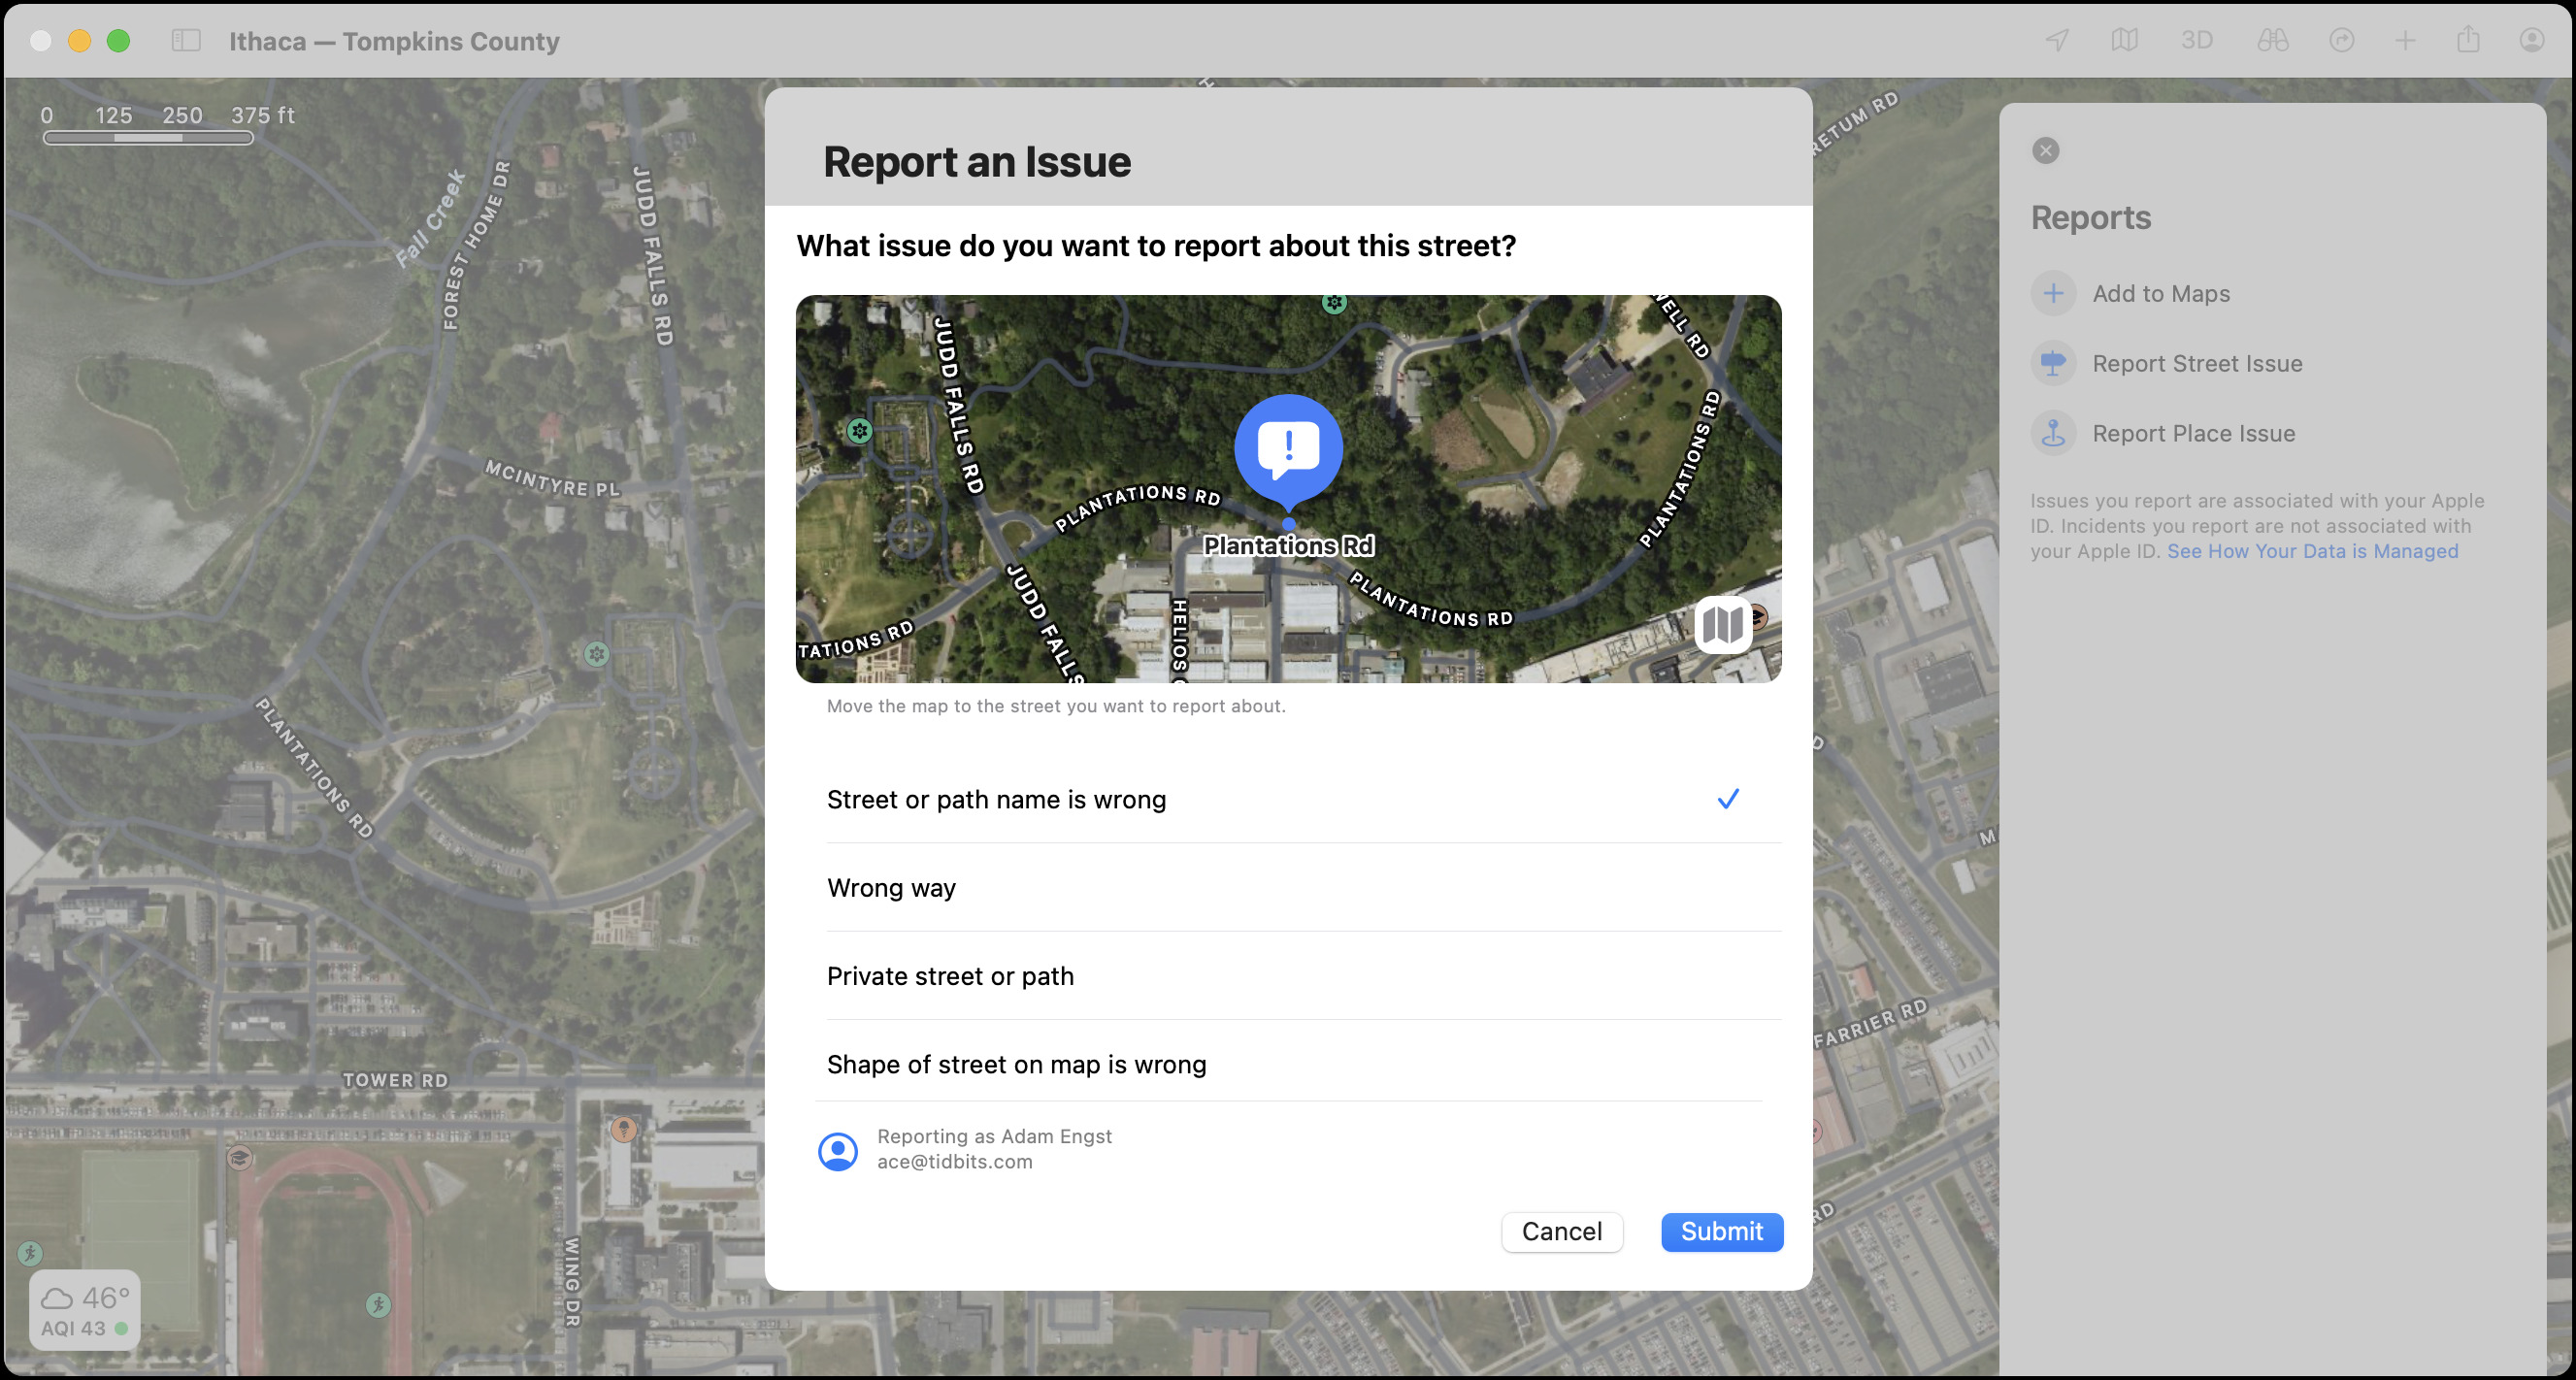
I couldn’t let this naming issue go, so I checked the Maps app on my Mac too, and like OpenStreetMap, it still had the old road name. Reporting the mistake was easy—I chose Maps > Report an Issue, clicked Report Street Issue, and filled in the dialog that appeared with the necessary information. I haven’t yet heard back from Apple on my fix.
Sometimes map mistakes involve more than just a quick report or edit. Several years ago, a county in West Virginia went through an E911 re-addressing project so emergency services could find all the addresses in the county. Apple Maps didn’t know about those changes, and the county guy in West Virginia wasn’t even an Apple user. He ended up asking Glenn Fleishman (via Glenn’s Mac 911 column for Macworld) for help, and Glenn asked me if I knew anyone on the Maps team. I didn’t, but after a couple of email messages to folks at Apple who I did know, we got someone from Apple Maps and the guy from West Virginia working on importing the new dataset.
More recently, Glenn got a somewhat similar request from a guy in North Wales who was getting up to 25 lost drivers per day turning around at his house, located at the end of a narrow dirt road. Why? The UK uses a system of postcodes that are much more specific than US ZIP codes. The first “outward” part of the postcode denotes the general area, and the second “inward” part identifies a small group of addresses in that area. Apparently, if Maps didn’t recognize an entered postcode, perhaps because it hadn’t yet been updated for a new housing development, it would fall back on the outward part of the postcode. Seemingly reasonable, but in this case, Maps was sending people to this guy’s house—rather than the center of the main nearby town—for mistakes in any of the 17,000 addresses covered by the outward part of his postcode. Apple did fix the problem in the version of Maps used by current Apple operating systems, but Maps in iOS 5.1.1 (but not in more recent versions) continues to display the problem, suggesting a few stragglers may still end up this gentleman’s front yard.
Don’t assume I’m the conduit for Maps-related fixes! (“There’s something wrong on the Internet. Better tell Adam.”) My contact on the Maps team said that Apple does fix reported problems, though it seems clear that some reports can fall through the cracks. Beyond the built-in reporting features in the Maps app (which aren’t available to non-Apple users and don’t seem to work as well), he recommended the following ways of reporting:
- The Maps page on Apple’s feedback website
- Calling AppleCare at 1-800-APLCARE
- The Places on Maps page for managing business places
 I realize that editing maps on the Internet is the rabbit hole to end all rabbit holes. It may be the perfect instantiation of xkcd’s classic Duty Calls comic. However, some people care deeply about specific errors, often with good reason. When I submitted the annotated map I’d made for the NYSDEC, one of the people reviewing it was unhappy because my map (though not my course) displayed some unauthorized trails across private land. I alerted him to the fact that he could edit OpenStreetMap, which was again the source of the data, and he was happy to learn that he could fix the underlying problem.
And so, while I can’t suggest that you devote your life to seeking out and reporting problems with online maps, if you do stumble on a mistake during your digital wanderings, taking a few minutes to fix or report the mistake can improve things for others.