SSD Optical Drive Replacement Speeds a Sluggish MacBook Pro
I blame the Retina MacBook Pro. Apple sent a unit for me to review for my Seattle Times column, and I was impressed (see “Retina MacBook Pro: a treat for the eyes, maybe not for the wallet”). Yes, the high-resolution screen is beautiful, but coming from the experience of using a mid-2010 MacBook Pro, the machine’s overall speed made more of an impact on me.
As tempting as the new machine is, however, I’m not yet ready to replace my current laptop. I usually refresh my computer every three years or so, which has historically worked in my favor (see “More Bang, Less Bucks for My MacBook Pro,” 20 November 2006). But experiencing what’s possible and then returning to what’s normal was especially difficult when I had to send the Retina MacBook Pro back to Apple.
The Retina MacBook Pro accomplishes its swiftness by using a fast CPU and graphics processor, but also by replacing a traditional hard drive with flash storage. Unlike a hard drive, flash storage has no spinning storage platters or read/write head skipping about to access data from physical locations on the discs, making data access much faster.
To conserve physical space, the flash storage in the Retina MacBook Pro is made up of strips of memory, much like RAM. For most other computers, the way to get flash storage is to install a solid-state drive (SSD), which puts the memory chips into an enclosure that fits into a hard drive bay.
SSDs are not new, but until now replacing my laptop’s hard drive with an SSD hasn’t been practical. SSDs have been almost exactly the opposite of hard drives in the key respects of price and capacity. Prices of hard drives have remained low as capacities have risen, while SSDs have been expensive and have offered far less capacity than their spinning counterparts. Fortunately, that curve is flattening out, and so I decided I was ready for a speed boost.
The Capacity Conundrum, Part I — First, I had to resolve the question of just how much capacity I really need. I’ve grown comfortable having a 500 GB drive — too comfortable, in fact, as I regularly bump up against the limit. A lot of that storage is cruft like old video files from my years of writing about iMovie and old applications and data I’ve never properly cleaned out because it has always been easier to move to a larger hard disk.
Replacing the drive with an SSD of similar size was still too expensive for me, landing in the $600-$700 range. Could I pare the contents of my drive to fit within 256 GB? Possible, but recommendations from a few friends on Twitter presented another option. I could keep my 500 GB hard drive for data storage and replace the MacBook Pro’s optical drive with an SSD which I’d use as the boot drive. The optical drive isn’t important to me — I rarely use CDs or DVDs, and I have an older Mac mini that can fulfill that role. If I find myself regularly needing the drive while out of the house, I could also put the optical drive into a $39.99 OWC SuperSlim enclosure, turning it
into an external USB device.
(Swapping the optical drive for an SSD works only for recent MacBook Pros that treat the optical drive as just another Serial ATA device, like a hard disk. I couldn’t avail myself of this approach with my older 2006 MacBook Pro, for example.)
With that decided, I ordered a caddy to replace the optical drive (the $15 Hard Drive Caddy Tray for Apple Unibody MacBook / MacBook Pro 13 15 17 SuperDrive) and set off to find an SSD to install in it.
Choosing an SSD — Start digging into options for SSDs and you might decide to stick with that old hard drive after all. Like shopping for an HDTV, specs and marketing claims compete for your attention, leading to (in my case) a nearly vapor-locked brain. However, it turns out that a lot of the considerations you need to make are out of your control, as I’ll explain in a moment.
All resellers will tout the incredible performance gains compared to a standard 5400 rpm hard drive. These are usually expressed in terms of peak read and write speeds, such as “500 MB per second,” and the number of input/output operations per second (IOPS). In general, higher numbers are better.
But those capabilities — which are invariably maximum performance figures, not real-world throughputs — depend on whether your Mac can push that amount of data through the connection to the drive. You can find this in the System Information utility: click the Apple menu, press the Option key, and choose System Information (under Mac OS X 10.6 Snow Leopard and earlier, it’s called System Profiler). Select Serial-ATA in the Contents column at left, click one of the headings in the top pane, and look at the Link Speed item in the details that appear.

On my machine, there are two SATA ports, both using Intel 5 Series chipsets, with link speeds of 3 gigabits per second (Gbps). (In the figure, the first port is in use by the 500 GB drive, and the second one is now in use by the SSD, but was previously used by the optical drive.)
When browsing the specs for SSDs online, look for the device’s SATA interface, which lists either SATA II (or SATA 2, or SATA revision 2) at 3 Gbps, or SATA III (or SATA 3 or SATA revision 3) at 6 Gbps. If your Mac supports link speeds of only 1.5 Gbps or 3 Gbps, it won’t be able to take full advantage of an SSD with a data throughput of 6 Gbps.
In theory, you wouldn’t want to buy an SSD that offers more throughput than your Mac can handle. That would be like purchasing a Ferrari but never driving it faster than 30 miles per hour. In my case, I wouldn’t need a 6 Gbps SATA III device because my MacBook Pro supports only up to 3 Gbps, or SATA II, speeds. Common sense would suggest that I would be able to buy a SATA II drive for less cost.
But as of this writing, there’s very little price difference between SATA II and SATA III SSDs, eliminating that variable from the equation. In the 256 GB range that I was researching, prices hovered around $250. I did find a few SATA III models that were cheaper, but was scared away by reports of necessary firmware updates or glitches encountered when installed in Macs.
I finally ended up choosing a $250 Samsung 830 SSD (specifically, the Samsung 830 — Series MZ-7PC256N/AM 256 GB 2.5 Inch SATA III MLC Internal SSD Laptop Kit with Norton Ghost 15; Norton Ghost is a Windows backup utility, so obviously I wouldn’t need it, but the software may come in handy for my Boot Camp partition running Windows). The price was right, even though my Mac can’t take full advantage of the 6 Gbps rate, and it uses the same technology as Apple employs for the Retina MacBook Pro. (Anandtech’s Anand Lal Shimpi takes a close look at the laptop’s flash memory performance in “The next-gen MacBook Pro with Retina Display: SSD Analysis.”) Even if my Mac won’t see the full performance the SSD is capable of, I may end up using it in a future Mac that can take advantage of the 6 Gbps throughput.
Installation — The difficulty of opening your Mac to install the SSD depends on your experience level and the machine you own. Getting into my MacBook Pro wasn’t difficult, thanks to the step-by-step guide I found at iFixit. Make sure you review the steps before you start, to ensure that you have the proper tools at hand and that you’re not getting in over your head. Apple has started using a variety of screw heads in its machines — in addition to a tiny Phillips-head screwdriver, I realized I needed (and was surprised to discover that I own) a Tri-wing Y1 screwdriver.
And, of course, I made a backup of my data. In this case, you wouldn’t think a backup would be important, since the 500 GB drive wasn’t being replaced. However, I’m paranoid about my data, and you should be, too. If I were to snap a cable or discharge static into the motherboard, that extra backup might become extremely welcome.
After carefully removing the optical drive and replacing it with the SSD in its drive caddy, I reassembled the MacBook Pro and powered it on. As with any new unformatted volume, Mac OS X asked if I’d like to initialize the drive, and clicking Initialize opened Disk Utility. I selected the drive in the sidebar, clicked the Partition heading, clicked the Options button, and set the Partition Map Scheme to GUID Partition Table to format the drive properly.
Lastly, I installed a fresh version of 10.7 Lion from the internal hard disk. (When you purchase Mac OS X from the Mac App Store, the installer application is stored in your Applications folder. However, it’s erased once you finish the installation (if you’re installing on the same drive), which is a pain. Therefore, I make a point of copying the installer elsewhere so I have it in times like this, rather than having to re-download the entire file.)
During the Mac OS X installation process, you’re asked if you want to migrate data from a backup or another drive. At first, I chose to skip that step and start completely new — and really, I was impatient to see just how much of an improvement the SSD made.
However, this introduced a snag: During setup, you need to create a user name and password. The problem is, when I ran Migration Assistant later, it didn’t like that I had used the same name and password from the 500 GB drive (because I didn’t want to abandon everything I’d set up in my normal operating environment).
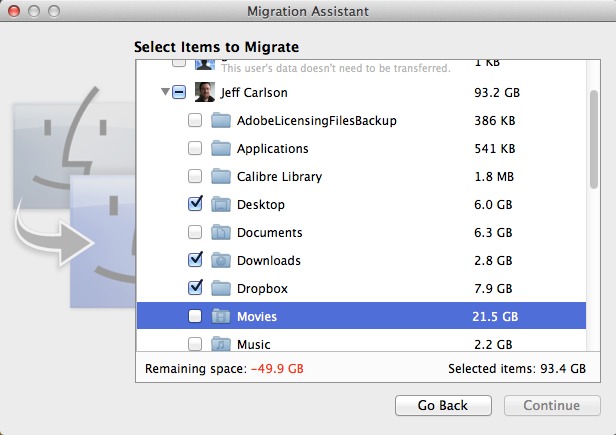
So, I reinstalled Mac OS X — which takes much less time on the SSD! — and ran the migration step from within the installation process. To get my data to fit onto the SSD, I omitted several large folders available through the Migration Assistant, such as Movies and Pictures in my Home directory. (The following screenshot was taken using the standalone Migration Assistant utility, since I didn’t grab a screenshot during the installation.)
Copying more than 200 GB of data, even to an SSD, takes quite some time, so I left the MacBook Pro running overnight. The next morning, I woke up to my own environment, with my original username, password, desktop wallpapers, and other settings, but in a significantly faster Mac.
A New Machine — How fast? Restarting my MacBook Pro typically took anywhere between 5 and 15 minutes, with Lion’s Resume feature enabled so that any applications that were running at restart came back to the same state. The same action now takes less than 2 minutes. I want to keep restarting just to enjoy that change.
Launching applications now happens in a few seconds, even startup hogs like Adobe InDesign CS5 (2:20 on the hard disk, 0:19 on the SSD). In fact, I swear even my mouse pointer moves faster than it used to, although I’m probably imagining that.
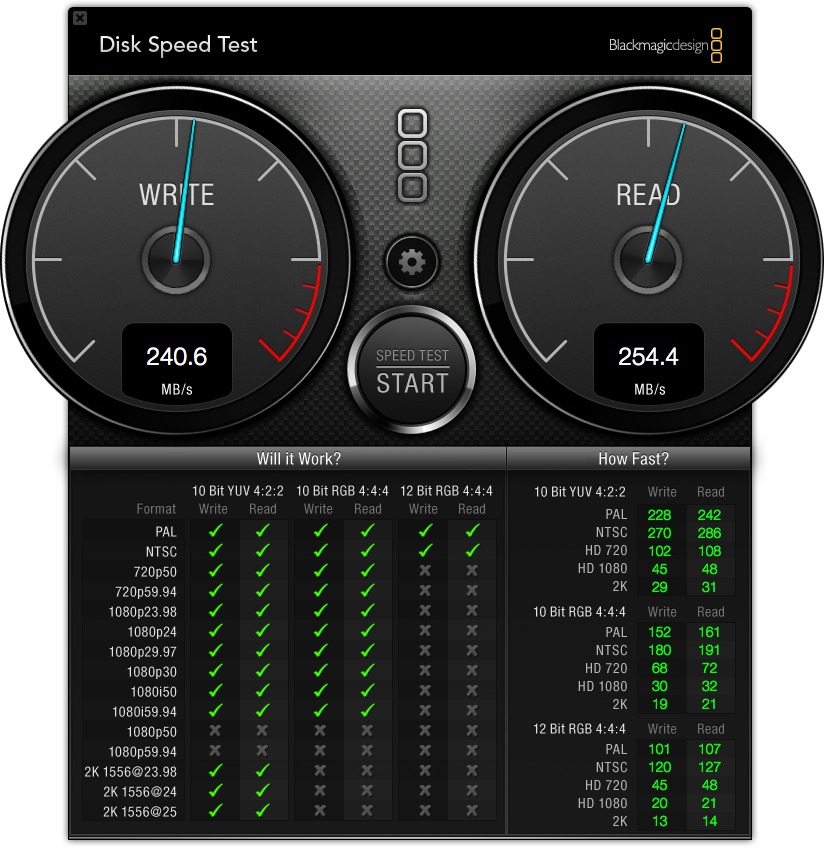
In terms of data performance, I ran tests using Black Magic Design’s free Disk Speed Test. My 500 GB hard disk managed about 70 MBps (megabytes per second) for both read and write operations.
The SSD averaged about 240 MBps for write operations and 255 MBps for read operations. That’s a great improvement, although throttled somewhat because my MacBook Pro can handle only 3 Gbps throughput instead of the 6 Gbps the SSD is capable of pushing.
Believe me, I’m not complaining. I’m sure I’ll grow accustomed to the new speed, but for now it really does feel like I have a new computer.
The Capacity Conundrum, Part II — Next began the work of turning my 500 GB drive into a storage disk instead of a slightly outdated mirror of the SSD. Since I kept most of the high-capacity items like music, movies, and photos on the hard drive, I needed to make them properly visible to Mac OS X running on the SSD.
I started with iTunes. I’ve switched to using iTunes Match, so my entire music library no longer occupies vast amounts of space on my MacBook Pro. However, I do keep many albums on the drive to avoid always streaming music from iCloud. Perhaps I should just give up on that idea and stream everything, since I’m mostly connected to Wi-Fi when I work on my laptop.
(However, my iTunes setup is slightly different from the default configuration. A while ago I moved all of my music and other iTunes media files to a Media folder at the root level of my hard drive, so they wouldn’t take up so much space in my Home folder. That turned out to be prescient, since I didn’t want them on the SSD.)
I assumed that pointing iTunes’s preferences to the correct folder containing them would do the trick. Nope, because that just specifies where files end up when imported. Instead, the solution is twofold: I copied my iTunes folder from ~/Music/ on the hard drive (which contains just the iTunes library file and associated data such as album cover artwork, not the music files themselves) to ~/Music/ on the SSD, and launched iTunes with the Option key held down. I then clicked Choose Library to point to that library file. When iTunes finished starting up, everything was exactly as I left it.
The same advice applies to iPhoto: I simply held down the Option key at launch and pointed at my iPhoto Library file on the 500 GB drive.
iMovie turned out to be a special case. The application looks for its data in two folders within the ~/Movies/ folder: iMovie Events and iMovie Projects. However, when events and projects are stored on a drive other than the startup drive, those two folders must live at the root level. So, I moved iMovie Events and iMovie Projects there. When you launch iMovie, it scans any connected drives and lists the projects and events in the appropriate panes.
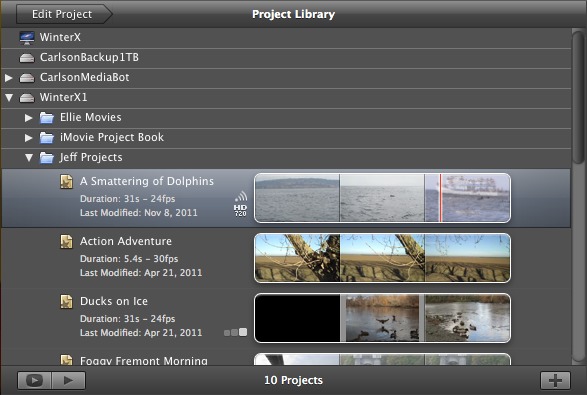
Fortunately, moving the projects and events together in this fashion doesn’t break any links or orphan any video clips. Normally, if you’re moving iMovie projects or events to other drives you want to do it within iMovie itself (make sure View > Group Events by Disk is enabled and drag items between volumes in the Project browser or Event browser).
Cleaning Up — I’m not done with my housekeeping yet, but those steps got my machine into basic working order. My next step is to wipe the 500 GB drive, since I don’t need a full Mac OS X installation on that disk with its hierarchy of user folders. To do that, I’ll make a backup, erase the drive using Disk Utility, and copy my media files back to it. Then, to wrap up, I’ll point iTunes and iPhoto at the new library locations.
But for now I’m not in a hurry to get that done. I need to go restart my MacBook Pro a few times and launch some apps, and marvel at how much more responsive my machine has become.
There are some significant gotchas lurking when installing an SSD on the mid-2009 MBP. A firmware downgrade to EFI 1.6 (which only runs at SATA1 speed) may be required and, according to OWC, an SATA3 drive won't work at all. This latter restriction also applies to 2008 aluminum MacBook.
> The application looks for its data in two folders within the ~/Movies/ folder: iMovie Events and iMovie Projects. However, when events and projects are stored on a drive other than the startup drive, those two folders must live at the root level.
It also seems to work if you replace the folders in the expected locations with symbolic links to the 'real' folders wherever they are, although this confuses iMovie's estimates of free space on the drives.
I bought a Crucial 512GB SSD and installed it in my late 2008 17" MBP, which originally came with a 320G HD. I considered doing it the way Jeff set his up, but decided for simplicity sake, to stick with one internal HD. All I know is that I am very happy with this upgrade--it is incredibly fast. I never want to have anything but an SSD in my Macs in the future.
Did you enable TRIM on your Mac? see http://digitaldj.net/tag/lion/ for terminal setup.
I just did the same thing with my mid-2009 MBP. I put an SSD in the optical bay and kept my internal HD. I'm a dinosaur who grew up with command lines and am comfortable in Terminal so I used symbolic links to keep some of my folders on the spinning drive. I kept my Parallels VMs on the spinning drive but they still start up much faster.
I didn't spend a ton of time shopping. I just went to OWC since I've been buying from them for years and they've always had good products at good prices. Like Jeff, I bought a SATA3 drive even though my Mac only supports SATA2. But when I installed it, I saw that the negotiated link speed was only 1.5Gbps. It turned out to be a known incompatibility between the mid-2009 MBP and the drive. OWC promptly issued me a refund and I got their SATA2 drive which works at 3Gbps.
Also like Jeff, I find myself restarting my computer every now and then just to bask in the speed. I think this is going to extend the life of the computer by another year.
You may be able to increase the boot up time by selecting the start up disk from the Preferences app. Once you select it just reboot and should imediatly see the difference.
I'm sorry - you said "Restarting my MacBook Pro typically took anywhere between 5 and 15 minutes...." How is that possible? (Even my Powerbook 1400 could boot faster than that!) My 2011 MBP restarts in a minute or so. 15 minutes?
As I wrote, that time was for restart plus the duration of applications to get back to the state when I restarted the Mac using the Resume feature.
You can also add an SSD in the optical drive bay for older Alu MacBook Pro. It's possible to buy an IDE version of the SSD adapter. And interestingly there seems to be little difference in the speed of the interface.
I have spent days looking at ways to put an SSD into a 2011 iMac 21.5". The 'surgery ' is a good deal more complicated than for the MacBook Pro, and I don't really want to lose the optical drive anyway.
However, all the speed gains are supposed to be possible using an external SSD connected via Thunderbolt, but the only existing drives (LaCie and Elgato) are very pricey, and I have drawn a blank trying to find an SSD/Thunderbolt enclosure in which to put, say, a Crucial 125 SSD. Anyone else solved this?
Check out the Seagate GoFlex Thunderbolt adapter (part no. STAE121). You can get it on Amazon for less than $99 (you need to supply the cable too though). It connects any 2.5" SATA drive to a Thunderbolt port and it supplies power to the drive too. Perfect for a SSD retrofit on an iMac without screwing around internally and voiding the warranty or AppleCare.
http://www.amazon.com/Seagate-GoFlex-Thunderbolt-Adapter-STAE121/dp/B006P1QWOQ
Thanks Simon. Also, more trawling led me to a long and detailed forum at which compares SSDs of many makes and sizes. It's at:
Macrumors / Forums / Mac Mini / 'I ordered a seagate t-bolt...'
Adding an SSD to your MBP is probably the single best thing you can do. It will easily add a year or two to your Mac's lifespan and chances are it will speed up even an old MBP beyond a newer MBP with a hard drive.
I'm still using a mid-2010 15" MBP (BTO 2.66 GHz Core i7) and it easily holds up to any current MBP in everyday tasks thanks to the SSD I installed. Originally it came with a 500 GB 7200 rpm drive that I immediately replaced with a 160 GB Intel X25-M SSD. At the time that was a crazy fast SSD. A modern Samsung 830 SSD would be much faster, but compared to any MBP running a hard drive, my MBP will still blow it out of the water in everyday tasks.
My boot time by the way: 9 seconds in Snow Leopard. 15 seconds in Lion. :)
There is an easier way to accomplish this - and thanks to the good folk at OWC, here is what I did. I have an early 2011 MBP with a 500 GB 7200 RPM spinning drive. I bought the "upgrade kit" from OWC, in my case, a 120 GB Mercury 3 SSD, drive caddy, and external enclosure for the optical drive. Loaded up Lion 10.7.4 from my USB Stick, used migration assistant to move only my applications. I "pointed" my user profile to the spinning drive by right clicking on the account name in the system pref and clicking advanced options which brought up a dialog box that enabled me to set my "old" user folder on the spinning drive as my "user" folder. So now I have all applications and the system on the SSD and all data on the spinning drive. Boot up time and application launch are very quick!
What happened to the BootCamp partition? Did you have to re-set up the partition and re-install Windows, or could you still use the original one?
Good question. I left it in place, and erased just the partition containing OS X. I wasn't sure if it would work, since Boot Camp doesn't work on external drives, but apparently as long as the drive is physically located in the computer it works just fine.
I have two 2009 13" Macbook Pro's. One has a fried board, but the HD works just fine, having tested it in my other MacBook Pro. Could I use this second drive like Jeff did by replacing the CD drive with it? It's a shame it's going to waste in the closet.
I have a mid-2009 MBP. Bought an OCZ Agility 4 256G drive. I can't get ML installed on it no matter how I try.
Any suggestions?
That machine should be able to run Mountain Lion. Did you set up the SSD as GUID Partition Table as the partition map scheme in Disk Utility? And make sure the format is Mac OS Extended (Journaled)?
So, what did you do with the optical drive? Did you put it in an external case for use via USB, or are you just doing without?
I'm waffling between those two options, and getting an external BD drive. "Doing without" seems to be winning at the moment.
Right now I'm doing without. It's in a ziplock bag on a shelf. But I also have an older Mac mini acting as a media server at home that I can use for optical access.
Ziplock bag + Mac mini server -- exactly the same here. FWIW, the one time I wanted to access an optical disk, it turned I couldn't do it over the magic device sharing, since the software doesn't allow sharing of audio CDs.
I followed Jeff's advice (replace the optical drive with a SSD, as I have exactly the same Mac) and decided to order the Samsung 830 (128Gb) SSD at Amazon.
I then started to replace the drives, with no problem, till I discovered that the SSD doesn't fit in my mid-2010 MacBook Pro Optical drive cable. Connector are not equal: the SSD connector is wider than the MBP Optical drive connector and there is no way to fir them.
As I have exactly the same machine, I simply don't get why this is so: how come my MBP does have an internal Optical drive connector that doesn't fit in the SSD, as the Mac has SATA interface, and has the Intel Series 5 chipset.
Did this unpleasant situation happen to anyone else?
Did you buy the sled that holds the SSD in the optical drive slot? It almost sounds like you're connecting the drive directly.
Sorry, I did miss something! What sled?
I just did this on my MacBook Pro (Late 2008) with a Samsung 840 128GB (main bay) and a Seagate Momentus 500GB (optical bay with caddy). I also tied them together into a Fusion drive for just over 600GB of CoreStorage goodness. My 300GB Aperture library is absolutely blazing!
so confused by all this. I want to keep my mbp 2009 17" computer going. I want a new optical drive to read/right dvd discs and I want a larger internal hard drive. I just don't know what to get. I have someone who can install it. too many options I'm not knowedgable about.
It sounds like putting in an SSD isn't your answer. You want to replace your optical drive and get a new larger hard disk. An SSD will definitely improve the performance of your MBP, but you won't get more storage unless you pay a lot more for a high-capacity SSD. (Although I don't know what capacity your current hard drive has.)
Check out OWC (Macsales.com); you'll find lots of options there.
Have just this week installed a Samsung 850 PRO 512GB SSD,and upgraded my RAM from 2x2 to 2x8GB (crucial)
My machine is up and FLYING!!!!! (MBP 8,2 15inch)
SERIOUSLY FAST !!
I installed the SSD into the HDD slot and used Carbon Copy Cloner to install.. ALL IS WELL....
I also purchased a cheap and cheesy cover for the HDD and am completely unsatisfied with having to lug an external device (USB)
Could someone advise me as to how id set up the HDD into the optical drive without affecting the incredible speed and agility I'm enjoying right now via this AWESOME SSD?