10 Secrets of iMovie ’09
I’m one of those people who thought iMovie ’08 was pretty much okay. It advanced consumer video editing on the Mac in several ways, such as having live transitions and effects that don’t require re-rendering clips and putting your entire video library at your fingers without opening old projects.
But iMovie ’08, having been written from scratch as a new application, was sparse in many areas, especially compared to its predecessor, iMovie HD 6. The good news is that iMovie ’09 restores most of iMovie HD’s features. (Read my Macworld review of iMovie ’09 for more.) The better news is that iMovie ’09 boasts a lot of other new features and hidden secrets that aren’t immediately apparent.
I’m hard at work on my book iMovie ’09 and iDVD for Mac OS X: Visual QuickStart Guide (click this link to pre-order it now and help support TidBITS), and am enjoying discovering many of iMovie’s hidden tips and features. Here are 10 things I’ve discovered that aren’t entirely obvious.
Double-click Clip to View Inspector — iMovie ’09 now collects its adjustment controls in a new Inspector heads-up-display, instead of providing separate floating panels for video and audio adjustments. You can select a clip and click the “i” icon in the toolbar, or choose an option from the new Action menu that appears on every clip, but it’s easier to double-click the clip to bring up the Inspector. (If you prefer iMovie ’08’s behavior of double-clicking a clip to play it, you can change the action in iMovie’s preferences.)

iMovie’s adjustment controls can also be invoked from the keyboard by pressing the following letters (with no modifier key): I for Clip adjustments; V for Video adjustments; A for Audio adjustments; and C for Cropping, Ken Burns and Rotation adjustments.
View Your Movie on a Secondary Display — iMovie’s monitor occupies the top-right corner of the program’s interface, and it can be resized by choosing one of the following sizes from the Window > Viewer submenu: Small (Command-8), Medium (Command-9), or Large (Command-0). That feature isn’t new, although the keystrokes have changed from iMovie ’08.
What’s cool about iMovie ’09 is that if you work with multiple displays, iMovie can use one of them as the monitor to play back your movie. Choose Window > Viewer on Secondary Display. (If you don’t see the menu item, make sure Show Advanced Tools is enabled in iMovie’s preferences.) This feature not only gives you a larger preview – it scales to fit the screen – but it removes the monitor from the iMovie interface, giving you more horizontal room for editing your project.
Copy and Paste Adjustments — One of iMovie ’09’s new features is the return of video effects. With a clip selected, bring up the Inspector and click the Video Effect button to view the effects iMovie offers. Now, let’s suppose that you also apply some other edits to the clip: increasing the exposure, muting the audio, applying image stabilization, changing its speed, etc. Quite a lot can happen to one clip, as you can see. If the following clip (or other clips) come from the same scene, you’d have to reapply all of those adjustments to make them match up.
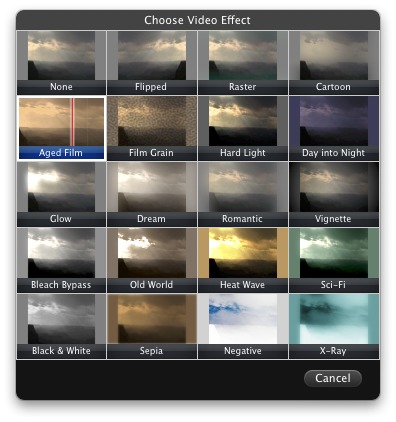
Instead, Apple expanded on a powerful feature that deserves attention. With the adjusted clip selected, choose Edit > Copy or press Command-C; all of the adjustments are copied. Then, choose one or more clips and choose which edits to apply from the Edit > Paste Adjustments submenu, either all at once or piecemeal. iMovie ’08 could paste only video, audio, or crop adjustments. This version also adds cutaway edits, video effects, stabilization, speed, and map style adjustments.

Move Projects and Events to Other Drives — In iMovie ’08, events (the folders in which raw footage was stored on the hard disk) could be kept on your computer’s startup disk or on external disks, but your movie projects had to be located on the startup disk. iMovie ’09 lets you choose where projects are stored, too.
You can also move projects from drive to drive, such as you might want to do if your startup disk runs low on space. Relocating event files in iMovie ’08 required that you move the applicable projects in the Finder. Now, drag a project or event to another drive’s icon in either the Project Library or the Event Library to copy the content. In the case of relocating project files, you’re given the option of copying just the project file or the file and its associated event footage, too. (Here’s a video example.) To move the files instead of copy them, hold the Command key while you drag.
Choose Which Clips Appear in Theme Transitions — iMovie ’09 offers new themes that add motion graphics to your clips, specifically to your movie’s opening and closing scenes and some transitions. Some themes transition between two clips by, for example, focusing on one clip “mounted” to a bulletin board, zooming out, and then zooming in on the next clip. Other transitions have several clips on the bulletin board.
You can choose which clips appear in which frames. Click one of the theme transitions to view a zoomed-out image that displays all of the available drop zones. A set of numbered yellow pins appears on your footage, each representing one of the drop zones. Drag the pins to the areas of your movie you want to appear in the other photos. (Here’s a video example.)
Consistent Map Styles in Themes — Speaking of themes, the Bulletin Board theme includes a map tacked onto the background of the board. If you already have a map in your project, or you add a new map, the map style on the board automatically assumes the same style from the project for consistency.
Add Locations to Travel Maps — iMovie includes an internal database of 4,000 cities, airports, and other locations for use when adding markers to its interactive maps. That’s a good start, but what if you want a location that isn’t included? With a little work, you can add it to iMovie’s database. (Credit for this tip goes to user markstew on Apple’s iMovie discussion forums.)
First, find the latitude and longitude coordinates of your destination using a service such as iTouchMap.com. Next, make sure iMovie is not running and open the application’s package: Control-click on the iMovie application icon and choose Show Package Contents from the contextual menu. (iMovie, like many applications, is a Mac OS X “package,” a folder that appears normally as a single file.)
Go to Contents/Resources/ and open the file WorldLocations.txt using a text editor. Copy an existing entry similar to the one you’re about to add; for example, find a city in your state or country. Paste that at the end of the list, and change the city name. Then, copy the coordinates you looked up on the Web and paste them in place of the coordinates in your custom line.
Save the file, close the folders, and launch iMovie. When you add a map and perform a search, your new location appears in the list.
The Date/Time Title — When you add this title style to a clip, the clip’s actual date and title appear. Only the start time is displayed – it won’t keep a running clock on your footage – and you can’t edit the text style. But if you need a quick notation of when the clip was shot, this title can save you some work.

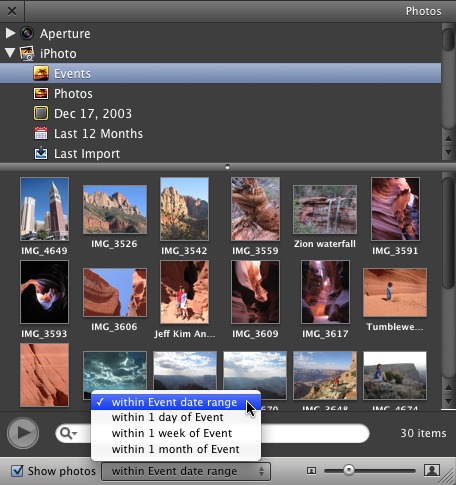
View Photos from Same Time Period — If you’re like me, you capture not only video during a trip or other occasion, but also a lot of still photos. iMovie ’09 makes it easier to find the photos you shot at the same time.
Select an event in the Event Library and then click the Photos button on the toolbar. At the bottom of the Photos pane is a new Show Photos pop-up menu; click its checkbox and then choose a time frame (Within Event Date Range, or Within 1 Day/Week/Month of Event).
Adjust the Opacity of a Cutaway — With the advanced tools enabled (an option in iMovie’s preferences that unlocks a lot of features), you can drag one clip on top of another and create a cutaway – the new clip is superimposed on top of the existing one. When you bring up the Inspector on the cutaway clip, a new Opacity slider lets you adjust how transparent the clip appears.
