Going In Depth on Mountain Lion’s Notifications
One of the marquee changes in OS X 10.8 Mountain Lion is Notifications, a system-wide feature that enables applications to tell you when certain events occur. These notifications may be reminders for appointments you’ve set in Calendar, banners that tell you when someone has sent you a chat in Messages, alerts for new tweets that mention your user name, and more. Notifications can be banners that disappear from the screen automatically, alerts that you must dismiss manually, entries in Notification Center, sounds, or icon badges. Some of these can be combined, so a single notification might throw up an alert, play a sound, and appear in Notification Center. (Notification Center is a pane that, when revealed, slides in from the right
side of the screen to display past notifications and upcoming calendar events.)
The Notifications feature comes from iOS, where it provides an efficient way to stay up to date on what your apps are doing in the background and see missed notifications in a single location (swipe down from the top of the screen on any iOS device to reveal Notification Center there). Since you can’t see multiple windows on iOS, notifications are essential. But notifications in Mac OS X, where you’re much more likely to have many apps generating alerts, can quickly become a digital kvetch if you don’t rein in their zealous behavior. Here are some tips to streamline your use of Notifications, along with ways to avoid notification overload.
Setting Things Up — For starters, let’s look at basic configuration, which takes place in the Notifications pane of System Preferences. The left-hand column shows the applications that can generate notifications, with two sections: “In Notification Center” and, if you scroll down, “Not In Notification Center.” When you click an app’s name, the right-hand pane lets you control how you will be notified of that app’s events. Here’s what you can do:
- To choose your alert style (None, Banners, or Alerts), click the associated example icon or name.
-
To add an app from Notification Center (and move it from one section of the list to the other), click the Show in Notification Center checkbox. Removing it merely requires deselecting that checkbox; you can also drag apps in the list from one section to the other. You can choose how many notifications Notification Center should display for each app: 1, 5, 10, or 20 of the most recent notifications.
-
To display a badge showing the number of notifications on an app’s icon, select the Badge App Icon checkbox.
-
To receive audible notifications, select Play Sound When Receiving Notifications. Alas, the sound is not customizable.

You can also choose how to display items in Notification Center by choosing By Time or Manually from the pop-up menu at the bottom of the preference pane. When By Time is chosen, notifications appear chronologically, with the most recent at the top. They are still collected by app, so you won’t have email intermixed with iMessage alerts, for instance.
Choose Manually, however, and notifications display according to the order of your apps in the list on the left side of the Notifications preference pane. You can drag apps up and down to change that order, putting the items that are the most important to you at the top. Frankly, the Manually option makes more sense for most situations, since it gives Notification Center a level of predictability.
There is one additional option available for those who use Twitter. If you have set up a Twitter account in the awkwardly named Mail, Contacts & Calendars pane of System Preferences, you can be notified of mentions and direct messages. To turn off notifications of direct messages, select Twitter in the app list, click the Notifications button, and then deselect the Direct Messages checkbox; to restrict mentions and replies, choose the “No one” radio button. Since support for Twitter has been rolled into Mountain Lion, you don’t even need to open a Twitter client for this to work.
Now that Facebook is now integrated into Mountain Lion (see “Facebook Integration Comes to Mountain Lion,” 19 September 2012), Facebook mentions and messages can also appear in Notification Center when you log in using the Mail, Contacts & Calendars preference pane. However, it does not offer the same notification controls that Twitter does.
Pick Your Poison — Even now, before many applications have been rewritten to support Notifications, the sheer volume of notifications can be overwhelming. If a banner or alert appears for every email message you receive, every tweet that mentions you, and every chat message you get via Messages, you may spend more time dealing with these notifications than working. Luckily, there are a variety of ways to control the flow.
For every app, you can choose among None, Banners, and Alerts for the alert style, and regardless of which of those you pick, you can have notifications appear in Notification Center, increment an icon badge, and play a sound. The trick is to combine these in interesting ways for the maximum benefit and minimum annoyance.
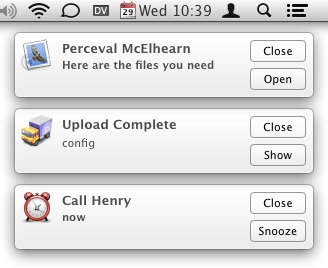
First, decide if you want visual notifications, which can take two forms: alerts and banners, both of which pop up in the upper-right corner of your screen. Alerts stick around until you click on them, and they present buttons that let you react in various ways. Along with a standard Close button, alerts from Messages provide a Reply button, Mail alerts offer an Open button, alerts from Reminders and Calendar have a Snooze button, and Twitter alerts have a Show button. Clicking one of these action buttons generally takes you to the associated app, though the Twitter alerts’ Show button uses your Web browser to view your Twitter account. Multiple alerts stack up at the right of your screen, so when you come back to your Mac, you can
see everything that happened. Alerts are best used for important notifications that you don’t want to miss, such as incoming iMessages from Messages or new events added to a shared iCloud calendar (which Calendar displays).
In contrast, banners stay on screen for only a few seconds, and then slide away. They’re ideal for apps that are notifying you of task completion, like when Transmit finishes uploading a file, or any situation where missing the notification isn’t a problem, as with Mail, where all the messages will be waiting in your Inbox when you come back to your Mac.
But being interrupted visually isn’t always a good idea, and for such situations, it’s better to set the alert style to None, and use the other options. If you get too many tweets, for instance, having them appear only in Notification Center might be best, and an email application might be best limited to icon badges, so you can see with a glance at its Dock icon how many new messages are waiting without having them interrupt you or clutter Notification Center. It’s too bad that the sounds aren’t configurable, since that would provide another way to receive background notifications that convey just the information that a specific event has happened.
Although the settings in the Notifications preference pane are relatively minimal for the moment, we may see more apps offering a Notifications dialog as Twitter does, giving you a bit more control over what events generate notifications. Plus, some apps already let you filter what sorts of notifications you receive in their own preferences. For example, Apple Mail’s General preferences pane has a New Message Notification setting, where you can choose to limit notifications to messages that arrive in your inbox, those from a list of VIPs, those from people in your Contacts, or messages that are picked up by a smart mailbox. After all, getting notifications for every piece of spam you receive would instantly become irritating.
Let’s say you step away from your Mac for a few minutes and come back to a number of alert notifications from Messages. Rather than click the Close or Reply buttons for each (which you certainly could do if you wanted to deal with them one by one), you can also just switch to Messages itself, at which point all the alerts immediately dismiss themselves.
Finally, if you need a break from alerts and banners interrupting you, you can turn them off temporarily. To enable this Do Not Disturb mode, Option-click the Notification Center icon at the far right of your menu bar. This turns off alerts and banners, either until you turn them back on with another Option-click, or until the next day if you forget. Alternatively, open Notification Center and swipe up to reveal a slider that lets you turn them off and on again.
Other Apps — As I noted, we’re seeing more apps support Notifications every day, and they’ll appear in the app list in the Notifications preference pane automatically. I also anticipate that we’ll see some more interesting uses of Notifications over time. For instance, one unusual example is Literature & Latte’s Scrivener. You can set a target word, character, or page count for either a text or a session, and get a notification when you reach that target. So, when writing an article in Scrivener, I can target the word count that I’ve been given by an editor, and get an alert when I’ve reached that number, so I
don’t have to display the program’s status bar, which shows a live word count.
You may also wonder why some apps are listed already. Both Safari and Google Chrome show up, but it’s unlikely you’ve seen a notification from either. Desktop notifications are a feature of HTML5 (check out the HTML5 Rocks site for an example), so you can see them in action in Gmail and Trello (see “Trello Offers Compelling Collaboration Tool,” 9 July 2012). Since the notifications will be generated only when the appropriate page is open, the feature can seem a bit haphazard.
As you can imagine, advertising-driven sites would quickly start using notifications for ads, so both Safari and Google Chrome ask for permission the first time a site tries to send you a notification. If you change your mind, you can deny or remove previously allowed sites in Safari’s Notifications preference pane; for Chrome, dig down into Chrome > Preferences > Show Advanced Settings > Privacy > Content Settings > Notifications > Manage Exceptions.
Using Notification Center — If you’re controlling the onslaught of notifications by pushing some off to Notification Center, you’ll find yourself in there fairly often. Luckily, Apple has given us four ways to open Notification Center.
-
Most obviously, click the Notification Center icon at the right end of the menu bar.
-
If you use a laptop or have a Magic Trackpad, swipe left from the right edge of the trackpad with two fingers, one on top of the other (this may be easiest with your left hand). This can require some practice; I often find myself just pushing my Magic Trackpad itself to the left. You can’t change this gesture, but if you find yourself invoking it accidentally, you can turn it off in the More Gestures view of the Trackpad preference pane. The gesture doesn’t work with a Magic Mouse.
-
If you don’t have a trackpad but still wish to use the mouse to reveal Notification Center, you can set a hot corner. In the Mission Control preference pane, click Hot Corners, and then choose Notification Center for one of the corners. I recommend setting it to the top-right corner, since that’s where the notifications appear and where the Notification Center icon lives.
-
For those who prefer working from the keyboard, you can set a keyboard shortcut to show and hide Notification Center; surprisingly, there is no preset shortcut. To do this, open the Keyboard Shortcuts view of the Keyboard preference pane, select Notification Center, and set the shortcut of your choice.
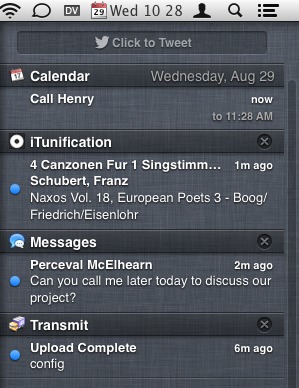
Once you have Notification Center open, there are a few things you can do in it. First, note that if you have Calendar set to use Notification Center, it shows upcoming events. Second, you can dismiss notifications by clicking the X button to the right of a category. That’s useful for acknowledging that you’ve seen all the tweets that are showing, for instance, and you want to make room for new ones.
Most of the time, the notification will be all you need, but in some cases, such as calendar events, it may be a trigger that reminds you to do something, such as change the time or add location information to the event. To open Calendar and jump quickly to the event, just click the notification in Notification Center. This seems to work a little sporadically with notifications generated by Safari and Google Chrome.
There is one special item in Notification Center: Share buttons that appear at the top if you have set up a Twitter or Facebook account in Mail, Contacts & Calendar. It’s self-explanatory — click the Click to Tweet or Click to Post button, enter your message, and click Send. If you don’t want to waste space on the Share buttons, turn them off in the app list in the Notifications preference pane. Before OS X 10.8.2, Notification Center didn’t automatically shorten URLs; now it does.
The Once and Future Growl — Before the Notifications feature appeared in Mountain Lion, and before it even debuted in iOS, there was Growl. This open-source notification manager provides a central control center for notifications from over 300 applications that have integrated Growl support into their code. For many Mac users, Mountain Lion’s Notifications feature does pretty much the same thing as Growl, but, perhaps unsurprisingly, Growl offers far more flexibility and customization. Growl notifications can appear in a variety of styles, and can be customized on a per-application basis. Although Growl was originally free, it’s now
available only through the Mac App Store for $3.99.
Plus, there are a number of extras, such as HardwareGrowler and GrowlTunes, that provide additional features. HardwareGrowler is an application that generates Growl notifications when devices are connected and disconnected from the Mac; supported types of devices include those that use FireWire, USB, Bluetooth, filesystem volumes, and network interfaces. GrowlTunes displays notifications that report on the currently playing track in iTunes. Both are $1.99 through the Mac App Store.
The current version of Growl is 2.0, which integrates directly with Notifications. Notifications from Growl-enabled apps appear in Growl if it’s installed. But if Growl isn’t installed, notifications from Growl-enabled apps use a non-configurable internal version of Growl called Mist in 10.6 Snow Leopard or 10.7 Lion, or use Notifications in 10.8 Mountain Lion. Plus, even if Growl is installed in Mountain Lion, notifications can optionally appear both in Growl and Notifications.
Growl 2.0 offers a number of other potentially interesting features, such as a split between visual alerts and actions, which can include things like sending email, speaking associated text out load, pushing notifications to an iOS device with the Prowl utility, and more. Plus, actions can be chained together, so a single event could generate email, speak out loud, and ping your iPhone. It also seems to fix the CPU problems in the previous 1.4 version and provide even more custom options for alerts.
It’s possible that many developers will rely on Growl’s software development kit to get support for Notifications, with the thought that those users who want Growl’s additional flexibility will appreciate the Growl support, and those who don’t know or care about what Growl brings to the game will be happy with Notifications. In the end, whether you pony up a few bucks for Growl comes down to whether you find yourself wanting more from Notifications than Apple is interested in providing. As is often the case, Apple has created a technology that does most of what many users will want, but power users and those accustomed to Growl’s capabilities will likely find Notifications lacking, and will be happy to stick with Growl.
Regardless, the Notifications feature is here to stay, and it will become a central part of the Mac experience for most users. For the most part, it’s well-designed and useful, and with some careful thought put into configuration, you can avoid becoming overwhelmed by too many notifications constantly interrupting your work.
Now if only Apple would put some thought into the insane duplication of notifications, since if you have several Macs and iOS devices, many of these notifications will appear on every device. Joe Kissell explains the problem — and suggests a solution in the form of alerts that cascade from device to device — in “An Alarming Abundance of Alerts” (13 May 2012). There has been little indication of Apple moving in this direction — the closest is the Do Not Disturb feature available by Option-clicking the Notification Center icon and a similarly named feature promised for iOS 6. But the mere fact that we saw notifications appear in iOS, and then later in Mountain Lion, to be followed
by iOS 6’s Do Not Disturb feature, indicates that Apple is slowly refining the idea of how Notifications should work. We can only hope that at some point, our Apple devices will be smart enough to understand when a notification has been delivered on one, such that it doesn’t need to appear on others, thus reducing the digital noise of our lives.
Bark (http://barkplug.in) is the best solution I've found yet for redirecting Growl to the Notification Center. And Mail has a Preferences setting for new message notifications, which allows you to specify a Smart Mailbox so you can use Mail's rules to reduce the clutter (and distractions) in Notification Center.
I am one who resents the intrusion of Notifications when I'm concentrating. I can drag everything out of "In notification center" but Apple's Mail program continues to notify me whenever I get an email. I can turn notifications off, but only for a day. For some goofy reason it resets to the on position. Why can't I just get rid of it?
Go to System Preferences > Notifications and click on each app that shows up in the list and uncheck Show in Notification Center and set alerts to None.
Thanks for the advice, but turning off banners etc in System Prefs does not stop them from appearing in Mail. I have to reset Notifications center every day.
Here's what I don't get about Notifications. It was developed right along-side iCloud. Why do I have three Notification Centers (iPhone, iPad, and iMac) that are essentially unconscious of the others? When someone leaves me a voicemail, my Mac should be able to notify me (assuming I want it to). Likewise, when 3rd party Mac developers add Notification Center support, I want to be able to tell Notification Center to include my mobile devices.
Apple's push for data synchronization is totally absent when it comes to this Top New Feature. And this is a feature where syncronization could be incredibly useful and necessary!
Unfortunately, one side effect of notifications is that ical alerts no longer allow you to specify the length of the snooze.
Not being able to ask an alert to remind me again in an hour or a day is a real step back from the pre-Mountain Lion ability.
Yes, absolutely. It's one of the reasons I prefer BusyCal to Apple's Calendar app.