OmniOutliner 4 Refines the Outlining Process
To someone who doesn’t work with words, an article about outlining software must sound pretty dry. An outline can be made using just about anything from a full-featured word processor to a basic text editor — it’s all just text. Sometimes, when I’m in a hurry, I’ll whip up an outline in BBEdit, Evernote, or the Drafts app on my iPad using simple tabs or dashes to denote levels of the hierarchy.
So what’s the point of an outlining application? If it’s good, it makes the act of outlining less intrusive so you can focus on organizing the information. As you’re building an outline initially, the application gets out of the way, and when you need to rearrange things later, it doesn’t trip you up with hard-to-find commands or an overburdened interface.
OmniOutliner, from The Omni Group, is one of the few applications I set to launch automatically when my Mac starts up. I don’t consider myself an obsessive outliner. I don’t use it as a rolling to-do list, for example, or as a way to track inventory or financial information (all of which are possible). But the articles and books I write require structure, planning, and flexibility. So, nearly every project begins life as an outline.
OmniOutliner 4, released in January 2014, caps a long span of time between major versions: OmniOutliner 3 first shipped in 2005 (before Apple switched Macs to Intel processors), and received several compatibility updates over the next 7 years. At the end of 2012, Omni Group CEO Ken Case teased a public beta of OmniOutliner 4, writing in a blog post that he had already switched to that version for his own documents.
But life happens. Or rather, Apple happens. According to Case in the latest progress update, the radical design change of iOS 7 required the company to shift its focus on retooling and adjusting other apps (OmniFocus 2 for iPhone, OmniOutliner 2 for iPad, and OmniPlan 2 for iPad).
Now that the iOS push is past, Omni has finally been able to wrap up OmniOutliner 4 for Mac. It’s available directly from Omni or from the Mac App Store and costs $49.99 for the Standard version or $99.99 for the Pro version. Upgrades run $24.99 or $49.99, and anyone who bought OmniOutliner 3 since 6 January 2011 can get the update for free.
Advantages of an Outliner — Microsoft Word and some other word processors (such as Apple’s Pages 4.3, but not the current Pages 5.1) include an outlining tool or separate outline view. But in those cases you’re using a feature that is secondary to the task of plunking words down one after another. OmniOutliner is designed solely for outlining, with a focus on doing everything from the keyboard (my preference).
When you’re building an outline in OmniOutliner, pressing the Return key creates a new row, and pressing Tab changes the row’s level, making it a “child” of the current level. If you want to create a new row above the current one, hold Shift and press Return. Since you often want to expand on an idea while building the outline, OmniOutliner offers a Note field that appears beneath the text of a row; pressing Command-‘ (apostrophe) enables the field.
I’ve discovered, however, that I prefer to view notes separately, which is where OmniOutliner’s capability to create columns is helpful. Having columns turns the outliner into a word spreadsheet that isn’t encumbered by the number-heavy approach of traditional spreadsheets like Microsoft Excel or Apple’s Numbers.
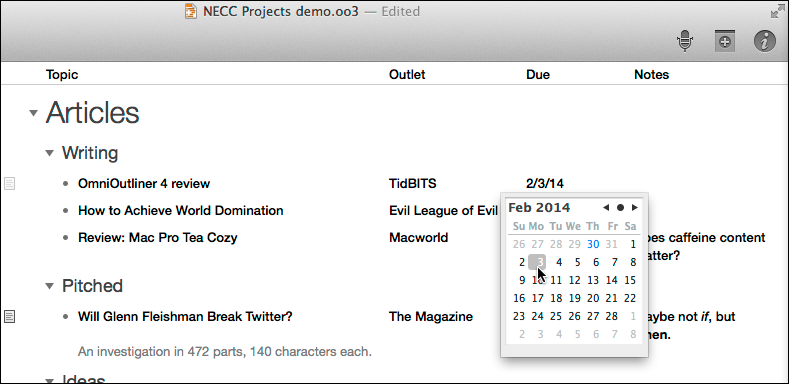
Columns open the outline to more possibilities, depending on the content on which you’re working. A list of current projects, for example, can include a column with date formatting to list due dates. Other column types include a checkbox, duration, number (with formatting and summary options), a pop-up list, and the default Rich Text.
The next step in outlining after collecting your thoughts is to rearrange rows, which is a dream in OmniOutliner using the keyboard. My most-used commands are those for moving rows up or down, which you accomplish by pressing Command-Control and the up or down arrow keys. Yes, you can grab the mouse, select the row, and drag it where you want (or choose Organize > Move), but the keyboard shortcuts make it possible to move whichever row (and its children) that the cursor is in.
(OmniOutliner 4.0.1, released while I was writing this article, unfortunately introduced a bug where the outline doesn’t show the results of Move keyboard commands when the cursor is within a row. Closing and reopening the file reveals that the rows do move, but it’s not displayed as you perform the action. Omni has acknowledged the bug, and I expect a fix to appear in the next maintenance release. Update: OmniOutliner 4.0.2, released soon after this article was published, fixed this bug.)
When an outline starts getting big, you can choose the Focus view mode to display only the current row and its children (Focus was called Hoist in the previous version of the application). You can also focus on a section by selecting it in the Contents pane of the sidebar.

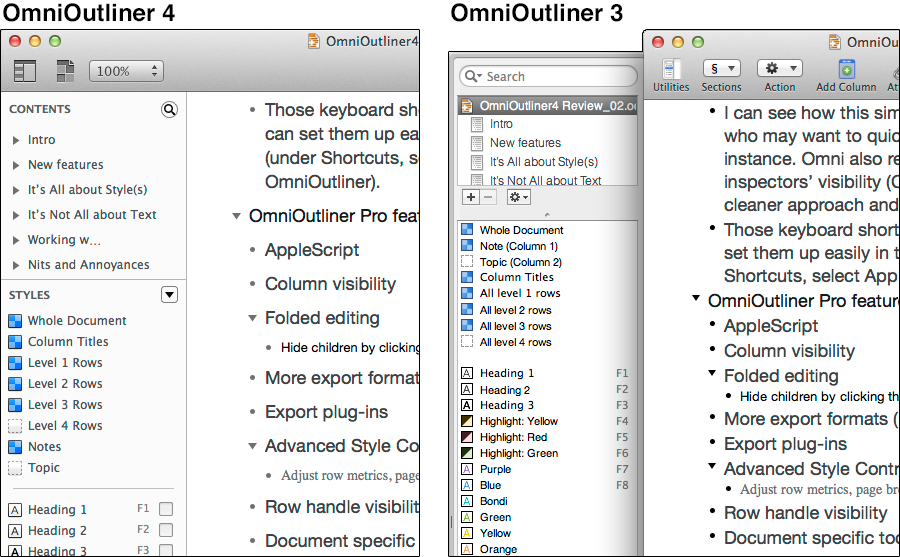
Overcoming the New Feature Trap — I must admit that the list of improvements and new features in OmniOutliner 4 left me a bit befuddled. Part of that could be due to some of the excited release notes for version 4.0. For example: “We’ve done away with the old style drawer in OmniOutliner 3 and have create a new Sidebar that lists the Contents of your outline, Styles, and more!”
Looking at the two versions, the same basic approach is used by both: controls for selecting styles and viewing the contents appear to the left of the main document window, only in version 3 it’s called a Utility Drawer and slides out from behind the document window (an aging Mac OS X convention that is no longer in fashion).
Or take the first item in the release notes: “Zooming — Text can now be magnified on screen without changing your print layout.” Is magnifying text really so exciting that it leads the list of improvements?
Well, yes, in a sense it is.
Thanks to higher screen pixel densities (OK, I’ll admit, mostly my aging eyesight), I often find myself increasing the size of text to make it more readable. Word processors offer a zoom control that scales the text onscreen without increasing its actual size (which would throw off printing and surprise other people who read the document). Instead of monkeying with text sizes in OmniOutliner, I can now zoom the text in the same way to make it more readable.
So, it turns out that for this current OmniOutliner user (and I’m sure many others), text zooming is, in fact, a high priority new feature. It removes a pain point that I’d internalized as a cost of using the application. The feature isn’t going to spur sales to new users, but it’s an important addition.
This same spirit extends to the application’s overall cleaner appearance compared to the previous version. The Inspector, in particular, has been stripped of complexity. In version 3, each section appears as if it, too, is an outline: click the disclosure triangle next to the Column heading, for example, to reveal its controls. The sections can also be removed to float independently or put into groups.
The Inspector in version 4 is a single entity that offers a horizontal row of icons at the top for each section and hides the settings that aren’t active. I think the icons are initially difficult to parse, but placing the pointer over one reveals its identity in the title bar of the Inspector. And it does so in a clean, subtle way: the current section is in a standard roman text, while hovering over another icon reveals the name in italicized text.

The new Inspector is a better, less-cluttered use of space, although I can see how this simplification could be annoying for someone who wants to view both the Style and Column controls quickly, for instance. Omni also removed the keyboard shortcuts to toggle the sections’ visibility (Command-1 through Command-5). However, those shortcuts are unmapped in the new version, so you can set them up easily in the Keyboard pane of System Preferences (under Shortcuts, select App Shortcuts and specify OmniOutliner).
It’s about Style(s) — How often have you found yourself spending an inordinate amount of time configuring the appearance of a word processor? The way text appears shouldn’t matter — but it does. Even when writing in a pure text editor like BBEdit (where a lot of my text is composed), the font and size make a difference. If someone were to switch my 14pt Lucida Grande with 12pt Garamond, it would be a distraction that I’d have trouble adapting to.
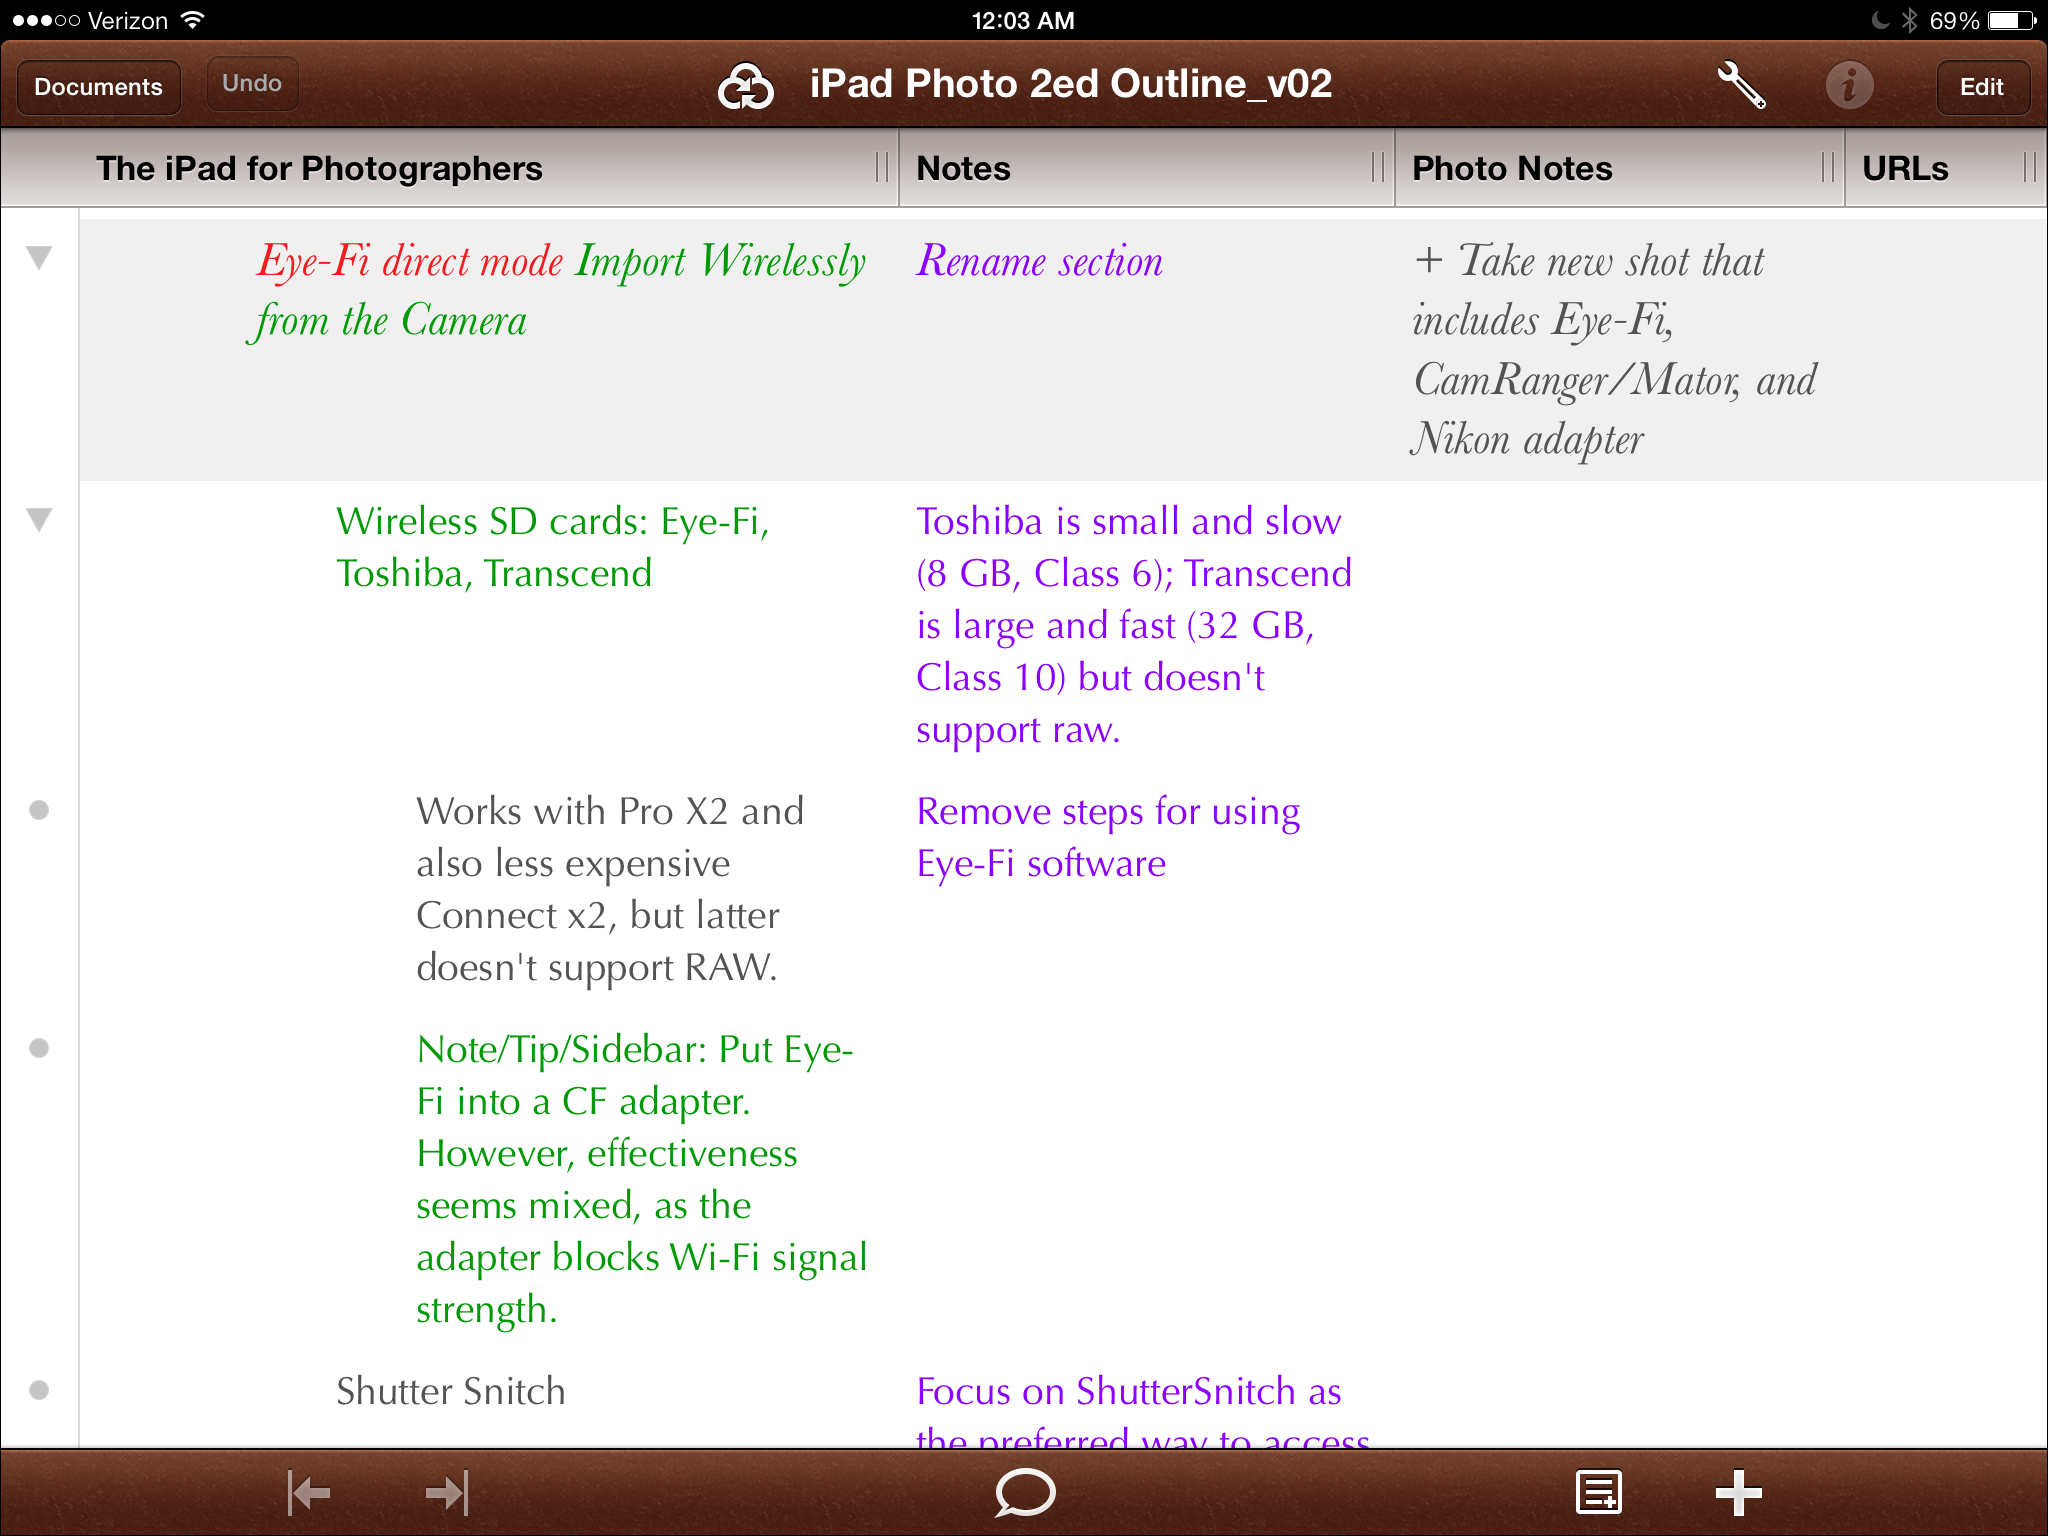
OmniOutliner uses character and row styles to define the look of an outline. When I update a book, I take the previous version’s outline and start marking up what needs to be added and removed. I’ve set up character styles so I can highlight a word, phrase, or row and mark it red (delete), green (add), or blue (moved to a new section). I can scan the outline quickly and see what needs to be done. Several such colors are set up initially, including highlighting effects, and you can change or create new styles as you see fit.

Each row and column can also be styled. As you add new rows and children, their levels dictate their appearances. For example, a complex outline could be made clearer by styling all level 2 rows with blue text, or all level 3 rows could appear in a monospaced font.
Those capabilities aren’t new to OmniOutliner 4, but the engine that drives them is. In fact, the application’s style system was pioneered in OmniOutliner 2 for iPad, then brought back to OmniOutliner 4 on the Mac so the two platforms would work well together.
What is new are themes, both pre-formatted and user-defined, all based on styles. The approach is like using Cascading Style Sheets (CSS) on the Web: the content of a page is defined in HTML, but the formatting is controlled using defined style sheets. Making a visual change throughout the site, such as styling all headlines in a new color, requires a small edit to the CSS properties instead of hand-coding the color on each headline.
When you create a new document, the new Resource Browser presents several outline templates with pre-formatted themes. (To get a better view of one, select it and press the Space bar for a Quick Look preview.)

As with text zooming, document templates aren’t some revolutionary new feature. What’s good about the implementation in OmniOutliner 4 is that you can switch between themes without disrupting your outline’s content (by choosing Format > Apply Template Theme). Character-level styles remain in place. For example, you could create a theme that is easier to read when projected to a room full of people (from the Mac or from OmniOutliner for iPad, a separate $29.99 app), and then switch back to your normal editing theme when you’re done.
Speaking of the iPad, transferring documents from Mac to iPad and back works great through The Omni Group’s OmniPresence sync system. Documents look the same, thanks to styles, and edits are reflected quickly. I use the company’s free Omni Sync Server, but it’s also possible to set up and run your own. (After running into limitations in iCloud’s syncing capabilities, The Omni Group chose to build its own service.)
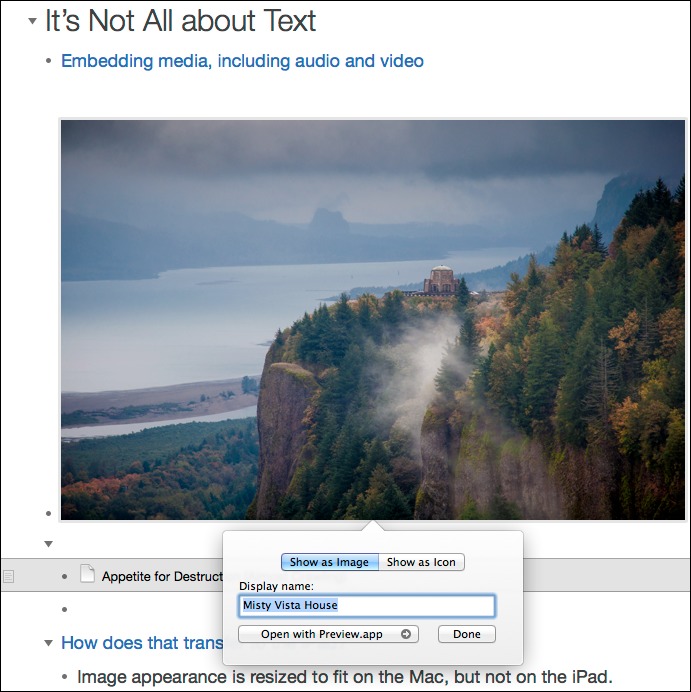
I work primarily with text in my outlines, but not through any fault of OmniOutliner’s. You can embed photos, audio, and video into a row by dragging it into place. Version 4 automatically resizes media to fit the column width, and uses a new popover to control how the image appears (with a preview or as an icon), what name should be used in place of the filename, and which helper application should be used to open it.
OmniOutliner Pro Features — The standard version of OmniOutliner 4 features everything I’ve mentioned so far, but for even more features, you can opt for OmniOutliner Pro, which is available either as a separate purchase or as an in-app upgrade in the standard version.
Much of the difference revolves around customizing things such as line height and padding for rows and notes, the visibility of row handles, and whether child rows are automatically indented (the default) or aligned with their parent rows. There’s also a setting to enable “folded” editing, where long text in rows is truncated with the exception of the row you’re currently working in.
But I suspect most people opting for the Pro version will be interested in AppleScript support, additional export formats such as Microsoft Word .docx and .dochtml (HTML), and whether notes appear inline or in a separate pane at the bottom of the outline. I particularly like the option to hide columns for clarity and to make information that I don’t need to reference, but want to keep, disappear. You can also create document-specific toolbars.
Purchase and Upgrades — OmniOutliner 4 comes in two versions: the Standard version costs $49.99 from The Omni Group Store or the Mac App Store; OmniOutliner Pro 4 is $99.99 from The Omni Group Store or the Mac App Store. If you buy the standard version, you can upgrade it to the Pro version via an in-app purchase. A 14-day trial version
is available for download from Omni, which lets you preview all the features.
Due to the delay between major versions, The Omni Group is offering OmniOutliner 4 as a free update for anyone who purchased version 3 during the past three years (since 6 January 2011). If you purchased an earlier version of OmniOutliner from Omni directly, you can upgrade to the OmniOutliner 4 standard version for $24.99 and the Pro version for $49.99.
Whether OmniOutliner 4 is a compelling upgrade depends entirely on how you use it. I imagine those who build only the occasional outline won’t be swayed to purchase the new version, especially if they already use version 3, which works just fine under OS X 10.9 Mavericks. Of course, if you fall within the free upgrade window, you should update right away.
On the other hand, if you can’t make it through the day without structuring something into an outline, and particularly if you’re already an OmniOutliner user, version 4 is a good upgrade. The cleaner interface, text zooming, and styles (especially if you work on outlines on both the Mac and the iPad) enable OmniOutliner 4 to do a better job of helping you build complex outlines without getting in your way.
I'm caught in a Catch-22 trying to get the 25-buck upgrade price. The iMac that OmniOutliner came bundled on has long since gone to MacHeaven, and for some reason, Apple can't seem to locate its serial number, the prerequisite for an upgrade. I have since migrated the app to a newer iMac, and, before I said shut up, it kept nagging me to upgrade for 25-bucks. I guess I'll just keep using version 3 until it breaks, then go looking for something else.
Have you tried contacting Omni support? This sounds like something where a human could intercede and make things work.
http://www.omnigroup.com/support/
Yes, that's where I started. They're quite inflexible on the matter. Then I went to Apple, and spent a very long time with "Javed" who was friendly but could not find any record of my old iMac (though he found a couple of my older ones). I then went to Amazon, where I actually bought the iMac. Nada, Zip, Zilch.
I even tried "recreating" a serial number of an Early 2006 iMac. Fail!
UPDATE: Heh! I tried using a serial number from one of my old Macs that did NOT come bundled with OmniOutliner, AND IT WORKED!
On a somewhat related note, can anyone recommend any similar outliners that're web based so I can collaborate with co-workers? I'd be especially interested in anything that has "columns"...like in the "iPad for Photographers" sample above where there's a separate column for "notes" "photo notes" and "urls".
Right now about the closest thing we have is Google Spreadsheets and hiding/unhiding rows, which is a real PITA and not made for this kind of use.
For a web based outliner I like Fargo, http://fargo.io/ It doesn't however have any support for columns.
I added a note in the parenthetical about the bug that appeared in version 4.0.1. OmniOutliner 4.0.2, released last week, fixes the bug.