FunBITS: Be a VJ with the iTunes Visualizer
There’s an underused gem of creative software installed on hundreds of millions of computers worldwide: iTunes. Yes, that’s right, iTunes. You may have thought it was just a media player, or perhaps a management utility for your iOS devices, but it has a little-used visualizer that can enable anyone to create stunning animations.
Here’s how to have fun with iTunes’ built-in visualizer and become a VJ — VJing being described as creating a “real-time visual performance.” Once you’re aware of a few important facts and tips, it becomes a joyful experience to control beautiful and colorful live 3D animations, with nothing required other than iTunes and music you love.
In 2001, Apple licensed and integrated a special version of SoundSpectrum’s G-Force visualizer into iTunes. In September 2008, Apple introduced the current default built-in visualizer in iTunes 8 (see “iTunes 8 Adds Genius; iTunes Store Adds HD TV and NBC,” 9 September 2008). What you may not realize is that what is today’s default visualizer was originally a third-party plug-in named Magnetosphere and developed by The Barbarian Group. The iTunes version of this visualizer has not evolved much since then.
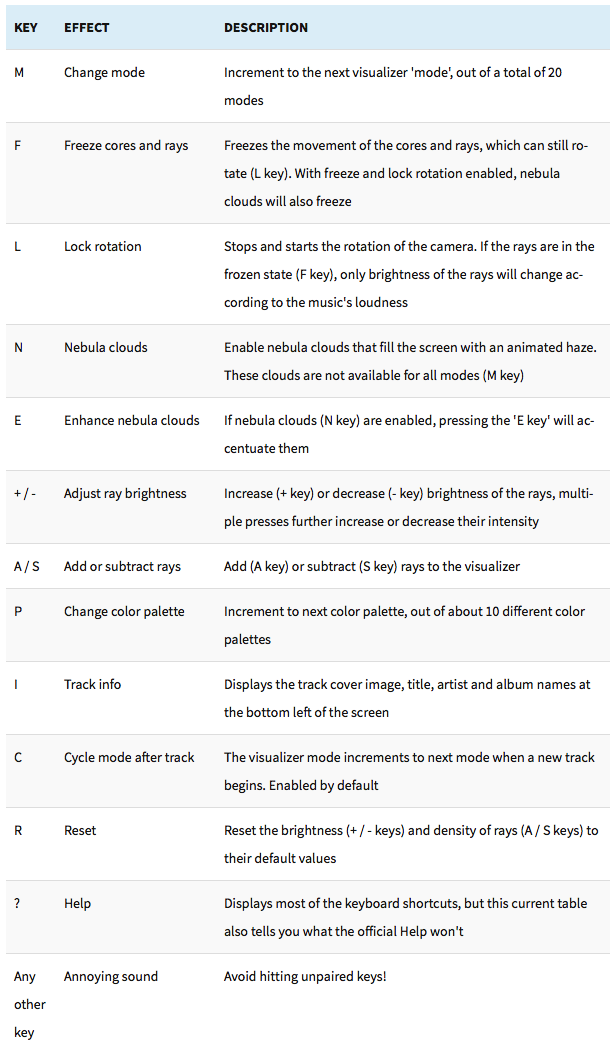
What’s wonderful about the iTunes visualizer is that you can control — in real-time — a number of its components, such as the type of visualization and its colors, brightness, rotation, and other factors, enabling you to create surprisingly nice animations. To dive into the experience, start a song in iTunes and press Command-T, which brings up the default iTunes visualizer. Pressing ? reveals a few keyboard commands, but not all. The following table lists all of the iTunes visualizer’s keyboard commands.
Now that you know which keys to press, it’s time to learn how to leverage those controls to enhance the experience. While I can’t help you with the artistic process of creatively tapping the M, L, F, N, and P keys in rhythm with the music to create something beautiful, I can tell you what I found about the
mechanics of the visualizer. There are three main visual components: the cores, which are the moving spheres; the rays, which flow out of the cores; and the nebula clouds, which fill the whole screen and impact the ambiance.
Here are a few tips:
- If you play a song that has rhythm and a varied frequency, you’ll get livelier visualizer animations than when playing a monotone track. The selection of the track will significantly influence the whole experience.
- Increase the presence of features on the screen by pressing
Aand+a few times. -
There are 20 modes for you to enjoy. Cycle through them with the
Mkey. Take the time to explore the various modes since they have the biggest impact on visualizations. -
When freezing is disabled, it’s easy to forget if you’ve locked rotation (
L); to make certain, simply freeze (F) the animation and if the cores move, then rotation is unlocked. -
Don’t underestimate the nebula clouds (
N) — they radically change the ambiance and can also be toggled on/off rhythmically. PressingEwill enhance the nebula clouds, making them more prominent. -
Cycle through the color palettes (
P) to alter the general feel of the animation. -
If you want your whole screen to be filled with shimmering lights you control, here’s the recipe: while rotation is unlocked (
L), freeze (F) the cores and wait until they get much closer and fill the screen. Once they do, lock the rotation (L) and the cores will remain close to the viewer and continue to fill the screen. Now is the time to rhythmically improvise with theM,F,N, andPkeys to modulate the ambiance. But don’t unlock rotation (L) until you want the cores and rays to go back to the background and stop filling the screen.
To demonstrate some of what you can do, I’ve created a few sample videos based on music I improvised with the award-winning Animoog app for iPad ($29.99). Music made on mobile devices is quickly growing in popularity with tons of innovative musical instruments disguised as apps being available for iOS. The Animoog solos accompanying the videos are not exactly Top 40, but the album has been featured by Moog Music and got some positive
reviews. That said, you should try the visualizer with some of your favorite songs from different genres.
In my first video, I did not use the recipe I explained above and thus the animations often appear distant and don’t fill the screen, offering an arguably less enveloping experience. My second video shows more cases where the action is set closer to the viewer, filling the whole screen. The third demo I created for this article goes to the extreme — I locked the cores close to the view and essentially played with the mode (M) and freeze (F) controls alone while never unlocking rotation. The resulting animation exhibits less variety but fills the screen the whole duration.
You have everything needed to record similar videos of your own iTunes visualizer performances. The approach I used involves recording the screen with QuickTime Player (File > New Screen Recording; I had to lower the display resolution in System Preferences to avoid stuttering), and then editing the video and audio track in iMovie with one of its default themes.
While there are many third-party music visualization tools available for OS X and iOS (my favorite being Uzu), iTunes is nearly ubiquitous and is perfect for getting a taste of what can be done. Magnetosphere continued to improve for a while outside its iTunes version, as demonstrated by these two 2010 Magnetosphere videos by Robert Hodgin, a former member of the development team. Although Apple hasn’t updated the iTunes visualizer in seven years, I hope the company eventually sees value in releasing an updated version. Meanwhile, the current visualizer is there to liberate your
inner VJ.
I am on OSX10.10.3 and iTunes 12.1.2.27. The keys/effects do not quite correspond with mine.
Hi hjtromp, can you tell us how they differ? If you press '?', this will display most of the keyboard shortcuts, they should be the same for everyone! Maybe they differ for the Windows version of iTunes? But you're telling us you're on OS X too... have fun -- Alex
Ah, it was my mistake. I choose the Classic Visualizer instead of the Visualizer. Then the commands are different.
Ive always loved the iTunes visualizer from day one when I bought my first Mac.
And I forget about it, thank you for jolting my old memory. I can run it on both my big screens side by side with the house lights off at night.
Remember the mosaic screensaver? That was certainly wonderful, I almost shed tears when Apple discontinued that, but I have kept an older OS, which runs it, and I leave it on a lot with my photos.
Do you ever think they will bring that back?