How to Migrate to a New Mac
When you get a new Mac — whether it’s brand new or just new to you — one of your first questions is bound to be how you move all your data from your old Mac (or PC, if you’re switching platforms) to the new one. Those of us who have moved from one Mac to another repeatedly may not give it much thought, but if you haven’t done it before, or at least recently, the prospect of dealing with loads of documents, folders, accounts, preferences, and so on can seem daunting.
In fact, there are several ways to migrate your data, and which way you choose depends on your circumstances. There are four main paths you might consider. In order from easiest to most challenging, those paths are:
- Sync from the Cloud: If you keep pretty much all your data in the cloud, all you need to do is log in to the appropriate accounts on your new Mac. Those accounts would cover documents in iCloud Drive, Dropbox, Google Drive, or whatever; email in an IMAP or Exchange account; contacts and calendars stored in CardDAV and CalDAV accounts; photos synced with iCloud Photo Library or comparable; music via streaming or synced using iTunes Match; and so on. Data that’s cached locally will sync automatically, and anything you normally leave in the cloud will remain there, just as accessible as it was on your old Mac. Migration is essentially a non-issue, except for any random files you stored only on your old Mac’s drive
— and you can copy those over to the new Mac manually. - Use a Clone to Migrate: If you have or are willing to make a bootable duplicate, or clone, of your old Mac onto an external hard drive using a utility such as Carbon Copy Cloner or SuperDuper, you can then connect the duplicate to your new Mac and boot from it. (Hold down Option on startup and select the duplicate — see “macOS Hidden Treasures: 15 Startup Key Combinations,” 1 September 2016). Now use the same backup utility to clone the duplicate onto the startup volume of your new Mac. Finally, reboot your new Mac from its internal drive. That’s it — your new Mac has all the same
apps, files, and other data as your old one.This is the approach I nearly always take, because it’s simple, it’s relatively fast, and it puts all my data exactly where I expect it to be. But, there are a couple of caveats. First, migrating via a clone assumes that the new Mac can run the same operating system that’s on your clone. But if your old Mac was running, say, Mavericks and you get a new Mac that requires Sierra or later, this procedure will leave you with a Mac that doesn’t boot. You can usually avoid this problem by upgrading your old Mac to the very latest system software before cloning it. And second, don’t use this approach if you’ve already created files on the new Mac because it will overwrite everything on that Mac’s drive.
-
Migrate via Setup Assistant: When you turn on a brand new Mac for the first time, a program called Setup Assistant runs; it walks you through creating a user account and various other essential first-run steps. One of those steps offers to transfer your data from another Mac, a Time Machine backup, an external startup disk, or a Windows PC. If your new Mac requires a newer operating system than what’s on your old Mac, using Setup Assistant is your best option — and you can still use your old system’s clone as a source if you like. Setup Assistant also runs when you install macOS onto a blank volume, giving you the same options. So, if you’re performing a clean install of a new operating system, as opposed to
an in-place upgrade, you can use this procedure to migrate your old data. -
Use Migration Assistant: Finally, there’s another utility included with every Mac called Migration Assistant, which can be used to migrate accounts and data from another Mac (or a backup) at any time. Migration Assistant looks and acts almost exactly like the file transfer portion of Setup Assistant, which is no accident — they use the same underlying code. If you’ve already been using your new Mac for a while, this may be your best option, but, for reasons I’ll explain in a moment, it’s not ideal in every situation.
If one of the first two options (cloud sync or using a clone) meets your needs, you can stop reading now. The remainder of this article is for people who need to use Apple’s migration technology via Setup Assistant or Migration Assistant. But before I launch into the steps you’ll take, I want to give you some essential background on migration that may affect your decisions.
Understand Migration Concepts — Migration is merely a fancy word for copying — a familiar, ordinary, everyday task that shouldn’t seem scary at all. Whenever you make a backup, you copy stuff from one place to another, just as when you share files over a network. You have stuff on your old computer, and you’re going to copy it onto your new one. No big deal — but there is quite a lot of copying to be done, and it has to be done in just the right way for best results.
Migration essentially involves two parts:
- Connecting the two computers: This can be a simple matter of stretching a Thunderbolt or FireWire cable between them, or having them on the same Ethernet or Wi-Fi network. If you can’t do either of those things, you can clone everything from the first computer’s disk onto an intermediate external hard drive and plug that into the new Mac.
-
Figuring Out Where the Old Stuff Needs to Go: Figuring out which stuff from the old computer needs to go where — and with which attributes (such as ownership and permissions) on the new Mac is trickier than it sounds, because some of your data may be hidden in databases or invisible folders, or may consist of numerous components scattered around your drive, as is often the case with applications.
The migration technology Apple baked into Setup Assistant and Migration Assistant knows how to copy stuff from your old computer to your new one. It knows where your old stuff is, where it should go, and how to copy it intact — even if locations and file formats have changed from your old computer to your new one. It handles the tricky bits so you don’t have to worry about them. It even simplifies the process of making a connection, in that you don’t need to mess with file sharing settings or mounting network volumes; at most you’ll have to run an app on the source computer and click a few buttons.
So far so good. But there’s a big difference between transferring stuff via Setup Assistant (in the process of setting up a brand new Mac or installing macOS on an empty volume), and running Migration Assistant manually later. With Setup Assistant, you’re starting from scratch, creating accounts on your new Mac based on the data from your old Mac. But with Migration Assistant, you’re adding to what’s already on your new Mac. And that leads to the crucial issue, which I want to emphasize:
Migration Assistant can’t merge accounts.
Here’s what I mean. Say I’ve brought home a new Mac, and I’ve gone through its Setup Assistant to set up a new user account with a full name of Joe Kissell and a short name (or “account name,” which is also the name of my home folder) of joe — for the logical reason that, well, that’s my name and it’s what I used on my old Mac or PC (Windows uses only long usernames). And I start saving files, adding calendar entries, and doing all the usual things I do. A week later, I decide to migrate the data from my old Mac or PC, which will include all the files in my main user account there. But when I try, Migration Assistant gives me some bad news: I
can’t migrate the data unless I change the account name, because every full and short username must be unique on a given Mac, and the new Mac already has an account called Joe Kissell, or joe for short!
So I could rename the account I’m transferring to Joseph Kissell with a short name of joseph or jk or whatever. But then I have something I don’t want — two accounts:
- My new
Joe Kissellaccount, which uses the name I want, and which has the data I’ve created since I set up the account a week ago -
My old account, which was called
Joe Kissellbut has now been renamed toJoseph Kissell, and which contains all my old data
If Migration Assistant could somehow merge all the stuff from my old Joe Kissell account into my new one, there’d be no problem. But it can’t! And sure, I could come up with a complicated procedure to merge the accounts manually, but it would be an awful lot of error-prone work. Not fun.
The moral of the story is: When you get a new Mac, or when you do a clean installation of macOS, the optimal time to migrate your old stuff (in order to keep account names intact) is right away, during that first run of Setup Assistant, instead of later, using Migration Assistant.
If it’s already too late — you’ve already set up a new account with a conflicting name — you have three choices, the first two of which can be performed by Migration Assistant, as I’ll describe shortly:
- Keep the existing account as is, and rename the old one as I described above. If you’re not especially tied to the old username, this might seem like a perfectly reasonable choice, but then you’ll have files under two different accounts, which is awkward at best.
-
If you’ve created relatively little new data yet in the new account, you can replace the account with the conflicting name — that is, overwrite all the data from the newer account with the data from the account you’re migrating while saving a copy of the overwritten data. If you already have important data under the new account, you can retrieve it later after logging in to the migrated account. This option is available when migrating from an account on another Mac, but not when migrating from a Windows PC.
-
Change the short (and long) name of the new account so it won’t conflict, transfer the old account, and manually copy data from the new one to the old one, deleting the new account when you’re done. If you want to do this, you can find instructions for the name-change part on Apple’s site, but I’m afraid you’ll have to do the actual data copying part manually. And, since you can’t normally access another user’s home folder, you’ll have to use the
/Users/Sharedfolder, an external drive, or some command-line magic to work around that restriction.
Having said all that, I should point out that using Migration Assistant, including the version in Setup Assistant, is not an all-or-nothing affair. You can use it to transfer only your applications, for example, or only particular user accounts, or only certain types of data from a user account. Although most people want to transfer everything, it’s entirely up to you.
With that background in mind, I’ll walk you through three scenarios:
- Migrating data from an old Mac via Setup Assistant during the initial setup of a new Mac, or after a clean install of macOS
-
Migrating data from an old Mac via Migration Assistant to a Mac that already has one or more active user accounts and data you don’t want to lose
-
Migrating data from a Windows PC
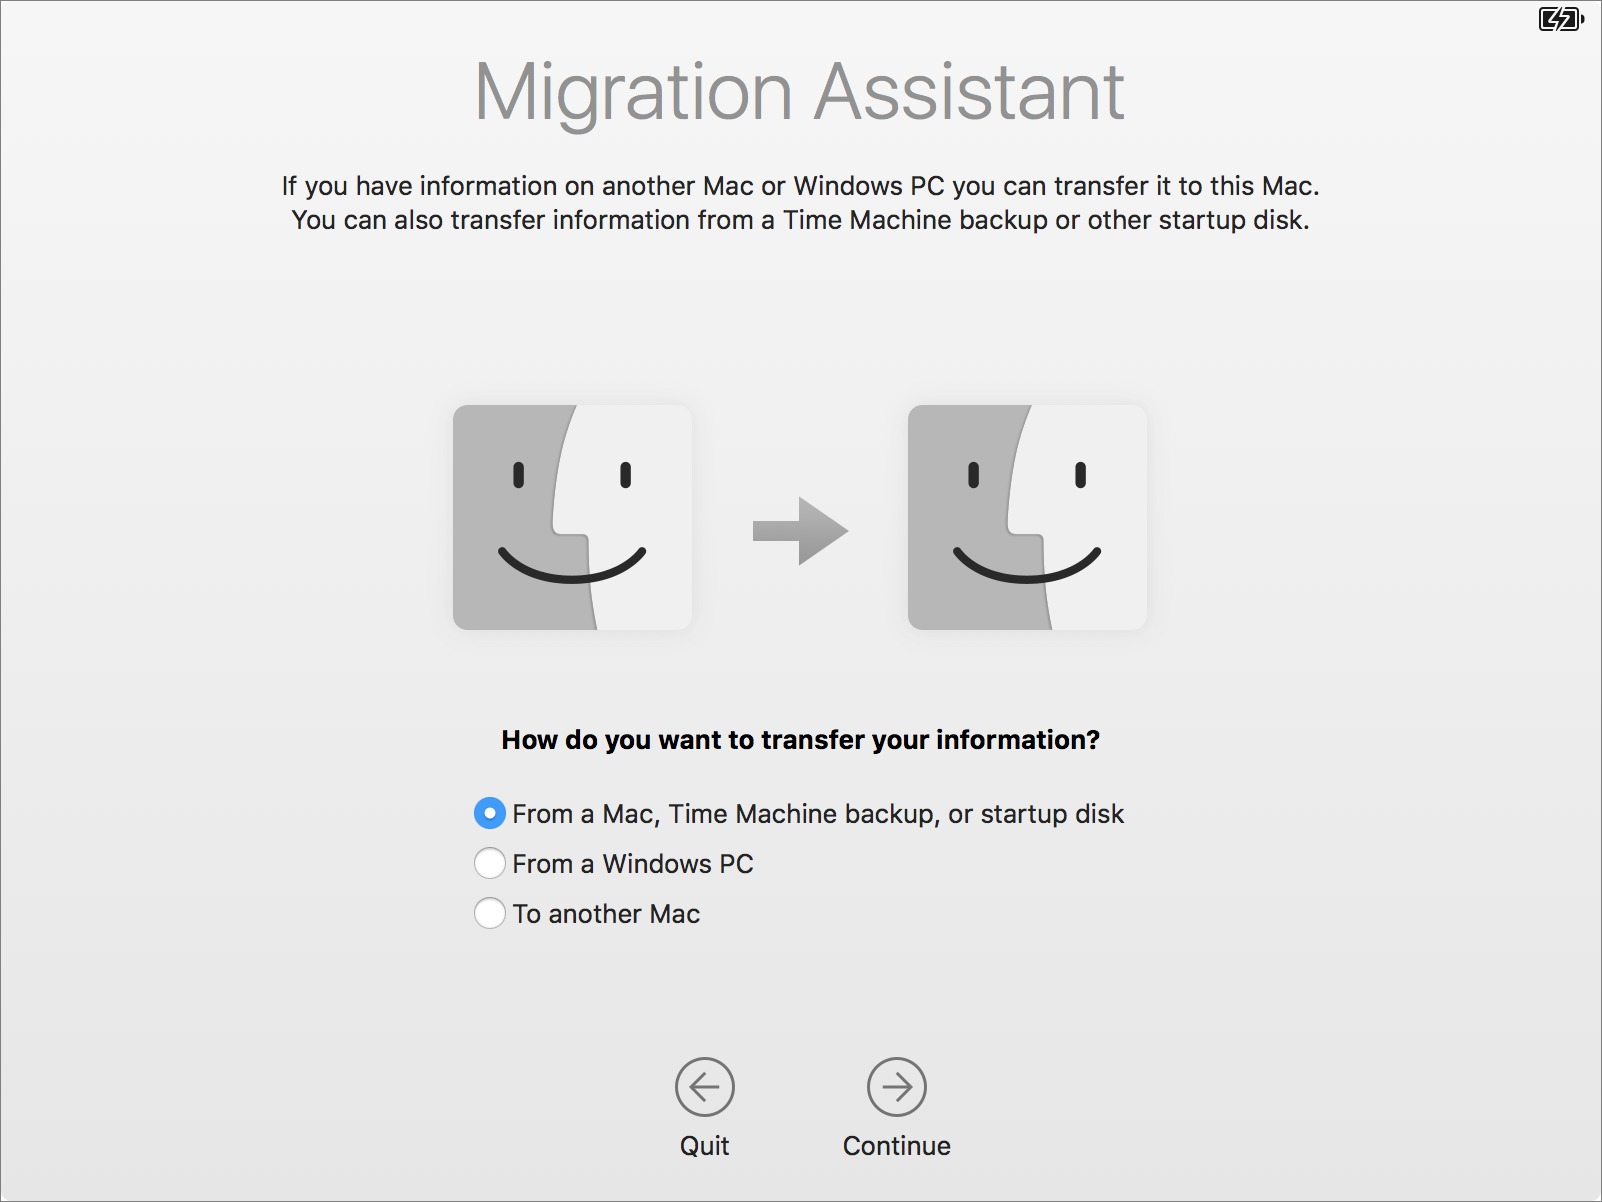
Migrate from Another Mac Using Setup Assistant — If you are transferring data from another Mac while running Setup Assistant on a brand new Mac — or during a clean installation of macOS onto a blank volume — follow these steps:
1: If you’re using a brand new Mac for the first time, work your way through Setup Assistant until you get to the Transfer Information to This Mac screen. Similarly, if you’ve just installed macOS onto a blank volume, follow the prompts until you get to this screen.
![]()
2: Select “From a Mac, Time Machine backup, or startup disk.” But don’t click Continue yet.
3: Make sure the old Mac, or the drive on which your Time Machine backup or bootable duplicate exists, is connected to your new Mac:
- Mac-to-Mac: If both Macs have Thunderbolt ports, your best bet is to connect a Thunderbolt cable to each. (If the newer Mac has a Thunderbolt 3 port, which uses the USB-C connector, you can connect it to an older Mac that has a Thunderbolt 1 or 2 port using a Thunderbolt 3 (USB-C) to Thunderbolt 2 Adapter and a conventional Thunderbolt cable.) If both Macs lack Thunderbolt but have FireWire ports, use a FireWire cable. If one has Thunderbolt and the other has FireWire, you can use a FireWire cable with a Thunderbolt-to-FireWire adapter. If neither Thunderbolt nor FireWire is an option, use an Ethernet cable. And, if even that isn’t possible because you’re using a Mac with no Ethernet port and don’t have a USB-to-Ethernet adapter, make sure the Macs are on the same Wi-Fi network — but bear in mind that Wi-Fi will nearly always be much slower than the other options.
-
Backup Drive: If you’re transferring information by way of a backup, make sure the backup drive is connected to the new Mac. If you backed up to a Time Capsule using Time Machine, connect the Time Capsule to the Mac via Ethernet if possible; if that isn’t possible, move the Mac as close as you can to the Time Capsule for better Wi-Fi reception.
4: If you’re using a Thunderbolt or FireWire cable, turn off the old Mac, and then turn it back on while holding down the T key. This puts it in Target Disk Mode, which means it functions as an external hard drive.
If you’re using an Ethernet cable or a Wi-Fi network, then on the old Mac, open Migration Assistant, from /Applications/Utilities. Follow the prompts until you get to the Migration Assistant screen. Select To Another Mac, and click Continue.
5: Back on the new Mac, click Continue.
6: Select the source from which you’ll be transferring your data (often there will be only one choice), and click Continue.
Note the following qualifications:
- Mac in Target Disk Mode or bootable duplicate on an external drive: If your source disk is encrypted with FileVault, the Continue button becomes Unlock. Click it and enter the disk’s password.
-
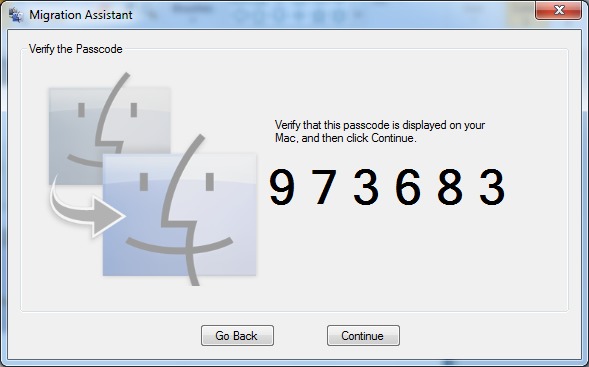
Mac connected via Ethernet or Wi-Fi: You’ll see additional prompts on both Macs for passcode verification. Once you’ve confirmed that they’re the same, click Continue on the source Mac.
-
Time Machine backup on a Time Capsule or an external drive: After you select the source and click Continue, you must select the backup (typically, there will be only one) and click Continue again. If prompted, also select the backup volume and click Continue.
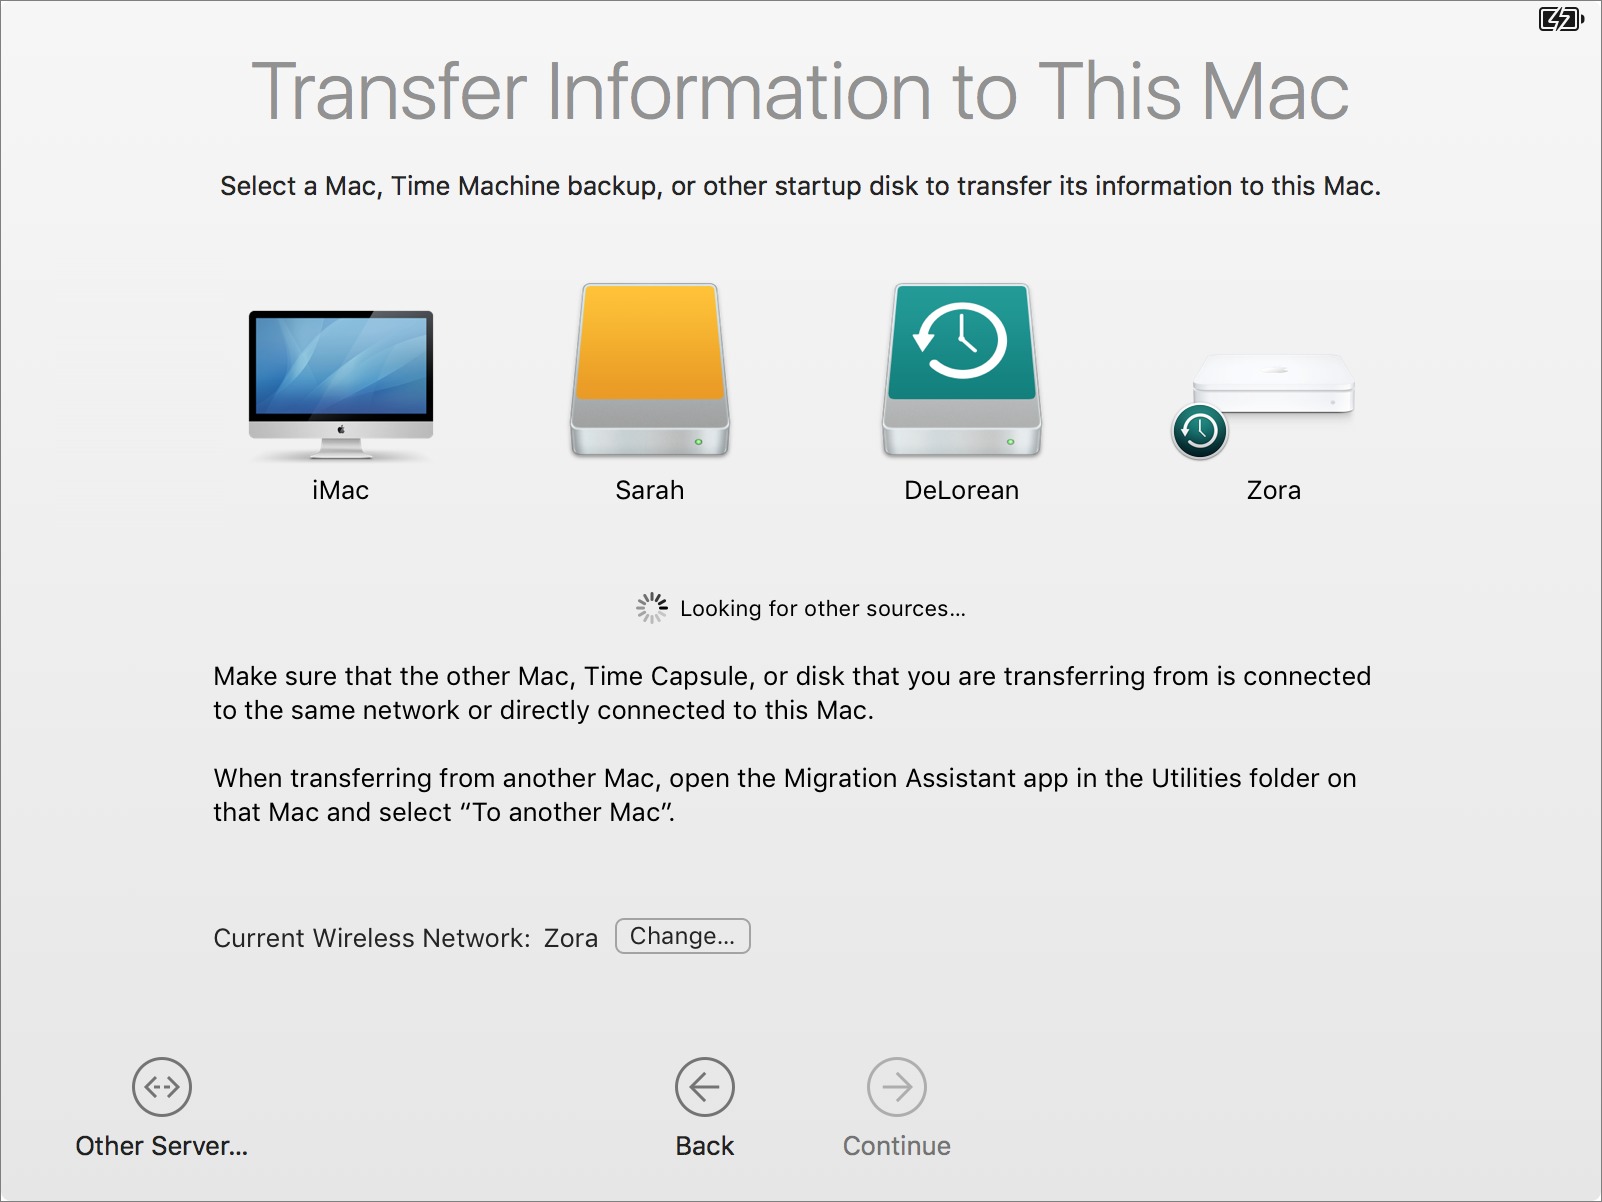
7: Select the kinds of data you want to transfer. The screen shows the size of each item and the total size of the selected items — along with available space on your destination volume — updates automatically as you change your selections. It may take a few minutes for the installer to initially display and calculate the sizes of each option.
![]()
If the volume you’re transferring from has just one user account, you may see only three checkboxes, all selected by default: Applications, Documents & Data (with an accompanying Edit button), and Computer & Network Settings. If the volume has more than one user account, as shown above, you’ll see a scrolling list that contains numerous items — again, all selected by default: Applications, each user account listed by name, an “Other files and folders” entry, and Computer & Network
Settings.
Here’s an explanation of each option, and my recommendations:
- Applications: This option transfers the contents of your previous
/Applicationsfolder and its subfolders, such as Utilities, skipping any applications for which the new Mac already has newer versions: Safari, Mail, and so on). Because you may find it tedious to reinstall your applications, leave this option selected, as it is by default.If you select Applications, Setup Assistant also copies the contents of
/Libraryon your previous system. This is extremely good, because that folder contains many support files without which some apps wouldn’t run. As with/Applications, Setup Assistant won’t copy any older files over newer versions it has just installed. -
Documents & Data: If you have just one user account, you’ll see a checkbox labeled Documents & Data — this refers to the data in your user account. Click Edit to view its contents. In the dialog that appears, you can deselect any top-level folder within the account, except for the Library folder. Along with the visible top-level folders is a folder called Other Data. Apple doesn’t specify what this includes and my tests to find out have been inconclusive, so I suggest leaving it selected just in case it contains anything you need. Finally, there’s a checkbox labeled “Other files and folders.” This option refers to any files or folders at the root level of your old volume as well as
anything in the/Users/Sharedfolder. I suggest leaving this checkbox selected. -
User accounts: If you have more than one user account, each is shown at the top level of the list.
This list may include “users” that don’t have a conventional user account or home folder on your Mac, but which your Mac considers to have an account of a sort — people with whom you’ve shared files using System Preferences > Sharing, for example, or special low-level accounts added by software such as MacPorts or Cloak (the
cloakproxyaccount). Some of these may display messages about having no home folder or having a home location that is relocated. Don’t worry about these messages; Setup Assistant is merely pointing out that these won’t create conventional user accounts, each with its own home folder. It’s best to leave such user accounts selected, even if they appear to contain no
data.Transferring a user means copying the user’s entire home folder, if any (
/Users/some-username), to the new Mac; once a user is transferred, the user can log in without having to set up an account again. You should transfer all existing user accounts except those that are no longer in use. You can, if you like, deselect any individual (top-level) folders within a user’s home folder to skip copying those to your new Mac. As for the unexplained Other Data folder that I mentioned in the previous bullet point, the safest course is to leave it selected. -
Other files and folders: As in the single-user account setting described in the second bullet point, this option refers to any files or folders at the root level of your old volume as well as anything in the
/Users/Sharedfolder. I suggest leaving this checkbox selected. -
Computer & Network Settings: This category sometimes has up to three sub-items that you can select. Computer includes certain system-wide settings, such as sharing preferences, Energy Saver settings, and parental controls. Printers refers to your printer settings. Network includes the settings in your Network preference pane. I suggest leaving Computer & Network Settings checked, along with all sub-items that may be present.
After making your selections, click Continue.
Setup Assistant copies the selected items to your new Mac — a process that may take just a few minutes or several hours, depending on how much data you are transferring.
Be aware of the following:
- You should completely disregard any time estimates you see — they’re notoriously and often ludicrously inaccurate.
-
If Setup Assistant notices any software conflicts with the files you’ve selected, it displays an Incompatible Software warning notice and moves the conflicting items to an Incompatible Software folder at the top level of your startup volume. Click Continue to keep going.
-
If FileVault was enabled on the volume you’re migrating data from, Setup Assistant reminds you that it’s not enabled automatically on your new volume — but that you can enable it manually.
At the end of the migration process, a Migration Complete screen appears, stating that your data has been migrated and is ready to use. Click Quit to dismiss the window. At this point, your Mac should prompt you to log in, and then ask you a few final questions.
Migrate from Another Mac Using Migration Assistant — If you’ve already set up a new Mac and you want to migrate data from an old Mac, the process is almost the same as what I just described, but with two modifications:
1: On the new Mac, open Migration Assistant from /Applications/Utilities. Follow the prompts until you get to the Migration Assistant screen shown earlier.
2: Pick up with Step 2 in the previous set of instructions. But when you get to Step 6, if you’ve selected a user account on the source Mac whose name (short or long) overlaps with one already on the destination Mac, a message appears underneath the list of items to transfer: “Some conflicts were detected. Finish selecting the information you’d like to transfer, then click Continue to fix any conflicts.” When you click Continue, you’ll see the dialog shown below.
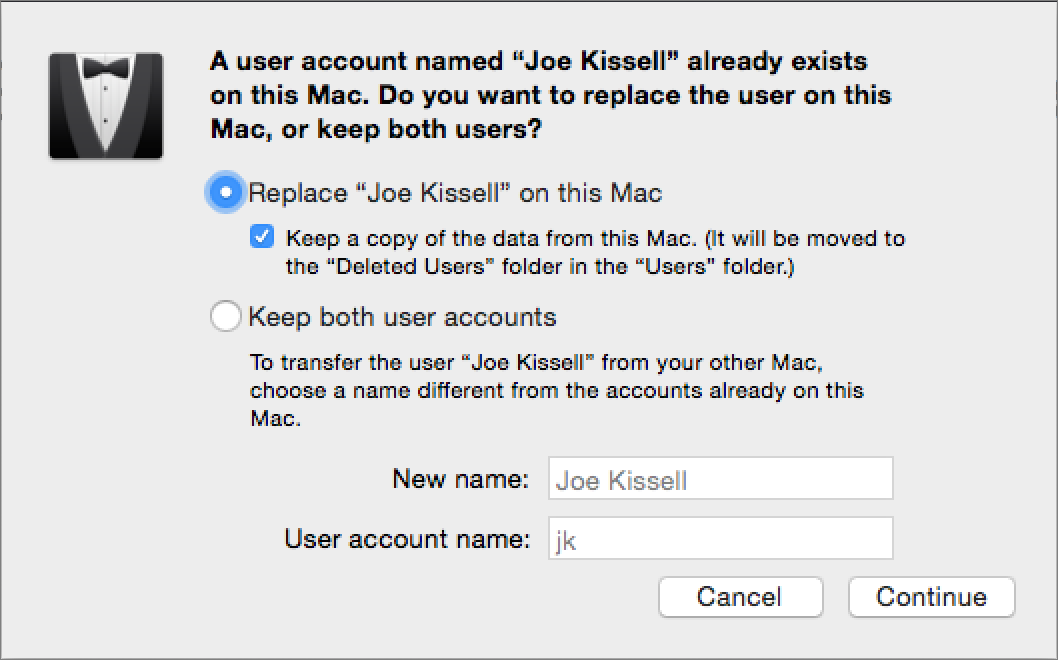
As I discussed earlier, you can select either:
- Replace “User Name” on this Mac: This choice removes the account on the destination Mac with the conflicting name. Happily, if you leave “Keep a copy of the data from this Mac” selected, as it is by default, Migration Assistant saves the account’s data in the Deleted Users subfolder of the Users folder so you can retrieve any needed files later.
-
Keep Both User Accounts: To keep both accounts, enter a new full name and User Account (short) name for the account you’re about to transfer from the other Mac.
Make your choice and click Continue. Migration Assistant copies the selected data. When it finishes, you can quit it on both Macs. You may be prompted to restart the destination Mac or to log back in.
Migrate from a Windows PC — The steps for migrating your data from a Windows PC using Migration Assistant are similar to what you would do in a Mac-to-Mac transfer.
A tip: If you’re doing this during the installation of macOS, you don’t need to jump through so many hoops. Specifically, follow Steps 1–3 below, and then, when Setup Assistant asks you where to transfer files from, select “From a Windows PC” and click Continue. Then skip ahead to Step 9, and pick up from there.
The steps to migrate from Windows to macOS are as follows:
1: Make sure the PC and the Mac are on the same Wi-Fi or, better yet, Ethernet network.
2: On the PC, download the Windows Migration Assistant and install it.
3: Run Migration Assistant on the PC and click Continue twice, which brings you to a screen that says Searching.

4: On the Mac, open Migration Assistant from /Applications/Utilities.
5: Follow the prompts until you get to the Migration Assistant screen.
6: Select “From a Windows PC” and click Continue.
7: Select the Windows PC as the source. In most cases, you’ll see only the PC on which you’re running the Windows Migration Assistant, but if you see more than one, select the one you want. Click Continue.
8: A passcode will appear on both your Windows screen and your Mac screen. Verify that the number is the same on both sides, and then, on the Windows PC, click Continue.
9: Back on the Mac, select the kinds of data you want to transfer. Your options are:
- Users: Each user account on the selected PC appears here, and all are selected by default. You can leave everything checked to transfer all the data to its corresponding location on your Mac, or deselect any of the folders at the top level of a user’s home directory (such as Music, Desktop, and Documents) as well as Contacts, Bookmarks, Calendars, and Settings. As when transferring data from another Mac, if you select a user whose name matches the full username of an account on your Mac, you’ll be asked to choose a new full name for the transferred account.
-
Other Files on C: This category, which may or may not appear depending on your configuration, includes other folders on your main Windows volume you may want to transfer, including Shared Files. They’re all selected by default, but you can deselect any you don’t care about.
10: After making your selections, click Continue.
The file transfer proceeds. When it’s finished, click Quit in Migration Assistant on the Windows PC, and follow the prompts on the Mac to complete setup.
Final Advice — As I noted earlier, the process of transferring files is far, far easier if you do it immediately upon unpacking your new Mac, or if you’re willing to overwrite the new Mac entirely from a bootable duplicate.
That said, if you’re reading this because you need to merge the contents of an old Mac onto a new Mac that you’ve been using for some time, I hope the advice above helps.
I have everything in the Cloud: Dropbox, iCloud or Google Photos, except my Quicken Data and Quicken bank account information. I have not found a cloud that handles Quicken (for Mac) information and files. Do you know of one?
I'm afraid I don't know anything about storing Quicken data in the cloud. My guess would be that if for whatever reason it won't work with one cloud service, it won't work with any. But I don't have any further details, sorry!
Excellent summary, Joe.
If you want to use Migration Assistant or Setup Assistant please note that the 'old' Mac should not be running a newer OS X version than the 'new' Mac. As trivial as that may sound, I royally shot myself in the foot last time I got a new Mac. Read on to learn how NOT to do it.
So a few days before I took delivery of my latest MBP Apple came out with an incremental 10.9.x update. I figured best to update the old system so it will be ready for the new Mac. That turned out to be a HUGE mistake. The new Mac arrived and of course it had shipped with 10.9.(x-1).
Obviously Setup Assistant on the new Mac then refused to migrate over stuff from my old Mac because that wasn't a 'compatible' system. At first I figured, no biggie, I'll just restart in recovery mode, download a vanilla OS X and have it install that expecting I'd get 10.9.x. Alas, that didn't happen. It kept downloading 10.9.(x-1) and I was as far as before.
So then I figured, no biggie, I'll use my old Mac to create a bootable USB OS X installer with 10.9.x, use that to set up my new Mac from scratch and then migrate. Of course that didn't end up working out either, because you cannot create the bootable installer from a running installation. You need to create it by re-downloading OS X from the App Store. Well the thing I could download there was 10.9.(x-1) and not the 10.9.x that the 'old' system was actually running. I don't understand why, but that's the way it was. Bummer.
Oh well. I decided to forget about migrating for the time being and instead just set up a dummy admin account on the new Mac, use that to update from 10.9.(x-1) to 10.9.x and only then migrate from the old system. And sure enough that worked. I thought I was being smart in using simon2 for the dummy account so there would be no conflict when Migration Assistant later on would migrate the simon account from the old system to what was going to be the new permanent simon account on the new system.
In theory that all made sense. The oversight was that I was considering user names and paths, but I forgot to think in terms of UIDs. It turns out the first account you set up with Setup Assistant always gets the same 501 UID. So that's what my dummy account got and once I was finished with the migration and deleted that dummy, I had essentially gotten rid of UID 501. When I migrated the old account (UID 501 on the old system), it was migrated just fine to the new system, but in the process it became UID 502.
So now whenever I attach external storage I used to use with the old system (I have lots of those disks) my new simon user does not have access since the items are owned by UID 501 and the new user simon is UID 502. Now of course I could change permissions everywhere or even change the UID, but after the entire ordeal I didn't feel like opening that can of worms.
I guess the moral of the story is to make sure you do not update OS X (macOS?) until you're certain the new system is actually updated itself. And secondly, dummy accounts might not be as simple a tool as you'd think.
Wow, that's quite a harrowing story! I've never encountered a situation where I was migrating from a newer version of the operating system to an older one, but I can certainly see how that would cause problems. I don't know exactly what's going on with your UID issue. That would require some research and experimentation. In any case, I appreciate the cautionary tale!
Lots of mysteries still there to me too.
I still wonder why Apple would let people download a newer OS X version from the App Store than they allow you to download in recovery mode. Or why you could have downloaded an incremental OS X update and installed it, but not at the same time be able to download that version of OS X from the App Store.
The irony is that I usually never rush these updates. Had I been as cautious there as I usually am, I would have saved myself a lot of grief. I guess a refresher lesson was called for. :))
I did have these UID issues too. But now I prepare every new Mac with a dedicated admin account, only to migrate my main accounts later.
I do the same - the initial account I create at 1st start-up is named admin, and it gets assigned uid501 by default.
Our household has several Macs with several users (me, wife, kids). Over the years, in order to minimize sharing and access problems, I've found it best to ensure each user has the same uid on all the machines, and on our shared file server. Me-502, Wife-503, Kid1-504, Kid2-505. This takes some careful coordination when creating new user accounts, and/or when using Migration Assistant. I'm not sure this is necessary to eliminate access issues, but it sure seems to help.
Joe - this might be a good topic for a chapter or a sidebar in the next version of your TC Migration book. I've never really figured out how Migration Assistant deals with UIDs. On occasion, I've spent hours fighting with Migration Assistant and OSX trying to get a particular user account copied on to a new Mac with the desired UID. Sometimes it uses the next available (unassigned) UID on the destination Mac; sometimes it seems to pick one at random.
Easiest to pay $100. for data transfer and Genius Bar
What I was hoping for was an explanation on how to migrate from a 1gb Mac to a new Mac with a much smaller 256 or 512gb flash disk. Do I have to upload excess files to the Apple iCloud? And what happens when I don't have wifi access? Thanks for any explanation on this.
Unfortunately, there is no easy way to do this—not even if you enable syncing of Desktop & Documents to iCloud Drive and enable Optimize Mac Storage. You're still almost certainly going to run into problems with Setup/Migration Assistant.
One approach is to offload a bunch of stuff to an external hard drive, and then transfer everything except that stuff. But it's just not straightforward to copy, say, 750 GB of your stuff to cloud storage and then get Setup/Migration Assistant to copy only whatever's left over.
And yes, whatever data is stored only in the cloud will be unavailable when you don't have Wi-Fi access. No way around that unless you use an external drive for storage.
The only real advice I can offer is to start with the low-hanging fruit—stuff like media purchased from the iTunes Store (which you don't have to transfer to the new Mac because you can download it as needed) and pictures (use iCloud Photo Library and then don't transfer your Pictures folder). But at a certain point, if you have a huge amount of stuff on the old Mac that won't fit on the new Mac, there's no magic way to avoid problems.
Sorry, I wish I had better advice, but it's something that's going to vary dramatically from one person to the next.
Thank you Joe for the reply (and all your great books). I was trying to avoid iCloud as I already have Dropbox 1TB and I like it and have lots of stuff there. But Dropbox is not the same as iCloud as files are both in your Mac and online. I will probably have to buy a new Mac in the coming weeks and all this Optimize Mac Storage is very confusing.
Thank you!
You're welcome!
My mid 2009 MacBook Pro has firewire, Ethernet and USB2 ports. I have never used or ever had a cable for the firewire port. Can I migrate through the USB2 port to a USB dongle on the new MacBook or do I need to invest in an Ethernet dongle? I'd rather not use wifi.
You can't use USB 2 for migration, I'm afraid. You could either get an Ethernet dongle or use a FireWire 800 cable, a FireWire-to-Thunderbolt adapter, and a Thunderbolt-to-USB-C adapter. Messy, I know. But I don't know of any other way to connect a FireWire 800 port to a Thunderbolt 3 USB-C port.
Assuming you have no other resources and excluding WiFi, the cheapest option is probably an Ethernet dongle for the new MBP. You're more likely to find that useful than a FireWire adapter (especially since you never used FireWire on your old Mac).
If you have an external USB hard drive, you could make a Time Machine backup of the old MBP to it then use Migration Assistant to restore from that to the new MBP. Assuming you're getting one of the just announced MBPs with only Thunderbolt 3 ports, you're bound to need some kind of adapter with a USB Type A port anyway so buying one to connect the existing external drive would not be a waste.
Thanks for the clarifications. I'll figure something out eventually.
Since I already use Time Machine, can I use it directly or do I need to make sure certain settings are in place, back up, and then use it?
Your existing Time Machine setup for your old Mac should be all you need to restore your data to your new Mac, so long as you can physically connect the Time Machine drive to the new Mac.
I plan to transfer all data from my MBP 13” mid 2014 to MBP 15” late 2016....
Migration or Clean Install?
The easiest quickest way is clearly using a bootable clone. In the past I have used Set-Up assistant (since 2010). So I have not done a clean install since buying a Macbook in 2008.
Does this mean, that I am building up miscellaneous clutter which possibly takes away performance? Also will I carry forward any file corruption that has build up over the years etc?
The thought of doing a clean install fills me with dread as there are so many utilities/apps that I have set up over the years that I would have to reinstall from scratch (eg Keyboard Maestro, Crashplan, Hazel, Devonthink, MS Office, VMWare etc etc). This will take a long time, but are the long term benefits worth it?
I do take relative care of my Mac OSX but what spring clean should I do?
Any suggestions / advice?
Is there a Take Control book that I should read to guide me through the various options?
Your Mac certainly can accumulate clutter over time. If you feel as though it's impacting your performance, check out my book Speeding Up Your Mac. (I also talk about decluttering quite a bit in Maintaining Your Mac.) Personally, I would avoid a new-from-scratch setup unless so many things had gone wrong that I had no other choice.
Thanks Joe for quick response & your suggestion. I actually bought these 2 books a few years ago, so I'll go back & review them again. I just bought TC Upgrading to Sierra and it gives some suggestions on migrating to a new Mac. When I get the new MBP I think my best strategy is to use Setup assistant to transfer all data & settings to the new machine (from a CCC Clone back up). My current machine is running El Cap (10.11.6), so I will upgrade machine & OSX at the same time. In the meantime, I'll review the older TC books to clean up my current machine...
Joe this is an excellent article but i would like to add my personal situation which is completely leaving with another option: Frankenstein.
I have a MBA (2011) and the first time I bought it I used setup migration from my previous mac and was very proud appraising apple for this perfect situation. Upgraded ever since land lately I did a Sierra installation So far so good until disaster stroke in the form of 10.12.1. The boot failed to finish. Lucky me I had TM and CCC backups. Despite my best efforts I could not find ANY way to upgrade. I did clean install in an external diskk upgraded that but trying ANY option to migrate broke the perfectly clean system, even just transferring only user files! Having to work my regular work I had to decide. I could live with the sierra without update that worked perfectly. Then one night leaving the machine home unattended, auto update, boom! To cut the long sorry short, I CCC'd the clean updated system OVER the working machine. Thus Frank works
I'm glad you got your Mac working! I haven't heard of any other similar stories, and I don't know what might have caused the problem, but backups FTW!
Hello Joe,
Thank you very much for this article that clarifies how to migrate data from one mac to another, and clarifies the difference between Migration Assistant and Setup Assistant. I would like to ask for an advise.
I have an iMac 24" (early 2008) constantly upgraded to 10.11.6. Amy iMac is not eligible for Sierra. I am having many issues since the upgrade to El Capitan and I would like to go back to Yosemite. Considering I still have a clone of my hard disk with Yosemite, but having more than one year old personal data, what would be your solution to migrate from El Capitan back to Yosemite ?
Thanks for your help.
Best Regards.
Short answer: I'm not sure. I have never tried using Setup/Migration Assistant to move from a newer OS to an older one. It may or may not work. You could try making a new clone, booting from that clone, erasing your iMac's drive, installing Yosemite, and then using Setup Assistant, but I honestly don't know if that will work. If it doesn't, you can re-clone your backup drive and get back to where you started. But then I'm not sure what the next-best migration path would be—it could just involve restoring your Yosemite clone and then doing lots and lots of tedious manual copying. Sorry, wish I had better advice for you. I just haven't encountered that situation before.