Leopard Simplifies File Sharing
I’m a jaded Mac OS X user. Since 10.2, when Apple made a host of basic functional improvements over 10.1, I’ve expected mostly incremental changes with each new system release. iChat AV and Spotlight – but, for me, not Dashboard nor Exposé – were notable marquee exceptions. So it was with a heavy heart that I prepared to work on “Take Control of Sharing Files in Leopard” with a beta of Leopard obtained through my membership in the Apple developer program a few months ago. I expected that Apple would refresh interfaces and add a few new items, but nothing more.
I was pleasantly surprised. Apple not only consolidated file sharing options for Apple Filing Protocol (AFP), Samba (or SMB), and FTP into one place, but they added back folder sharing, a feature never seen in Mac OS X, even though it was widely used in Mac OS 9 and releases before that.
Apple’s changes allowed me to cut more than 30 pages from the book while improving its utility: no longer do you need to edit text configuration files and change obscure settings. It’s mostly check a box, click a button, and choose a value from a pop-up menu. As Steve Jobs would say, boom.
Major Streamlining — Let me give you a quick overview of what has changed in file sharing.
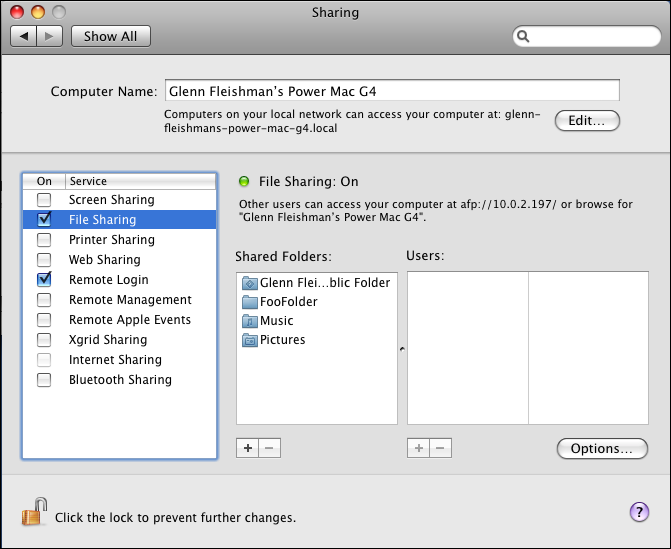
- AFP, Samba, and FTP are all controlled from one place. In Tiger and before, Apple gave its own names to AFP and Samba (Personal File Sharing and Windows Sharing), and assigned them to three separate checkboxes in the Sharing preference pane’s Services tab. In Leopard, there is a single File Sharing service in the Sharing preference pane that consolidates access for all three services.
-
Folder sharing. It’s a blast from the past! You can take any folder or mounted drive and share it as though it were a volume. Share like it’s 1999! Or 1997.
-
Granular access permissions. The File Sharing service lets you assign specific read and write permissions for users and groups to each volume.
-
Sharing Only accounts. Apple neatly added a way to create accounts that are enabled only for sharing, and lack a home directory or permission to log in via SSH.
-
Guest account. There’s a guest account that has a separate choice for allowing password-free server access to specific folders. It has some limits that I’ll discuss later.
-
Finder access to sharing. Apple rejiggered how servers appear and how volumes are mounted in the Finder to make life much better for average users and power users alike.
Let’s look at how this works for setting up file sharing.
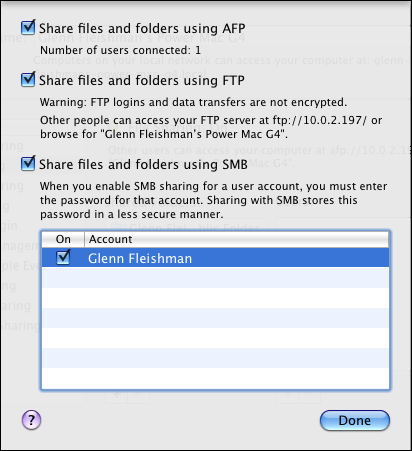
File Sharing Setup — With File Sharing selected in the Sharing preference pane, you might be briefly baffled as to where you go to turn on any of the three sharing protocols. Click the Options button, and you’ll find a checkbox for each of AFP, Samba, and FTP, which can be enabled in any combination. Samba access is enabled for specific accounts due to concerns about its method of storing passwords being easier to crack than Apple’s very strong method. (This is unrelated to AFP, Samba, and FTP passwords being transferred over a network; only Samba passwords are encrypted by default.)
The main File Sharing dialog linked previously shows two lists: Shared Folders and Users. Any mounted volume or folder that you’re sharing as a network volume appears in the list at left. To add a folder to that list, either drag it in, or, in the Finder, select a folder or volume, choose Get Info, and check Shared Folder. You can also click the + sign below the list and then navigate to and select folders or volumes.
When you select a shared folder – you can only select one at a time – the associated access rights show up in the Users list. The Unix users already assigned to a folder appear, and you can add or remove users and groups.
For each user or group, you can choose one of three types of access: Read Only, Read & Write, and Write Only (Drop Box). With the write-only option, Leopard creates a Drop Box folder in the volume to which the specified remote user or users with access can copy files, but whose contents they can’t view – it can’t be opened. (The special Everyone user, which encompasses all users including the Guest account, has an extra status of No Access. It’s a way to disable access without removing the folder from the Shared Folders list.)
To add users, you click the + sign below the list, and then choose named users under Mac OS X or people in your Address Book. For Address Book selections, Leopard prompts you to create a password, which it uses to then make a Sharing Only user account, if you haven’t already done so.
The File Sharing options all take effect right away – you don’t need to restart anything or click other buttons to make the changes available immediately. Shared volumes can be accessed by any other system – with AppleTalk enabled on the appropriate network interface, you can even discover shared folders from Mac OS 9. (See the postscript at the end of this article for a discussion on AppleTalk.)
Making the Right Kind of Drop Box — There’s one multi-step process worth walking through: Creating a drop box. A drop box is a folder with special permissions that lets a remote user with write-only privileges drop files into the folder, but not open the folder to view or copy its contents. (This can be used among users on the same computer; it is what each user’s Public folder’s Drop Box folder is partly for.)
You can set user permissions for a shared folder to be Write Only (Drop Box), but that makes the entire volume write-only. When a user mounts that volume, they’re told that they can’t read the contents, which could be confusing.
Instead of making the volume a drop box, create a nested folder, inside which you put the drop box. First, create a folder that will be the volume; let’s call it “Put Files Here”. Next, share that folder by dragging it into File Sharing’s Shared Folders list. Select it in that list, and choose Read Only for all the users who need access. Don’t put any files in that folder.
Now create a new folder called “Drop Box” inside “Put Files Here”. Select “Drop Box” in the Finder, choose File > Get Info, and in the Sharing & Permissions section, set all the users you want to limit to Write Only (Drop Box) access. (You may need to click the lock icon and enter an administrator password to make this change.)
When users mount “Put Files Here” as a volume and open its window in the Finder, all they’ll see in that window is the “Drop Box” folder with a downward-pointing arrow indicating it can only be written to.
Finder Tune-up — The way that volumes are mounted in the Finder and appear on the Desktop has hardly changed since we moved from the Chooser in the classic Mac OS to the often-problematic network browsing in Mac OS X. Leopard reworks this, partly by combining some of the aspects of the Chooser with Mac OS X – no kidding!
You can still use Go > Connect to Server in the Finder to type in an AFP name, an IP address, a domain name, or the name by which Windows identifies a shared volume, or to pull up a server you’ve added to favorites. But the browsing option is what’s new and improved in Leopard.
In any Finder window, you can now see available network servers and connected servers in the sidebar. You can choose whether servers visible over the network and connected servers appear in the sidebar by selecting Finder > Preferences, clicking the Sidebar button, and unchecking Connected Servers or Bonjour Computers. (The list of Bonjour Computers includes Windows servers advertised via NetBIOS servers, too.)
Select a server in the sidebar, and Leopard automatically tries to connect as Guest using AFP, and shows you the available volumes in such a case. Click the Connect As button in the upper right of the window, and you can use a standard server login dialog to enter a username and password. If you store your login details in the Keychain, the server automatically logs on the next time you click it after unmounting.
Networked volumes no longer appear on the Desktop by default unless you use the Finder’s preferences to make them appear. Choose Finder > Preferences, click General, and check Connected Servers. Otherwise you will, like me, be scratching your head, wondering where those volumes went to!
In an extremely welcome change, Apple has added a bit of underlying magic called AutoFS to eliminate the Finder lockups (complete with the spinning pizza of death) that we’ve all grown to loathe when mounted network volumes become inaccessible for some reason. With AutoFS, Leopard spawns a separate thread – a separate thought process, as it were – to handle mounting the volume. You no longer wait for it to mount, and your system shouldn’t lock the Finder if the volume suddenly becomes unavailable. I have yet to test this extensively, but AutoFS has worked in this way on other Unix systems for quite a while.
Administrators and File Sharing — Mac OS X has always had an issue with the relationship between users who had been granted administrator privileges in the Accounts preference pane and file sharing. Until Leopard, if you turned file sharing on, an administrative user could access all mounted hard drives, and any folders within those drives that they had permission to access. That typically included everything but the contents of folders in other users’ home directories.
Leopard doesn’t share anything automatically except the Public folder in each user’s home directory, which is typically empty. To share your startup drive, for instance, you add the drive to the Sharing Folders list and its default permissions are pre-filled in the Users list.
Here’s where it gets tricky. Three entries appear in the Users list: System Administrator, which is the Unix root account, set to Read & Write; Administrators, a group comprising all users on the system with administrator access, set to Read & Write; and Everyone, a Unix group comprised of all user accounts on the system, set to Read Only.
You might think, well, I’d like to remove administrative users’ access, so I’ll just select Administrators in the User list and click the – (minus) button below the list. Wait! You can hear the spooky music starting as you move toward that button. Removing Administrators from the Users list doesn’t affect just the sharing permissions attached to the shared volume, but also the underlying file permissions used for local access.
In my test, my startup volume’s icon shifted from a hard disk to a folder with a red circle icon on it with a horizontal line. If I’d restarted the machine at that point, I would not like to think about what might have happened. Adding the Administrators group back in restored the drive’s icon and access.
My advice? Don’t share entire drives or partitions unless you’re sure you want all administrator-level users to have access to the files they would if they were sitting in front of the computer with direct access.
What’s Missing — While Leopard is a big step forward, Apple made a few choices I hope to see improved upon or at least explained in future updates:
- The Guest account can’t access FTP. For some reason, the Guest account can access only AFP and Windows servers. This might be a security feature, but I’ve not yet found a way to override this limitation; I’m still looking. (It probably requires a configuration change, but Apple has changed how it creates configuration files for services in Leopard, too.)
-
Secure FTP (SFTP) isn’t integrated with File Sharing (nor has it been in the past). The encrypted FTP server option requires that you turn on Remote Access in the Sharing preference pane. SFTP is technically a component of SSH, a way of securely connecting to remote systems for command-line sessions. So SFTP honors Mac OS X accounts, but doesn’t honor the shared folders you’ve set up. Any Mac OS X user can connect via SFTP to any drive or mounted volume that they have permission to access, which typically means almost every one outside of system resources and individual users’ home directory contents. It would be nice to see SFTP more fully integrated with File Sharing, although Apple is working with constraints that are designed
into SSH. -
AFP login options have disappeared. Most of these options had to do with secure logins, and my colleagues in the worlds in which secure AFP was used say that setup was always somewhat wonky. TidBITS friend Chris Pepper reports that they aren’t available in the Leopard Server administration tool, either.
More Information — If you’re looking for more information about sharing files in Leopard, check out my new book on this topic, “Take Control of Sharing Files in Leopard.” The 89-page book is full of step-by-step instructions for working with everything mentioned above, plus a detailed section on sharing iTunes and iPhoto libraries among users on the same computer or users connecting across the network. The book starts with a set of sections on how to figure out what kind of file sharing best fits your needs and the challenges that face you – along with their appropriate solutions.
A Postscript about AppleTalk and AFP — AppleTalk has a tricky history relative to AFP. While Apple enabled AFP-over-IP or AppleShare-over-IP using Internet networking instead of AppleTalk as the transport mechanism starting with Mac OS 9, it didn’t disable AppleTalk as an option until Tiger. Further, the way that AFP volumes are advertised on the local network under Mac OS X since 10.2 isn’t backwards compatible with earlier system versions. In brief, and I believe I now have all the nuance in here:
- Mac OS 8 can access Tiger and Leopard AFP-shared volumes and see those volumes in the Chooser if AppleTalk is enabled on Leopard on the network interface feeding the network that the Mac OS 8 computer is connected to, such as an Ethernet network.
-
Mac OS 9 and Mac OS X 10.1 to 10.3 can access AFP-shared volumes via either AppleTalk or AFP-over-IP. (Mac OS X 10.0 doesn’t allow AppleTalk connections, but I can’t imagine anyone in their right mind still running 10.0.)
-
Mac OS 9 and Mac OS X 10.0 to 10.1 can’t discover AFP volumes that are shared without AppleTalk on the network they’re connected to, but they can connect by IP address or domain name.
-
Mac OS X 10.2 and later can use Rendezvous (10.2, 10.3) and Bonjour (10.4, 10.5) to discover AFP-shared volumes.
Apple’s technical note on the matter has quite a lot of additional detail that should help people using networks with different versions of the Mac OS sort it all out.
In short, if you’re still using a variety of older versions of Mac OS on your network, you should enable AppleTalk. Tiger and Leopard can’t connect to an AFP server via AppleTalk, but they can serve it up for older machines.
To enable AppleTalk in Leopard, open the Network preferences pane, select the interface – like Ethernet – and choose the AppleTalk tab. Check the Make AppleTalk Active box. You can have AppleTalk active on only a single interface at a time under the regular version of Leopard; the server version lets you activate AppleTalk on multiple interfaces.