22 Useful iPad Tips
As many companies have discovered, you can’t successfully slap a desktop operating system onto a tablet device. The iPad uses Apple’s iPhone OS, which, although based on the guts of Mac OS X, was designed with a touch interface in mind. And when you’re designing something from scratch, there are numerous opportunities to enhance the experience.
Now that I have an iPad in my hands, I’ve discovered some new techniques and hidden shortcuts, and also found myself making heavier use of existing iPhone shortcuts (including a few I didn’t realize were there).
Small Swipes for Large Actions — No doubt the iPad’s biggest selling point is its large screen, especially compared to an iPhone or iPod touch. But it can also feel like a liability at times.
In the Home screen or the Photos app, for example, you’ll be tempted to swoosh across the entire width of the screen, which is what I’ve always done on the iPhone. Instead, only a small swipe motion is required. For example, to advance images in the Photos app, position your left thumb at the left edge of the screen (where it likely is if you’re holding the iPad with your left hand supporting its weight) and just flick the thumb half an inch right-to-left or left-to-right.
(This tip also applies to the iPhone and iPod touch, but the small size of the screen makes it less useful.)
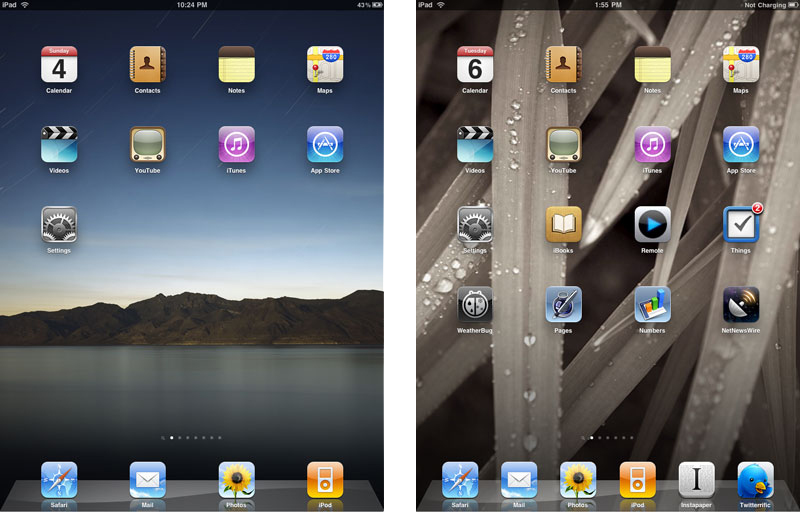
Add Up to Six Apps to the Dock — The iPad ships with a basic iPhone layout, which includes four apps on the Dock that appears at the bottom of all Home screens. Take advantage of the extra screen size and add up to two more. Tap and hold an app you want to add until all of the apps begin jiggling. Then drag the app to the Dock. Press the Home button when you’re done.
Unfortunately, you can’t put more than 20 apps on a screen, but there are 11 screens. This will change with folders in iPhone OS 4.
Jump to the Top — This behavior was introduced on the iPhone, but you need it more on the iPad’s large screen. Tap the status bar at the top of the screen to jump back to the top of the page or window you’re viewing.
I wish there were a similar action for jumping to the end of a page (such as when I want to read comments at the end of an article, for example). The closest there is to a workaround is Vais Salikhov’s free End of Page app, which is actually a clever bookmarklet that works in Safari. (He also has a similar Find in Page app that enables searching inside Web pages.)
Lock That Rotate — This may not qualify as much of a secret, since Apple promotes the feature, but in my early experience, it’s terrifically useful. Flick the switch above the volume controls to lock screen rotation. The iPad is quite sensitive to orientation, and rotates its screen with little provocation. Locking rotation means sticking with the view you’re in, even as you shift position, or place the iPad flat on a surface.
Quick Mute — With that switch repurposed for rotation lock, what happened to the iPhone’s capability of using it to mute the volume? On the iPad, press and hold the volume down button. After about two bars of volume, the iPad’s volume jumps to zero. (Take Control author Sharon Zardetto gets credit for pointing out this tip.)
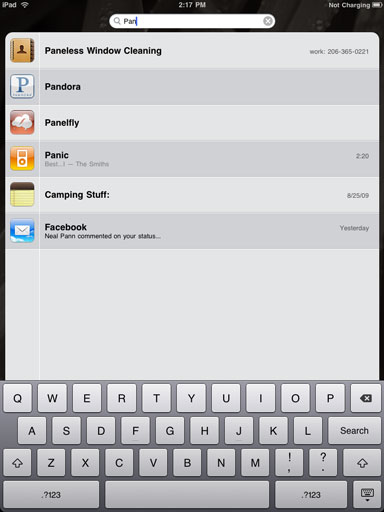
Use Spotlight to Launch Apps — Again, this is something not unique to the iPad, but I never used it on the iPhone. Once you’ve accumulated a bunch of apps, it can take a while to flip through several home screens to find the one you want. Although there’s no equivalent to LaunchBar for the iPad (believe me, I’d buy it in a heartbeat), here’s the next best thing.
When you’re on a home screen, press the Home button to get to the first screen, then either press the button again or swipe to the right to expose the Spotlight search interface. Tap the Search field and start typing the app name; you’ll see that Spotlight also grabs everything similar, including Mail messages, song titles, contacts, and events, as well as the app. Then tap the one you want to launch.
The iPad returns results on this page enormously faster than on an iPhone 3GS or current iPod touch.
Type an Apostrophe from the Basic Keyboard Layout — The iPad’s onscreen keyboard approaches the dimensions of a full-size keyboard (in wide orientation, at least), but accommodations still had to be made to get it to fit. One of the most maddening is the lack of an apostrophe key. I keep hitting the Return key with my right pinkie finger when I mean to type an apostrophe. You need to tap the “.?123” button to reveal the correct key, which itself is in an odd position at the bottom of the layout.
Instead, press and hold the comma key. A pop-up variation appears with an apostrophe, and it even appears highlighted, which means you don’t have to move your finger to select it. Simply tap, hold for a moment, then release to create the apostrophe.
Type Curly Quotes — Similarly, tap and hold the single or double-quote key to get a selection of real quotes (the curly kind) as used in major languages that use the Roman alphabet. This feature is in the iPhone, too, and I’d never discovered it, probably because I didn’t notice typography as much on the small screen. When putting together a Keynote presentation, however, those curly quotes make a big difference. (Straight quotes – disparagingly referred to by typographers as “typewriter quotes” – often indicate the person is a graphics amateur.)
The onscreen keyboard hides all kinds of other goodies, too, which seem more useful in extended typing on the iPad than on the iPhone or iPod touch. For instance, hold down the period key on some keyboards, and a list of domain extensions (like .com and .org) appear.
Access Alternate Characters — This tip isn’t specific to the iPad, but it’s worth remembering. Touch and hold a character on the onscreen keyboard to view related characters. For example, holding the E key brings up accented E characters, or holding the $ key brings up other currency symbols. (Thanks to reader “Arthur” for the reminder.)
Better Word Suggestions — This one isn’t so much a tip as it is an observation. I’ve noticed that the iPad’s word assistance is better than the iPhone’s. When I miss the space bar while typing (especially now as I’m just getting accustomed to the onscreen keyboard), the iPad automatically suggests that something like “feellike” should be “feel like”.
Practice Good Typing Form — I never realized that I rest my hands on the keyboard when I type until I started using the onscreen keyboard where every contact on the screen creates an action. Keep those fingers and palms up as you type.
Zoom Way, Way In — The Zoom accessibility option that’s in the iPhone OS is even more helpful on the iPad than on a smaller device because of the additional screen territory. You can turn this on from Settings > Accessibility > Zoom by flipping Zoom to On.
The Zoom screen explains the three options: double tap with three fingers to zoom in; drag with three fingers for panning around the screen; and use three fingers to double tap without releasing, and then drag up or down to zoom in or out.
Use an External Keyboard — When you want to do some extended typing, pair the iPad with a Bluetooth keyboard or plug it into Apple’s iPad Keyboard Dock. In addition to better ergonomics, this setup gives you access to common keyboard commands like Copy (Command-C) and Paste (Command-V), and lets you make selections of text by holding down a Shift key and using the arrows for navigation. You can also delete words with Option-Delete, and entire lines with Command-Delete.
It’s also helpful for navigating a document. Press Command-Up arrow to jump to the top of a document (like a Home key), or Command-Down arrow to jump to the end (like an End key). Option-Left arrow and Option-Right arrow move the insertion point by words, as you’d expect.
Manage a Bluetooth Keyboard — If you’ve paired a Bluetooth keyboard, be sure to turn it off or disable Bluetooth when you’re not using it. If you enter any editable text field that requires text input and the keyboard is within range, the onscreen keyboard won’t appear.
You can press the Eject button on the Bluetooth keyboard to toggle the appearance of the onscreen keyboard. But it’s easier just to turn off the external keyboard when you’re not going to use it for a while, or taking the iPad to another room.
To turn off the Apple Wireless Keyboard, press and hold the power button for a few seconds. The status light will come on; wait until it goes out. Then the keyboard’s power is off, and the iPad will resume using its onscreen keyboard.
You can also go to Settings > General > Bluetooth and set the Bluetooth switch to off, which both reduces battery usage and disables any other paired Bluetooth connection.
Master Shifting — The iPad has territory enough to offer a Shift key on both the left and right sides of the keyboard and for your hands to lie flat on the screen. This lets you take advantage of a feature found in the iPhone OS, but not quite practical to use on the iPad’s smaller siblings: you can hold down the Shift key while typing a letter to a get a single capital letter, then release, as with normal physical keyboard touch typing. This can dramatically increase your typing speed. You can still tap a Shift key, which turns blue, and then tap a letter to get a single capital letter.
I’ve actually disabled the Caps Lock key on my MacBook Pro because I hate accidentally hitting it and TYPING IN ALL CAPS, but there are times where turning on Caps Lock is helpful (such as writing about topics with lots of acronyms like AVCHD, HDCP, HDTVs, or TANSTAAFL). You can do this in the iPhone OS too, though I never felt the need for it when typing on those devices.
Go to Settings > Keyboard > Enable Caps Lock and set the switch to On. Then, when you’re typing, double-tap one of the Shift keys. The entire key becomes illuminated in blue, with a white arrow in the middle, to indicate that caps are locked. Tap a Shift key again to exit the Caps Lock mode.
You can also hold down either Shift key and type letters to create a series of capitals.
Easier Text Selection — This feature is also not unique to the iPad, but it’s worthwhile and something I never knew about until a few days ago. Double-tap and hold a word to select it to circumvent the need to tap the Select button that appears, and then drag to extend the selection to additional words. It works on both sides of the selected word; when you’re moving just the selection handles, that’s not the case.
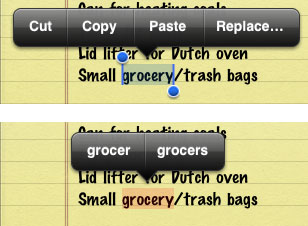
Replace Text — When you select a word, the familiar pop-up options appear: Cut, Copy, and Paste. The iPad adds a new option: Replace. Tap it to view alternate spellings or corrections.
Use the Spell Checker — The iPad includes a built-in spell check feature that acts the same as the one in Mac OS X. If you misspell a word, it appears with a dotted red underline. Tap the word to view suggested spellings. (Thanks to reader “Rivka” for pointing this out.)
Watch iTunes-Purchased Movies on an HDTV — Movies in the iTunes Store are wrapped in Apple’s FairPlay DRM, which uses HDCP to ensure that only devices that support HDCP can play the video. If you bought the iPad Dock Connector to VGA Adapter and hope to play video on your recent HDTV, you’re out of luck because it won’t carry the digital signal. If your television has component connections (red, green, and blue cables), buy Apple’s Component AV Cable kit and hook your iPad to the TV. Voilà! It’s like having a portable Apple TV with you at all times.
Always Show Bookmarks Bar in Safari — I use MobileMe to sync my Safari bookmarks to the iPad, and keep my most-used bookmarks handy by storing them in the Bookmarks Bar on my MacBook Pro. Safari on the iPad also features a Bookmarks Bar, but it’s hidden by default. In fact, the only way to make it appear is to tap the Address field to position the cursor there. Instead, go to Settings > Safari and turn on the Always Show Bookmarks Bar setting to make the bar appear at all times.
Two-Finger Zoom for Web Video — Reader “Joe” pointed out that when you encounter a video on a Web page that the iPad can play, touching it with two fingers and expanding (the opposite of the pinch gesture) zooms the video to full-screen mode.
iBooks Easter Egg — I haven’t heard of any Easter eggs – hidden programming surprises that developers sometimes include in software – in the iPad’s software, but I did discover something similar. In the iBooks app, touch and hold the shelves that display your library, then drag down as far as you can to reveal a little surprise hidden behind the faux wood.
Have you discovered any iPad tips? Share them in the article’s comments and we’ll update this article or write a new one (with full credit, of course)!


The brightness slider in the iBooks app can dim the display even more than the master slider will allow.
Excellent tips! Especially the apostrophe trick! Thanks!
When trying to select a word on a large webpage it's frustrating when you get a whole section instead? Zoom in on the page and it will then let you select Single words or small chunks
When watching HTML5 video in Safari, a two finger flick will put the video in fullscreen mode. Likewise a two-finger pinch will go back.
Also correct any red underlined miss spelled (rather than miss typed) words with a quick single tap to get a pop up of corrected options. Similar to the replace trick you gave.
I'm not sure if this will help with the apostrophe, but often you don't need to type it at all. For "don't", just type "dont" and it will automatically add the apostrophe. "im" turns into "I'm" and so on. For those times when it doesn't automatically appear the hint is useful.
Yes, I take advantage of that all the time. What trips me up all the time is "well" when I mean to type we'll.
I've found that most "dual-use" words such as were/we're well/we'll etc. you can simply type the letter after the apostrophe twice to get the appropriate auto-replacement. So to get we're, type werre, to get we'll, type welll. The only one it doesn't seem to work with is I'll, but for some reason that's auto-suggested for "ill" in any case.
Another trick for typing Capital letters on the iPhone (which should work on the iPad) is to touch the Shift key and then slide to the desired letter. When you lift your finger, you've typed a capital letter.
Just let the iPad or iPhone auto-correct when you need an apostrophe. Type the word with no apostrophe and it'll autocorrect with one.
In iBooks you only need to tap lightly in the right hand margin to turn the page. Tap in the left hand margin to go back a page.
There are dozens of keyboard shortcuts like holding down the & key to get the section symbol. Holding the letter z for accented options. $ can get additional currency symbols. S gets other choices. The complete options are too numerous to list. Go through all the letters and symbols, it's mind blowing how many options are available. However, not everything has an alternative, k is just a k.
Re: Easier Text Selection - in my testing with an iPhone 3GS, it seems to be the other way round: after selecting a word by double-tapping and holding, moving the handles automatically selects adjacent words, while dragging to extend the selection does not.
If you open an Internet music stream in Safari (both mp3 and aac streams will work, try Shouutcast.com for some streams) it will continue to play even if you switch tabs or exit Safari to use another App. Streams even continue to play if you hit the sleep button (turning off the display saves lots of power).
You can quickie launch streams by bookmarking them as home page icons.
Until multitasking for background music players like pandora comes out with OS4 this is a great workaround.
Has anyone figured out how to move a Kindle book to the iBook bookcase?
Short of hacking the file format, I don't think it's possible due to the Kindle DRM. But since there's a Kindle app, why would you want to?
There's an even easier way to get an apostrophe--just swipe your finger upwards across the comma key. No waiting, no additional selecting.
If you like reading white text on black background, you are out of luck where the iBooks app is concerned. But here is a workaround. Go to Settings >General >Accessibility >Triple Click Home. Set this to "Toggle white on black." Now, when you click the home button three times quickly, all the color values of whatever app you're in will be reversed. This lets you read iBooks in white on black - complete with an eerie glow when you turn a page.