Improve MacBook Pro Battery Life with gfxCardStatus
Roughly every three years, I replace my MacBook Pro with a new model. That cycle gives me plenty of use out of each machine, but also means I leapfrog into features that appeared in intervening models.
Buying a new MacBook Pro (with a 2.66 GHz Intel Core i7 processor) last year was like a surprise birthday gift: It boasts significantly better battery life, the full range of multi-touch trackpad gestures, the aluminum unibody construction (which I’m surprised is one of my favorite features—it just feels so much more sturdy than previous models), and a high-resolution LED screen.
This laptop also includes two graphics cards (designated as GPUs, or graphics processing units): the integrated Intel HD Graphics, and a discrete Nvidia GeForce GT 330M. The former is designed for low power consumption, and therefore better battery life, while the latter kicks in to provide graphics horsepower when needed.
Earlier dual-GPU MacBook Pros required that you specify which graphics mode to use in the Energy Saver preference pane, and then log out and log back in to your user account. Starting with the mid-2010 models, the switching occurs automatically: when an application is launched that requires more graphics power, the discrete Nvidia GPU fires up. Otherwise, the integrated Intel GPU provides the graphics without burning through the battery’s charge. (You can turn off automatic switching in the preference pane, which leaves the Nvidia chip active all the time.)
When working away from my desk, I want to get the longest battery life I can. I would quit any obvious GPU hogs such as Photoshop, iPhoto, or iMovie, but I couldn’t easily tell whether my MacBook Pro had switched to the integrated GPU.
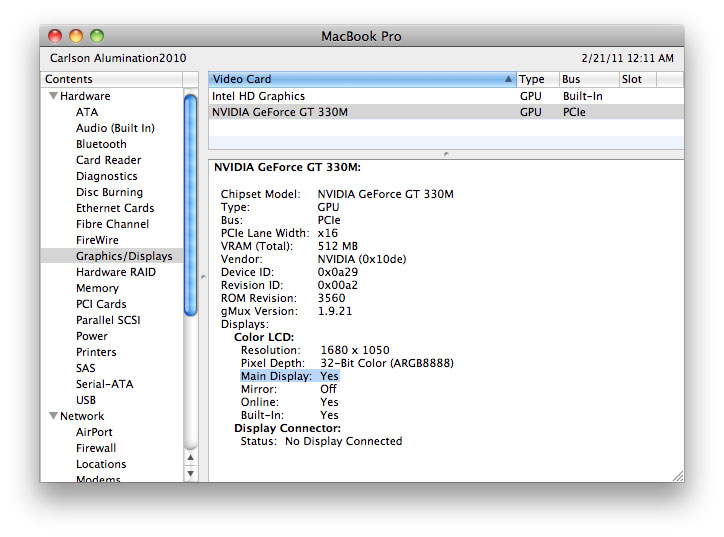
To determine which GPU is active, you have to open the System Profiler application (press Option and choose System Profiler from the Apple menu), click the Graphics/Displays item under Hardware in the sidebar, and select the Intel or Nvidia video card. The one being used includes a Main Display: Yes.
So, I would quit some obvious applications, go back to System Profiler, press Command-R to refresh the data, and see if “Main Display: Yes” appeared in the Intel GPU. I felt like I’d been transported back to the days of hunting disagreeable startup extensions in Mac OS 8.
However, it turns out the Nvidia GPU can be triggered by applications you wouldn’t think of as being traditionally graphics hungry, such as most Twitter clients and even stalwart Fetch (perhaps because of the running dog progress animation?). Sure, I still get better battery life on this machine when using the Nvidia GPU than I did on my old laptop, but that doesn’t mean I don’t want to take advantage of low-power integrated graphics.
Initially, I installed Cody Krieger’s free gfxCardStatus 2.0 because it adds a menu bar icon that identifies which GPU is in use: a simple “i” for Intel (or “integrated”), or “n” for Nvidia. That alone saved a lot of time and frustration.
But then I noticed that when you click the icon, gfxCardStatus helpfully reveals which applications are forcing the discrete GPU, listed under Dependencies.
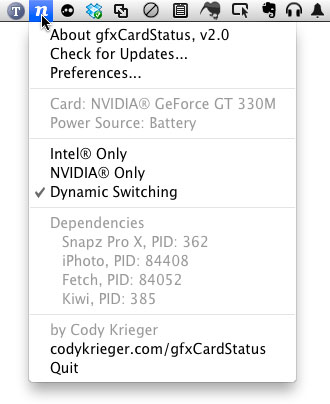
The utility goes beyond just reporting, though. You can force the MacBook Pro to use just integrated Intel graphics, discrete Nvidia graphics, or stick with dynamic switching, by choosing one of the options in the menu.
Some applications don’t respond well to a live switchover from the discrete to integrated GPU. BusyCal, for example, loses its capability to move between months when it’s forced into Intel-only mode. However, quitting and re-launching BusyCal fixes the problem (since the software must also work on computers like the MacBook or Mac mini that include only integrated graphics).
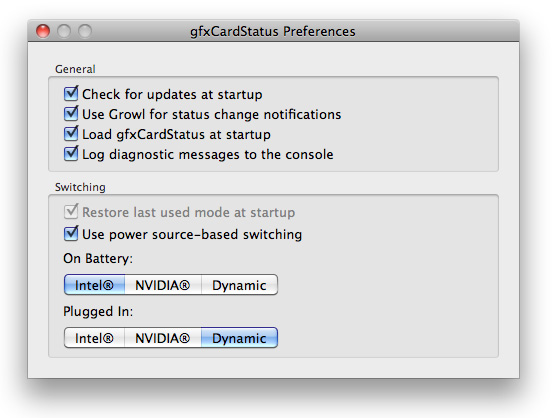
gfxCardStatus 2.0 was released in December 2010 and adds a helpful new feature: it can switch GPUs based on whether you’re working on battery or AC power. If you need the most battery life when working on the go, you can force the integrated graphics automatically. This feature is disabled by default, to avoid problems with apps that don’t switch cleanly.
I haven’t timed the difference between running integrated and discrete graphics other than to notice that the battery estimate provided by Mac OS X’s menu bar item does increase significantly (up to an hour more) when I’m on battery and have quit all dependent applications.
gfxCardStatus works with the following recent MacBook Pro models:
- 2010 i5/i7 MacBook Pro with Intel HD/Nvidia GeForce GT 330M GPUs
- 2009 MacBook Pro with Nvidia GeForce 9400M/9600M GT GPUs
- Late 2008 MacBook Pro with Nvidia GeForce 9400M/9600M GT GPUs
gfxCardStatus definitely fills a narrow niche, but it’s an elegant, helpful way to eke out the most time from your MacBook Pro’s battery charge.
I tried gfxCardStatus a while back. I was surprised to see my battery life become WORSE when I forced my MBP to use Intel's integrated graphics instead of the GeForce 330M. I decided to ditch the app.
Can anybody offer an explanation for the peculiar behavior?
My guess would be that one of the apps you use needed to use more CPU processing power (versus handing it off to the GPU) to accomplish its tasks. But that's just speculation on my part.
I have a 2.4GHz MBP from early 2008, and discovered gfxCardStatus a few weeks ago when I was trying to figure out why Aperture 3 was such a pig. Turned out I was running on the low-end graphics card because that's what my Energy Saver preference was set to (my machine doesn't do the auto-switching thing). Now I use gfxCardStatus to selectively switch graphics cards, and it's brilliant. Its only shortcoming is that if I have it switch based on battery/AC, it doesn't detect any change (e.g., if you pull the power cord) if the machine is asleep, so you have to change it manually when it wakes up.
But this aside, it's an invaluable little app!
We were surprised when we learned that Fetch's animated progress donut triggers use of the MacBook Pro discrete graphics card. We've asked Apple for a way to avoid that, or at least to switch back to integrated graphics after a transfer finishes, but so far no joy.
Clearly you should be using animated ASCII graphics. :-)
anyone found a way to get at the data and display with geektool?