iTunes Match Improves Sonos Music Selection
I wasn’t initially excited about iTunes Match, Apple’s service for accessing music you’ve purchased via iCloud, but I signed up for it anyway because I knew I’d need to write about it for TidBITS and my books about the iPad. My purchase of a Sonos stereo system, however, has more than made the $24.99 annual fee for iTunes Match worth it.
Until recently, if we wanted to listen to music in our living room, we had to do it through our HDTV by way of an Apple TV (we didn’t have a functional stereo). It wasn’t a terrible setup — the room isn’t large — but I hated having to power the entire TV just to listen to music. I decided to buy the Sonos Play:5, a $399 single unit that features five speakers and a wireless network connection. (For more about the Sonos system, see “Audio Bliss: Sonos Digital Music System,” 23 January 2006.)
It’s a great solution. With the addition of the Sonos Bridge, a wireless device that connects to my AirPort Extreme via Ethernet and routes music to the Play:5, I can access the music library stored on a Mac mini in my office. I control playback using the free Sonos Controller app for the iPad or iPhone/iPod touch.
However, there’s a problem — a problem that’s fading into the past, but still a problem. The Sonos system, as well as other devices that can play iTunes content, can’t play older FairPlay-protected tracks. Apple stopped wrapping purchased music in annoying DRM in 2009 (see “iTunes Drops DRM from Music, Initiates Tiered Pricing,” 7 April 2009), but I never bothered to update my tracks (which cost $0.30 each); the songs played fine on my computer and iOS devices, so there was no urgent need.
Unfortunately, those songs are invisible to the Sonos. I could convert them to another format, but iTunes Match provides an easier and higher quality solution. Plus, I don’t have to pay anything more than that initial $24.99 fee; I can keep the upgraded tracks even if I choose not to renew my iTunes Match service.
Here’s what I did to locate and convert the files, and to make them available to the Sonos. As a bonus, this process gave me higher quality versions of songs I ripped at bit rates below the 256 Kbps rate of tracks in iTunes Match.
Warning! You need to be an iTunes Match subscriber and have iTunes Match completely updated before doing any of the following. But you don’t need a Sonos or other device to take advantage of this technique of getting higher quality, DRM-free copies of your music.
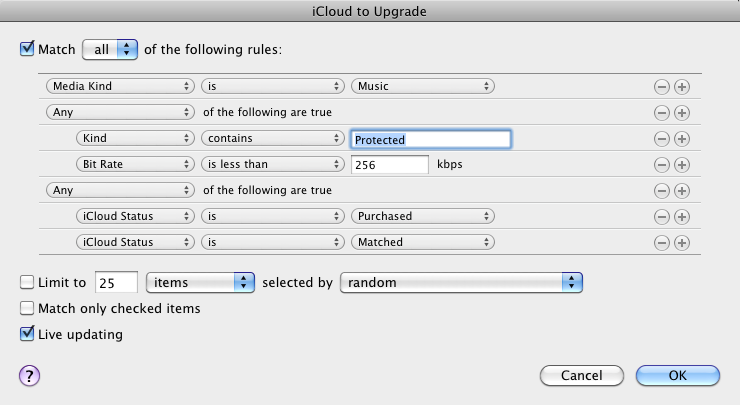
Create a Smart Playlist — First, to locate the DRM-shackled songs, create a new smart playlist in iTunes by choosing File > New Smart Playlist and set it up with the following attributes.
- Media Kind is Music
(Nest the following two conditions by Option-clicking the plus-sign (+) button to the right of the previous attribute, and change All to Any from the “of the following are true” pop-up menu.)
- Kind contains Protected
- Bit Rate is less than 256 kbps
(Nest these two as well, also as Any instead of All.)
- iCloud Status is Purchased
- iCloud Status is Matched
Lastly, click OK to create the playlist. It appears in the iTunes sidebar ready to be named.
This smart playlist goes above and beyond finding protected tracks by identifying any whose bit rates are less than 256 Kbps. If you’re going to sweep through your library to replace protected tracks, you might as well replace low quality tracks in the same pass.
Delete Local Files — The next step is to delete the local files. That seems like a drastic action, but remember, all music matched by iTunes Match exists on iCloud, either in the form of a copy already stored by Apple or a copy uploaded for any of your files that are missing from the iTunes Match database. (That said, I always recommend having a backup before deleting anything.)
Select a group of songs (or all of them), hold Option, and press the Delete key (Option-Delete enables you to delete tracks from within a playlist, even a smart playlist that doesn’t normally allow manual editing). When iTunes asks for confirmation, make sure the option to delete files from iCloud is not checked.
In the next dialog that appears, click the Move to Trash button to remove the old files from your hard disk. The songs remain in your library, but their iCloud Download status is set to Not Downloaded.
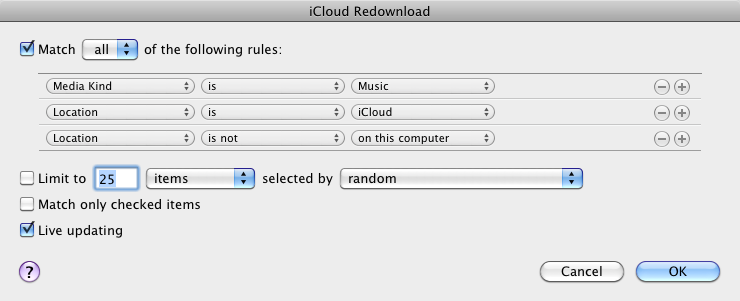
Locate and Re-download Songs — Deleting the files removes them from the smart playlist, so another one is required to make them visible again. Create a new smart playlist with the following attributes.
- Media Kind is Music
- Location is iCloud
- Location is not on this computer
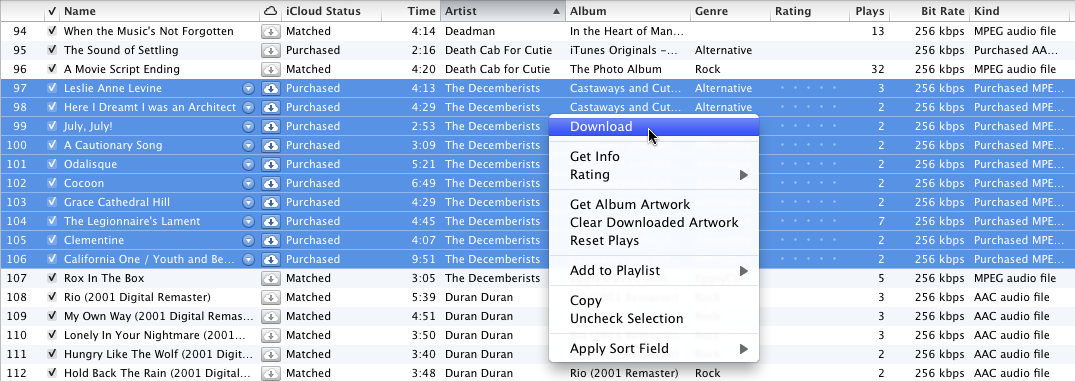
Next, select the songs you want to re-download. Control-click (or right-click) one of them to bring up the contextual menu and choose Download to get high-quality, DRM-free copies.
Or, to download everything listed (which could involve multiple gigabytes of data and might best be done overnight), click the iCloud button to the right of the smart playlist’s name in the sidebar when the playlist is selected.
Update the Sonos Database — The last step in my situation was to make the Sonos speaker recognize the new files — if you’re just following along to get higher-quality, DRM-free copies of your songs and you don’t have a Sonos, you’re done.
Otherwise, in the Sonos Desktop Controller software, choose Music > Update Music Now to re-index the music library. You could also do this from the Sonos Controller iOS app: tap the Music button, then go to Settings > Manage Music Library > Update Music Index Now.
After the Sonos software finishes indexing, the previously unavailable songs will be ready to play.


Why would you have to turn on your TV to listen to music? Couldn't you just use the Remote app and send the music from your Mac to your stereo via the Apple TV? That's how I do it.
It's even easier now - I don't know if it's a newer version of the Remote app, or the new Apple TV. You can select the Apple TV from Remote (it shows as a library), and do everything that way.
I didn't have a working stereo. :-) Edited to reflect that.
I was in a smilar situation. But there was no way I was going to listen to music through a TV.
So I bought a $50 amplifier and used it to connect my AirPort Express to my speakers. I control it through the Remote app on my iPhone. Done :)
I don't get the smart list menu shown, no media type etc, just an abreviated version. Running iTunes 10.6 on snow leopard