Choosing Hardware and Software for Podcast Recording
After writing my first TidBITS article, publisher Adam Engst threw me a curveball: I needed to record the article for the TidBITS podcast feed. With no special gear and no idea what I was doing, I fumbled around with GarageBand and the microphone in my Apple EarPods until I got something that sounded halfway acceptable.
As I wrote more for TidBITS, I slowly upgraded my setup, and now I’m at the point where I’m fairly happy with my audio quality. If you’re looking at breaking into podcasting, you could do a lot worse than what I use.
Yeti Microphone by Blue — The Yeti microphone by Blue ($90–$100) is the standard for affordable podcast recording. It’s big, it’s highly adjustable, it has a built-in headphone jack for monitoring your audio, and it uses a standard USB connection.

My friends at The Wirecutter agree on the Yeti’s excellence, picking it over Blue’s podcast-focused Nessie and the commonly used Rode Podcaster.
One thing to watch out for is the Yeti’s fragile micro-USB connector, which can break if torqued, as our own Glenn Fleishman discovered. For this reason, I keep the Yeti unplugged when I’m not using it.
As for the settings, I set Gain and Volume to about mid-level. On the Pattern knob, I switch it to Cardioid, which causes the microphone to record from a single direction, so it focuses on my voice.
While I use the Yeti’s included stand, the mic does offer threading to make it compatible with stands from other companies. At some point, I’d like to add an arm stand for better positioning, but at the moment I’m pretty happy with this setup.
Sony MDR-V6 Headphones — Long ago, when I was much younger and dumber, I smashed my eDimensional AudioFX force-feedback headset against a wall after a particularly bad round of Counter-Strike. Sobered by the experience, I decided I needed to get a grip, along with a pair of headphones that sounded better and were built to last. The force-feedback feature of the AudioFX was neat, but the overall sound quality was fairly poor.
After much research, I picked the Sony MDR-V6 ($85–$100), a professional standard since the 1980s, and it’s one of the best tech investments I’ve made. I had to replace the headphone plug a couple of years in, and the earpads are a bit worse for wear, but otherwise, it works like a champ. The earpads are replaceable, but I see mine like a well-worn pair of shoes.
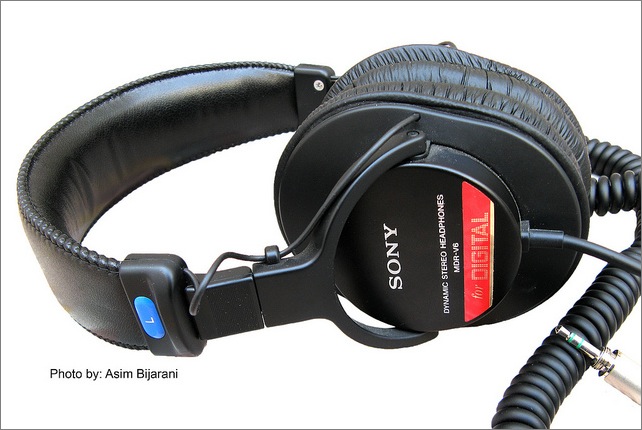
What makes the MDR-V6 great for professional work, besides its ruggedness, is that it offers flat, accurate sound. That might be disappointing for music lovers looking for lots of bass or treble, but for professional work, it’s exactly what you want. I use the MDR-V6 for music and gaming as well, and it’s great for both. I like my audio to sound like it should, with no funny business.
You might also look at the Sony MDR-7506, which is now about the same price, and according to The Wirecutter, offers even better sound quality.
Audio Hijack Pro — The developers at Rogue Amoeba are masters of Mac audio, and Audio Hijack Pro ($32) is no exception. It can record sound from just about any app, but I usually just capture audio directly from my Yeti.
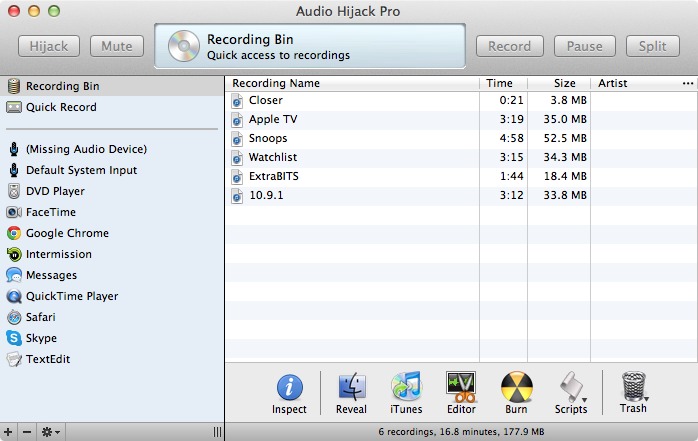
Why use Audio Hijack Pro over the free GarageBand? The main reason is that, unlike GarageBand, Audio Hijack Pro doesn’t take over my entire screen — a must when I’m reading TidBITS articles.
It also offers built-in monitoring, so if you don’t have a microphone that includes that, Audio Hijack Pro picks up the slack. I prefer it to the monitoring in my Yeti microphone, as I want to hear exactly what the software is recording.
Finally, what makes Audio Hijack Pro a winner is its built-in effects, which I was ignorant of until I read Andy Affleck’s “Take Control of Podcasting on the Mac, Second Edition.” While that book hasn’t been updated in a few years, much of its advice is still invaluable. Thanks to Andy, I learned how to use Audio Hijack Pro’s effects, which drastically improved my recording quality.
Andy recommends the following effects: Reverb (set to a very low level — mine’s at 0.035 for the Wet/Dry Mix, 0.005 for Room Size, and 0.020 for Damping), AUMultibandCompressor, and most important for me, the 10-Band EQ. If you get a background hum when recording like I do, the EQ can filter that out. (Andy also suggests some other effects, like Declipper for normalizing loud sounds, but I have a different solution for that, as I mention below.)
There’s no point in sharing my precise settings, as yours will vary depending on your environment. But for the EQ, play with each setting to remove “house noise,” while not distorting your voice. As for Reverb, you don’t want so much that your voice echoes, just a tiny bit to flesh your voice out. With a bit of tweaking, your recordings will sound more professional.
Fission — My old setup involved recording in Audio Hijack Pro, creating a new track in GarageBand, and then dragging my recording to GarageBand for editing.
The reason I jumped through such hoops was because GarageBand has a built-in noise gate, which filters out background noise. Once I figured out Audio Hijack Pro’s effects, which work much better, I no longer needed GarageBand and happily switched to Rogue Amoeba’s Fission ($32).
What’s the upside of Fission? Most notably, the entire editing workflow is much faster. I don’t have to monkey around with loops or exporting to AIFF. I just click the Editor button in Audio Hijack Pro’s Recording Bin to open the file in Fission, select the portion of the audio waveform I don’t want, delete it, add in any extra clips, clear the splits, save, and I’m done (more on my workflow in a moment).

Unlike GarageBand, Fission doesn’t offer any effects, since it’s meant to be used alongside Audio Hijack Pro. For that reason, you get a discount if you buy them together from Rogue Amoeba ($50 instead of $64). TidBITS members save an extra 20 percent, dropping the combined price to $40!
Since discovering Fission, my podcast editing time has plummeted.
My Recording Process — Now that you know the tools I use, here’s my process for recording articles every Monday.
I edit articles in the morning and record in the afternoon, but podcast preparation is an all-day affair. I have to be careful about what I eat or drink. Carbonated beverages or eating right before recording are guaranteed to result in a huge belch in the middle of a paragraph, which adds to editing time. On podcast days, I stick with water and juice and eat lunch early.
Dry mouth is another problem, and the best solution I’ve found is plain apple juice. It’s tart enough to encourage saliva production, but isn’t so acidic as to make my vocal cords hurt. And the sugar keeps my throat coated. I sip water and coffee in the morning, and pour a glass of apple juice for recording.
Before I begin recording, I enable Do No Disturb on both my MacBook Pro and my iPhone, as I don’t want them to interrupting me in the middle of a recording. Also, I crank up the volume on my Mac, so I can hear my own voice loud and clear. I like being able to monitor myself, for confidence that the recording is happening, to be certain the levels are right, and to work on my microphone technique.
When I’m ready, I open Audio Hijack Pro, click the Hijack button so I can hear my own voice, and then test my microphone to find the best position. I usually have to turn hijacking off and then back on, since the first time I turn it on, there’s a bit of a delay, and toggling fixes that.
The first thing I record is the closer: “This is TidBITS, brought to you by…” Since I do several podcasts in one go, being able to reuse the closer saves me time. I just drag the closer onto the end of each recording in Fission. If I’m in a rush, I can use the closer from the previous week, assuming our sponsors haven’t changed.
I’ve learned to think about editing as I speak. If I screw up mid-sentence, it’s generally easier to wait a few seconds, then re-record the entire paragraph, deleting the flubbed sentence in Fission later (the silence is easy to spot in the audio waveform in Fission). That way, it’s not obvious that I’ve edited the podcast. I also try to pause briefly between sentences and paragraphs in case I need to make an edit. But those pauses can’t be too long, or the whole thing sounds unnatural and makes those listening on the iPhone think they’re receiving a phone call.
I record all my podcasts in one go, and then I edit them in a batch with Fission. The Crop tool is handy for trimming dead air at the beginning and end of the recording. After that, I listen to the whole thing, selecting and deleting chunks as needed. Finally, I drop the closer at the end of the timeline, and then choose Edit > Clear All Splits. Adding one audio file to another creates a “split,” and Fission wants to save each split as a separate file. When you clear all splits, Fission merges those files into the original.
When I’m done, I select each podcast in Audio Hijack Pro’s Recording Bin, click the Reveal button to expose the file, and then drop it onto PodBOT, our robotic podcast uploader, which handles metadata and other things (see “PodBOT Improves TidBITS Audio,” 7 May 2012). One thing PodBOT does is run The Levelator over the track to even out the volume. It’s a free tool that professionals swear by, though it is unfortunately no longer being developed.
There are still things I’d like to improve in my setup, but as it stands, I’m happy with my gear, workflow, and results. My recordings now sound much more professional. So if you’re getting into the world of podcasting, take my advice and save yourself a lot of time and embarrassment. As The Mid Roll’s Lex Friedman says, “Good audio is important, people.” If you want listeners, you have to deliver top-notch audio. If your podcast sounds like it was recorded in a tin can, no one will want to listen, regardless of the content.
For those interested in learning about the gear and recommendations of well-known podcasters (leaning towards Mac-oriented podcasters) check out the Show Me Your Mic podcast: http://www.ssktn.com/category/smym/
Great article; lots of good tips. The one thing that eludes me with USB microphone recording is the ability to use multiple microphones. I usually record 4 people, each with their own mic, and it looks like recording can only be done with analog microphones. Any ideas how to record using multiple USB microphones?
OS X lets you create an aggregate audio device, though the best solution is probably XLR mics plugged into a USB interface.
http://support.apple.com/kb/HT1215
I've been making a weekly blues podcast since 2008 and have been through various sets of hardware and software. I started with the free Audacity but it had a habit of 'quitting unexpectedly' so I now use an application called Sound Studio and PPMulatorPlus which gives me the kind of readout I was used to in a broadcast radio studio. I also have a mixing desk which lets me plug an XLR mic in. For the playlist, I use Megaseg out from iTunes via an iMic to the mixing desk and then back into Sound Studio to record it. My MacBook Pro is fast enough to send it out and receive it back without dropout. You can check me out at http://www.nothingbuttheblues.co.uk/radio.html
Happy to answer any further questions ...
Cliff
Nothing But The Blues