The Power of Preview: Advanced Editing Techniques
In “The Power of Preview: Cropping and Resizing Images” (18 March 2016) and “The Power of Preview: Annotating Documents and Images” (2 April 2016), we explored editing and annotation tasks with Preview, OS X’s built-in document and image powerhouse. This week, we’ll go deeper with some advanced editing techniques, and double back for a few tidbits we skipped in previous articles.
Advanced Selection Tools for Images — In “The Power of Preview: Cropping and Resizing Images,” we discussed using the Rectangular Selection tool. However, when working with images, several other selection tools offer more variety and control. You find them in the Markup Toolbar, which you display by choosing View > Show Markup Toolbar (Command-Shift-A). The selection tools are accessed via the first button at the left.
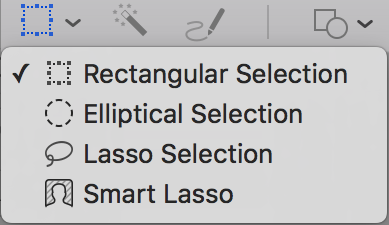
Elliptical Selection is the second choice on the selection tools pop-up menu. It works just like the Rectangular Selection tool, except that it selects elliptical rather than rectangular areas. As with the Rectangular Selection tool and the shape tools, you can press Option while making the original selection to size it from the center, and pressing Shift gives you a perfect circle.
After dragging out an elliptical selection, you get the usual drag handles. The handles attached to the selection ellipse itself adjust one dimension at a time, whereas those on the corners of the rectangle that encloses the ellipse can adjust two dimensions at once.
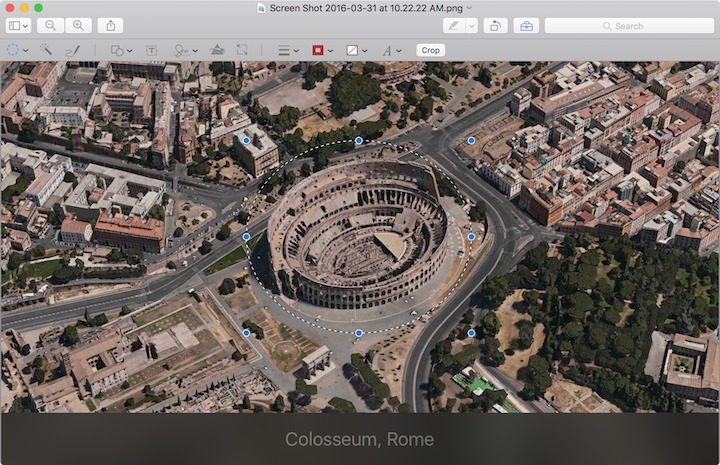
The next selection tool is Lasso Selection, which Bill Atkinson first invented for MacPaint in 1983. The Rectangular Selection and Elliptical Selection tools fall down when you need to select an irregularly shaped object or portion of a graphic. But with the Lasso Selection tool, you can hand-draw a selection around any object. The hard part of this is that you have to do it in a single click-and-drag motion. Since the Lasso
Selection has to form a closed shape, if you don’t close it yourself by ending your drawing back on the starting point, the selection closes itself with a straight line. Once you’ve finished making a selection, you can drag the selection — not the underlying image, but the dashed line selection — around with the pointer, or nudge it with the arrow keys.
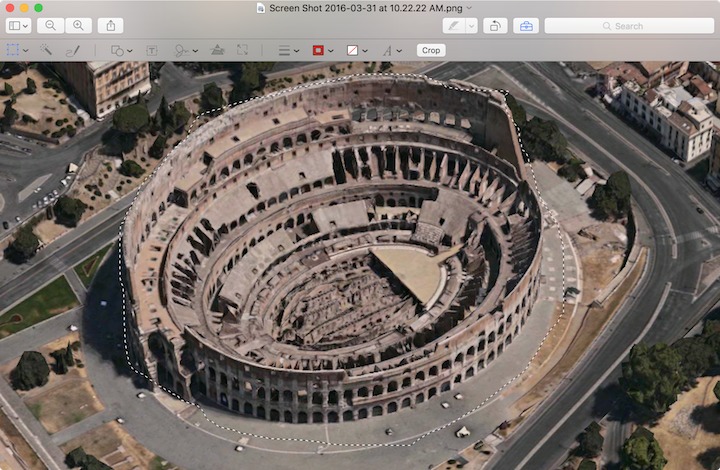
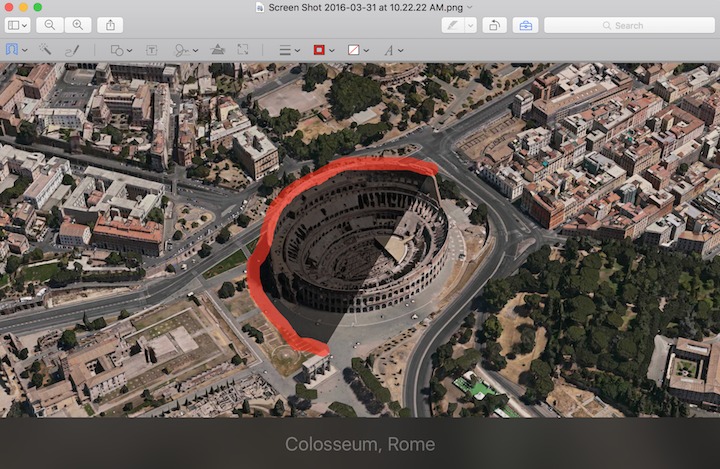
The Lasso Selection tool works well when the irregularly shaped object you want is well separated from other parts of the image. But in a photograph, for instance, you’re unlikely to be so lucky. For such situations, Preview offers the Smart Lasso tool, which offers some assistance. When you drag, you see a thick red line instead of a thin white line — draw that around the object you want to select and Preview tries to construct the selection intelligently. It will take some experimentation to get the desired results. Oddly, you
can’t move a Smart Lasso selection afterwards with the pointer, but you can nudge it with the arrow keys.
Once you’ve selected something with one of these tools, you have a few options:
- Choose Edit > Invert Selection (Command-Shift-I) to select everything other than what you just selected. It’s handy at times!
- Press Delete to remove it from the image, leaving a hole.
-
Use Command-C to copy the selection, so you can paste a copy into this or another image. Remember that you can also choose File > New from Clipboard to create a new file with the copied selection.
-
Once you have a copy, you can move and resize it to your heart’s content, although it will always be essentially rectangular in Preview’s eyes, no matter how irregular it was to start. One technique we frequently employ is obscuring part of a screenshot by copying a chunk of its background color and pasting it over the part of the image we want to cover up.
Honestly, there aren’t that many uses for the Elliptical Selection tool, and both of the lasso tools are finicky, so we use them only occasionally. Let us know if you’ve found good uses for these tools, but if you’re just trying to remove a background from an image, the Instant Alpha tool is a better choice.
Instant Alpha — No, Instant Alpha won’t make you leader of the pack. Rather, it’s a color-based selection tool, similar to magic wand tools in other image manipulation apps. It’s best used to strip solid-colored backgrounds from images (replacing them with transparency, which doesn’t obscure the background color on a Web page, for instance).
The Instant Alpha tool is the second button in the Markup Toolbar. Click it, and then click and hold on the colored area you wish to select. The selected area turns red; you can then drag the pointer to adjust the tool’s sensitivity to include the colors you drag over. Once you’re happy with the selection, lift your finger from the mouse or trackpad to finalize your selection.
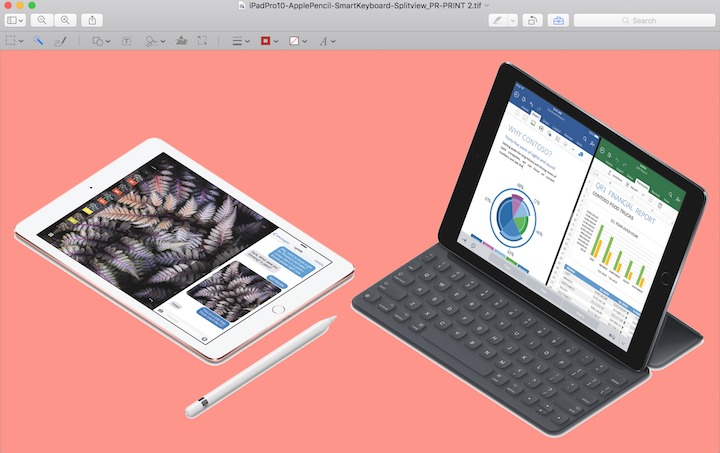
As you’d expect, you can press Delete to delete the selection. In the screenshot below, I first used Instant Alpha to select the background, which I deleted.
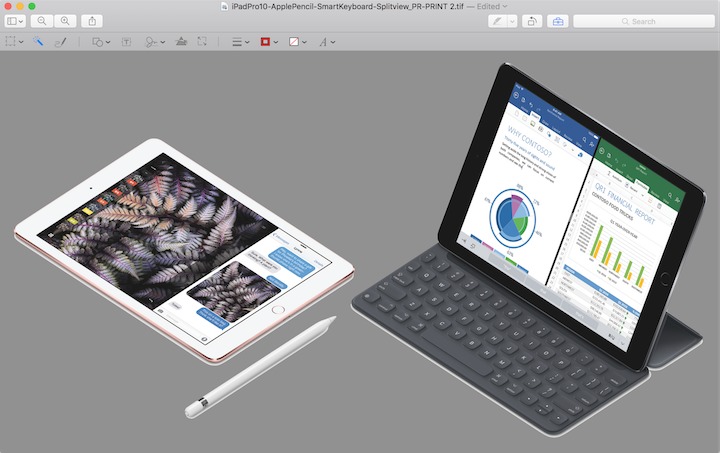
Then I undid that, selected the background again, inverted it with Edit > Invert Selection, and deleted the iPads and Apple Pencil, making for a neat silhouette effect.

Realistically, though, the main time we use the Instant Alpha tool is when we’re working on a button or logo for a Web site, and the original image has a white or colored background instead of a transparent background. A few quick clicks and the background is history.
Adjust Colors — For the most part, we’ve been talking about editing images that someone created from scratch in a graphics app, rather than photographs. However, if you do find yourself needing to edit a photograph, Preview provides some surprisingly robust image adjustment tools when you choose Tools > Adjust Color (Command-Option-C). These tools are essentially identical to those that first appeared in iPhoto many years ago.

At the top of the Adjust Colors window is a histogram with three drag handles with which you can adjust the image’s white point, black point, and midtone. Click the Auto Levels button to get a suggestion of how to reset the white and black points. Then play with each of the sliders to get a feel for how they lighten or darken the image; if you don’t like how things turn out, you can reset all of your changes with the Reset All button at the bottom of the window.
The rest of the sliders are at least labeled, but we still recommend experimentation to see how each affects a given image. Remember, you can undo your adjustments at any time with Reset All. Here’s what they do:
- Exposure: If a photograph is too dark or too light due to being under-exposed or over-exposed, this slider will let you fix that. It’s mostly helpful in a small way to brighten photos that were dimly lit.
-
Contrast: This slider lets you control the difference between the lightest and darkest areas in a photo. It’s seldom worth messing with much, though increasing contrast a little bit can make an image look crisper and more detailed.
-
Highlights: This slider reveals detail in the brightest points of a photograph, which can be useful for making clouds more visible, for instance.
-
Shadows: More generally useful than the previous one, the Shadows slider throws light on the darker parts of a photo, revealing detail that was previously hard to see. Since you’re most likely to use it on a dark photo, it will probably lighten the entire photo as well.
-
Saturation: Use this slider to adjust how saturated the colors are. Moving the Saturation slider all the way to the left makes the image grayscale, which can be a useful effect, while sliding it to the right makes colors practically explode off the screen. If an image seems a little dull, try increasing saturation just a bit.
-
Temperature: With this slider, you can make the image cooler (more blue) or warmer (more yellow). This isn’t terribly useful, but if the photo was taken in unkind fluorescent lighting, the Temperature slider might improve it a bit.
-
Tint: While the Temperature slider lets you make an image more blue or more yellow, the Tint slider does the same with green and red. To make it easier to use, Apple provides a dropper next to it; select it and then click a part of the image that should be a neutral gray or white. That sets the Tint slider automatically. Click the dropper in a few different spots to see how they differ; the best way to evaluate how well it has worked is to look at some skin tones.
-
Sepia: This slider is a one-trick pony; it reduces the saturation of the photo using sepia tones instead of grayscale. Crank it all the way up to give your image an “old-timey” feel.
-
Sharpness: This slider can make your image blurrier or sharper. Blurrier might be helpful with an almost abstract sunset, but mostly you’ll want to sharpen photos to bring out more detail. Don’t go too far, though, since excessive sharpness can make the image look grainy.
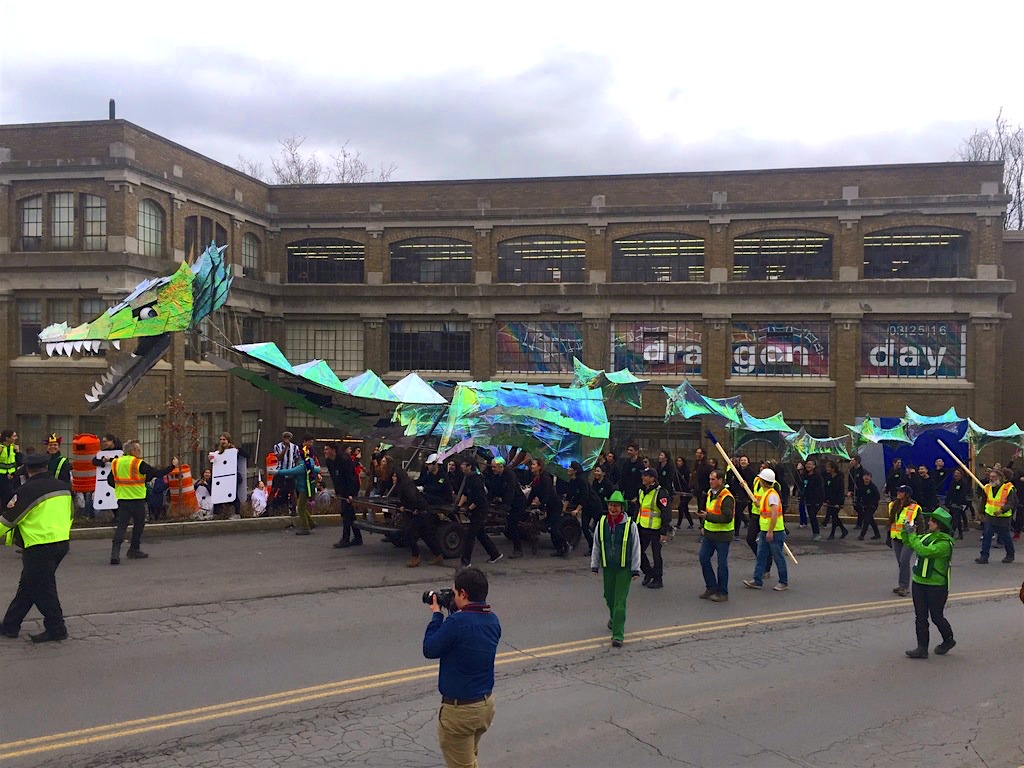
To give an example of what these controls can do for your photos, here’s a photo Adam took recently at Cornell University’s Dragon Day. Unfortunately, because it was an overcast day, it looks less like a celebration and more like a funeral procession. Let’s see if we can brighten things up a bit.

First, I clicked Auto Levels to establish a baseline, and then I moved exposure up a bit to brighten the image. But increasing exposure blew out some of the clouds, so I darkened the highlights to make it look more natural, while also lightening shadows a bit to add more brightness. Then I upped the saturation to make the bright colors in the photo more vibrant. Finally, I bumped up temperature, tint, saturation, and sharpness just a bit to round things out.
The end result is a brighter, clearer photo. Now there’s a celebration!
One last note about color. Preview supports color profiles, which define how different displays or printers can output color. In View > Soft Proof with Profile, you can choose a color profile with which to preview the image, and if you want to assign a particular profile, choose Tools > Assign Profile and pick a profile from the pop-up menu in the dialog that appears. These features could be useful for graphics professionals who care deeply about color reproduction, although we suspect they’re using different tools.
Rotate Photos and Pages — Every now and then, you end up with an image which isn’t rotated the way you want. Happily, Preview makes it easy to rotate images: choose either Tools > Rotate Left (Command-L) or Tools > Rotate Right (Command-R).
Less commonly useful than the Rotate commands are the next two in the Tools menu: Flip Horizontal and Flip Vertical. They rotate the image too, but around a horizontal or vertical center line. For example, Flip Horizontal can be helpful if you need a person’s headshot to face a different direction. Flip Vertical is useful when you need to flip a photo upside-down.
Preview can also rotate PDF pages, which is only very occasionally necessary. When you rotate a PDF page, Preview rotates just the currently selected page, which probably isn’t what you want. To instead rotate all pages, display thumbnails in the sidebar by choosing View > Thumbnails, select a page in the sidebar, choose Edit > Select All (Command-A) to select all pages, and then use the rotation commands. You can of course rotate just a subset of pages, if you want.
Crop Multiple Pages in PDFs — In “The Power of Preview: Cropping and Resizing Images,” we said, “Preview crops only a single page at a time”. It turns out that’s not entirely true.
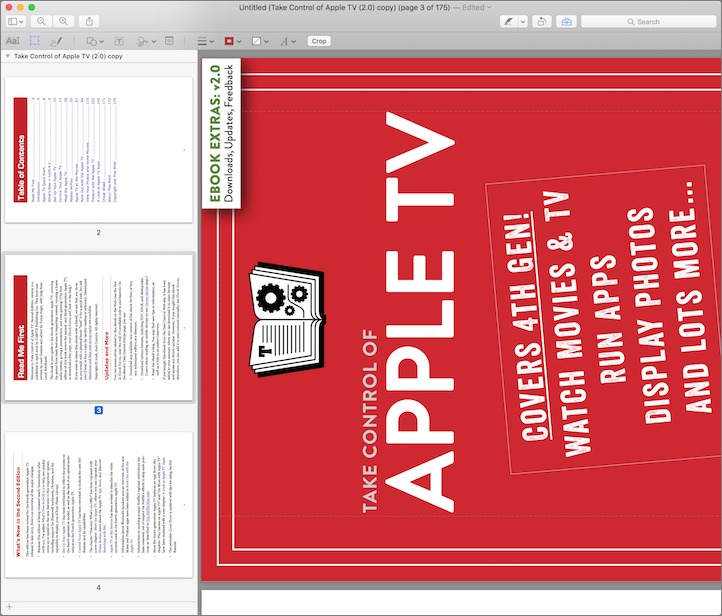
To crop multiple PDF pages, reveal the sidebar thumbnails as explained above and then use the Rectangular Selection tool on the page to select the area to which you want to crop (in the screenshot below, we’re eliminating the white page margins). Once you’ve made your selection, click the current page in the sidebar and choose Edit > Select All (Command-A) to select all the pages. Finally, choose Tools > Crop (Command-K) to crop every page in the document to the selected dimensions.

Unfortunately, this still isn’t all that useful, because Preview only hides content instead of deleting it, and there’s no guarantee that other PDF viewers will honor the crop. It’s probably most useful if you’re trying, for instance, to make a bunch of postcards scanned as full pages into something more viewable.
Edit and Rearrange PDFs — As you’re probably coming to realize, Preview gives you complete control over the individual pages in a PDF from the thumbnail sidebar view. Here’s what you can do:
- Rearrange pages: Click and drag a thumbnail in a sidebar and move the page to where you want it in the document.
-
Delete pages: Select one or more thumbnails (by Shift-clicking for a contiguous selection or Command-clicking for a discontiguous selection) in the sidebar and press Delete.
-
Combine PDFs: You can drag thumbnails from one document’s sidebar into the sidebar of another to copy pages between documents. Likewise, you can select all the thumbnails in a document’s sidebar and drag them into another document to combine the two. This is particularly handy for combining scanned single-page PDFs into a single file.
At this point, it might seem as though we’ve covered everything Preview can do, but we have more in the wings! Stay tuned to TidBITS to learn more about the power of Preview.
Great article. But when I attempted to find the menu choices from the rectangle selection tool icon, there is NO v to its right indicating a menu, nor is one actually there. I'm running OSX 10.11.4 and Preview 8.1 (877.7).
Any ideas where my missing menu might be?
Are you viewing an image or a PDF? Those options don't appear in PDFs.
I so wish there was an easy way to print all three articles, or is there one of which I am ignorant?
We keep getting requests to put these in book form, which is something that we're strongly considering.
Use Evernote and save the articles as "Simplified article". You can print from Evernote. This won't save or print the comments, but it also eliminates the "stuff" on either side of the article at the top.
If you're using Safari to view this article online, simply switch to Safari's Reader feature and use File > Print from the menu bar or ⌘P.
A Preview control that would be very useful, available in image editors such as Photoshop Elements, is ability to make small changes to the image angle vs. only 90 degrees. Frequently needed to tweak photos that are a bit crooked. Can it be done in Preview?
I'm afraid Preview only rotates images in 90-degree increments.
When I try dragging page thumbnails from one pdf document to another I don't get pages combined into one document. I just get multiple documents combined into a single window.
I can't think why that would be, Duane. Does it happen regardless of what PDFs you drag from and to?