The Power of Preview: Converting Images and Exporting PDFs
In our exploration of Preview, OS X’s built-in image and PDF powerhouse, we’ve walked you through getting files into Preview (see “The Power of Preview: Pulling Files into Preview,” 25 February 2016) all the way to advanced editing techniques (see “The Power of Preview: Advanced Editing Techniques,” 25 April 2016). As our series draws to a close, it’s time to end it in the natural place: saving and exporting your files.
Since Preview uses the Modern Document Model (see “The Very Model of a Modern Mountain Lion Document,” 7 August 2012), it saves existing files automatically as you edit. Likewise, Preview supports Resume, so if you quit Preview without saving, or Preview closes due to a crash or power outage, you won’t lose your work.
But that’s all Mac 101. More interesting is how Preview can convert your files into different formats. You can even export a PDF as an image or vice versa! That can be handy if, for instance, you have a one-page PDF flyer that you want to convert to a PNG or JPEG so it can be posted more easily on Facebook.
Three commands in Preview’s File menu help you export your files:
- Export: This command enables you to save a copy of your file with a different name, in a different location, and even in a different format.
- Export as PDF: As you’d expect, this command is mostly a faster way to get a PDF out of Preview. Oddly, the Export as PDF dialog lacks the Quartz filter and encryption options that the regular Export command does, and all the other options available with the next command.
-
Print: You may not realize this, but in OS X, you can “print” anything to a PDF! More on this in a bit, but for now, just know that using the Print dialog to export a PDF offers some advantages.
There’s also a fourth option, Save As, which doesn’t appear by default. Hold down the Option key to change the Duplicate command to Save As. But with one minor exception that we’ll cover later, Save As does the same thing as Export, so there’s no need to bother, unless you’re just working out of habit. If you prefer Save As to Duplicate, check out “Put Save As Back on the File Menu” (30 November 2015).
Converting Image Formats — We assume that you understand the basics of naming, saving, and tagging files, so we’ll focus on the interesting bit: format selection. The Export dialog’s Format pop-up menu shows only 6 file formats by default, but if you Option-click it, Preview displays 19 choices!
This conversion capability is handy, because if you have a JPEG and need a PNG, all you have to do is open the JPEG in Preview, choose File > Export, change the Format pop-up menu to PNG (note the resulting file size estimate), and click Save.
But if you don’t already know that you need a PNG, which format should you pick? It depends on your intended destination for the file. We’ll look at PDF next, but the four most common image formats are:
- GIF: An ancient format, first introduced by CompuServe in 1987, the GIF image format has been superseded by PNG in every way but one: GIF supports a flipbook-style animation, which is a topic for another article. Don’t use GIF unless you want to create an animation, or just feel like reliving the battle over how it’s pronounced.
-
JPEG: JPEG is great for photographs, and any image-viewing app can open JPEG images. When exporting as JPEG, you can reduce the quality to reduce the file size, which is useful for Web publishing. However, be aware that JPEG’s compression is lossy, which means data is actually thrown away during saves and can’t be recovered. Because of this, every time you edit and save a JPEG, the picture quality will degrade a little.
Don’t confuse JPEG with the JPEG-2000 format. Despite having a similar name and coming from the same group, they’re entirely different. In theory, JPEG-2000 is better, but in reality, it doesn’t offer many benefits.
-
PNG: Conceived as an improved, non-patented replacement for GIF, PNG is designed for Internet image sharing, as opposed to professional-quality printing (it doesn’t support non-RGB color spaces like CMYK). PNG uses lossless compression, making it ideal for images that you need to edit repeatedly, and it excels with computer-generated images that have large, uniformly colored areas, like screenshots and logos. There are two variants of PNG that support animation — MNG and APNG — but support and usage are minimal at best, so GIF remains the choice for animations.
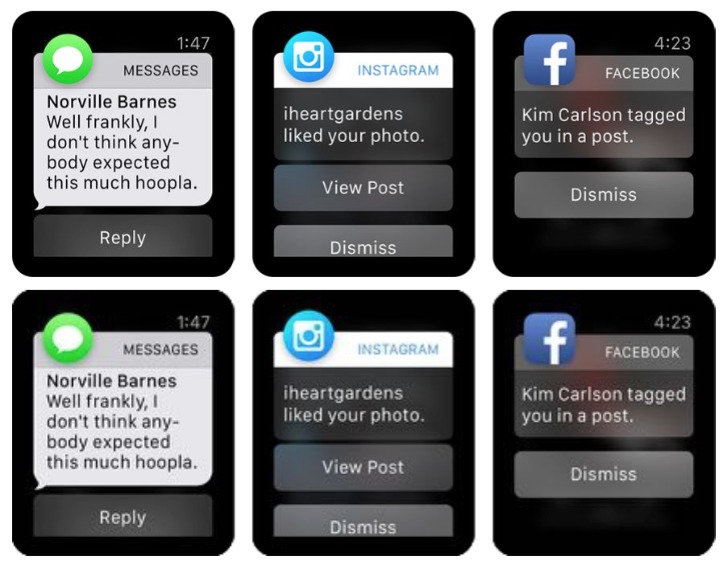
Because of its lossless compression, photos saved in PNG format have much larger files than those saved in JPEG format. By default, OS X creates screenshots in PNG format, though that can be changed with a
defaults writecommand if necessary. (iOS screenshots are also saved in PNG format.) Be careful using JPEG for screenshots, or you may see artifacting in areas of solid color. In the example below (click it to zoom on our Web site!), the top image in PNG format is 1.4 MB, thanks to the photo background, whereas the bottom picture, saved at 50 percent quality in JPEG format, is only 152 KB. Notice that the photographic portion is nearly indistinguishable between the two, whereas the solid blue in
the book cover shows artifacting, particularly near the white text, in the JPEG image.
When exporting a PNG from which you’ve removed the background with the Instant Alpha tool, as explained in “The Power of Preview: Advanced Editing Techniques” (25 April 2016), pay attention to the Export dialog’s Alpha checkbox. This setting enables or disables transparency, which sets a particular color as transparent, so the background color (of the Web page, say) shows through. If alpha is disabled, transparent portions of your image will be rendered as white.
It’s worth remembering that while PNG and GIF support transparency, JPEG does not. So if you convert an image in one of those two formats to JPEG, whatever color has been declared as transparent (usually white) may instead be rendered as another color. The code in the TidBITS Publishing System that makes thumbnails of graphics always creates JPEGs, which means that thumbnails of certain PNGs that contain transparency end up with black replacing the transparent portion of the image (at least until we notice and fix it).
-
TIFF: TIFF is another venerable format that has evolved over the years to be extremely capable and useful, though today it’s mostly used in the print world. TIFF files can be compressed, though that’s not required, and when saving one in Preview, you can choose from no compression, LZW compression, and Packbits compression. The two compression choices are lossless, like PNG’s compression, and LZW seems to result in a smaller file.
Also like PNG, TIFF supports transparency, but what sets it apart is its support for layers. In graphics programs like Photoshop and Pixelmator, layers enable you to work on the image as though you’re drawing on a transparent sheet of acetate. Objects on layers can be manipulated independently, and layers can be turned on or off to try various edits without committing to them. Unfortunately, Preview doesn’t support layers at all, so while it can open a TIFF that contains layers, it “flattens” them into a single layer. The same goes for edits made in Preview; you can add a shape to a TIFF and move it around while editing, but as soon as you close the image, the shape is merged with the image layer.
So, if you’re unsure, which format should you use? If the image is photographic, JPEG provides the best combination of quality and reduced file size. On the other hand, if it’s a computer-generated graphic with large areas of uniform color, like most screenshots, or if transparency is needed, stick with PNG. TIFF is useful primarily in the print publishing world; for instance, a publisher may require that screenshots for a book be in TIFF rather than PNG for color workflow reasons. Also, use TIFF if you will need to edit with layers in an app like Photoshop.
What about all those other image formats? For the most part, they’re old, uncommon, or both, at least in the Mac world. The two exceptions are Photoshop and QuickTime Movie, which are plenty common, but unlikely to be useful within Preview. Saving a file in Photoshop format does mean that Photoshop can open it natively, but as far as we can see, there’s no advantage over PNG in that regard. And we can’t figure out what file format you can open in Preview that you could later save using QuickTime Movie; animated GIFs seemed the most likely, but they can’t be saved as QuickTime movies. If you’d like to read up on these other formats, here’s a full list, with informative links:
- ASTC
- ICNS
- JPEG-2000
- KTX
- Microsoft BMP
- Microsoft Icon
- OpenEXR
- PBM/PGM/PPM
- PVRTC
- Photoshop
- PostScript
- QuickTime Movie
- SGI
- TGA
Despite the length of that list, there are many more graphic formats out there. If you run across a file that you can’t open, or if you need to save an image in a format that Preview doesn’t support, turn to Lemke Software’s venerable GraphicConverter, which can import approximately 200 file formats and export in roughly 80 formats.
Exporting to PDF: Quartz Filters — Entire books have been written about Portable Document Format (like “PDF Hacks,” “PDF Explained,” and “Developing with PDF,” all from O’Reilly Media). Originally created by Adobe but an open ISO standard since 2008, PDF is one of the tech world’s most useful file formats. In the simplest terms, PDF represents the text and graphics of a printed document in digital form. The most common usage of PDF is in
printing and publication, with examples ranging from government forms to Take Control ebooks. But PDF is incredibly flexible — OS X’s Quartz rendering engine uses PDF internally, which is why it’s so easy to export things as PDF in OS X.
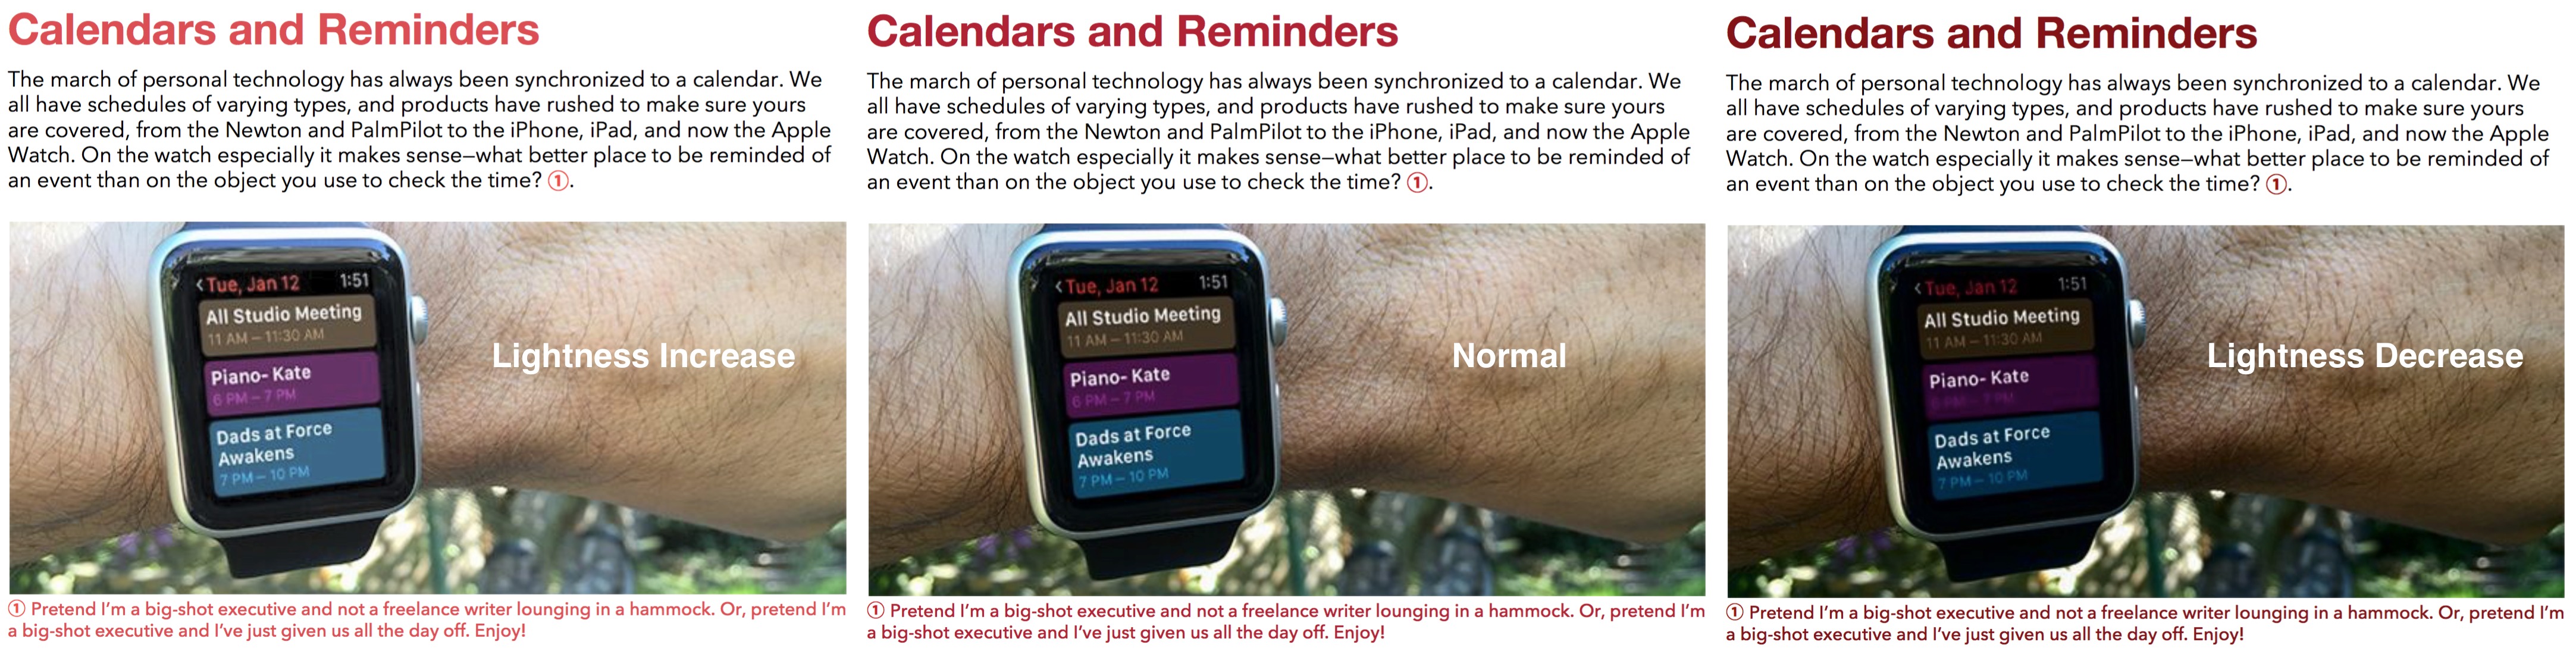
Preview’s Export dialog provides two extra options when exporting PDFs: Quartz filters and encryption. Quartz filters modify the exported PDF in various ways, either adjusting the look of the document or tweaking its format under the hood.
In the first category, you’ll find Quartz filters for Black & White, Blue Tone, Gray Tone, Lightness Decrease, Lightness Increase, and Sepia Tone. The tonal adjustments do what you’d expect, making the image black-and-white or turning all colors into shades of blue, gray, or sepia.
The two lightness filters apply to all colors as well, so their effects are relatively subtle in photos, but can make a large difference to colored text.
When it comes to fiddling with the document format, Apple provides Quartz filters for Create Generic PDFX-3 Document and Reduce File Size. PDFX-3 is a subset of PDF with printing-related requirements that facilitate a color-managed workflow. Honestly, if you need a color-managed workflow, you should be (or already are) using Adobe Acrobat Pro.
Reduce File Size is alluring, but beware if you have images other than photos in your document. When you use Reduce File Size, Preview uses lossy compression to reduce the quality of every image in the document, making non-photos notably fuzzy. Photos see a quality reduction too, but the effects are less noticeable. Happily, Reduce File Size has improved radically from earlier versions of Preview, which also deleted useful metadata like a PDF’s table of contents.
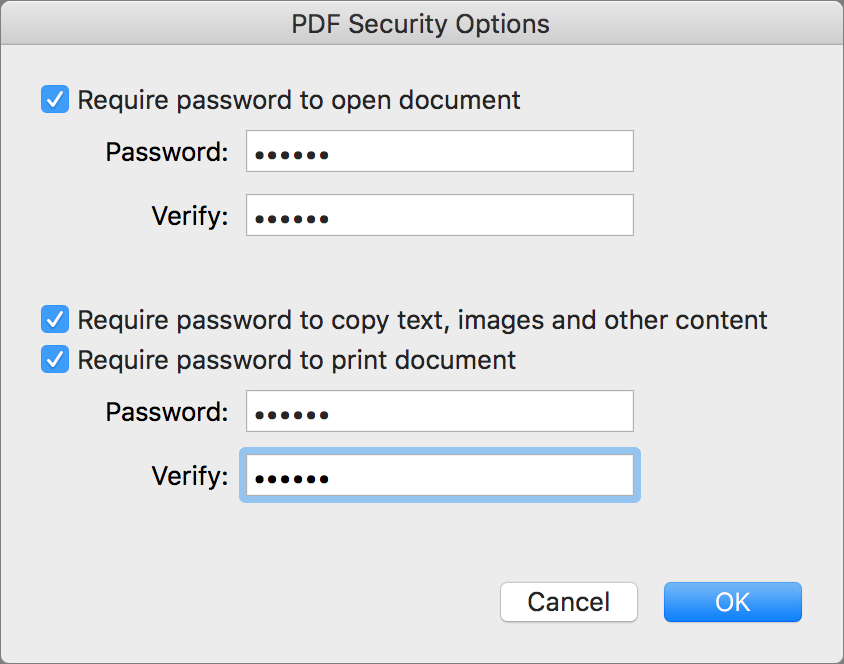
Exporting to PDF: Encryption — Preview’s Encrypt checkbox may be more useful to you. If you’re sharing a PDF that contains confidential information, you can reduce the chances that it will be read more widely by encrypting the document, after which a password is necessary to display it.
In PDF parlance, the password created by Preview’s Encrypt checkbox is a “document open” or “user” password, as opposed to a “permissions” or “owner” password, which restricts editing and printing of the document. More on how to set a permissions password in a moment; you can’t do it from the Export dialog.
Preview offers no facility for entering the permissions password to override previously set restrictions, with one exception. If you open a PDF encrypted with a permissions password that prevents changes, and then try to use Preview’s File > Export or Export as PDF commands, you’ll be prompted for the permissions password. That is, unfortunately, false security because any change in a permissions-protected PDF causes Preview to make a copy that you can save. Plus, while Export may ask for a password, File > Save As does not. Oops.
To encrypt a PDF with a document open password, choose File > Export, select the Encrypt checkbox, enter a password, and then enter the password again to confirm it. From then on, when anyone — including you — tries to open the encrypted PDF, in any PDF-savvy app, they’ll be prompted for the password.

As far as we’re aware, as long as the document open password is relatively strong, there’s no way to brute force it. (If you use a weak password, a dictionary attack may be able to crack it.) You may run across utilities or Internet services like PDFUnlock that claim to be able to remove passwords from PDFs. They’re talking about the permissions password, not the document open password, and thus can’t do anything for you that you can’t accomplish more efficiently in Preview
itself.
What if you want to remove a document open password from an encrypted PDF? As long as you know the password, it’s simple — just open the PDF, enter the password, and then use Export to save it again, without selecting the Encrypt checkbox. This technique might be useful if a document was confidential for a time, but no longer needs to be.
Printing to PDF: More Encryption — As previously mentioned, you can “print” any document from any app to a PDF. This is a system-wide feature in OS X, thanks to Quartz’s foundations in PDF, and is tremendously useful for testing what a print job will look like before sending it to your printer or for saving a Web page as a PDF.
But why print to a PDF from Preview, which has built-in PDF export capabilities? For one thing, it offers more metadata and security options than Preview’s export feature, but it also solves a common Preview problem.
Since we began this series, several readers have written in with the same issue: you mark up a document in Preview, save it, send it to a collaborator, and they don’t see your annotations. We don’t know why this might happen — PDF is a standard, but that doesn’t mean every app implements it correctly — but printing to PDF appears to cause the annotations to show up properly in most cases.
To export a PDF in this way, choose File > Print. In the resulting dialog, click the PDF pop-up menu in the lower left and choose Save as PDF. (Further down in that menu, you may see a bunch of printing workflows that various apps install for you. They make it easy, for instance, to print a document to PDF and send it with Messages in one step.)
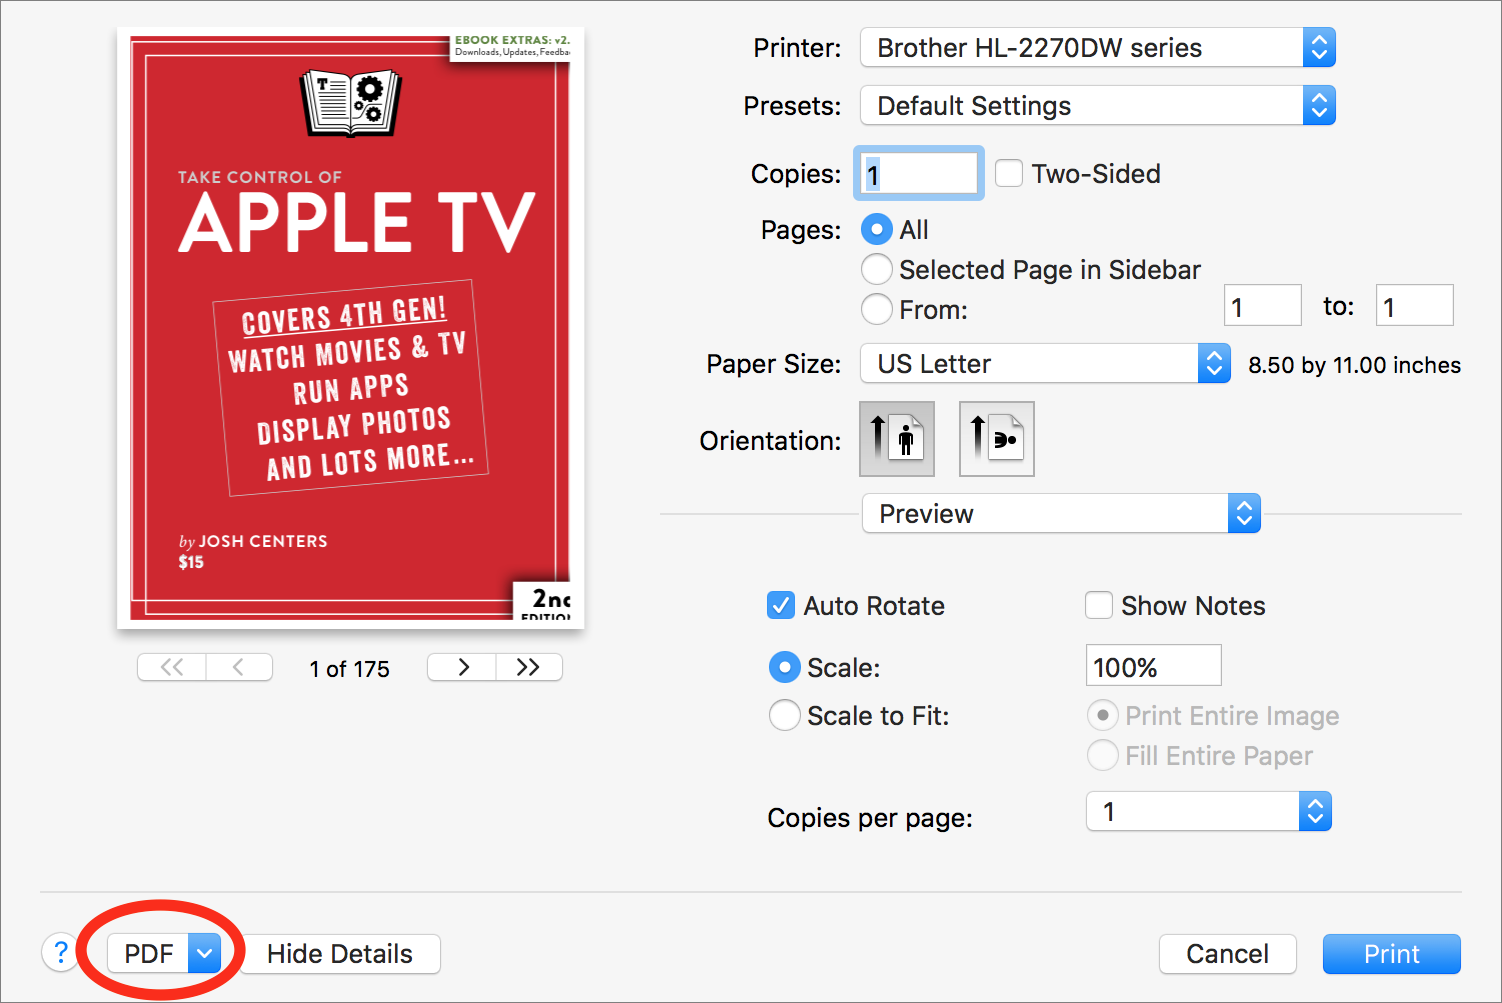
In the Save dialog that appears next, you’ll notice a few additional options. You can enter not just the filename, but also title, author, subject, and keyword metadata. This standard PDF metadata becomes visible in Preview’s Inspector window (choose Tools > Show Inspector or press Command-I), in other PDF apps, and even in the Finder’s Get Info dialog.
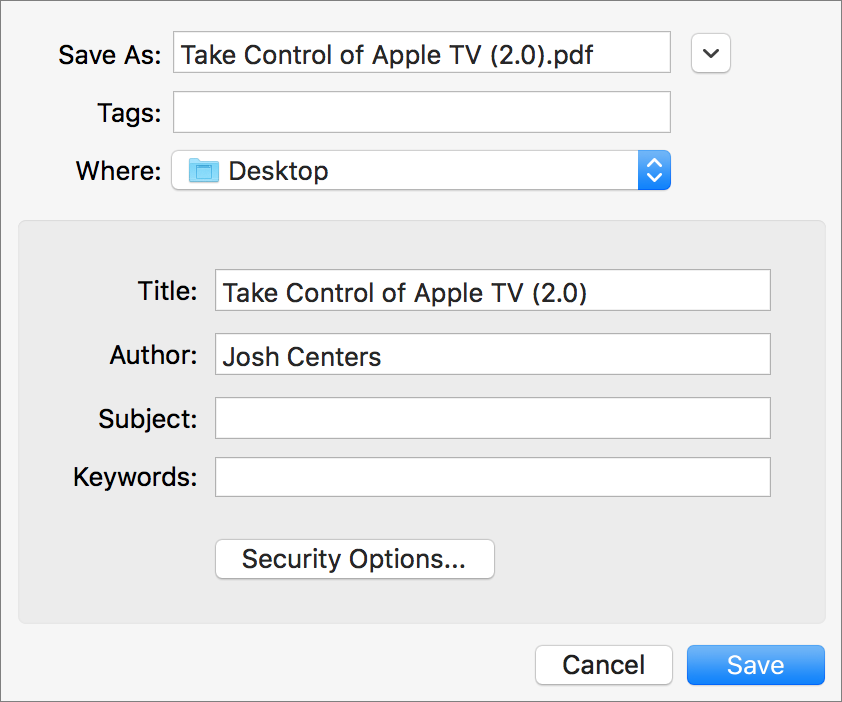
But there’s more! Click Security Options, and you can set both the document open and the permissions passwords for the PDF, and choose whether the permissions password will restrict changes, printing, or both.
Preview in the Rearview Mirror — This article wraps up our series on Preview. We hope you’ve enjoyed it, and if you have more questions about Preview or tips to share, let us know. Who knows what additional features might lurk within Preview’s depths?
Finally, although we don’t have a schedule set yet, the response to this series has been so positive that we’re planning to start on a “Take Control of Preview” book.
I'd be interested in a TCoPreview book.
Me too!
I'm editing the manuscript today!
I had no idea preview did so much. This series is definitely a keeper.
Congratulations Josh & Adam on an excellent series. Wonderfully detailed and thorough. These articles are exactly what makes TidBITS stand out.
I should have become a member a long time ago. But this series really drove it home.
Thanks so much for the support, Simon!
"In the screenshot below (click it to zoom on our Web site!), the top image in PNG format is 1.4 MB, thanks to the photo background, whereas the bottom picture, saved at 50 percent quality in JPEG format, is only 152 KB."
Does this screenshot exist? I don't see it.
Oops! We missed a link reference—check now.
In looking at it on the site, the difference isn't super noticeable. You might want to download it (right-click and save or copy the zoomed image) to see better.
You didn’t mention the most important feature of creating PDFs in Preview: the ability to combine multiple open images into one PDF.
In Preview, ‘Select All’, ‘Print Selected Images’.
Most users would type [command] [P] for 'Print' without seeing that final option in the File menu.
I’m using Preview 5.3 and assume that option remains in the latest version.
In my experience, some of the images will end up with an incorrect orientation, but once the combination PDF is created, I close Preview to close all the open images and then open the newly-created PDF and rotate any individual images with Tools/Rotate left or right. Save the PDF again and it’s done. Easy peasy.
Interesting use case! I did some testing here. If you open multiple images such that they're all in the sidebar of a single Preview window, and then you select them all in the sidebar (click on, then press Command-A), you can then use Print to make a single PDF with one page per image. (The Print Selected Images command must have disappeared since your version of Preview).
It's important not to use Export as PDF, since that exports just the image that's showing in Preview's main window, regardless of what's selected in the sidebar. Nor does Export Selected Images work the way you'd want; it creates a separate PDF for each image.
As far as rotation goes, I suspect that Preview uses the rotation of the image as you see it; the trick would be to make sure to set the rotation of the page appropriately in the Print dialog. So if you have landscape images, make sure to switch the page orientation in the Print dialog to landscape as well.
Great article - wonder if there is a reason why my iPad only opens the first page of .pdf's sent by Mail? Anyone have a fix?
Using Mail and Preview in El Capitan, double-clicking a PDF attachment in a message opens it properly in Preview here, with all pages accessible. What's the process you're using, and with what versions?
Excellent series. Looking forward to a TC Book.
What is the difference between Print > PDF and Export as PDF?
Glad you liked it!
As noted above, Export as PDF is just a shortcut to get a PDF out quickly. It lacks the Quartz filter and encryption options of the normal Export dialog, and the metadata and permissions options of using Print > Save as PDF.
I've got an advanced question. I've got a PDF of a sample chapter of a book, and searching and copying do not work properly. The ligatures go missing when the text is copied, and words with ligatures aren't found when doing a search for that word.
But the ligatures work fine in Adobe Reader, according to a friend of mine.
Any idea what the state of ligature support is in Preview?
Poor to non-existent? :-) I've noticed the same failure of Preview to copy ligatures correctly. And it makes sense that if the PDF's text layer contains ligatures that Preview doesn't understand, searching would work only sporadically.
I'm not entirely surprised by this, since the level of PDF support that Quartz would need likely wouldn't include the kind of advanced typography that Acrobat would understand.
Thanks for the answer. It's a shame, but what can you do? Installing Adobe Reader is low on my priorities list.
:)
I use Preview extensively, especially for the first review and basic editing of images from photo shoots. One problem I have is the flaky scroll bar on the Thumbnail column. This is one of the many problems noted at discussion.apple.com for preview in the last 90 days. Many of these problems have been around for much longer.
What's the problem you're seeing? When I scanned Apple's forums for Preview problems just now, nearly all of them were threads that started years ago and just got a recent addition that was as often as not another answer.
That's not to say that Preview doesn't have bugs, but we didn't hit that many in months of intensive use. Mostly the spurious permissions error after opening a lot of files (just quit and relaunch Preview) and the issue with it not copying ligatures from PDF text. There were some crashes too, but given what Preview is for and how it auto-saves, they almost never resulted in any loss of work.
The thumbnails in the left pane have a line after the last one. When combining pdf documents by dragging thumbnails from one to the other it's important to drag the incoming thumbnails above this line. Dragging them below the line seems to work but the result is not permanent. Once the revised pdf is closed and reopened the imported pages won't be there. Dragging the imported pages above the line results in the numbering of the pages to continue uninterrupted. Dragging the imported pages below the line results in the original and imported pages appearing as two separate documents in the left pane, each having a disclosure triangle that can be used to collapse or expand the associated group of pages, but, as said above, the result is not permanent. Why Preview behaves this way is a mystery. By the way, a pdf file can be imported by dragging it from the Finder into the thumbnail pane of an opened pdf document.