macOS Hidden Treasures: 15 Startup Key Combinations
When the proverbial manure hits the fan and prevents your Mac from booting as you want, knowing the right startup key combination can save the day, whether you boot into Safe Mode, Recovery, Apple Diagnostics, or from another disk entirely.
Here are fifteen startup key combinations that can save the day when things go wrong. Not all are useful on today’s Macs, but we wanted the list to be complete.
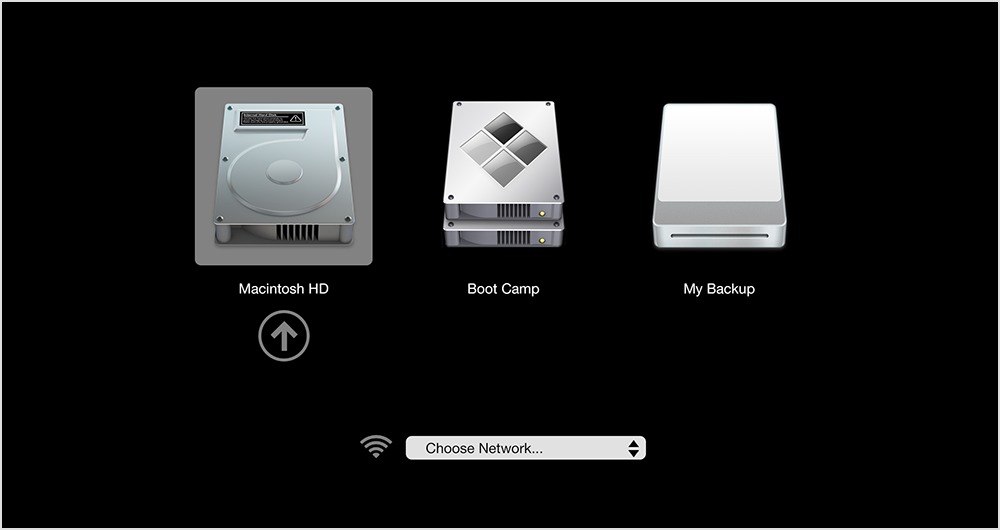
Option: Invoke Startup Manager — The first startup key every Mac user should know is the Option key. Press and hold Option as your Mac boots to enter the Startup Manager, which lets you select which disk to boot from.
Startup Manager is primarily useful for booting from an alternative drive, like a system clone, USB thumb drive, or a Boot Camp partition. However, you can also use it to force a boot from your primary drive if your Mac is stubbornly booting from another disk. Startup Manager may also help identify a flaky hard drive; if the drive you’re looking for doesn’t appear in Startup Manager, you know you have a problem.
If you have a bootable external drive, booting from that drive can also help you isolate problems or provide a different environment, such as a different version of OS X.
T: Target Disk Mode — What if you want to boot from another Mac’s drive using Startup Manager? You can connect the Macs via FireWire or Thunderbolt, and then put the other Mac into Target Disk Mode, which lets it serve as an external drive. Hold T during boot to enter this mode. If either Mac lacks a FireWire or Thunderbolt port, you’re out of luck.
In addition to troubleshooting, Target Disk Mode can also be useful for quickly transferring many gigabytes of files. And if your main Mac’s display fails, you can use Target Disk Mode to turn it into the boot drive for another Mac with a working screen.
Shift-Control-Option: Reset the SMC — When your Mac is exhibiting truly odd behavior, it may be worth resetting the System Management Controller (SMC), which controls all manner of things, such as batteries, keyboard backlight, and cooling fans. Apple lists all the things an SMC reset can fix.
On desktop Macs, you reset the SMC by unplugging the power cable for 15 seconds, plugging it back in, and turning the Mac on after 5 seconds. On older Mac notebooks, you can reset the SMC by removing the battery and power adapter, holding down the power button for 5 seconds to drain the capacitors, reinserting the battery, and turning it back on again.
However, for newer Mac notebooks, where it’s impossible to remove the battery, you need to know this key combo: Shift-Control-Option, using the keys on the left side of the keyboard. Shut down your Mac, connect it to power, press Shift-Control-Option, and then press the power button while holding those keys down. Release the keys and press the power button again to fire up the Mac with a fresh set of SMC settings.
Command-Option-P-R: Reset NVRAM — The other quick fix is resetting Non-Volatile Random Access Memory (NVRAM), which you do by holding Command-Option-P-R during startup. The Mac startup chime should sound a second time. After that, release the keys. (The reason for using P and R in the key combination is that Apple used to call this bit of non-volatile memory “PRAM,” for Parameter RAM.)
NVRAM controls things like speaker volume, screen resolution, and startup drive selection. Like an SMC reset, an NVRAM reset can fix a host of seemingly random issues.
Shift: Safe Mode — If your Mac gets stuck during the boot process, booting in Safe Mode might help you diagnose what’s wrong. To invoke Safe Mode, hold the Shift key while booting. It does a few things:
- Verifies and repairs your startup disk
- Loads only essential kernel extensions
- Ignores startup and login items
- Disables user-installed fonts
- Deletes all system cache files
Simply booting in Safe Mode may solve your problem, if it was related to directory corruption or a messed-up cache file. If a Safe Mode boot works fine, try a regular boot immediately, and if it proceeds normally, you’re all set.
However, if your Mac boots fine in Safe Mode, but has problems otherwise, you probably have a software problem related to something that loads at startup. You might guess that a third-party kernel extension was the culprit, but it could also be a corrupt font. Start poking around in the various Library folders on your Mac.
(If all you want to do is disable login items, press Shift when you click the Log In button in the login window, or as soon as you see the progress bar in the startup screen. Release it when you see the Desktop or Dock.)
Command-R: Recovery — Every modern Mac can boot into a special mode called Recovery, which provides tools to resolve a variety of problems. The system disk of most Macs contains a small partition containing a stripped-down version of OS X, which you can boot from by holding Command-R as your Mac boots. If the recovery partition is missing for some reason, you can load the Recovery software from the Internet by holding Command-Option-R at startup. Needless to say, loading Internet Recovery takes quite a bit longer; happily, it does provide a time estimate.
Recovery gives you seven options:
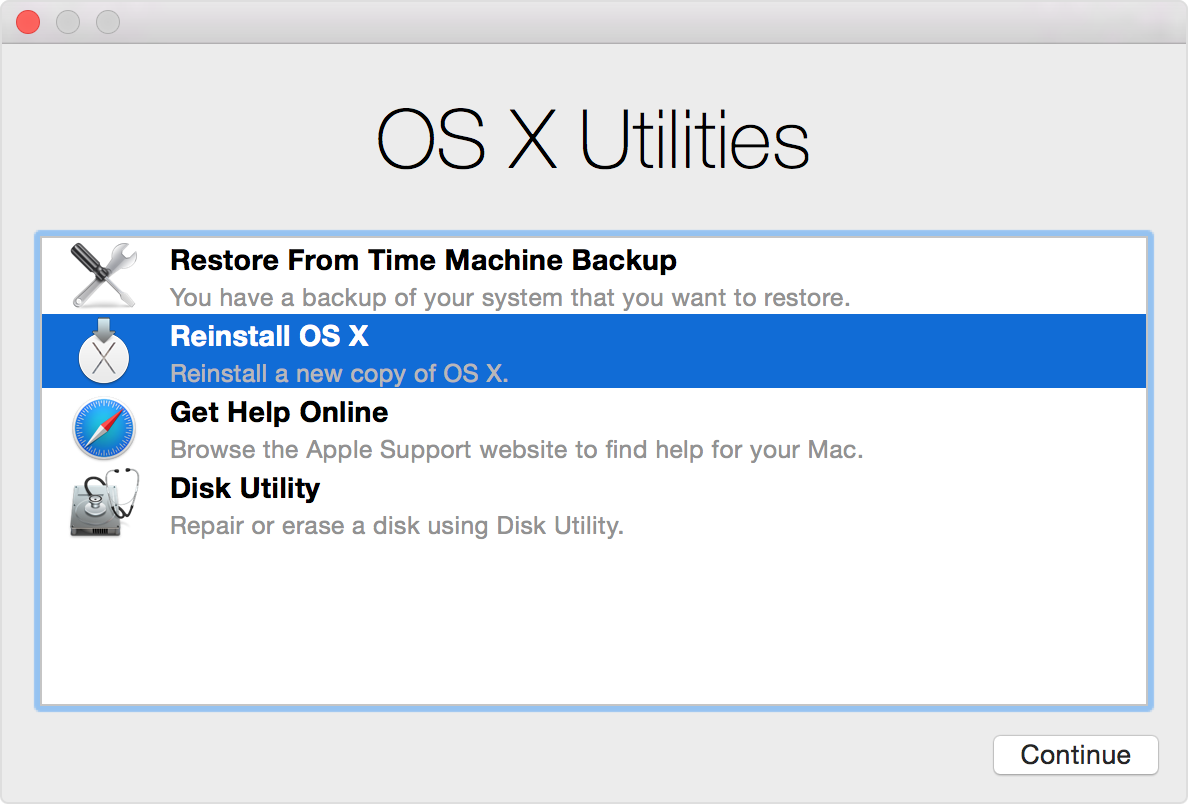
- Restore from a Time Machine Backup: You do have a Time Machine backup, right? Right?
- Reinstall OS X: You don’t have to wipe your disk and start from scratch; this option reinstalls the currently installed version of OS X over your existing install, which can fix missing or corrupted system files. If you use Internet Recovery, you get the version of OS X that originally came with your Mac instead.
- Get Help Online: This option opens Safari so you can browse Apple’s support site for help.
- Disk Utility: Clicking this item in the list brings up the Disk Utility app, which can check and repair your disks. If absolutely necessary, you can use Disk Utility to erase your system disk, onto which you can then restore your data from Time Machine. (You do have that backup, right?)
- Firmware Password Utility: Choose Utilities > Firmware Password Utility to launch this app, which lets you set and turn off a firmware password. You might want to enable a firmware password to make Find My Mac more secure (see “Disable Find My Mac by Resetting NVRAM,” 22 July 2016).
- Network Utility: Also available from the Utilities menu, Network Utility lets you test local and Internet connectivity using tools like Netstat, Ping, Traceroute, and more. It’s more easily used when the Mac isn’t in Recovery mode, but it’s here if you need it.
- Terminal: For those who are more comfortable at the command line, you can also launch Terminal from the Utilities menu. It’s a stripped-down installation that may lack some of the Unix tools you’re accustomed to having, but you can move around, look at files, and delete things. Be careful!
D: Apple Diagnostics — If nothing mentioned so far is solving your problem, your Mac might be suffering from a hardware issue. Hold D at startup to boot into Apple Hardware Test or Apple Diagnostics.
Which you get depends on the age of your Mac; Macs produced before June 2013 have Apple Hardware Test, while later Macs have Apple Diagnostics. They do basically the same thing, but Apple Hardware Test is a blast from the past — it looks like the old, pre-OS X Mac OS! Apple Diagnostics is a lot slicker looking and more or less automatic, while you have to click a button to start Apple Hardware Test. Apple Hardware Test also gives the option of an extended test, which takes a lot longer and isn’t usually necessary. Apple recommends disconnecting all external devices except the keyboard, mouse, display, and Ethernet adapter before starting either test.

If you can’t boot into one of these tests for some reason, try holding Option-D instead to load an Internet-based hardware test.
Command-V: Verbose Mode — Holding Command-V during startup puts your Mac in verbose mode. Instead of a tasteful gray screen, you see every single Unix system message as your Mac boots. Verbose mode could be useful for troubleshooting if you’re already a Unix expert; otherwise it’s mostly amusing to watch.
Command-S: Single-User Mode — To go one step beyond verbose mode, hold Command-S during boot, which puts your Mac in single-user mode. After the Mac finishes displaying all the Unix messages during its boot sequence, you’re given a command-line prompt, just as though you were in Terminal. As with using Terminal from Recovery, single-user mode is useful mostly if you’re already comfortable in Unix. Some people use single-user mode to run the Unix fsck utility, although it’s easier to boot into Safe Mode or run Disk Utility from Recovery for that purpose.
To leave single-user mode and continue booting, type exit and press Return. Or, to start over, type reboot and press Return.
Neither single-user mode nor verbose mode is accessible if you have a firmware password enabled.
C: Boot from Removable Media — If you hold the C key during boot, the Mac will start up from removable media, such as a CD, DVD, or USB thumb drive. Since Apple has largely done away with optical drives and physical installation discs are a thing of the past, this shortcut isn’t as useful as it used to be. Using Option to bring up Startup Manager is a better option because then you know exactly which disk you’re going to boot from.
Eject, F12: Eject All Removable Media — Here’s a neat trick: if you hold the Eject key (if your Mac has one), F12, or the mouse or trackpad button during boot, the Mac will eject all removable media. Like the C shortcut, this technique isn’t as necessary as it used to be when it was the standard way of getting non-bootable floppy disks out of a Mac quickly, but it’s worth remembering should you ever end up working on an old Mac.
N: NetBoot — If you hold N at startup, the Mac will boot from an available NetBoot server. Holding Option-N will boot from the default boot image on a NetBoot server. For those who have never even heard of NetBoot, it’s an Apple technology in OS X Server that enables a Mac to load the operating system from a network server, rather than from a local drive. Large networked environments sometimes use NetBoot to ensure that every Mac is using a consistent, approved version of the operating system. Chances are, you will never have to worry about booting from NetBoot.
X: Force a Boot into OS X, instead of Classic — Finally, there’s X, which Apple says causes the Mac to “Start up from an OS X startup volume when the Mac would otherwise start up from a non-OS X startup volume.” This one threw us for a loop, but Phil Dokas, our shadow editor Chris Pepper, and several commenters reminded us that it’s a holdover from the early days of Mac OS X, when it was used to keep the Mac from booting into the Classic environment. Kevin Patfield said there was even a companion option — holding 9 — that forced a boot into Classic. If you know a contemporary use for this key, let us know in the comments!
Incredibly useful compilation. Thanks.
Ditto -- An extremely helpful article.
X is a legacy command from when you could boot into OS9
Exactly right. There's also a companion "9" option to force a boot into ... OK, you get the idea
Thanks so much, guys! I'll update the article.
Adam, uh, I don't know about Josh, but you've been around long enough to know the Classic stuff. ;-) At any rate, you were publishing TidBITS in those "good old" days, and before that, actually. Of course knowing and remembering are not necessarily the same thing. There's been a lot of Apple flavored water under the bridge since then.
In any case, thanks for the list. I learned a few things I didn't know—or had forgotten. Like the difference between flashing PRAM (now NVRAM) and resetting the SMC. Not an insignificant distinction. I'll be saving the list. I've probably got a similar list somewhere, but this is an instance where duplication is a good thing.
Way too much trivia bouncing around in my head already, apparently, to remember a key combination I didn't use 15 years ago. :-)
My first Mac was a Lombard PowerBook that I believe shipped with Mac OS 8.5, which I later updated to Mac OS X 10.1 Puma, so I'm not totally new to the block. :-)
X is also useful if you have Windows installed, holding the X key will boot MacOS, even if the default is set to your Windows partition. (Maybe Unix and Linux partitions too, but I haven't tested it.
If you need to eject a floppy disk, just use a paperclip.
If you hold down the Control key while selecting a drive in the Startup Manager it will be 'blessed' as the default startup drive
Neat! Thanks!
That's a good note. Thanks!
THANK YOU! ??
Holding the left mouse key while starting up will eject floppies and optical disks that may be in their respective drives (for those of us who prefer these types of media over iClod).
Thanks for this compilation. I actually use the X and 9 modes on my old iMac. Sometimes it is refreshing to use "classic". It is so simple and straightforward it reminds me why I chose Apple years ago for all things creative.
Nice compilation, Josh! This list should be pinned up somewhere where we can always get to it!
this is a great example of how far off-course apple has gone from being a smiple tool for ordinary people. Who can remember all this stuff, or even remember where to find it? How hard would it be to have option-restart bring up a list of these options with click to do it? This is worse than DOS ever was.
Oh please. This stuff isn't for average users (most of whom never used DOS, by the way, or even know what it is—or was). These shortcuts are primarily for the technically inclined who often do maintenance on their and other people's Macs, either as a volunteer (helping friends) or professionally. If you use these shortcuts even occasionally you will remember the most important and useful ones. And you will keep this or another list handy for reference, since nobody can remember everything.
As for DOS, or Windows, for that matter, there are far fewer ways to address system and hardware problems on a PC. And most of these Mac shortcuts don't require any Terminal proficiency. Though if you boot into Single User Mode the code that runs will list the fsck codes you can use just before the user prompt—in case you've forgotten them. But Single User Mode has become far less important since Apple started including a Recovery Disk with each install of OS X. And, even simpler, starting in Safe Mode will run fsck on your disk as well. Just about anyone can learn to use Safe Mode, even if they don't know exactly what it does.
As for Apple getting off course, most of these shortcuts have been around for a long time in one form or another. Mac OS 7 through 9 had their own set of troubleshooting startup tools. OS X has expanded on those functions significantly. I consider these to be improvements. And the best ones, like Target Disk Mode, remain available to all Macs and all versions of OS X and through all I/O changes, from SCSI through USB, FireWire and even Thunderbolt (though I don't know about the MacBook with that stupid USB C port). Try TDM on a PC, any PC, with DOS, Windows or Linux. Oops, it ain't there. Sorry. While I have many issues with the way Apple does OS X these days, startup shortcuts is not one of them.
@ Josh: Interesting that you use the new name for OS X in the article title, even though the release version of Sierra is not out yet and all the in-service versions of OS X still, and will forever, use the old name. Which is to say, all these startup shortcuts apply to OS X. Though they can be expected to remain usable in the macOS, we are not really there yet. While the name change will provide continuity with Apple's other operating systems, it can be expected to add only confusion to discussions of OS X maintenance and support.
That said, I suppose you are future proofing your article for people who will read it a year or two down the road, supposing Sierra doesn't change anything referenced here.
This is not a criticism, only an observation.
We struggle with Apple's renaming issues regularly. It was in the middle of the Lion era when Apple changed from "Mac OS X" to "OS X" and we've tried to stay true to that when referring to specific versions. With macOS 10.12 Sierra, we're planning to switch the generic term to "macOS" and use "OS X" (and "Mac OS X") to refer to specific versions.
I'm much happier with "macOS" than with "OS X" as the general term, since it more clearly refers to the Mac and is consistent with iOS, watchOS, and tvOS.
Can we get a sticker made with this list? That way I can stick it to the back of my laptop and I'll have it when I need it.
Doesn't X let you boot macOS even if you have a Bootcamp partition as default startup disk?
Great list - thank you. I will add it to my troubleshooting tips at http://users.tpg.com.au/users/aoaug/mac_osx.html#link_hardware
( some are a little dated!)