Carpool-Kids Takes the Hassle out of Carpools
We’re well into the school year, and for those of us with school-aged kids, that means constant driving. Happily, the street I live on has the three things that all carpools need: cars, kids going to the same school, and willing drivers. Our neighbors have a daughter in our daughter’s class, and we have four parents with four cars. All we needed was a way to coordinate it all so we’re not drowning in email threads to plan every event.
Enter Carpool-Kids, a free iOS app that includes both iPhone and iPad versions. In addition, all your carpool data syncs through the Carpool-Kids Web site, which means your non-Apple friends can participate using a Web browser. In fact, after a bit of trial and error on our part, we found that it’s best to use a Web browser to set up your carpool because one key feature described below is not available in the iOS app.
Cranking the Carpool — Use your Web browser to go to carpool-kids.com, click the Sign Up button, and set up your account. A Basic account is free and lets you create or join one carpool. You can upgrade at any time to a Pro account, which gives you access to as many carpools as you want for $4.99 per year.
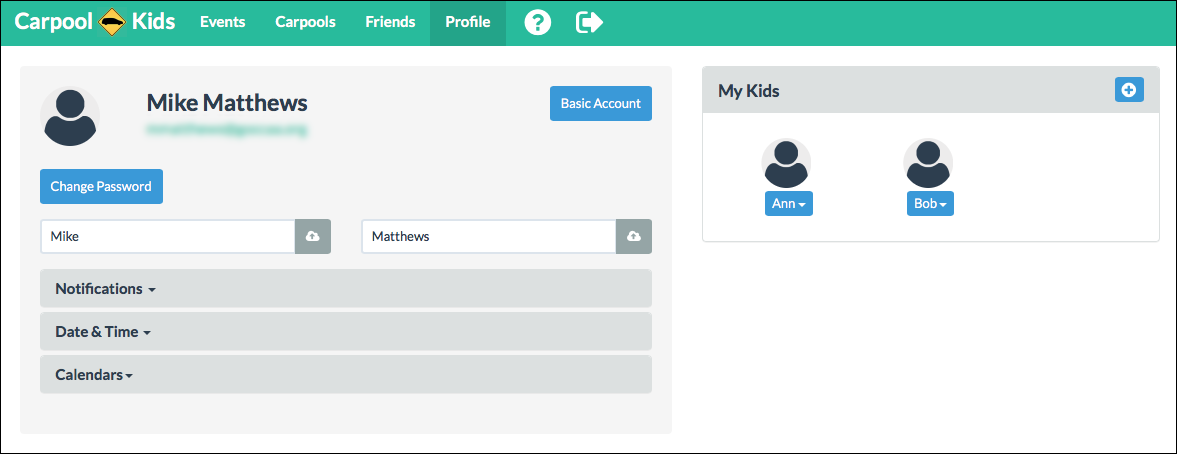
After logging in for the first time, you should be on the Profile screen, but if you’re not, click the Profile tab, and then, for each of your kids:
- In the My Kids area, click the blue + button or “No Kids — Add One Now.”
- Enter your kid’s name, and click Save Kid.
Now, add other drivers:
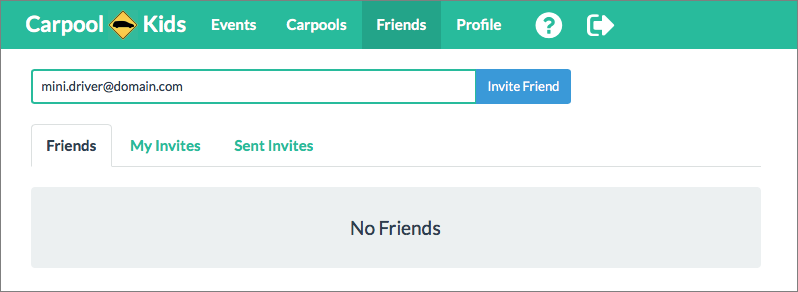
- Click the Friends tab.
- Enter the email address of another driver.
- Click Invite Friend.
After you invite other drivers, they’ll follow the same routine: log in to the Carpool-Kids Web site and set up an account. When a friend creates an account and accepts your invitation to join the carpool as a driver, they and their kids will appear in the Friends tab.
With all the people in place, it’s time to give the kids somewhere to go and someone to get them there.
Hitting the Road — Carpool-Kids revolves around Events, which specify drop-off times, drivers, passengers, locations, and pickup times. A Carpool acts as a template for these Events, which saves you data entry time. You can create only one Carpool with a free account.
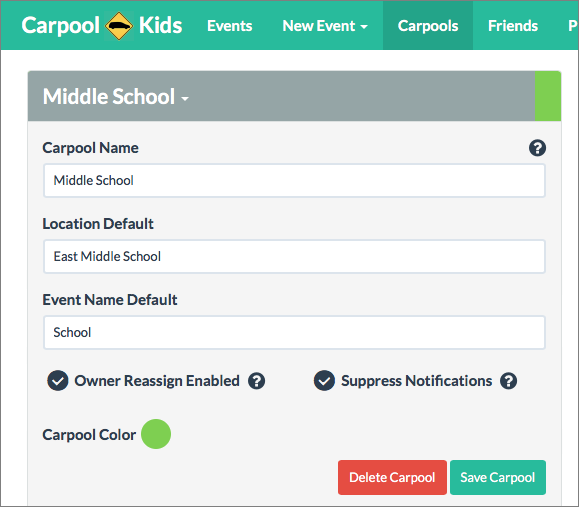
Click the Carpools tab and create your first carpool:
- Click Create New Carpool.
- Enter a Carpool Name, like “Middle School”.
- Enter a Location Default, like “East Middle School”.
- Enter an Event Name Default (how about, um, “School”).
- Click Save Carpool.
Make sure to select Owner Reassign Enabled, which gives you, as the owner, the ability to reassign driving duties. This capability can come in handy if a carpool needs someone to schedule drivers for all events. Also select Suppress Notifications. While you’re setting up the carpool and its events, you will keep your friends happy if they don’t receive a notification for every little change you make during the setup process. Once your carpool is ready to go, deselect that checkbox to let the notifications flow freely.
In the Drivers section, click the + button to add your friends as drivers. In the Riders section, click the + button to add kids (both yours and those of other drivers) to the carpool.
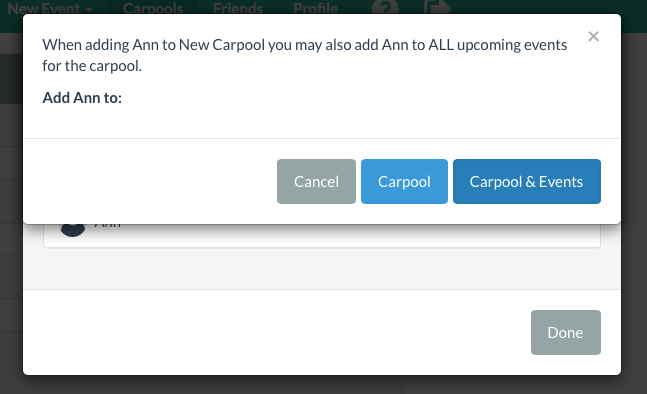
Here is why it’s best to use the Carpool-Kids Web site when you set up your carpool. When you click the name of a kid to add them to the carpool, be sure to click the button that adds the kid to the Carpool & Events.
The iOS app lacks this option. If a kid will be in the carpool on a regular basis, it will be easier to add them to every one of the carpool’s events automatically — again, you can do this only via a Web browser — and then delete that kid from an event if need be.
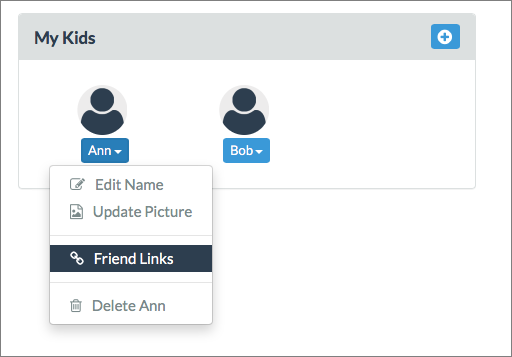
Another tip: In your carpool, if you have a spouse or partner who will also serve as a driver, then only one of you has to add kids to your profile because you can use the Friend Links option to share a kid between accounts. To do so, go to the Profile tab, and under My Kids, click the drop-down menu for the kid and choose Friend Links.
Then click the name of the friend you want to link to your kid, and, in the drop-down menu that appears, to link your kid to your friend.
The best use of this feature is when you and your spouse have separate Carpool-Kids accounts, but you want to share the same kid. Linking your kid helps keep your kid’s schedule straight.
The final part of the setup process involves creating events, which are the actual carpool entries. Here’s how to make a new event:
- Click the New Event tab.
-
Click the name of your carpool to create a new event for that carpool. Your default destination and event name will be filled out for you.
-
Add a date and choose whether this is a one-time only event or a repeating event.
-
For both the To and From legs of the event, enter a time and optionally assign a driver. If you know a kid will not be riding during all or part of this event, click the icon for that kid to dim it.
What about the Active/Inactive buttons? If you know an event will be one-way from the destination, then make the To leg of the event inactive by clicking its Inactive button. Similarly, if an event will be one-way to the destination, then make the From leg inactive by clicking its Inactive button. Making an event one-way can be done only at this point, when you’re creating it.
Here’s an example. You want to set up a carpool for driving kids to school, but they will take the bus home from school. The To section of the event will be active, but the From section will be inactive since the kids will be riding the bus instead of carpooling.
-
When you’re done, click Create Event.
Create as many events as you need. For example, if your kids’ school hours are the same from Monday through Thursday, create a repeating event for those four days. If they are released from school early on Fridays, make a repeating event just for Friday with the earlier pickup time.
You can delete and edit existing events in the Events tab.
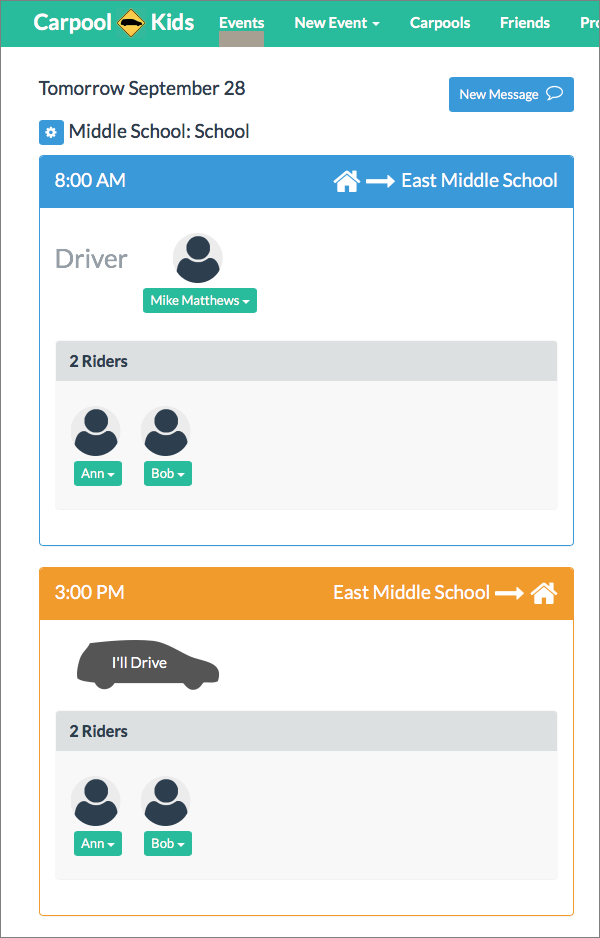
Road Map — The Events tab shows all of your carpool’s events in either a list or calendar view. You can use the filter button to see only one carpool’s events or just the events for which you are the driver.
In the Events view you can add yourself as a driver, using either the Web interface or the iOS app:
- Click or tap in the summary of the event to see its details.
-
If no driver has been assigned, click or tap the I’ll Drive button to volunteer. If a driver has been assigned but you want to swap, you can ask to take over driving duty in the following ways:
- On the Carpool-Kids Web site, click the driver’s name and in the drop-down menu that appears, click Request This Drive.
-
In iOS, swipe from right to left across the driver’s name to send a drive request.
You can add a short note to the driver before sending your request. The recipient receives an email and a notification in the iOS app. With a click or tap of a button, the scheduled driver can then swap the requester in as the new driver.
Here are some other things you can do:
- Click or tap the name of a rider to reveal a way to remove the rider from a leg of the event. That’s helpful if a kid gets sick and won’t be going to the school concert.
-
Click the gear icon in the Web interface to attach a message to the event, edit the event, duplicate it, or delete it. In the iOS app, buttons at the bottom of the event details screen accomplish the same tasks. Any time messages are created or changes occur, Carpool-Kids generates push notifications.
Details, Details — Now that you’ve created the carpool, it’s time for the finishing touches.
As the carpool owner, you should go back to the carpool settings and turn off Suppress Notifications. On the other side of the equation, all drivers should revisit their Profile settings (by clicking the Profile tab in the Web browser or the gear icon in the iOS app) and turn on the notifications they want to receive.
Everyone involved in the carpool can check the Events list for at least a month in advance to see who is driving when. But drivers should consider subscribing to the carpool calendar and their own driving calendar, both of which were generated automatically when you set up the carpool.
The driving calendar is particularly helpful; it creates a new calendar in the Calendar app on your Mac or iOS device that updates automatically, showing you the days that you are scheduled to drive. It’s best to do this on your Mac and save the subscribed calendar to your iCloud account. Doing so automatically makes it available in your iCloud account on your iOS devices. (On the Web, click Profile > Calendars; on iOS, tap Settings > Calendar Subscriptions.)
Upgrading to the Pro version of Carpool-Kids lets you see stats for each carpool showing how often each person has been the driver in the past and is scheduled to drive in the future. In the Events section of the Carpool-Kids Web site, just click the Stats button; in the iOS app, tap the pie-chart icon at the bottom of the Events screen. If you like to make sure people are reminded to do their fair share of the driving (or, put another way, if you like a little guilt with your carpool), this feature is worth the subscription fee.
Where the Rubber Meets the Road — Carpool-Kids has been rock solid for us in the few months we’ve been using it. The subscription calendars and notification system work well for keeping everyone in the loop — we haven’t forgotten a child or missed an event yet.
There are some differences between the capabilities of the Web site and the app — most prominently, the Carpool & Events button that is accessible only on the Web site when adding kids to a carpool. It would also be nice if the iOS app were Touch ID-enabled, which would enable parents to sign out of the app in order to protect information about their kids and locations and yet be able to sign back in easily with a fingerprint rather than a password.
But these are minor bumps in the road. The Carpool-Kids app is bright, clean, and simple to use. If you’re in a carpool, and check it out and save yourself the headaches involved with a lot of back-and-forth email or text messaging.
