How to Set Up and Use Airline Boarding Passes in Wallet
When Tonya and I first started taking airline flights back in the early 1990s, I found it almost overwhelmingly stressful. It stemmed from the fact that flying was so expensive for us, but I also dreaded the byzantine process of buying tickets, checking in repeatedly, and dealing with security. So much seemed to hinge on not losing tickets, boarding passes, or identification cards. We never made any mistakes, though, and in retrospect, misplacing a ticket or boarding pass likely wouldn’t have been a big deal. (The first time I flew to Canada, pre 9/11, I forgot my passport but was still allowed through customs with a stern talking-to. Who knows what would happen today!)
I still don’t enjoy airline travel, but I’ve done it enough that it no longer stresses me out to the same extent, even as dealing with invasive and unpleasant security requirements has gotten far worse. Plus, thanks to the Internet and the iPhone, the logistics have become vastly simpler. Being able to buy tickets, check in, and print boarding passes online was the first step, and the next major improvement came when Apple released the Passbook app, since renamed Wallet.
I’ve been using Passbook/Wallet as long as has been possible — it took smaller airports like Ithaca a while to get the necessary scanners — but as much as I liked eliminating the need for paper, there were many problems early on. Getting passes into Passbook was difficult, due to horrible airline apps, and bringing up the passes quickly and reliably was also hard. Even during our trip to MacTech Conference in Los Angeles in November 2016, when I was using an iPhone 7 running iOS 10, I had problems. I eventually realized the Raise to Wake option kept swapping the boarding pass for the lock screen every time I lowered my iPhone while waiting in line to board.
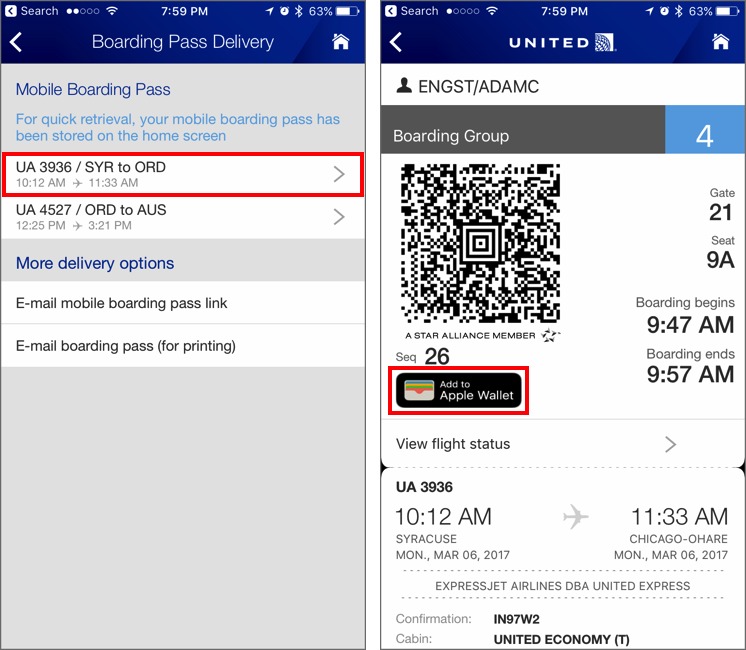
But on my most recent trip, to Austin for the ASMC Summit for independent Apple resellers, everything just worked. The United app knew about my itinerary once I was logged in, and the Delta app figured it out once I entered the ticket number. Both notified me when I could check in, and made it easy to do that and add my boarding passes to Wallet. iOS 10 and Wallet were smart enough to display a constant notification on the lock screen during the time I needed it, a single swipe brought up the boarding pass, and it stayed on screen while I waited in line, regardless of Raise to Wake.
I’m sure many of you are nodding your heads in agreement, or wondering why I’m telling you all this. I’m no frequent flyer, so I’m sure that these improvements have been obvious to road warriors for a while. But I wanted to document how to do all this because I saw a lot of people still relying on paper boarding passes on that last trip. The experience of relying on an iPhone is so good, and so much better than dealing with paper, that if you’ve avoided it so far, I urge you to give it a try next time. But feel free to print a paper boarding pass as a backup until you’re comfortable with using your iPhone instead!
Get the Airline App — The first step is perhaps the hardest. It’s not that finding or downloading airline apps is difficult or expensive — they’re all free, and you can download them from the App Store like any other app. Here are links for the main U.S. airlines: Alaska Airlines, Allegiant Air, American Airlines, Delta Air Lines, Frontier Airlines, Hawaiian Airlines, JetBlue, Southwest Airlines, United Airlines, and Virgin
America.
In my experience, the tricky part, particularly for those of us who have been traveling for many years, is logging in. I strongly recommend taking some time well before your next flight to set up the airline apps you might use. Do them all at once, since it can be a fussy, annoying process if you have old accounts, or if airline mergers have confused matters. It’s far easier to figure out your login information — usually some combination of frequent flyer number, email address, or username, plus a password or PIN — via the airline Web sites while working calmly on a Mac at home.
You may need to ask for new passwords in some cases, and regardless, I’d encourage you to change your password to a 20-character random password and store it in a password manager like 1Password or LastPass. You have to assume that airline Web sites are under attack all the time, given the value of the information they store, and I imagine that identity theft surrounding airline travel could cause a world of hurt. So set strong passwords and make sure to use a password manager that you can access on your iPhone too.
Check In and Add Boarding Passes — Once you’re logged in to the airline app, it should be relatively obvious how you can check in for your flight, which you can usually do 24 hours beforehand. If you booked the flight through the same airline, the app might even know about your itinerary already. If not, you may have to enter a confirmation number or ticket number — I had to do that when using the Delta app to check in for the return leg of my last trip, which had originated on United.
At the end of the check-in process, the apps I’ve used have provided a relatively clear Add to Wallet link or button. Tap it, and when it hands you off to Wallet, make sure everything looks correct in the boarding pass and then tap the Add link in the upper-right corner. You may or may not need to do this for each boarding pass; check to see what’s in Wallet after the first one. Now you’re ready for when you go to the airport.
Call Up a Boarding Pass — As you’re waiting in the security line, you’ll want to get your iPhone ready to display the boarding pass to the first security checker. Since Wallet knows your flight times, it starts displaying a notification on the iPhone’s lock screen some hours before.
That notification appears every time you wake the iPhone, and you can swipe it to the right to display the boarding pass. Those with an iPhone 6, 6s, or 7 can also 3D Touch it and then tap a Show Pass button, but that’s a bit clumsier than the swipe. The boarding pass will stay on screen even beyond the time set in Settings > Display & Brightness > Auto-Lock, but as you approach the head of the line, check to make sure you haven’t inadvertently pressed the Sleep/Wake button on your iPhone.
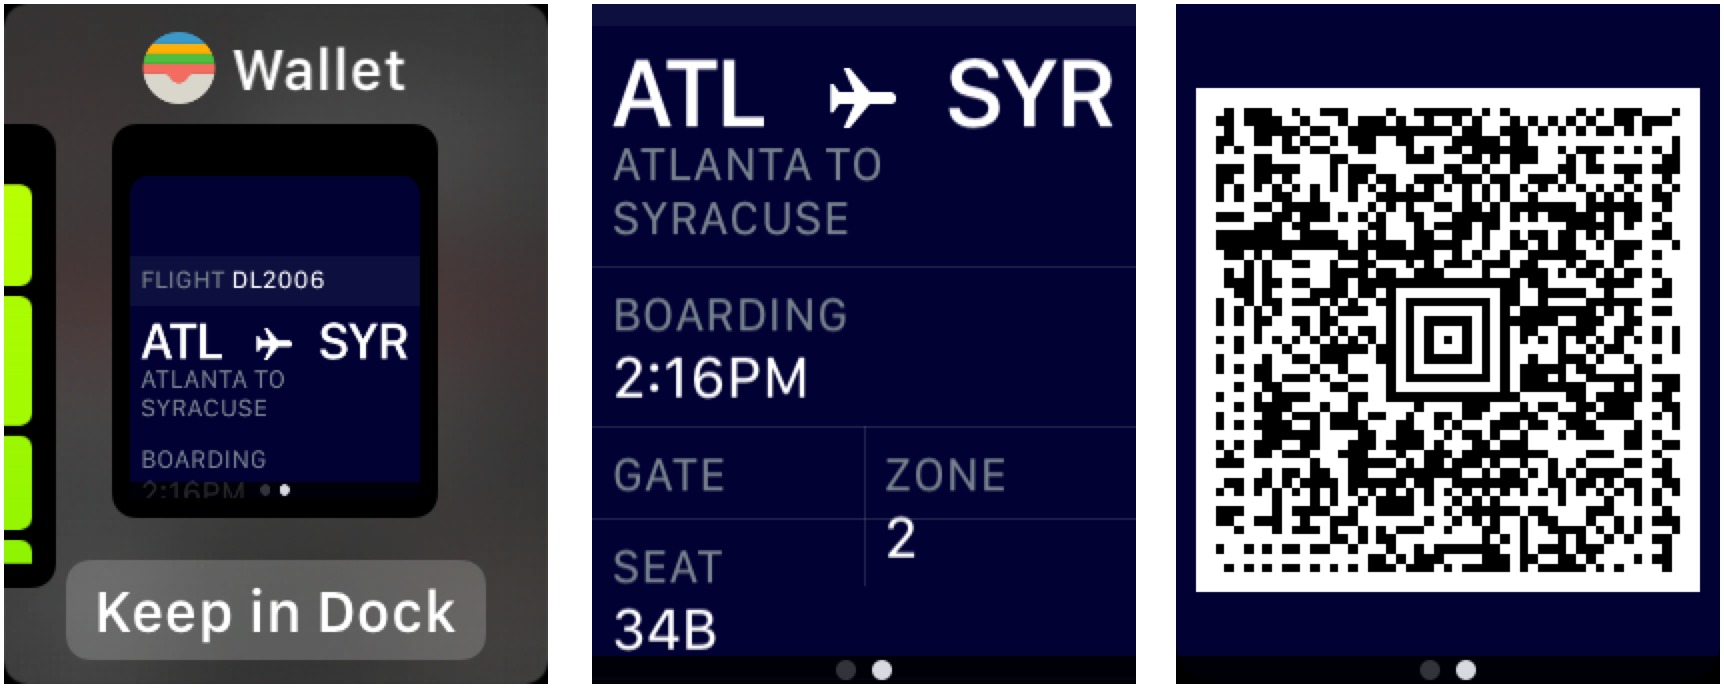
If you have an Apple Watch, you can instead bring up the Wallet app there — you might want to tap the Keep in Dock button to make it easier to get to for your return flight. The watch’s Wallet app shows the same passes that are in Wallet on the iPhone, and tapping the boarding pass shows you the same information, although you have to scroll down (or rotate the digital crown) to get to the QR code required for the scanner. While the Wallet app is up on the Apple Watch, the screen doesn’t turn off, so
you don’t have to struggle with it when you get to the desk.
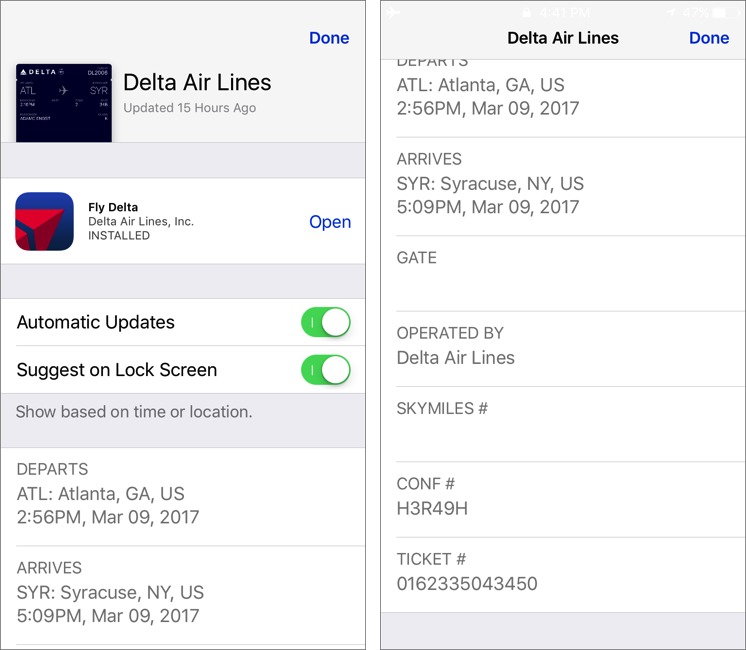
Although I can’t imagine a scenario where this makes sense, you can prevent a boarding pass from appearing on your lock screen. Swipe right on its notification, tap the i button in the lower-right corner, and in the next screen, disable Suggest on Lock Screen. You can turn off automatic updates here too, but again, I can’t think of when it would be useful to have a boarding pass not update automatically.
One final note. Since many flights have multiple legs, each with a separate boarding pass, note that Wallet seems to try to keep them together. If you see multiple dots at the bottom of a screen showing a boarding pass, try swiping left and right to move between them. The same applies if you’re traveling with a family and you have boarding passes for multiple people in your iPhone.
Speaking of which, if you and your traveling companions all have iPhones and airline accounts, it’s usually possible for each person to manage their own boarding passes. But if not, you can check in for multiple travelers and add all their boarding passes to your iPhone, though that will require some swiping back and forth whenever you need to present them.
Delete Passes — Back in the day, you sometimes wanted to hold on to boarding passes to prove that you’d flown the miles for a frequent flyer program. In today’s world, unless you’re a tech writer who wants to keep a few boarding passes around to document how Wallet works, there’s little reason to retain them.
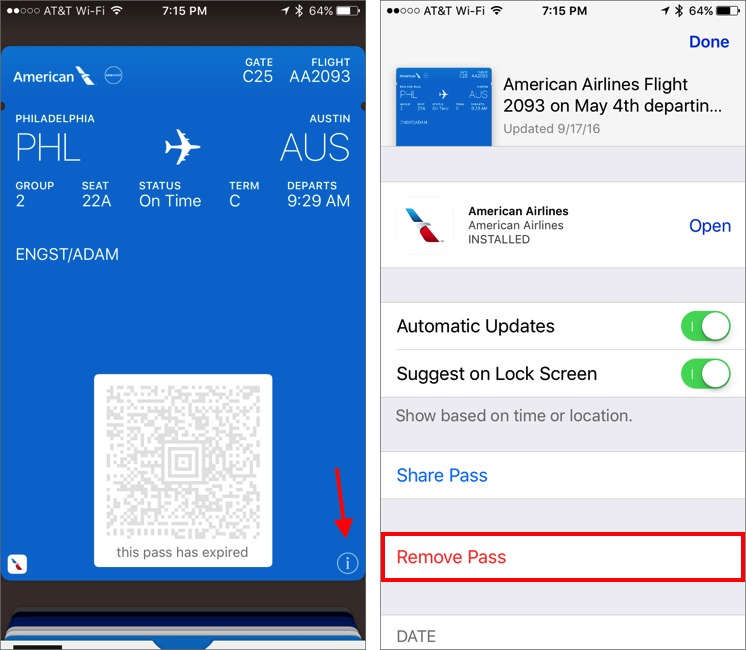
To delete an expired boarding pass, open Wallet, tap the boarding pass, tap the i button in the lower-right corner, and then tap the Remove Pass option.
Anything Else? — It was difficult to document how all this works since I had to do it live, while juggling luggage and making sure I ended up on the right flight and in the right seat. There’s no way to simulate different scenarios or test something again. So, if I’ve missed something in this description of using boarding passes in Wallet, please let me know in the comments.
Finally, what if you lose or break your iPhone, with all your travel documents on it, during your trip? If that happened to me while en route, I’d go to the nearest airline desk to see if they could print me a new boarding pass. And if it happened in the middle of my trip, which seems more likely, I’d try to get to the airport early for my departure, so there would be extra time to check in for the flight and get a printed boarding pass. If you have ever experienced such an iPhone disaster, leaving you without a boarding pass or information about your itinerary, tell us in the comments how you worked around the problem.


I was a road warrior and agree that using Apple wallet can be great. That said, ALWAYS carry a paper copy of your itinerary with you. You never when your phone starts misbehaving, or runs out of power (evening flights), etc.
Sometimes, though, I found it hard lugging a carry-on with one hand, toting a small computer backpack, and then juggling the phone with my non-dominant hand to show the flight attendant my seat assignment--it almost fell between the jetway and the plane (would have landed on the tarmac!). That would not have been good.
Another consideration, if traveling internationally I may be tempted to backup my phone using iTunes and restore it to factory settings just to prevent a possible Customs and Immigration privacy invasion, not so much because I'm paranoid but more out of principle.
Good point. In fact the NBC Nightly News had a story tonight (13 Mar 17) on the CBP demanding the phones and passwords of US Citizens at both land and air entry points.
I mean really all that trouble.
Just print it out, fold it up and put in your wallet. Sometimes all this tech stuff just gets in the way of life. Flying is already stressful-why deal with this. Another headache.
I always found the paper boarding passes much more stressful. You have to remember to print them out, put them in a location where you won't forget (and my wallet isn't nearly big enough to hold an 8.5x11 sheet of paper), and then constantly be sorting through them to get the right one for the right leg of the trip. Plus, you have to take them out and put them back repeatedly as you go through security and (sometimes) check in, and if you have any other papers with you, it's easy for them to get mixed up together. And of course, paper boarding passes don't update with new gate or time information.
The iPhone is always in my right front pocket or in my hand, and the Apple Watch is always on my wrist. Now that Wallet works well, I find it a much better solution.
But hey, if you like the paper, there's nothing stopping you from using it.
I used the iPhone for a few years and the process has got much simpler. Now I use the watch, less juggling things but some airlines have code readers that you cannot get your wrist under, hopefully they will upgrade soon.
Yes, the scanners do have to be the right orientation for the watch. I didn't have trouble with that on this trip, but on some previous one, it was clear that I wouldn't be able to use the watch and I had to revert back to the iPhone.
Adam, since the CBP is now demanding access to the phones of returning US Citizens, you might as well get the app "Mobile Passport" so you can just give them your phone immediately before 3 of their goons tackle you.
Oh, don't get me started... The EFF has a page on privacy at the boarder, and I need to write more about it.
http://www.eff.org/wp/digital-privacy-us-border-2017
When my husband and I travel together, we always put both of our boarding passes on both phones to provide a backup in case one phone goes on the fritz during the boarding process.
That's smart!
That is a very cute username! :-)
I kinda thought so, too ;-)
I often book flights on Southwest for my wife, son, and me. When I do that, I get one itinerary number and Southwest won't let me put the boarding passes on my phone. To fix this, I need to call Southwest and ask them to give each family member a separate itinerary number. They are willing to do this and it fixes the problem.
I could probably accomplish the same thing by booking each of the flights separately, but I'm always afraid I won't get the same fare for each flight if I do that.
Interesting! I know I've put boarding passes for multiple people on my iPhone with the United app, but since I've lived in the Northwest and the Northeast, I've never flown Southwest. :-)
If I put my boarding pass in Wallet, am I prohibited from also printing a back up paper pass? I've resisted using Wallet because I didn't want to depend exclusively on an unfamiliar system.
You can always print a boarding pass separately, just as you always have. If you're concerned, print the boarding pass first, and then add it to Wallet.
Here's an interesting reason to go paperless: increased security due to not revealing details via your paper boarding pass.
http://blog.strom.com/wp/?p=6152