Rescue Blurry Photos with Live Photos in iOS 11
I love the idea behind the Live Photos feature baked into new iOS devices because it lets me capture short videos of my son doing something cute. But when it comes to snapping a photo of an expense receipt or a particularly attractive pot of butter chicken I’ve cooked, it’s hard to justify the extra storage space a Live Photo consumes for the few seconds of extra video. Thankfully, iOS 11 introduced new features to help make it worthwhile to leave Live Photos on.
Apple advertised one such feature heavily in the WWDC keynote. Swipe up on a Live Photo and you see different effects you can apply to it: Live (the default), Loop, Bounce, and Long Exposure. Jeff Carlson wrote about the last one in “Using Long Exposure in iOS 11’s Photos App” (12 October 2017). Long Exposure and the others are neat, but Apple didn’t do much to tell people about what may be the most useful Live Photo feature of iOS 11: choosing a new key photo.
The key photo is the still image you see of a Live Photo in the Photos app. If you tend to take pictures of fast-moving subjects, you have undoubtedly run into this problem: you line up a perfect shot but before you can press the shutter button, your subject moves. That may result in a blurry photo, or one that misses the moment you wanted.
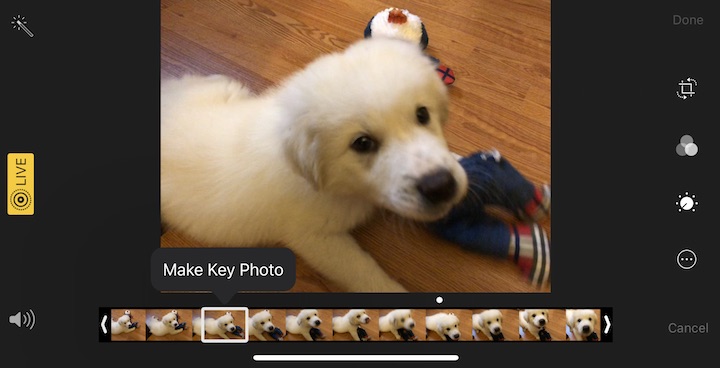
But here’s the thing! In iOS 11, with Live Photos enabled, the Camera app actually captures 1.5 seconds of video before you press the shutter button. So when you choose a new key photo, it’s like editing your photo with a highly precise time machine that can show you every moment of the second and a half before the photo was taken. Here’s how you do it in Photos for iOS, but it works exactly the same in Photos for Mac:
-
- Choose a Live Photo in the Photos app and tap Edit in the upper-right corner.

- At the bottom of the screen, you’ll see a strip of images that Apple calls the frame viewer.
- On the frame viewer, you’ll see a white square that indicates the current key photo. Tap, hold, and drag that square to move through the frames of the Live Photo until you find a better one. It’s best to do this slowly.
- When you stop and let go of the square, a Make Key Photo popover appears. Tap that to change the key photo to the frame that you’ve selected.

- Choose a Live Photo in the Photos app and tap Edit in the upper-right corner.
Photos marks both the original key photo and the selected frame with a dot. If you have a 3D Touch device, you’ll feel a click when you select one of those dotted images. If you tap Done to finish editing and decide you don’t like the key photo you’ve chosen, you can always go back in and pick another one or tap Revert to undo all edits to that image.
Don’t set your expectations too high. The alternative key photos may not be perfectly sharp either, but you can often make a dramatic improvement and rescue an otherwise terrible photo!
For more helpful iOS tips, check out my book, “Take Control of iOS 11,” and thanks for making it my best-selling book yet!
But what is the resolution? For those of us that occasionally print or even just show these photos on a large screen, it seems like this is an important piece of info.
Changing the key frame could be a recipe for trouble later, if you never know whether a photo is hi-res anymore, without checking.
+1 on the resolution question. Is each frame of a live photo on my iPhone 7 plus a 12 megapixel image? And how is this different than burst mode?
I haven't found Live Photos much help with a blurry photo, but I have found it of great help when taking pictures of people because you can completely avoid the problem of somebody blinking when you touch the shutter.
+ on the resolution question
+ I would like the possibility to reduce it to a normal photo after changing the key photo (like in a burst, selecting one or two and removing the rest)